Lesson 12
Alert Views and Action Sheets
The user interface elements you have encountered so far have all been created by dragging and dropping from the Object library. In this lesson you are introduced to alert views and action sheets, two user interface elements that are created only with code. Prior to iOS 8, alert views and action sheets were represented by the UIAlertViewUIActionSheetUIAlertController
Alert Views
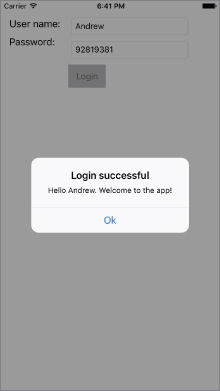
An alert view is a special modal view that is used to display a short message to the user and typically enables the user to choose from a small number of options. The most common use of an alert view is to display information on success or failure of an operation; for example, on success a typical login operation may display an alert view, as shown in Figure 12.1.
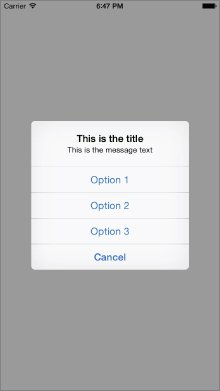
When an alert view is displayed, the screen is dimmed automatically for you. You can specify a title, a message, and one or more buttons to present the user with options. When multiple options are presented to the user, it is common to designate one of the buttons to act as the cancel button. You can change the text displayed in the cancel button, but it is always displayed at the bottom of the alert view with a boldface font, as shown in Figure 12.2.
An alert view is managed by an instance of the UIAlertControllerUIKit
let alert = UIAlertController(title: "This is the title",
            message: "This is the message text",
            preferredStyle: UIAlertControllerStyle.Alert)
The first parameter is the title of the alert view. This is followed by the message. The third parameter should be UIAlertControllerStyle.Alert
Once you have created an alert view, you need to add buttons to it. This is achieved by creating instances of the UIAlertActionaddAction
alert.addAction(UIAlertAction(title: "Ok",
style: UIAlertActionStyle.Default,
handler: nil))
alert.addAction(UIAlertAction(title: "Cancel",
style: UIAlertActionStyle.Cancel,
handler: nil))
The first parameter to the UIAlertAction
The following code snippet creates an alert view with two actions. The first action has a closure associated with it that will display another alert view:
let alert = UIAlertController(title: "Help",
            message: "Would you like to call customer services?",
            preferredStyle: UIAlertControllerStyle.Alert)
let dialActionHandler = { (action:UIAlertAction!) -> Void in
            let alertMessage = UIAlertController(title: "Error",
                message: "Sorry, unable to make a call at the moment.",
                preferredStyle: UIAlertControllerStyle.Alert)
            alertMessage.addAction(UIAlertAction(title: "OK",
                style: .Default,
                handler: nil))
            self.presentViewController(alertMessage,
                animated: true,
                completion: nil)
        }
alert.addAction(UIAlertAction(title: "Call +44 7922 394132",
            style: UIAlertActionStyle.Default,
            handler: dialActionHandler))
alert.addAction(UIAlertAction(title: "Cancel",
            style: UIAlertActionStyle.Cancel,
            handler: nil))
To show the alert view, simply use the presentViewControllerUIViewController
self.presentViewController(alert, animated: true, completion: nil)The alert view object enables you to add up to two text fields, in addition to buttons. This comes in handy when you want to collect username and password information from the user (see Figure 12.3).

To do this, you can use the addTextFieldWithConfigurationHandlerUIAlertController
let alert = UIAlertController(title: "Enter name",
            message: "",
            preferredStyle: UIAlertControllerStyle.Alert)
alert.addAction(UIAlertAction(title: "Ok",
            style: UIAlertActionStyle.Default,
            handler: nil))
alert.addTextFieldWithConfigurationHandler({(textField: UITextField!) in
            textField.placeholder = "What is your name?"
        })
self.presentViewController(alert, animated: true, completion: nil)
To retrieve the value typed by the user when the alert view is dismissed, you need to retrieve a reference to the UITextField
let alert = UIAlertController(title: "Enter name",
            message: "",
            preferredStyle: UIAlertControllerStyle.Alert)
let okActionHandler = { (action:UIAlertAction!) -> Void in
            var nameField = alert.textFields![0] as UITextField
            let alertMessage = UIAlertController(title: "Hello",
            message: "\(nameField.text)",
            preferredStyle: UIAlertControllerStyle.Alert)
            alertMessage.addAction(UIAlertAction(title: "OK",
            style: .Default,
            handler: nil))
            self.presentViewController(alertMessage,
            animated: true,
            completion: nil)
        }
alert.addAction(UIAlertAction(title: "Ok",
            style: UIAlertActionStyle.Default,
            handler: okActionHandler))
alert.addTextFieldWithConfigurationHandler({(textField: UITextField!) in
            textField.placeholder = "What is your name?"
        })
self.presentViewController(alert, animated: true, completion: nil)
Action Sheets
An action sheet is another user interface component that is created through code and can be used to present a list of choices to a user. Action sheets are similar to alert views in many respects, but they have several important differences. To start with, action sheets look significantly different from alert views, and they look different on an iPhone and an iPad (see Figure 12.4).
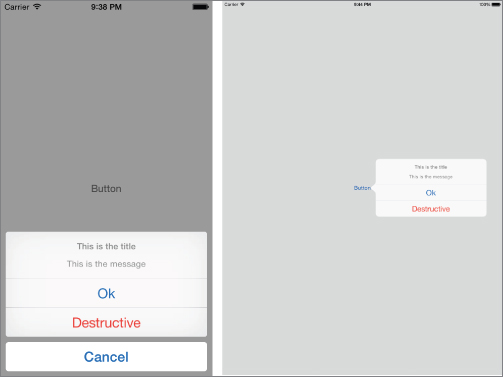
On an iPhone, they slide up from the bottom of the screen, and on the iPad they display as popover windows. On an iPad, the cancel button is not visible. If the user taps outside the action sheet on an iPad, the action sheet is dismissed.
Action sheets enable you to highlight one of the buttons in red—this button is referred to as the destructive button. The following code snippet shows how to create an action sheet on an iPhone:
let alert = UIAlertController(title: "This is the title",
            message: "This is the message",
            preferredStyle: UIAlertControllerStyle.ActionSheet)
alert.addAction(UIAlertAction(title: "Ok",
            style: UIAlertActionStyle.Default,
            handler: nil))
alert.addAction(UIAlertAction(title: "Cancel",
            style: UIAlertActionStyle.Cancel,
            handler: nil))
alert.addAction(UIAlertAction(title: "Destructive",
            style: UIAlertActionStyle.Destructive,
            handler: nil))
self.presentViewController(alert, animated: true, completion: nil)
As you can see, the parameters are very similar to those of an alert view, with the main difference being that the third argument to the UIAlertControllerUIAlertControllerstyle.ActionSheet
The destructive button is created by instantiating a UIAlertActionUIAlertActionStyle.Destructive
alert.addAction(UIAlertAction(title: "Destructive",
            style: UIAlertActionStyle.Destructive,
            handler: nil))
Showing an action sheet on an iPhone is identical to alert views:
self.presentViewController(alert, animated: true, completion: nil)However, on an iPad you will need additional code, as the action sheet is presented in a popover. To show an action sheet on an iPad, use the following snippet:
alert.modalPresentationStyle = UIModalPresentationStyle.Popover
if let popoverController = alert.popoverPresentationController {
    popoverController.sourceView = sender as UIView;
    popoverController.sourceRect = sender.bounds;
}
self.presentViewController(alert, animated: true, completion: nil)
You cannot display an action sheet in the viewDidLoad
Try It
In this Try It, you create a new Xcode project based on the Single View Application template called ActionSheetSample
Lesson Requirements
- Launch Xcode.
- Create a new project based on the Single View Application template.
- Edit the storyboard with Interface Builder.
- Add UIButton instance to the default scene.
- Write code to display a list of colors to the user when the button is tapped.
- Write code to update the background color of the scene to reflect the selected color.
Hints
- To show the Object library, select View &cmdarr; Utilities &cmdarr; Show Object Library.
- To show the assistant editor, select View &cmdarr; Assistant Editor &cmdarr;Show Assistant Editor.
Step-by-Step
- Create a Single View Application in Xcode called
ActionSheetSample- Launch Xcode and create a new application by selecting File &cmdarr; New &cmdarr; Project.
- Select the Single View Application template from the list of iOS project templates.
- In the project options screen, use the following values:
- Product Name: ActionSheetSample
- Organization Name: your company
- Organization Identifier: com.yourcompany
- Language: Swift
- Devices: iPhone
- Use Core Data: Unchecked
- Include Unit Tests: Unchecked
- Include UI Tests: Unchecked
- Save the project to your hard disk.
- Open the
Main.storyboard- Ensure the project navigator is visible and the ActionSheetSample project is open.
- Click the
Main.storyboard
- Add a
UIButton- From the Object library, drag and drop a Button object onto the scene.
- Double-click it and set the text in the button to
Change Background Color - Select the button in the scene and click the Pin button to display the constraints editor. Set the following constraints:
- The width of the button should be 210.
- The height of the button should be 40.
- Change the background color for the button to a dark gray color so that it is visible against a white background.
- Select the button in the scene and click the Align button to display the alignment constraint editor. Add two constrains to center the button both horizontally and vertically (see Figure 12.5).

-
Update the frames to match the constraints you have set.
- Click on the View controller item in the dock above the storyboard scene. This is the first of the three icons located directly above the selected storyboard scene.
- Select Editor &cmdarr; Resolve Auto Layout Issues &cmdarr; Update Frames.
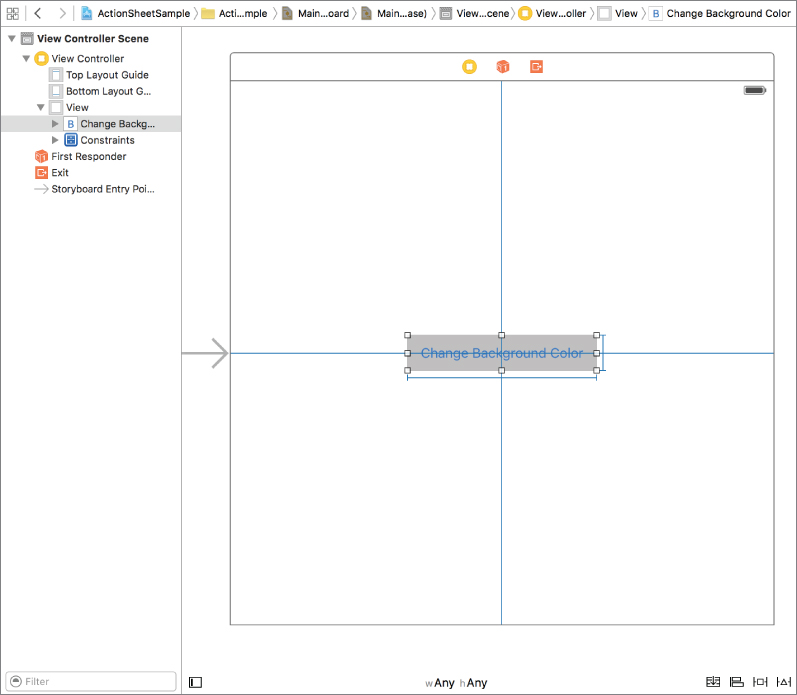
Your storyboard should resemble Figure 12.6.
- Create an action in the
ViewController.swift- Select the storyboard in the project navigator.
- Right-click the Change Background Color button in the scene to display its context menu, and drag from the circle beside the Touch Up Inside item to an empty line in the
ViewController.swift - Name the new action method
onPresentActionSheet - Click the
ViewController.swift - Add the following code to the implementation of the
onPresentActionSheetlet alert = UIAlertController(title: "Change background color", message: "Select a color", preferredStyle: UIAlertControllerStyle.ActionSheet) alert.addAction(UIAlertAction(title: "Red", style: UIAlertActionStyle.Default, handler: { (action: UIAlertAction) -> Void in self.view.backgroundColor = UIColor.redColor() })) alert.addAction(UIAlertAction(title: "Green", style: UIAlertActionStyle.Default, handler: { (action: UIAlertAction) -> Void in self.view.backgroundColor = UIColor.greenColor() })) alert.addAction(UIAlertAction(title: "Blue", style: UIAlertActionStyle.Default, handler: { (action: UIAlertAction) -> Void in self.view.backgroundColor = UIColor.blueColor() })) alert.addAction(UIAlertAction(title: "Yellow", style: UIAlertActionStyle.Default, handler: { (action: UIAlertAction) -> Void in self.view.backgroundColor = UIColor.yellowColor() })) alert.addAction(UIAlertAction(title: "Cancel", style: UIAlertActionStyle.Cancel, handler:nil)) self.presentViewController(alert, animated: true, completion: nil)
-
Test your app in the iOS Simulator.
Click the Run button in the Xcode toolbar. Alternatively, you can use the Project &cmdarr; Run menu item.