Lesson 16
Table Views
A table view is a user interface component used to present a list of items to the user. Table views are instances of the UITableView class and are part of the UIKit framework. Table views are one of the most versatile user interface components in UIKit and can be found in several apps, including Apple's own contacts, and mail applications. In this lesson, you learn to use table views in your applications.
Table View Appearance
A table view allows you to present a single column of values. Each value is presented vertically in its own row. A user can scroll through the rows vertically. Vertical scrolling is automatically managed by the table view and is enabled when the number of rows exceed the visible height of the table view.
Each row in a table view is an instance of another UIKit class called UITableViewCell. The table view has a mechanism in place that allows you to reuse table view cells instead of creating a new one for each row.
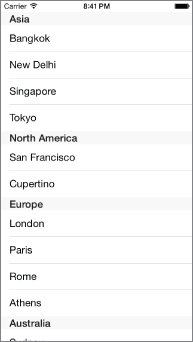
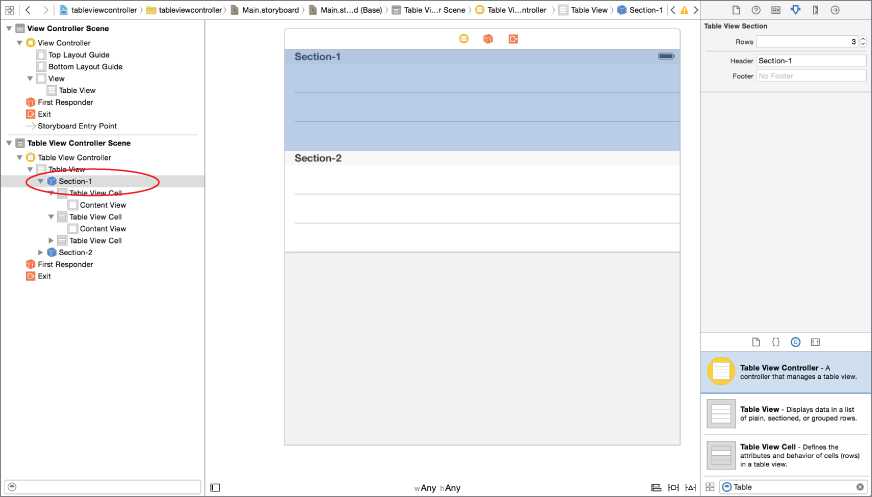
Data in table views are presented in sections. Sections are numbered from zero and run vertically down the table (see Figure 16.1).
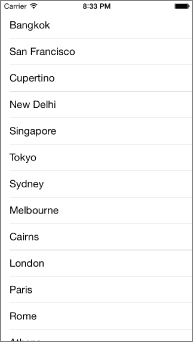
Each section can have an optional header and footer. The default table view has just one section with no visible header or footer (see Figure 16.2).
Rows within each section are also numbered from 0 and run vertically down the table, within the section.
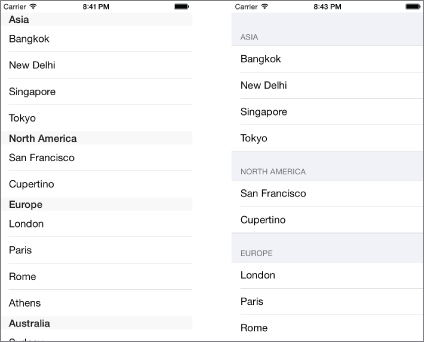
Additionally, a table view has one of two presentation styles, plain and grouped (see Figure 16.3). A plain table view is a continuous list; a grouped table view has gaps between sections.
Creating a Table View with Interface Builder
To add a new scene in your storyboard that contains a table view, simply drag and drop a Table View Controller object into your scene. A table view controller is an object that manages a table view (see Figure 16.4).

If, however, you want to add a table view to an existing scene, drag and drop a table view object onto the scene. When using a table view, your view controller class will be responsible for managing the table view, and will need to implement the UITableViewDataSource and UITableViewDelegate protocols. You can use the Attribute inspector to set up the table views style as plain or grouped (see Figure 16.5).
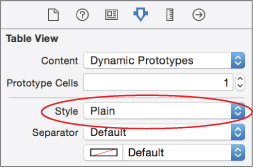
You can set up your table view to show static or dynamic content by using the Content property in the Attribute inspector.
Static Table Views
A table view with static content has a fixed number of rows that are configured at design time in the storyboard. Static cells can only be used with table view controllers.
If you are using a table view controller and wish to populate it with static content, simply use the Attribute inspector to set the Content property of the table view to Static Cells.
You can then use the Sections attribute to configure the number of sections in the table view. To edit the number of rows, section header, or section footer for each section, simply select the section from the document outline and use the Attribute inspector (see Figure 16.6).
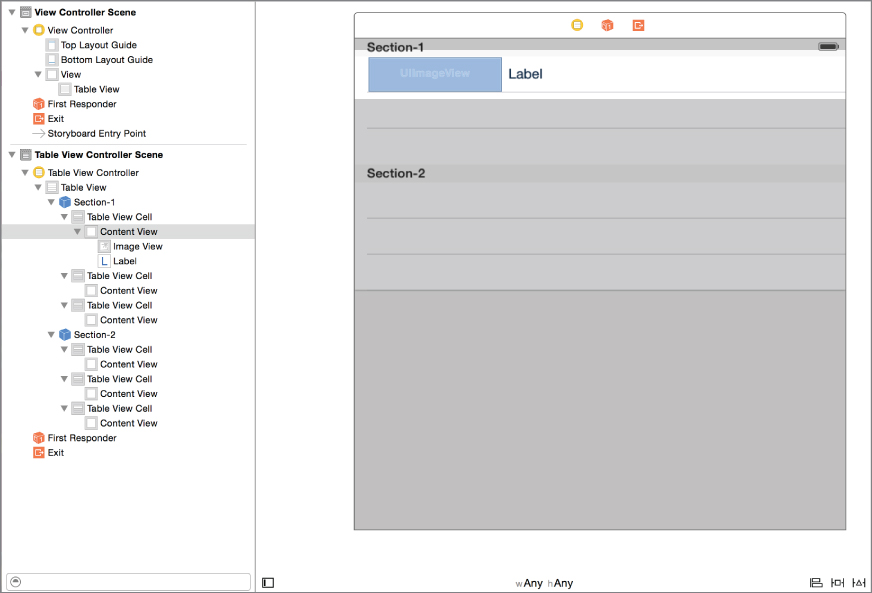
To edit the content of each row, select a row in the document outline and drag standard components, such as labels and image views, into the cell. You will need to set up the constraints for each cell individually (see Figure 16.7).
If the layout for your cell is simple, you can optionally use a standard cell style for each row. This can be done by selecting the row in the document outline and using the Attribute inspector to change the cell style to one of four options:
- Basic
- Right Detail
- Left Detail
- Subtitle
Selecting one of these options will add one or more labels into the cell at fixed positions; you can simply edit the text in these labels by double-clicking the label (see Figure 16.8).

Dynamic Table Views
If the contents of your table view are to be managed at runtime, you need to set the Content attribute to Dynamic Prototype. When using dynamic table views, you will first need to design a template cell in the storyboard. This template cell is known as a prototype cell and will be instantiated programmatically at runtime and populated with content for each row.
It is possible to register multiple prototype cells with a table view, but this is not often used as the rows in a table view generally share the same visual layout, differing only in content.
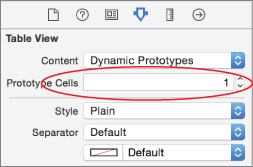
To set up the number of prototype cells in a dynamic table view, select the table view and change the value of the Prototype Cells property in the Attribute inspector (see Figure 16.9)
For each prototype cell in a dynamic table view, you will need to provide a unique string for the Identifier property in the Attribute inspector By default, each prototype cell is an instance of UITableViewCell. UITableViewCell provides an image view and a text label, accessed via the imageView and textLabel properties.
If, however, your prototype cell contains more than just a single line of text and an image view, you will need to first create a subclass of UITableViewCell and associate it with the cell using the Identity inspector (see Figure 16.10).
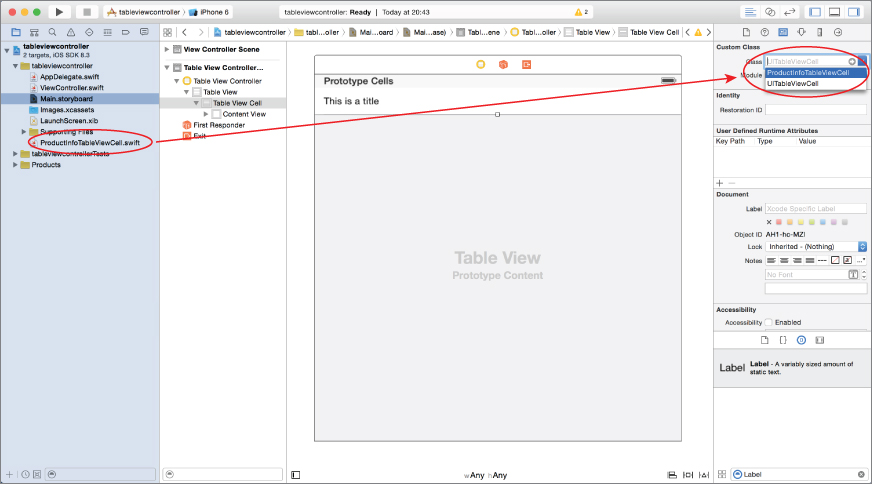
You can then drag and drop standard user interface elements onto the prototype cell and create outlets/actions in the associated UITableViewCell subclass.
Dynamic table views require a data source and a delegate object. A data source object must implement the UITableViewDataSource protocol, and the delegate object must implement the UITableViewDelegate protocol.
If the table view was added to an existing scene, then the data source and delegate are both usually set to be the view controller, with the view controller implementing the relevant methods from both protocols (see Figure 16.11).

The UITableViewDataSource and UITableViewDelegate protocols define several methods, most of which are optional. The most common UITableViewDataSource methods you are likely to implement are:
func numberOfSectionsInTableView(tableView: UITableView) -> Int
func tableView(tableView: UITableView,
numberOfRowsInSection section: Int) -> Int
func tableView(tableView: UITableView,
cellForRowAtIndexPath indexPath: NSIndexPath) -> UITableViewCell
You should return the number of sections in your table view from the numberOfSectionsInTableView method. If this method is not implemented, the table view assumes a single section. The number of rows in each section are to be returned from numberOfRowsInSection and a UITableViewCell instance for each row within each section is to be returned from cellForRowAtIndexPath.
The most common UITableViewDelegate method that you are likely to implement is:
func tableView(tableView: UITableView,
didSelectRowAtIndexPath indexPath: NSIndexPath)
This method is called when the user selects a row in your table view. If, however, you have created segues in your storyboard from your table view to another scene, then prepareForSegue is called instead.
If on the other hand, you are using a table view controller in your storyboard, then you will need to associate a custom UITableViewController subclass with the table view controller in the Identity Inspector and implement the data source and delegate methods in this subclass.
The following code snippet shows how these data source and delegate methods are implemented in a view controller:
class ViewController: UIViewController, UITableViewDataSource,
UITableViewDelegate {
     var fruits:Array<String> = ["Apple", "Banana",
"Mango", "Pear",
"Peach", "Plum",
"Grape", "Melon",
"Orange"]
    override func viewDidLoad() {
        super.viewDidLoad()
    }
    override func didReceiveMemoryWarning() {
        super.didReceiveMemoryWarning()
    }
    func numberOfSectionsInTableView(tableView: UITableView) -> Int
    {
        return 1
    }
    func tableView(tableView: UITableView,
  numberOfRowsInSection section: Int) -> Int
    {
        return fruits.count
    }
    func tableView(tableView: UITableView,
         cellForRowAtIndexPath indexPath: NSIndexPath) -> UITableViewCell
    {
        var cell:UITableViewCell =
tableView.dequeueReusableCellWithIdentifier("cellPrototype1")
as! UITableViewCell
        cell.textLabel?.text = fruits[indexPath.row]
        return cell
    }
}
Try It
In this Try It, you create a new Xcode project based on the Single View Application template called TableViewTest that adds a grouped table view with multiple sections to an existing scene of the default storyboard.
Lesson Requirements
- Launch Xcode.
- Create a new project based on the Single View Application template.
- Edit the storyboard with Interface Builder.
- Add a table view to the default scene.
- Set up a prototype cell.
- Set up table view attributes with the Attribute inspector.
- Set up the data source and delegate property of the table view.
- Implement
UITableViewDataSourceandUITableViewDelegatemethods.
Hints
- To show the Object library, select View
 Utilities Show Object Library.
 - To show the assistant editor, select View Assistant Editor Show Assistant Editor.
Step-by-Step
- Create a Single View Application in Xcode called
TableViewTest.- Launch Xcode and create a new application by selecting File New Project.
- Select the Single View Application template from the list of iOS project templates.
- In the project options screen, use the following values:
- Product Name: TableViewTest
- Organization Name: your company
- Organization Identifier: com.yourcompany
- Language: Swift
- Devices: iPhone
- Use Core Data: Unchecked
- Include Unit Tests: Unchecked
- Include UI Tests: Unchecked
- Save the project onto your hard disk.
- Launch Xcode and create a new application by selecting File
- Add a
UITableViewinstance to the default scene.- From the Object library, drag and drop a Table View object onto the scene.
- Ensure the table view is selected and use the Pin button to display the constraints editor popup.
- Ensure the Constrain to margins option is unchecked.
- Pin the distance between the left edge of the view and the table view to 0.
- Pin the distance between the right edge of the view and the table view to 0.
- Pin the distance between the bottom of the view and the table view to 0.
- Pin the distance between the top of the view and the table view to 20.
- Click the Add 4 Constraints button to dismiss the constraints editor popup.
- Update the frames to match the constraints you have set.
- Click on the View controller item in the dock above the storyboard scene. This is the first of the three icons located directly above the selected storyboard scene.
- Select Editor Resolve Auto Layout Issues Update Frames.
- Set up the data source and delegate properties.
- Right-click the table view to bring up a context menu. Drag from the item labeled “dataSource” in the context menu to the item labeled “View Controller” in the document outline.
- Right-click the table view to bring up a context menu. Drag from the item labeled “delegate” in the context menu to the item labeled “View Controller” in the document outline.
- Set up the table view's appearance:
- Select the table view and ensure the Attribute inspector is visible.
- Ensure the Content attribute is set to Dynamic Prototypes.
- Ensure the value of the Prototype Cells attribute is 1.
- Ensure the Style attribute is set to Grouped.
- Set up the prototype cell:
- Expand the table view in the document outline; this will reveal the table view cell.
- Select the table view cell.
- Use the attribute editor to ensure that the value of the identifier attribute is
prototypeCell1. - Ensure the Style attribute is set to Basic.
- Implement the data source and delegate methods in the view controller.
- Add the following code snippet to the
ViewController.swiftfile to declare five arrays of strings:var continents:Array<String> = ["Asia", "North America", "Europe", "Australia"] var citiesInAsia:Array<String> = ["Bangkok", "New Delhi", "Singapore", "Tokyo"] var citiesInNorthAmerica:Array<String> = ["San Francisco","Cupertino"] var citiesInEurope:Array<String> = ["London", "Paris", "Rome", "Athens"] var citiesInAustralia:Array<String> = ["Sydney", "Melbourne", "Cairns"] - Implement the
numberOfSectionsInTableViewdata source method as follows:func numberOfSectionsInTableView(tableView: UITableView) -> Int { return continents.count; } - Implement the
numberOfRowsInSectiondata source method as follows:func tableView(tableView: UITableView, numberOfRowsInSection section: Int) -> Int { if section == 0 { return citiesInAsia.count } else if section == 1 { return citiesInNorthAmerica.count } else if section == 2 { return citiesInEurope.count } else if section == 3 { return citiesInAustralia.count } return 0 } - Implement the
titleForHeaderInSectiondata source method as follows:func tableView(tableView: UITableView, titleForHeaderInSection section: Int) -> String? { return continents[section]; } - Implement the
cellforRowAtIndexPathdata source method as follows:func tableView(tableView: UITableView, cellForRowAtIndexPath indexPath: NSIndexPath) -> UITableViewCell { var cell:UITableViewCell = tableView.dequeueReusableCellWithIdentifier("prototypeCell1") as! UITableViewCell if indexPath.section == 0 { cell.textLabel?.text = citiesInAsia[indexPath.row] } else if indexPath.section == 1 { cell.textLabel?.text = citiesInNorthAmerica[indexPath.row] } else if indexPath.section == 2 { cell.textLabel?.text = citiesInEurope[indexPath.row] } else if indexPath.section == 3 { cell.textLabel?.text = citiesInAustralia[indexPath.row] } return cell } - Modify the declaration of the
ViewControllerclass to inherit fromUIViewController,UITableViewDataSource, andUITableViewDelegate:class ViewController: UIViewController, UITableViewDataSource, UITableViewDelegate {
- Add the following code snippet to the
-
Test your app in the iOS Simulator.
Click the Run button in the Xcode toolbar. Alternatively, you can select Project
Run.