Lesson 17
Collection Views
In the previous lesson, you learned about table views. Collection views are similar to table views in many respects; the primary difference between them is that collection views are not restricted to single column layouts. A collection views layout can be customized programmatically, allowing collection views to present data in grid layouts, circular layouts, and cover-flow layouts (see Figure 17.1).

Collection views are instances of the UICollectionView class and are part of the UIKit framework. Data in a collection view is referred to as Items that are grouped into sections. Each section can have an optional header and a footer view.
Creating a Collection View with Interface Builder
To add a new scene in your storyboard that contains a collection view, simply drag and drop a Collection View Controller object into your scene. A collection view controller is an object that manages a collection view (see Figure 17.2).

If, however, you want to add a collection view to an existing scene, drag and drop a collection view object onto the scene. When using a collection view your view controller class will be responsible for managing the collection view and will need to implement relevant methods from the UICollectionViewDataSource and UICollectionViewDelegate protocols. You will also need to set the view controller to act as both the data source and delegate object for the collection view (see Figure 17.3). The data source and delegate will be discussed in more detail later in this lesson.

Collection View Cells
Each item in a collection view is an instance of another UIKit class called UICollectionViewCell. The collection view has a mechanism in place that allows you to reuse collection view cells instead of creating one for each item.
When you add a collection view to your storyboard, the collection view has a default cell of dimensions 50 x 50 units. Select the collection view in the document outline, and use the Size Inspector to edit the dimensions of the cell and the spacing between cells (see Figure 17.4).

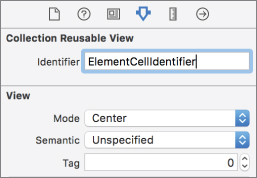
Select the collection view cell (not the collection view) in the document outline and switch to the Attribute inspector to set up a unique identifier that will be used to access this cell programmatically (see Figure 17.5).
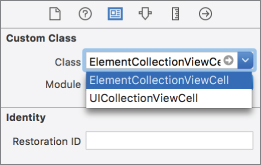
You will also need to create a custom UICollectionViewCell subclass and associate it with the collection view cell using the Identity Inspector (see Figure 17.6).
Unlike table view cells, the default collection view cell is empty. You will need to build a layout using standard UIKit elements such as labels and image views, and set up layout constraints within the cell.
Once a custom UICollectionViewCell subclass is associated with the collection view cell in the storyboard, you can create outlets and actions for the elements within the cell in this class.
Collection View Delegate and Data Source
The UICollectionViewDataSource and UICollectionViewDelegate protocols define several methods, most of which are optional. The most common UICollectionViewDataSource methods you are likely to implement are:
func collectionView(collectionView: UICollectionView,
numberOfItemsInSection section: Int) -> Int
func collectionView(collectionView: UICollectionView,
cellForItemAtIndexPath indexPath: NSIndexPath) ->
UICollectionViewCell
func numberOfSectionsInCollectionView(collectionView: UICollectionView) -> Int
You should return the number of sections in your collection view from the numberOfSectionsInCollectionView method. If this method is not implemented, the collection view assumes a single section. The number of items in each section are to be returned from collectionView(collectionView, numberOfItemsInSection), and a UICollectionViewCell instance for each row within each section is to be returned from collectionView(collectionView, cellForItemAtIndexPath).
The most common UICollectionViewDelegate method that you are likely to implement is:
func collectionView(collectionView: UICollectionView,
didSelectItemAtIndexPath indexPath: NSIndexPath)
This method is called when the user selects an item in your collection view. If, however, you have created segues in your storyboard from your table view to another scene, then prepareForSegue is called instead.
If, on the other hand, you are using a collection view controller in your storyboard, then you will need to associate a custom UICollectionViewController subclass with the collection view controller in the Identity Inspector and implement the data source and delegate methods in this subclass.
The following code snippet shows how these data source and delegate methods are implemented in a view controller; this snippet assumes that ElementCollectionViewCell is a custom UICollectionViewCell subclass:
class ViewController: UIViewController,
                      UICollectionViewDataSource,
                      UICollectionViewDelegate {
    var elements:Array<String> = ["Hi", "He", "Li", "Be", "B", "C",
                                  "N", "O", "F" ,"Ne", "Na", "Mg",
                                  "Al", "Si", "P", "S", "Cl", "Ar",
                                  "K", "Ca"]
    override func viewDidLoad() {
        super.viewDidLoad()
    }
    override func didReceiveMemoryWarning() {
        super.didReceiveMemoryWarning()
    }
    func collectionView(collectionView: UICollectionView,
         numberOfItemsInSection section: Int) -> Int
    {
        return elements.count;
    }
    func collectionView(collectionView: UICollectionView,
                       cellForItemAtIndexPath indexPath: NSIndexPath) ->
                       UICollectionViewCell
    {
        var cell: ElementCollectionViewCell =
collectionView.dequeueReusableCellWithReuseIdentifier("ElementCell",
forIndexPath:indexPath) as! ElementCollectionViewCell
        var elementName:String = elements[indexPath.row]
        cell.elementImage.image = UIImage(named: elementName)
        return cell
    }
    func numberOfSectionsInCollectionView(collectionView: UICollectionView) -> Int
    {
        return 1;
    }
}
Try It
In this Try It, you create a new Xcode project based on the Single View Application template called CollectionViewTest that adds a collection view with three sections to an existing scene of the default storyboard. The sections display a few elements from the periodic table sorted into solids, liquids, and gases.
Lesson Requirements
- Launch Xcode.
- Create a new project based on the Single View Application template.
- Edit the storyboard with Interface Builder.
- Add a collection view to the default scene.
- Set up a collection view cell.
- Set up collection view attributes with the Attribute inspector.
- Set up the data source and delegate property of the table view.
- Implement
UICollectionViewDataSourceandUICollectionViewDelegatemethods.
Hints
- To show the Object library, select View
 Utilities Show Object Library.
 - To show the assistant editor, select View Assistant Editor Show Assistant Editor.
Step-by-Step
- Create a Single View Application in Xcode called
CollectionViewTest.- Launch Xcode and create a new application by selecting File New Project.
- Select the Single View Application template from the list of iOS project templates.
- In the project options screen, use the following values:
- Product Name: CollectionViewTest
- Organization Name: your company
- Organization Identifier: com.yourcompany
- Language: Swift
- Devices: iPhone
- Use Core Data: Unchecked
- Save the project onto your hard disk.
- Launch Xcode and create a new application by selecting File
- Add image resources to your project.
- Ensure the project navigator is visible. To show it, select View Navigators Show Project Navigator.
- Open the
Assets.xcassetsfile by clicking it in the project navigator. - Navigate to the
Imagesfolder in this chapter's resources from the website. - Create a new Image set by selecting Editor New Image Set, and name this new image set
Al. - Drag the
Al_1x.png,Al_2x.png, andAl_3x.pngimages from this chapter's resources into the appropriate placeholders in the image set. - Similarly, create new image sets called
F,Hg,Li,N,O, andSi, and use the appropriate images from this chapter's resources folder.
- Ensure the project navigator is visible. To show it, select View
- Add a
UICollectionViewinstance to the default scene.- From the Object library, drag and drop a Collection View object onto the scene.
- Ensure the collection view is selected and use the Pin button to display the constraints editor popup.
- Ensure the Constrain to margins option is unchecked.
- Pin the distance between the left edge of the view and the table view to 0.
- Pin the distance between the right edge of the view and the table view to 0.
- Pin the distance between the bottom of the view and the table view to 0.
- Pin the distance between the top of the view and the table view to 20.
- Click the Add 4 Constraints button to dismiss the constraints editor popup.
- Update the frames to match the constraints you have set.
- Click on the View controller item in the dock above the storyboard scene. This is the first of the three icons located directly above the selected storyboard scene.
- Select Editor Resolve Auto Layout Issues Update Frames.
- Set up the data source and delegate properties.
- Right-click the collection view to bring up a context menu. Drag from the item labeled “dataSource” in the context menu to the item labeled “View Controller” in the document outline.
- Right-click the collection view to bring up a context menu. Drag from the item labeled “delegate” in the context menu to the item labeled “View Controller” in the document outline.
- Set up the collection view's appearance.
- Select the collection view and ensure the Attribute inspector is visible.
- Ensure the Layout attribute is set to Flow.
- Ensure the Scroll Direction attribute is set to Vertical.
- Ensure the Section Header check box is unchecked.
- Ensure the collection view is selected, and switch to the Size Inspector to set the height and width of the collection view cell to 150 units each.
- Set the Top Section Inset to 10 units.
- Add a
UICollectionViewCellsubclass.- Option-click the
CollectionViewTestgroup in the project explorer and select New File from the context menu. - Select Swift File under the iOS Templates section.
- Name the file
ElementCollectionViewCell.swiftand click Create. - Modify the contents of the
ElementCollectionViewCell.swiftfile to subclassUICollectionViewCell. The modified contents of this file should resemble the following:import UIKit class ElementCollectionViewCell: UICollectionViewCell { }
- Option-click the
- Set up the collection view cell.
- Expand the collection view in the document outline; this will reveal the collection view cell.
- Select the collection view cell.
- Use the attribute editor to ensure that the value of the identifier attribute is
ElementCellIdentifier. - Drag and drop an Image view onto the collection view cell.
- Ensure the image view is selected and use the pin button to display the constraints editor popup.
- Ensure the Constrain to margins option is unchecked.
- Pin the distance between the left edge of the view and the table view to 0.
- Pin the distance between the right edge of the view and the table view to 0.
- Pin the distance between the bottom of the view and the table view to 0.
- Pin the distance between the top of the view and the table view to 0.
- Click the Add 4 Constraints button to dismiss the constraints editor popup.
- Update the frames to match the constraints you have set.
- Select the collection view cell in the document outline. This will now be listed as
ElementCellIdentifier. - Select Editor Resolve Auto Layout Issues Update Frames.
- Select the collection view cell in the document outline. This will now be listed as
- Select the collection view cell, and use the Identity Inspector to change the custom class of the cell to
ElementCollectionViewCell. - Ensure the assistant editor is visible and the
ElementCollectionViewCell.Swiftfile is open in it. - Select the image view in the document outline and create an outlet for the image view in the
ElementCollectionViewCell.Swiftfile. Name the outletimageView.
- Implement the data source and delegate methods in the view controller.
- Add the following code snippet to the
ViewController.swiftfile to declare four arrays of strings:var statesOfMatter:Array<String> = ["Solid", "Liquid", "Gas"] var solids:Array<String> = ["Li", "Al", "Si"] var liquids:Array<String> = ["Hg"] var gasses:Array<String> = ["N", "O", "F"] - Implement the
numberOfSectionsInCollectionViewdata source method as follows:func numberOfSectionsInCollectionView(collectionView: UICollectionView) -> Int { return statesOfMatter.count; } - Implement the
collectionView(collectionView, numberOfItemsInSection)data source method as follows:func collectionView(collectionView: UICollectionView, numberOfItemsInSection section: Int) -> Int { if section == 0 { return solids.count } else if section == 1 { return liquids.count } else if section == 2 { return gasses.count } return 0 } - Implement the
collectionView(collectionView, cellForItemAtIndexPath)data source method as follows:func collectionView(collectionView: UICollectionView, cellForItemAtIndexPath indexPath: NSIndexPath) -> UICollectionViewCell { var section = indexPath.section var row = indexPath.row var cell: ElementCollectionViewCell = collectionView.dequeueReusableCellWithReuseIdentifier ("ElementCellIdentifier", forIndexPath:indexPath) as! ElementCollectionViewCell if section == 0 { var elementName:String = solids[indexPath.row] cell.imageView.image = UIImage(named: elementName) } else if section == 1 { var elementName:String = liquids[indexPath.row] cell.imageView.image = UIImage(named: elementName) } else if section == 2 { var elementName:String = gasses[indexPath.row] cell.imageView.image = UIImage(named: elementName) } return cell } - Modify the declaration of the
ViewControllerclass to inherit fromUIViewController,UICollectionViewDataSource, andUICollectionViewDelegate:class ViewController: UIViewController, UICollectionViewDataSource, UICollectionViewDelegate {
- Add the following code snippet to the
-
Test your app in the iOS Simulator.
Click the Run button in the Xcode toolbar. Alternatively, you can select Project
Run.