Lesson 25
Introduction to CloudKit
In Lesson 24, you learned how to create an app that could store documents on iCloud and access these documents across different devices. In this lesson, you learn about CloudKit, which is a set of APIs that allow you to move structured data between your app and iCloud. Whereas iCloud document storage operates on files, CloudKit operates on dictionaries of key-value pairs called records. To use a relational database analogy, a record is similar to a row in a table.
CloudKit also allows relationships between records. You may be tempted to use CloudKit to replace CoreData in your application, but these two technologies complement each other and are not meant to replace each other. CoreData is concerned with storing model objects locally; CloudKit is concerned with moving some of the data in these model objects to iCloud so that they can be accessed by other instances of your application.
When using CloudKit, your application decides when to move data to and from iCloud. The process is not automatic. It is possible to configure iCloud to inform your application when changes occur; your application will still need to fetch those changes. In this lesson, you will look at some of the key concepts involved in building iOS applications with CloudKit.
Containers, Databases, and Records
Data in iCloud is organized into containers. Containers are represented by instances of CKContainer objects and every iCloud enabled app has at least one container called the default container, the identifier of which is the same as that of the app. Conceptually, you can think of a container to represent storage space for your app on iCloud.
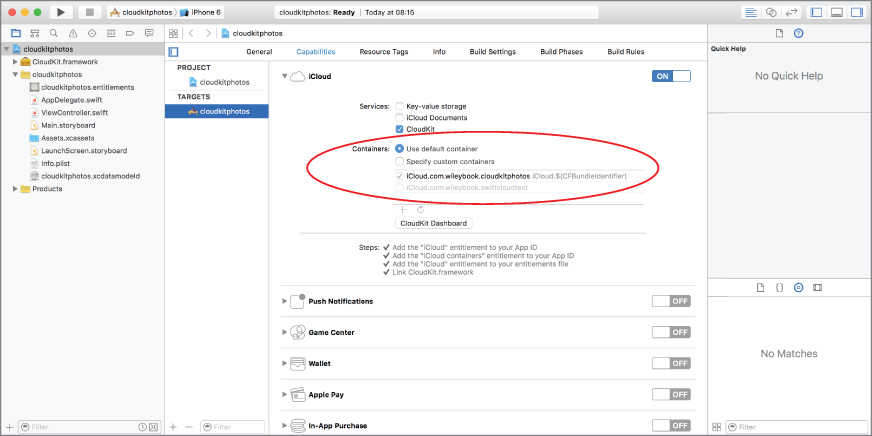
When you add iCloud entitlements in your Xcode project, Xcode adds the identifier for the app's default container to the project (see Figure 25.1).
You have the option to add other container identifiers, which is something you would do if you wanted to perhaps share data between a group of applications you have developed. Multiple container identifiers are outside the scope of this lesson.
To obtain a reference to the default container for your app, simply use the defaultContainer class method of the CKContainer class:
let defaultContainer = CKContainer.defaultContainer()Each Container contains a public database and multiple private databases (there is one private database per user of your app). Databases are represented by instances of CKDatabase objects. Data in a private database is only visible to the user who created it. Data in a public database is visible to all users of the app.
You can retrieve a CKDatabase instance for the public or private database using the publicCloudDatabase() or privateCloudDatabase() instance methods of CKContainer:
let privateDatabase:CKDatabase = CKContainer.defaultContainer().privateCloudDatabase
let publicDatabase:CKDatabase = CKContainer.defaultContainer().publicCloudDatabase
At runtime, all the data in the public database will always be readable by your app, even if there is no active iCloud account on the device. However, a user must set up an iCloud account in order to write to public databases or access private databases.
Within databases, your app's data is grouped into record types. In terms of a relational database analogy, record types are the equivalent of database tables. A record type contains a unique identifier, a collection of records, and some additional metadata required by CloudKit. A collection of record types is known as a schema.
A record is an instance of a CKRecord objects and is a dictionary of key-value pairs called fields. A record is similar to a row in a relational database system. CloudKit requires that a record not exceed 1MB in size, and because of this limitation you should save large files such as images in physical files, and simply store the file name in the record. Table 25.1 shows the commonly used field types.
Table 25.1 CloudKit Field Types
| Field | Class | Description |
| Asset | CKAsset |
A large file that is stored separately from the record |
| Bytes | NSData |
Raw binary data stored within the record |
| Date/Time | NSDate |
A date/time |
| Double | NSNumber |
A double |
| Int | NSNumber |
An integer |
| Location | CLLocation |
A latitude and longitude pair |
| Reference | CKReference |
A relationship to a field in another record type |
| String | NSString |
An immutable string |
| List | NSArray |
An array of any of the above types |
The relationship between containers, databases, and records is shown in Figure 25.2.

Development and Production Environments
CloudKit provides separate development and production environments for your app's data. The development environment is only accessible to members of your development team. When you save a record to a database in the development environment, CloudKit automatically updates the database schema by creating the associated record type. This feature is called just-in-time schema and is only available in the development environment.
In the development environment, you can also use the CloudKit Dashboard to modify the schema and records. In the production environment, you cannot edit the schema but you can modify individual records in the public database.
If you decide to use CloudKit to generate the schema for you, keep in mind that once you add a field to a record, the data type associated with that field cannot be changed programmatically. It can, however, be changed from the CloudKit dashboard.
Typically, you use the development environment while developing and testing your app. In fact, when you run your app from Xcode on a simulator or device, it is automatically configured to use the development environment.
When you use Xcode to submit your app for review, Xcode will automatically configure the app to target the production environment prior to submission. When you export an app for testing, you will be asked to specify either the development or production environment.
Once your app appears to be working fine with the development environment, you will want to switch over to the production environment prior to submitting the app to the iTunes Store. Switching over to the production environment will require you to deploy the schema into the production environment. Deploying a scheme only copies the record types, and not the individual records themselves.
The first time you deploy the schema from the development environment to the production environment, the schema is copied over to the production environment. The next time you deploy the schema (because perhaps you modified the schema in the development environment), the schema is merged with the production schema.
To prevent merge conflicts, CloudKit does not allow you to delete fields or record types in a schema in the development environment that was previously deployed to the production environment.
The CloudKit Dashboard
The CloudKit dashboard (see Figure 25.3) is a web-based application that allows you to manage both the schema and the records stored on iCloud by your CloudKit-based applications. You can access it at https://icloud.developer.apple.com/dashboard/.
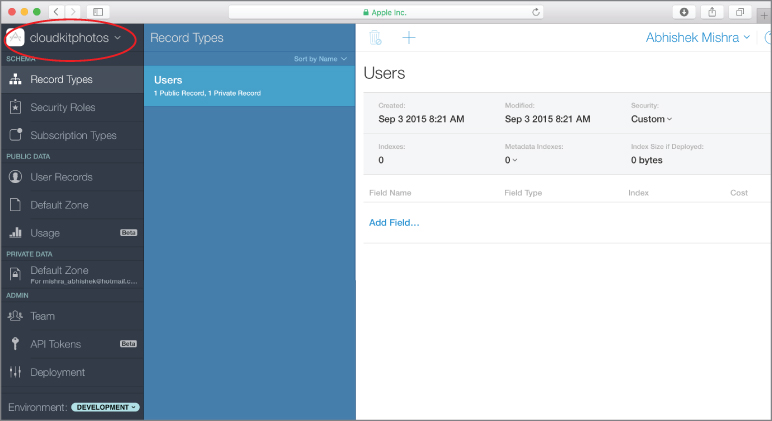
The features of the dashboard only apply to the currently selected container. You can use the drop-down combo box located at the top left of the dashboard to switch containers. The dashboard will only display containers that belong to your Apple developer account.
The rest of this section explores some of the common tasks you are likely to perform with the dashboard. Keep in mind that some of these tasks can be performed programmatically.
Creating a Record Type
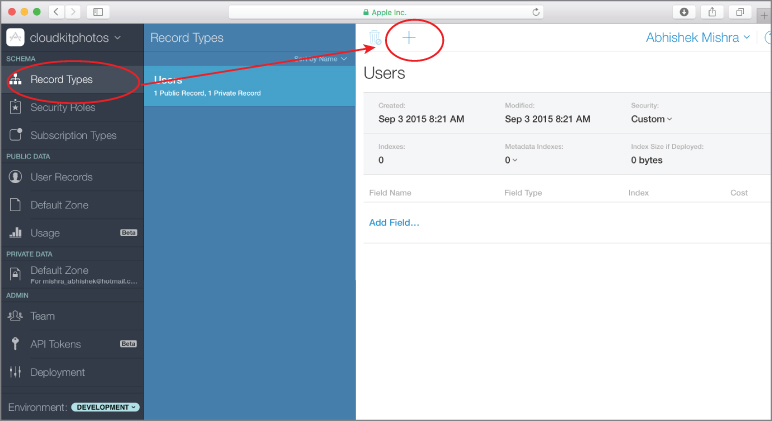
A record type is the equivalent of a table in a relational database. To create a record type, first click on the Record Types option under the Schema group in the left-hand navigation menu. Next, click the Add (+) button in the upper-left corner of the detail area (see Figure 25.4).
Enter a name for the new record type, and then proceed to add fields to the record type. There is no limit to the number of fields you can have in a record type. A record type must have at least one field, and to enforce this the dashboard creates one for you by default (see Figure 25.5).

Every field must have a unique name, and can have one of the data types listed in Table 25.1. To add additional fields click the Add Field button. When you have finished creating all the fields, click the Save button on the bottom right side of the detail area to update the schema.
You can delete a field by clicking the delete (X) button located to the right of the field row (see Figure 25.6). Deleting a field will remove the field from the record type as well as any records.

Deleting a Record Type
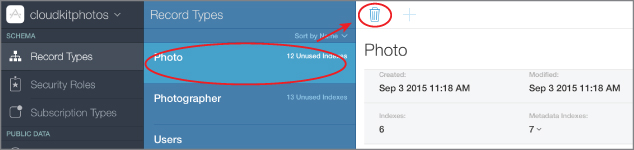
To delete a record type, simply select it in the list of record types and click the trash icon in the upper-left corner of the detail area (see Figure 25.7). Deleting a record type will also delete all records that are based on the record type. Once a development schema has been deployed to the production environment, you cannot delete record types.
Creating Relationships Between Record Types
Relationships between record types are represented using fields that have the CKReference data type. Relationships can be used to express hierarchies in the data and can be both one-to-one or one-to-many.
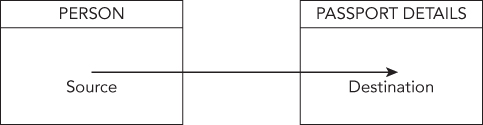
A CKReference object encapsulates a record identifier of a target record and is added to the source record. To add a one-to-one relationship between a source and target record types, add the reference field to the source record type (see Figure 25.8).
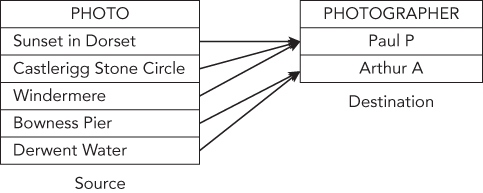
When adding a one-to-many relationship between record types in CloudKit, the child object is considered to be the source of the relationship and the CKReference object is added to the child. This is illustrated in Figure 25.9 where there is a one-to-many relationship between a record type called Photographer and a record type called Photo.
The actual process of adding the field from the CloudKit dashboard is a simple matter of selecting the correct record type and adding a field, whose type is Reference (see Figure 25.10).

While adding references between two record types, it is advisable to create inverse references from the destination record type to the source record type as well.
Adding Records
To add a new record to a container, you must first decide which database you want to add the record to. If you add the record to the public database, the record will be visible to all users of your application. If you add the record to the private database, then the record will be added to your private database (as you are accessing the CloudKit dashboard using your developer account).
Data within the database is grouped into zones. A zone is a logical grouping of the records in the database; every database starts out with a single zone called the Default zone. Additional zones can be added.
For certain types of applications, segregating the data in the database by zones may make sense (for example, zones could represent different business functions within an organization such as finance, marketing, development, and so on). In the examples created in this lesson, however, all databases use the default zone.
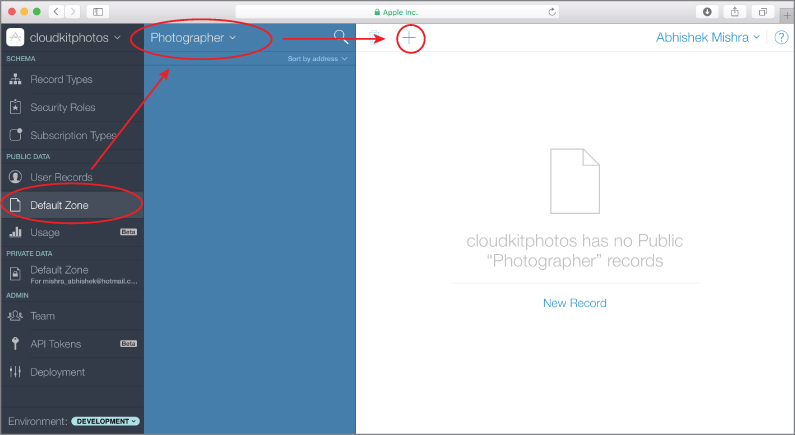
To add a new record using the dashboard, simply select the Default zone for the public or private database on the left-hand side navigation menu, select the record type, and click the Add (+) button in the detail area (see Figure 25.11).
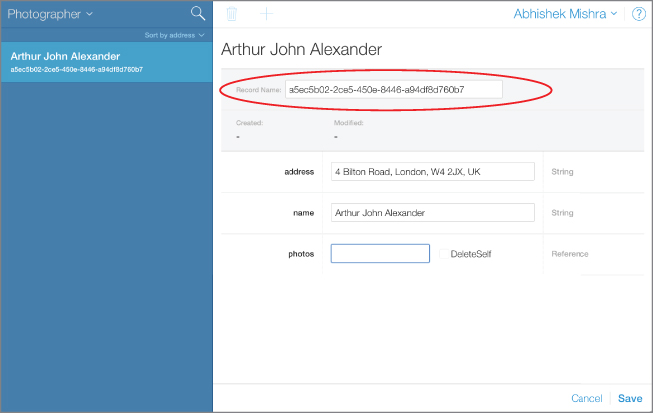
Type in values for the fields and click the Save button to create the record. When you add a record from the dashboard, CloudKit automatically creates a unique record identifier for the record, which is visible in the Record Name attribute in Figure 25.12.
If the field type is a reference, then you will have a check box labeled DeleteSelf visible beside the field value (see Figure 25.13).

Enabling the DeleteSelf option implies that the record you are creating will be automatically deleted if the referenced record is deleted.
Modifying and Deleting Records
To edit a record, simply select the record from the list of records, enter new values for the fields, and click Save. To delete a record, use the trash icon located at the upper-left corner of the detail area (see Figure 25.14).

Resetting the Development Schema
You can reset the development schema to a previous state by using the Deployment ![]() Reset Development Environment option (see Figure 25.15).
Reset Development Environment option (see Figure 25.15).

If you have never deployed your schema to the production environment, resetting the schema results in all records and record types being deleted from all databases.
If, however, you have deployed your schema previously, then resetting the schema in the development environment results in all records being deleted and the schema being restored to the production version.
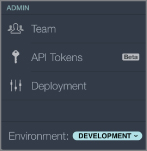
The Deployment option is only available when you are working in the development environment. To find out which environment you are working in (or to switch to the other environment), use the environment drop-down option at the bottom-left of the dashboard (see Figure 25.16).
Deploying to Production
Once your app appears to be working fine with the development environment, you will want to switch over to the production environment prior to submitting the app to the iTunes Store. Switching over to the production environment will require you to deploy the schema into the production environment. Deploying a schema only copies the record types, not the individual records themselves.
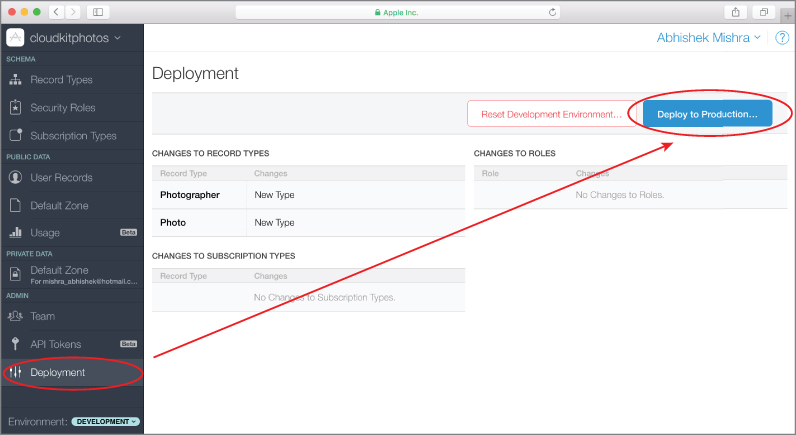
To deploy a schema to production, click the Deployment option in the left-hand navigation menu and then click the Deploy to Production button in the detail area (see Figure 25.17).
If you have unused indexes, you may get a warning message asking you to either deploy unused indexes or optimize them. An Index helps to improve the speed of fetching records from the database.
When you add fields to a record type, CloudKit creates an index for the field. Depending on the type of field, CloudKid will create indexes for sorting, querying, and searching on that field. In production, it is wasteful to store indexes you do not use.
Preparing to Use CloudKit
To use the CloudKit APIs in an application, you need to perform three steps:
- Create an iCloud-enabled App ID.
- Create an appropriate provisioning profile.
- Enable appropriate entitlements in your Xcode project.
Create an iCloud-Enabled App ID
To create an appropriate App ID, log in to your iOS developer account at https://developer.apple.com/ios. Click the Member Center link on the right side to access the member center. Within the member center, click the Certificates, Identifiers & Profiles link (see Figure 25.18).

Next, click the Identifiers link in the iOS Apps category on the left side of the page (see Figure 25.19).

To create a new App ID, click the New App ID button on the top-right side (see Figure 25.20).

Provide a descriptive name of the new App ID in the Name field and select Team ID in the App ID prefix drop-down. Select the Explicit App ID radio button under the App ID suffix section and provide a unique identifier in the Bundle ID field that ends in the name of the Xcode project you are going to create (or have created).
Typically, you create this identifier by combining the reverse-domain name of your website and the name of your Xcode project. For example, the project created in this lesson is called CloudKitPhotos and the bundle identifier specified is com.wileybook.cloudkitphotos. Your browser window should resemble Figure 25.21.

Scroll down to reveal the App Services section and ensure that both the iCloud checkbox and the Include CloudKit support option are selected (see Figure 25.22).

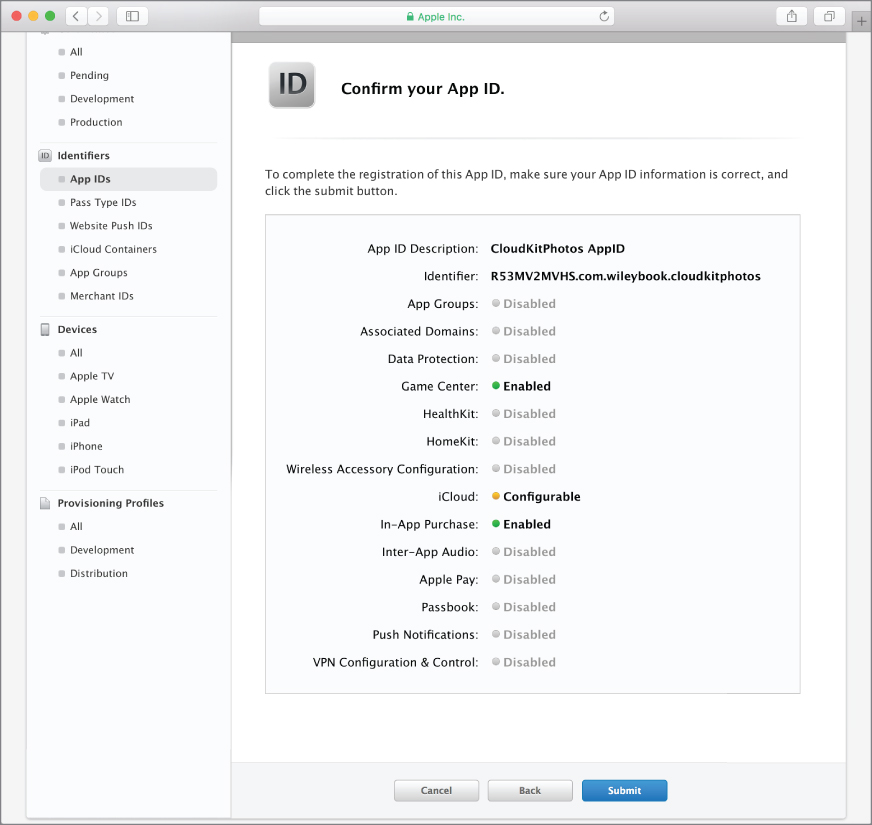
Click the Continue button to proceed. You will be presented with a summary of the App ID information (see Figure 25.23). Click Submit to finish creating the App ID.
Create an Appropriate Provisioning Profile
To create a provisioning profile for an iCloud-enabled App ID, click the All link (under the Provisioning category) in the menu on the left-hand side of the iOS Provisioning Portal window (see Figure 25.24).

Click the New Profile button on the top-right side (see Figure 25.25).

You will be asked to choose between a development or distribution provisioning profile. A distribution provisioning profile is used to submit applications to iTunes Connect. For the moment, select the iOS App Development option and click Continue (see Figure 25.26).

A development provisioning profile ties together three pieces of information:
- A single App ID
- One or more public keys
- A list of test device IDs
The next step requires you to select an App ID that will be associated with this provisioning profile. Select the iCloud-enabled App ID you have created (see Figure 25.27) and click Continue.

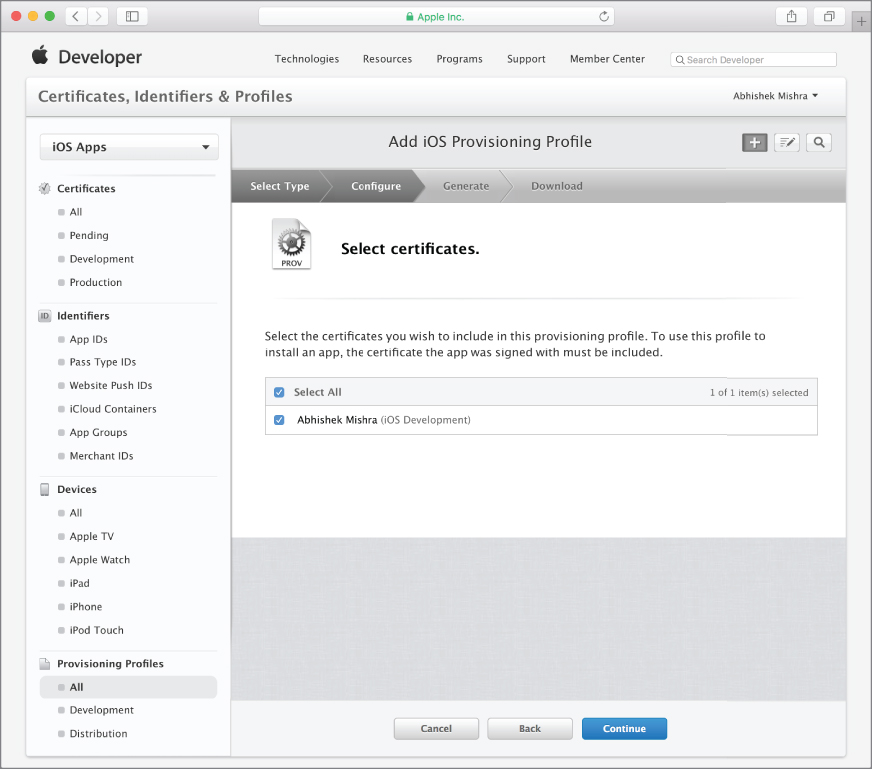
Select one or more development certificates that will be included in the profile. You must make sure to sign the app in Xcode using one of the certificates you select here. Select a suitable certificate and click Continue (see Figure 25.28).
Next, you must select one or more devices that will be included in this provisioning profile. The corresponding identifiers for these devices must be registered with your development account. Your app will only be testable on these devices (see Figure 25.29).

The final step involves providing a suitable name for the profile and clicking the Generate button. When the profile is created, you will be provided an option to download it onto your computer (see Figure 25.30).

If you were to now click the All link under the Provisioning section of the left-hand side menu, you would see an entry for the new profile in the list of available profiles. You can also download a provisioning profile from this list.
Once the profile has been downloaded, simply locate it in the Downloads folder on your Mac and double-click it to install it in Xcode.
Enable Appropriate Entitlements in Your Xcode Project
Create a new project in Xcode using one of the standard iOS application templates. In the Project Options dialog box, make sure you provide the correct value for the Product Name and Organization Identifier fields so as to create the same App ID that was registered on the iOS Provisioning Portal. If, for instance, the App ID you registered was com.wileybook.cloudkitphotos, use cloudkitphotos for the Product Name field and com.wileybook for the Company Identifier field.
Applications that use iCloud must be signed with iCloud-specific entitlements. These entitlements ensure that only your applications can access the documents that they create. To enable entitlements, select the project's root node in the project navigator and the appropriate build target. Ensure the Capabilities tab is selected. Locate the iCloud node and enable it. You may be asked to provide your iOS developer accounts credentials when you enable the iCloud entitlement. Because this lesson is about CloudKit, ensure the CloudKit checkbox is checked (see Figure 25.31).

Common Operations
In this section, you learn how to perform common operations such as checking for service availability, adding/updating records, and retrieving records. While it is possible to create records using the iCloud dashboard, you will most likely need to be able to do this programmatically in response to some action taken by the user.
Checking for Service Availability
Before writing data to one of the CloudKit databases (private or public), the user must be signed in to iCloud. The following snippet uses the accountStatusWithCompletionHandler method of the CKContainer object to check if the user is signed in:
CKContainer.defaultContainer().accountStatusWithCompletionHandler {
(accountStatus, error) -> Void in
            if accountStatus == CKAccountStatus.NoAccount {
                let alert = UIAlertController(title: "Sign in to iCloud",
                    message: "You need to sign in to iCloud to create records.",
                    preferredStyle: UIAlertControllerStyle.Alert)
                alert.addAction(UIAlertAction(title: "Ok",
                    style: UIAlertActionStyle.Default,
                    handler: nil))
                self.presentViewController(alert,
                    animated: true,
                    completion: nil)
            }
            else {
                // show the view controller to allow the user to create a
new record.
            }
        }
Creating Records Programmatically
To create a record, you will first need to give it a unique record identifier. CloudKit only generates unique record identifiers for records created using the dashboard. To generate unique record identifiers, use the UDIDString method of the NSUDID class to generate a unique record name:
let uuid:String = NSUUID().UUIDStringand then create a CKRecordID instance with that name:
let photoRecordID = CKRecordID(recordName: uuid)The next step is to create a CKRecordInstance. To create one, you will need to provide a string that represents the record type and the unique record identifier for the new record. This is shown in the following snippet:
let photoRecord:CKRecord = CKRecord(recordType: "Photo", recordID: photoRecordID)You can set up the values of individual fields in the record using key-value coding:
photoRecord["photoCaption" ] = "By the lake"
photoRecord["photoDescription"] = "Photo by Andy Brown"
Finally, save the CKRecord instance to CloudKit by using the saveRecord method of a CKDatabase instance. The following snippet demonstrates how to save a record to the public database:
let publicDatabase:CKDatabase = CKContainer.defaultContainer().publicCloudDatabase
publicDatabase.saveRecord(photoRecord) { (newRecord, error) -> Void in
   if error != nil {
        // handle the error in some way.
   }
}
Retrieving Records
If you know the record identifier (listed as “record name” on the CloudKit dashboard) for the record you want to retrieve, you can create a CKRecordID instance with that identifier and then use the fetchRecordWithID() method of the CKDatabase instance. This is demonstrated in the following snippet:
let publicDatabase = CKContainer.defaultContainer().publicCloudDatabase
let someRecordID:CKRecordID = CKRecordID(recordName: "9181.a8d5xv26")
publicDatabase.fetchRecordWithID(someRecordID) { (record:CKRecord?,
error:NSError?) -> Void in
            // examine error, if no error then do something with record.
}
The fetchRecordWithID method requires two arguments. The first is a CKRecordID that contains the record identifier for the record you wish to retrieve; the second parameter is a completion block that will be called by CloudKit with the results of the fetch operation.
If you do not know the record identifier, then you will need to perform a query on the database to retrieve all records that satisfy some criteria and then iterate through the results. The following code snippet performs a query on the database to retrieve all records from the Photographer table that have the name field containing the value Arthur:
let publicDatabase:CKDatabase = CKContainer.defaultContainer().publicCloudDatabase
let predicate:NSPredicate = NSPredicate(format: "name = ",
    argumentArray: ["Arthur"])
let query:CKQuery = CKQuery(recordType: "Photographer",
    predicate: predicate)
publicDatabase.performQuery(query,
    inZoneWithID: nil,
    completionHandler: { (results:[CKRecord]?, error:NSError?) -> Void in
      // if error is nil, then examine the contents of the array results
})
Try It
In this Try It, you build a new Xcode project based on the Single View Application template called CloudKitPhotos. In this application, you use CloudKit to share photos with other users of your application using a public database. You also use Core Data to save these photos locally on your device.
Lesson Requirements
- Create a new Universal application project based on the Single View Application template.
- Register the App ID with the iOS Provisioning Portal.
- Create a development provisioning profile.
- Download and install the development provisioning profile.
- Create a Table View Controller based user interface.
- Create a data model with Core Data.
- Check iCloud service availability in the
viewDidLoadmethod of the view controller class. - Load previously downloaded content into the table view.
- Build a detail view to show information on a photo selected in the table view.
- Build a view controller that allows users to upload new pictures.
- Implement code to upload new images to the public CloudKit database.
Hints
- To make best use of this application, you will need at least two iOS devices set up to use the same iCloud account.
- You must ensure iCloud has been set up on each test device.
- Testing your apps on iOS devices is covered in Appendix B.
Step-by-Step
- Create a Single View Application in Xcode called
CloudKitPhotos.- Launch Xcode and create a new application by selecting File
 New Project.
 - Select the Single View Application template from the list of iOS project templates.
- In the project options screen, use the following values:
- Product Name: cloudkitphotos (in lowercase)
- Organization Name: your company
- Organization Identifier: com.wileybook.cloudkitphotos
- Language: Swift
- Devices: Universal
- Use Core Data: Checked
- Include Unit Tests: Unchecked
- Include UI Tests: Unchecked
- Save the project onto your hard disk.
- Launch Xcode and create a new application by selecting File
- Register an App ID with the iOS Provisioning Portal.
- Log in to the iOS Provisioning Portal, and register a new App ID with the following details:
- Description: CloudKitPhotos AppID
- Bundle Seed ID: Use Team ID
- Bundle Identifier: com.wileybook.cloudkitphotos
Enable the App ID to use with iCloud.
This process is covered in the section “Create an iCloud-Enabled App ID” earlier in this lesson.
- Log in to the iOS Provisioning Portal, and register a new App ID with the following details:
- Create a development provisioning profile using the App ID created in the previous step.
- The process of creating the provisioning profile is covered in the section “Creating an Appropriate Provisioning Profile” earlier in this lesson. Follow those instructions to create a development provisioning profile called “Swift Cloud Test Development Profile.”
- Download and install the provisioning profile by double-clicking on the profile after it has been downloaded to your computer.
- Enable iCloud-specific entitlements for the application target.
- Select the project's root node in the project navigator and select the appropriate build target. Ensure the Capabilities tab is selected. Scroll down to the iCloud option and enable it.
- Once the iCloud entitlement has been enabled, ensure the CloudKit checkbox has been selected.
- Build the user interface of the application.
-
Open the
Main.storyboardfile from the project explorer and drag-and-drop a Table View Controller object onto the storyboard. This will create a new scene in the storyboard (see Figure 25.32).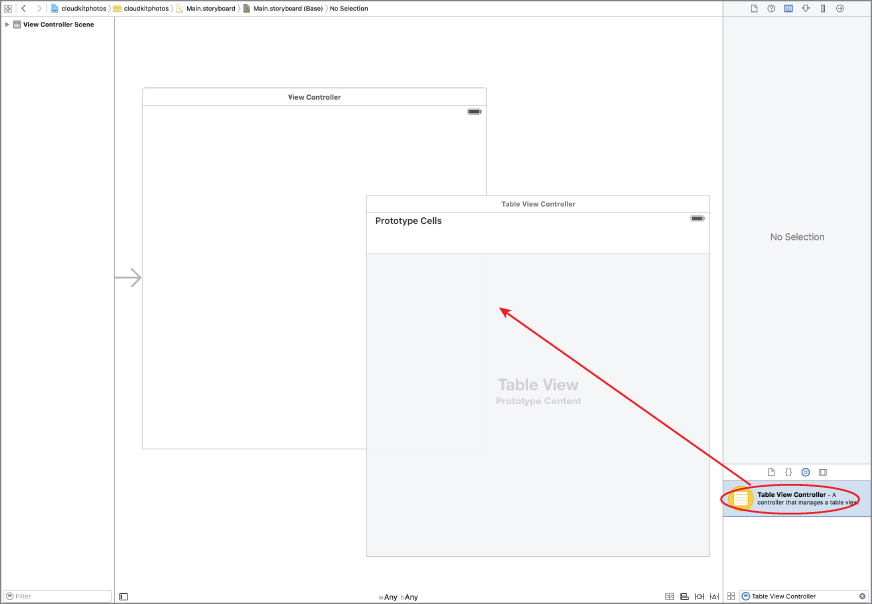
A table view controller is an instance of
UITableViewControllerand is used to manage a table view. The table view in this application will be used to present a list of photos in the local database to the user. - Position the two scenes side by side, and zoom out of the storyboard a little if necessary. To zoom in/out, select Editor Canvas Zoom.
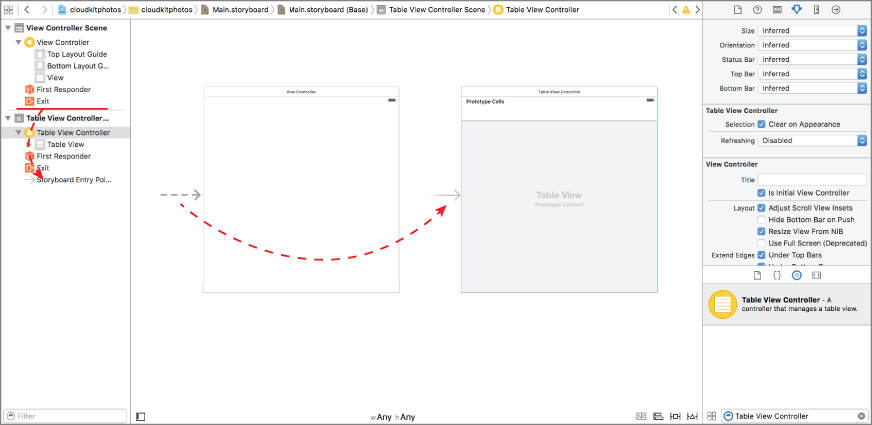
- Set up the Table View Controller scene to replace the default scene of the storyboard.
- Select the Table View Controller scene in the storyboard.
- Ensure the Attribute inspector is visible and scroll down to the View Controller section.
- Ensure the Is Initial View Controller option is selected. When you select this option, the Storyboard Entry Point indicator will jump to the table view controller scene (see Figure 25.33).
- Delete the View Controller scene from the storyboard. Your storyboard should now have just one scene (the Table View Controller scene).
-
Embed the Table View Controller scene in a navigation controller.
- Select the Table View Controller scene from the document outline panel and then select Editor Embed In Navigation Controller.
This action will add a Navigation Controller scene to the storyboard and make it the default scene of the storyboard. Your Table View Controller scene will now be embedded in the Navigation Controller (see Figure 25.34).

- Select the Table View Controller scene from the document outline panel and then select Editor
- Set up the table view's appearance.
- Select the table view and ensure the Attribute inspector is visible.
- Ensure the Content attribute is set to Dynamic Prototypes.
- Ensure the value of the Prototype Cells attribute is 1.
- Ensure the Style attribute is set to Grouped.
- Set up the prototype cell.
- Expand the table view in the document outline; this will reveal the table view cell.
- Select the table view cell.
- Use the attribute editor to ensure that the value of the identifier attribute is
prototypeCell1. - Ensure the Style attribute is set to Basic.
- Set up the
ViewControllerclass (implemented inViewController.swift) to inherit fromUITableViewControllerinstead ofUIViewController.- Open the
ViewController.Swiftfile. - Locate the following line in the file:
class ViewController: UIViewController { - Change it to
class ViewController: UITableViewController {
- Open the
- Add a right bar button item to the navigation bar of the Table View Controller scene.
- Expand the document outline for the storyboard and select the Navigation Item under the Table View (see Figure 25.35).

- Drag and drop a Bar Button Item from the object library onto the right edge of the Navigation Item (see Figure 25.36).

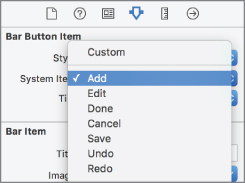
- Select the new Bar Button Item and use the Attribute inspector to set the value of its System Item attribute to Add (see Figure 25.37).
- Expand the document outline for the storyboard and select the Navigation Item under the Table View (see Figure 25.35).
- Link the Table View Controller scene in the storyboard to the
ViewControllerclass.- Select the Table View Controller scene.
- Use the Identity Inspector to change the Custom Class to
ViewController.
- Add a detail view controller scene. This view controller will be used to show details on a photo selected in the table view.
- Drag and drop a View Controller object onto the storyboard. This will create a new scene.
-
Create a Show detail segue between the table view cell and the new view controller. Hold down the Control key on your keyboard and drag from the prototype cell in the Table View Controller and drop onto the new scene you have added (see Figure 25.38).

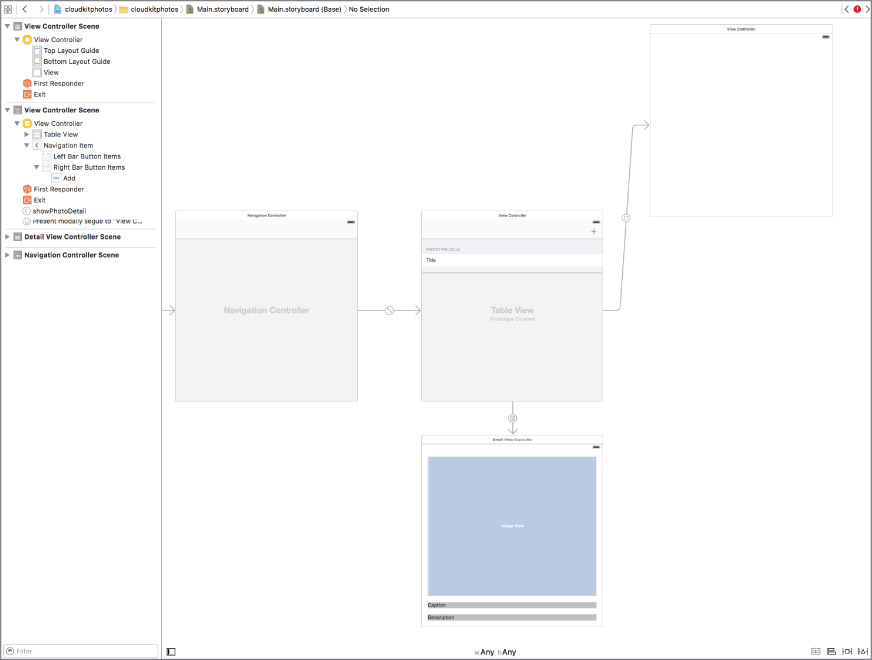
Your storyboard will now have three scenes and will resemble Figure 25.39.

- Select the segue that you have just created, and use the Attribute inspector to set the identifier property of the segue to
showPhotoDetail. - Create a new Swift file called
DetailViewController.swiftand replace its contents with the following code:import UIKit class DetailViewController: UIViewController { override func viewDidLoad() { super.viewDidLoad() } override func didReceiveMemoryWarning() { super.didReceiveMemoryWarning() } } - Use the Identity Inspector to change the Custom Class of the new scene to
DetailViewController.
- Add user interface elements to the Detail View Controller scene.
-
Drag-and-drop an image view and two label objects onto the Detail View Controller scene and position them to resemble Figure 25.40.
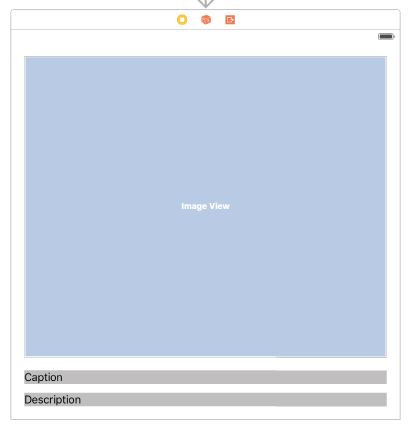
You will need to zoom in to 100 percent magnification to be able to add objects onto scenes.
- Create layout constraints for each of elements on the storyboard scene using the information in Table 25.2. When creating layout constraints using the pin constraints dialog box, ensure the Constrain to margins option is unchecked and Update Frames is set to None.
Table 25.2 Layout Constraints
Element Left Top Right Bottom Image view 20 20 20 20 Caption label 20 20 20 20 Description label 20 20 20 20 - Select the Detail View Controller scene in the document outline and select Editor Resolve Auto Layout Issues All Views Update Frames to update the storyboard scene with the layout constraints you have just applied.
- Using the Assistant Editor, create an outlet in the
DetailViewControllerclass calledimageViewand connect it to the image view. - Using the Assistant Editor, create an outlet in the
DetailViewControllerclass calledcaptionLabeland connect it to the first label. -
Using the Assistant Editor, create an outlet in the
DetailViewControllerclass calleddetailLabeland connect it to the second label.The code in
DetailViewController.swiftshould now resemble the following:import UIKit class DetailViewController: UIViewController { @IBOutlet weak var imageView: UIImageView! @IBOutlet weak var captionLabel: UILabel! @IBOutlet weak var detailLabel: UILabel! override func viewDidLoad() { super.viewDidLoad() } override func didReceiveMemoryWarning() { super.didReceiveMemoryWarning() } }
-
- Add a new view controller scene to the storyboard scene. This will be used when the user wants to add a photo to iCloud using CloudKit.
- Drag-and-drop a View Controller object onto the storyboard. This will create a new scene.
- Create a Present modally segue between the right bar button item and the new view controller.
- Your storyboard will now have four scenes and will resemble Figure 25.41.
- Select the segue that you have just created and use the Attribute inspector to set the identifier property of the segue to
addPhoto. - Create a new Swift file called
AddPhotoViewController.swiftand replace its contents with the following code:import UIKit class AddPhotoViewController: UIViewController { override func viewDidLoad() { super.viewDidLoad() } override func didReceiveMemoryWarning() { super.didReceiveMemoryWarning() } } - Use the Identity inspector to change the Custom Class of the new scene to
AddPhotoViewController.
- Add user interface elements to the Add Photo View Controller scene.
-
Drag-and-drop an image view, two text fields, and three buttons onto the Add Photo View Controller scene and position them to resemble Figure 25.42.
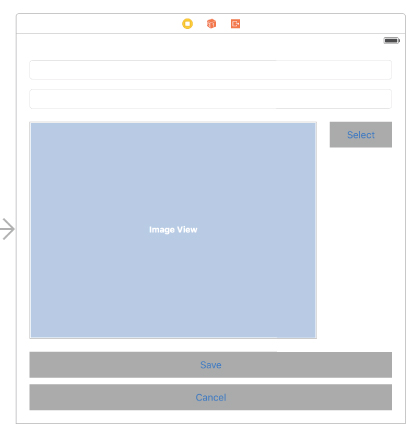
You will need to zoom in to 100 percent magnification to be able to add objects onto scenes.
- Create layout constraints for each of elements on the storyboard scene using the information in Table 25.3. When creating layout constraints using the pin constraints dialog box, ensure the Constrain to margins option is unchecked and Update Frames is set to None.
Table 25.3 Layout Constraints
Element Left Top Right Bottom Height Text field 1 20 20 20 20 30 Text field 2 20 20 20 20 30 Image view 20 20 20 20 Select button 20 20 20 40 Save button 20 10 20 10 40 Cancel button 20 10 20 20 40 - Select the Add Photo View Controller scene in the document outline and select Editor Resolve Auto Layout Issues All Views Update Frames to update the storyboard scene with the layout constraints you have just applied.
- Using the Assistant editor, create outlets in the
AddPhotoViewControllerclass calledimageView,captionField, anddescriptionFieldand then connect the image view, first text field, and second text field respectively. -
Create action methods in the
AddPhotoViewControllerclass calledonSelectPicture,onSaveRecord, andonCanceland connect them to the Select Picture, Save, and Cancel buttons respectively.The code in
AddPhotoViewController.swiftshould now resemble the following:import UIKit class AddPhotoViewController: UIViewController { @IBOutlet weak var imageView: UIImageView! @IBOutlet weak var captionField: UITextField! @IBOutlet weak var descriptionField: UITextField! override func viewDidLoad() { super.viewDidLoad() } override func didReceiveMemoryWarning() { super.didReceiveMemoryWarning() } @IBAction func onSelectPicture(sender: AnyObject) { } @IBAction func onSaveRecord(sender: AnyObject) { } @IBAction func onCancel(sender: AnyObject) { } }
-
-
- Build the client-side data model using Core Data.
- Select the
cloudkitphotos.xcdatamodeldfile in the project navigator to open it in the Xcode editor. - Add an Entity to the data model to represent photos.
- Select Editor Add Entity and name the new entity
Photo. -
Add the following attributes to the Photo entity:
photoCaption: StringphotoDescription: StringfileName: StringdateTaken: DateckRecordID: String
- Select Editor
- Use the Editor Create NSManagedObject subclass menu item to create an
NSManagedObjectsubclass to represent thePhotoentity. While creating theNSManagedObjectsubclass, ensure the language is set to Swift. - Ensure the
Photo.swiftfile has the following import statements at the top:import Foundation import CoreData import CloudKit import UIKit -
Add a method called
saveImageToDocumentsDirectory, which saves aUIImageinstance to a JPEG file in the documents directory and returns the path to the saved file:static func saveImageToDocumentsDirectory(image: UIImage, _ fileName:String) -> NSURL { let documentsURL = NSFileManager.defaultManager().URLsForDirectory( .DocumentDirectory, inDomains:.UserDomainMask)[0] let fileURL = documentsURL.URLByAppendingPathComponent(fileName) UIImageJPEGRepresentation(image, 0.5)?. writeToURL(fileURL, atomically: true) return fileURL }This method has been defined with the static keyword; therefore, you do not need an instance of Photo to use this method. You can simply call it on the class.
-
Add a static method called
addFromCKRecord, which creates aPhotoentity in Core Data from aCKRecordinstance.static func addFromCKRecord(record:CKRecord) { // read fields from CKRecord let recordIdentifier:String = record.recordID.recordName guard let dateTaken:NSDate = record["dateTaken"] as? NSDate, fileName:String = record["filename"] as? String, photoCaption:String = record["photoCaption"] as? String, photoDescription:String = record["photoDescription"] as? String, asset:CKAsset = record["photoAsset"] as? CKAsset else { return } // save asset to documents directory guard let image = UIImage(contentsOfFile:asset.fileURL.path!) else { print ("unable to download image") return } saveImageToDocumentsDirectory(image, fileName) // insert new record. let appDelegate = UIApplication.sharedApplication().delegate as! AppDelegate let newItem = NSEntityDescription.insertNewObjectForEntityForName("Photo", inManagedObjectContext: appDelegate.managedObjectContext) as! Photo newItem.ckRecordID = recordIdentifier newItem.fileName = fileName newItem.dateTaken = dateTaken newItem.photoCaption = photoCaption newItem.photoDescription = photoDescription // save managed object context. do { try appDelegate.managedObjectContext.save() } catch { print("error saving managed object context") } }The preceding code snippet extracts fields from the
CKRecordinstance, downloads the asset into the documents directory, and creates a managed object in the local data store.
- Select the
- Build the server-side data model using the CloudKit Dashboard.
Adding record types using the CloudKit dashboard has been covered earlier in this lesson.
- Log in to the CloudKit dashboard at
https://icloud.developer.apple.com/dashboard/. - Ensure the dashboard is set to use the correct container. The
cloudkitphotoscontainer should be selected in the drop-down menu located at the top-left corner of the dashboard. - Ensure you are working with the development environment. The development environment should be selected in the drop-down menu located at the bottom-left corner of the dashboard.
- Add a record type called
Photo. To this record type, add the following fields:dateTaken: Date/TimefileName: StringphotoAsset: Assetowner: ReferencephotoCaption: StringphotoDescription: String
- Log in to the CloudKit dashboard at
- Add code to the
ViewController.swiftfile to Fetch initial data from CloudKit and save to the managed objects using Core Data.- Ensure both CloudKit and CoreData have been imported at the top of the
ViewController.swiftfile:import CloudKit import CoreData - Declare a protocol called
CloudLoaderDelegateas follows:protocol CloudLoaderDelegate : NSObjectProtocol { func willProcessRecords(recordType:String, _ records:[CKRecord]?) func processCKRecord(recordType:String, _ record:CKRecord) func didProcessRecords(recordType:String, _ records:[CKRecord]?) func didReceiveError(recordType:String, _ error:NSError?) } - Add the following variable declarations to the
ViewController.swiftfile:var photos:[Photo]? var publicDatabase:CKDatabase? var matchAllPredicate:NSPredicate? -
Ensure the
ViewControllerclass implements theCloudLoaderDelegateprotocol by changing the following line:class ViewController: UITableViewController {to
class ViewController: UITableViewController, CloudLoaderDelegate { -
Declare a block called
recordDownloadBlock, which takes as input a record type,CKDatabaseinstance, a predicate, and a delegate object that implementsCloudLoaderDelegateas follows:let recordDownloadBlock: (String, CKDatabase, NSPredicate, CloudLoaderDelegate) -> Void = { (recordType, database, predicate, delegate) -> Void in let query = CKQuery(recordType: recordType, predicate: predicate) database.performQuery(query, inZoneWithID: nil) { results, error in if error != nil{ delegate.didReceiveError(recordType, error) return } guard let results = results else { delegate.didProcessRecords(recordType, nil) return } // delete photographer records from Core Data delegate.willProcessRecords(recordType, results) for record in results { delegate.processCKRecord(recordType, record) } delegate.didProcessRecords(recordType, results) } }This block will perform a query on a CloudKit database to retrieve records of a specific record type and call methods on the delegate object when it has retrieved records.
The code in
ViewController.swiftshould now resemble the following:import UIKit import CloudKit import CoreData protocol CloudLoaderDelegate : NSObjectProtocol { func willProcessRecords(recordType:String, _ records:[CKRecord]?) func processCKRecord(recordType:String, _ record:CKRecord) func didProcessRecords(recordType:String, _ records:[CKRecord]?) func didReceiveError(recordType:String, _ error:NSError?) } class ViewController: UITableViewController, CloudLoaderDelegate { var photos:[Photo]? var publicDatabase:CKDatabase? var matchAllPredicate:NSPredicate? let recordDownloadBlock: (String, CKDatabase, NSPredicate, CloudLoaderDelegate) -> Void = { (recordType, database, predicate, delegate) -> Void in let query = CKQuery(recordType: recordType, predicate: predicate) database.performQuery(query, inZoneWithID: nil) { results, error in if error != nil{ delegate.didReceiveError(recordType, error) return } guard let results = results else { delegate.didProcessRecords(recordType, nil) return } // delete photographer records from Core Data delegate.willProcessRecords(recordType, results) for record in results { delegate.processCKRecord(recordType, record) } delegate.didProcessRecords(recordType, results) } } override func viewDidLoad() { super.viewDidLoad() } override func didReceiveMemoryWarning() { super.didReceiveMemoryWarning() } } - Get a reference to the public CloudKit database and create a predicate that will return all records in a record type in the
viewDidLoadmethod:override func viewDidLoad() { super.viewDidLoad() self.publicDatabase = CKContainer.defaultContainer().publicCloudDatabase self.matchAllPredicate = NSPredicate(value: true) } -
Override the
viewDidAppearmethod in yourViewController.swiftfile as follows:override func viewDidAppear(animated: Bool) { super.viewDidAppear(animated) fetchListOfPhotos() tableView.reloadData() downloadPhotosFromCloud(recordDownloadBlock) }This method fetches all
Photoentities from the CoreData store and then reloads the contents of the table view. It then attempts to downloadPhotorecords from CloudKit if the user has signed into the device with a CloudKit account. - Implement the
fetchListOfPhotosmethods in theViewController.swiftfile as follows:func fetchListOfPhotos() { let fetchRequest = NSFetchRequest(entityName: "Photo") let appDelegate = UIApplication.sharedApplication().delegate as! AppDelegate do { self.photos = try appDelegate.managedObjectContext.executeFetchRequest(fetchRequest) as? [Photo] } catch { print ("error retrieving list of photos from local database.") } } -
Implement the
downloadPhotosFromCloudmethod as follows:func downloadPhotosFromCloud(completionBlock : (String, CKDatabase, NSPredicate, CloudLoaderDelegate) -> Void) { CKContainer.defaultContainer().accountStatusWithCompletionHandler { (accountStatus, error) -> Void in if accountStatus == CKAccountStatus.NoAccount { // user has not signed in to iCloud, show an alert. let alert = UIAlertController(title: "Sign in to iCloud", message: "You need to sign in to iCloud to create records.", preferredStyle: UIAlertControllerStyle.Alert) alert.addAction(UIAlertAction(title: "Ok", style: UIAlertActionStyle.Default, handler: nil)) self.presentViewController(alert, animated: true, completion: nil) } else { // user has signed in to iCloud, download Photo from server completionBlock("Photo", self.publicDatabase!, self.matchAllPredicate!, self); } } }This method takes as input, a block that will be called to fetch data from CloudKit. However, this block will only be called if the user has signed in to iCloud on the device.
- Implement the
CloudLoaderDelegatemethods as follows:func willProcessRecords(recordType:String, _ records:[CKRecord]?) { // delete all Photos from core data before // processing new ones in CloudKit let fetchRequest = NSFetchRequest(entityName: "Photo") let appDelegate = UIApplication.sharedApplication().delegate as! AppDelegate var results:[Photo]? = nil do { results = try appDelegate.managedObjectContext.executeFetchRequest(fetchRequest) as? [Photo] guard let results = results else { return } for photo in results { appDelegate.managedObjectContext.deleteObject(photo) } try appDelegate.managedObjectContext.save() } catch { print ("error retrieving list of photos from local database.") } } func processCKRecord(recordType:String, _ record:CKRecord) { if recordType.compare("Photo") == NSComparisonResult.OrderedSame { Photo.addFromCKRecord(record) } } func didProcessRecords(recordType:String, _ records:[CKRecord]?) { if recordType.compare("Photo") == NSComparisonResult.OrderedSame { fetchListOfPhotos() tableView.reloadData() } } func didReceiveError(recordType:String, _ error:NSError?) { print ("received error \(error) for record type \(recordType)") } - Override the
prepareforSeguemethods in the ViewController.swift file to pass the selected item in the table view to the photo detail view controller:override func prepareForSegue(segue: UIStoryboardSegue, sender: AnyObject?) { guard let identifier = segue.identifier else { return } if identifier.compare("showPhotoDetail") == NSComparisonResult.OrderedSame { guard let detailViewController = segue.destinationViewController as? DetailViewController else { return } guard let indexPath = tableView.indexPathForSelectedRow, arrayOfPhotos = self.photos else { return } let modelObject:Photo = arrayOfPhotos[indexPath.row] detailViewController.modelObject = modelObject } }
- Ensure both CloudKit and CoreData have been imported at the top of the
- Implement
UITableViewDataSourcemethods in theViewController.swiftfile.- Implement the
tableView(tableView, numberOfRowsInSection)method as follows:override func tableView(tableView: UITableView, numberOfRowsInSection section: Int) -> Int { if photos != nil { return photos!.count } return 0 } - Implement the
tableview(tableView, cellForRowAtIndexPath)method as followsoverride func tableView(tableView: UITableView, cellForRowAtIndexPath indexPath: NSIndexPath) -> UITableViewCell { let cell:UITableViewCell = tableView.dequeueReusableCellWithIdentifier("prototypeCell1", forIndexPath: indexPath) let somePhoto:Photo! = photos![indexPath.row] cell.textLabel?.text = somePhoto.photoCaption return cell }
- Implement the
- Add code to the
DetailViewController.swiftfile to display information on aPhotoinstance.- Declare an optional variable called
modelObjectin theDetailViewControllerclass.var modelObject:Photo? -
Update the code in the
viewDidLoadmethod to resemble the following:override func viewDidLoad() { super.viewDidLoad() guard let modelObject = modelObject, photoDescription = modelObject.photoDescription, photoCaption = modelObject.photoCaption, imageFileName = modelObject.fileName else { return } detailLabel.text = photoDescription captionLabel.text = photoCaption loadImageFromFileInDocumentsDirectory(imageFileName) }The preceding snippet extracts the
photoCaption,photoDescription, andfileNameattributes of thePhotoentity and updates information on the view. - Implement a method called
loadImageFromFileInDocumentsDirectory(imageFileName), which is given the name of a file in the documents directory and loads the image into the image view:func loadImageFromFileInDocumentsDirectory(imageFileName:String) { let documentsURL = NSFileManager.defaultManager().URLsForDirectory(.DocumentDirectory, inDomains: .UserDomainMask)[0] let fileURL = documentsURL.URLByAppendingPathComponent(imageFileName) let image:UIImage? = UIImage(contentsOfFile: fileURL.path!) if (image != nil) { imageView.image = image imageView.contentMode = UIViewContentMode.ScaleAspectFit } }
- Declare an optional variable called
- Add code to the
AddPhotoViewController.swiftfile to allow the user to add a photo to the public CloudKit database.- Import the CloudKit framework at the top of the
AddPhotoViewController.swiftfile. - Create an action method in the
AddPhotoViewControllerclass and associate it with the Did End On Exit events of the two text fields.- Right-click the first
UITextFieldobject to display its context menu, and drag from the circle beside the Did End On Exit item to an empty line in theAddPhotoViewController.swiftfile. - Name the new Action
onDismissKeyboard. - Right-click the second
UITextFieldobject to display its context menu, and drag from the circle beside the Did End On Exit item to the icon representing the view controller in the dock. - Release the mouse button over the yellow view controller icon in the dock to present a list of existing action methods in the view controller. Select the
onDismissKeyboardmethod.
- Right-click the first
-
Click the
AddPhotoViewController.swiftfile in the project navigator to open it.Add the following code to the implementation of the
onDismissKeyboardmethod:captionField.resignFirstResponder() descriptionField.resignFirstResponder() - Add a tap gesture recognizer and use it to dismiss the keyboard when the background area of the view is tapped.
- Add the following method declaration to the
AddPhotoViewController.swiftfile:func handleBackgroundTap(sender: UITapGestureRecognizer) { captionField.resignFirstResponder() descriptionField.resignFirstResponder() } - Add the following code to the
viewDidLoadmethod after thesuper.viewDidLoad()line:let tapRecognizer = UITapGestureRecognizer(target:self, action: Selector("handleBackgroundTap:")) tapRecognizer.cancelsTouchesInView = false self.view.addGestureRecognizer(tapRecognizer)
- Add the following method declaration to the
-
Set up placeholder text in the text fields when the view is loaded.
Add the following code to the
viewDidLoadmethod after thesupe.viewDidLoad()line:captionField.placeholder = "Photo caption" descriptionField.placeholder = "Photo description"Your
viewDidLoadmethod ofAddPhotoViewController.swiftshould now resemble the following:override func viewDidLoad() { super.viewDidLoad() captionField.placeholder = "Photo caption" descriptionField.placeholder = "Photo description" let tapRecognizer = UITapGestureRecognizer(target:self , action: Selector("handleBackgroundTap:")) tapRecognizer.cancelsTouchesInView = false self.view.addGestureRecognizer(tapRecognizer) } - Add code to allow the user to select a picture from the photo library on the device. Selecting pictures from the photo library is covered in Lesson 31.
- Replace the implementation of the
onSelectPicturemethod with the following:@IBAction func onSelectPicture(sender: AnyObject) { guard let cameraButton = sender as? UIButton else { return } let imagePicker:UIImagePickerController = UIImagePickerController() imagePicker.sourceType = UIImagePickerControllerSourceType.PhotoLibrary imagePicker.delegate = self if UIDevice().userInterfaceIdiom == UIUserInterfaceIdiom.Pad { imagePicker.modalPresentationStyle = UIModalPresentationStyle.Popover self.presentViewController(imagePicker, animated: true, completion: nil) let presentationController:UIPopoverPresentationController = imagePicker.popoverPresentationController! presentationController.permittedArrowDirections = UIPopoverArrowDirection.Left presentationController.sourceView = self.view presentationController.sourceRect = cameraButton.frame } else { self.presentViewController(imagePicker, animated: true, completion: nil) } } -
AddPhotoViewControllerclass fromclass AddPhotoViewController: UIViewController {to
class AddPhotoViewController: UIViewController, UIImagePickerControllerDelegate, UINavigationControllerDelegate { - Add the following implementation of
UIImagePickerDelegatemethods in theAddPhotoViewController.swiftfile:func imagePickerController(picker: UIImagePickerController, didFinishPickingMediaWithInfo info: [String : AnyObject]) { let image:UIImage = info[UIImagePickerControllerOriginalImage] as! UIImage imageView.image = image picker.dismissViewControllerAnimated(true, completion: nil) } func imagePickerControllerDidCancel(picker: UIImagePickerController) { picker.dismissViewControllerAnimated(true, completion: nil) }
- Replace the implementation of the
-
Add code to dismiss the
AddPhotoViewControllerwhen the Cancel button is tapped.Replace the implementation of the
OnCancelmethod with the following:@IBAction func onCancel(sender: AnyObject) { self.dismissViewControllerAnimated(true, completion: nil) } -
Add code to save the image to the local file system and update CloudKit when the Save button is tapped.
Replace the implementation of the
OnSaveRecordmethod with the following:@IBAction func onSaveRecord(sender: AnyObject) { // ensure data has been filled. guard let photoCaption = captionField.text, photoDescription = descriptionField.text, image = imageView.image else { // user has not filled in all fields let alert = UIAlertController(title: "Incomplete information!", message: "You must select an image, provide a caption and a description.", preferredStyle: UIAlertControllerStyle.Alert) alert.addAction(UIAlertAction(title: "Ok", style: UIAlertActionStyle.Default, handler: nil)) self.presentViewController(alert, animated: true, completion: nil) return } if photoCaption.characters.count == 0 || photoDescription.characters.count == 0 { // user has not filled in all fields let alert = UIAlertController(title: "Incomplete information!", message: "You must select an image, provide a caption and a description.", preferredStyle: UIAlertControllerStyle.Alert) alert.addAction(UIAlertAction(title: "Ok", style: UIAlertActionStyle.Default, handler: nil)) self.presentViewController(alert, animated: true, completion: nil) return } // generate a unique record identifier let uuid:String = NSUUID().UUIDString let photoRecordID:CKRecordID = CKRecordID(recordName: uuid) // save the image to a file in the documents directory let fileName:String = "\(uuid).jpg" let fileURL:NSURL = Photo.saveImageToDocumentsDirectory(image, fileName) // make a CKAsset from the file. let photoAsset:CKAsset = CKAsset(fileURL: fileURL) // create a photoRecord let photoRecord:CKRecord = CKRecord(recordType: "Photo", recordID: photoRecordID) photoRecord["photoCaption" ] = photoCaption photoRecord["photoDescription"] = photoDescription photoRecord["dateTaken"] = NSDate() photoRecord["filename"] = fileName photoRecord["photoAsset"] = photoAsset // save the record to the public database with CloudKit let publicDatabase:CKDatabase = CKContainer.defaultContainer().publicCloudDatabase publicDatabase.saveRecord(photoRecord) { (newRecord, error) -> Void in if error != nil { let alert = UIAlertController(title: "Error!", message: "Error saving to Cloudkit", preferredStyle: UIAlertControllerStyle.Alert) alert.addAction(UIAlertAction(title: "Ok", style: UIAlertActionStyle.Default, handler: nil)) self.presentViewController(alert, animated: true, completion: nil) return } self.dismissViewControllerAnimated(true, completion: nil) } }
- Import the CloudKit framework at the top of the
- Test your app in the iOS Simulator.
- Click the Run button in the Xcode toolbar. Alternatively, you can select Project Run.
- When you launch the app for the first time, you will be presented with an empty table view. Use the Add button to add a photo to your CloudKit database. Once you have added a photo, wait for a few seconds for the table view to refresh its contents. You will see a row in the table view for each photo you add to CloudKit.
- Click the Run button in the Xcode toolbar. Alternatively, you can select Project