Lesson 27
Consuming RESTful JSON Web Services
A web service is essentially a web application that runs on a web server and provides a list of methods that allow users to access server-side resources. These resources can be web pages, business data, images, or video files. You access the web service as you would any other website using a URL.
Web services themselves can be written using one of several technologies including Node.js, PHP, ASP.NET, and ColdFusion. Creating a web service is outside the scope of this book.
The examples in this lesson use a simple web service called MathService. Table 27.1 lists the operations supported by the web service, the web service end point, and a brief description of each.
Table 27.1 MathService Methods
| Method Name | Endpoint URL | Supported HTTP Operations | Description |
CircleArea |
www.asmtechnology.com/MathService/CircleArea/?radius=X |
GET | Input: radiusOutput: Returns the area of a circle with specified radius. |
RectangleArea |
www.asmtechnology.com/MathService/RectangleArea/?length=X&breadth=Y |
GET | Input: length, breadthOutput: Returns the area of a rectangle with specified length and breadth. |
SquareArea |
www.asmtechnology.com/MathService/SquareArea/?length=X |
GET | Input: lengthOutput: Returns the area of a square whose sides are of specified length. |
TriangleArea |
www.asmtechnology.com/MathService/TriangleArea?base=X&height=Y |
GET | Input: base, heightOutput: Returns the area of a triangle with specified base length and height. |
Types of Web Services
There are two kinds of web services:
- RESTful
- SOAP
RESTful Web Services
REST is an acronym for Representational State Transfer. REST is an architecture style, primarily used to build lightweight, scalable web services. Each server-side resource that is exposed by a RESTful web service will have at least one URL. It is quite common for RESTful web services to return responses in either XML or JSON formats with the latter gaining popularity in recent years.
A RESTful service URL resembles a directory-like structure and identifies a resource or collection of resources as objects. A key differentiating point between web services that are RESTful and those that aren't is how resources are accessed.
When a resource is accessed through a RESTful web service, the actual operation that will be performed on the server is determined by the HTTP verb specified when making the request. The response from the server includes a status code that can be inspected to determine success or failure. A list of HTTP status codes can be found at http://www.w3.org/Protocols/rfc2616/rfc2616-sec10.html.
The most common HTTP verbs are GET, POST, and DELETE. The same URL can be called with different HTTP verbs to perform different operations. This is different from non-RESTful web services where one would have a different URL for each operation that is to be performed on the server.
For instance, if you had a database of employees on a server that you wished to expose publicly with a RESTful web service, the URL to identify an employee (with unique identifier of 1790716) would resemble the following:
http://www.example.com/Employee/1790716
If you were to send an HTTP GET request to this URL, the service would typically return some information about that particular employee. If, on the other hand, you were to send an HTTP DELETE request to the same URL, the service could potentially delete the employee record.
Needless to say, web service designers carefully decide which operations will be supported on a web service.
SOAP Web Services
SOAP is an acronym for Simple Object Access Protocol. It is an XML-based message format, which allows different applications to exchange objects with each other. SOAP web services often contain a machine-readable description of the functions exposed by the web service written in WSDL (Web Services Description Language). SOAP web services are generally used when communicating between enterprise applications. SOAP requests and responses are larger than equivalent RESTful versions and are therefore not suited to processing on mobile devices.
JSON and NSJSONSerialization
JSON is an acronym for JavaScript Object Notation and provides constructs that allow you to conveniently serialize objects to UTF-8 text. It is used primarily to communicate between servers and clients as an alternative to XML.
JSON is preferred over XML because JSON data takes fewer bytes to represent the same information. For example, the following snippet shows how a collection of Organization objects would be encoded in JSON and XML. As you can see, the JSON representation is more compact, which translates to fewer bytes being sent over the network.
{"organizations":[
  {«name»:"ACME Corportation", "address":"112, Fleming Drive, LE3 4F6, UK"},
  {«name»:"Bright Ideas LLC", "address":"26, Syon Lane, London TW3 3P2"},
  {«name»:"Chromatic Inks Ltd", "address":"178, Lexuar Drive, Langley, SL6 3U0"}
]}
<organizations>
  <organization>
    <name>ACME Corportation</name>
<address>112, Fleming Drive, LE3 4F6, UK</address>
  </organization>
  <organization>
     <name>Bright Ideas LLC</name>
<address>26, Syon Lane, London TW3 3P2</address>
  </organization>
  <organization>
    <name>Chromatic Inks Ltd</name>
<address>178, Lexuar Drive, Langley, SL6 3U0</address>
  </organization>
</organizations>
NSJSONSerialization is a class that is part of the Foundation framework and can be used to convert JSON objects into Foundation objects and vice versa. NSJSONSerialization requires that the top level object is an array or dictionary and that all objects in the JSON are either strings, numbers, arrays, or dictionaries. Table 27.2 lists the mapping between Foundation types and JSON types
Table 27.2 Mapping Foundation to JSON Types
| JSON Type | Foundation Type |
Array |
NSArray |
Dictionary |
NSDictionary |
String |
NSString |
Number |
NSNumber |
Assuming you have an NSData instance that contains JSON objects, you can convert them to Foundation objects using the JSONObjectWithData class method:
class func JSONObjectWithData(_data: NSData, options opt: NSJSONReadingOptions)
           throws -> AnyObject
The first parameter to this method is an NSData instance that contains JSON objects, encoded using either UTF-8, or UTF-16. The second parameter is used to specify how Foundation objects are generated from JSON objects, and can be a combination of the following:
- MutableContainers: Creates
NSMutableArrayandNSMutableDictionaryinstead ofNSArrayandNSDictionary. - MutableLeaves: Specifies that leaf nodes that contain string data will convert to
NSMutableStringinstead ofNSString. - AllowFragments: Specifies that the parser should allow top-level objects that are not arrays or dictionaries.
This method returns a non-optional result and will throw an error if it was unable to parse the JSON input. The following snippet shows how you would use this method:
do {
    let JSONObject = try NSJSONSerialization.JSONObjectWithData(data!,
                     options: .MutableContainers)
    // use JSONObject
}
catch {
    // handle exceptions.
}
NSURLSession and Application Transport Security
NSURLSession refers to a class from a set of related classes that allow you to download content via HTTP. It was introduced in iOS7 and supersedes the NSURLConnection API. The new NSURLSession API is asynchronous by design and provides several improvements over NSURLConnection including the following:
- Support for HTTP2.0 out of the box
- Support for per-session cache, cookies, and auth credentials
- Support for background downloads
With the NSURLSession API, your app can create multiple sessions, with each session coordinating a group of data transfer tasks. A session is analogous to a tab in a browser window, and a data transfer task to a request to fetch a single resource such as an image. Within each session you could hit the server multiple times for different resources. Each session has its own cache and HTTP security credentials.
Some of the key classes in the NSURLSession API are:
NSURLSession: Represents a session objectNSURLSessionConfiguration: Represents a configuration object used while creating a session objectNSURLSessionDataTask: Represents a task for retrieving the contents of a URL as anNSDataobjectNSURLSessionDownloadTask: Represents a task for retrieving the contents of a URL as a temporary file on the diskNSURLSessionUploadTask: A task for uploading anNSDataobject to a fileNSURLSessionStreamTask: A task that lets you communicate using raw TCP/IP sockets. This is useful if you want to use a protocol other than HTTP/HTTPS such as IRC.
The API also provides several protocols that define delegate methods you can implement in your code for better control over session and task behavior:
NSSessionDelegate: Contains delegate methods to handle session level eventsNSURLSessionTaskDelegate: Contains delegate methods to handle events common to all task typesNSURLSessionDataDelegate: Contains delegate methods to handle events specific to data and upload tasksNSURLSessionDownloadDelegate: Contains delegate methods to handle events specific to download tasksNSURLSessionStreamDelegate: Contains delegate methods to handle events specific to stream tasks
Creating an NSURLSession
To create an NSURLSession instance, you must first create a session configuration; use the defaultSessionConfiguration() method of the NSURLSessionClass:
let configuration = NSURLSessionConfiguration.defaultSessionConfiguration()Once you have a session configuration, you can fine-tune it by editing some of its attributes, including the following:
allowsCellularAccess: A value that indicates if the request should proceed over cellular networkstimeoutIntervalForRequests: A value that will cause a timeout if no data is transmitted after this interval has elapsedHTTPAdditionalHeaders: Additional headers for outgoing HTTP requestsHTTPMaximumConnectionsPerHost: Limits the maximum number of simultaneous connections to a server
The following code snippet shows how to set a custom HTTP request header to support HTTP basic authentication in your code:
let configuration = NSURLSessionConfiguration.defaultSessionConfiguration()
let userPasswordString = "username@yourcompany.com:password"
let userPasswordData = userPasswordString.dataUsingEncoding(NSUTF8StringEncoding)
let base64EncodedCredential =
userPasswordData!.base64EncodedStringWithOptions(
NSDataBase64EncodingOptions.Encoding64CharacterLineLength)
let authString = "Basic \(base64EncodedCredential)"
configuration.HTTPAdditionalHeaders = ["Authorization" : authString]
To learn more about how HTTP basic authentication works, refer to the section “Basic Authentication Scheme” in the HTTP reference documentation at http://www.w3.org/Protocols/HTTP/1.0/spec.html#BasicAA.
Once you have a session configuration, you can create a session using the following:
let session: NSURLSession! = NSURLSession(configuration: configuration,
                             delegate: nil, delegateQueue: nil)
The delegate is optional, and is an object that implements the NSURLSession protocol. The final parameter, delegateQueue, is a queue for scheduling the delegate calls and completion handlers. If nil, the session creates a serial operation queue. It is important to note that your delegate methods (or completion handler) will be called on this queue. If you intend to update the user interface within these callbacks, then you must make sure that the code that updates the UI is called on the main queue.
One way to do this is by using NSOperationQueue.mainQueue() as the final parameter while creating the NSURLSesssion:
let session: NSURLSession! = NSURLSession(configuration: configuration,
                             delegate: nil,
                             delegateQueue: NSOperationQueue.mainQueue())
Creating a Data Task
If you wanted to call a method on a web service, chances are that you will end up using a data task. To create a data task, you can use any of the following methods of the session object.
dataTaskWithRequest(urlRequest)
dataTaskWithRequest(urlRequest:completionHandler:)
There are two versions of this method. Use the first one if you want to supply a delegate object; the second one takes a block that is called when the request completes. The following code snippet shows how you could create a data task with a completion handler:
let task : NSURLSessionDataTask! = session.dataTaskWithRequest(request,
                         completionHandler: {(data, response, error) in
});
The first parameter to both these methods is an NSURLRequest instance. An NSURLRequest instance allows you to specify not only the URL but also additional information such as the request type (GET/POST). NSURLRequest defaults to creating a GET request, but Apple provides a mutable version called NSMutableURLRequest that allows you to set the content type. In general, it is common practice to use NSMutableURLRequest in your code as you always have the option of changing the request type when needed.
The following code snippet shows how you could create an NSMutableURLRequest from a URL and set the request type to POST:
let serviceURL:String =
"http://www.asmtechnology.com/MathService/CircleArea/?radius=\(radius)"
let url:NSURL! = NSURL(string: serviceURL)
let request: NSMutableURLRequest = NSMutableURLRequest(URL: url)
request.HTTPMethod = "POST"Once you have created an appropriate task, you need to call its resume() method to begin it:
task.resume()Application Transport Security
Application Transport Security (ATS) is a new feature in iOS 9 that helps prevent accidental disclosure of data while making network requests by encouraging your application to make secure connections to web services.
By default, ATS prevents calls to HTTP URLs. In fact, even if you provided an http:// prefix to your URL, The NSURLSession API will end up making an HTTPS call. This is fine if your server supports HTTPS, but if it doesn't, then you will need to configure an exception for one or more URLs in your application's Info.plist file.
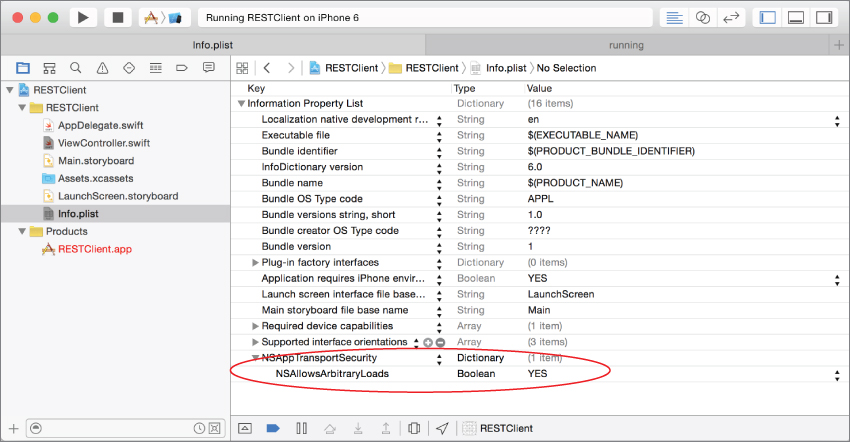
To configure ATS, you need to add a new key to your Info.plist file called NSAppTransportSecurity and set its type to be a Dictionary.
To disable ATS completely (not recommended), thereby allowing all http:// URL requests to pass through, add a new Boolean value to this dictionary called NSAllowsArbitraryLoads and set its value to YES (Figure 27.1).
If, on the other hand, you want ATS to allow only specific insecure connections, you need to use a different key called NSExceptionDomains (which is also a dictionary). Within this dictionary, you can configure exceptions on a domain basis.
For each domain you want to configure, you need to provide a child dictionary within the NSExceptionDomains dictionary. This domain-specific configuration dictionary can have any of the following keys:
NSIncludesSubdomainsNSExceptionAllowsInsecureHTTPLoadsNSExceptionRequiresForwardSecrecyNSExceptionMinimumTLSVersion
For instance, if you wanted to allow insecure http requests for all URLs in the asmtechnology.com domain, your Info.plist file would resemble Figure 27.2.

In the next session you will see how to put all of this together to call a web service.
Try It
In this Try It, you create a simple iPhone application based on the Single View Application template called RESTClient, which uses a RESTful web service (described in Table 27.1) to calculate the area of a circle.
Lesson Requirements
- Launch Xcode.
- Create a new iPhone project based on the Single View Application template.
- Add a
UIButtonto the default scene and an appropriate action method to the view controller class. - Add a
UITextFieldto the default scene and an appropriate outlet to the view controller class. - Add a scrolling
UITextViewto the default scene and an appropriate outlet to the view controller class. - Dismiss the text field when the Return button is pressed on the keyboard by implementing a
UITextFieldDelegatemethod. - Send a GET request to a RESTful web service when the
UIButtonis pressed. - Parse and display the response in the
UITextView.
Hints
- The math web service implements a web method called
CircleAreathat requires a single parameter calledradius. The service endpoint ishttp://www.asmtechnology.com/MathService/CircleArea. - When creating a new project, you can use your website's domain name as the Company Identifier in the Project Options dialog box.
- To show the Object library, select View
 Utilities Show Object Library.
 - To show the assistant editor, select View Assistant Editor Show Assistant Editor.
Step-by-Step
- Create a Single View Application in Xcode called
RESTClient.- Launch Xcode and create a new application by selecting File New Project.
- Select the Single View Application template from the list of iOS project templates.
- In the project options screen, use the following values:
- Product Name: RESTClient
- Organization Name: your company
- Organization Identifier: com.yourcompany
- Language: Swift
- Devices: iPhone
- Use Core Data: Unchecked
- Include UI Tests: Unchecked
- Include Unit Tests: Unchecked
- Save the project onto your hard disk.
- Launch Xcode and create a new application by selecting File
- Add UI elements to the default scene.
- Open the
Main.storyboardfile in the Interface Editor - From the Object library, drag and drop a button, text field, and text view objects onto the scene and place to resemble Figure 27.3.
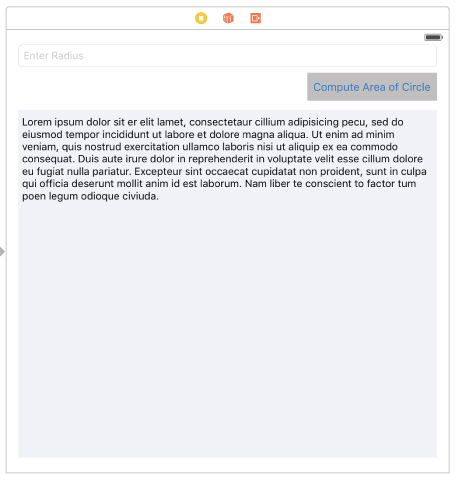
- Select the Text field and use the Attribute inspector, to change the value of the Placeholder attribute to Enter Radius.
- Select the Button and use the Attribute inspector to change its background color to a shade of gray and its caption to “Compute Area of Circle”
- Select the Text view and use the Attribute inspector to change its background color to a lighter shade of gray than the button.
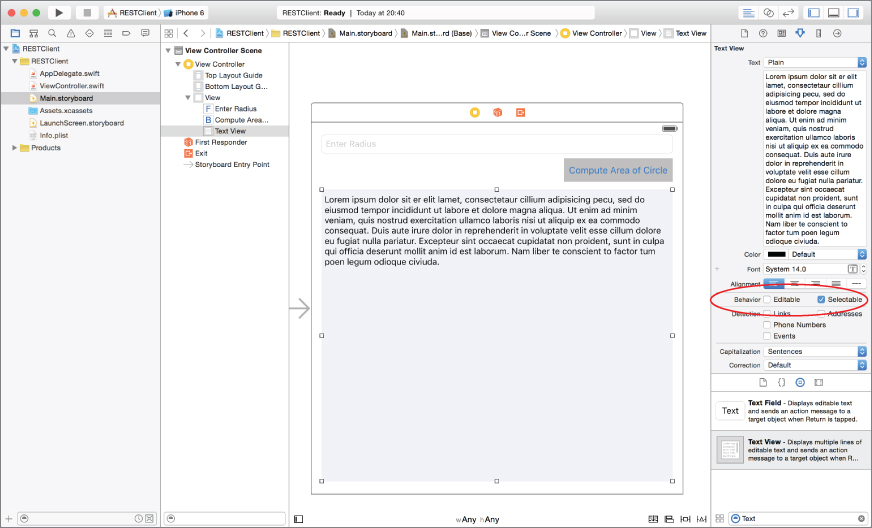
- With the Text view still selected, uncheck the Editable attribute (see Figure 27.4). This will ensure that the user cannot change the contents of the text view.
- Create layout constraints for each of the elements on the storyboard scene using the information in Table 27.3. When creating layout constraints using the pin constraints popup, ensure the Constrain to margins option is unchecked and Update Frames is set to Items of New Constraints.
Table 27.3 Layout Constraints
Element Left Top Right Bottom Width Height Text Field 16 20 16 30 Button 56 16 176 38 Text View 16 8 16 20 - Use the assistant editor to create an outlet for the Text field in the view controller class. Name the outlet
radiusField. - Set up the delegate property for the Text field.
- Ensure the Assistant Editor is visible and the
ViewController.swiftfile is loaded in it. - Right-click the table view to bring up a context menu. Drag from the item labeled “delegate” in the context menu to the item labeled “View Controller” in the document outline.
- Ensure the Assistant Editor is visible and the
- Create an action method in the
ViewControllerclass and associate it with the Did End On Exit event of the text field.- Right-click the
UITextFieldobject on the scene to display its context menu, and drag from the circle beside the Did End On Exit item to an empty line in theViewController.swiftfile. - Name the new Action
onDismissKeyboard.
- Right-click the
- Use the assistant editor to create an outlet for the Text view in the view controller class. Name the outlet
serverResponseView. - Create an action in the view controller class and connect it with the Touch Up Inside event of the button.
- Ensure the Assistant editor is visible and the
ViewController.swiftfile is loaded in it. - Right-click the button in the scene to display its context menu, and drag from the circle beside the Touch Up Inside item to an empty line in the
ViewController.swiftfile. - Name the new action
onCalculateArea.
- Ensure the Assistant editor is visible and the
- Open the
-
Ensure the
ViewControllerclass implements theUITextFieldDelegateprotocol.Modify the declaration of the
ViewControllerclass from:class ViewController: UIViewControllerto
class ViewController: UIViewController, UITextFieldDelegate - Modify code in the view controller class.
- Open the
ViewController.swiftfile in the project explorer. - Add the following line to the implementation of the
onDismissKeyboardmethod:radiusField.resignFirstResponder()
- Open the
- Add a tap gesture recognizer and use it to dismiss the keyboard when the background area of the view is tapped.
- Add the following method to the
ViewController.swiftfile:func handleBackgroundTap(sender: UITapGestureRecognizer) { radiusField.resignFirstResponder() } - Add the following code to the
viewDidLoadmethod of the view controller class, after thesuper.viewDidLoad()line:let tapRecognizer = UITapGestureRecognizer(target:self , action: Selector("handleBackgroundTap:")) tapRecognizer.cancelsTouchesInView = false self.view.addGestureRecognizer(tapRecognizer) - Add code to clear the initial contents of the text view when the view is loaded.
- Add the following line to the end of the
viewDidLoadmethod:serverResponseView.text = "" - The
viewDidLoadmethod in yourViewController.swiftfile should now resemble the following:override func viewDidLoad() { super.viewDidLoad() let tapRecognizer = UITapGestureRecognizer(target:self , action: Selector("handleBackgroundTap:")) tapRecognizer.cancelsTouchesInView = false self.view.addGestureRecognizer(tapRecognizer) serverResponseView.text = "" }
- Add the following line to the end of the
- Replace the implementation of the
onCalculateAreamethod with the following:@IBAction func onCalculateArea(sender: AnyObject) { let radius:String = radiusField.text! if radius.isEmpty { return; } let serviceURL:String = "http://www.asmtechnology.com/MathService/CircleArea/?radius=\(radius)" let url:NSURL! = NSURL(string: serviceURL) let request: NSMutableURLRequest = NSMutableURLRequest(URL: url) let configuration = NSURLSessionConfiguration.defaultSessionConfiguration() configuration.timeoutIntervalForRequest = 15.0 let session: NSURLSession! = NSURLSession(configuration: configuration, delegate: nil, delegateQueue: NSOperationQueue.mainQueue()) let task : NSURLSessionDataTask! = session.dataTaskWithRequest(request, completionHandler: {(data, response, error) in if data != nil { let decodedString = NSString(data: data!, encoding: NSUTF8StringEncoding) self.serverResponseView.text = decodedString as! String } }); task.resume() }
- Add the following method to the
- Configure Application Transport Security to allow an insecure HTTP connection for the
asmtechnology.comdomain.- Expand the
RESTClientgroup in the project navigator and click on theInfo.plistfile to open it in the property list editor. - Add a new key to the
Info.plistfile calledNSAppTransportSecurityand set its type asDictionary. - Expand the
NSAppTransportSecuritykey and add a new child key calledNSExceptionDomains, also of typeDictionary. - Expand the
NSExceptionDomainskey and add a child key calledasmtechnology.com, also of typeDictionary. - Expand the
asmtechnology.comkey and add two Boolean keys, both set toYES, calledNSIncludesSubdomainsandNSExceptionAllowsInsecureHTTPLoads.
- Expand the
- Test your app in the iOS Simulator.
- Click the Run button in the Xcode toolbar. Alternatively, you can select Project Run.
- Ensure your computer has an active Internet connection.
- Enter a numeric value for the radius field and tap the Compute Area of Circle button.
- Click the Run button in the Xcode toolbar. Alternatively, you can select Project