This section shows how to prepare your Windows NT environment before you start developing your CORBA application using VisualAge for Java. The CICS ORB classes and the JCICS APIs are shipped with VisualAge for Java 3.0 Enterprise Edition as additional features. If you are working with Version 2.0, you need to copy the required packages from the CD-ROM that accompanies this book, set up the CICS IDL environment, and configure the ET/390 environment, as explained here:
- Downloading the required packages from CICS Transaction Server
To develop a JCICS IIOP application on the workstation, you need, at a minimum, the CICS ORB and IDL compiler. If your application uses JCICS classes, you need the JCICS package as well. CICS TS for OS/390 Version 1.3 provides these packages and utilities in the HFS directory called $CICS_HOME/classes during CICS installation. FTP them to your workstation in binary format. They are also on the CD-ROM that accompanies this book in the directory that is called \cicsadp\CORBA Server\CICS classes. The three jar files supplied with CICS are:
- dfjcics.jar
The JCICS API classes, required for compilation of Java server programs that uses JCICS to access CICS services.
- dfjcorb.jar
The CICS ORB classes, required to build the IIOP server application. This also contains the GenericFactory utility that is used to help build your client program.
- dfjcidl.jar
The CICS IDL compiler to be used in building the IIOP server application.
After transferring the required packages to the workstation, import them into the VisualAge for Java IDE so their references can be resolved when you develop your application using the package classes.
- Importing the JCICS classes
To import the JCICS classes, use the following steps:
Go to the menu bar and select File and then Import. The Import SmartGuide dialog is displayed.
Choose Jar File and select Next.
In the Import from a jar/zip file SmartGuide dialog, click Browse and navigate to the directory containing the dfjcics.jar file. This is on the CD-ROM in the directory called \cicsadp\CORBA Server\CICS classes.
Select the file, dfjcics.jar, and click Open to return to the Import from a jar/zip file SmartGuide dialog.
Ensure that the checkboxes for class and resource are checked.
In the Project field, type in a name to identify the JCICS project, such as JCICS Classes and click Finish.
A question box appears stating that the JCICS Classes project does not exist and asking if you want to create it. Click Yes and wait until it finishes importing.
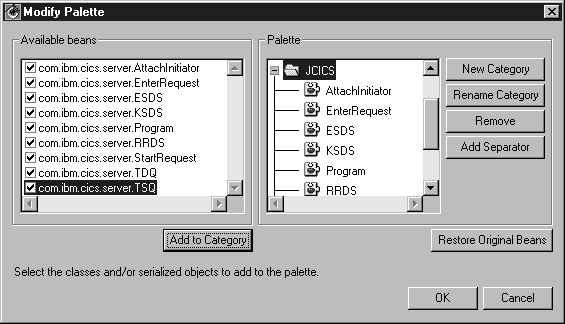
The JCICS classes contain bean classes, so you are prompted to create a bean category for the bean classes. Select New Category and type a name for the new category, such as JCICS. Ensure that all beans under Available beans are selected and that the new category JCICS is selected, click Add to Category.
Finally, click OK.
Figure 7-1 shows the results of this procedure, including the JCICS beans:
- Importing the CICS ORB classes and the CICS IDL compiler
After importing the JCICS classes, use the same procedure to import the CICS ORB classes into the IDE. These are in the file called dfjcorb.jar. Unlike the JCICS classes, the CICS ORB does not contain any bean classes in the package, so you won’t be asked to create a bean category.
Now repeat the process to import the CICS IDL compiler; this is found in the file called dfjcidl.jar.
Tip
VisualAge for Java Enterprise Edition Version 3.0 includes the CICS ORB and JCICS classes. To ensure that you are using these classes, you need to add them as a feature. Select File → Quickstart → Feature → Add Feature and click OK. From the list select JCICS Application Programming Library 3.0, then OK. If you are using Version 2.0, add these features to the IDE as shown in this section.
- Preparing the IDL development environment
The IDL development environment is an additional feature of VisualAge for Java. It provides an environment to create IDL objects and generate server skeletons and client stubs by invoking the IDL-to-Java compiler. To add the IDL development environment into the IDE:
From the Workbench, go to the menu bar and select File and click Quick Start. The Quick Start SmartGuide dialog is displayed. Alternatively press the F2 key.
Ensure that Features is highlighted in the left column, then select Add Feature and click OK. The Selection Required SmartGuide dialog is displayed.
Navigate the list and highlight IDL Development Environment 2.0, then click OK.
The IDL development environment is added to the IDE and is ready for use.
- Mounting a network drive
In order to export and bind the Java code so that it works in your CICS region, you need to have HFS mounted as one of the drives in your development environment; you need to install an NFS client. Hummingbird’s NFS Maestro Solo is a client-based program that allows Windows NT and Windows 95/98 users to access file and print resources of other network attached machines, or any other system that supports NFS. To do this:
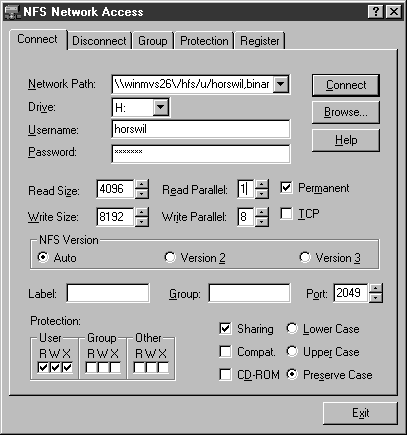
Start NFS Maestro Solo—NFS Network Access. Select Start → Programs → NFS Maestro → NFS Network Access.
Enter your Network Path, for example, \\winmvs26\/hfs/u/horswil,binary, a Drive letter, Username and Password. On the remainder of the screen change Read Size to 4096 and the Write Size to 8192, and finally select Preserve Case. Figure 7-2 shows you the settings that we used.
- Configuring your ET/390 host environment
When you use ET/390 to bind and run your OS/390 Java applications, you have to provide the OS/390 host session information to VisualAge for Java. A sample ET/390 Java Install Data file can be found in your ET/390 install tree on OS/390. It describes your working environment and where the ET/390 bytecode binder is installed. You can modify it to fit your working environment. When you add the host session, ET/390 downloads a copy of the ET/390 Java Install Data file to the workstation and saves a copy for your ET/390 development work. The information in the Data file is used by ET/390 to locate the host where it exports the class files and binds the application. To add an ET/390 host session:
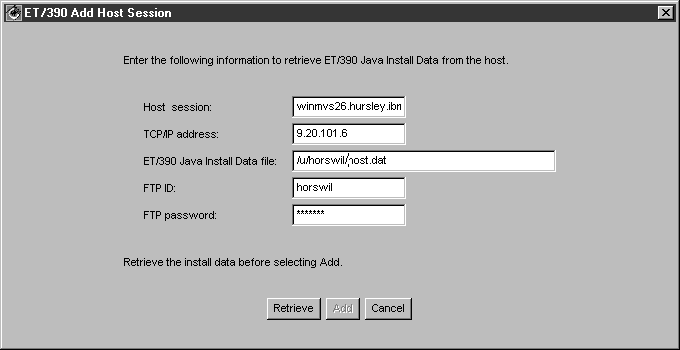
Go to the menu bar of the Workbench page and select Workspace → Tools → ET/390 → Host sessions → Add. Figure 7-3 shows the panel.
Enter the information appropriate to your host system and user ID, select Retrieve and then Add. You only need to add the host session once before you first use ET/390. The file names are case sensitive.
We have provided a sample file on the CD-ROM called \cicsadp\CORBA Server\host.dat. You will have to edit this file to point to your own system. Example 7-1 shows a sample file definition that works for our environment. You have now done all the preparation work and you can start writing your IIOP application.
Example 7-1. Sample of host.dat file
@@HPJHostName:@@HPJHome: /u/hpj/extract.spe23/hpj.dev @@HPJBinderExecutablesPDSE: HPJ.R14.TOBEY.JAV2R0M0.SPE23 @@HPJBinderMessagesPDSE: HPJ.R14.TOBEY @@HPJLERuntimeBind: PP.ADLE370.OS39025.SCEELKED:PP.ADLE370.OS39025.SCEELKEX:PP. ADLE370.OS39025.SCEEOBJ:PP.ADLE370.OS39025.SCEECPP @@HPJLERuntimeRun: PP.ADLE370.OS39025.SCEERUN @@HPJRuntime: HPJ.BUILD.JAV2R0M0.SPE23.LOAD @@HPJDebugger: HPJ.DEBUG.VISUAL.SEQAMOD @@HPJProfiler: @@HPJJavaHome: /usr/lpp/java114/J1.1 @@HPJPICLHome: @@HPJCICSRegion:Host machine address@@HPJCICSEXCI: CTS130.GA3.CICS.SDFHEXCIregionName