This section describes two methods of handling data with standard CICS object-orientated support through the ECI and secondly using VisualAge InterSpace services.
Let’s look at some extracts taken from the Visual Basic Project module, comsubs.bas, of our sample application. Comsubs.bas is concerned with the connection to the CICS server application by native CICS calls. The data-handling methods used with VisualAge Interspace is discussed Creating the VisualAge Interspace Service for the NACT02 CICS Server Application later in this chapter.
The definitions of the Visual Basic GUI data fields used by NACT05 are shown in Example 13-1.
Example 13-1. Definitions of the Visual Basic GUI Data Fields
'structure of Account Browser (NACT05) commarea
Public Const commBRWSlength = 30668 '0 to 30688 total value 30669
' Byte array for Acct Browse CICS COMMAREA
Public cabrws(commBRWSlength) As Byte
Public cabrws_version As String * 3
Public cabrws_request  As String * 1
Public cabrws_response As String * 4
Public cabrws_reason   As String * 4
Public cabrws_function As String * 5
Public cabrws_limit    As String * 4
Public cabrws_found    As String * 4
Public cabrws_more     As String * 4
Public cabrws_matches(80) As AccRecord
Note how nested structures contained within the COMMAREA are handled. The COMMAREA definition contains a datatype AccRecord whose definition includes a datatype of PayHistory. The datatype AccRecord is defined as shown in Example 13-2.
Example 13-2. Datatypes for AccRecord
Type AccRecord
 Acct            As String * 5     'Account number
 SName           As String * 18    'Last/surname
 FName           As String * 12    'First Name
 Mid             As String * 1     'Middle Initial
 Title           As String * 4     'Title e.g. Mr./Mrs./Dr.
 TelNo           As String * 10    'Telephone Number
 Address1        As String * 24    'Address field 1
 Address2        As String * 24    'Address field 2
 Address3        As String * 24    'Address field 3
 AuthUser1       As String * 32    'Additional Authorised Card User 1
 AuthUser2       As String * 32    'Additional Authorised Card User 2
 AuthUser3       As String * 32    'Additional Authorised Card User 3
 AuthUser4       As String * 32    'Additional Authorised Card User 4
 Cards           As String * 1     'Number of cards issued to Customer
 Imonth          As String * 2     'Month card issued
 Iday            As String * 2     'Day card issued
 Iyear           As String * 2     'Year card issued
 Reason          As String * 1     'Reason code for card issue
 CardCode        As String * 1     'Card status Code e.g. G for Gold
 Approver        As String * 3     'Code of Card issue approver
 SpecialCode1    As String * 1     'Additional Privilege Code 1
 SpecialCode2    As String * 1     'Additional Privilege Code 2
 SpecialCode3    As String * 1     'Additional Privilege Code 3
 Status          As String * 2     'Account Status
 Limit           As String * 8     'Customer Account Credit Limit
 History1        As PayHistory     'Payment History first of last three
                                   'months
 History2        As PayHistory     'Payment History second of last three
                                   'months
 History3        As PayHistory     'Payment History third of last three
                                   'months
End Type
PayHistory is itself a data structure of fields of type String. The datatype of String used in the Visual Basic application corresponds to a datatype of CHAR on the OS/390 host. PayHistory is defined in Example 13-3.
Example 13-3. Definitions of Pay History Datatype
Type PayHistory
 Balance          As String * 8     'Account Balance
 BMonth           As String * 2     'Month
 BDay             As String * 2     'Day
 BYear            As String * 2     'Year
 BAmount          As String * 8     'Amount of Balance
 PMonth           As String * 2     'Payment Month
 PDay             As String * 2     'Payment Day
 PYear            As String * 2     'Payment Year
 PAmount          As String * 8     'Payment Amount
End Type
This section shows extracts from the Visual Basic module comsubs.bas that are used to link to the CICS Browser application. The Visual Basic application makes use of the ECI Component Object Module (COM) library supplied with the CICS Universal Clients Version 3.1. A set of samples is also supplied in the \cicsadp\IBM CICS Universal Client\Samples\VB directory.
The following guidelines will help you make an ECI link call to CICS:
Declare and instantiate the objects to be used. This can be done in the Form_Load subroutine or at some later stage in response to some user action. Note that a CclOECI must be created first to allow use of the ECI COM class. The definitions look like this:
Public  ECI As New CclOECI
Private Connect As New CclOConn
Private Flow As New CclOFlow
Private buffer As New CclOBuf
Private UOW As New CclOUOW
Tip
Using the CclOUOW class, a number of link calls can be made to a CICS server within a single unit of work (UOW). Updates to recoverable resources in the CICS server can then be committed or backed out by the client program as necessary. An example of UOW use is where several databases using the same data are to be updated by different CICS applications. It is important that either all or none are updated with the new information to keep them in step with one another. This is integral to the function on mainframe CICS, but this is an exercise for the programmer on CICS client.
By specifying a null value for the UOW, we are in effect saying that each link call constitutes a complete unit of work (equivalent to LINK SYNCONRETURN in the CICS server).
Set the length of the buffer to the required COMMAREA size for the Browser program NACT05:
buffer.SetLength commBRWSlength
Provide details of the CICS server to be used. The CICS server name variable CICSServer has been left as null, forcing the first entry in the CICS Client initiation file ctg.ini to be used. The user ID and password values are those supplied by the user at Log in. Details are supplied using the details method for the Connect COM class. Before the Connect COM class can be used it needs to be initialized using the details method:
Connect.Details CICSServer, Userid, Password
Build the buffer. This is done automatically, because the required fields for the input COMMAREA have already been set within the Data Structure, as described in the Data field definitions earlier in this chapter.
Move data into the COMMAREA byte array. The parameters used are:
- Ca()
The COMMAREA byte array
- In_str
The input string to be added to the byte array
- Ca_ofs
The offset in the byte array at which the input string is to be added
- Ca_len
The length of the data (in bytes) to be added
Example 13-4 shows the routine that is used to move data into the COMMAREA byte array.
Example 13-4. Code to Move Data into the Byte Array for COMMAREA
Public Sub move_comm(ca() As Byte, in_str As String, ca_ofs As Integer, ca_len As
         Integer)
    Dim st As String
    ' Get the input string
    st = in_str
    While Len(st) < ca_len
        st = st + " "
    Wend
    ' Make sure that the result is not too long
    If Len(st) > ca_len Then
        st = Left(st, ca_len)
    End If
    ' Now, move the data into the COMMAREA array
    For i = 1 To ca_len
        ca(ca_ofs + i - 1) = Asc(Mid(st, i, 1))
    Next
End Sub
Use the SetData for the CclOBuffer object to populate the buffer with the contents of the byte array ca:
buffer.SetData ca
Now we are ready to make the call to CICS. The Link method takes as parameters the Flow object, the name of the CICS server program to be invoked, the buffer object, and a UOW object. In this example, the UOW object has been defined but not set explicitly. Java initializes it to a null value; this call is not part of a recoverable unit of work:
Connect.Link Flow, prog, buffer, UOW
The updated data contained in the buffer object is stored in the variable tempca and then restored to the COMMAREA byte array ca:
For i = 0 To commlen
        ca(i) = tempca(i)
Next i
Finally, the CICS COM objects are deleted:
Public Sub deleteECIobjects()
    ' Delete the ECI objects we created
    Set buffer = Nothing
    Set Flow = Nothing
    Set Connect = Nothing
    Set ECI = Nothing
End Sub
The recommended way of handling errors with the CICS ECI COM classes is to use the standard Visual Basic On Error statement.
The form of the call used in the sample Visual Basic application is shown in the following code extract:
' Execute the CICS NACT05 program

    On Error GoTo ErrorHandler
    Connect.Link Flow, prog, buffer, UOW
When an error condition occurs, the program logic drops through to the label ErrorHandler at the end of the subroutine, or in this case, function. The code below shows how the error information is stored. CclExceptionCodes contains details of the possible error exception codes that can be returned from CICS. Each exception code has a number and associated message that can be displayed to the application user. Where an abend has occurred, the value of the error returned is cclTransaction (code 13) and the Abendcode can be queried and displayed.
Tip
Example 13-5 shows the use of the preceding Exit Function statement to stop the error handler code being run as part of the normal flow through the function.
Example 13-5. Code to Stop Error Handling Code Used as Part of the Normal Flow
Exit Function
ErrorHandler:
'The connect call failed
'Parse the error number this will work regardless of
'how the ECI objects were Dimmed

Dim RealError As CclECIExceptionCodes
RealError = Err.Number And 65535 - ECI.ErrorOffset
If RealError = cclTransaction Then
    'Transaction abend, so query the Abend code
    If AbendCode = "AEY7" Then
MsgBox "Invalid Userid/Password to execute the CICS Program", , "CICS ECI Error"
    Else
MsgBox "Unable to execute EC01, transaction abend:" + AbendCode, , "CICS ECI Error"
    End If
Else
  MsgBox RealError, , "CICS Error"
  MsgBox Err.Description, , "CICS ECI Error"
End If
rc = RealError
End FunctionThere are a number of methods for using VisualAge Interspace with CICS as a starting point for new CICS applications. We have focused on using a service to communicate using the CICS ECI with the existing CRUD program NACT02.
The following steps are required:
Use the VisualAge Interspace Service Interface Painter to create the service to link to the CICS server application.
Test the service from the painter.
Generate the Visual Basic module for the service to be used by the Visual Basic program developer.
Incorporate the generated service module together with other required modules into the Visual Basic project.
Make the necessary VisualAge Interspace API calls to link to and use the CICS server application.
We now look at each of these steps in more detail in the following sections.
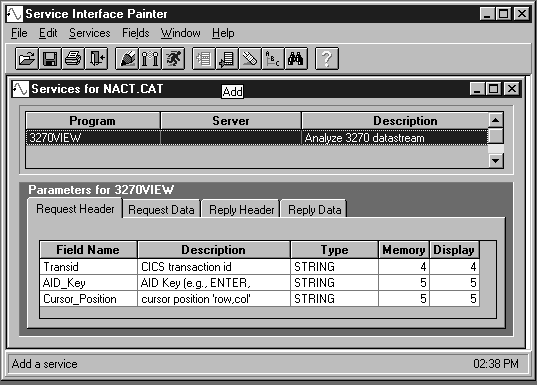
VisualAge Interspace thinks of a service for communicating with an application as providing a request to which it receives a reply. The request is the COMMAREA being sent to the NACT02 program and the reply is the COMMAREA returned from the NACT02 program. Figure 13-3 shows the Defaults window.
The Distributed Environment for which the new services will be used is CICS. The Buffer Type is STRING that corresponds to the datatype of CHAR used for the COMMAREA field definitions used in our COBOL program NACT02. The field definitions and services created are stored in a plain text catalog file that we have chosen to call NACT and placed under the Interspace base directory. These are the only default settings we need to concern ourselves with for this example.
In order to set up the COMMAREA for the service we first need to provide Interspace with definitions for fields to be used in the COMMAREA. This can be done in one of two ways:
Typing the details into the field list
Using Interspace to extract the field definitions from the relevant COBOL copybook
For more information about the Importing Fields topic, refer to the Interspace online help.
VisualAge Interspace allows for a request header and request data. The request header can be thought of as the fields at the start of the COMMAREA, and the request data as a set of records of the same layout returned at the end of the COMMAREA. We have chosen to split the COMMAREA between the request header and request data but could equally as well have chosen to supply the entire COMMAREA as the request data. The design of VisualAge Interspace is such that it normally expects a set of control character fields at the start of a transmission from the calling application which, amongst other information, gives the number of records of the type specified as request data that are being returned.
There is also an option Suppress Control Fields; this must be set here as the NACT02 program will not supply or understand these control fields. When set, the Suppress Control Fields option does not send any control data or expect any to be returned from the called application. Interspace assumes that it is to receive one record whose structure is specified by the fields set up in the Request Data. This simplifies the communication with any CICS ECI application.
NACT02 only ever receives one record. If we were to work with a different application that provided a list of records, then there are additional steps which would need to be implemented. VisualAge Interspace uses the idea of what it calls a composite service to deal with this type of CICS application. The data area used to hold the records being returned by the CICS application is defined as a single field. This field can then be supplied as the request data to a composite service set up by the user which transforms it into a field array using the record structure detailed in the reply data of the composite service.
Taking a simple case the field RecordData returned from a CICS application contains several customer records. This data is supplied as the request data to a composite service. The reply data is defined as consisting of three fields:
name (a nine-character STRING)
valuea (a one-character STRING)
valueb (a one-character STRING)
Data is extracted from RecordData using the field structure specified in the reply data for the composite service. The process is then repeated on the remaining characters in the string until it is used up, as shown in the following table:
Reply Data Provided from CICS Application | Request Data Supplied to Composite Service | Reply Data from Composite Service |
|---|---|---|
field1 xxxx | ||
field2 xxxx | ||
RecordData SMITH….12JONES…. 34 | RecordData SMITH….12JONES…. 34 | name(1) SMITH…. |
valuea(1) 1 | ||
valueb(1) 2 | ||
name(2) JONES…. | ||
valuea(2) 3 | ||
valueb(2) 4 |
Again, this idea is explained in more detail in the online help provided with VisualAge Interspace.
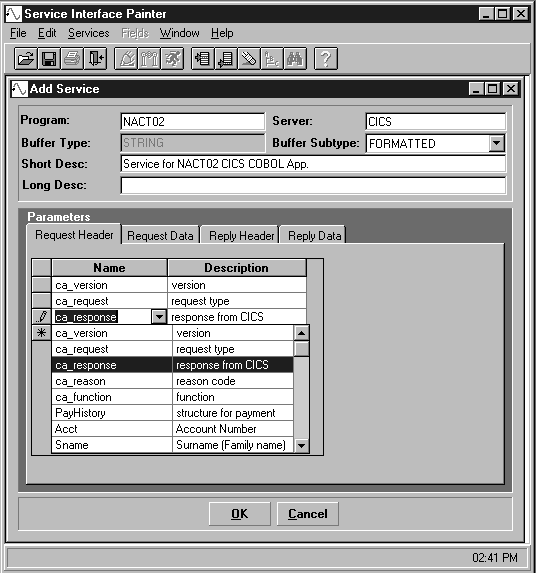
Once the necessary fields have been set up within the Service Interface Painter, you can then create the service itself.
Click on the Add icon to create a new service.
The Add Service panel, as shown in Figure 13-4, is then used to add the fields in the order required for the NACT02 COMMAREA.
Once the service has been created it can be tested within the painter provided that the CICS client has been set up correctly and the NACT02 program is accessible. To bring up the Test window, select the NACT02 service and click on the Test icon; the Test window is shown in Figure 13-5.
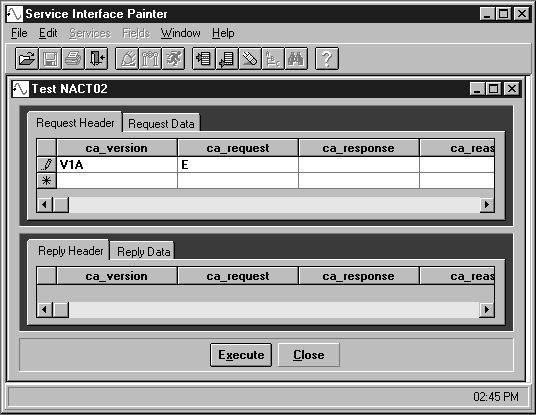
You can then add the values required for the various COMMAREA fields. Click Execute to send the completed COMMAREA to the NACT02 program. The Reply Header and Reply Data are returned from the CICS application assuming it is available. This means that the service can be tested before any Visual Basic code is written.
Once the service has been tested and data successfully retrieved, you can generate the required Visual Basic module that will link to NACT02:
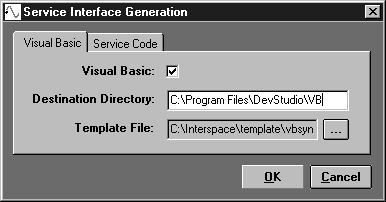
Click on the Generate icon to display the Service Interface Generation window, shown in Figure 13-6.
Check the Visual Basic box, if it is not already checked.
Specify a suitable destination directory and select the appropriate template from the set provided by VisualAge Interspace. For this synchronous communication with CICS we specify the vbsync.tpl (see Figure 13-6).
Click OK. This causes the Visual Basic module NACT02.bas to be generated in the specified directory:
The module generated contains all the necessary procedures required to communicate with the NACT02 program, and includes all the relevant data structures.
To incorporate the service module into Visual Basic:
Add the NACT02.bas module.
Add the required Interspace function modules DCIDPL.bas and DCIGEL.bas.
These steps are described in more detail below.
Initialize Interspace to CICS at startup. The application name field has been specified as NACT rather than NACT02. We are making use of the catalog file nact.cat, which contains the details of the NACT02 service and could be used to hold additional services. It is not unusual to keep a large number of services for related applications in the same catalog. The nact.cat file needs to be made available to VisualAge Interspace by placing it in the Windows NT path or current directory. The code looks like this:
ReturnCode = dcifx_init("CICS", "NACT", Userid, Password)
If ReturnCode = -1 Then
   dcifx_show_error vbCritical, "Interspace Initialization Failed"
   Call endProgram
End If
Create instances of the structures for NACT02 used to send and receive data. In order to communicate with the NACT02 server application, we need to create instances of the request and reply structures that will be used by the Interspace service. These are then accessed from within two separate forms, so we have chosen to add the declaration to the NACT02.bas module. The code looks like this:
'Create instances of the request message NACT02_request_msg
'and reply message NACT02_reply_msg.
Global NACT02_Request As NACT02_request_msg
Global NACT02_Reply As NACT02_reply_msg
Prepare the COMMAREA fields required to be sent. Now we need to set the required COMMAREA fields. The code looks like this:
'Set value of version in request service header
NACT02_Request.header.ca_version = "V1A"
'Set value of request type in request Service Header
NACT02_Request.header.ca_request = "E"
'Ensure we can write data into the RequestData
ReDim NACT02_Request.data(1)
'Set value of account number in request data
NACT02_Request.data(1).Acct = "10000"
Notice the use of header and data prefixes together with the fields names that were used in the Service Interface Painter service.
Issue the Interspace request and receive the reply. Once the required data has been added to the request COMMAREA we can issue the call to the NACT02 program through Interspace and check the response. Interspace returns the reply from NACT02 in the NACT02_Reply object structure. The code looks like this:
'Issue the relevant call for Interspace to send the request
'to NACT02 and receive the reply
ReturnCode = receive_NACT02_sync(NACT02_Request, NACT02_Reply)
'Check request issued correctly
     If ReturnCode = -1 Then
        dcifx_show_error vbCritical, "Call to the CICS application NACT02 failed
        to complete"
        Exit Sub
     End If
Exit Interspace when ending the program. To end communication using Interspace, issue the dcifx_exit call for CICS:
'Check to see if Interspace was initialized
If CICSOpen = 1 Then
       'Issue call to exit Interspace
        ReturnCode = dcifx_exit("CICS")
       'Check request issued correctly
       If ReturnCode = -1 Then
          dcifx_show_error vbCritical, "Interspace Exit Call Failed"
       End If
  End If
Interspace insulates the Visual Basic programmer from needing to know anything about CICS in order to make use of the NACT02 program. You can use the same Visual Basic application to communicate with several CICS server applications by generating additional service modules using the Service Interface Painter, and then adding them to the project.