To get your creative imagination going, here is a small sample of the many color possibilities for your container garden palette; many more will present themselves to you in the chapters on individual plants.
A beautiful garden does not happen by accident. It is the result of a graceful alliance of research, planning, and sure-handed understanding of the principles of good design. This is true whether it is an estate garden encompassing many acres or a container garden on a tiny patio. And it is as true for edible gardens as it is for ornamentals.
For those who equate vegetable gardens with long, boring rows, it may come as a surprise to learn that vegetables and good design can coexist. Delete that image of long rows from your memory; in container gardens you will do things differently.
The primary tools of garden designers are color, shape, and texture, combined in ways that produce pleasing contrasts and a sense of rhythm. In a thoughtful design, all these elements work together to create a handsome garden that reflects the owner’s intentions. Garden design is an art of subtlety. Stepping into some gardens, you might feel a strong sense of serenity; others call up a mental picture of lively socializing. The more strongly you feel this emotional response, the more likely it is that the gardener designed for it.
Garden design is by no means simple. Designers must think about the color, shape, and texture of every single plant they consider: trees, shrubs, perennial and annual flowers, and ground covers and lawn. In this regard they work like artists, with one crucial extra dimension: the plants don’t stand still, but change their appearance with the seasons. Perennial plants and trees continue to grow in size each year.
Designing a container garden is light-years easier. For one thing, many of the ingredients of a large garden—most trees, large shrubs, broad sweeps of lawn or ground cover—simply do not apply. For another, because a container garden is a smaller, more concentrated space, you are not overwhelmed with too many options. And since most plants in a garden of edibles are annuals, you have very few long-range decisions to make.
A full course in garden design is, we think, more than you need. If the subject interests you, a visit to your library or favorite bookstore will deliver some excellent books on the topic.
To create containers that are beautiful as well as productive, focus your attention in these areas.
• Accent the plants’ best features.
• Learn to use color well (for both plants and containers).
• Create groupings for spatial impact, to make a strong visual statement.
• Guard against clutter.
A small note of caution: any garden represents a series of compromises between an ideal vision and the limitations of reality. You may develop a delightful design that your growing conditions simply will not support. Our goal is to lay out ideas that may be helpful as you begin the planning process; take the ones you can use, and leave the rest.
We believe fiercely that edible plants are intrinsically beautiful and provide the raw ingredients, so to speak, of an artful composition. Even the humblest vegetable plant has at least one gorgeous quality, and most have many. Consider:
• The large, lusty blossoms of squash plants, almost tropical in their voluptuous excess.
• The deep green leaves of the kale plant, their edges delicately and perfectly ruffled as by a master seamstress.
• The elegant purple skin of an eggplant, so smooth you cannot resist caressing it.
• The dark green leaves of Swiss chard, held erect by broad-shouldered stems in jewel tones of ruby, garnet, and gold.
How can anyone think these plants plain looking?
Train yourself to take note of each plant’s most attractive aspects. Then, when designing your container garden, try to envision an arrangement that takes advantage of the plants’ best features. For example, mizuna, a very pretty salad green, grows in the shape of a frilly rosette, which is best appreciated when viewed from above; this would be a good plant to put in one of your lowest containers. Red Swiss chard is noteworthy for its beautiful garnet-colored stems; this variety would be best placed closer to eye level, and with nothing underplanted that would block the stems from view. Scented geraniums have insignificant flowers, but their aromatic leaves invite touching; position them where they can be easily reached.
If this is your first garden of any kind, you may not already know what the plants look like. In that case, turn to the best friend a gardener has: mail-order catalogs with color photographs. In the Appendix, you’ll find addresses of numerous companies that sell seeds and plants by mail; they don’t all have color pictures (in fact, some of the best do not), but at the moment we are using the catalogs only as visual aids. Collect as many as you can get your hands on, and study the pictures.
When you have narrowed down your choices, try this designer’s trick: cut out the photos and lay them out on a plain piece of paper, moving them around until you get a combination you like. With a little experience, you’ll be able to make your own mental pictures from the written descriptions in the catalogs that do not show color photos but offer interesting varieties.
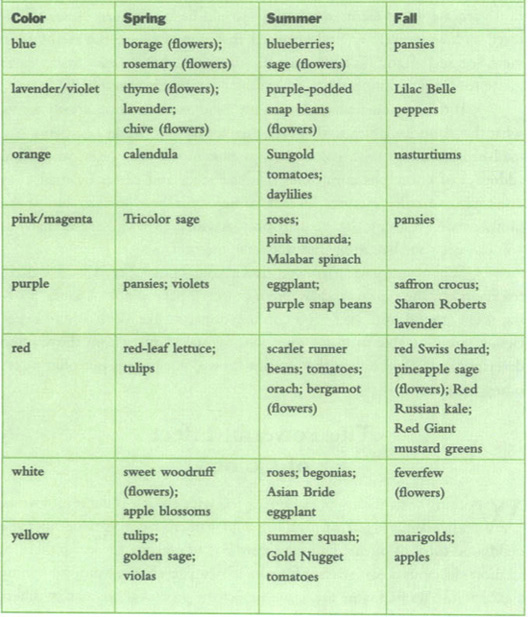
Working with color—or rather, playing with color—is the most joyous, exhilarating aspect of planning your garden. Do you remember the childhood thrill of opening a brand-new box of crayons, the excitement of all those delicious colors waiting for you, so many to choose from? Designing a garden invokes that same thrill, and in fact the process is not all that different. Spread out all your colors—which are plants rather than crayons—and experiment with different combinations until you hit on something that feels just right. With artful color choices, you can achieve many moods, many looks: soft and romantic (pastels); lively (lots of bright, saturated colors); restful (just a few dark tones and hues); vivid (strong yellows and oranges); serene (monochromatic); or playful (unusual juxtapositions of color).
In plants, color comes from flowers, fruit, foliage, and bark. In container gardens, bark is usually insignificant as a visual component, so we can focus on the other three. (See the box above for a starter guide to choosing plants for their colors.)
To get your creative imagination going, here is a small sample of the many color possibilities for your container garden palette; many more will present themselves to you in the chapters on individual plants.
FLOWERS. The flowers of most vegetable plants are only a minor attraction; exceptions include squash, scarlet runner beans, and purple-podded snap beans. All fruits are preceded by flowers, in a brief but lovely show. Most herbs produce flowers, usually small and subtle but occasionally flashy (calendula and monarda, for instance). With edible flowers, the blossoms are the whole story, and just about every color is possible.
FRUITS AND VEGETABLES. Except for edible flowers, the splashiest and longest-lasting color show in your container garden will come from fruits and vegetables: red strawberries, yellow apples, dusky blue blueberries. Beans in tones of green, purple, and yellow. Peppers wearing flamboyant coats of green, red, orange, yellow, creamy white, violet, and purple. Tomatoes that are yellow, orange, pink, and green-striped, in addition to jump-in-the-mouth red.
FOLIAGE. Sometimes we tend to think that all leaves are simply green. It’s only when we look carefully that we notice the many different shades and hues of green, and the splashes of other colors intermixed with the green (known as variegation),You’ll find interesting coloration in the many varieties of red-leaf lettuce; in variegated thyme, sage, and scented geraniums; in the luminescent stems of Bright Lights Swiss chard. And don’t overlook the design possibilities of all-green plants that show different tones: green so dark it seems almost black, rich kelly green, blue-green, bright apple green, chartreuse—every one is a different color, a different crayon for you to play with.
The first step is to become aware of which plants offer which colors; the next step is to ponder how to combine colors in ways that are pleasing to the eye.
Think back to the color wheel that you learned in grade school. Colors that are directly opposite each other on this wheel are called complementary: yellow to purple; blue to orange; red to green. Complementary colors look good together. When we run into trouble, it’s often because we are working with colors that are not pure hues but have undertones of another color. So even though green and red are complementary, it doesn’t mean that any red works well with any green; a red with undertones of blue will look better next to a bluish green than it would near a green with undertones of yellow.
Another valuable guideline: colors that are next to each other on the wheel also look good together.
Red, orange, and yellow, and all the tones between, are called hot colors; the cool colors are blue, green, and violet. Hot colors appear to be closer; cool colors seem to recede. Hot colors therefore catch the eye sooner, especially the strong, deep, nonpastel tones. This is why some gardeners say they find yellow and orange hard to work with; in a broad expanse of garden, those two colors jump out at you, overwhelming everything else.
It’s useful, and also fun, to know these abstract concepts about color. But as a practical matter, in a vegetable garden Mother Nature starts you off with many choices already made. The dominant color is going to be green. Most of the accent colors will be hot: reds, yellows, or oranges—that’s because most of the vegetables we grow, if they are not green, are one of the hot colors. Only a few are pink, purple, or lavender, and they’ll look best combined with other plants that show pink, purple, and lavender. The strongest color effects will be provided by edible flowers; fortunately, they come in just about every color you could wish for.
Don’t forget that in container gardens, the containers themselves are a big part of the visual impact. Especially early in the season, while the plants are still babies, the containers may be your only source of extra color. This is a good thing if the colors are attractive and well coordinated, and it’s a bad thing if they are a discordant jumble. See the box above for ideas on helping the containers enhance, rather than fight, the overall look of the garden.
Working in the limited areas that usually characterize container gardens, you’ll no doubt want to get maximum efficiency and maximum visual punch from your space. An excellent way to accomplish that is to create a grouping of several containers at various heights, in effect “painting” an area with plants. This gives an integrated design with a strong focal point and, in addition, offers several practical advantages. It allows you very efficient use of your space; maintaining the plants is easier than it would be if they were scattered around; and you can create combinations of plants that need different kinds of care and thus would not do well in the same container.
The difference between a well-planned group and a jumble of individual pots placed here and there at random is the same difference as that between a collection of framed artwork in a tasteful, cohesive arrangement and a bunch of pictures hung haphazardly on the wall. No doubt you’ve seen examples of both at some point in your life, and there is no question which one is more pleasing to look at.
What makes these plant groupings work is the variation in height. Here are some suggestions:
• Simplest of all, set a container on top of an empty container of the same size, turned upside down, or on top of a concrete block.
• Create a tiered effect with concrete blocks; in the rear, stack two blocks and put one container on top. In the middle row, set one block with a container on top. In the front, set a container on the floor. Each concrete block (wonderfully utilitarian but not exactly gorgeous) is hidden by the plant in front of it.
• Take that same idea a bit further if you have the space. Make your tiers longer by resting wooden planks on concrete blocks, and set the plants on these “benches.”
• Place three containers of the same height on the floor in a triangular arrangement; then set a fourth container on top, resting on the rims of the three below.
• Use a stepladder to display a series of small or medium-size containers; if the ladder is wooden, first paint it a compatible color. Remember that the rungs of a ladder are not wide; choose pots with an appropriate size at the bottom, and fasten them in place using the dowel-and-chain technique described on pages 9 to 10. Another solution is to add an extra board atop each rung, making them wider.
• If you have basic carpentry skills or can sweet-talk someone who does, build a two-tiered box-within-a-box, like that described on page 34.
Another device for taking advantage of all available space is a trellis. Several kinds are described in Chapter 4, but for now we simply want you to keep in mind that a trellis makes a wonderful focal point.
The overall design is always a matter of balancing the size and arrangement of the containers with the structural look of the plants themselves. Keep these guidelines in mind.
• In window boxes, include some upright plants and some that trail down.
• In containers that will be viewed from all sides, put a tall plant in the center, with smaller upright plants at its feet, and surround everything with plants that cascade over the edge.
• If the container backs up to a wall, put the tallest plants in the rear, fronted with smaller plants, and then something that trails down.
A defining characteristic of container gardens, in comparison to traditional ones, is that they tend to be smaller, more compact, and closer at hand. Because they are right under our noses, so to speak, it’s easier to admire their delights and, in the case of edible plants, savor their produce. But by the same token, flaws are more obvious. Whereas in a traditional garden, ratty-looking foliage and dead flowers are lost in the overall view, in containers every disagreeable problem is right there, in your face.
All of which means that to preserve the beauty you have so artfully achieved, it’s important to keep up with maintenance. If you don’t use all your edible flowers in cooking, be sure to pick off any dead blossoms, a chore given the endearing name “deadheading.” Snip away any dead or holey leaves, and keep the soil surface clear of plant debris. All these little attentions will also help to discourage plant pests and diseases.
This is not a major operation. As you stand by your containers, admiring and praising the plants for how well they’ve grown since yesterday, just run a quick critical eye over everything and take care of any problems you see.
In terms of the overall appearance of your garden, there is another kind of clutter: the visual chaos of mismatched, unattractive containers stuck here and there with no thought. This kind of disorder tends to creep up on you as in your enthusiasm, you succumb to new plants and new containers on every trip to the garden center. Before you know it, you have a real mess: empty containers stacked up in one corner, along with half-used bags of potting mix and compost, a watering can with a broken handle, and all those small nursery pots you can’t bear to throw away. It takes real discipline to buy only containers that blend well with the ones you already have. It may seem like too much trouble to create a storage space for all your supplies, but do it anyway. In the long run, you’ll be happier.
It has been said that beauty is in the eye of the beholder. It has also been said that Mother Nature is the best garden designer. That’s a bit like saying water is wet—true, but not very helpful. Sometimes it’s hard to know where to start when building a garden where none now exists. This summary may help.
1. Your first step is to analyze the space you have available for gardening, following the information in Chapter 1. Everything else depends on this fundamental question: what growing conditions do you have to work with?
2. Using the ideas in Chapter 2, make up a wish list of the plants you would like to grow—things you already know you enjoy, plus any new temptations you think it would be fun to try.
3. Compare the two. Read up on the horticultural requirements of the plants on your wish list (consult the individual plant chapters), and eliminate those items that simply will not grow in your space.
4. Now for aesthetics. What do you know about the colors, textures, and shapes of the plants you like? Are there special varieties that will provide unusual visual interest? As you look over the list, considering color for starters, what combinations suggest themselves to you? Or try thinking in terms of a theme: if you’re mad for Thai food, for instance, can you create a container with ingredients that are often used in that cuisine? Many suggestions for Theme Gardens are spread throughout this book.
5. Double-check your plant selections: do those you visualize growing beautifully together need the same growing conditions, or will they have to be in separate containers? If you spot a potential problem, can you substitute another plant that provides the same visual effect (color, texture, or whatever)?
6. Incorporate into your imaginings the visual effects of man-made elements: containers, trellises, any decorative additions that enhance your theme. Will painting the containers a dark purple pull your color scheme together? Would a grouping of containers look better at varied heights, and can you create some kind of platform to provide that? If a trellis is part of the plan, what should it look like: a rustic creation of twigs and branches, sleek bamboo, or perhaps wood, painted a compatible color?
7. Be prepared to be surprised. Some of the effects you planned so carefully will turn out differently—and maybe much better. One very cooperative feature of containers is that they are portable. If you don’t like the way things are turning out, move your containers around, adjusting their positions to take better advantage of the sun or to create a more pleasing group. Even the containers that have several plants growing together can be fine-tuned during the season. If something dies, replace it; if the begonias turn out to be a different color from what you expected, move them. Make a few notes for next year, and then don’t fret. Put your energy into enjoying what you’ve accomplished. You have every right to feel proud.