Your first venture into a large garden center can be overwhelming; there is simply so much stuff, how can anyone know what’s what? Even when focusing on just one item—pots, say—there’s enough variety to make a person dizzy. And that’s before you take even the first peek at the plants. In this chapter and the next, we’ll help you sort it all out.
Nearly all containers are fabricated from one of five materials, each with its advantages and disadvantages: clay, plastic, wood, paper pulp, and metal.
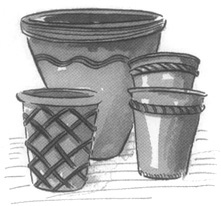
CLAY. The classic terra-cotta flowerpot that you’ve seen a million times is made of unglazed pottery clay. Clay pots are heavy and relatively fragile; they break and chip easily. Unglazed pots are porous, which is both good and bad. It’s good because air circulates more easily to the root zone; it’s bad because soil moisture evaporates more rapidly and you’ll need to water more often. (Even that has a positive side because evaporation is a cooling process, and so plants in clay pots have some summertime protection against ultrahot soil, which can burn the roots.)
Perhaps the biggest drawback is that in winter, wet soil or even water trapped in the pores of the pot can freeze, expand, and crack the container.
Many gardeners, however, willingly overlook all these faults because of aesthetics: in any size, shape, or condition, terra-cotta pots are beautiful. Even the markings left by fertilizer residues and moss are considered a plus by many people, for weathered pots add an antique charm, especially in rustic or “country” gardens.
A variation on this basic theme is glazed clay. Applied to the outside, the glaze serves to give color and also seals the clay, creating a smooth surface. Because glazed-clay pots are therefore less porous, evaporation is less of a problem than with unglazed clay. The primary attraction of these pots is their beautiful colors. You may find them in solid colors, in both bright and muted tones, and in many swirled blends. Some may have been specially painted to create an antique look; others have colorful designs painted on a solid neutral background, similar to painted china. As you might imagine, with all that artistic attention, these pots are more expensive than the equivalent sizes of plain terra-cotta. Because they are less porous, glazed pots are not so vulnerable to winter freeze, but they are still breakable; you’ll want to handle them carefully.
Classic terra-cotta pots come in many handsome styles.
PLASTIC. Plastic is inexpensive, lightweight, and nonbreakable. It is non-porous, and so holds water well. In practical terms, these qualities make it an ideal material for plant containers. Where plastic pots tend to fall short is in aesthetics, although that has improved in recent years. Most plastic containers are white or dark green, and they come in many shapes: the traditional tapered flowerpot, wide shallow bowls, square or rectangular boxes, and so forth.
New high-tech plastics have the look of stoneware but not the weight.
You will also see plastic pots in bright decorative colors. Used carefully, they provide a strong color theme and a sleek, modern look; used haphazardly, they can easily overwhelm the plants in visual impact. A jumble of uncoordinated colors and textures looks like a kindergarten gone berserk; stick to one color or one color family, and you can create something quite stunning.
Some inexpensive plastic pots are modeled after terra-cotta in both shape and color. Whether or not they work for you is a matter of personal preference.
Rose Marie says: Plastic that looks like plastic is fine, and has a respectable place in my garden, but I have no patience for plastic that pretends to be something it’s not. On the whole, I still prefer wood or clay for pots.
Maggie says: They aren’t so bad, and besides, the price is right. I’d rather put my money into the plants.
The black plastic containers that nursery plants come in can also be used. (We’re referring to the heavy-duty plastic pots in 1-, 2-, or 5-gallon sizes, not the thin plastic used for small 2- or 4-inch transplants.) The smaller heavy-duty ones work especially well in window boxes (with plants in individual pots, you can move them in and out) and in groupings where you need to separate plants that require different care.
The newest players on the scene are handsome containers made from various high-tech plastics: polyester or foam resin, polyethylene, fiberglass, high-density polyurethane. All these space-age materials are very durable and amazingly lightweight; you can lift with two fingers a large urn that looks as if it is made of concrete. The containers have the appearance of cast concrete and antique terra-cotta, but none of their fragility. They aren’t inexpensive, but they do last for years and are gorgeous.
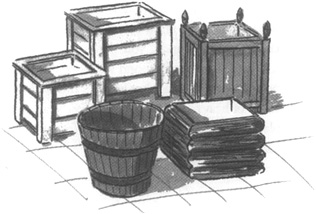
Wooden containers are the favorite of many gardeners, both for their beauty and for their lasting qualities. If you have basic tools and moderate skills (or have leverage over someone who does), you can make your own. Not only is this vastly satisfying and economical, but you also end up with containers that are exactly the size you want.
Building a container is a simple woodworking project: an open box with no lid. For something that will last for years, use rot-resistant lumber (cedar or redwood) or apply a wood sealer to other types of wood. (We know someone who makes them out of discarded wooden pallets.) For ease of maintenance and 100 percent resistance to rot, you could ask at the building supply store for the new composite material made of recycled plastic and wood waste products such as sawdust; one popular brand is Trex. Most commonly used for decks and other outdoor projects, it comes in the same sizes as dimension lumber, and can be cut with a power saw.
A box-within-a-box holds deep-rooted and smaller plants in one compact space.
To avoid ugly rust streaks, use galvanized nails, screws, and bolts. Add wooden “runners” at the bottom, to raise the container an inch or so and provide air circulation. And be sure to drill holes in the bottom for drainage.
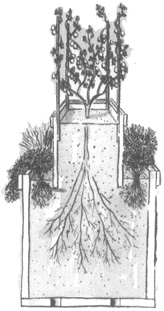
A Box Within a Box. This two-story container provides space for tomatoes, with their deep root system, along with shallow-rooted vegetables in a broader, lower box. The bottom box can be any size; the drawing shows a 2-foot cube. The top is a bottomless 1-foot cube. Fill the lower container with potting mix, then set the top box in position and fill it; now you have a total planting depth of 3 feet. To make the tomatoes very happy, you might want to add four stakes to the corners of the top box, providing the skeleton of a 3-foot tomato cage.
A Plant Tower. This tower consists of a series of progressively smaller boxes, each one turned 90 degrees from the one below so that it rests on the edges of the larger box below, and presents four triangular-shaped planting spots at each level. With an arrangement such as this, you can grow a large amount of produce in a small space. A tower is particularly attractive planted with trailers and danglers.

The plant tower, a simple carpentry project, makes very efficient use of a small space.
WOOD. Containers made of wood are intrinsically beautiful, if you happen to love wood for its own sake (as we do), but somewhat more problematic than clay or plastic. Wood containers are usually heavy (compared to plastic in an equivalent size), and over time they will rot from the damp soil. If you are buying ready-made wooden containers, look for those constructed from redwood or cedar, which are naturally decay-resistant. If you are making your own, either use one of those two woods or, if that’s not practical, use other wood but apply a sealer to the inside and outside surfaces of your finished product.
The natural look of wooden containers complements most plants. For longer life, choose rot-resistant woods.
PAPER PULP. These pots look like they’re made of thick, bumpy cardboard, and in fact that’s essentially what they are—paper pulp (often made from recycled paper) pressed into shape. They are very lightweight and quite inexpensive, but not long-lasting. With care, you can usually get three years’ use out of them, especially if you elevate them off the floor to give them a bit of breathing space.
METAL, CONCRETE, WIRE. Containers of brass (or faux brass) or other metals work better for houseplants than for outdoor gardens. Large tubs or rectangular planters made of cast or poured concrete are found in the pages of gardening magazines more often than in a normal garden; they photograph well but are very heavy to work with, and can get hot enough to cook your plants. Hanging containers (often called baskets even if they aren’t) made of wire can be used only if first lined with something that keeps the soil from dribbling through; see page 64 for planting techniques.
All the containers we have listed so far have a tendency to drip onto whatever surface they rest on. A wide drip tray underneath the pots will offer some protection for your new wood deck, or your neighbor’s balcony one floor below.
GROW BAGS. Very popular in Europe, the concept of grow bags is now finding its way to America. These are large bags filled with rich potting soil; slits are cut in the bag and the plants are grown directly in place, without any other containers. Large bags of commercial potting mix can be used the same way. One main drawback is looks: until the plants get big enough to cover it, you can see the bag underneath—advertising label and all. The other drawback to grow bags is their shape: they have to be laid flat on the floor or another broad surface, so you’re limited as to where you can put them. But they are excruciatingly simple, and if you want a quick way to get going, this is it.
We recently found an ingenious product that operates on the same principle as grow bags but is much more attractive. These are long, narrow bags made of heavy-duty nylon-reinforced plastic (black or dark green) with precut planting slits and a loop at the top for hanging. When we first saw them, they had been hung in a vertical arrangement on the posts framing a doorway, four on each side, so that the whole post seemed to be made of flowers. The same company (see the Appendix) also makes a double bag that can be looped over a balcony rail like a saddlebag, so passersby (along with the owner) get to enjoy the garden.

An old toy box, with the top opening down, makes a charming storage unit for supplies and display for small plants. Coat with polyurethane for weather protection.
HOUSEHOLD ITEMS AND FOUND ART. Between the two of us, we have some of just about all the kinds of pots described so far, but we both also have our share of containers created mostly out of ingenuity—items that weren’t originally designed as planters but that have great potential. Keep your eyes open whenever you’re in a hardware store, secondhand store, or thrift shop, the household goods section of a large general merchandiser (such as Kmart, Target, or Home Depot), or at a garage sale or flea market, and continually ask yourself, “How could I use that?” For instance:
• In the “$1 only” section of a large variety store, Maggie found round white plastic tubs about 2 feet in diameter. “I had no immediate plans, but I knew they would make great planters so I bought five of them.”
• Rose Marie discovered large plastic buckets (probably intended for laundry or general cleanup) in her local discount outlet, and was attracted to three nice features: they’re deeper than they are wide (good for deep-rooted vegetables), they have handles (easy to move around), and they come in several attractive colors.
• Empty 5-gallon paint buckets left over from your own or a neighbor’s house-painting project are the perfect size for growing tomatoes. (One caution for all plastic containers: make sure they are fully opaque; if they are translucent enough to admit sunlight, the plant roots can burn in hot summers.)
• A child’s wooden toy box will hold plants on top and your garden supplies inside. Try setting it on its side, with the top opening downward, and see if it seems strong enough and stable enough to hold plants on top (which is really a side); if it is, you’ll be able to get into the storage without having to move the plants. If the box looks nice in the condition you find it, you won’t need to do anything except give it a protective coating of polyurethane; if it has seen better days, give it a new coat of paint.
• If you have a friendly connection with a restaurant, ask if they’ll save some of those really large cans for you. Several grouped together make a pretty planting of salad greens (especially if painted; see box). You can also use them effectively in a window box or other planter where you might want to move plants in and out during the season. If nothing else, they make an inexpensive platform for lifting some of your containers to a modest height.
• In a category all by themselves are wine and whiskey barrels. You may find them for sale at garden centers—either the real thing or reproductions—but if you are fortunate enough to live near a wine-growing region, inquire about buying old barrels that are no longer in use. Last summer Rose Marie purchased some whole barrels from a nearby winery, and then worked out a trade with a neighbor: he sawed them in half; she cooked him a fabulous dinner. Try to find the kind known as true Burgundian barrels, which have wooden bands holding the staves together rather than rust-prone metal; or paint the metal black with a rust-resistant outdoor paint like Rustoleum.
Some of the most satisfying and interesting containers are those you find at thrift shops and yard sales—items that were never meant to hold plants but nonetheless do so very nicely. To be successful in this approach, you need a good eye and an explorer’s soul.
Maggie, who can smell a good yard sale blocks away, found these treasures on a recent Saturday; grouped together, they create a miniature kitchen garden with a rustic charm.
• A very large wooden salad bowl (about 20 inches across) with little round feet. It had originally been painted red on the outside, but paint had chipped off and the inside was so badly scarred with knife marks that the varnish was flaking off—in other words, no one in her right mind would use it for salad. But with drainage holes drilled in the bottom, it made a very handsome planter for salad greens, which have shallow roots. “And,” says Maggie, “the symmetry of growing salad in a salad bowl pleases me.”
• An old wire market basket with handles, badly rusted but otherwise intact. “I spray-painted it with dark red Rustoleum, lined it with 3-mil black plastic, and filled it with herbs.”
• A large, restaurant-size colander that had seen better days. Lined with the same heavy black plastic, it very nicely holds mizuna, which grows into a low, rounded mound, with an outer fringe of radishes. (It could also have been made into a hanging container, using the handles.)
Rose Marie, who lives in a more agricultural area, went looking for unusual containers in preparation for this book and found gold in a local junk shop:
• An old metal washtub. With drainage holes drilled in the bottom, it held a small, self-contained herb garden: thyme, several basils, rosemary, chives, dill, and parsley.
• A large commercial mop bucket made of galvanized zinc. Rose Marie planted it with a staked tomato and lemon cucumber spilling over the edge.
• A chicken feeder—a tall cylinder, slightly tapered at the bottom, that rests in a wide, shallow pan. Farmers add feed to the top and a small amount drops into the bottom through narrow openings; as the chickens eat the feed in the pan, opening up space, more seed dribbles in. Those same narrow openings serve as drainage now that it’s converted to a planter.
On any day of any week, you can find clever containers in your favorite thrift store, for example:
• An old spatterware washbasin with rusted-out holes in the bottom.
• Large, decorative food tins, especially if the design is printed directly on the metal, rather than on a paper label.
• For a child’s garden, large old toys like a dump truck with missing wheels, a child’s wheelbarrow, a toy wagon.
• Scads of straw baskets in all shapes and sizes, with handles for hanging (add liner first).

QUESTIONS OF SIZE. Most containers are measured by their diameter at the top. In the familiar tapered flowerpot shape, broader at the top than at the base, the height is usually the same dimension as the diameter of the top. (When your favorite nursery advertises “6-inch plants,” it’s not the plant that is 6 inches but the pot.)
As a general rule, you’ll be better off with larger containers because they don’t dry out as quickly. The trade-off is that to get a broad surface area, large enough to do a serious planting, you may also be getting depth, which makes the container quite heavy. Some vegetables need that deep soil (tomatoes are a classic example), but many others are happy in just 8 to 10 inches; the extra depth of soil is wasted. (For ways to fill up some of that space, see the planting tips in the box on page 62.) Taking all this into account, your best bet is to have a collection of sizes and shapes to enable you to match plant size to container size; if you’re not sure how much root room to allow for, err on the side of too much rather than too little.
Imagine the final weight of a very large container, filled with soil, in the larger context of your entire planting area. If there’s a chance you might want to move the container—maybe to make room for a picnic table later in the summer, or to move a young tree into a more sheltered spot in winter—then you’d be smart to plan now for mobility. Garden centers sell plant bases with wheels, or you can easily create your own from scrap lumber and casters.
ONE ABSOLUTE RULE. No matter what material the container is made from, or what size or shape it is, it must have drainage holes in the bottom. No exceptions, no excuses, no arguments. Anything you see in the garden center that does not have holes is meant to be used as a decorative outer container (called a cachepot), with another, usually plainer pot set inside.
Keep this in mind for found art and other household items that you plan to use as containers: you have to be able to add holes. Plastic and wooden containers can be drilled with an ordinary household drill; the size of the drill bit determines the size of the hole. If you’re recycling large tin cans, make holes around the bottom edges with a church key, the kind of can opener that makes triangular pouring spouts.
A trellis is any kind of structure onto which plants are encouraged to grow upward; it can be a free-standing tower or, more commonly, a flat form that works best when attached to something like a wall or a large container. Because they take advantage of vertical space, trellises are a good idea in all gardens and a lifesaver for container vegetable gardens.
You can buy commercial trellises at your favorite garden center, home improvement center, or lumberyard. They are made of wood (stained, painted, or left natural) and also plastic, and come in several basic shapes and sizes. In the same retail locations you’ll also find lattice screening, made of very thin wood strips fashioned into a diamond pattern or square grid. By themselves these lattice panels have little structural integrity and are intended to be nailed onto some kind of framework. But you may also find this latticework already made up into framed panels, and they work very well for trellises; panels in narrow widths are especially versatile, and can be combined into many arrangements. Also available commercially are flexible trellises made of nylon string or plastic gridwork; these, too, have to be nailed onto something.
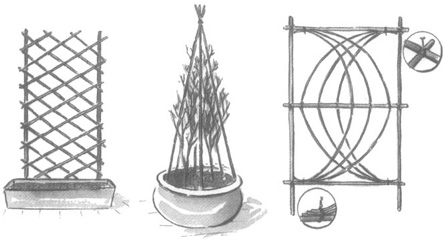
Trellises can be made from many materials, adding aesthetics and practicality to your containers. From left: lengths of bamboo from the garden center, tall stakes from the lumberyard, branch trimmings from a neighbor’s spring pruning.
Freestanding trellises made of wood or metal are another way to go. They represent more of an investment, but they often have a strong architectural or decorative look that will add a significant design dimension to your garden.
Of course you or your favorite handyperson can construct your own trellis, in just the right size, from dimension lumber; check out the styles at the garden center, and copy the format you like best. This is a great opportunity to explore the wonders of a real hardware store and let yourself be dazzled by all the items you didn’t know existed.
How about a custom-made trellis handcrafted from bamboo (individual lengths are sold at the garden center), or from tree branches rescued from a tree-trimming project? All you need are strong garden twine, a good pair of pruners, and your creative eye.
A very clever tent arrangement can be made with two trellises and two rectangular planters. The trellises should be at least 4 feet tall, and the planters 8 to 10 inches deep. Set the planters about 2 feet apart and position the trellises so they angle inward from the outside edge of their planters toward the space between the two, then fasten the tops together to form a sort of A-frame tent. Because of the triangulation, this is an extremely strong construction. Pole beans, peas, or cucumbers, in all their rambunctious glory, climb up over the trellises and down the other side. To really use your space well, grow cool-season vegetables like spinach or lettuce in the shade underneath the trellises. To make it easier to reach them, you might construct a flat box with wheels, and set the shade containers on it. This is also a good way to recycle a child’s toy wagon or an old skateboard your teenagers have outgrown.
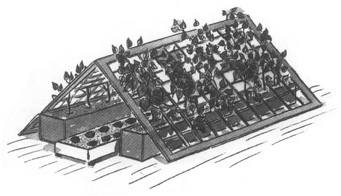
Two trellises attached at the top provide growing space for vining plants and make shade for cool-season plants in the wheeled box underneath.
Even in a space that at first seems too small, you might be able to grow fruit trees if you can set up an espalier. They are a perfect combination of utility and good looks: not only do you have your own apples a few steps away, but you’ve also created a very beautiful decorative arrangement.
First, pick your spot: a sunny wall. Make sure you can add bolts to the wall, and don’t forget that once the tree is growing, you won’t easily be able to move it. Attach large eye-bolts up the wall in at least five rows that are 18 inches apart vertically, and string heavy-duty wire through them horizontally. In spring or fall, plant the tree in a container at least 2 feet deep, and cut the trunk back to about 2 inches above your lowest wire. When it begins to branch out, pick out the three best-looking sprouts and prune away the others. As these sprouts grow into small branches, ease two of them downward and tie them onto the horizontal wires; allow the third to grow upward to the next highest wire. As soon as it reaches the next wire, which may be later this season or next year, repeat the process. Keep going this way until you reach the top wire, where you will cut away all signs of new upward growth.
As the tree grows it sends out very short stems, called spurs, where the fruit will form; prune away any that are facing into the wall. Also, be alert for signs of new branches forming where you don’t want them; if one of these renegades shows up, snip it completely off.
Choose dwarf or semidwarf varieties of fruit trees, and check the individual plant descriptions in the Fruits section for specifics about caring for them.
Start your espalier structure by attaching heavy wires to a sunny wall, about a foot and a half apart.
As the tree grows, force branches laterally on each wire, and remove those that grow between wires.
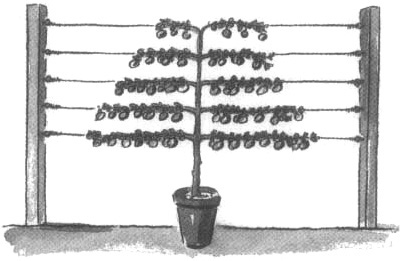
Enjoy many years of fruit.
A nice alternative to a flat trellis is a demicage made of wire fencing. At a hardware store, lumberyard, or well-stocked garden center, buy a length of wire fencing or concrete-reinforcing wire. The piece should be at least 4 feet wide (more is better), and as long as two-thirds the circumference of your container. Thus if your container is 20 inches across (a good size for large vining plants like squash, cucumbers, and tomatoes), buy a 40-inch length of 4-foot or 6-foot fencing material. Make sure the grid opening is large enough for you to get your hand through.
Set the wire fencing in a semicircle around your container, with one end resting on the ground. Secure your “fence” to the container with two lengths of heavy-duty picture wire, threaded through the grid and twisted together in front. Gloves and wire cutters make this easier. (Yes, you do have wire cutters. Look at your basic pliers; there’s a wire cutter just forward of the hinge.)
The vines will climb the fence as they grow (with a bit of encouragement from you in the beginning). The produce will be more prolific, cleaner, and less apt to rot because it’s not resting on damp ground. And because the fence does not completely encircle the container, you can easily reach in through the open side for planting and picking.
Many other configurations are possible; you’re limited only by your imagination. Look over your garden space and think “Up.” What can you create? Here’s one example from Maggie’s garden.
Grow large vining plants (like squash and tomatoes) upward on a half-cage of heavy-duty wire grid with fist-size openings.
Maggie says: I think snap peas are the greatest thing since homemade bread, and I can’t imagine a garden without them. But I like the productivity of pole peas, and they need to grow up on something, and besides you already know how tiny my patio space is. So I thought it would be fun to try growing them outside my living room window in what is otherwise unused airspace. First I nailed a row of galvanized nails, 2 inches apart, into the top and bottom window frames, and strung 50-pound monofilament (i.e., fishing line) between them. Then I found a small plastic storage cabinet that just exactly fits under the windowsill (it is intended by its manufacturer to be hung on a wall, but it works just as well sitting on the patio floor). On top of the cabinet (which holds my garden supplies) sits a rectangular planter box that is planted with peas at the rear (closest to the window) and pansies at the front. The peas are quite happily growing up the monofilament, and at the same time they create a very pretty green curtain; I love the way they look with sunlight coming through the leaves.
Unless your container is very deep, simply sinking the legs of the trellis into the soil will not hold it securely enough to withstand strong winds or heavy cucumbers, especially if the trellis is tall. Bolt or screw the legs either to the container (which means you can move container and trellis together as a unit) or if possible to an adjoining wall, which means you can fasten it at the top as well as the bottom. The second method is preferable for a very tall trellis, which in windy situations can act like a sail, causing the whole thing to topple.
One other thing to consider: what will you be growing on the trellis? Not all plants like all kinds of trellises equally well; it depends on how they grow.
• Peas send out short, thin tendrils that wrap themselves tightly around thin supports like a wire or string but cannot easily fit around something wide or fat like a thick bamboo pole or 1-inch wood strips.
• Pole beans and tall nasturtiums grow on vines that wind themselves, stem and all, around a pole or stake; they will also wind around a thin wire, but something with a wider diameter uses your space more efficiently (see page 82). They have an easier time with wood, with its slightly rough surface, than with smooth plastic or bamboo.
• Climbing roses do not twine themselves on their own, but need to be tied in place with household string or garden twine. Squash and cucumbers also make tendrils, like peas, but they’re not stout enough to hold the heavy fruits; you’ll need to tie the vines in place. The diameter of the trellis pieces is not as critical as strength is; no wimpy trellises here.
A specialized type of trellis is the one used to espalier fruit trees (espalier can be done with many types of plants, but fruit trees are most commonly used). Through careful pruning, espaliered trees are trained to grow in a more or less flat plane, rather than in all directions. This allows trees to grow in spaces that are otherwise too narrow, and it also creates a very beautiful look. There is a real botanical advantage as well: fruit trees send off their short fruit-bearing stems from branches that are horizontal, so by creating an espalier, with its strong horizontal lines, you’re encouraging the tree to produce fruit.
It is possible to espalier plants onto a freestanding support, but usually they are attached to a wall or fence, and that is the assumption with our directions (see page 42). Espaliered trees are more or less permanent additions to the garden, so they are best for people who are ready to stay put for a few years.
Finally, even though they’re not exactly trellises, those round wire supports known as tomato cages serve the same purpose. They don’t provide the height of a full-size trellis, but they are adequate for tallish vegetables that have a tendency to sprawl in all directions. Many gardeners have learned the hard way that these cages are actually too flimsy for vigorous tomatoes, but you may find them a handy way to corral tall herb plants and some vegetables. They’re inexpensive, so it doesn’t hurt to keep a few on hand.
Here’s a piece of good news: container gardeners need far fewer tools than traditional gardeners do, and none with long handles. Only two things are really essential, a trowel and gloves, and if you don’t care whether your hands get dirty you don’t even need gloves.
TROWEL. A multipurpose tool you will use for mixing potting soil ingredients, loosening up crusted soil from last year, digging holes for seeds or transplants, and levering out dead things. Don’t buy the cheapest kind you see; it will probably bend out of shape the first time you try to do any serious digging. A broad trowel is the most versatile, good for almost every task, but narrow ones are very handy for snuggling in a small transplant between existing plants, or for bulbs.
GLOVES. When you start mixing together components of your potting soil or planting three dozen tulip bulbs, you’ll be glad to have a good pair of gloves. As to what type of glove, you have a choice of fabric, leather, and rubber. Leather gloves are more expensive but last longer; fabric (usually cotton) is inexpensive and washable, up to a point.
This is a subject about which gardeners tend to have strong opinions.
Maggie says: My favorite pair now is something I was originally very skeptical about. They are heavy rubber in a distinctive orange color, with a fabric lining and long length that gives protection halfway up to your elbows. They’re sturdy enough to resist thorns, yet flexible enough that you can pick up seeds (that’s the part I didn’t believe, but it turns out to be true).
Rose Marie says: I hate gloves that make my hands feel sweaty and clammy. The ones I like best are made of breathable knit fabric that has been dipped in green latex on the palm side only, so your fingers and palms are protected but your hands stay cool.
PRUNER. A small hand pruner or trimmer will come in handy for trimming away dead or ugly leaves as well as for actual pruning. We don’t consider them as essential because often you can do those chores with just your fingers or your household scissors, but the pruner gives a cleaner cut that’s important if you are growing something with a tough stem such as rosemary. And if you have roses or fruit trees, a pruner is fairly essential.
CULTIVATOR FORK. A hand tool with tines at its business end. The tines may be either straight or bent 90 degrees so they’re perpendicular to the handle. This tool is useful for loosening up soil before planting, and for drawing a shallow furrow in case you want to plant seeds in a straight line.
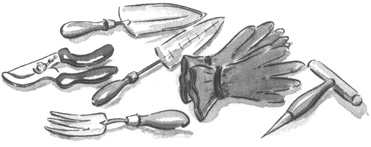
Good tools make life easier. Clockwise from top: two trowels, one regular and one narrow; gloves; dibble; cultivator fork; pruners.
DIBBLE. A T-shaped digging implement with a pointed end, used to make large holes, as for planting bulbs.
HOUSEHOLD ITEMS RECYCLED. Lots of the items that normally pass through your kitchen can be put to use as garden tools; not only do you save resources, but you get to feel terribly clever. Here are a few of our favorites:
• Chopsticks. These make great tools for seed planting, for staking short plants, and for holding frost covers up off tender seedlings. Restaurants are usually required to throw out the wooden kind because of health codes, so you don’t need to feel guilty about bringing them home after your meal.
• Plastic milk or water jugs. Trim away the bottom and most of three sides, but leave the top and handle, and you have a scoop for mixing and transferring soil. Or cut off the base and leave everything else in place, and you’ve created a cloche to protect baby tomatoes, peppers, or eggplants from cold nights. A sharp knife cuts plastic very easily.
• Panty hose. Cut old panty hose into short, narrow strips, and use them to tie plants to a stake or trellis. They are wonderfully stretchy, and don’t cut into plant stems the way some twine will. You may consider this funky or silly, but in truth it’s hard to find a commercial product that works as well; hide them discreetly under the foliage and trim away the excess, and no one has to know.
If you can’t find room indoors for your garden supplies, or if you’d like the materials closer to your container garden, here are some tidy ideas for storing them outdoors.
Spend some time in the housewares section of your favorite store, investigating the many shapes and sizes of plastic storage bins with snap-on lids (Rubbermaid makes them, as do many other manufacturers). Most of the ones we’ve seen are rectangular, which is more space efficient than round tubs; some are broader than they are tall, while others are tall but narrow, like oversized wastebaskets. Some have concave lids to allow stacking—a nice feature. The bins work well for holding your supplies and for mixing and then storing potting soil; one or two provide the basis for a more or less permanent workstation (see box).
The bins themselves are fairly neutral in appearance, and they would be perfectly acceptable tucked off in a corner. You might want to stack two and put a planted container on top if you don’t mind moving it to get into the storage bins. Even better, build a deep bench from outdoor plywood, or assemble one with wide wood planks and concrete blocks; tuck the bins underneath, and display your containers on top.
In that same housewares section, check out the selection of plastic storage cubes. They’re about 18 inches square and come in all sorts of colors, the sides are open grids, and usually they don’t have tops. If they are strong enough—and this is what you have to ascertain—you can use them to create an inexpensive storage unit. Set two side by side with the opening facing out, then set two more on top. Now you can place medium-size planted containers on the top, and put your gardening supplies inside the cubes. They’re not completely out of sight, but they are tidy looking.
Rubbermaid makes a line of outdoor storage lockers (large) and indoor/outdoor snap-together cabinets (medium to small) in an unobtrusive tan color; probably other manufacturers do as well. The small cabinet that Maggie used for her pea trellis is one example.

Gear boxes keep small necessaries together and neatly tucked away underneath a display bench.