CHAPTER 5
SOFTWARE
SOIL, SEEDS, AND PLANTS
We said earlier that container gardening is light-years easier than traditional gardening in the ground. In this chapter you’ll find out why.
Soil
In a garden, everything begins and ends with soil quality. Good soil allows both fast drainage and moisture retention. The only way around this apparent catch-22 is a soil that has an almost perfect blend of ingredients that provide both qualities—and that also has adequate nutrients and the right structure to allow good aeration.
Traditional gardeners rarely start out with that kind of soil; they must create it through hours of extremely difficult physical labor. And if they skip that step of preparing the soil, or even if they do just a halfway job, they might as well find another hobby because they’ll never get satisfactory results.
Container gardeners, on the other hand, have it much easier: all we have to do is make a trip to the garden center, buy a big bag of good potting soil, pour some into our containers, and then try not to smirk.
When it comes to choosing potting soil for containers, there are basically two ways to go: dead easy and almost as easy. Dead easy is selecting a high-quality potting soil and using it straight from the bag. Almost as easy is buying any all-purpose potting soil and adding other things to it to fit your specific needs. (A third choice, not as easy, is to purchase each separate ingredient and mix your own planting medium from scratch. This is not terribly practical for container gardeners, and for most people it’s not necessary; the end result would be something very like either of the other two choices.)
The difference between the two basic options—the product you can use as is, and the one you might want to amend—is mostly one of degree. Speaking very generally, the basic ingredients are much the same, but the higher-quality material has smaller, finer pieces of the main constituents and lesser amounts of coarse filler material. Usually, but not always, price is a good indicator.
Again speaking broadly, commercial potting mixes are a combination of (1) something that holds water well (commonly either peat or ground bark) and (2) something that keeps the first ingredient from compacting tightly (usually either perlite, vermiculite, or pumice, or some combination thereof). If you check the list of ingredients on the label, you’ll see other things listed as well. Mixes may have regional variations depending on locally available materials. We’ve seen some that include earthworm castings, compost, ground fir bark, and sand.
One item you will probably not see listed is actual soil. Gardeners use the term “potting soil” out of habit, but in fact almost all potting mixes are soilless.
So which way should you go: straight out of the bag, or your own blend? It’s partly a question of your budget, and partly what’s available on the day you go shopping. Compare two brands. With any luck, the bags will have some areas of clear plastic and you can look inside. A high-quality mix has ground peat moss (looks like soft, dark brown dirt) combined in about equal measure with either perlite (looks like tiny white rocks), vermiculite (shiny flat bits), or some of each. Large pieces of bark or other shredded plant parts are often a clue to lesser quality. So is a smaller proportion of perlite or vermiculite. One very respectable approach, and quite affordable, is to get a large bag of the lesser-quality mix and a small bag of the amendment it seems to lack: ground peat moss, perlite, or vermiculite. At home, you will mix the bags together.
You’ll want to avoid two things. Don’t buy potting mixes formulated for one specific type of plant (roses, rhododendrons, orchids, and so on) unless you’re growing that particular plant. And don’t buy bags of topsoil (garden soil), which is too dense for your purposes. It’s probably labeled “topsoil,” but one good way to check is to lift the bag; if it is heavy, especially in comparison to another soil-mix product of the same size, you don’t want it. Good potting mix has various ingredients that aerate it, making it very lightweight.
Using actual soil, straight from someone’s yard, is not a good solution. Even if it is nutrient rich and well balanced, the very structure of garden soil presents some special problems for container gardeners. Because it is heavy (the gardener’s term for soil that is dense, which also makes it literally heavy), it will not drain well from a container, which usually has only one drainage outlet. As you water, this soil compacts more and more, which means that roots will not get enough oxygen for growth, will not be able to take up fertilizers and other nutrients, and will be subject to rot. Furthermore, garden soil contains a host of microorganisms that exist in a natural balance in a garden plot, but can easily get out of balance in the confines of a container.
Then, to your basic potting mix, you may wish or need to add other ingredients.
FERTILIZER. The ingredients of fertilizer are described on pages 67 to 70. We recommend that you use a double-dose program of liquid fertilizer and timed-release granules, described on page 67. Those granules are easiest to apply if you mix them in as part of your soil mixture.
MICRONUTRIENTS. If your timed-release fertilizer does not include the important micronutrients, you will need to add them separately. An easy way to do that is with a material called greensand (described on page 68), mixed into the potting soil along with everything else.
LIME. The relative acidity or alkalinity of substances is measured on the pH scale, which stands for “potential Hydrogen” and is written with a lowercase p and an uppercase H. Low numbers are very acidic (lemon juice is 2); high numbers are very alkaline (baking soda is 8); 7 is neutral. Most vegetables do well at a soil pH of 6.5. Commercial potting mixes that have a high proportion of peat moss or ground tree bark (which are naturally acidic) usually also include some agricultural lime (which is alkaline) to produce the proper pH. Examine the label or check with a knowledgeable salesperson. If you have reason to think the pH might be too low, buy a small amount of agricultural lime or ground dolomite and work it into your mixture. You can also just sprinkle it on top of the soil after planting, like a fine coating of powdered sugar.
Incidentally, a few things that you might have in your garden (blueberries, for one) actually prefer an acidic soil; we’ll tell you how to deal with that in the specific plant chapters.
WATER-HOLDING CRYSTALS. These granules (see page 66) start out small and dry, then absorb water and gradually release it. They, too, are easiest to apply if you work them into the soil mix before planting. Note that some manufacturers add micronutrients to the crystals; if the brand you choose has these, that’s one thing you won’t have to add.
Somewhere on the label of the potting soil you bought is an indication of its volume, usually measured in quarts. The packages of the other ingredients give you application rates: so much of their product in so many quarts or gallons of soil, or so many square feet, and so on. You’ll probably have to do some converting; remember that 1 gallon is 4 quarts, and 1 cubic foot (an area 12 inches by 12 inches by 12 inches) holds 6.6 gallons.
Seeds and Plants
Planting seeds is not hard; you learned how in the first grade. Neither is setting out transplants; we discuss this later in this chapter, but the fact is, it’s pretty self-evident even if you’ve never done it. What is not so obvious is deciding whether you should start with seeds or transplants.
Buy seeds if:
• The items you want, or the varieties you’re interested in, aren’t available any other way.
• The items don’t transplant well: beans, peas, carrots, beets, and radishes, for example.
• You’re trying to stretch your budget, especially if you can split seed packets with another gardener.
• You don’t mind that you’ll have to start some seeds indoors (a fairly tricky operation) in colder climates (see pages 54 to 60 for directions).
• You enjoy the convenience of making small repeat sowings of things like lettuce, mesclun, radishes, cilantro, and spinach; just tuck in a few seeds whenever an empty space appears.
• You don’t want to miss the fun of witnessing a very dependable, very accessible miracle.
Buy transplants if:
• Your growing season is short.
• You want to grow plants with a long maturity. In most parts of the country, that means they’ll need to be started indoors early, and you may rather have someone else—like a commercial grower—do that part.
• You want only one or two of certain plants, not a hundred.
• Something dies and you need a fast-track replacement.
As a practical matter, nearly everyone is better off with transplants—either from your own windowsill or a commercial greenhouse—for these plants:
• Tomatoes
• Peppers
• Eggplant
• Basil
• Chives
• Perennial herbs
• Pansies, violets, violas
And you usually have to start these from seeds:
• Peas
• Beans
• Carrots
• Beets
• Radishes
• Nasturtiums
• Sunflowers
• Cilantro
Many others are in a go-either-way category; the decision has largely to do with your climate. It is not hard to grow these plants from seed, provided your growing season is long enough and the gods are smiling:
• Cucumbers
• Squash
• Scallions
• Lettuce and other salad greens
• Leafy green vegetables
• Marigolds
In the case of edible flowers, often the seed-versus-transplant question simply doesn’t arise: for tulips and begonias, you have to start with bulbs; for roses, with a rosebush; and so forth. And, of course, with fruits you buy a small tree.
Starting Seeds Indoors
Inside your house or apartment, it’s nice and warm even when the outside temperature is chilly. You can get a jump on the season by starting seeds indoors, then transplanting them into your outdoor containers when the weather is right.
Fair warning: this is not dead simple. It’s a fairly fussy operation, and it involves a very tricky piece of timing. But if you are patient and have a nurturing temperament, the results can be satisfying indeed. Besides, for certain out-of-the-ordinary varieties, you simply have no choice—they can’t be found in a nursery.
It’s an old farmer’s axiom that to get off to a good start, seeds need a cool head and warm feet. In more prosaic terms, for good germination seeds have two requirements: even moisture and heat.
Here are the steps for starting seeds indoors:
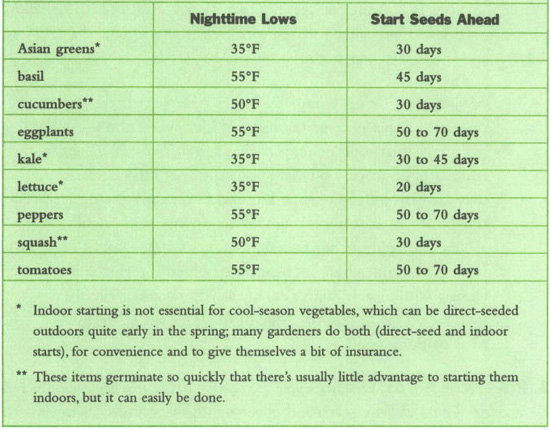
1. FIGURE OUT WHEN TO PLANT THE SEEDS. In general, you want to plant far enough in advance that the seedlings are ready to go into outdoor containers when the weather is ready to receive them—and not before. A common mistake is starting the seeds too soon; they hit transplant time before the weather is warm enough. Unless you take special protective measures (see the box at right), they will die outside; and if you try to keep them indoors longer, they’ll get leggy, rot, or succumb to fungal diseases.
Obviously you have to know your own weather patterns, and you have to know the seeds’ approximate germination time. Where we live it usually isn’t warm enough for tomato seeds to germinate outdoors until early June, and if there’s a killing frost in September, which there sometimes is, that doesn’t leave enough time to produce anything other than a fulsome crop of green tomatoes. So we buy good-size tomato transplants at the garden center in late May or June, or start our own seeds indoors in April (that’s how long it takes a tomato seedling to reach a transplant size large enough to do any good).
In the box on page 57 you’ll find some general guidelines on timing. We have included only the seeds that are easiest to start indoors. Do a bit of checking on your local climate patterns, and adjust these guidelines as needed. Also, note that with some extra care, described on page 55, you can fool Mother Nature into thinking it is warmer than it really is, and can move your plants outdoors sooner.
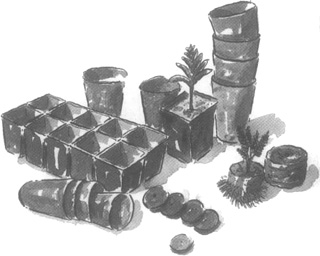
2. COLLECT YOUR EQUIPMENT. Essentially you need:
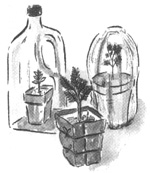
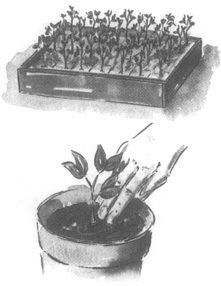
• Seed-starting medium. We recommend buying a bag of mix specifically designed for starting seeds (it will be labeled as such). This mix is very lightweight and contains very finely milled bits of peat or perlite, or both—nothing large enough to thwart a tender seed trying to unfurl. The most important concern for seeds is that the medium they are planted in be completely sterile (thus free of any disease agents). Some regular potting mixes are sterile, some not; but usually you can count on seed-starting mixes to be free of microscopic troublemakers. One bag will probably be enough for all your seeds for a season; it’s a good investment.
• Something to put the medium and seeds into. Small pots made of dried, compressed peat (round or square, in several sizes) are handy. When the seedling is ready to go outside, plant the whole thing, pot and all; the roots grow right through the sides of the pot, thus minimizing transplant shock.
You can also reuse small nursery containers that you saved from last year, as long as you clean them thoroughly with a mild bleach solution to kill any residual pathogens.
A very simple alternative a product called Jiffy pellets, which are circles of compressed peat encased in a very fine netting. These serve as both pot and soil, and they go straight into the garden without any repotting, which is easier on you and the plant as it avoids transplant shock. When dry they are flat, about the size of a silver dollar. Soak them in water and they expand to about 2 inches high, with a little dimple on top where the seeds go.
• A drip tray to catch the excess water. (If you’re using Jiffy pellets, place them on a cookie sheet.)
• Clear plastic to hold in humidity while the seeds are germinating. Any clear plastic bag will work, but don’t use the stretchy film that clings to itself.
• Something to label the containers with (all baby seedlings look alike). Garden centers sell small wooden and plastic sticks that you can write on with a permanent marker.
• A source of heat (not essential but very helpful). You can purchase propagating mats or grow-mats if you’re planning to start a lot of seeds indoors; or you can use a regular household heating pad, as long as it’s approved for moist heat. Keep it at the lowest setting, and set your trays on top. Another heat source you may already own is a food-warming tray, the kind you use on a buffet table; first cover it with a folded towel, and again, keep it at the lowest setting.
As well as these individual items, your favorite garden center undoubtedly stocks several types of complete seed-starting kits, which are very handy; many mail-order catalogs carry similar items. The kits often mimic the setup in commercial greenhouses; they consist of broad, shallow plastic trays divided into small squares, with a clear plastic lid and a drip tray. All you add is the seed-starting mixture and the seeds.
Maggie says: Being essentially lazy, I have settled on just one very simple system: it consists of Jiffy pellets and those foam trays that supermarkets package their meat in. When I find a good price, I buy large quantities of Jiffys because they have an indefinite shelf life, and I save only the meat trays that are narrow enough to fit on my windowsills. When I’m ready to start seeds, I soak a whole sinkful of Jiffys at one time, then fill meat trays (which I sterilized by rinsing with bleach) with as many as will fit, and write the seed variety names on the edge of the trays with a permanent marking pen.
3. PLANT THE SEEDS. First, dampen the seed-starting mix thoroughly and let it drain. Then add the seeds and cover lightly with more damp mix. If you have a source of heat, put the seedling pots and drip tray on it now.
4. COVER LOOSELY WITH CLEAR PLASTIC. This will help keep the surface of the seed-starting mix from drying out. Use chopsticks, pencils, or small twigs to prop up the plastic and hold it away from direct contact with the soil and the tiny sprouts. The plastic should not be airtight; you want air to circulate.
5. MAKE SURE THE SEED-STARTING MIX STAYS MOIST. If you have covered the pots with plastic, you can easily tell if they are moist because water beads will form on the inside of the plastic. When the mix gets dry, water gently with a mister; it’s important not to disturb the surface while the seeds are germinating. You can also pour water into the drip tray, and it will be absorbed up from the bottom.
Up to this point, light has been irrelevant. Seeds sprout in the dark. But once a seed has sprouted and formed its first set of true leaves (see box), the process of photosynthesis, upon which all green plants depend, has begun, and sunlight is necessary for it to continue.
6. REMOVE THE PLASTIC AND ENSURE GOOD LIGHT. Carefully lift the plastic so it doesn’t disturb the growing seedlings, and check your light source. If you don’t have good sunny windows, move a fluorescent lamp close by. Special full-spectrum grow lights are available but not really necessary.
7. THIN THE SEEDLINGS, IF NEEDED. If you planted lots of seeds for insurance and they all germinate, you will soon have a crowded forest of baby seedlings. You have to sacrifice some of them, or none will do well. The roots are extremely tender, and pulling out seedlings can injure the ones you wish to keep. A better technique is to snip off the discards, at the soil line, with something like manicure or embroidery scissors.
8. PROTECT AGAINST DISEASE. Very young seedlings are particularly susceptible to a fungal disease called damping-off. It’s a greenhouse version of sudden death syndrome: one minute the seedling looks fine; the next minute it has keeled right over. This fungus is rarely a problem with direct seeding, but it seems to find an easy foothold in the indoor environment. The best way to prevent damping-off is to water from the bottom by filling the drip tray with water in which you have dissolved a fungicide. For a homemade organic version, brew a batch of chamomile tea and water the seedlings with it; chamomile contains a natural fungicidal ingredient.
9. MOVE SEEDLINGS INTO A LARGER POT. Sometimes seedlings grow to an intermediate size while it is still too cold to put them outside, a common dilemma with heat lovers like tomatoes, eggplant, and peppers. If they stay in the original indoor seedling bed too long, their root growth will be stunted and they will never develop into healthy, thriving plants. So you need to move them into a larger interim container, where they’ll have more room to grow.
Rule of thumb: when a seedling has three sets of true leaves, it’s ready to come out of the seedling tray. If it can’t go into the outdoor container, it needs to be moved into a larger temporary pot. Carefully remove the seedlings, taking as much seed-starting mix as possible; if they are in one broad flat, slice out a block of mix with a table knife, as if you were cutting a pan of brownies. Plant the seedlings in larger pots filled with the same sterile seed-starting mix. Be delicate; the baby plant is still quite tender and needs to be handled with great care.
At this point, start feeding the babies with a balanced fertilizer dissolved in water; balanced fertilizer is one in which the three numbers (see Chapter 6) are approximately the same.
If seedlings are ready but the outside temperature is not, move them to an intermediate pot to prevent legginess.
10. GRADUALLY ACCLIMATE PLANTS TO THE OUTDOOR CLIMATE. It’s easy to be seduced into premature action come the first sunny day. But don’t move tender seedlings directly into their outdoor containers; the shock of drastically different temperatures would be too much for them. Instead, acclimate them gradually, in the process known as hardening off: day 1, set them outside for one to two hours, and then back into a sheltered location (a porch is ideal); day 2, outside for three to four hours, then back; and so on. After four or five days, they’ll be ready to stay outdoors.
Buying Good Plants
If you decide you’d rather let someone else do the work of sprouting seeds and want to buy potted transplants at the garden center instead, you’ll get no argument from us. In this case, your task is to get really healthy little plants.
In choosing healthy plants, short and compact is better than tall and lanky. Avoid plants that are leggy (with long stretched-out stem sections and relatively few leaves). Small, perky-looking plants with lots of green leaves will soon take off in a good environment like your containers; leggy ones always seem to have difficulty getting established, no matter what you do.
Roots growing out the bottom of the nursery container are a sign that the plant is rootbound. Vegetables and annual flowers in very small nursery pots or so-called six-packs often show this condition because commercial growers, eager to produce a large volume of plants in a short time, encourage fast growth, and at the retail nursery the plants just keep growing until someone buys them. It’s not a perfect situation, but it’s also not disastrous; just tear away the heavily matted roots before you plant. But if you have a choice between a six-pack that is rootbound and one that is not, choose the latter.
If you’re buying a plant for its flowers, it’s good if one of them is open so you can see the actual color, but in general look for a mass of buds rather than a mass of blossoms.
For all plants, check the stems and undersides of leaves for any indication of insects or disease. Most of these signs are obvious (discolored or misshapen leaves, for example); you may not know exactly what is causing the problem, but it’s clear that some kind of problem is present.
Planting the Containers
Your beautiful new pots are empty and waiting; your special potting soil, with all its additives, is mixed up and ready to go; you’ve accumulated a nice selection of seed packets and a flat of eager small plants. Now what?
If you have already figured out that your large containers are deeper than your plants’ roots will need, start by filling in some of the extra space (see box); the containers will be lighter and easier to move should you later wish to do so.
Fill the containers with potting soil up to about 2 inches from the top, and water them thoroughly; now you’re ready to plant seeds or baby plants, or both.
Planting seeds directly into the container where they will grow, known as direct sowing, is simplicity itself; just follow the instructions on the seed packet for how deep to plant them and how far apart. A seed should usually be planted as deep as its own largest dimension. That means that very tiny seeds just get pressed down into the mix with your fingers; very large seeds, like some beans, might require a depth of as much as an inch.
Deciding where in the container to place the seeds is mostly a question of your ultimate design for that container. If you want a fringe of carrots around the edges of a large round container, plant the seeds close to the rim. If you want a semicircle of bush peas at the rear, fronted with an inner crescent of beets, plant the seeds in that pattern. On the other hand, if your container will have just one item—salad greens, for instance—spread the seeds over the entire soil surface in a way that maximizes the space. In rectangular containers, plant in tight rows; in oval or round containers, in concentric circles. There are no hard-and-fast rules about this; common sense will guide you. Just remember that young seedlings will fare much better if they are not moved, so plant the seeds where you want the mature plants to be.
And thin the seedlings with small scissors once they sprout (see page 59).
Moving transplants into the container takes a little more attention, but not much. Make sure the mix in the container is lightly and evenly damp; also, thoroughly water the small pots holding the baby plants and let them drain while you proceed. With your trowel, dig a hole about as deep as the small containers. Slide the fingers of one hand around the base of a baby plant, and turn it upside down so that the plant and all its soil slide out into your other hand. If the plant doesn’t come right out, tap the rim of the small pot against something solid and try again. The thin plastic pots that many nurseries use for transplants will often release their contents if you simply squeeze them.
Try to keep intact the soil ball around the transplant. If you see a thick mat of roots twisted at the bottom, untangle them with your fingers and trim back the longest ones. Fit the plant and its soil ball into the hole you prepared, and fill in with the extra potting mix. Tamp the soil lightly with your hand, and move on to the next plant. When everything is in, water the entire container to help the plants settle.
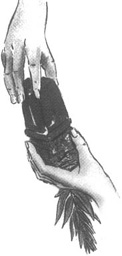
When removing a small plant from its nursery pot, try to keep the soil intact.
Do this, if possible, on a cloudy or overcast day; bright sun is hard on tender transplants. Best of all, do your planting when cloudy weather is forecast for the next several days. If that means waiting a few days, keep the flat of transplants in a sheltered outdoor location in the interim. Don’t keep them inside your warm apartment. Store them outdoors in a sheltered location, and check every day to make sure the soil doesn’t dry out.
If you have chosen a variety that you expect to tumble prettily over the edge of the container, gravity will eventually take care of it, but you can help things along with this planting technique: put the plant in the container leaning sideways, at approximately a 45-degree angle, with the tip of the plant pointing toward the edge; the roots will find their way down into the soil, and the new foliage growth will take off downward, as you intended.
Unless you have specific instructions to the contrary, plant bulbs twice as deep as their diameter. Most of the bulbs suggested in this book are planted in the fall and bloom the following spring; if you also want to sow some early-spring seeds in the same container, be careful not to dig up the bulbs as you prepare the soil.
PLANTING IN WIRE BASKETS. So far we have been working with containers that have solid sides. For containers made of wire grid, different techniques are needed. Commonly seen in the form of hanging baskets, wire is also used for certain styles of window boxes and even some freestanding planters. Because the sides of wire planters have lots of openings, a liner is needed to hold the potting soil in place. Plants go in not only at the top, as with solid-sided containers, but also through the sides for an all-around burst of color.
You have several choices of lining material. The classic is a thick layer of moss, but the results can be disappointing; it is sometimes difficult to keep everything from drying out. Newer products that hold moisture better are made from recycled wood products and recycled wool, ground up and pressed into a mat. Heavy plastic liners work fine but are rather unattractive until the plants grow large enough to cover the liner completely. Burlap works well, although it doesn’t usually last more than one year.
We have experimented with shade cloth (a heavy nylon mesh normally used in greenhouses to provide shade), and so far it looks promising as a liner. It will last for at least two years, and because it is flat black rather than glossy like plastic sheeting, it tends to disappear visually. A similar material is weed barrier, a permeable black plastic fabric designed to block out weeds in large garden plots. Both shade cloth and weed barrier have openings fine enough for water to drain out and air to circulate through, but they’re not large enough for soil to leak through. Both are sold at garden centers, and both are easily cut with scissors.
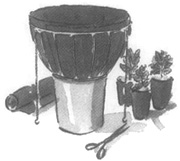
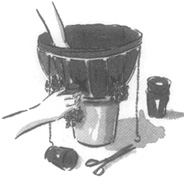
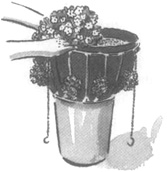
Set a round-bottom planter into a bucket for stability. Cut planting holes all around the liner, and add plants to all sides as well as the top.
If you’re working with a basket that has a rounded bottom, set it down into an empty pail for stability while you work. Put the liner in place, all the way up to the rim; leave an inch or so of excess at the top to allow for settling, and trim it off at the very end. You are going to work in layers: add a few inches of damp soil, slit openings in the liner, wiggle a plant into position, add in some more soil, make more planting slits, and so on until the entire outer surface is covered with plants.