Weeding? None. Hoeing and other heavy cultivating? None. Bugs? Sometimes, but easily spotted. Diseases? Less than in traditional gardens. Pruning? Not often. General tidying up? Sure, but not a big chore in such small spaces. Fertilizing? Yes. Watering? Yes.
Ongoing maintenance is not an overwhelming task in container gardens; it’s nothing like maintenance in traditional gardens. You have only two major areas to worry about—watering and fertilizing—but those two are absolutely critical.
In the ground, plants have a wide soil area from which to draw moisture. Even more important, the surrounding soil acts as an environmental buffer for the plant roots, tempering the drying effects of wind and hot sun. In a container, a plant has a limited area of soil, and there is nothing beyond the container but air. If that air is hot and dry, it will quickly pull moisture from the plant and soil. In the dead of summer, it’s not at all uncommon that containers need to be watered twice a day.
If you are to be successful with containers, you must be prepared with a good irrigation system and the discipline to use it. The system does not have to be high tech—a simple watering can is perfectly acceptable—but it does have to be used faithfully.
Your life will be a great deal simpler if you can run a hose to the area where your containers are. This may take some ingenuity on your part, but don’t give up without investigating all possibilities. We know a dedicated gardener who, while temporarily living in a large city with only a balcony for garden space, added a Y-shaped fitting to the water pipe in her laundry area. The washing machine attachment fastened to one side of the Y, and from the other she ran a hose through the apartment and out the door to the balcony.
A long wand (a rigid extension that fastens to the end of the hose) is useful for reaching hanging containers. A hose attachment that allows you to switch from a hard, tight spray to a broad mist is convenient. Another handy hose gadget, called a bubbler, disperses the solid stream of water so it doesn’t gouge a hole in the soil.
But if all you can do is fill the watering can and make lots of trips, then that’s what you’ll have to do. One way to make things a bit easier on yourself is to mix moisture-retaining polymers into the potting soil before you plant anything. Fairly new on the market, these are very small crystals of clear gel that start out about the size of coarse salt. They absorb water, swelling in size manyfold, and then slowly release the moisture back into the soil. A variation on this idea is a thin mat made of similar material that absorbs and then gradually releases water; you cut the mat to size and place it in the bottom of your container. Using these products is no substitute for watering, but they may buy you a little extra time, and that couldn’t hurt.
Several companies offer so-called self-watering pots—containers with a built-in water reservoir. The reservoirs can hold up to several quarts of water, which is gradually wicked up into the soil. The containers are more expensive than plain pots of equivalent size, but may be a good solution for people who travel often.
And if you really want to go all the way, purchase a drip watering system: long flexible tubing with a series of offshoots, each of which ends in a water emitter that fits down into the top of a container. The best systems have small screens behind the emitters to keep small pieces of grit from clogging the ends. For the ultimate in convenience add a timer to the system, a small box that fastens to the faucet and opens and closes the valve according to the programmed instructions. You can set the system to water all the containers once a day for 30 minutes, or several times a day for shorter periods, or whatever works best for you, and you can vary the settings as the plants grow and the weather changes. As you might imagine, this is an expensive solution, but it is basically foolproof and does allow you to have extended vacations without imposing on the neighbors.
Fertilizing and watering are interconnected chores. Fertilizers dissolve in water—that is the only way plants can absorb them, through the roots. With all the watering you must do, you are also washing away fertilizer, and so you need to replace it. That is true for all container plants, but it’s particularly critical for edibles for this reason: you have only so much time in any one growing season to produce the food, and so you must get maximum growth out of the plants during that time.
We recommend that you start off with potting soil into which you have mixed a slow-release granular fertilizer—solid fertilizer encased in small coated pellets about the size of BBs (Osmocote is one popular brand). With repeated waterings, the fertilizer gradually dissolves into the soil. For those who prefer the all-organic route, timed-release fish pellets are available but harder to find. The granules last several months before they gradually dissolve away to nothing. This gives you a good fertilizer foundation, so to speak, but by itself is not sufficient; you need to supplement with a regular program of additional fertilizing. What kind should it be? To answer that, we need a short lesson in plant nutrition.
Plants need three main nutrients for healthy growth: nitrogen (which promotes healthy foliage), phosphorus (for flowers), and potassium (for strong roots and overall vigor). On fertilizer packages they are represented by three numbers, always in that sequence, and always prominently displayed. Thus a label that reads 10-15-8 signifies that 10 percent of the contents is nitrogen, 15 percent phosphorus, and 8 percent potassium. The numbers never add up to 100, which would be too strong a concentration; the balance is composed of other nutrients (which we’ll address shortly) and inert filler. Fertilizers that contain all three primary nutrients are called complete (if one of the numbers is 0, it’s not complete); they are said to be balanced if the three are in roughly equal proportions.
It’s helpful to think of formulations in terms of ratio: the proportion of each primary nutrient in relation to the other two. A 20-10-10 formulation has the same ratio as 10-5-5, but has more fertilizing power. In the later sections of this book we often suggest fertilizers by ratio, because in different parts of the country you will find different formulations on the shelves. And by the way, arithmetic precision is not paramount: by ratio, 10-20-8 fertilizer is not significantly different from 5-15-6 or 8-20-5.
If you are growing vegetables mostly for the leaves (salad greens, for instance), you would want a fertilizer that has more nitrogen than anything else (a larger first number). But if you’re growing plants that flower first (tomatoes, squash, blueberries, and so on), you want a higher proportion of phosphorus (a higher middle number). So you might want to have two formulations on hand: something like 20-10-10 for leafy vegetables and 10-20-10 for vegetables that flower. Or if simplicity is your goal, choose just one all-purpose formula with a somewhat higher middle number (such as 10-15-10), and use it for everything.
Another way to go, almost as simple: use one balanced fertilizer (such as 12-12-12) for everything, and then add a nitrogen booster for leafy, plants and a phosphorus booster for flowering plants (these boosters are described below). This last technique works especially well with tomatoes, which often put on a burst of leaf growth early on and then fizzle out when it comes time for developing flowers and fruit; the phosphate helps them kick in to full production.
Commercial fertilizer comes in the form of either liquid or powder concentrates, both meant to be dissolved in water; the label will give you the correct dilution rate. You can make a weaker batch, but if you go stronger you’re asking for trouble.
In addition to the Big Three of nitrogen, phosphorus, and potassium, plants need certain secondary nutrients and micronutrients, called trace minerals, for vigorous growth. The secondary nutrients are calcium, magnesium, and sulfur. The main micronutrients are iron, manganese, copper, chlorine, boron, zinc, and molybdenum. Plants need only small amounts of these nutrients, but without them they do not thrive.
One way to make sure your plants are getting everything they need is to search out all-purpose, complete fertilizers that also contain the secondary nutrients and micronutrients. Manufacturers are required to list all the ingredients, by percentage, on the package label. Another way is to start with a basic complete fertilizer and then add one or more of the “boosters” described here. The advantages of this latter approach are that you can fine-tune your containers for your particular plants, and it’s easier to maintain an organic garden, if that is important to you. The disadvantage is lost convenience: you need to purchase all the various ingredients individually, and find a space to store what you don’t use.
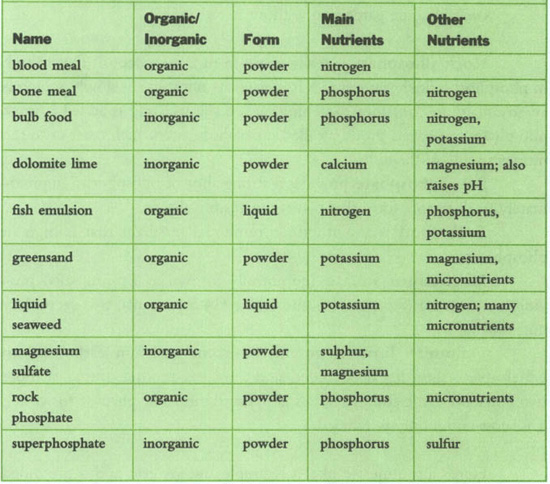
Here are some of the items you might find in a well-stocked garden center, starting with the organic products.
Greensand is a powder of finely ground rock that contains potassium, magnesium, and many micronutrients, and also helps improve the texture of the potting mix. The name is a bit misleading; it does indeed have a texture like very fine sand but is not itself green. Long popular with European gardeners, greensand is now becoming more widely known in America.
Bone meal, a fine powder, is indeed made from ground-up animal bones. It is an organic source of phosphorus (usually about 4-12-0). Blood meal, another slaughterhouse by-product, is an organic source of nitrogen (12-0-0).
Fish emulsion comes as a brown liquid, very concentrated and very fishy smelling. It provides mostly nitrogen, in proportions that vary by manufacturer.
Liquid seaweed, also a liquid concentrate, has light amounts of nitrogen and potassium and a wide range of critical micronutrients; it is especially valuable for helping seedlings develop strong roots.
Rose Marie says: In our business we use liquid seaweed constantly, for almost everything. I can’t stand to see any plant die, and I have successfully rescued many a wilted, puny specimen by dribbling liquid seaweed, full strength, around the rim of the pot and watering it well. I simply can’t imagine gardening without it.
Rock phosphate is really made from a rock deposit that is high in phosphorus, finely pulverized. It releases its phosphorus slowly, which is an advantage in container gardening. When sulfuric acid is added to rock phosphate, you have a product called superphosphate, which takes us to the inorganic side of the aisle.
Superphosphate provides a strong shot of phosphorus (approximately 0-20-0) in a form that plants can readily absorb.
Bulb food is a synthetic commercial fertilizer that is high in phosphorus.
Magnesium sulfate (commonly known as Epsom salts) provides magnesium (9.6 percent) and sulfur (14.5 percent), two secondary nutrients.
Dolomite lime is ground limestone (calcium carbonate) to which magnesium has been added, and thus it is another source of those two nutrients. Lime also increases soil pH, and this is the purpose for which it is most commonly purchased.
Here’s a routine we like; it is simple and generic, and is grounded in the assumption that you do not need extra boosts of any one nutrient. When you first prepare your containers in the spring, mix some greensand and granules of a balanced slow-release fertilizer into the potting mix. Then, when the plants start actively growing and producing, apply a complete, balanced fertilizer in a half-strength formulation once a week. If you replant for a fall garden late in the season, add some new slow-release granules, and then start adding liquid fertilizer once the new plants take off. Incidentally, if you have a container with a plant already established, such as a fruit tree or perennials, you can sprinkle new fertilizer granules right onto the surface of the soil once or twice a season.
A task that terrifies so many gardeners, pruning is virtually nonexistent in vegetable gardens. It’s important for fruit trees and some perennial herbs, and so is covered in detail in those chapters, but with vegetables it is seldom needed. If you do any pruning at all, it will probably be with tomatoes and rampant vines that threaten to overgrow their trellises. In any case, it will be helpful to get the basic principle fixed in your mind.
Plants grow from the top, not the bottom. If you remove the growing tip, side branches will develop. If you then remove the growing tips from those branches, they will branch out yet again. In this way you can encourage compact, bushy growth, which is a good thing in tight spaces. Most of the time you can just pinch off the top with your fingers. This technique will come in handy if your pole beans are heading for the roof or your tomatoes are bursting out of their cages.

Pinching the growing tip promotes bushiness.
Right from the get-go, you have one big advantage over traditional gardeners: because you are using sterile potting mixes, you completely avoid those soilborne diseases that are so hard to spot and even harder to get rid of. For instance, an extremely common problem with tomatoes is a fungal disease called verticillium wilt, caused by a pathogen that lives in infected soil and enters the plant through its root system; container gardeners using potting mixes that contain no real soil neatly bypass the problem. For extra insurance, or if you’re reusing a container from last year, select disease-resistant varieties; good catalogs include this information.
You may, however, experience other plant diseases that travel through the air or are carried in by insects. And you may be visited by any of a variety of damaging insects, but even here your life is easier because you’ll have fewer of them and because you’ll notice them sooner, while they are still relatively easy to take care of. In this section we introduce you to some of the worst troublemakers. First, though, we’ll give you a bit of perspective on the matter and point you toward a source of expert assistance.
It may seem, as you scan through all the problems described in this section, that the gods are aligned against you; how can you possibly be successful if all these malevolent forces are gathering on the horizon? The truth is, in all likelihood you’ll experience very few of these problems, and quite possibly none of them.
If you do see signs of a problem, we hope you will pause before taking action. Don’t rush to the store for pesticides the first time you find a few holes in the escarole. That poison will do you a lot more harm than whatever of God’s creatures is munching on your salad greens. First, try to figure out what you’re dealing with. Be a detective: check the plant thoroughly, especially the back sides of leaves and the stem down at the soil line. Then consider how critical the damage is and how far you are willing to go to correct it. Research the various treatment possibilities, and decide which one makes the most sense for you. (Excellent help is waiting at your local county extension office; see box.)
Taking the broader view, strong toxins constitute a threat to the environment, some of them in ways we do not yet realize. Many diseases can be avoided by choosing disease-free or disease-resistant varieties of plants. Many garden insects are actually beneficial, and most of the others can be controlled through nontoxic measures.
Here’s how we see it: anything you ultimately plan to put in your mouth should be treated tenderly and respectfully; we use toxic controls only as a last resort. Even then, we try to use products that break down quickly and are the least harmful.
APHIDS. Tiny little devils no bigger than a comma that suck the juices out of plants, eventually killing them. And even if they don’t kill the plants themselves, they sometimes transmit other diseases. They’re especially partial to tender new growth, so you find them clustered near the growing tips, on the stems, buds, or underside of leaves. They like hot weather.
Maggie says: Except for slugs, there’s nothing I hate worse than aphids. Just the sight of them clambering all over each other gives me the willies.
You don’t usually see just one aphid but a whole clump of them. To get rid of them, spray that clump hard with the hose; the goal is to knock them off. You can also just rub them off with your thumb (gloves are nice). If that doesn’t get rid of them, go to the next level: spray with insecticidal soap, pyrethrum, or rotenone (described below). A plant that is very severely infested should be dug up and disposed of, before the infestation spreads.
Keep an eye out for a line of ants marching into your containers; that’s an early warning signal of aphids. The aphids secrete a sticky sweet substance that ants like, and so they (the ants) draw in aphids and keep them in place, rather like a herd of cows.
All members of the cabbage family, like kale, seem to attract black aphids at the soil line. The best controls are insecticidal soap, pyrethrum, and rotenone.
Insecticidal soap. This is a soap by chemical definition (the product of an alkali reacting with a fatty substance), but don’t confuse it with dishwashing detergent—it is a poison, although safer and less environmentally harmful than many synthetic pesticides. Dilute it with water according to the directions and spray it where you see insects; you may have to repeat applications.
Rose Marie says: At our nursery we add a few drops of essential oil of orange to the sprayer along with the soap. It helps the soap stick and is itself a natural insecticide, effective against ants and scale, and it smells nice.
Pyrethrum. An insecticide made from chrysanthemum flowers; it is safe to use on food crops, and readily breaks down in the soil without toxic residues.
Rotenone. Another insecticide derived from natural sources, this time from certain legumes, and also safe to use on edible plants.
For all controls that are applied as a spray, use these directions. Make up the solution according to the instructions on the package label; resist the temptation to make it stronger. You can use a small spray bottle, but if you have access to a large tank sprayer, it works better. Wear gloves. Direct the spray to all parts of the plant, and don’t overlook the undersides of leaves. Don’t spray when it’s very windy or in bright sunshine. Check after a few days; repeat if necessary. Wait a day or so after application before harvesting, and wash your produce well.
SLUGS AND SNAILS. Truly disgusting creatures that chomp big holes in almost every kind of plant, slugs and snails are large enough to see easily, but they do their dirty work mostly at night and hide below soil level in the daytime. They are prevalent where the environment is cool and damp, so be especially watchful in the spring, unless like us you live where practically the entire growing season is like that.
Organic gardeners favor hand-picking them and dropping them into a container of salty or soapy water. Copper strips, attached to the outsides of containers, are effective deterrents; slugs get an electric shock when they crawl over. Snip off a section of a copper scouring pad and use it to block access through the drainage hole. A new type of slug bait, made of iron phosphate in granular form, works well with slugs but it is not harmful to pets. Find it at your garden center (brand name is Sluggo) or mail-order (Escar-Go!, from Gardens Alive!).
FLEA BEETLES. These are black and very small, about the size of fleas, and they jump like fleas. They eat tiny holes in leaves; eggplant and arugula are particularly vulnerable. Spread a row cover over the entire plant early in the season, and you can keep them out. It also helps to raise your containers up off the ground several feet, out of reach of these jumpers. Flea beetles also feast on weeds and dead leaves, so keep these cleaned away.
CUTWORMS. You usually don’t see these worms, just their results—the stem is sliced off at the soil line, and the plant topples over. Organic gardeners with large gardens protect young seedlings with some kind of collar, like a bottomless tin can pushed around the stem. In a container, you are less likely to have these pests, and if you do you won’t know it until the young plant suddenly keels over. If that happens, dig around the potting mix at the base of the plant, looking for brownish caterpillar-like worms. Pick them out by hand and put them in the garbage, then run to the nursery for a replacement plant.
TOMATO HORNWORMS. If Walt Disney ever did an animated film about gardens and bugs, this fellow might be a star: you can easily imagine a playful rendition of this fearsome-looking critter, with his fat striped body and sharp horn. Hornworms eat big holes in tomatoes and chomp away at the leaves. They are well disguised, the exact color of tomato leaves, so you’ll have to go looking. Fortunately, they’re large enough that once you find them you can just pick them off and dispose of them.
MILDEW. Big splotches of mildew—grayish patches on leaves that seem to leach out the green color—are unsightly and also unhealthy. There are two types: downy mildew, which occurs in cool, damp conditions; and powdery mildew, which occurs when the weather is hot and humid. You usually see downy mildew in early spring, with peas, beets, and other cool-season vegetables; powdery mildew hits in late summer, especially with squashes and cucumbers. Cut off the most severely affected leaves, and spray the rest with a mixture of 1 teaspoon of baking soda dissolved in 1 quart of water. You may have to repeat sprayings every few days to keep the problem from spreading.
BLOSSOM-END ROT. The sign is impossible to miss: at the blossom end of the fruit (where the flower used to be, not the end that is now attached to the stem), a big, ugly, sunken black spot develops. It doesn’t actually rot, but it definitely ruins the fruit. Two things seem to be responsible: a lack of calcium in the soil, and uneven watering. To control this disease, correct those two faults and throw away the blemished fruits. See more information in the chapters on tomatoes and peppers, which are the primary targets of this malady.
Of course, the best control for all problems is prevention: clean away dead leaves and other debris that collects on the soil surface, and remember to run a critical eye over your plants while you’re admiring them, checking for early signs of a problem. If you spot something suspicious, move that container away from the others while you figure out what’s wrong. And remember to keep a healthy perspective.
Maggie says: I have a rather unconventional philosophy about insect and disease problems: if you can’t fix it easily, toss it out and start over with something else. Life’s too short to make yourself crazy over things like this.
Rose Marie says: Amen.