CHAPTER 7
Automation Tools
In this chapter, you will learn how to
• Install and use Oracle Cloud Infrastructure CLI
• Install, configure, and use Terraform
While most OCI tasks may be performed through the OCI console, the real power of cloud infrastructure computing is realized through automation tools that allow you to deploy Infrastructure as Code (IaC). Treating infrastructure as code changes the deployment paradigm by supporting massive, yet consistent, infrastructure architectures to be programmatically deployed.
OCI is accessed through REST APIs. Infrastructure orchestration is based on calling these APIs to create, update, or destroy OCI resources. The OCI web console, CLI, and SDKs interact with OCI resources through these APIs. The CLI and SDKs extend the functionality of the console by supporting scripting and programmatic interfaces to OCI. Additional developer tools provided by Oracle include a Toolkit for Eclipse and an HDFS connector for object storage. Several DevOps automation tools are provided, such as a Terraform provider and Ansible modules as well as many plugins for Chef Knife, Jenkins, and Grafana. These are just a few from a constantly evolving list. The taxonomy presented in Figure 7-1 shows several popular IaC tools categorized into tools for scripting, configuration management, templates, and infrastructure provisioning.
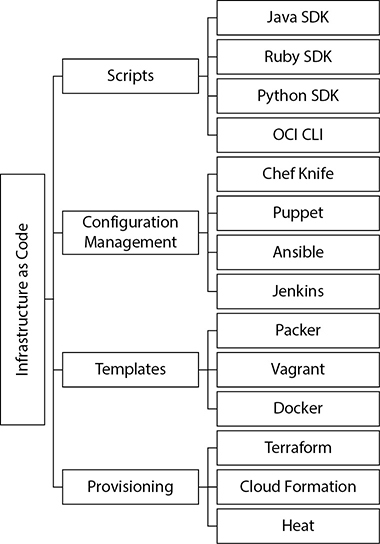
Figure 7-1 Popular groups of IaC tools
Terraform is a generic declarative tool designed by HashiCorp to provision infrastructure through code. Oracle provides a freely downloadable Terraform provider for OCI that exposes OCI services to Terraform. While many automation tools enable you to orchestrate infrastructure on OCI, this short chapter focuses on getting you started with using the OCI CLI and Terraform.
OCI CLI
The OCI CLI operates in a similar manner to many other Oracle command-line interfaces. It is simple and powerful and lends itself to easy integration into shell scripts. The CLI is based on Python and makes use of JSON input and output formats. The Python code is a wrapper around OCI REST APIs. OCI CLI commands call these APIs that implement the required functionality. These are the same APIs called by the SDKs and the console.
Many examples throughout this book are illustrated using OCI CLI commands. In this section, you will install the OCI CLI and use it to interact with several OCI resources.
Install and Configure OCI CLI
The OCI CLI runs on Mac, Windows, and Linux machines and is built on Python. Refer to the relevant online documentation for updated installation instructions. The following prerequisites must be met before installing and configuring OCI CLI:
• An OCI account
• An OCI user with sufficient permissions
• An SSH key pair
• A compatible version of Python
• FIPS-validated libraries if FIPS compliance is required
The CLI may be installed automatically on Linux, Unix, and Mac OS with a single command, or you can perform a manual installation.
Automated Installation of the OCI CLI
Using the QuickStart installation script provided by Oracle is the simplest and quickest way to get started with the CLI. Refer to the online documentation for the latest installation procedure as this may vary slightly as the tool evolves.
Exercise 7-1: Install the OCI CLI Using the Quickstart Installation Script
In this exercise, you install the OCI CLI on Linux, Unix, or Mac OS using an installation script provided by Oracle. Your output may differ depending on your operating system and the packaging of the CLI at the time of installation.
1. Log on to the machine where the OCI CLI is to be installed. This may be your personal workstation or a shared OCI VM to be used for automation and orchestration. In this exercise, a VM with Oracle Linux 6.8 is used and the OCI CLI is installed by the Oracle user.
2. At the shell prompt, run the Quickstart installation script as per the documentation. At the time of this writing, the installation script is downloaded and executed through the bash command shell with the following command:

3. The initial shell script is downloaded and the OCI CLI Installer is started in interactive mode. Provide responses to the installation script prompts. On Linux, for example, the script verifies prerequisites, such as a compatible version of Python and any other platform-specific packages like virtualenv, and downloads and installs missing dependencies.

4. You must provide directories where the install, oci executable, and OCI scripts must be placed.

5. Once the packages are installed and built, you have the option to have the PATH environment variable updated in your profile to include the path to the oci executable, allowing the executable to be invoked without providing the full path. You are also given the option to enable shell/tab completion, which allows OCI commands to be autocompleted when you partially enter an OCI command and press the tab key to complete the command. Respond with Y if you want these two options enabled.

6. If all goes well, the install script completes with the following message:

Manual Installation of the OCI CLI
If you prefer to install the OCI CLI manually instead of using the Quickstart script, the steps vary depending on your platform. At a high level, the manual installation involves these steps:
1. Install a compatible version of Python. On Oracle Linux 7.3, for example, the following packages are required for Python and several additional components before installing the CLI.

2. Install and configure virtualenv, which is a virtual environment builder for isolating Python environments. If you choose to not use virtualenv, the system-wide Python execution environment is used and package conflicts may occur. On Linux, virtualenv is often packaged separately from Python and may be downloaded from GitHub or the Python Package Index (PyPI). The virtualenv environment may be installed using the following pip and pip3 commands for Python 2 and Python 3 respectively.

3. Download the CLI from GitHub or PyPI and install using pip. For example, you can download and unzip oci-cli.zip from GitHub and install using the following:

You can check if the CLI is successfully installed by running the tool with the help option. This option describes the commands and capabilities of the OCI CLI tool. The output has been truncated for brevity.

Once the OCI CLI is installed it must be configured before use.
Configure the OCI CLI
Configuring the CLI includes saving the Oracle Cloud IDs (OCIDs) for your OCI user and tenancy as well as RSA key references in a configuration file that you create manually or let the CLI configuration process automatically create for you. A pair of RSA public and private keys is needed to authenticate your CLI user with OCI. You keep the private key safe and do not share or post publicly. You add the public key to your designated OCI user. This creates an API signing key. This process supports the OCI CLI user authentication. Once the configuration in complete, OCI CLI commands are run using the user and tenancy specified in the configuration file.
You may also use token-based authentication allowing users to authenticate sessions interactively without an API signing key. This section focuses on configuring the OCI CLI to use API signing keys.
Exercise 7-2: Configure OCI CLI
In this exercise, you will configure the OCI CLI on Linux, Unix, or Mac OS. Before you configure the OCI CLI, you will need the Oracle Cloud ID (OCID) values for both the OCI users and the tenancy.
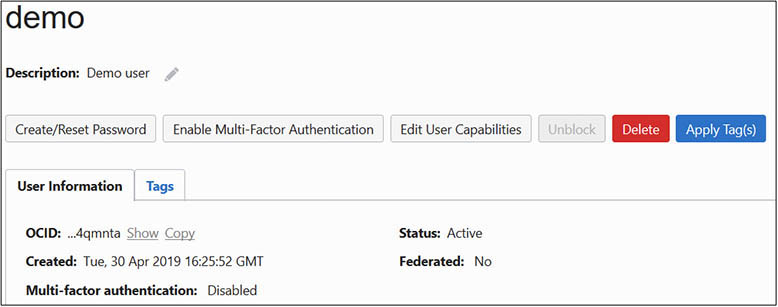
1. Obtain the OCID for the username that will interact with OCI through the CLI. Connect to Oracle Cloud using the console. Navigate to Identity | Users and choose a username. Choose the Copy link next to OCID in the User Information section to copy the OCID to your clipboard. Paste this OCID in a safe location.
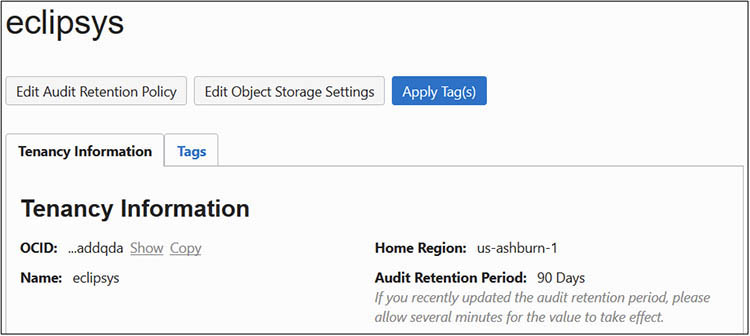
2. Obtain the OCID for the tenancy you will interact with through the CLI. Navigate to Administration | Tenancy Details and choose the Copy link next to OCID in the Tenancy Information section to copy the OCID to your clipboard. Paste this OCID in a safe location. Take note of the Home Region of your tenancy. In this example, the Home Region is us-ashburn-1.
3. Log on to the machine as the user that installed the OCI CLI.
4. At the shell prompt, run the oci setup config command, which guides you through the setup of a valid CLI configuration file.

5. You are prompted to enter a location for the config file.

6. You are prompted for the user OCID and tenancy OCID and region.

7. At this stage in the configuration, you may choose to provide your own RSA keys or to generate a new pair. Keys are then written to various locations you choose.

8. The public key must be added to the OCI user. View the public key in a text editor and copy the contents to your clipboard. The key output has been truncated for brevity.

9. In the console, navigate to Identity | Users and choose your designated user. Scroll to the API Keys section and choose Add Public Key. Paste the public key referenced in the previous step and choose Add.

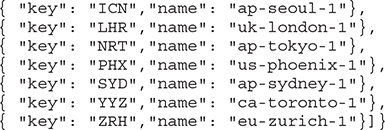
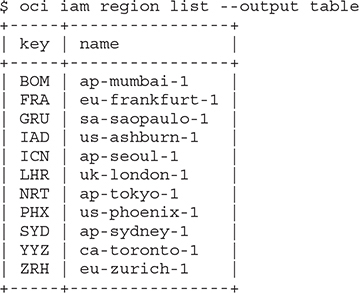
10. You should be all set to test the OCI CLI from your workstation. Run the oci iam region list command to report on all OCI regions available to you.

Use OCI CLI
The previous exercise showed how the OCI CLI output is returned in JSON format. You may also create JSON format input files to pass to OCI CLI commands. This is beyond the scope of this book. The CLI output may alternatively be displayed in a tabular format by appending --output table to the command.
After configuring the CLI, the config file may include the following fields:
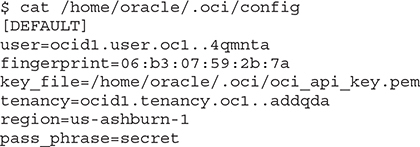
You may generate a new RSA key pair and update the configuration file accordingly. Remember to add the new public key to the user profile through the console or through the CLI. The profile header [DEFAULT] in the configuration file refers to the default settings used whenever the CLI is invoked. You may add your preferred compartment or namespace as default values to avoid explicitly specifying these in CLI commands. You may also add other non-default profiles and use those associated key-value pairs by providing the --profile parameter to the oci command.
The CLI usage syntax is based on service, type, action, and options.

Table 7-1 lists a subset of an ever-growing set of OCI services exposed to the CLI, including Block volume, Compute, and Database services. As OCI services are added, APIs to interact with these services are built and exposed to the CLI, SDKs, and other interfaces.
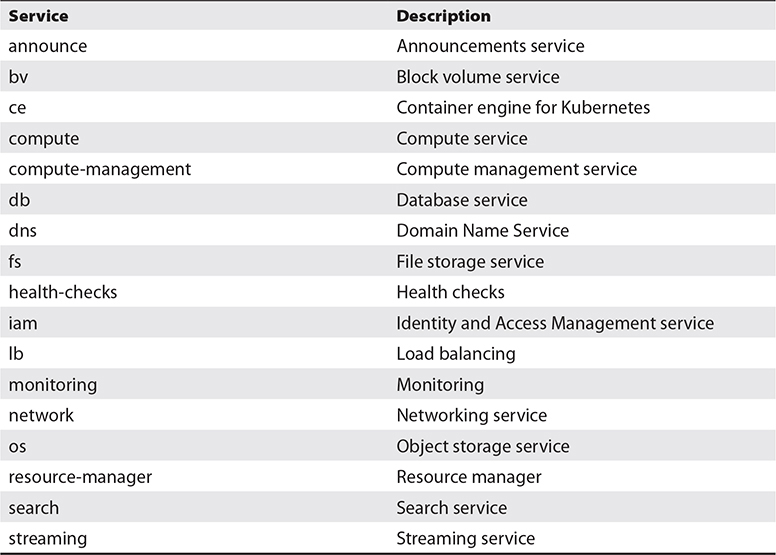
Table 7-1 Subset of OCI Services Accessible Through the CLI
The following examples demonstrate the basic usage principles of the OCI CLI. Just type oci and press enter and the full usage manual page scrolls by. Drill into the different types of Networking Service CLI commands with oci network. If you are interested in the virtual cloud network (VCN) resource type, you need only issue the oci network vcn command to see the available actions to perform on this resource type.
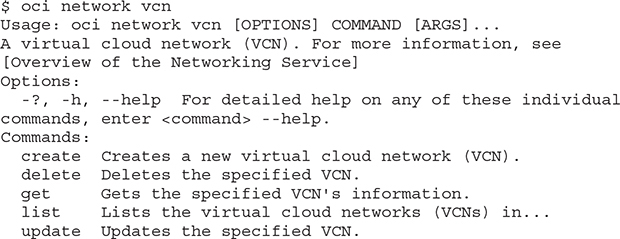
The actions available through the oci network vcn command is this example are create, delete, get, list, and update and are a fairly consistent set of action commands available for most resource types. The oci bv backup command lists these same actions for backups through the Block volume service in addition to specific actions such as copy and change-compartment.
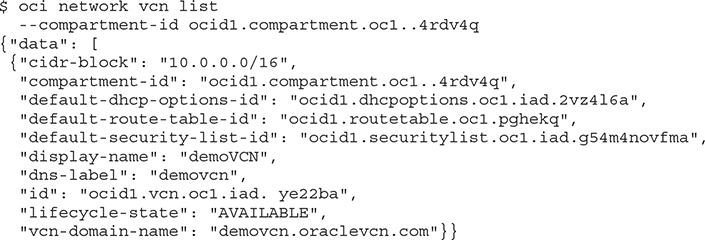
The options for individual commands vary and usually limit the scope of the command to a specific OCID or compartment. For example, the oci network vcn list --compartment-id <compartment OCID> command returns a JSON format listing of the VCNs in the specified compartment, assuming the CLI user has IAM permissions to list the VCNs.
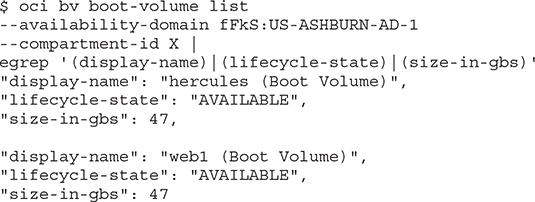
You may list all block volumes in an AD that belongs to a compartment with the following OCI CLI command:

Boot volumes in the same AD may be listed by querying the Block volume service with the following OCI CLI commands. Note the difference between the previous command and this command. Both call the Block volume service (oci bv) but block volumes use the bv api while boot volumes use the boot-volume api.
Exercise 7-3: Use the OCI CLI to List Supported Oracle Databases
In this exercise, you create a block volume in the same AD as compute instance web1. If you completed all the exercises in Chapter 4, you should already have this compute instance.
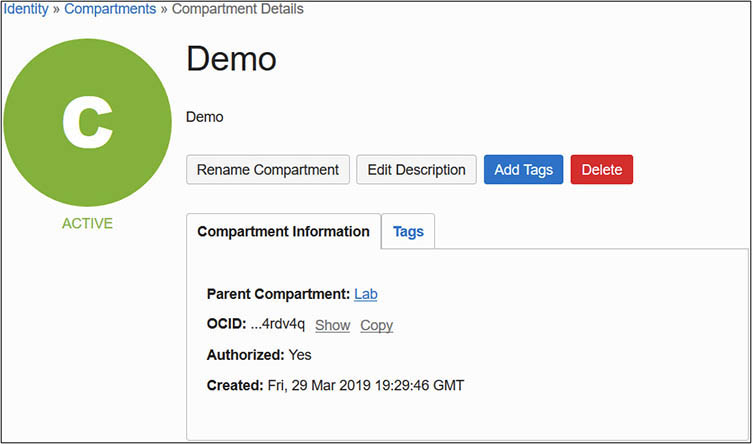
1. Obtain the OCID of a compartment to which your CLI user has been granted at least read access. Sign in to the OCI console and navigate to Identity | Compartments and choose a compartment accessible to your CLI user. Copy the compartment OCID to your clipboard. You will need this OCID in the next step.
2. Log on to the machine as the user that installed the OCI CLI.
3. At the shell prompt, run the oci db version list --output table --compartment-id command, providing the compartment OCID.

4. Your output may differ as new database versions are supported by the OCI DB service and older versions are deprecated.
You could architect and script the creation, management, and removal of infrastructure using the OCI CLI with great efficiency. Indeed, treating infrastructure as code (IaC) is the only feasible scalable model for future infrastructure management. The following section describes the creation, listing, and removal of a VCN using three simple OCI CLI commands. It is followed by a simple example of creating a VCN using a JSON formatted input file. It is likely that you will use the JSON input file approach for more complex and repetitive tasks. The following CLI command creates a network VCN in the specified compartment using the CIDR block 10.0.0.0/22. In this example, the CIDR range is a subset of the CIDR block allocated to the root compartment to which this compartment belongs. Navigating to Networking | Virtual Cloud Networks and choosing the appropriate compartment through the OCI console will list the newly created VCN.

You may alternatively list the VCNs in the compartment using the following:

When the VCN is no longer needed, it may be easily deleted using the following:

As mentioned previously, the CLI output is in JSON format. You may also pass commands to the CLI using a JSON input file that is in a specific format. The CLI provides the --generate-full-command-json-input option to generate the JSON code to use as input for CLI commands. The following command generates the JSON code to use as input for the CLI to create a VCN.
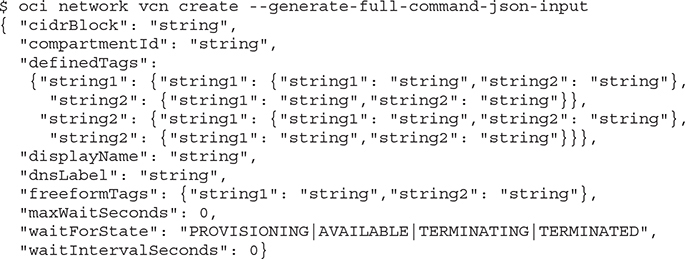
Many of these variables are optional. For this example, a JSON file is created with these name-value pairs:

This input file is provided to the CLI using the --from-json file option:

Terraform
Terraform is a declarative tool used to automate the full infrastructure lifecycle from the provision stage to updates and maintenance to the destroy stage. Terraform is developed by HashiCorp and is integrated into OCI through the Terraform provider for OCI. Terraform uses text configuration files with HashiCorp Configuration Language (HCL), which is simple to understand and edit, providing a self-documenting infrastructure provisioning solution. Terraform can also read JSON configurations. HCL code is used to specify infrastructure provisioning directives that are agnostic. Terraform files may be used by multiple cloud and on-premises infrastructure providers. The Terraform provider for OCI handles the interaction between Terraform and OCI, allowing OCI credentials to be configured, and translates the Terraform directives into OCI API calls, effectively exposing OCI resources to Terraform code.
Follow these steps to get started using Terraform on OCI:
1. Download and install Terraform and the provider for OCI.
2. Collect OCIDs and API and SSH keys for Terraform.
3. Prepare your provisioning environment for Terraform.
4. Create terraform configuration files.
5. Use Terraform commands such as plan, graph, apply, and refresh.
6. Use the Terraform destroy command to purge resources no longer required.
This section is designed to get you started with Terraform and the provider for OCI. It is an introduction and in no way a comprehensive treatment of the subject.
Install and Configure Terraform and the Provider for OCI
Terraform may be installed on a variety of platforms. When using Windows, it is useful to have access to a bash shell through a tool like Git-bash. Several packages need to be managed during the installation and, on Windows, tools like the Chocolately package manager ease this process. Basic knowledge of git is useful as well to clone the Terraform OCI provider repository. For more details on how to set up Terraform and the OCI provider on Windows, refer to the online documentation.
Exercise 7-4: Install and Configure Terraform and the Provider for OCI on Linux
In this exercise, you will download and install both Terraform and the Terraform provider for OCI on a Linux host. Several prerequisites are required for setting up the Terraform provider for OCI. These include the OCIDs for the tenancy and an OCI user whose account is used for the OCI interaction through Terraform on your host. A PEM format private key and public key are required as well.
1. You may reuse an existing PEM key pair or generate a new pair of keys on your Linux host using the following commands:

2. Obtain the OCID of the tenancy. Sign in to the OCI console and navigate to Administration | Tenancy Details and copy the OCID to your clipboard. You will need this OCID later. You can use Terraform to orchestrate infrastructure in any region to which your tenancy is subscribed. Take note of your preferred region for this exercise.
3. Obtain the OCID of the designated user. This user will be used by Terraform and the provider to interface with OCI, so ensure that adequate IAM privileges are granted to the user. Navigate to Identity | Users in the console, choose the user, and copy the OCID to your clipboard.
4. Navigate to the API Keys section if a new PEM key is to be added to the user. Choose Add Public Key and paste the public key created in the first step of this exercise, and then choose Add. Copy the fingerprint associated with the public key to your clipboard.
5. Download Terraform for your platform from the HashiCorp download page (https://www.terraform.io/downloads.html) and copy the zip file to your Linux machine where you plan to install and configure Terraform and the provider for OCI.
6. Unzip the Terraform archive in your preferred location. At the time of this writing, the Terraform archive contains a single executable. You may wish to add this location to your default PATH. Confirm the executable works by checking the version.

7. Using the data in your clipboard, set the following environment variables in your shell.

8. Create a Terraform file to instantiate the Terraform provider for OCI. You may embed other Terraform commands in this file, but at the very least, you need to specify references to the environment variables set in the previous step. As Terraform versions evolve, slight variations in the file formats may be required. The tool will let you know if any upgrades or modifications are required for your Terraform files.
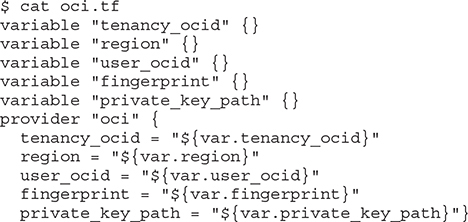
9. Initialize Terraform.
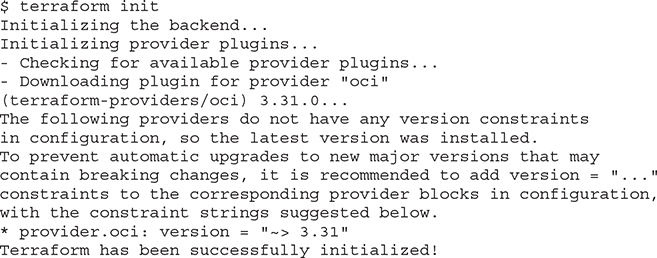
10. Confirm that both Terraform and the provider for OCI have been installed and configured.

Use Terraform
You can describe and manage your infrastructure as code using Terraform configuration files written in either human-readable HCL files ending with the .tf extension or machine-readable JSON format files ending with the .tf.json file extension. Terraform configuration files specify provider definitions, like the oci.tf file used in the previous exercise when initializing the provider for OCI, as well as for defining OCI resources, variables, and data sources. Terraform converts these configurations into a set of API calls against the OCI API endpoints.
Terraform configuration files reside in a specific directory on your file system. When Terraform commands are run, all .tf and .tf.json files in a directory are loaded. By default, Terraform expects each configuration file to define a distinct set of objects and returns an error if multiple files attempt to define the same object. Overriding this behavior is possible by using a special override file, but this is rare and not encouraged as it hurts readability. Refer to the online Terraform documentation for syntax description. HCL is a complex command language that is being updated constantly and is out of scope for this chapter. It is common to see the following HCL configuration language elements in these configuration files:
• variable Both input and output variables are supported, enabling data to be sent to and received by OCI through the API.
• resource These are the primary constructs in Terraform configurations and typically consist of resource blocks describing one or more infrastructure resource objects.
• provider A provider offers a set of resource types that determine the behaviors of the resources. Providers expose IaaS resource types to Terraform. For example, the OCI provider exposes the virtual cloud network resource type. Resource constructs can then interact with this type by defining, creating, managing, and destroying elements of this resource type.
Terraform creates state files to store information about your managed infrastructure and configuration. This is primarily used to map real-world resources to your configuration and is located by default in a local file named terraform.tfstate.
Once the Terraform configuration files are created, use the Terraform commands to load and process these. The following popular Terraform commands are briefly described:
• init Initializes new or changes existing Terraform configurations.
• plan Generates and displays an execution plan that helps you validate your script before you apply it to your environment.
• apply Runs the Terraform scripts using the variables passed in with the terraform plan command to build or change infrastructure.
• graph Builds a visual graph of Terraform resources.
• refresh Synchronizes the local state file with real-world resources.
• taint Marks a resource for recreation. The next time the Terraform apply runs, the resource is destroyed and rebuilt.
• untaint Updates the resource state metadata so it is no longer marked as tainted and remains unchanged at the next Terraform apply.
• destroy Deletes the Terraform managed infrastructure resource.
There are hundreds of examples of Terraform configurations on the Oracle maintained GitHub site so you have to start from scratch. At the time of this writing, this GitHub repo resides at https://github.com/terraform-providers/terraform-provider-oci/tree/master/examples.
Exercise 7-5: Use Terraform to Create and Remove an OCI VCN
In this exercise, you will create a VCN and then delete it by using Terraform and the provider for OCI. You are guided through creating a single Terraform configuration file that defines the variables for the OCI environment to be impacted, the provider to use, and the resource to manage. Terraform commands are used to validate the configuration file and build the resource defined before finally removing the VCN. This exercise is dependent on your successful completion of the previous exercise.
1. Obtain the OCID of the compartment that will contain the new VCN. Navigate to Identity | Compartments in the console, choose the compartment, and copy the OCID to your clipboard.
2. Using the data in your clipboard, set the following environment variables in your shell. If you are working in the same shell session you used for the previous exercise, some of these variables may already be set, but it does not hurt to set them anyway.

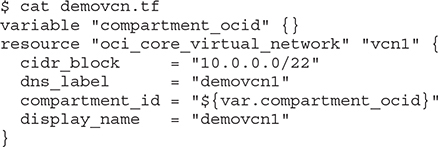
3. Create a Terraform configuration file named demovcn.tf in the same directory as the provider configuration file oci.tf. This file references the OCID of the compartment where the VCN named demovcn1 is to be created.
4. Run the terraform plan command to generate an execution plan.
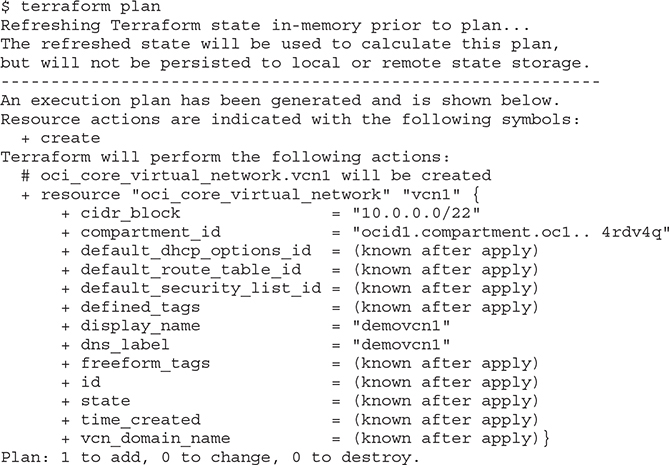
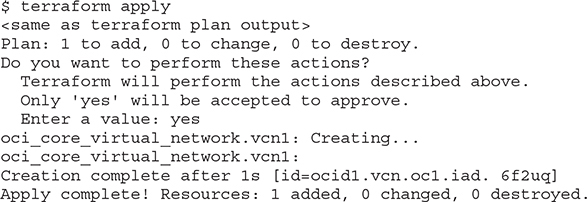
5. Review the generated plan and verify the planned changes are aligned with your expectations. Until you apply the planned changes, no changes are made in OCI. You may want to connect to the OCI console and navigate to Networking | Virtual Cloud Networks and confirm there is no demovcn1 in the specified compartment. When you are ready, apply the plan. The output has been truncated for brevity and the generated execution plan output that is identical to the output in the previous step has been removed.
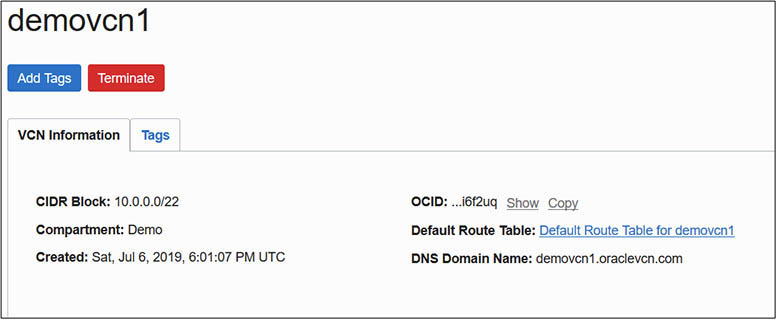
6. A new VCN should appear in the OCI console.
7. You could update the demovcn.tf configuration file with new elements to specify subnets, route tables, or other resources, or create new configuration files defining other resources to be managed.
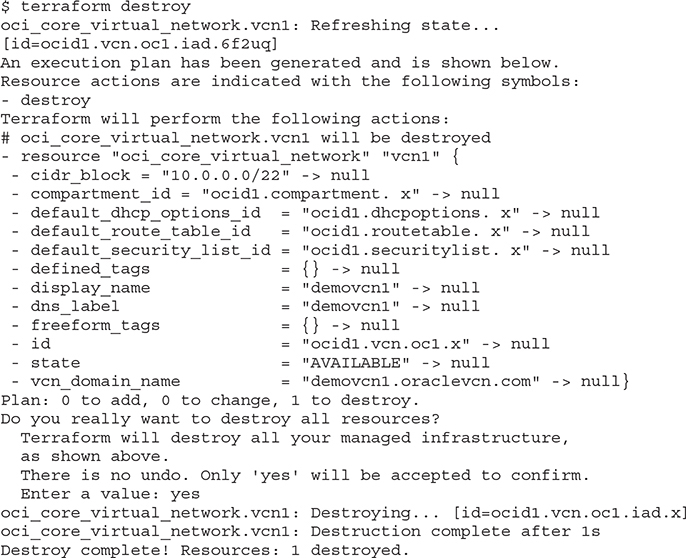
8. When you are ready to decommission a resource, it is easily removed with the terraform destroy command.
Chapter Review
This chapter introduced the concept of Infrastructure-as-Code. IaC is key to automating large-scale infrastructure architectures. OCI is designed with IaC in mind with a service-based API interface wrapped around all OCI resources. To interact with OCI resources, tools need only access the API endpoints. The OCI console, which is the official graphical face of OCI, uses these API calls. You could write your own console interface using these APIs if so desired, and the SDKs provided facilitate your applications interacting with OCI through these APIs. The OCI CLI and Terraform with a provider for OCI make use of these APIs to interact with OCI.
The OCI CLI presents an interface familiar to most Oracle technologists and is easily suited for shell scripting or ad-hoc maintenance. Terraform has become a de facto standard in infrastructure automation and treating infrastructure as code, and Oracle has supported this standard through the Terraform provider for OCI.
You were guided through the installation, configuration, and some introductory usage examples in this chapter to not only whet your appetite but to familiarize you with the OCI CLI, which is used throughout this book.
Questions
1. List the supported interfaces for programmatically interacting with OCI.
A. Java, Python, Ruby, Go SDKs
B. OCI CLI
C. C++ SDK
D. Terraform with the provider for OCI
2. Which of the following formats are acceptable input and output when using the OCI CLI?
A. Terraform .tf configuration files
B. HCL commands
C. JSON
D. CamelCase
3. Which command displays the VCNs in a compartment using the OCI CLI?
A. oci network vcn list --compartment-id <compartment-id >
B. oci vcn list --compartment-id <compartment-id >
C. oci network list --compartment-id <compartment-id >
D. oci compartment list --vcn-id <vcn-id >
4. Which of the following are acceptable input formats when using Terraform and the provider for OCI?
A. Terraform .tf configuration files
B. CLI commands
C. Terraform .tf.json configuration files
D. CamelCase
5. Which of the following statements are true?
A. Terraform may only be used to manage OCI resources.
B. Terraform is an Oracle technology.
C. Terraform may be used to manage infrastructure from many providers.
D. Terraform manages infrastructure as code.
6. What are commonly used HCL elements found in Terraform configuration files?
A. variable
B. resource
C. apply
D. plan
7. Which of the following statements is true?
A. You can only interact with OCI resources using the CLI and Terraform.
B. You can only interact with OCI resources using the CLI, Terraform, and SDKs.
C. You can only interact with OCI resources using the CLI, Terraform, SDKs, and the OCI console.
D. You can interact with OCI using any tool through the OCI API endpoints.
8. Which of the following statements are true?
A. Only input variables are supported in Terraform configuration files.
B. Only output variables are supported in Terraform configuration files.
C. Both input and output variables are supported in Terraform configuration files.
D. Common HCL elements found in Terraform configuration files include variable, resource, and providers.
9. What are commonly used Terraform commands?
A. init, plan, apply, graph, refresh, destroy, taint, untaint
B. variable, resource, provider
C. oci <service> <type> <action> <options>
D. create, delete, get, list, update
10. Which Terraform commands can potentially change OCI infrastructure resources?
A. apply
B. plan
C. init
D. destroy
Answers
1. A, B, D. Java, Python, Ruby, Go SDKs, the OCI CLI, and Terraform with the provider for OCI are supported interfaces for programmatically interacting with OCI.
2. C. JSON format is acceptable input and output when using the OCI CLI.
3. A. oci network vcn list --compartment-id <compartment-id> is the correct command to display the VCNs in a specified compartment using the OCI CLI.
4. A, C. Terraform .tf and .tf.json configuration files are acceptable input formats when using Terraform and the provider for OCI.
5. C, D. Terraform may be used to manage infrastructure from many providers as code.
6. A, B. Both variable and resource are commonly used HCL elements found in Terraform configuration files.
7. D. You can interact with OCI using any tool through the OCI API endpoints. You are not confined to using any specific tools.
8. C, D. Both input and output variables are supported in Terraform configuration files, and common HCL elements found in Terraform configuration files include variable, resource, and providers.
9. A. Commonly used Terraform commands include init, plan, apply, graph, refresh, destroy, taint, untaint.
10. A, D. The apply command runs Terraform scripts using the variables passed in with the terraform plan command to build or change infrastructure, and the destroy command deletes managed infrastructure resources.

