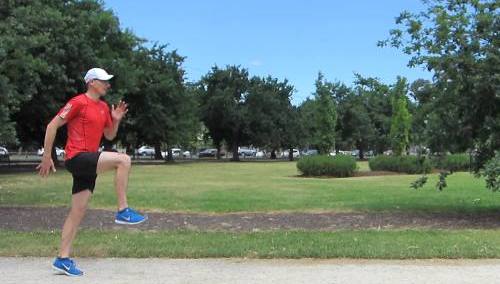
This exercise is a great place to start for practicing a running-like movement pattern. The walking or marching component allows you to focus on each part of the movement while executing it precisely in your own time.
The A drills capture the essential elements of good running technique that can be practiced by any runner, no matter how fast or slow. This drill is also a great muscle activation exercise and can form part of a dynamic warm-up to your runs.
The A March running drill is sometimes called the high-knees drill, which is probably why some runners misunderstand the main purpose of the drill. Running with high knees isn’t necessarily a pathway to faster or better running technique, so that aspect of this movement pattern needs to be kept in perspective when you begin to transfer the skills to running.
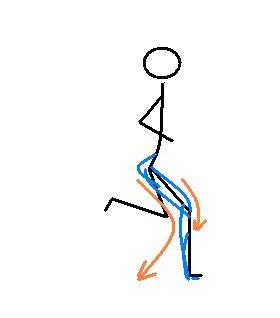
The A March and Skipping drills do seem, on first analysis, to model the knee lift aspect of running. However, if you look more closely, the need to be balanced and stable on a single leg really is the heart and soul of this movement. The hip extension impulse (thigh pushing down and back as the foot contacts the ground) provides the go button for swing leg retrieval and knee drive or lift, which in-turn helps complete a fuller hip extension.
Full hip extension - A Drill
There is no need to rush this drill. It is much better to slowly practice the movement than race forwards. You don’t need to cover much ground as you step through this drill; very small forward progression with each step indicates better execution of the technique than big strides ahead.
Coordination and running. The A-March drill looks to be all about raising your knees up high. This part of the drill is important, but should be seen as secondary to the ability to maintain stability and strength on the grounded or supporting leg. When I use this drill with recreational runners it’s for the specific purpose of improving the understanding of activating the glutes and hamstrings together as the foot contacts the ground.
Muscle activity on ground contact
This provides a stable base of support to reduce twisting of the thigh, lower leg and foot. In other words this is an active, strong and springy landing, rather than the dead, passive, hard alternative.
And it doesn’t stop there. Contacting the ground with these posterior muscles active is key, but it’s not the time to quit early. This is where pressure applied downwards by squeezing the butt and pushing the thigh down and extending the lower back brings you up to attention. This prevents the stability gained during contact being lost as you progress through the support phase of running.
The contact point and pressure down as coach Mark says is the go button to bring the opposite leg through and drive the knee forwards and up by pulling through with the hamstrings and activating your hip flexors. Think especially about the TFL (the hip flexor on the outside and top of your thigh) as this will help position the thigh in good alignment with the hip in preparation for contact with the ground.
Your glutes, core, quads and lower back will need to be engaged to prevent twisting and wobbling with every step. Keeping your core set and lower back strong also prevents the pelvis from being tilted backwards as the thigh comes forward and up. Beginners often find themselves tilted backwards with their entire weight heading in the wrong direction. I know I did!
As you become more proficient with this drill you will notice that the raising of the knee on the swing leg will actually help you to fully extend your hip on the supporting leg. This element becomes more pronounced in the skipping version of this drill where the movement is faster and more dynamic.
Think about a scissoring action where as one leg drives down the other comes up. Another way to think of this is push and pull-through. As you get better you can add in the more circular recovery phase which fires the hamstrings as well as the hip flexors as the knee drives up and forwards.
Getting set-up: Find a flat even surface with about 20 - 30 meters of space to practice the drill.
How to:
1. Lengthen your spine and keep your eyes looking straight
ahead.
2. Start with one thigh raised to at least the horizontal. Don’t
point the toes into the ground.
3. The opposite arm should be forward.
4. Drive or push the raised thigh down towards the ground - foot
held lightly dorsiflexed (foot horizontal to the ground on
contact). Try to initiate this movement from the hips.
5. Contact the ground and put some pressure through the
forefoot
6. Continue to engage the glutes as you contact (pressure down).
Keep your torso upright.
7. Don’t let your hips collapse or knee track inwards on contact.
Keep your butt flexed and hips strong.
8. This is the time to get the opposite (swing) leg thigh and knee
driving forwards and up.
9. Extend the hip of the supporting leg - keep a long spine.
10. Repeat.
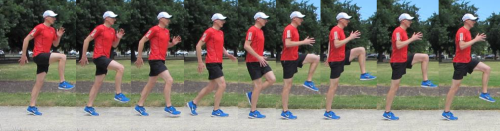
Tip: Use the forward swing of your arm as a cue to drive the raised swing leg back onto the ground.
Troubleshooting
These are some of the more common errors I’ve observed when runners first begin learning these running form drills. Please check out the videos at the resources page where I further explain some of these errors and provide tips to resolve them.
Leaning back: Often runners first practicing this drill tend to lean backwards as they search for the desired butt activation. Try maintaining a long spine but have knees and hips slightly flexed. Don’t let the forward momentum of your thigh tilt your pelvis backwards. Keep your core set, lower back muscles and buttocks/glutes engaged - imagine sticking your butt out if that helps!
Striding out: We’re so used to running like we walk that even in a slow movement like this drill runners want to straighten the knee and start striding out. Don’t do this, keep the knee flexed or slightly bent at all times.
Popping off the calves: The idea of this exercise is to maintain a relatively firm foot and ankle posture i.e. foot parallel to the ground. As you push down with the glutes, quads and hamstrings you need only maintain strength in your foot and calf. Don’t do a calf raise as you push down and extend the hip. The idea is to load the lower leg and foot with the big muscles in the hips and thighs. If your calves are doing the work in drills or running you’re at risk of injury.
If you suffer from chronic calf strains you may wish to check out a feature article I wrote that further explains these concepts on Running Technique Tips.
Dead landing: The runner stops applying pressure down and back, the glutes and hamstrings are not engaged, the posterior extension chain is broken and you’ll get a dead, weak and passive landing. The movement should feel strong and decisive not weak and floppy.
Can’t activate the glutes and hamstrings: Try using bridging, lunges or prone hip extension exercises to help get a feel for activating the glutes and hamstrings. Then try the drill again and use the same muscle activation pattern as the foot touches down.
Pointing the toes into the ground: Avoid slamming the toes into the ground (especially with a stiff foot), keep the foot as close to horizontal to the ground as possible - in this position you can still make contact with the forefoot or mid-foot. If you can’t avoid toe first contact be aware of allowing your foot to settle somewhat flat before putting too much force through the ground.
Contacting heel first: This can prevent some runners doing this drill well if they don’t apply pressure through the forefoot after contact. Try getting contacting the ground just behind the forefoot with a neutral foot and ankle posture. Don’t worry if you heel-strike when running, this is only a tip for the drill.
Do: Two sets of 10-20 meters
Final Tip: Raise your knee in good alignment with your hip - don’t drag your thigh across the body.
****