
“Here the brigade encountered a most terrific fire of grape and shell ... every discharge made sad havoc in our lines.” – Brigadier General Alfred Scales, Brigade Commander, Pender’s Division
Clearing McPherson’s Ridge of the Federals had taken Heth longer than expected, and although Pender’s Division had not been needed, the tough fighting had exhausted Heth’s Division. The next ridge position – the one with the Seminary – that the Union had fallen back to looked significantly stronger yet. Looking though his binoculars at the Federal position, Major General A. P. Hill counted at least 20 well-positioned Federal guns and in some places it appeared that they might have thrown up some hasty works. This would not be work suitable for a tired division, so Pender was ordered to take the lead, with Heth’s Division serving as a reserve and staying ready in the rear if needed. Looking to the north, Hill could see that Rodes was definitely making progress on the Federal flank, so perhaps one good, hard attack would send the enemy running. The orders were given. Pender’s Division would move up and pass through Heth’s Division; then Scales’ North Carolinians would attack on the left, Perrin’s South Carolinians would go up the middle, and Lane’s Brigade would sweep up the right, where the Union flank looked vulnerable as it seemed to be anchored with only a cavalry brigade.
“Tell General Doubleday that I don’t know a damned thing about strategy, but we are giving the Rebels hell with these guns and I want to give them a few more shots before we leave!” – Colonel Charles Wainwright, I Corps Artillery Brigade Commander
Though Seminary Ridge position was potentially strong, with just enough elevation and slope that the Union artillery could fire over their infantry, none of the troops defending this line were fresh. They were all tired, and some of the best brigades, such as Meredith’s and Cutler’s, had already suffered considerable casualties. Major General Abner Doubleday, who following the death of General Reynolds was running the I Corps, knew that in moments his line would almost certainly be attacked by a fresh Confederate division. Even should he hold against the storm that he knew was coming against his front, the battle to the north did not seem to be going well – it was only a matter of time before he would be forced off the ridge. However, before he was forced to yield this position he was determined that he would make the Rebels pay dearly for it.
General Doubleday had not expected to be thrust into command of the I Corps, and was still upset that General Howard had insisted that his units remain on McPherson’s Ridge even after the position was clearly untenable. Though many of his units had already had a tough day, he had a good position. He knew he could count on the proven veterans of Meredith’s and Cutler’s brigades, and Stone’s “new” Pennsylvania “Bucktails” had stood up well in the their first real fight. Biddle’s Brigade seemed a little nervous, but at least it had Gamble’s cavalry to support its flank.
Doubleday’s artillery chief, Colonel Wainwright, seemed invigorated by the fact that finally he would have more artillery than the Rebels in the battle for this ridge. All day he had been fighting against massed Confederate guns on the high ground of Herr Ridge, but now it seemed that they had neglected to bring those guns forward. It was mistake that he would make their infantry pay dearly for. Going from battery to battery, Wainwright made sure that their limber chests were full and where possible extra canister rounds were brought forward from the reserve caissons. They were now as ready as they would ever be. He could see a long three-brigade line passing through a forward line and advancing in perfect alignment towards his position.
The scenario starts with the beginning of the 3.30 p.m. turn and continues until the end of the 6 p.m. turn, for a total of five turns.
For the Confederates to win, by the end of the 6 p.m. turn no Union units can be on any part of Seminary Ridge south of the unfinished railroad grade and north of the southern board edge – the Confederates must occupy it all. For the Union to win they must avoid that. Historically, the Confederates won, as by 6 p.m. all the Federal forces were fleeing through Gettysburg and beginning to rally on Cemetery Hill.

The Confederates turn the Union’s Seminary Ridge line and begin to unravel it from south to north. (Patrick LeBeau & Chris Ward)
The historical scenario assumes that General Reynolds has been killed and that Major General Abner Doubleday is now in command of the I Corps. In that case, the Confederates have the initiative. If, however, General Reynolds is still alive, then the initiative is determined by a competitive 1D6 die roll with a tie going to the Confederates as Lee would now be on the field. To determine if Reynolds has survived, roll a 1D6 at the beginning of the scenario. If a 1 or 2 is rolled he is alive – anything else and he is dead.
They were on the field and were originally in front of Pender’s Division. However, Heth’s Division was exhausted and depleted from the McPherson’s Ridge fight, and Pender’s Division simply marched through the division and deployed in front of it. None of Heth’s brigades would play a significant part in the Confederate attack on Seminary Ridge. However, a few companies of both the 26th and 11th North Carolina regiments did attach themselves to other North Carolina regiments in Pender’s Division. To indicate this, take one full stand from both the 26th and 11th North Carolina regiments and attach them to two other North Carolina units.
Historically, Thomas’ Brigade was held in reserve on Herr Ridge as infantry support for Pegram’s and McIntosh’s gun battalions throughout the day’s battle. They saw no action. However, they could have been committed as follows. Beginning on the 4 p.m. turn and at the start of every following Confederate player turn, roll a 1D6 for the possible release of Thomas’ Brigade. It takes a 1 for the brigade to be released, and if released they appear in line on Herr Ridge behind Pegram’s and McIntosh’s gun battalions and are now free to advance and engage at will.
For the bulk of the fighting, Pogue’s Artillery Battalion was kept in reserve and not brought forward until the battle was decided. To reflect this, roll 1D6 each turn, beginning with the Confederate portion of the 4 p.m. turn, and if a 1 is rolled, Pogue’s entire gun battalion arrives limbered on the Chambersburg Pike.
Line of Sight visibility for Pegram and McIntosh’s batteries is limited to any enemy unit on or anywhere west of McPherson’s Ridge, anywhere on the western slopes of Oak Hill and on the highest level of Seminary Ridge. Union units between the highest levels of McPherson Ridge and Seminary Ridge are considered to be in “blind zones” and cannot be fired at. Likewise, Union units behind the high ground of Seminary Ridge cannot be fired at by the Confederate guns on Herr Ridge.
The Confederate artillery cannot move off Herr Ridge until the Confederate turn after five non-depleted, non-shaken or non-routed Confederate regiments are standing on McPherson’s Ridge from the Chambersburg Pike to the Fairfield Road. At that point, the Confederate artillery may roll a 1D6 for each battery once each turn for release. If released, the battery may freely redeploy to McPherson’s Ridge. However, at no time in this scenario may the Confederate guns move beyond a supporting position on McPherson’s Ridge. Historical Note: With the exception of Bander’s Battery, which was temporarily moved forward, the Confederate guns were not moved off Herr Ridge until after Seminary Ridge was secured.
If a routed Union unit’s movement takes it to the edge of the table, it gets an immediate rally attempt. If it rallies, it stops where it is as a shaken unit. If it fails to rally, it is removed from the game.
Meredith’s and Cutler’s brigades have taken heavy losses. Prior to the start of the scenario, roll 2D6 for each brigade to give the number of figures they have lost, to be spread out as evenly as practical among the various regiments. They have also had a hard morning and their morale is worsened by a +2 MMP modifier. If doubles are rolled, then Meredith and/or Cutler were killed and are not included in this scenario, which raises the morale detriment to a +3 MMP modifier. Biddle’s and Stone’s infantry brigades have taken some losses; to give the number of figures those brigades have lost at the start of this scenario, roll a 1D6. In addition, due to having been driven off McPherson’s Ridge, those brigades have a +1 MMP modifier to all their morale checks.
Both Hall’s Battery and Calef’s Horse Artillery have had a rough morning dueling against the more numerous Confederate batteries. Prior to the start of the scenario, roll a 1D6 for both Hall’s and Calef’s battery. If a 3, 4 or 5 is rolled, that battery has lost a section. If however a 6 is rolled, then they have lost two sections, and are withdrawn off the board and unavailable for this scenario.
Gamble’s Brigade has taken slight losses. To give the number of figures it has lost, roll a 1D6 for the brigade; the losses are to be spread out evenly as practical among the various regiments. However, since the brigade was not directly involved in the final and futile defense of McPherson’s Ridge, it has recovered somewhat from the stress of the morning, so that all units in Gamble’s Brigade now only have a +1 MMP morale modifier. Nevertheless, should any battalion of Gamble’s Brigade fail a morale check and go shaken or routed, that battalion and its entire parent regiment withdraws off the board and is removed from the game.
As Lane’s Brigade advanced, Gamble would remount the entire 8th Illinois and threaten the Confederate flank. To see if this occurs, roll a single 1D6 at the start of each Union active turn. If a 1 is rolled, then the Union player must immediately decide if he wishes to remount any one complete regiment and have it move freely as a mounted unit. However, since Gamble’s orders were to stay on the flank, his units – mounted or dismounted – may not move north of the Fairfield Road. If on one of the following turns another 1, is rolled, then Gamble is only allowed to remount a single additional regiment in the scenario. Once one of Gamble’s regiments has remounted, it must stay mounted for the rest of the scenario.
Historical Note: The order for Gamble to make a mounted demonstration came from Major General Winfield Hancock, who arrived on Cemetery Hill about 4.30 p.m. and immediately took charge of the chaos. The decision to remount the 8th Illinois and threaten the Confederate flank with a possible cavalry charge paid off handsomely. At least one regiment of Lane’s Brigade panicked at the sight of the advancing horsemen and formed square, and the others immediately stopped advancing. Though Gamble’s troop never charged – it was a bluff – the formed square made a great target for Gamble’s dismounted regiments that had the longer-ranged Sharps breechloading carbines. The net result was that Lane’s Brigade contributed nothing to the assault on Seminary Ridge, which led the Confederate General Scales to comment that “Lane did not come up until the Yankees were clear out of reach.”
“SEMINARY RIDGE”
There was no doubt that Major General Oliver O. Howard instinctively appreciated that Cemetery Hill south of Gettysburg was a vital position, and as the senior commander on the field, following Reynolds’ death, he wanted the other generals to know that this was the position that must not fall. From Cemetery Hill, Howard could see the gray-clad infantry moving forward, and to emphasize his intent he grabbed an aide and ordered him to ride over to Seminary Ridge and inform the senior officer there that Cemetery Hill had to be held at all costs. The aide duly galloped off on his mission. Unfortunately, he was one of the many recent German immigrants that made up much of the XI Corps and only spoke a broken and most heavily accented English.
The senior officer that he found was Colonel Charles Wainwright, who commanded the I Corps artillery, and was organizing the guns for a delaying defense of Seminary Ridge. Wainwright, not having had the opportunity to go on to Cemetery Hill, was unaware that there was a cemetery there or anywhere else in the area. So when Howard’s aide in broken German-English stressed that “Cemetery Hill” had to be held “at all hazards”, Wainwright understood him to say “Seminary Hill”, and so the defense of Seminary Ridge would become a “no retreat” last-stand type of defense rather than a more prudent delaying action.
There is evidence that a portion of the Federal position on Seminary Ridge was protected by hasty works. To reflect this, any one-brigade position is allowed to be protected by a line of hasty works on Seminary Ridge.
Though the Union infantry brigades on Seminary Ridge had been battered and driven off McPherson’s Ridge, most of their artillery was relatively unscathed and was well positioned to pour shot, shell and canister into the attacking Rebels. Scales’ Brigade on the Confederate left would be advancing into the concentrated fire of three undamaged Union batteries (Stewart’s, Stevens’ and Cooper’s) and one section of Reynold’s battery before it would even get into musket range of the mixed survivors of Cutler’s, Stone’s and Meredith’s brigades. The result was carnage, and in less than an hour Scale’s Brigade was wrecked. That morning about 1,400 men were available for the assault, but by the evening the brigade was only able to muster about 500 effectives. With Scales’ Brigade rebuffed with heavy losses and Lane’s Brigade intimidated by the flashing sabers of one or two regiments of Gamble’s cavalry brigade, that left only Perrin’s four South Carolina regiments – with no artillery support – to carry the Ridge.
Fortunately for the Confederate attack, Perrin’s South Carolinians faced Biddle’s rather wobbly brigade and only two sections of Reynolds’ Battery, which did not have adequate infantry support. The bulk of Biddle’s Brigade held well enough, but it was just too far away to provide support for the four guns of Reynolds’ Battery and the 1st South Carolina broke the seam between it and the 121st Pennsylvania. At that point, the entire Union line began to unravel from south to north. Despite instances of heroic resistance by individual companies, the Federal I Corps was beaten, and quickly its panicked survivors were joining their XI Corps comrades in a headlong retreat through the streets of Gettysburg, heading for Cemetery Hill and the safety of an even stronger position.
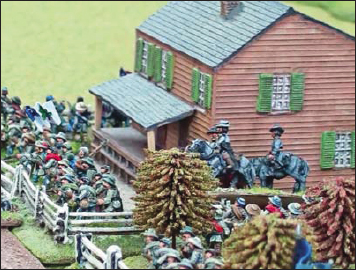
General Pender readies his division outside Herr Tavern to move forward and assault Seminary Ridge. (Malcolm Johnston)
A DEVASTATED BRIGADE
The prolonged fighting reduced the regiments of the Iron Brigade to shadows of their former strength, as follows:
| Regiment | Engaged Strength | Total Losses | Percentage Loss |
| 19th Indiana | 308 men | 210 men | 68% |
| 24th Michigan | 496 men | 363 men | 73% |
| 2nd Wisconsin | 302 men | 233 men | 77% |
| 6th Wisconsin | 344 men | 168 men | 49% |
| 7th Wisconsin | 364 men | 178 men | 49% |
(For brigade, regiment and battery details see Army List)
Left Wing/I Corps, Major General Reynolds (2 LB)
If General Reynolds has been killed, substitute Major General Abner Doubleday (1 LB) 1st Cavalry Division, 1st Brigade
• Gamble’s Cavalry Brigade
• Calef’s Battery
I Corps/1st Division – Brigadier General James S. Wadsworth (1 LB)
• Meredith’s – 1st Brigade, Brigadier General Solomon Meredith (1 LB) (9.30 a.m.)
• Cutler’s – 2nd Brigade, Brigadier General Lysander Cutler (1 LB) (arrives 9 a.m.)
I Corps/3rd Division – Major General Abner Doubleday (1 LB)
Brigadier General Thomas Rowley (No LB) if Reynolds was killed
• Biddle’s – 1st Brigade – Colonel Chapman Biddle (1 LB)
• Stone’s – 2nd Brigade – Colonel Roy Stone (1 LB)
I Corps Artillery Brigade – Colonel Charles Wainwright (1 Artillery LB)
• Stewart’s Battery
• Hall’s Battery
• Stevens’ Battery
• Cooper’s Battery
• Reynolds’ Battery
III Corps, Lieutenant General Ambrose Powell Hill (1 LB)
Pender’s Division – Major General William Dorsey Pender (1 LB)
• Perrin’s Brigade – Colonel Abner Perrin (1 LB)
• Lane’s Brigade – Brigadier General James Lane (No LB)
• Scales’ Brigade – Brigadier General Alfred Scales (1 LB)
• Thomas’ Brigade – Brigadier General Edward Thomas (1 LB)
Roll for availability, from 4:00 p.m. on, each turn starting with the Confederate active portion of the 4 p.m. turn. Roll 1D6 – on a 1, Thomas’ Brigade appears behind the gun battalions on Herr Ridge.
Pender’s Divisional Artillery Battalion – Major William Pogue (1 LB)
Roll for availability from 4:00 p.m. on. On a 1D6 roll of 1, they appear limbered on Chambersburg Pike.
• Wyatt’s Battery
• Graham’s Battery
• Ward’s Battery
• Brooke’s Battery
II Corps
• Daniel’s Brigade – Brigadier General Junius Daniel (1 LB)