13
Psoas, Hips, and Pelvis
PSOAS
The psoas (pronounced so-as) is the deep abdominal muscle that connects the upper and lower body, just as the scalenes connect head to torso. It is a diagonal muscle that starts at the inside of the lumbar spine and ends at the hip joint (see fig. 8.6). The main movement the psoas facilitates is walking, but it can (and often does) substitute for the quads and the abdominals in other movements.
One sign that your psoas is doing the work of other muscles is if crunches or other abdominal exercises hurt your lower and midback. That means the psoas is contracting more than any other muscle and pulling the lumbar spine down as it shortens. That will lead to lower back problems. Usually the psoas needs to be stretched and the other deep abdominal muscles strengthened.
You need to stretch your psoas if:
- You have a swayback (pronounced lumbar curve).
- You wear down shoes more on the outside edge or you have turned-out feet. This distorts the hip joint, which will compromise your psoas.
- You walk down steps with your feet turned out.
- You have lower back pain.
- You have weak abs.
- You prefer to cross your legs when sitting in a chair. Especially if you favor one leg. Again, hip distortion.
- You sometimes find it hard to breathe. Psoas is also involved with the diaphragm, and if a tight psoas pulls the lumbar spine down and in, it limits the flexibility of the diaphragm.
- You have any knee problems or have had a knee injury. The more flexibility you have in your hips, the less stress there will be on your knee joints.
- You sit a lot. The lumbar spine starts to compress if you spend a lot of time sitting in a chair, and the psoas will shorten.
- You wear high heels. The forward position of the thighs will tip the weight of your torso onto the front of your psoas, near the hip joint, and create a swayback.
 Psoas Stretches
Start by opening the groin and the quads in order to access the deeper parts of the psoas.
 Psoas Stretch I
1. Lie on your back, knees apart, and soles of feet together, in a diamond shape. You can vary the stretch by bringing your feet closer to your groin, or farther away. The heels should be together and in line with the perineum (fig. 13.1). Notice if one leg is closer to the ground than the other—it probably is. Then look at your feet. Join the soles of the feet together so your big toes, pads of big toes, and heels meet exactly. This will probably change your hip alignment, but it may create some muscular effort in your legs. You can tie your feet together with a yoga strap if it does.

Fig. 13.1. Psoas Stretch I
2. If the soles of the feet are perfectly aligned, the hips should automatically become more even. If this doesn’t happen and there is still a discrepancy between the two sides, place a pillow under the knee that is closer to the ground (the more open hip), until the sides are even.
3. Stay in this stretch for at least one minute, preferably longer—as long as you like—with your gaze point at the ceiling.
Psoas Stretch II
1. Lie on your stomach with the soles of your feet joined together and your knees apart, in a diamond shape. Scoot your torso away from your legs by sliding it forward with your arms so the hip points (iliac crests) touch the floor, or come as close as possible (fig. 13.2).

Fig. 13.2. Psoas Stretch II
2. Look down at yourself to check that the heels are in line with the groin, your torso is centered over your legs, and your knees are even. Your feet will probably be way off the ground. That’s normal.
3. If you want to intensify the stretch, bring one foot on top of the other and press down. Then reverse feet. If you want still more of a stretch in the groin, bring your hands by your chest, about at the nipple line, palms down. Press your hands down into the ground and isometrically toward your feet (don’t move your hands, though). You can then lift your groin off the floor, keeping the legs and feet in the same diamond shape. Your gaze point is either straight in front of you or, if you can backbend comfortably, at the ceiling. Make sure your tailbone is dropped and soft, and keep your lower back long.
4. There should be no tight or constricted feeling in the back. If there is, press more toward your feet with your hands, bringing your chest forward, and suck in your navel slightly.
5. If there is still lower-back pressure, back out of the position. Come out the way you came in: lower the groin and torso to the floor, and then move your feet and knees apart and stretch back. Then fold over your bent knees to give your back a forward or counterstretch (fig. 13.3).

Fig. 13.3. Counter stretch
Psoas Stretch III
1. Lie on your forearms and stomach, with your knees apart and the thighs at right angles to your body (fig. 13.4). Your feet should be in line with the middle part of the thigh, with the toes flexed. You may need padding under your knees. Rest on your forearms, letting the tailbone drop. Don’t arch your back. Bring the tailbone back toward your feet to increase the stretch.

Fig. 13.4. Psoas Stretch III
2. Now look at your knees to make sure they are lined up with each other and your torso is right in the middle, not tilting over to the right or left. There should be equal pressure in both forearms. Place one hand on your sacrum to check that your hips are parallel to the ceiling. You probably will not feel an equal stretch in both groins even in a correct alignment, since it’s unlikely that your hips are equally tight.
3. You can place a bolster under your groin for a supported version of this stretch. The bolster, rolled-up towel or blanket, or whatever you use should support just the groin, not the thighs, and should preferably be fairly soft, so that as you sink into it, it will open up your body.
4. If the stretch is excruciating (it can be), try it supported. Stretches that create a burning sensation in the area that is being released are stretching fascia as well as muscle—which is good, but since fascia does not stretch as readily as muscle, more support and gentleness are necessary.
Psoas Stretch
IV
1. To further open the psoas, start by coming into a lunge position, one leg in front of the other (fig. 13.5). Keep the knee over the ankle in front.

Fig. 13.5. Psoas Stretch IV
Bring your hands to the hips, and feel the iliac crests. You’ll probably find that the hipbone on the side of the leg with the knee on the ground wants to move back away from you and may be angled down, so that the top of the crest is more forward than the bottom. This means the pelvis is tipping and rotated, preventing the psoas from opening.
2. Even up your hips, even if you can’t stretch deeply any longer. Use your hands to turn the pelvis so that the right and left crests are in line, and straighten the angle of the pelvis so there is no tipping. This will mean slightly tucking in your tailbone.
3. Move into a deeper stretch slowly by dropping the hips slightly without losing alignment; you may find that, if you can keep your pelvis even, your spine now compensates, probably by arching so the front lower ribs stick out more, and the back shortens and pulls forward.
Psoas
Stretch V
1. Place your hand on the knee in front of you, and bring your spine into alignment by pressing back gently.
2. Pull the belly away from the thigh in front by tightening your abdominals and pulling up your pubic bone (fig. 13.6). Make sure your spine stays long, and keep your neck in line with the rest of your spine.

Fig. 13.6. Psoas Stretch V
Advanced Psoas Stretch
Do this one only after warming up with the previous stretches, even if you are very flexible. Make sure that you do not feel any compression, and back out of the position if you do. If the knee is uncomfortable, use lots of padding under it and stretch the quads more before you do this stretch.
1. Bring your knee back to a wall with your shin vertical and pressing against the wall. Use some padding under the knee. The knee should be pretty much flush against the wall, depending on the shape of your kneecap, but not more than 2 inches away. The shin maintains a slight pressure against the wall the whole time—this position will release your groin and protect your lower back.
2. Place the other foot in front of you on the floor, knee bent, about hip width away from the foot on the wall. Make sure the thigh is straight between hip and knee and does not angle in or out (the hip will probably want to move outward, away from your body). The ankle should be directly under the knee. Your hips and back are away from the wall, your hands on the ground (fig. 13.7).

Fig. 13.7. Advanced Psoas Stretch
3. Now check your alignment—front foot straight, slight pressure into the ground at the pad of the big toe, thigh straight, hips square, back shin vertical, and top of foot flat against the wall. Put padding between your foot and the wall if your foot is uncomfortable. Make sure the thighs and hips of the leg against the wall are straight.
4. Now start to come up, eventually bringing your back almost flat against the wall. First, lengthen the spine. Try to bring your hand to your front knee. If that’s too difficult, you could place a chair on the inside of the knee and use that. You can also start to walk the hands back, keeping them on the ground. Make sure your torso faces front squarely. Walking the hands back can be tricky, depending on the relative length of arms and torso—you could place yoga blocks under the hands to make it easier.
5. As you move back, think of bringing the pubic bone up toward the navel, slightly tightening your lower abdominals. Keep lengthening the spine. The trick to achieving this opening successfully is in the foundation of it. Your forward foot should press into the floor, sending your pelvis back toward the wall and pressing your shin into the wall and knee and down into the floor. This will give your body the support you need to release further.
6. If this feels good to you and you can get your hips to the wall comfortably, move your front foot forward. Check your alignment, lengthen your back, thigh, and spine a lot, and move back until your back is on the wall. It should be almost flush, with a slight lumbar curve (see fig. 13.7). Lengthen your side body, and bring your arms above your head.
7. To correct an anterior tilt to the pelvis (that’s when the top of the hipbones is farther forward than the bottom), tuck the tailbone under, lengthen the front of the thighs a lot, and bring the top of the sacrum to the wall. To help you, you can press the tailbone away from the wall with one hand and lift up the pubic bone with the other.
8. Now adjust your front foot forward, letting the hips dip away from the wall. You can bring your hands to the floor to do this. Push the shin of the back leg against the wall and press the front heel into the ground. Your hands can be on the floor, on blocks, or on your knee. Lengthen the spine, and move the pubic bone toward the navel to make sure your back isn’t arching too much. Lengthen your side body and stretch the arms above your head, palms facing each other.
9. Square the shoulders, check alignment, and, if you want, move into a backbend with the arms by the ears. To take the backbend even farther, bring your hands to the wall behind you over your head, with fingertips pointing down, wrists on the wall, and push away from the wall with your hands. This will engage the upper back muscles, which will open up the psoas more.
10. Repeat on the other side. The gaze point is straight ahead, with shoulders squared or very slightly to the opposite side.
Three Modified Psoas Stretches
Modified Psoas Stretch I
- Lie on your back, and bring one knee to your chest. The other leg is straight on the floor, foot flexed and knee facing the ceiling.
- Bring the knee on your chest to the opposite shoulder until you feel compression in the groin. Drop the hip as much as you can, letting the head of the femur stay in the socket. This doesn’t feel like a stretch at all—it’s more like a squeezing sensation—but it is, and it can relieve back spasms (fig. 13.8).

Fig. 13.8. Modified Psoas Stretch I
3. If you have any pain in the hip, place a rolled-up cloth, about 2 inches thick, in the crease of the groin. Repeat on the other side.
Modified Psoas Stretch II
You can also lie on your back and bring both knees to your chest, the knees as close together as possible. You should feel some compression in the groin area. Hold your knees there, and pull your tailbone down into the floor and away from your groin, until the compressed feeling releases.
Modified Psoas Stretch III
Many lower back stretches and some inner thigh stretches will lengthen parts of the psoas. The best, most complete stretch for the psoas requires a surface that you can lie on and that also has a drop of at least three feet, preferably more. A kitchen counter, a table, or even a high bed will do. Make sure it is stable before you start.
1. Lie on your back with the edge of the table at the very top of your thighs, just below the buttocks. Pull your right knee to your chest with your leg bent, and let the left leg drop (fig. 13.9). You will feel the stretch on the left side in the groin, through the abdomen, and maybe in the lower back. You can put a weight on your left leg or have someone push it down for a greater stretch.

Fig.13.9. Modified Psoas Stretch III
2. Then pull the left leg to the chest, and let the right leg drop for a stretch to the
right psoas.
3. Come out of the stretch by bending both knees to the chest and rolling to
one side.
Psoas Strengthening Exercise
The psoas can become so tight that it actually weakens. I was always told that the psoas muscle remains strong because we use it all the time in walking. This isn’t true. The portion of the psoas that connects into the spine can become very weak if there are spinal faults that cause misalignment there. The psoas will tighten to protect the spine in that area and may become immobile and therefore weak.
1. For this exercise use a heavyish gauge of TheraBand, cut quite long. Stand with your pelvis and back against a wall, with the band looped under one foot and over the other knee (fig. 13.10).

Fig. 13.10. Psoas Strengthening Exercise
2. Press your back slightly against the wall and lift the knee up as high as you can. The knee stays bent. Do this very slowly, taking about 10 seconds, and release down. Repeat till your muscles fatigue. Then repeat on the other side.
3. Start on the weak side, shift to the strong side, and then back to the weak side again.
Psoas Exercise for Lower Back Pain
1. Sit with your legs straight out in front of you and your back against a wall. Turn the legs out (fig. 13.11). This engages the psoas. You can do this exercise with legs turned in, to engage your quads and possibly abdominals.
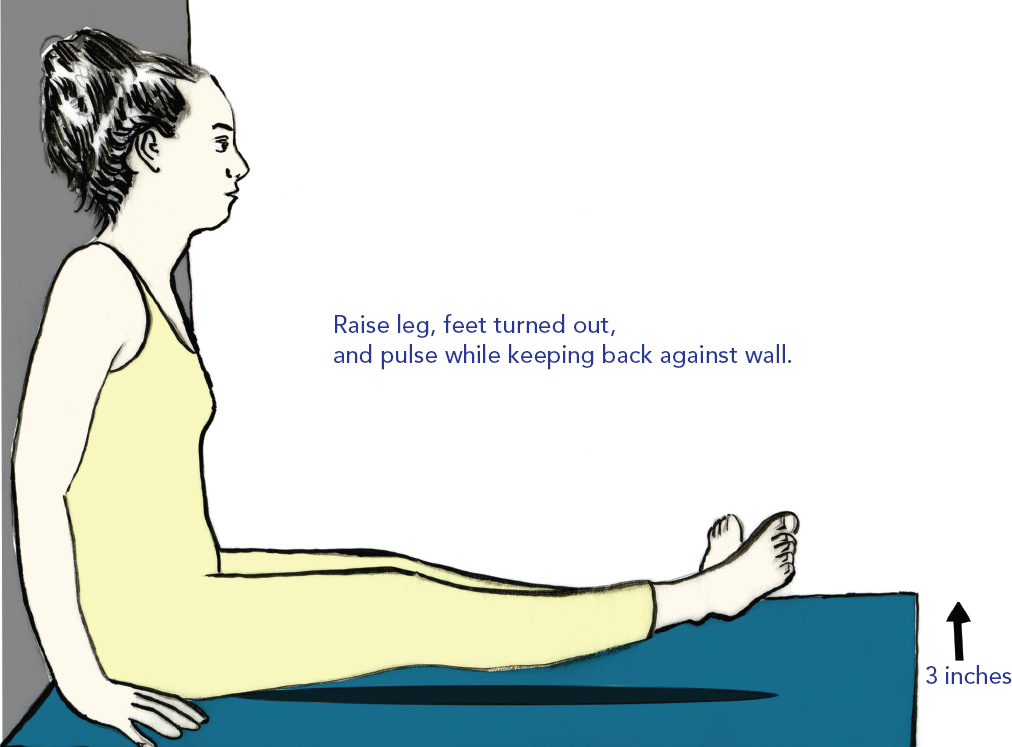
Fig.13.11. Psoas Exercise for Lower Back Pain
2. Now lift and pulse one leg—making tiny movements up and down with your leg. Lift your leg only about 3 inches. Keep your back pressed against the wall.
3. If the pain is on one side, the chances are that the leg won’t lift on that side. If you can’t lift the leg on one or both sides, tie a strap around the leg and use the strap to pick up the leg about an inch from the floor. Now try to pulse from there.
4. Work one side until your muscles fatigue, and then work the other side. Work the weak side twice, the strong side just once. This exercise will pull up your belly and reposition your hip joints.
Correcting the High Hip
This exercise will correct the problem of one side of the pelvis rotating farther forward than the other, when that distortion is caused by an imbalance in the psoas. If not corrected, this could contribute to lower back pain. You will see this imbalance show up when one leg turns out more than the other, especially when you lie on your back, and when one leg wants to step back behind the other. Usually the leg that turns out less and comes ahead of the other is the stronger one, and that is often the side we like to lean onto, the more stable side.
- To check, lie on your back and feel your hip points. Notice if one side is closer to the ceiling than the other.
- Now stand up, keep your feet parallel, your hips square, your toes straight, and your torso straight. Keep your hands firmly on your hip points, so you can prevent their moving, and then lift one leg with the foot flexed, not letting the leg turn out. Don’t let the other hip jut out to the side or your head come forward.
- Your head should be in line with the spine (and don’t lean back or forward). Keep the hip of the raised leg dropped down and level with the other hip. In other words, the torso stays as it was when you began; the only change is in the raised leg. This alignment makes the position much harder and focuses it more in the part of the psoas closest to the spine.
- If one leg rises up farther and you can hold the position more easily on that side, then do the exercises with the other leg. If you can barely raise either leg, do it with both legs alternately. Just raise the weak leg once with correct alignment, and hold it. You could pulse the leg slightly about an inch up and down. Try to hold 90 seconds.
- Now stand with your back on a wall, feet hip width apart and parallel, your feet a comfortable distance away from the wall. Again, bring your hands to your hips. Hold them and your torso firmly against the wall. Now raise one leg, as before. You will notice that you want to tip to one side. Your head, shoulders, and hips will want to move. Your head may come forward, your jaw tighten.
Your goal is to isolate the movement in the leg so that there is no shifting or tightening in your torso at all. Until you have achieved that through strengthening the deeper muscles, you can help yourself get there by pressing back against the wall, pressing the standing foot firmly into the ground, and going very slowly. Don’t be surprised if it is impossible for you to raise the leg at all while you do this. - Alternate the freestanding leg lift with this version; you may notice the psoas on one side is stronger when you lean against the wall or the reverse. This is because you are using slightly different muscles. For the wall version, always do both sides. Pulsing is not necessary.
You may notice that the hip that was closer to the ceiling, or more raised toward your head, when you checked it lying on your back, is the weaker or stronger one. That depends on the balance of stabilizing and directly activated muscles. However, after doing this exercise, lie on your back and check your hips again, as you did before. Notice any changes. The balance of the hips should be more even now. If you get more uneven, check that: (1) your body was really still and aligned (that’s the most common mistake); (2) you raised the legs equally high (if possible); (3) you are checking, or did previously check, correctly.
Correcting Pelvic Rotation and Spinal Movement
Correcting Pelvic Rotation I
1. Stand on your heels with your arms straight out in front (fig. 13.12).

Fig. 13.12. Correcting Pelvic Rotation I
2. This is difficult for most people. If you have an anterior tilt to your pelvis (swayback), you may want to stick your behind out and lean forward to balance—which actually won’t work. Instead, walk on your heels, moving as little as possible. Just focus on aiming to stop moving and simply balancing. Or you can modify by touching a wall in front of you. Do this for up to five minutes to correct the pelvic rotation.
Correcting Pelvic Rotation II
1. Stand on your tiptoes with your arms at your sides (fig. 13.13).

Fig. 13.13. Correcting Pelvic Rotation II
2. This is easier for most people. When it becomes more difficult (or if it is shaky right away), you will probably tend to balance by falling to the outside of your feet. Most of us rely on the outer part of the leg, which causes misalignment in the ball-and-socket joint of the thighbone. The outer portion of the pelvis contains part of the internal rotators of the joint, so if our weight falls to the outside of the foot too much, we will tighten the hips at the inside. Press the balls of the big toes down to balance the muscles at the inside and outside of the hips.
3. The challenge here is to stay as long as you can in this position. Close your eyes for an extra challenge.
4. To balance more easily, bring your awareness to your tailbone (see fig. 2.16). If you can keep the sacrum still—and you will only be able to do this if your torso is centered correctly over your pelvis—you will be able to stay up much more easily. To still the sacrum, imagine a quiet pond. Use your imagination, and the rest will follow.
5. Then think of lifting your rib cage, back and front, up away from your hips, lengthening the side of your body. The pelvis and hips press down slightly into the ground; the upper body rises from its stable base. The more you can achieve this, the easier it will be to move your upper body without losing balance.
LEGS, HIPS, AND PSOAS IN RELATION TO GRAVITY
Awareness and control of the psoas and the other deep pelvic muscles can help you feel how movements are supported from deep inside your body and give you a core strength that will let you consciously release tight peripheral muscles, such as your jaw, neck, shoulders, and so on.
If our lower body is not supporting us properly, we tend to pull up with our shoulders and tighten our neck muscles to keep upright, pulling away from gravity instead of releasing into it. The whole upper body should be able to relax fully and safely over the pelvis and legs, so that the upper back and shoulder muscles are free for movement. The muscles of the upper body are smaller, designed to transfer weight down the spine, not support it.
When you stand in a relaxed position, feet straight, knees soft, shoulders relaxed, you should be able to rock the pelvis back and forth slightly, using your tailbone, without engaging other muscles. You should be able to keep the knees in the same position relative to your toes (look down briefly to check), and the torso above the pelvis should be stationary. See if rocking the pelvis with the awareness of the psoas and its path through the inside of your body makes it easier to isolate.
Exploring Your Relationship with Gravity
Try this exercise to explore the relationship of your legs, hips, and psoas with gravity.
1. Stand on one leg, and lift the other leg straight up in the air, as high as you can. Both hips must be level and even, and your torso should not change position (fig. 13.14).
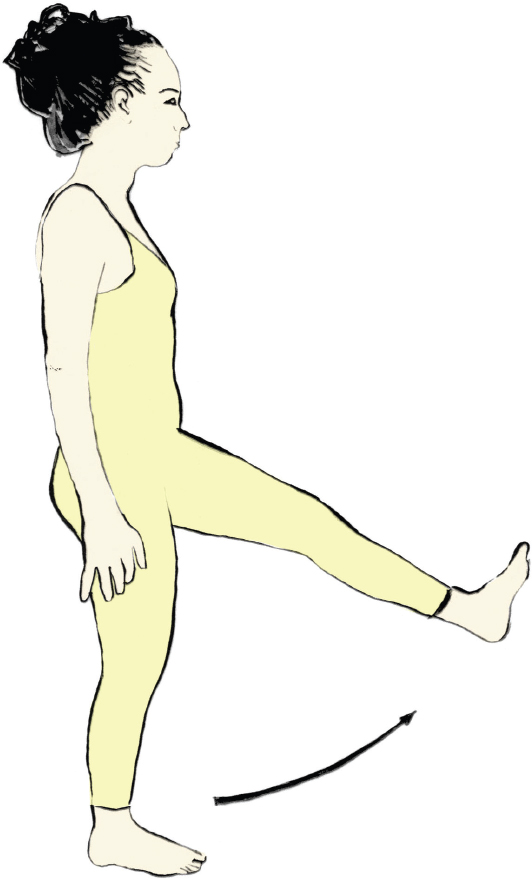
Fig. 13.14. Exploring Your Relationship with Gravity
2. The leg, for this purpose, is straight. Hold as high as you can for as long as you can. The raised leg must not rotate out or in, so keep the raised foot at a perfect right angle to the leg.
3. Repeat on the other side. Notice the differences.
4. Now stand on the original leg, and bring the leg straight out to the side, again with the foot straight. Notice how high you can raise the leg without changing the original position of the hips.
5. Repeat on the other side, noting differences.
6. Now repeat the sequence, this time consciously using your abdominals to lift up out of the hips, while pressing your standing leg down firmly and evenly into the ground. Notice the relationship between your pelvis and the ground. Your pelvis becomes the “ground” for your torso, as the floor grounds your foot. Does this awareness change the exercise at all?
THE PELVIC FLOOR
The pelvic floor is a kyo area for the vast majority of adults. It is often not very responsive, a neurologically disconnected zone, which can lead to problems in other parts of the body, as other muscles have to take over the work of keeping us upright. You can see this if you watch people walking. Most people pull up into their pelvis, almost as though they are carrying their pelvis with their upper body. It appears stuck, not fluid and connected to their movement. It is weak, tight, disconnected, and unconscious for a number of reasons, including physical and emotional stress and trauma, shallow breathing, and the reliance we have on chairs.
There is increasing awareness of the damage that the modern sedentary, chair-oriented, lifestyle causes, and there is an attempt to address this through standing desks and various exercise systems. Chairs, particularly when sitting in them is our dominant movement pattern, become a “prosthetic pelvis” or “hip replacement.” If you observe the way that many people walk as they become hunched over in old age, it looks as though they are still in the shape of the chair, as though it has become welded to the body and they are dragging it behind. This is one of the ways we lose mobility, strength, and connection to the support from our pelvis for our spine and head. Remember that the spine extends inside the skull and the skull is slotted onto the top vertebra. The weight of the head needs to be supported through the whole spine; the spine is in turn supported by the elastic, cushy muscles of the pelvic floor.
On a societal level, the pelvic floor is a deep kyo because sensation in the area, which connects to the genitals and the anus, is relegated almost exclusively to the realm of sexuality and bowel and urinary functions. These muscles are not allowed to experience much sensation in breath and movement. They are compartmentalized and often, subtly or not so subtly, regarded as shameful and tied up with any negative sexual experiences. There is a natural urge to protect the genitals; however, this does not require our becoming cut off from sensation in breath and movement or from a vital energetic and nerve center.
The deep tension around the area that I see in most people actually makes us more vulnerable, because the muscles become weak and inelastic. The pelvic floor is then unable to support the movement of the hips and smaller movements of the bones in the pelvis, which become stiff, leading to the ubiquitous lower back pain and the head moving farther and farther forward of the pelvis with age. The head coming forward draws us away from our center of gravity, and this makes us much more vulnerable to falls. Supporting the head from the pelvic floor, in addition to cultivating awareness of the tailbone as a stability point, will increase balance immensely, making both the young and elderly less vulnerable to injury.
Working with Your Pelvic Floor
The first step to approaching any kyo area is to bring gentle awareness to it. Attention needs to be paid to the release and the contraction of the pelvic floor, which is a diamond-shaped area defined by four bony landmarks—the two sit bones, the pubic bone, and the coccyx (tailbone). A muscular “sling” extends across the area and divides it into two triangles.*9
- You can begin with the breath, which is in constant dialogue with the pelvic floor. As you inhale slowly and steadily, preferably through your nose, see if you can feel the muscles of the pelvic floor gently filling and descending through the bones of your pelvis.
The downward movement (engagement) of the breathing diaphragm nudges the abdominal organs slightly downward and the pelvic floor relaxes and descends to make more space in the abdomen. Imagine the pelvic “sling” softening and gently supporting your organs. Think of the bony landmarks of the pelvis expanding away from each other as you inhale. - As you exhale, the breathing diaphragm relaxes upward and the pelvic floor engages very slightly to support the exhalation (the muscles are in an agonist-antagonist relationship, so conscious relaxation and engagement in the pelvic floor will help with excess tension in the diaphragm—this is crucial for singers). Try consciously engaging the pelvic floor as you exhale, this may be easier to feel if you exhale through your mouth. See if you can feel the difference between the front and the back of the pelvic floor. Release any extra tension in the back portion and feel the engagement more in the front.
I like the image that physical therapist Deborah Bowes uses in her wonderful and clear audio guide to accessing the pelvic floor.*10 She describes the sensation as being as if you are drawing a silk scarf up through your pelvic floor as you engage. I prefer this to the classic description of doing a “Kegel,” which, however, is another way to access these muscles. I like the image of the scarf because it is gradual and more of an upward engagement; it also may be less panicky for some people. For men, it can be more helpful to imagine the perineum between the scrotum and anus drawing upward. The idea is the same; there is a relaxation as you inhale and a gradual, subtle engagement on the exhalation, especially at the end of the exhalation. - See if you can relax your throat and tongue, allowing your soft palate to lift slightly away from the pelvic floor as you inhale. As the pelvic floor muscles descend on the inhalation, see if you can feel how the soft palate lifts, creating more space through the breathing space and the whole body. Take 10 breaths like this, slow and steady, feeling the rhythm and relationship between the soft palate, the breathing diaphragm, and the pelvic floor.
When you are sitting, the soft palate, the muscular “roof ” of your spine inside your skull, should be aligned over the pelvic floor, the muscular “floor” of your spine. Actively engage with any surface you sit on, whether it is the floor or a chair, lengthening the soft palate up from the support of the pelvic floor, pressing your sit bones slightly into your seat and lengthening through your spine. In other words, even if you are using a chair, engage your internal support, rather than allowing the chair to usurp this function. If you can sit in a full squat, this is a great stretch for the pelvic floor. If you cannot squat comfortably, you can hold onto the back of a chair and gradually ease into a modified squat.
In walking or running, imagine that the energy from the legs is being transmitted up through your pelvic floor, providing springy, resilient support for your movement. See if you can feel the ilium moving with your leg as you walk, opening up the sacroiliac joint. This subtle movement can begin to happen as the pelvic floor muscles wake up, with profound effects through the whole body. The same rhythmic breathing pattern in step 3 of the exercise above applies in walking. See what it feels like to release into your pelvis, allowing the muscles to move, breathe, and support your whole upper body as you walk. You can incorporate pelvic floor engagement into any exercise you do; when you stretch, allow the stretch to travel up through your pelvic floor too.
Our societal kyo around the pelvic floor is being addressed by a number of people in the bodywork and movement worlds, contributing lots of valuable awareness and exercises. Please use helpful resources like Deborah Bowes’s CD to guide you through awareness exercises. Working with your pelvic floor can be very emotional, so be aware of this. Any abuse or negative sexual experiences may come up. On a subtle level, there is a reconnection to your own life force that can be startling and unfamiliar. The need to control expression can result in a clamping down in this area, which may be completely unconscious. For thousands of years yogis have focused on the pelvic floor muscles as the trigger for moola bandha, the awakener of kundalini energy. This deep level of yoga is key to a more advanced yoga practice. As Swami Buddhananda puts it in his book, Moola Bandha:
The perfection of moola bandha requires the development of an acute refinement of mental and psychic awareness that allows for the localization, isolation and contraction of mooladhara chakra. This is developed in the beginning through the physical contraction of the perineal body or the cervix as the case may be. We begin at the most accessible level, the tangible physical body. By combining physical contraction with mental awareness and visualization, we can then heighten our sensitivity on the psychic plane.*11
If you already practice yoga, you can explore moola bandha and the fundamental life force of kundalini with an experienced teacher. I recommend reading Moola Bandha too. There is great energy locked up in the pelvis, and refined awareness and access to it can energize your creativity, spontaneity, sexuality, and your whole life.