8
The Head and Neck
ONE OF THE MOST DIFFICULT TASKS you have to accomplish as a human being is to support your head. It weighs ten to twelve pounds and is poised on top of a rather vulnerable neck. If the weight of the head falls onto muscles that are not designed to support it, the result can be a lot of tension and pain throughout the body. The support of the head is not the job of the neck. In fact, all the muscles in the neck that carry the weight of the head originate in either the rib cage or the back, so that the weight of the head can be relayed down the whole spine. Extremely heavy weights, such as jugs of water, can be carried on the head without hand support at all if the weight is aligned correctly with the spine. In traditional cultures, people carried heavy objects on their heads and upper backs so they could use their whole spine for support.
Correct alignment means that the top of the head and the tailbone are in a straight line with each other. The back of the neck is long so the muscles at the front and side of the neck are left free. Every time we move our heads, the whole spine all the way down should move slightly to adapt to the shift in weight; the head and spine should move as a functional unit.
 Neck and Head Alignment
The movements in this exercise are incremental. Isolate each movement as completely as you can.
1. It’s particularly hard to feel your own neck alignment, so first of all align yourself in front of a mirror, checking that your shoulders, ears, and eyes are level. Bring the tips of the ears back and slightly up until they are directly over the tops of your shoulders or at least as far back as possible without causing strain.
2. The next step is to absorb your C7 vertebra (the big knobby bone at the bottom of the neck) slightly in toward the center of your body and slightly up, without engaging your shoulder or your jaw. Place your hand on your collarbone in the center to keep it still. With the head and neck in the same position, pull in C7 in a tiny, almost invisible movement. Think of the inside of the seventh cervical being sucked into your body about an inch, and moving diagonally up toward the crown of your head. Relax the shoulders, don’t bring them back deliberately, but notice how they naturally fall back, the collarbones widen, and C7 moves into place.
3. Then feel for the hyoid cartilage in the throat (fig. 8.1). It’s about where the Adam’s apple is, a free-floating semicircle of cartilage that contains the muscles that support your larynx and thyroid. Absorb the hyoid cartilage into your anterior spine and slightly up. Keep the chin parallel with the ground and the jaw relaxed. The cartilage will “smile”: imagine the corners angling up and back, as though you had smiling lips where your hyoid bone is. Feel how the back of the neck releases as the bone draws in.
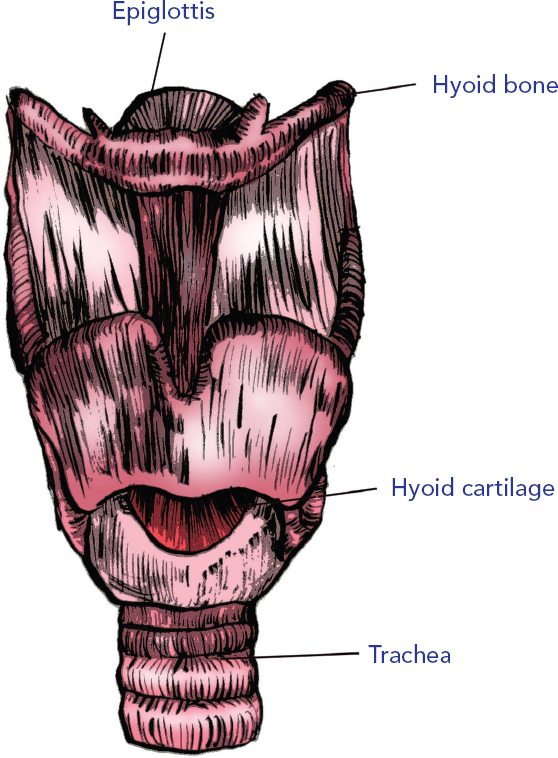
Fig. 8.1. Hyoid cartilage in the throat
4. Now run your tongue back along the center of the roof of the mouth until you feel the hollow area at the very back. This is your soft palate. It’s actually just in front of the very top of the spine. Most people don’t realize that the spine ends at the level of the ears and cheekbones, so the skull is fitted carefully into the surface that the top vertebra creates (fig. 8.2). This allows for a much more balanced distribution of the weight of the head over the spine.

Fig. 8.2. The skull is fitted carefully over the top of the spine, level with the ears and cheekbones.
5. Now find your pubic bone (direct line below the navel to the top part of the triangle of the groin)—you should feel a thin, horizontal bone. Put one hand there and the other on your tailbone. Visualize the point directly in the middle of your two hands—the very center of the pelvic floor. Line the soft palate up with that point. This will align your head correctly on your spine.
6. Imagine someone is lifting you up, holding the sides of your head, and that he lifts you high enough so that your feet come off the ground. Feel how your spine would dangle in its natural curves, as you hang there from your head. Move your head slightly in all directions. You should feel a sense of freedom and “lift” in the neck and head.
7. Then imagine you have an inflatable rubber ring around your upper neck. As this ring inflates it expands up, down and out, but not inward (your throat does not compress). As you inhale, the ring expands farther, lifting your chin and the base of your skull evenly, slightly raising your ears. Feel the space around your upper throat and upper neck. Keep that spacious, airy feeling, and drop your collarbones and scapulae down.
8. Come into a forward bend from standing and notice which parts of your neck may shorten. Imagine blowing up that rubber ring again, and move your head toward the floor from the soft palate, the top of your spine. As you move the palate, feel how the rest of your spine lengthens and moves from it.
9. Make circles clockwise and counterclockwise from the soft palate as though drawing them on the floor. Is it easier to move clockwise or counterclockwise? Is it easier to move forward or backward?
10. Close your eyes, and move the soft palate in the most difficult direction. You can explore this movement using the whole spine, drawing circles around the perimeter, or keeping the spine below C7 still while moving the head. In the latter case, imagine your circles moving around the inside space of C7. Keep the feel of the rubber ring inflating with your inhale, deflating slightly as you exhale during the movement.
GAZE POINT
One of the most common causes of neck pain has to do with the gaze point, something I don’t think I’ve ever seen mentioned in relation to this common problem.
People who have neck pain tend to look downward habitually. It’s part of the forward flexion defense pattern we have talked about (see here). This habit goes with myopia—if you can’t see very far ahead, it’s much safer to look down. Emotionally, it has to do with drawing into yourself—withdrawing—low self-esteem, and shyness. Just notice where you habitually look as you walk along the street. If you do find yourself always casting your gaze downward, try looking straight ahead for a while. What is that like for you?
I tried looking ahead after noticing that I always look down. The first thing I was aware of, of course, was that I was making eye contact with a lot more people. This is disconcerting for a shy person. I also became aware that I always carry a book or magazine around to read when I’m on the subway or just waiting for something. Part of this is a desire to catch up with my reading. The other part is, if I don’t look down and into the world of a printed page, I feel overwhelmed by sensory input from my peripheral vision. The reading and the downcast glance feel like a defense against people, against meeting their eyes, and encountering a possibly hostile environment and overwhelming sensory stimulation.
Notice how you habitually look at the world; see how you feel if you change your glance—perhaps you look up habitually if you are a short person. That can be a strain on the neck in a different way. People with neck pain have also often been told not to look up, to relax and lengthen the back of the neck, but this results in the muscles getting “locked long” and the deep inner neck muscles “locked short.”
The natural head position is not the one we use for reading or computer work. It is this: gaze straight ahead with a strong awareness of peripheral vision, so that there is a visual awareness extending in a wide arch across the front of the body. This would also be the safest head position for a primitive human in the jungle—if you look down, you won’t see predators coming.
So gaze straight ahead, neither to the right nor left, but be aware of both sides in a relaxed way. When the back of the head lifts, the chin is parallel with the ground so the neck doesn’t shorten. Try this for a while, and notice how you feel and how your neck feels.
“Cracking” Your Neck
Lots of people ask me if it’s okay to “crack” their necks. The cervical spine has lots of mobility and a complex structure, so it’s easy to move the joints over each other and crack them. The cracking sound is actually caused by air pockets (carbon dioxide) that get trapped in the joints. But cracking isn’t a good idea, because the problem that makes people think they need to have their neck cracked doesn’t actually come directly from the neck itself. It has to do with the relationship between the upper thoracic vertebrae, which are much less mobile vertically, and the flexible cervical spine.
When the upper thoracic vertebrae are jammed, we often overcompensate by twisting the neck around—on the principle that we can do that more easily. But this actually makes the situation worse, as it increases the discrepancy between the thoracic and cervical spine. So the solution is generally to strengthen the neck and increase flexibility in the upper spine.
CHANGING OUR MOVEMENT VOCABULARY
We can often find clues to our mysterious aches and pains in the way we do certain common movements, such as walking, writing, driving, moving our jaw, and so on. One reason pains clear up on a weekend or a vacation is not because we have a break from the stress of work, although that may be part of it as well, but because we have stopped moving in a way that causes tension. These are good areas on which to focus attention, because there can be large gaps in our movement vocabulary, which we may never notice or connect to a chronic pain.
 Jaw Release
In order to release head and neck tension, the jaw must be released. The jaw is not connected to the head muscularly in front of the ears, but under the cheekbones, about four-fingers-width from the ears. Run your fingers from your ears along your cheekbone, toward underneath the eyes, and you will feel the connection at the inner edge of the cheekbone. This awareness can help you keep the jaw relaxed because you will use the strongest part of the masseter muscle (chewing muscle) if you think of using the inner, central part of the jaw when you chew and talk. There should be some space between the top and bottom molars when the jaw is at rest.
- Begin by stretching your tongue out of your mouth as far as you can, then pull it even farther with your fingers. You can use a piece of gauze to make it easier to hold the tongue if you like.
- Now, keeping your shoulders relaxed, bring your right ear as close to your right shoulder as you can comfortably. Feel what happens in the jaw and tongue as you move your head. Does the jawbone move closer to the shoulder than the head, or does it stay in the same relationship to the head as when both are straight? Can you feel your tongue move with your head, all the way down to your throat?
- Now bring your left ear to the left shoulder and see if the left side feels different.
- When your jaw is completely relaxed, it should feel as though there is a hinge at the opposite side of the jaw (by the right ear if you are moving to your left shoulder). That hinge opens as you move your head. Let your chin relax completely to help you feel this.
- Try moving your head forward and back, moving it on a diagonal, and twisting it. Notice what happens to your jaw.
- Also be aware that opening the mouth can involve lifting the head from the cheekbone as well as opening the jaw downward. Try opening your mouth while holding your chin with your hand so the lower jaw does not move. Think of using your nose to lift your head away from your jaw. This simple movement can relieve a lot of jaw tension, by throwing the constant up-and-down movement of the mouth onto stronger muscles and a larger area.
 Correcting Head Tilt
The position of the head on the spine is one of the most important factors in neck tension. Because we are almost always facing forward, the weight of the head tends to be supported by the side and front muscles of the neck, a position that tightens the sides of the neck and the rotators just under the skull. Most people also have a significant tilt to the right or left. In this series of exercises, we’ll explore the sideways tilt, which, again because of the weight of the head and the amount of mobility it has, can throw off the rest of the spine and the hips. So let’s correct it and find how the spine can release and strengthen without our having to struggle to balance our heads.
- Sit in front of a mirror, on a chair with legs uncrossed or on the floor. You need to be in a position in which your pelvis is stable and square to the mirror. Bring your arms straight out to the side, palms facing down and in a straight line through the body, both hands in line with the shoulders.
- Now close your eyes and turn your head from side to side. Feel where your ears are in relation to your shoulders and where the top of your head is in relation to the lower spine; the hands, arms, and collarbone are still. Only the head moves.
- Now, with your eyes still closed, find a place where your head feels completely centered. Open your eyes. Notice: Are your ears and eyes in a straight line? Is your head tilted or turned in any way? Are your hands and arms still even? Probably not!
- Notice this, reposition yourself more evenly, and then repeat the exercise. See how your body can absorb the information your eyes have given you. Keep correcting yourself until you can feel the center position with your eyes closed.
 Enhancing Side-to-Side Balance of the Head
Without moving your shoulders, turn your head from side to side. Keep the ears even and the crown of the head over the spine—don’t lean the head forward at all. Keep the face parallel to the wall and the eyes moving with the head.
- Rotate your head slightly, with no forcing or effort at stretching, turning the chin first toward the right shoulder. You will notice that at a certain point in the twist, the head will automatically shift upward very slightly, the shoulder you turn toward may want to rise up (don’t let it), and you will probably feel a slight “glitch” at the side of the neck. This is the place where the two top cervical vertebrae (remember the spine starts at the level of the ears) shift slightly in their relationship to each other, and a gentle movement becomes a more effortful stretch. Notice this place on the right by looking at it in a mirror if you can, or just noting with your hands the position of the head relative to the body.
- Then turn to the left, and locate the “glitch” where the movement shifts on that side. What we are interested in now is the difference between those two places. It is likely that the head will turn more easily to one side than the other.
Most right-handed people can move farther to the right because they look at things and write turning to the right (the opposite pattern is true for most left-handed people). The left side of the neck usually tightens to pull the head back into line, and the left shoulder rises up to compensate. There is usually a bigger space between the inside edge of the right shoulder and the ear to compensate, and a bigger space between the inside edge of the shoulder blade and the spine on the left side than on the right. You can experiment with this by placing books, the computer screen, and so on, at an angle that is different from the familiar, probably more to the left, and see how that changes your alignment and your focus and connection. - To correct the habit you have, turn to the side where the “glitch” is closer to the centerline. If this is to the left side, you are probably chronically tilting your head to the right. Stay in the glitch. Relax and drop both shoulders, making sure the collarbone is straight. Lift the soft palate to lengthen the spine.
- Now move your head back and forth over the glitch about 1 inch to either side of it, feeling the twist in the whole spine. Move your eyes all around, loosening up your field of vision—look as far in the direction you are turning as you can without moving the head more than an inch. Keep lengthening your spine for about two minutes.
- Now turn your head back to the center. With your eyes closed, move your chin in a half-moon shape, swinging slowly from side to side, keeping your alignment. Even out the movement. After a minute or so, come back to center and notice any changes. Rest.
 Moving Your Skull over Your Neck
This exercise has a lot to do with how we use our eyes, the coordination between them, and how that influences the weight of our heads. For example, if your head is chronically tilted because of looking more to one side, even if only a fraction, that weight over time can create tightness in one hip, in the legs, and in your feet. Your eyes are also your brain, and your cognitive process, memories, and emotions are bound up with your vision. So as you do this, pay especially close attention to the eyes.
If you can complete this movement with palms pressing against the ears and the shoulders pressed down, use this position. If not, modify it by putting just the tips of your fingers against the ears. You want a firm grip on the area around and just above your ears either way (see fig. 8.3).
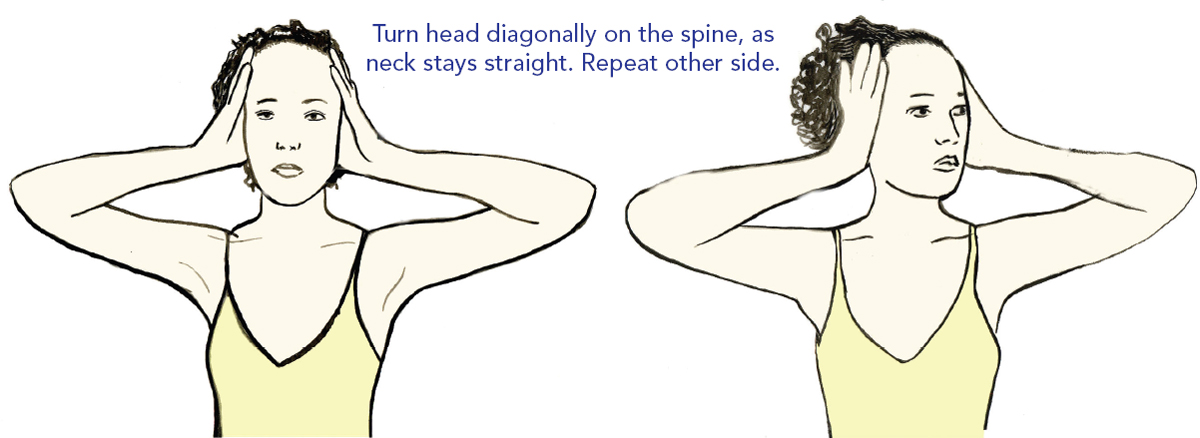
Fig. 8.3. Moving Your Skull over Your Neck
- Keep your neck and chin back, but not tucked in. You want your face on the same plane as the wall in front of you. The underside of your chin needs to be parallel with the floor. You’ll probably find that your chin will want to jut forward and so will your neck.
- Now, keeping your chin and neck back, use your hands to turn the head diagonally on the spine. Keep looking straight ahead—your line of vision will shift, of course. Make sure your neck stays straight, so you are turning the cranium on the spine, opening up some space between the first two vertebrae in the neck, above the level of the skull. Go in both directions, noticing which one is easier.
- Use your hands to turn your head to the side that is most difficult. Stay there for 90 seconds if you can, pressing slightly with the side of your head against your hands toward the more difficult direction. Your head provides a very slight isometric resistance to your hands. Envision sliding the upper hand upward slightly and the lower one downward, pressing your skull and squeezing the cranial bones slightly, as though you were lifting the base of your skull up and very gently turning it in the difficult direction. This will help you feel the separation between the movement of the atlas (C1, the first cervical vertebra) and the axis (C2, the second cervical vertebra), and the space between them and the skull (occiput).
- Then turn the head in again in each of the two directions, noticing any differences that you feel now.
You can use this exercise for any spiral or bilateral distortions in the spine, scoliosis, eyestrain, and most neck pain.
NECK FLEXORS
Look at the path of the neck flexors (fig. 8.4). You would think that the forward position of the head, unfortunately common in most people, would strengthen the flexors—after all, we are in chronic flexion. However, in this position the flexors shorten and then cannot contract or expand properly (fig. 8.5). Architecturally, the flexors resemble our other troublemaker, the psoas; they support the weight of our heads the same way the psoas supports our torso (see 8.6).
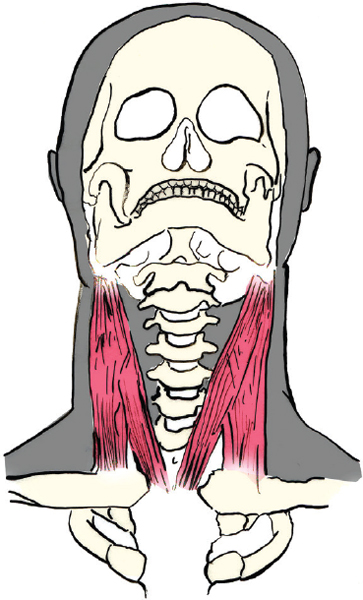
Fig. 8.4. Neck flexors
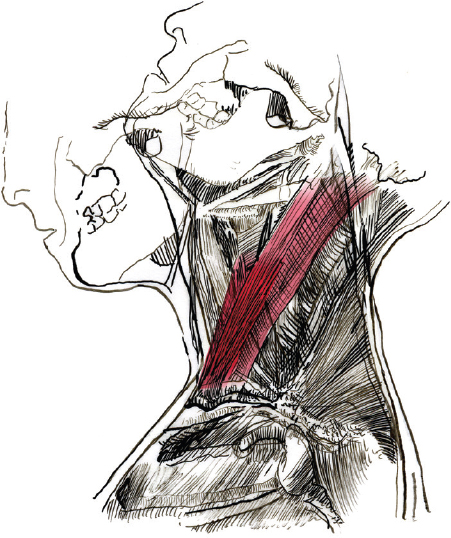
Fig.8.5. Neck flexors in motion
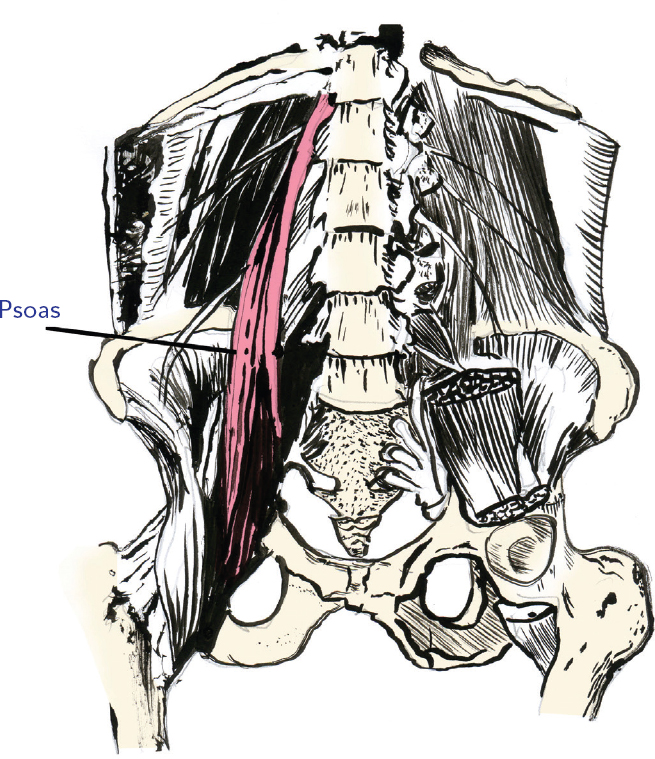
Fig. 8.6. Psoas muscle
 Strengthen Your Neck Flexors
Make sure your shoulders stay relaxed. Your chin should be slightly down, but with some space between your chin and your throat. You should feel the work in the front of your neck and in the back next to the base of the skull.
- Lie on your back, arms by your sides, palms down.
- Think of stretching your spine long as you bring your head up about 8 inches or so from the floor and look between your feet. The gaze point between your feet should keep the neck in the correct position.
- Hold for 3 minutes if you can, without shifting position.
This is also a good test to see how strong your neck is. If you can’t hold the position for at least a minute, your neck flexors are quite weak and could be responsible for some neck pain. Weak flexors allow the head to fall too far forward, causing pain at the back of the neck.
 Advanced Strengthening Exercise for the Neck
This is a good exercise to deal with neck tension (weak neck flexors and rotators) if:
- When you do abdominal crunches, your neck hurts unless you support it
- The position of your head is forward of your body in profile
- You have had whiplash or another neck injury (but be careful if you have disc herniation or other vertebral issues)
- You have eyestrain
- You have neck tension
Try this advanced exercise very carefully. Don’t rush it. This is an amazing exercise with fast results if you do it correctly. However, if you practice it with poor alignment, you can easily hurt your delicate neck.
1. Use a bed or table. Lie on your back with your shoulders at the edge and your neck hanging over backward (fig. 8.7). Take a rolled-up bath towel and place it lengthwise on the table directly under the spine of the upper back, so your thoracic spine is supported and the shoulder blades fall down on either side of the towel. The length of the rolled-up towel should run between the seventh cervical and about T12—not up to the neck or down to the waist or lower back. Without this support, you may compress T1, T2, and T3 when you lift your head.
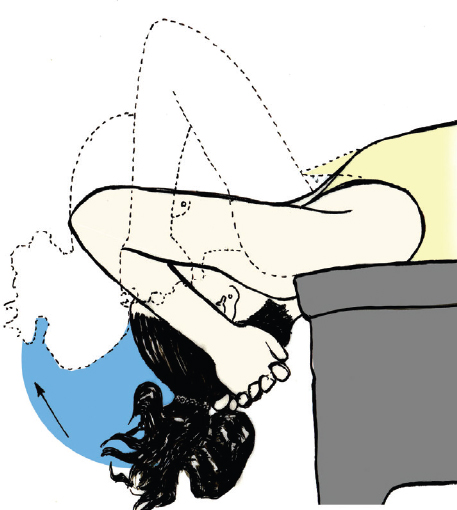
Fig. 8.7. Advanced Strengthening Exercise for the Neck
2. Bring your hands back to a point about a hand’s width back from the crown of the head. You will probably feel a ledge of bone there—the edge of one of the cranial plates. Hold it gently with the fingertips of both hands, and lengthen the back of the neck. The neck must stay long throughout the exercise. The chin, with the mouth shut, remains in the same proximity to the throat the whole time—about 3 inches away. Depending on your strength, provide more or less support with your fingertips.
3. Keeping the point you are touching supported, so the head does not fall back and the back of the neck stays long, lift the neck toward the chest. Make sure your chin is right in the center of your shoulders. Keep your gaze directed toward the center of your chest. Come up only as far as you can without lifting your upper back from the towel. You will probably bring the head slightly above shoulder level.
4. Keep your head alignment, and bring the head back down to the starting position. The eccentric (negative) movement is usually a little easier, so relax your fingertips more now and try to feel the movement in the back of the neck, close to the skull. If you feel the movement mostly in the front, you will need to tuck the chin more and lengthen the back of the neck. Adjust your neck position carefully, so you are working primarily in the back, not the front. You may also feel work in the lower back portion of the neck. The contraction of these muscles can feel like a gripping neck tension. This is okay. Gripping and cramping in the throat is not—it’s an indication you are compressing your neck.
5. Each movement should be very slow and controlled. Make the upward (concentric) movement of the head to a slow count of five, the downward (eccentric) to a slow count of ten. Five to twelve reps equal one set.
Follow immediately with Jaw Release.
 Stretch for the Neck
1. Sit on a chair or cross-legged on the floor. Support yourself with one hand on the floor or by holding the chair as you lean away from it (fig. 8.8).
2. If you are sitting on the floor, press your hand into the floor (probably the palm will feel the best, but you can experiment with different hand positions). Bring the opposite ear toward the opposite shoulder. You can support, or gently press, the head toward the shoulder with the free hand as long as you can relax the shoulder and feel no compression in the neck. If you feel a lot of compression in the neck, you could place a rolled-up towel between the neck and shoulder. Your Neck Roll might also work (see here). If you don’t feel compression, just hold the head in a gently stretched position.
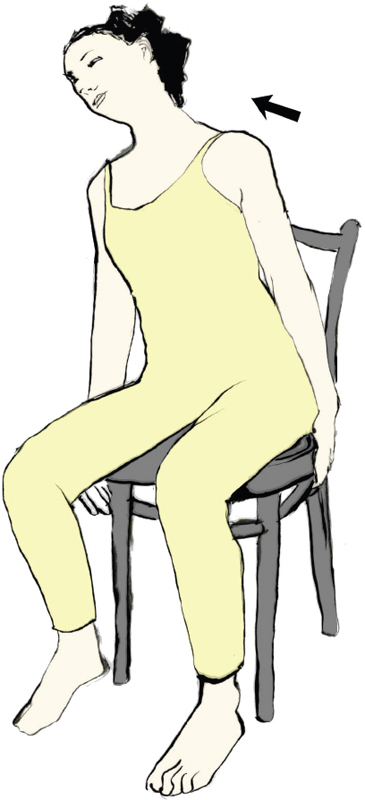
Fig. 8.8. Stretch for the Neck
3. Press the collarbones firmly down, while the neck stretches. You can change the angle of your head to find a good stretch between the collarbone and the chin, opening up the fascia in that triangle. Follow your body’s guidance and explore different stretches in the front and sides of the neck. Using the dynamic of the collarbone pressing down will open up the lower part of the neck and the upper chest. You may also feel the stretch through the rotator cuff muscles in the thehead shoulder. and necK