12
The Spine and Deep Core Muscles
MOST BACK PROBLEMS come from an imbalance in the spirallic lines of movement in the spine. Scoliosis, where the spine has a visible S curve from right to left, is an obvious example and probably the cause of much undiagnosed chronic back pain. The spirallic movements can also be distorted when the spine appears straight right to left but is actually rotated incorrectly along its axis—in other words, when the left or right side of the vertebrae are in front or back of each other. The spine will attempt to balance itself by curving more and more in different directions, so eventually the condition becomes chronic and results in “traveling” pain—one day the upper back hurts, the next day it’s the lower.
Spiral line distortions originate in genetics, and they can be congenital. (There is a theory that pressures against the uterus from the mother’s own spinal distortion can create uneven formations in the connective tissues of the fetus.) Mostly, however, these distortions are acquired by injury or habit.
SPIRAL DISTORTIONS
Look at fig. 7.4 to get an idea of the complexities of spiral distortion. The other issue that we must understand to change this condition is that some parts of the spine are naturally very mobile and will compensate more—and usually hurt more—than the rest of the back. As you can see from the illustration in fig. 8.2, the atlas and axis, under the skull, have an interesting and limited mobility. You can see how easily they might “stick” in one position and how difficult it would then be to free them up. The entire thoracic spine has a similar formation; because of the rib joints attaching, it can’t rotate much without lengthening. Otherwise, our ribs would snap off or grind into each other. The lumbar and cervical spine are much more flexible.
C3 and T12 (which is half lumbar and half thoracic in its formation), are usually the most mobile vertebrae in the spine—and those are the locations where many people have pain (see fig. 2.17). These areas will take on the extra work that the stuck parts of the spine can’t do, so the overworked muscles around them go into spasm. These areas may feel as though they need loosening—and it’s true the muscles do—but the best and more long-term solution is to free the thoracic spine by learning to lengthen and then rotate it and to free up atlas and axis by mobilizing the cranium, addressing the underlying kyo.
C3 and T12 seldom herniate because of their mobility. The likelihood of injury is highest at the stress points of the spine, where there is much wear on the discs. C5 and C6, adjoining the thoracic spine, and L4 and L5, connecting the flexible lumbar spine to the less mobile and heavy pelvic structure, are particularly vulnerable to herniations.
THE ROLE OF THE DEEP BACK MUSCLES IN BACK PAIN
A good deal of back pain, whether it’s caused by weak muscles or not, can be helped by strengthening certain muscles. You can have disc herniations, osteoporosis, and even more severe spinal injury without having any back pain. One interesting study showed that 64 percent of people with no back pain, who said they had never had back pain, have some disc herniations that show up on an MRI. Different conclusions have been drawn from this study, of course.
John Sarno, M.D., believes that studies like this show that almost all back pain is psychological in origin.*6 Jim Johnston, P.T., draws the conclusion that the difference between the pain-free and pain-full group is the strength of the back muscles, specifically the multifidus.†7 Since there also appears to be a correlation between psychological difficulties and weak back muscles, they could both be right.
John Sarno has his own stress reduction program outlined in his book, and it has helped many people. However, I naturally tend to see those people for whom his program has not been successful, and they are usually helped by the back strengthening exercise approach and by my work, so let’s look at the role of the deep back muscles in the correction of back pain.
The Multifidus Muscle
There are a lot of deep back muscles that run by the spine. The one that we’ll look at is multifidus, which physical therapist Jim Johnson credits as being responsible for almost all back pain. I have found his approach invaluable and have drawn a great deal from his writing. You will see that I have included many exercises for both multifidus and transverse abdominis. These two muscles work together: the action of transverse abdominis stimulates the lumbar fascia, which in turn activates multifidus (fig. 12.1). The transverse abdominis is supposed to fire to support the spine whenever we move. However, this pathway is turned off if there has been back pain, any spinal or abdominal surgery, including caesarean, often after childbirth, and so on. In order to regain the support of these muscles, they must be consciously and patiently retrained.
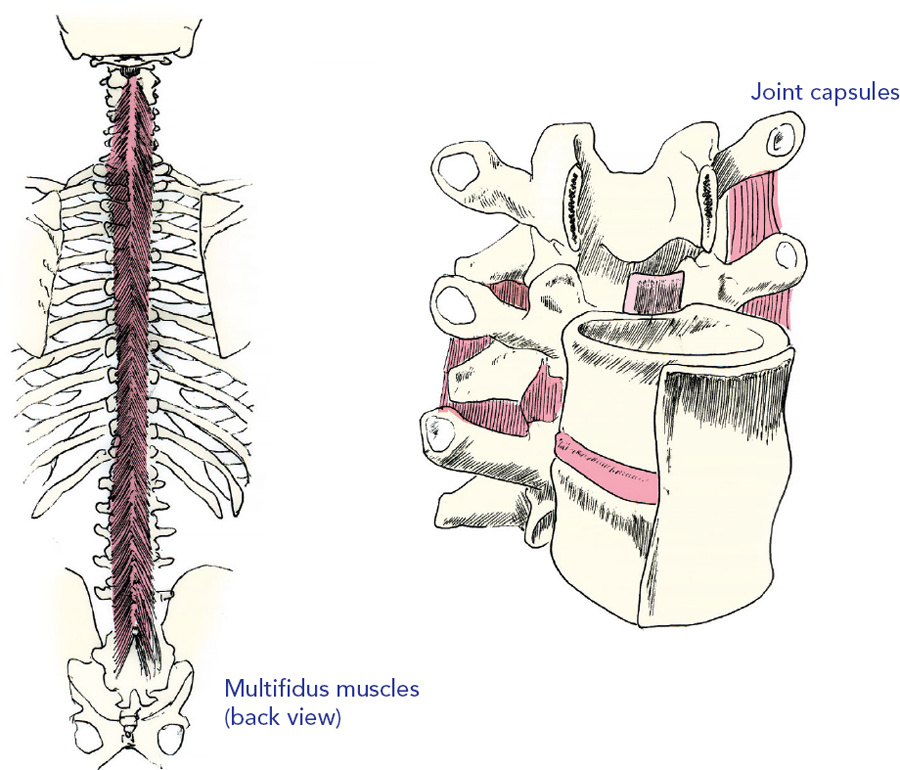
Fig. 12.1. Multifidus and joint capsule
Multifidus differs from the other deep back muscles in two important ways:
- It is attached to the joint capsule of the spine, rather than to the joints themselves.
- It connects only with the nerve that innervates that section of the spine to which it attaches, unlike all the other deep back muscles.
Now, why is this important enough that I’m including it? Look at our joint capsules (see fig. 12.1 above). They are just tissue that surrounds and protects the facet joints of the spine, sort of like the bursa of the elbow or the shoulder. We know how painful bursitis is. Well, if the multifidus is weak, or not synchronized with the other muscles, it may not fulfill its function of pulling the joint capsule tissue away from the joint itself when you move, especially in sudden movement, which can result in nipping the facets—ouch! The result: the back goes into spasm. This accounts for about 80 percent of seemingly inexplicable back spasm attacks—I was just vacuuming the floor, lifting my child, and so on.
The multifidus is vulnerable, since it can only use one spinal nerve, at the level of the spine to which it is attached. Other back muscles can pick from a variety of spinal nerves. Why? We don’t really know the evolutionary reason for this—maybe it strengthens the multifidus/neural pathway somehow. What we do know is that if one vital nerve is compressed for any reason, the multifidus muscles at that part of the spine will suffer.
That is why most of my back exercises also include strong multifidus work. Here’s one that isolates multifidus.
 Exercise for Multifidus in the Back, Especially the Lower Back
1. Rest your weight evenly on your hands and knees (fig 12.2). Make sure wrists are over shoulders and hips over knees. Press all four stabilizing points into the floor (hands and shins) equally.
2. Now, simultaneously lift the right hand and left knee up off the floor just 2 inches, no more, without changing your torso position. If you lift your hand or knee too high, you won’t be able to do this.
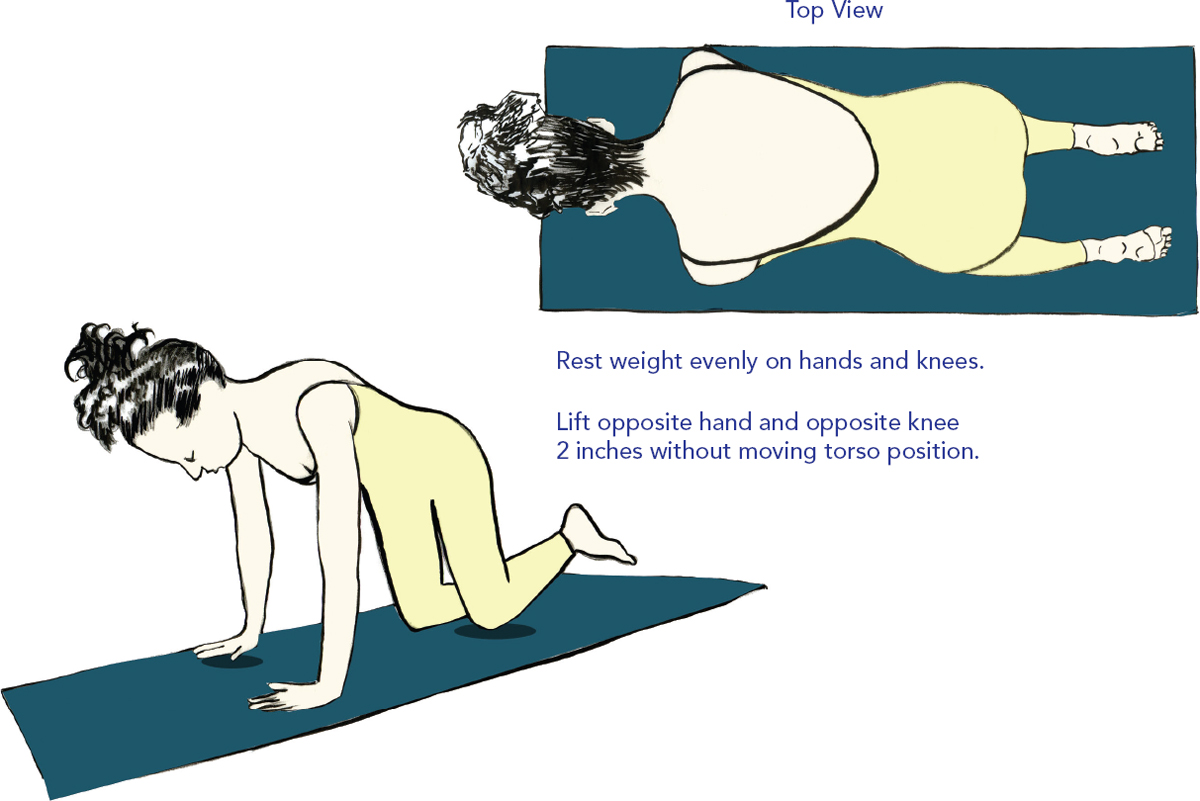
Fig. 12.2. Multifidus Exercise
3. Hold for 90 seconds. Repeat on the other side.
4. One side is probably easier than the other. Hold the weak side twice as long as the strong side, same number of repetitions on each side—probably 3 or so before muscle fatigue. Build up to 10 repetitions on each side.
ALIGNING THE SPIRAL PATHWAY
Any imbalances in the core spiral shape and the rotational movement of the spine will reflect in various right/left distortions in the rest of the body. And any inequalities in the right/left alignment of the pelvis, torso, shoulder girdle, and head will show up in distortions of the rotational pattern of the vertebrae, somewhere in the spine.
There are grids you can stand against that will show you which shoulder and hip are higher, as well as other postural deviations that become apparent when you look at the body from one plane without movement. You can see these imbalances yourself if you look carefully, facing forward in a mirror. The spiral distortions are subtler and may only show up in movement. Even if they appear structurally, they’re harder to catch. One shoulder may be in front of the other without being higher or lower. That condition won’t be very easy to see, but it means that more muscles are imbalanced than in a high/low distortion, because the spine is involved more directly.
Adjusting bone or massaging muscle offers only temporary fixes for back pain because neither muscle nor bone forms the shape of the spine—connective tissue creates the shape of our physical structure. However, muscle, strengthened and stretched appropriately, can change the shape of the fascia over time. Permanent pain relief happens when fascia is changed through bodywork, concentrated and deliberate exercises, and changes in the nervous system that correct long-term habits.
The series of spiral pathway exercises included here involve the whole spine because of the nature of compensation and balance in the rotational movements. You will find these four exercises useful if:
- Any part of your body hurts more on one side than the other
- You have traveling pains, pain and tightness that move around the body
- You spend, or have spent, time in an asymmetrical position habitually (e.g., working on a computer with the head slightly turned or playing a violin)
- You have loose joints
These are alignment exercises. This means that the purpose of the movement is not fulfilled if you make the shape of the movement or posture but don’t use the correct muscles. This is the hard part, because every other body part will want to work, except the weak stabilizing muscles we are trying to get to! So resist the temptation to do it wrong. You’re much better off holding the position correctly in a modified form. That way your body will learn a new way of being that is more comfortable. New neurological pathways will be created, but you must hold each position for at least ninety seconds minimum for the muscle memory to be created in the brain.
I suggest you start with a modification that you think will be too easy for you and hold it, paying attention only to your form (and the clock) for at least ninety seconds. Focus on the areas you want to use as well as the compensations that are happening, and let your attention scan your whole body every ten seconds or so. Stay aware and alert; make sure your breath stays open and continuous. As soon as you lose concentration, old habits will creep back in.
For all the exercises except the fourth one, the hips and shoulder are square and level. Pay a lot of attention to this. Don’t let the head or torso move to the right or left. You are strengthening the central line of your body so that the spinal movements can free up and equalize. There should be a lot of sensation in the inner core of the body, inner legs, abdomen, and spine.
Scoliosis is an obvious spiral line distortion; there are lots of others that show up in movement patterns in which you twist more easily in one direction than the other. You may not even be aware of these patterns.
Whatever your problems are, start with the first exercise; initially don’t add more than one exercise each day, holding the postures once or twice, no more. So on day one you’ll do exercise No. 1; day two will be exercises No. 1 and No. 2; day three will be No. 1, No. 2, and No. 3; and day four, No. 1 through No. 4. Then you’ll do either all four every day or every other day, as you choose, and leave out anything unsuitable.
The exercises are very mentally challenging—you can’t do them successfully while watching TV. You’re better off visualizing and thinking correctly while messing up the exercise—well, at least, not being able to do much of it—than not thinking and mechanically completing a correct movement. It’s actually in the effort that the change happens. So if you can do the unmodified exercise without any effort, there’s a 90 percent chance you’re doing it incorrectly and a 10 percent possibility that you just don’t need it, in which case, go to the next one.
 Spiral Pathway Exercise No. 1: Transverse Abdominis Exercise I
You can refer back to fig. 9.8 to have a clear picture of the muscle being worked.
1. Stand by a doorjamb so you can hold on to a corner of it. Facing forward, place the outer edge of the right foot, the side of the hip, and the side of the rib cage on the doorjamb, your right hand and arm on the other side of the wall slightly behind you, holding on to the molding or the wall (see fig. 12.3 below). If you can’t touch your rib cage to the doorjamb without twisting your body, place some padding between your rib cage and the edge so you can face front squarely, without any distortion. The hips should be square and level, both feet parallel at hip distance.

Fig. 12.3. Transverse Abdominis Exercise I
2. Make sure the shoulder at the edge of the doorjamb is comfortable; all doors
are different and you may need to experiment a little to find the right one. The
distance your hand is from the edge will make this movement more or less
difficult—the farther away, the harder it will be to balance.
The hipbone, where it contacts the edge of the doorjamb, must be straight
and not tilted up or down. You want to feel as much distance as you can between
the crest of the bone and the bottom of the pelvis, as though someone were
squeezing your hips together and they were elongating. The rib cage also
should not tip forward or back, so let the lower back part of the rib cage widen and lift up toward the ceiling while the shoulders relax. You want to feel as much length as possible in the torso before you start the movement, so concentrate on drawing the rib cage away from the pelvis and lengthening the spine.
3. Keep the length and the alignment against the doorjamb, hold on firmly, and check alignment pointers again—connections to doorjamb, foot position, hips square and level, relaxed shoulders. Hold on with your arm muscles rather than the shoulders. Then lift the leg farthest from the doorjamb about 45 degrees, very slowly. You should feel a strong contraction, like a belt, around your navel, pulling in. That’s the upper part of transverse abdominis working. If you don’t feel this, start again, and check all your alignment. Don’t lose any length as you lift the leg. There will be an optimum place where you can lift the leg and feel the “belt” action—it may be lower or higher than 45 degrees.
As you lift the leg slowly, think of the ankle rising easily and the head of the thigh bone softening back into the socket, engaging your abs rather than leg muscles, without losing hip placement. If you can’t lift your leg, raise the foot slightly on a block and just think of lifting to find the same muscles.
4. Stay in the optimum leg lift position for at least 90 seconds, continuing to lengthen the torso like a snake sliding up the wall. If you can find a lift in the back of the head, let that help you too. You are feeling the support of transverse abdominis under the stomach and diaphragm.
5. Do the exercise on both sides, holding for 90 seconds, with one repetition on each side.
After you release the position, your breathing may feel easier and more relaxed. If you had tightness in the solar plexus, it may release. The spine will also feel more supported. Enjoy the sensation; ultimately it can lead to a core strength that will allow your movements to feel less effortful and more graceful.
You can use this lengthening feeling in the back between your rib cage and pelvis when you are sitting. Imagine your rib cage in the back floating up and away from the pelvis and, when you can maintain that, feel the whole torso lift up away from the pubic bone and the structure of the pelvis in the back.
 Spiral Pathway Exercise No. 2: Transverse Abdominis Exercise II
This exercise strengthens side, abdominal, and some leg muscles. This pathway corrects imbalances in the back, which you can feel as lower and midback pain, inability to sit and stand up straight, and lower back pain that is primarily on one side of the body. The exercise will also help scoliosis.
1. Kneel parallel to a wall, with the space between your knee and the wall as long as a yoga block. Kneel upright with padding under your knees, if you want, and the block touching the side of your knee and the wall. Your hips are up, directly over the knees. You may (you will!) need a chair in front of you to hold on to.
2. Now bring the yoga block between your hip and the wall, so the distance is the same between the hip and the wall as it was between the knee and wall (fig. 12.4). Keep the block there to support your hip. Hold on to the chair in front of you, however you feel comfortable. Keep the hips square and level and straighten the leg that is farthest from the wall, so that the toes of that leg and the knee of the leg closest to the wall are in a straight line. Try to lift the straight leg only 2 inches from the floor, keeping the hips square. Hold for 90 seconds, one repetition.
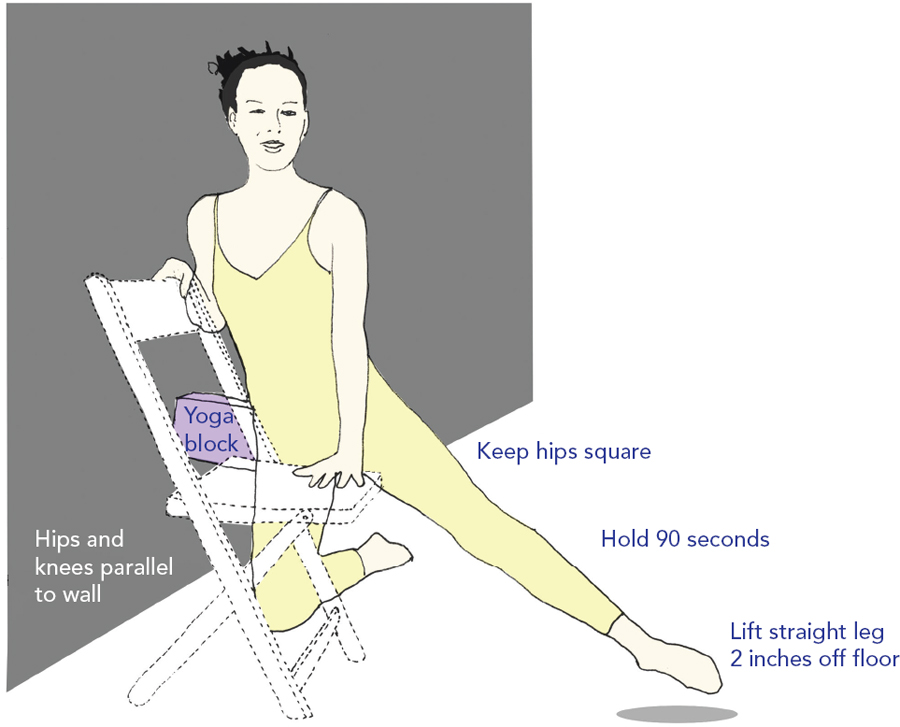
Fig. 12.4.Transverse Abdominis Exercise II
3. Repeat on the other side. One side will probably be stronger. Work the weak side first, and then the strong side, and then the weak side again.
To modify: Bend the leg slightly, and lean forward onto the chair. You can cheat just a little by bringing the knee closest to the wall a little farther away. If it is not possible for you to lift the leg at all, you can simply hold the position and envision lifting it until you get stronger.
This is a very hard exercise for most of us. You must be able to do it while keeping the hips square and level, tailbone slightly dropped, so the lower back is straight and your shoulders are over your hips. Don’t let the shoulder nearest the wall veer in toward it or rise up.
To make this easier, you can use your arm strength, lean forward, and use some isometric pressure of the hip against the block to push against.
 An Easier Version of Transverse Abdominis Exercise II
If you can’t get this one at all, here’s an easier version.
Adopt the same position, but this time position yourself next to a doorjamb so you can hold on (fig. 12.5). The outer leg, hip, and rib cage (use padding if necessary) touch the edge of the doorjamb. Same alignment.

Fig. 12.5. Transverse Abdominis Exercise II Modification
 Spiral Pathway Exercise No. 3: Outer Spiral Exercise
Just as the Transverse Abdominis Exercise works the deep inner muscles that help the inner part of our spiral movement pathway, so this one engages the deep outer muscles that support the outer part.
 Outer
Spiral Exercise Level I
1. Lie on a mat or any comfortable surface that has a straight edge (but not one you can fall off). Position yourself on your left side, with your left arm straight and under your head. Bring your left side into a straight line by using the edge of the mat, so the side of your hip, your rib cage, your shoulder girdle, your left arm, and your head line up.
2. Then position your legs so they line up too. You can use your right hand to stabilize as you move, but then move your right arm on top of your right side, palm on the side of your right thigh (fig. 12.6).

Fig. 12.6. Outer Spiral Exercise Level I
3. Stack your hips so they are square and level. The right hip will probably want to roll back a lot, so feel the side of the pelvic bone to allow you to roll it into the correct position. It should be square with the ceiling, as should your shoulders. Feet are flexed and active. The outside of your left foot should press against the floor, at a right angle to your leg. Your head must be in line with your spine—not forward—so the weight of your head will rest in the middle of your left arm.
4. Gaze ahead, and check that the top of your head is in line with your pelvic floor. It will want to roll forward on its own. If that happens, don’t go farther; press the outer left side of your body down into the mat, and think of lengthening your spine.
5. Hold this position for 90 seconds, and then repeat on the other side. Work the weaker side first for one 90-second repetition, and then the stronger side for the same time, and then the weaker side again.
6. The degree of difficulty you’ll discover does not depend on strength exactly, but on the amount of torsion in your lumbar vertebrae. If the position as I’ve just described it is not challenging, keep the alignment in your hips, shoulders, and head the same, but move your legs an inch or so back, using the right hand for balance.
7. Now realign as we did initially—spine straight, hips and shoulders square, head in line with spine, gaze in front, and bring back the right arm to the starting position, palm down on the side of your right thigh. Roll the right hip forward again.
8. Keep moving the legs back until you feel a challenge—if you are doing this correctly, you won’t need to move more than a few inches. The position should be possible to maintain, but will take some work. Then lift the right leg up a few inches, keeping it in line with the left leg exactly. There will be an optimum distance for you to position the leg so that the challenge is right.
The left leg must be able to keep its starting position. It is very important here that only the distance between the right and left leg change, not the angle, and the hips stay stacked. Hold this position for 90 seconds, and then repeat on the other side.
9. Work the weaker side first for one 90-second repetition, and then the stronger side for the same time, and then the weaker side again.
 Outer Spiral Exercise Level II
1. For the next level of challenge, make sure the hip point on top stays rolled forward so you are in line. Then bring the top leg forward, keeping the hip stable. Keep the foot flexed and straight. Make sure your gaze stays straight ahead. Keeping the outer edge of the foot and the leg itself straight, bring the leg to the place of maximum challenge (fig. 12.7).
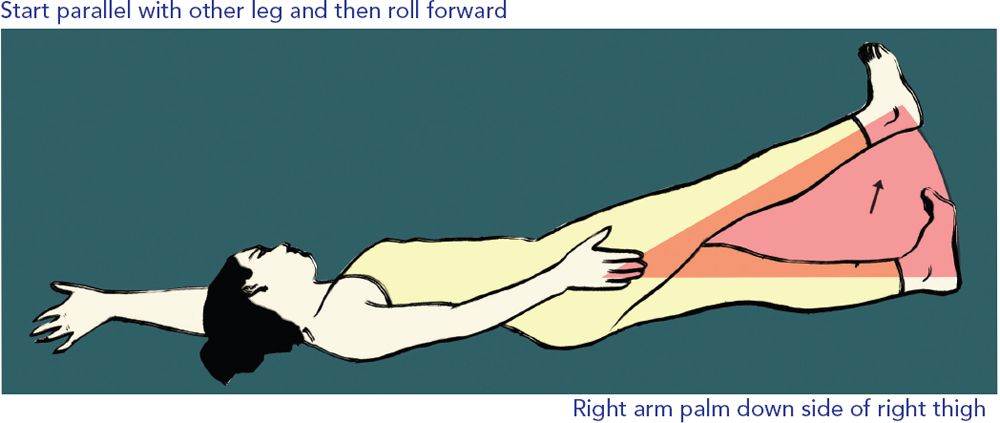 Fig.
Fig.
12.7. Outer Spiral Exercise Level IIa
2. Then, keeping alignment, rotate your leg in by bringing your heel toward the ceiling as you think of lengthening the leg. The leg and hip do not change position (fig. 12.8).

Fig. 12.8. Outer Spiral Exercise Level IIb
3. You can then externally rotate the leg by turning the foot outward, so the toes move toward the ceiling (fig. 12.9).
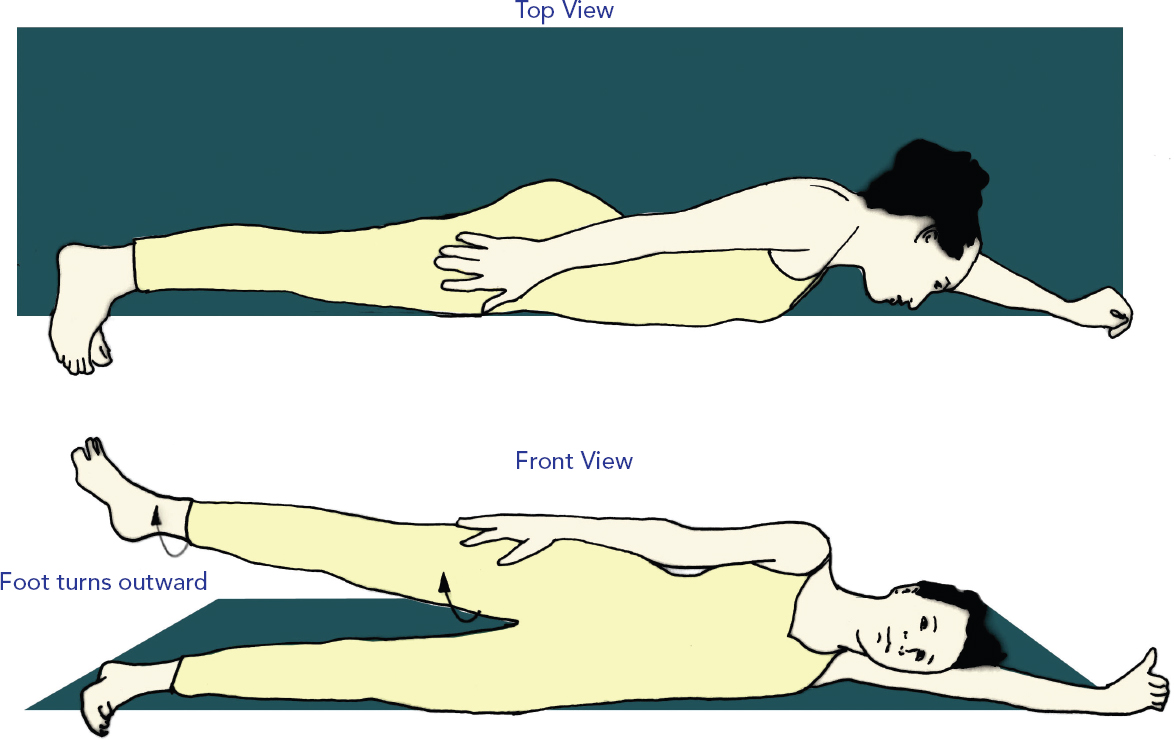
Fig. 12.9. Outer Spiral Exercise Level IIc
4. Notice which is more difficult. Hold the leg with the foot straight for 90 seconds, and then repeat the more difficult movement for about 10 seconds.
5. Repeat the sequence on the other side.
 Spiral Pathway Exercise No. 4: Lower Back Exercise with Physio Ball
This exercise works to stretch and strengthen obliques, quadratus, and sides of the back. This move is very safe and works for most lower back pain, both short and long term. You will need to use a physio ball of the appropriate size for your height. If you are not sure of your balance you can use a wall to steady yourself. You can even use a corner of the room, so you can prop the side of the ball against both walls. However, you should not use the wall unless you absolutely need it, because you want to strengthen your stabilizing muscles—the ones you use to balance on the ball. Although this is a tricky exercise, it is well worth the effort for the magic effect it has on the lower back.
1. Position yourself exactly on the ball (as shown in fig. 12.10) in order to work the side of the body. You should feel the movement on the side between the hipbone and the rib cage and maybe up the rib cage and down into the side of the hip. Place your feet on the wall with the top foot behind the bottom or with one foot on the floor and one against the wall as shown. Knees can be bent as much as needed. The exercise is easier when your knees are very bent, so you can use your feet against the wall to stabilize your body. Your hips are square and stacked, one on top of the other.

Fig. 12.10. Lower Back Exercise with Physio Ball
2. Your body lies in a straight line, as though following an imaginary line drawn on top of the ball, and your hips are directly over each other, shoulders stacked in the same way, as though both the front and back body are pressed between two panes of glass. You can bring your hand behind your back to make sure you are not leaning forward or back. Your head should be in line with your tailbone (it will want to jut forward, especially when you move). Check that the side of your rib cage faces the ceiling. Your gaze should be straight ahead.
3. Bring the bottom hand down on the floor to align yourself, and stretch over the ball as far as you can. Start the movement from the most stretched-out position you can obtain. This allows you to stretch the outer muscles of the side body so you have to access the weaker deep muscles and to engage the postural aspects of the lower back—the parts of the muscles that support your spine.
4. Bring the elbows by the ears, arms straight, or bring the hands to the top of the head for an easier move. You could even keep the bottom hand on the floor to modify, or the top arm on the body.
5. Keeping 100 percent aligned, as described, slowly and evenly raise your side body, using a controlled movement. Do not use the weight of your head to lift up. Look straight ahead, and relax your neck—the effort should come only from the side body. Push your feet or foot into the wall to stabilize yourself. Do not come up above the angle where your body forms a line (as shown), in order not to contract the outer muscles too deeply. You want to keep a slight stretch in the side body.
6. You can repeat the movement up to 6 times, for a count of 10 seconds for each repetition—10 up and 10 down. If you can do this without tiring, your alignment is almost certainly not correct. Check it, and try again. One repetition may be enough.
7. Repeat on the other side. Start on the weaker side, and then work the stronger one, and then the weaker again.
 Lower Back Exercise with Wall and Physio Ball
This exercise can be modified in a few ways to make it easier. One is to use a firm ball and prop the ball against a corner. You can also use a stool to raise your hands, so your starting position is less extreme. Or you can lean with your back against a wall, feet a comfortable distance away, so your back is flat on the wall and your head touches the wall. It’s best if your shoulders touch the wall too—if they don’t, work at bringing them back without losing the contact of your back against the wall.
- With your back flat against the wall, raise your right arm, elbow at right ear, palm facing out. Then slowly bend to the left side, keeping the hips still and the back flat. Here’s the more difficult part—you must keep both sides equally long, so the left side of your body keeps quite straight and does not collapse at all.
- Go as far as you can without losing the straight edge of the left rib cage. Keep the right shoulder and arm against the wall. You probably won’t get very far without losing alignment. Go to where you can keep form, and then bring up your left arm to your left ear. Hold for 90 seconds, and repeat on the other side.
BALANCING THE MIDBACK (12TH THORACIC VERTEBRA)
The 12th thoracic vertebra is a common “problem” area, located at a junction point between the upper back and lower back. This area is an especially complex meeting place, because the vertebra itself is formed as a thoracic vertebra at the top and a lumbar vertebra at the bottom. This allows more movement, yet because of the greater ease of twisting in the lumbar, it often gets stuck rotated to one side or the other, causing back pain.
As the neck and the lower back are the most naturally flexible parts of the spine, they compensate for tightness and immobility in the thoracic spine. They go “out of line” when they are pulled beyond their limits, and then the muscles around the overstretched parts of the spine can go into spasm for protection.
We can solve this problem by (a) strengthening the neck and lower back and (b) stretching and opening the spaces between the thoracic vertebrae.
 Arm Raise Twist
This twisting exercise will correct the rotation by aligning the muscles around this part of the spine, gently persuading the vertebrae to line up.
1. Sit cross-legged on the floor. If you can’t sit cross-legged, sit on a chair with your feet flat on the ground. Bring your right elbow to your left knee, and use the leverage of the knee to twist as far as you can away from the knee. You will probably notice the left hip move back to facilitate your twist. Press the left hip forward as you turn, so the hips stay level. This will prevent the lumbar vertebrae from turning too much.
2. Allow the midback to open. Make sure your neck stays in line with the rest of your spine by aligning your chin with your sternum. You don’t want to drop your head, though; think of slightly bending back rather than forward, which will help to straighten the spine. You will feel the twist deep in the lower, mid-, and upper spine.
If any part of the back feels tight or sore when you twist, check that:
- You are not leaning back or forward; your spine should be straight
- Your shoulders are turning with your body and are level with each other
- Your lower ribs are level and not tipping unevenly right or left
3. Your shoulders should be slightly back over the ribs, so there is just a little back bend in the upper spine—think of widening your collar bones and pulling the shoulders away from each other. That will contract the muscles between the shoulder blades slightly. Relax your hands!
4. Think of lifting the crown of your head up toward the ceiling, and feel each vertebra lengthen and open.
5. Now go back to your hips and make sure the right hip is square with the left—not moving back. Bring it forward, keep it there, and go through the steps again!
6. Then raise your left arm, and twist farther if possible, looking up at the left hand (fig. 12.11). Ideally, there will be a straight line from the left hand through the left shoulder and the chest to the right elbow and left knee. Hold for about 30 seconds.
7. Repeat on the other side. Then reverse the cross of the legs and repeat the two movements. You have a sequence of four movements: left arm up, twisting right, and the same two with the legs crossed the opposite way. If you are sitting in a chair, you will have only two movements.

Fig. 12.11. Arm Raise Twist
8. If the 12th thoracic area is “stuck,” one or two of the movements will be more difficult. Go back to the difficult movement(s), and stay with it until you can perform all four movements with equal ease (or as close to this goal as you can accomplish).
Do this exercise regularly for chronic back issues, scoliosis, and other ailments, and occasionally if you want temporary relief from midback pain.
USING THE HORSE STANCE TO STRENGTHEN AND ALIGN THE BACK
The Horse Stance is used by qi gong and tai chi practitioners as a meditation posture. They’ll stand in it for much longer than suggested in this variation, sometimes for an hour or more. The complete straightness of the spine that the posture demands allows them to channel energy up the core of the spine with various breathing techniques.
For our purposes, the straight spine forces us to use the lower abdomen as the center of gravity. At the same time the exercise strengthens the back muscles and realigns the “collars” of the body. These horizontal bands of fascia can distort spiral movements. Because the spirals run across the body, they will be interrupted by a tight band that prevents the open flow of movement—this will become obvious when you do Horse Stance. Since you will be preventing all spirallic movement while doing this posture, any tight horizontal fascia will be pulled and stretched by the bones. It may feel as though your muscles are tight, but the difference is that you can’t consciously release the fascia. Just let the bones hang into the fascia, let the back muscles strengthen, and eventually, the fascia will soften.
The most important part of the Horse Stance exercise, for the purpose of relieving back pain, is the engagement of the lower back and abdominal muscles in the pelvic tuck. The stance itself prevents the utilization of the wrong muscles.
 Variation on the Horse Stance
- Stand with your feet parallel, shoulder width apart. Position yourself close to a mirror so you can see yourself from one side. Weight is even on both feet to start. Lower your hips about 6 inches, making sure your knees do not come past your toes as you look down. You’ll have to keep checking this, as your knees will want to creep forward as you progress, so make sure you check by just glancing down, not by moving your whole body (fig. 12.12).
- Now curl your tailbone under and pull up your pubic bone, feeling engagement in the lower abdomen. Keep the area between the navel and the rib cage long—don’t lean forward.
- Bring the back directly over the tailbone in one straight line with your arms making a circle in front of you, palms facing you, as though you are holding a large, light ball. Your spine will be completely straight, with no curves except for the neck. Make sure your shoulders come back too, and don’t let your arms pull forward. They should feel relaxed.
- At this point, you are likely to experience some difficulty. Your feet may want to come up off the floor in front if the tibia (shin bone) is normally positioned too far forward. To help this long term, you can stretch the front and back of your calves and feet (see here). If you are really in danger of falling over, position yourself so your toes go under a door, or put something heavy on your feet. For now it’s okay if your weight falls mainly on your heels. Just keep pressing the balls of your toes into the floor until the alignment changes.
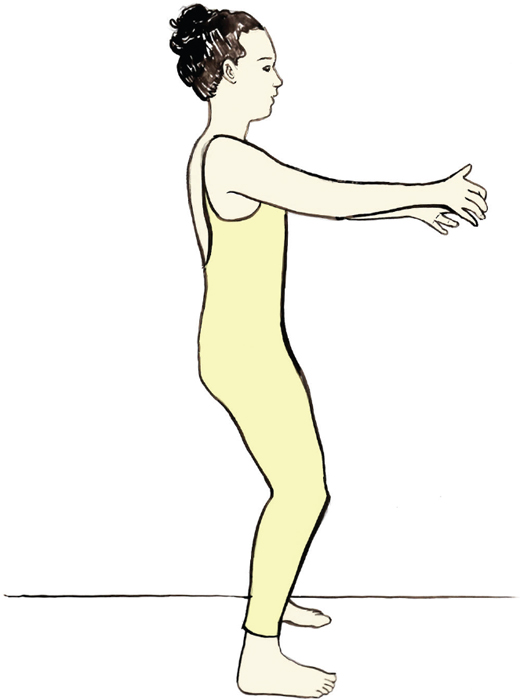
Fig. 12.12. Variation on Horse Stance
5. Your knees may creep forward. Keep pressing them back and then retucking the pelvis. Your back must be completely straight. For most of us, who are chronically forward flexed, this will feel like we are falling backward.
6. Now fine-tune the position of the head and shoulders: Gaze straight ahead, and position your head over your new center of gravity, the crown of your head over the middle of your pelvic floor, your chin parallel with the ground. Your shoulders must be back, down, and as relaxed as you can get them. To release the shoulders and chest, bring the hands in front of you, palms facing you, and touch them together lightly, just to the roots of the fingers, to give a very minimal support to the arms. Now release the hands completely. Feel the collarbone and shoulder blades drop.
Bring the head up toward the ceiling about ¼ inch, feeling that connection between ceiling, crown of head, and all the way down the spine. Imagine that your spine is as thick as your neck, and stretch it up slightly with the crown of your head. You may be able to feel a very slight stretch inside your sacrum. Let the entire shoulder girdle relax. Relax your tongue and jaw.
7. Now check that you have your:
- Feet parallel, weight evenly distributed between your left and right foot
- Knees behind your toes
- Pelvis tucked, engaged in lower abs
- Arms in front, shoulders back, not pulling forward
- Spine completely straight, no forward lean at all
- Head back, chin parallel to floor, and crown in line with middle of pelvic floor
- Shoulders, neck, hands, and jaw relaxed
- Breathing focused into lower abdomen in a relaxed way
- Focus on lower abdomen, legs, hips, and back
8. Ideally you should feel a nice strong contraction in the lumbar spine (multifidus) and the lower abdominals (transverse abdominis). Put your hands there to check—try to engage front and back equally, if you can. Feel a pleasant stretch in the lower back; it shouldn’t hurt.
9. You’ll notice that, as the lower back and abdominal muscles tire, you’ll feel other muscle groups chime in. That’s natural—they’re just helping out—but for our purposes, we want to keep the back/abdominal tension. So just as though you were meditating, draw the focus back to that area as the muscles drift, until you no longer can, and then stop.
To modify: The obvious way to make this easier, you might think, would be to support the back. I thought that too and tried it, and it took me a while to figure out why it didn’t work. You’ve probably guessed already. The back of the head sticks out behind you if your head is aligned. You would need to use either a good six inches of padding between your shoulders and hips on a wall, or else use a wall that has a hole where your head sticks out. Both these ways present some logistical problems.
You could support your hands on a shelf, making sure the shoulders relax back and down. Or if you need just a slight modification, come down only an inch or so. You can do this sitting, if standing is difficult. Just sit with your feet parallel, knees over ankles, sit bones even on the chair. Then line up your torso, shoulders directly over hips, just as though you were standing. Everything will be the same from the hips up. You can’t really tuck the pelvis successfully while sitting on a chair—you’ll slide your sit bones forward too much—so pull the pubic bone up toward the navel by tightening your abdominals and draw your navel up and in. You will still keep the lumbar curve that way.
SPECIFIC TARGETS AND OVERALL STRETCHES FOR THE BACK
In this section, there are two exercises that each have a specific target and then two that stretch the entire back.
 Exercise for the Paraspinals
You may have a very strong back, but weak postural muscles. This exercise will challenge the paraspinals, which are part of the postural muscles.
1. Make your body into a perfect L-shape. Make sure your hips don’t pull back too far (keep them as far forward as your body will allow—it is hard) and that your head and arms are in line with your straight spine. Your arms should be straight and close by your ears (fig. 12.13).
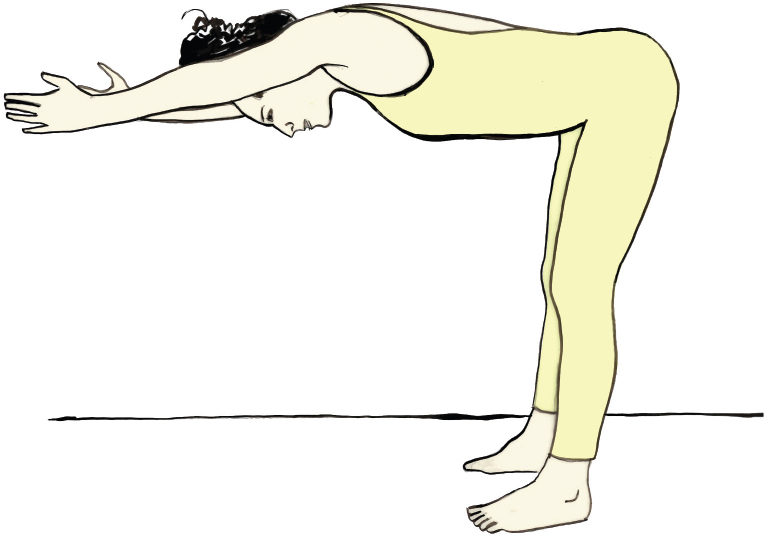
Fig. 12.13. Exercise for the Paraspinals
2. Bring the bottom tips of the shoulder blades down the back, and reach forward with the fingertips. (If you can’t straighten your arms without pulling the shoulder blades up your back, it’s actually shoulder tension that’s the problem, so try the Shoulder Stretches. Hold this position as long as you can. This exercise can be sobering if your back is strong in other areas. It will help to strengthen the muscles that prevent back pain, so persist.
To modify: You can support your hips against a wall; you can even touch a wall with your fingertips.
 Exercise for the Sacroiliac Joint
- Lie on your stomach, preferably on a thick mat or with some padding under your pelvis (but don’t let the pelvis rise up very far). Bring the legs together, making sure the knees are connecting. Then bend at the knees. Make sure your thighs are parallel.
- Then raise the knees off the floor (if you can), pressing the pubic bone evenly into the floor. You probably won’t get very far. Hold as long as you can. A person with a moderate degree of back strength could hold this position with the knees a few inches off the floor. It would be wonderful if you have a friend who could gently press the tailbone down toward your knees, lengthening the lower back. But if you don’t, just think of dropping the tailbone down between your legs—or just imagine your friend is there, pressing the bone down gently.
If this position hurts, you may be uneven—tilting to one side or the other—or you may have too weak a lower back to practice this successfully. Avoid it until the other exercises have strengthened the supporting muscles sufficiently.
 Wall Hang Stretch
If you do only one thing, do this stretch. It opens up the entire back of the body, from heels to the neck, and uses gravity to gently traction your lower back.
1. Stand facing a wall, with your legs apart. The farther apart your legs are and the farther from the wall you are, the easier the stretch will be. You need to be able to lean forward and lean your upper back on the wall comfortably (fig. 12.14).
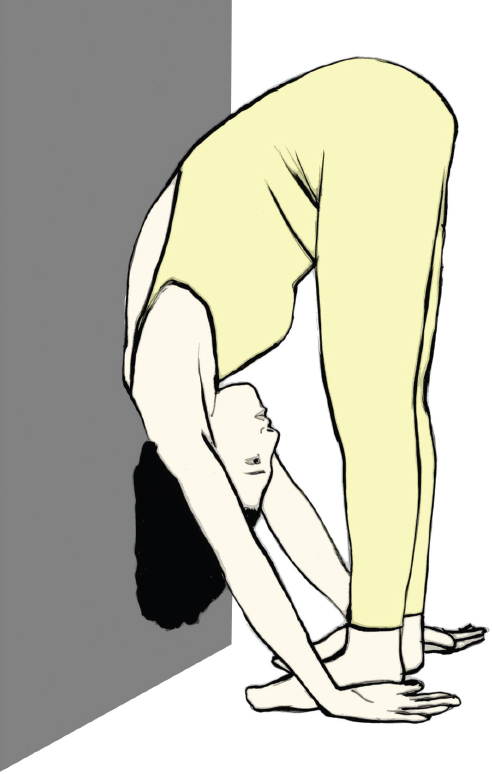
Fig. 12.14. Wall Hang Stretch
2. After you do this, relax and give your weight to the wall so it is supporting you completely. Bend your knees if you need to, and change your position so that the stretch is felt in the backs of your legs and your back.
3. Shuffle around until you find your optimum position. Then align yourself. If your hamstrings are so tight that you cannot bring your heels to the ground, put padding under the heels. Look at your feet and ankles, especially the inner bones of the ankles. Make sure they are not dropping inward or turning outward. The ankles should be straight and even.
4. Then check your hips. You will want to lean toward the most flexible side, so move your hips to get a good stretch, even if it makes you a little uneven. But stay in the stretch for a longer period with correct alignment; that is, with the hips straight and your body hanging evenly between the hips. If you don’t have a mirror behind you, or a friend who can spot you, run your hand up the outside of your legs and torso, and you can probably feel where your hips and torso are in relation to each other. Most people have a chronic twist to one side or the other, and this exercise can help correct it.
5. This is also a good position to check how your neck is aligned between your shoulders, and give it a gentle stretch with your hands. You can turn the neck to the right and left, if it feels good.
6. This stretch involves your hamstrings and your lower back. Tight hamstrings will pull on the pelvis and can cause lower back problems. You want to make sure you are stretching the middle and upper part of the muscle, not just the area behind your knees. So start out with your knees slightly bent, even if you don’t need to bend them. Then lift your tailbone toward the ceiling and toward the wall at your back. Straighten the legs by bringing the upper thighs back behind you, rather than just straightening your knees.
 Stretching the Back and the Neck
It’s important to stretch all the back muscles together, because they tend to shorten together. Imagine a line that starts at your heels and goes all the way up your body to the base of the skull. Any shortening or tightening along that line will result in some degree of shortening everywhere along its length. That’s why stretching the neck on its own usually doesn’t do much to loosen it up. This sequence of back stretches lengthens the muscles that usually tighten in the course of daily life. Using it just five minutes a day will help to prevent back problems.
- Start by sitting on the floor with your legs extended and your heels touching the wall. Your feet should be hip width and straight (not rotated out or in). For some people, this position alone is uncomfortable. If you are one of them, find the degree of bearable discomfort you can maintain and stay there until you gain more flexibility. You can put padding under your knees if you can’t straighten them on the floor.
- If you can sit this way easily, let your head drop slowly toward your knees, arms relaxed, and hold for 2 minutes. Then stretch toward the toes with your hands on the floor, head still dropped (fig. 12.15). Stretch from the lower back; don’t pull with the arms. This is a lower back stretch. Hold.
- Now, maintaining this position, push the balls of the feet into the wall and push the heels away. This stretches your shins. Hold.

Fig. 12.15. Lower back and hamstring stretch
4. Then reverse this posture by flexing the feet and pushing the heels into the wall, toes away from the wall. You should feel the stretch in your hamstrings at first. Wait a minute or so to feel the stretch in the deep calf muscles and the Achilles tendon.
5. Go back to the “slumped” sitting position, head dropped toward the knees. Interlock your hands behind your head, keeping your shoulders relaxed. Don’t push at first. Feel the stretch in the upper back, and then gently, if you want to, increase the pressure, making sure your shoulders stay relaxed. Turn your nose to the left for a stretch to the right side of the trapezius, keeping your arms in the same position, and then turn to the right. Go back again to the starting position.
6. Now bend your right arm, extend the elbow up to the ceiling, and slide your palm down your neck and upper back as far as you can. Bend forward to feel a stretch in the shoulder (see fig. 12.16 below). Now repeat on the left side.
7. Go back to that starting position again, and now try to touch your head to the floor on the right side of your legs at about knee level. (Unless you are very flexible, you won’t get very far.) Stretch your arms out diagonally in front of you, so that both arms and your head are in parallel lines (see fig. 12.17). Make sure both hips stay on the ground for a stretch in the lower back. Repeat on the opposite side.
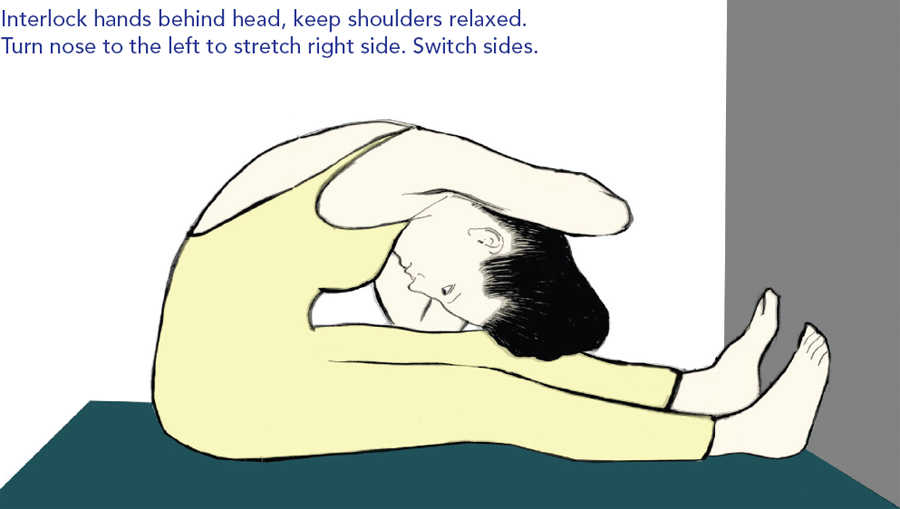
Fig. 12.16. Upper back and neck stretch
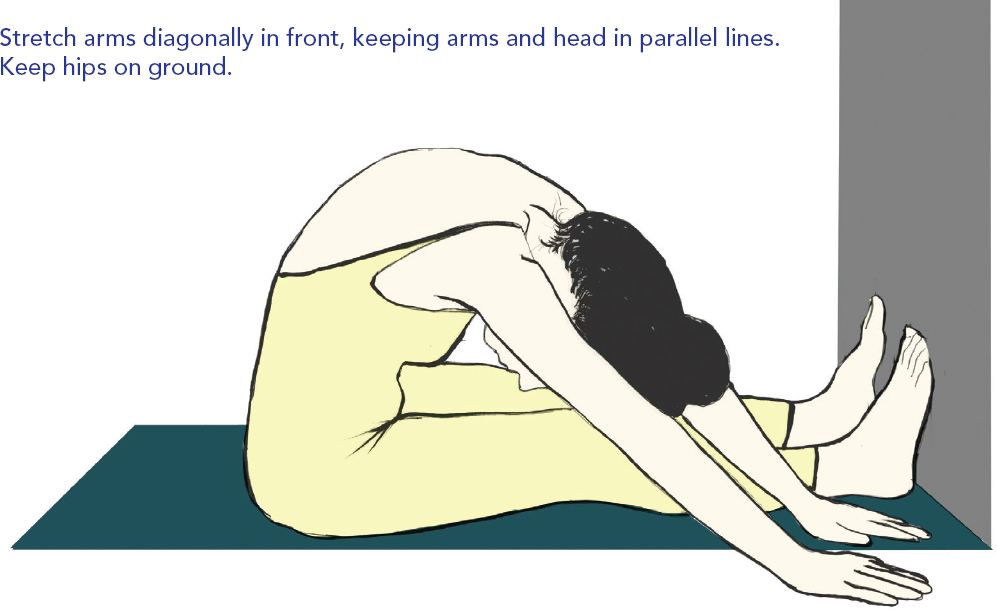
Fig. 12.17. Upper and lower back stretch
SPINAL ALIGNMENT WITH ROLL, BLOCKS, AND BALLS
You can change the shape of your spine simply by practicing small movements while lying on different kinds of props, using the forces of gravity and the combination of passive shaping and movement that has such a powerful effect on structure.
Using props may seem like a lazy person’s way to do his own bodywork (and one reason I’ve had a chance to develop this system is that I can get almost any client to do these exercises on his own), but the body learns in a powerful way when it is able to be completely relaxed and passive. The props give the system new information about the shapes that it can incorporate, which might be more efficient for its movements.
Most of the positions I describe here should be held for about five minutes. You will feel very little as you lie there initially. Then, as the body stretches and starts to reform around the props, you will feel stretching and maybe some discomfort. Then these sensations will pass, and the props will start to feel comfortable and minimally present. This shows that your body has integrated the information. You can then remove the props, and relax for a minute lying down. This last step is important—don’t skip it—it helps the brain process the change. You’ll feel an immediate and often dramatic change in your body after you take the props away and lie back down.
You need to be able to relax on the props and breathe consciously and slowly. Modify if you can’t relax into the sensation or your breathing tightens to a place where you cannot consciously release it. Intensify if you can’t feel any sensation at all, or use the props for longer—a half hour or so. That will intensify the exercise also.
Then move around as you normally would—or just go to sleep if you do the exercises in bed at night.
Neck Roll
The first prop—you might as well make this one yourself if you are going to use it—is the neck roll. You will find this useful if you have an overstraightened (reverse curve) neck. About 75 percent of people with neck problems have this configuration of the cervical spine, and the neck roll will be useful to them. The other 25 percent have the opposite problem—too much curve in the neck—and the neck roll will be of no value to them.
How can you tell which alignment you have in your neck? If you tend to look downward and tuck your chin in, if you have pain at the base of your skull, tension in your throat, or if you have had whiplash injuries to the neck, you probably have a reverse curve in the cervical spine. This usually happens because the scalene muscles, deep neck muscles that attach to the inside of the cervical spine and run through to the top rib, tighten up or are damaged in some way (you can see from fig. 8.5 how a whiplash injury might cause tearing and scar tissue here). These diagonal muscles provide the architectural support for the head, as the psoas does for the torso. If you imagine them shortening, you can see how that might either straighten the back of the neck and pull the chin toward the chest or compress the head down while tilting the chin up, like a swayback in the neck. The shape the scalene shortening gives the neck depends on where in the scalenes the damage has occurred.
Both types of reverse curve will benefit from using the neck roll. To make a neck roll for yourself, you can either roll up a bath towel very tightly until the circumference is about the same as your fist, then secure it with rubber bands, or do the same with a yoga mat (you could cut the mat if it’s too big). The size (thickness) of the roll will depend on the natural length of your neck.
 Using the Neck Roll
Lie on your back with the neck roll under your neck, not your head. Your head should lightly touch the floor or bed (fig. 12.18). The neck roll should be firm enough that your neck doesn’t compress it at all; you will feel each vertebra move away from the ones next to it, even though the spine is in a curved position. Relax on the roll for about 15 minutes. Do this once a day; before you go to sleep is ideal—you can do it in your bed.

Fig.12.18. Using the Neck Roll
 Using Props with the Thoracic Spine
The next area we can lengthen and open is the thoracic spine. Use a roll lengthwise on the spine, or a yoga block with the longest, thinnest edge on the spine. The placement of the block is important—it must come to the seventh cervical vertebra and slot between the shoulder blades. If it is lower than that, you may hurt your lower back. If you choose the gentler prop of the roll, it should be in the same placement, but it’s less important exactly how far the bottom edge comes down on the back.
You can support your head with a pillow. I suggest lying on a secure surface so the block doesn’t slip. You may also need to move your body back and forth so the block is flush to the floor. If it feels “tippy” at all, you will need to adjust yourself on the block. It usually takes a few tries to get it right.
Bring your arms back, with the elbows touching the floor if you can, to a comfortable stretch. You can also open up the knees and press the soles of the feet together for a groin stretch. Breathe in the rib cage and chest. Stay for at least 5 minutes.
 Using Props with the Sacrum
You can also use a yoga block under the sacrum, the triangular bone at the base of the spine. Don’t put the block any higher—you may hurt your back. Use the longest, thinnest edge widthwise across the sacrum. (You can also use a 5-inch ball.) Then straighten the legs and turn them in, internally rotating the head of the femur. Bring the legs as close together as you can.
To open up the hip joints on the inside, stretching the psoas and the groin, you could even tie your leg with a strap; you’d have to do this first before getting on the block.
 Using Props with the Mid-Lower Back
For the mid-lower back, lie on your back, knees up, feet on the ground, and place a yoga block with the widest surface up under your tailbone (see fig. 12.19 below). Make sure it’s on the very lowest part of your spine. You can lie there relaxing your back, and the muscles will lengthen and relax after a while—maybe 20 minutes. This move can take the lower back out of spasm.
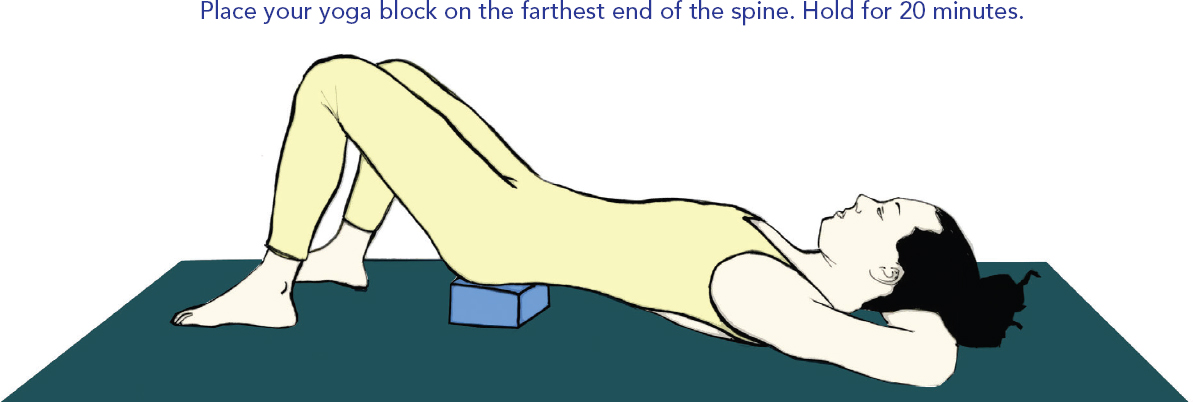
Fig.12.19. Using Props with the Mid-Lower Back
DISC HERNIATION
A herniated, bulging, or slipped disc means the jelly-like substance in between the vertebrae that provides cushioning to the spine and prevents friction has slid from its mooring, and part of it extends beyond the body of the vertebra. You probably won’t know if you have a herniated disc unless it presses on a nerve. Sciatic pain may come from a disc or from a problem in the sciatic notch of the hip. So nerve pain doesn’t necessarily mean that a disc is injured.
Disc herniation is incredibly common. Most people over the age of thirty with no history of back pain will show some disc herniations on an MRI. This odd fact does logically imply that the cause of back pain is not necessarily related to the disc. As I mentioned earlier (chapter 12), these studies have led different practitioners in various directions. On the one hand, there is John Sarno, M.D., who wrote the famous book, Healing Back Pain: The Mind-Body Connection. However, I have found that approaching back pain from a purely psychological perspective does not work for many people. Perhaps the location of the herniation is the crucial factor or perhaps, as one school of physical therapists believes, the strength of the spinal stabilizers, especially the deep multifidus muscle, is the most important factor in back pain. Also as mentioned earlier, Jim Johnson, P.T., wrote several excellent books with easy-to-follow exercises for back and neck pain, including The Multifidus Back Pain Solution: Simple Exercises that Target the Muscles that Count. He quotes studies that show that back pain is much more clearly correlated to multifidus strength than to disc herniation.
I’m more inclined to believe this; studies back Jim Johnson up, and I’ve never had a client who was a dropout from his program, whereas I’ve had a lot who failed with the Sarno program. The sad thing is that the dropouts from Sarno’s program often feel like they are lamentable failures and psychologically unhealthy. It’s bad enough to have that kind of pain without blaming yourself for it.
So if you have the misfortune to have herniated a disc that causes pain, here are your main options.
Option 1: Wait it out—under the care of a good health professional, of course. You probably need to rest a lot and do stabilization exercises. Swimming and biking can be fine exercise too, but probably not walking or running. Eventually—weeks to months—the bulge in the disc will break off and be reabsorbed in the body, and the nerve impingement will stop.
In the meantime, these things may help:
- Rest in a horizontal position, so the disc is not compressed
- Treatment with a good chiropractor trained in kinesiology, or an osteopath
- Stabilization exercise
- Visualization and relaxation practices
- A good nutritional program
- Fasting
- Muscle Activation Technique, a method that reestablishes proper neuromuscular function by getting our muscles to fire properly
- Good soft tissue work (excellent acupuncture, massage, or bodywork)
- Avoidance of forward bending (which won’t feel good), lifting things, carrying stuff, sitting and standing for long periods
- Be patient
Option 2: If the pain is more serious and disabling (this is mostly your call, although some nerve pressures that involve bladder or bowel control require emergency medical treatment), you can choose the more invasive approaches. Of those, traction, as in the DRX9000 treatment described below, is the least invasive. The manufacturers of this spinal compression machine describe their product like this:
The DRX9000 is a non-surgical, non-invasive procedure that was developed for the treatment of lower back pain caused by disc herniations and degenerative disc disease. The process is effective in relieving low back pain by enlarging intradiscal space, reducing herniation, strengthening outer ligaments to help move herniated areas back into place, and reversing high intradiscal pressures through application of negative pressure.*8
Obviously, the website will tout the benefits of the DRX9000. There are drawbacks, however, especially the fact that you are moving the vertebra in one area of the spine forcibly apart without taking into account what is happening in the rest of the spine or the soft tissues. You may correct the disc situation and still be in pain, or be in pain somewhere else. I’d still try this before the third option.
Option 3: Surgery. Studies show that although surgery will relieve pain short term, the long-term prognosis is not so good. There are considerable risks, including infection, when the body is opened up. Even if you do opt for surgery, you will still need to strengthen the spinal stabilizers. The great disadvantage of any back surgery is that you will create a fusion of sorts in the spinal column that is irreparable. There will be less mobility and the spine will be permanently shorter.
You may be wondering why surgery wouldn’t actually open up the spinal space instead of closing it. And sure enough, there is an experimental surgical procedure that does exactly that. It’s in the beginning stages now, but I believe this does offer real hope for back pain sufferers.
If your pain is not serious enough to require constant pain medication, I would go with option 1—waiting it out—first. Whatever you decide, work with a competent health professional, and tune in to your inner wisdom—it’s easy to be swayed by strong opinions when you are in a lot of pain.