Chapter 4
Using Advanced Organizing Tools

Photoshop Elements includes advanced tools for managing images. For example, you can associate tags with photos to help you identify their content. You can group photos based on where they were taken, the people in them, and with your own custom categories.
Work with People, Place, and Event Tags
Find Duplicate Photos
You can use the Organizer to find all the duplicate photos in your collection. You can then stack them — collect them so they take a single space in the Organizer. For more about stacking, see the “Stack Photos” section in this chapter.
If you have many photos and a slow computer, a duplicate search can take minutes or even hours. To search for duplicates of a single photo, use the Visual Similarity search. For details see the Find by Visual Similarity section in this chapter.
Find Duplicate Photos

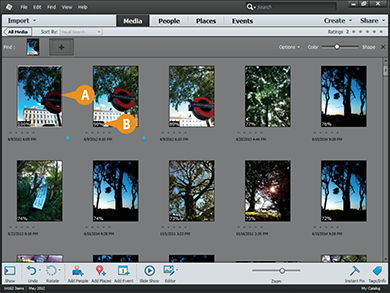
 In the Organizer, click the search box (
 ) and select Duplicate Photo Search.
You may see an alert box about Visual Similarity search.

 If this alert appears, click OK, deselect all photos in the Organizer, and repeat Step 1.

B Photoshop Elements displays a progress bar as it searches for duplicates.
Note: You may see a second progress bar showing an automatic Visual Similarity search after the first progress bar completes.

C Photoshop Elements groups all similar photos into small collections.
D You can use the Zoom slider to make the photos bigger so you can see more detail.
 Review the collections.
Note: The search finds similar photos as well as duplicates. You must review the collections by eye to decide which photos you want to stack.
 Click Stack to group a collection.
 Use the scroll bar to scroll through all the collections. Repeat Step 4 for every collection you want to stack.
 Click Done when finished.
Photoshop Elements stacks the photos you selected as duplicates.
Work with Keyword Tags
Keyword tags help you categorize and filter your digital photos. For example, you can create a tag called car and apply it to all your photos of cars. You can assign the Organizer’s preset tags or use tags that you have created. You can also assign more than one tag to a photo. For example, a photo of an automobile could have a car tag as well as a convertible tag.
The Organizer comes with several predefined tags, but the selection is limited. You should add your own tags to make searching easier.
Work with Keyword Tags
Create a Keyword Tag
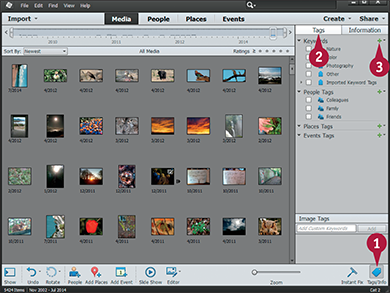
In the Organizer, click Tags/Info.
Click Tags.
Click the plus sign ( ).
).
The Create Keyword Tag dialog box opens.
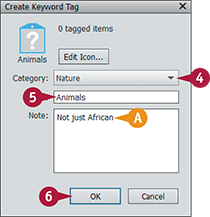
Click the category menu, and choose a category for the new tag.
Type a name for the keyword tag.
A You can add a note about the keyword tag here.
Click OK.
Assign Tags
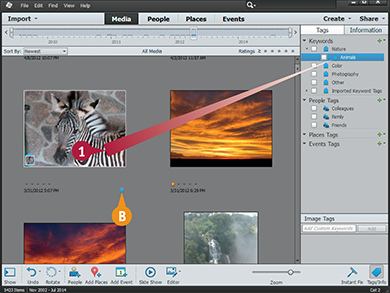
Click and drag the tag from the Keyword Tags panel, and then drop it on the photo you want to tag.
B The Organizer displays a keyword tag ( ).
).
You can also drag a thumbnail image from the Media Browser to a keyword tag to assign a tag.
Note: If you cannot see a tag, select View ⇒ Details in the main menu.
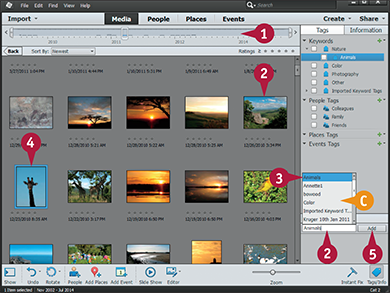
Click the Keyword Tags search box.
C Photoshop Elements lists all existing tags.
Click a tag in the list.
Click a photo you want to tag.
You can  +click (
 +click on a Mac) to select multiple photos.
Click Add.
Photoshop Elements applies the tag () to the selected photo.
TIP
How do I edit a keyword tag?
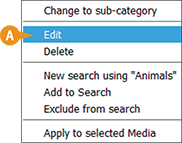
Right-click the keyword tag, and choose Edit (A). The Edit Keyword Tag dialog box opens. Type a new keyword tag name or make other edits to the tag, and click OK. Photoshop Elements applies the changes. Any images that have the keyword tag applied are updated.
Work with Keyword Tags (continued)
After you assign keyword tags, you can tell Photoshop Elements to display photos with any combination of tags. For example, you can show photos with certain kinds of content, or which feature certain people.
To save you time, Photoshop Elements can tag faces automatically. For details see the next section, “Define People in Photos.” This makes it easy to use tags to find people.
Work with Keyword Tags (continued)
Filter by Tags
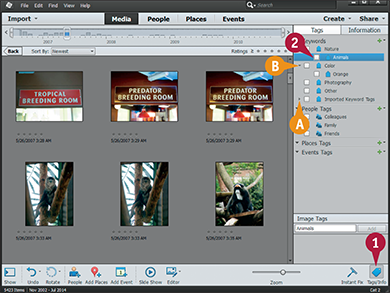
Open the Tags/Info panel if it is not already visible.
Position your mouse pointer over the keyword tag you want to apply, and click the box ( becomes
  ).
).
A You can click  to expand a tag category.
B You can click  to collapse a tag category.

C The Organizer displays all the photos with the tag you selected in Step 2.
D The Organizer displays a tag mark () for each tag associated with a photo.
Note: You can hover the mouse pointer over each tag to view the tag name as a tool tip.
E To filter by multiple tags, click additional tag boxes ().
If you check multiple tags, only photos that have all the tags appear. You cannot select photos with any other combination of tags.
Remove a Tag from a Photo

Right-click a photo with a tag.
Click Remove Keyword Tag.
Click the keyword tag you want to remove.
The Organizer removes the keyword tag from the photo.
If the tag was filtering the photo in the Media Browser, the photo disappears.
TIP
How can I create a new keyword tag category?
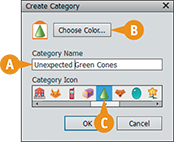
Photoshop Elements comes with several predefined categories such as Nature and Color, but you can define your own. Click the next to , and click New Category in the menu that appears. The Create Category dialog box opens. Type a name for the category (A). Optionally, you can choose a color (B) and icon (C). Click OK to save the category.
Define People in Photos
You can find people in your photos and tag them with names. The Organizer includes a feature that looks for human faces in your photos. You can view all the faces as a collection and tag them with names. Searching a catalog for faces can take a long time. The search is not perfect. It sometimes mistakes random objects for faces or misses people.
Click People at the top of the Organizer to see a grid of stacked photos with all the people you have named. You can double-click a stack to view photos that feature that person.
Define People in Photos

In the Organizer, select photos with people that you want to name.
If you do not select any photos, Photoshop Elements searches all the photos in the current catalog. This can take a long time.
Click Add People.
If you are you searching an entire catalog, click YES when an alert appears.
Photoshop Elements searches for faces and displays the results in a People Recognition dialog box.
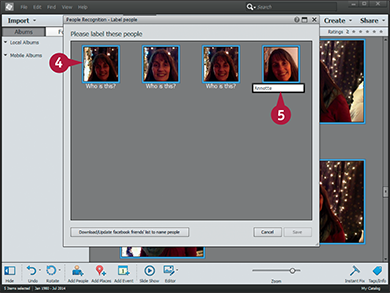
 +click or +click (+click on a Mac) to select all the photos of one person’s face.
Type a name for the face.
Press  .
.
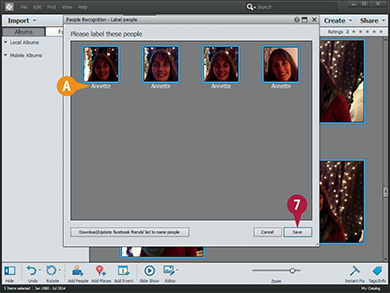
A Photoshop Elements tags all the photos you select with the name.
If you selected photos of more than one person, you can repeat Steps 3 to 5 to label them.
 Click Save.
Depending on how many photos you are analyzing, Photoshop Elements may present additional sets of faces to name or confirm. You can continue naming them and click Save or click Cancel to stop.
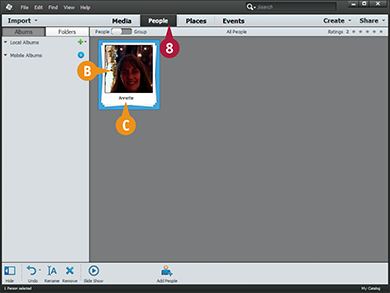
 Click People.
Photoshop Elements displays the people you have defined.
B You can move your cursor across a thumbnail to preview the faces for a person.
C Double-click a face to display the photos for that person.
Define Places
You can use the Places feature in the Organizer to locate your photos on a map. To define places, click and drag photo thumbnails onto a Google map.
You can place a batch of photos at a single location, or specify different locations for each photo more precisely — for example, to spread photo locations around different parts of a park or a small city area. Placing individual photos takes more time. Placing photos in a batch takes less time, but is less accurate. You can choose either approach.
Define Places
In the Organizer, click the photo you want to place on the map.
Note: You can control +click (+click on a Mac) to select multiple photos.
Note: Skip this step if you want to map all your photos. (This is not recommended if you have many photos.)
Click Add Places.
The Add Places dialog box appears.
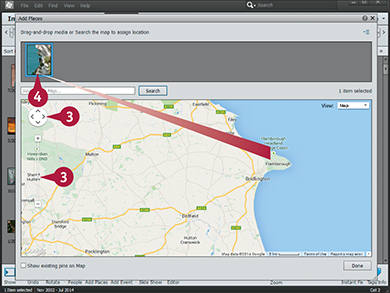
Use the map controls to pan and zoom to the location where the photos were taken.
You can also click-drag with your mouse to pan, and use the mouse wheel to zoom in and out.
Click and drag a thumbnail onto the map.
If you selected more than one thumbnail in Step 1, you can drag them all to a single location. You can also click them to select them one by one and drag them to different locations.
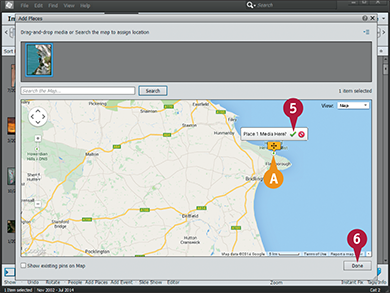
A Photoshop Elements displays an icon to mark the place.
Click  to confirm the location.
You can click  or press
  to cancel.
Click Done.
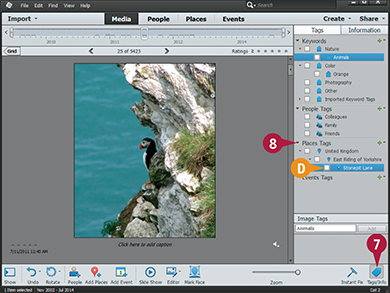
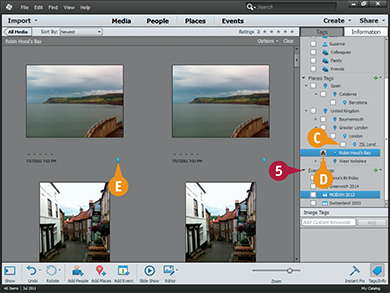
Click Tags/Info to view tags for your photos.
Click Places Tags.
D Photoshop Elements automatically tags your selected photos based on the place.
For more about tags, see the section “Work with People, Place, and Event Tags.”
To view a map showing where you have placed all your photos in the Organizer, see the next section, “View Places.”
TIPS
What happens if my photos have location information associated with them already?
Some cameras, including iPhones and other camera phones, assign a location to a photo automatically when you take it. This is sometimes known as geo-tagging. Photoshop Elements reads this information and adds the locations without being asked. So you do not need to add these locations manually.
How can I place the photos at a named location?
If you know the name of a location you can type the name into the Add Places search box and click Search. Photoshop Elements tries to find the location. If it succeeds, click to group the photos at that location.
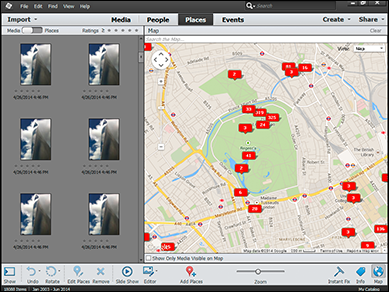
View Places
You can view the Photoshop Elements map to see all the places linked to your photos. Click each icon on the map to view the photo or photos at that location.
You can use zoom and panning controls on the map to find photos that you have placed at certain locations. You can also search for places by keyword.
View Places
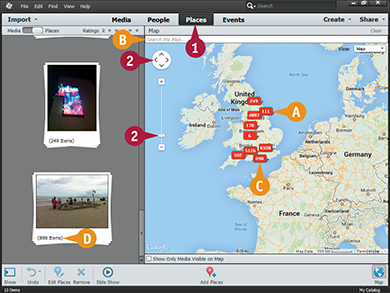
In the Organizer, click Places.
A map appears.
A Icons on the map represent defined places with numbers representing the number of photos at a place.
Use the map controls to pan and zoom to find a location of interest.
B You can also type the name of a location here press to search for it.
C As you zoom out, Photoshop Elements groups photos at nearby locations together to avoid clutter.
D Photoshop Elements displays the matching photo groups here.
Note: To find a matching group, check the number of items.

E You can use the map controls or your mouse to zoom in if you want to see more detail on the map.
Click a place icon on the map.
Click Show Media.
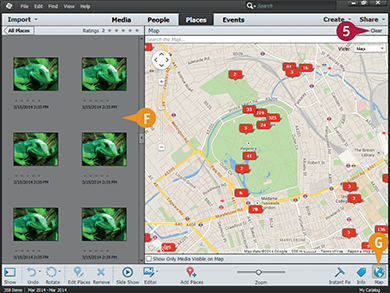
F Photoshop Elements shows only the photos associated with the place.
Note: The location icon does not remain highlighted in blue.
G You can click Map to toggle the map open and closed. Closing the map gives you a larger area for viewing photos.
Click Clear.
Photoshop Elements shows all the photos again and returns to the default view on the map.
TIPS
How can I move a photo to a different place?
If you want to change the location associated with a photo, you can select the photo and click Edit Places at the bottom of the Organizer workspace. The Edit Place dialog box appears. You can now click+drag the photo to a different location on the map.
How can I remove a photo from a place?
Right-click the place icon ( ) for the photo, and click Remove command in the pop-up menu. Because the tags are nested, you may need to remove multiple tags for each photo.
Define Events
You can group your photos into events to associate them with specific dates or time periods. This is a good way to organize photos taken on birthdays, holidays, and vacations. You must define an event before you can add photos to it. To view your events, click Events at the top of the Organizer.
Photoshop Elements also supports Smart Events, which group photos by date automatically. For more about Smart Events, see the “Using Smart Events” section in this chapter.
Define Events

In the Organizer, +click (+click on a Mac) to select the photos for your event.
To find photos that were taken during a specific time period, see Chapter 3.
Click Add Event.
The Add New Event pane opens with your photos added.
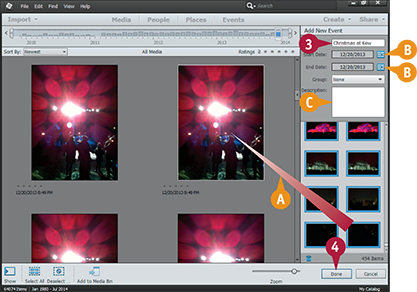
A You can click and drag to add more photos to your event.
Type a name for the event.
Photoshop Elements sets a start and end date for your event based on the timestamps associated with the photos.
B You can click the calendar icons to change the start and end dates of the event.
C You can type an optional description for the event here.
Click Done.
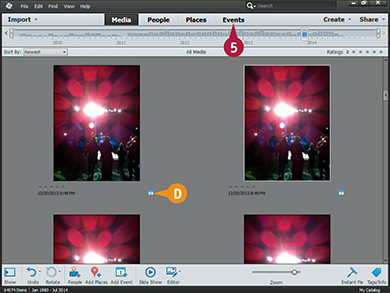
D Photoshop Elements adds event icons () to the photos. You can position your cursor over them to view the names.
You can right-click an event icon () to remove a photo from an event.
Click Events.
Photoshop Elements displays the events you have defined.
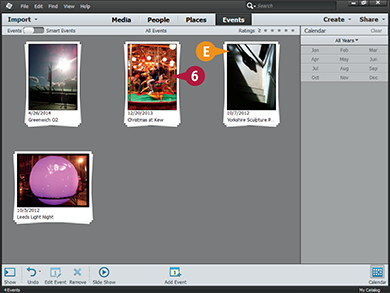
E You can move your cursor across a thumbnail to preview the photos for an event.
Double-click an event to display its photos.
Note: Every event you create has a tag associated with it. See the section “Work with People, Place, and Event Tags” for more.
Using Smart Events
You can use the Smart Event feature to group your photos by date automatically. You can use this feature as-is or as a starting point for custom events; you can select one or more Smart Events and collect them into a custom event.
When you work with Smart Events, Photoshop Elements groups photos imported on the same day or within a date and time range. When you group photos by time, you can click and drag a slider to set a time range. Note that photos are grouped by the time you imported them, not the time they were shot.
Using Smart Events
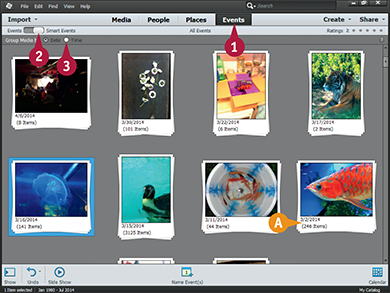
In the Organizer, click Events.
Click the virtual switch to select Smart Events.
Photoshop Elements groups your photos by date.
A Each group shows the date and the number of photos.
Click Time.
Photoshop Elements displays your photos in groups based on time and date.
Note: Photoshop Elements does not group photos by time of day. It groups photos by a time range within or around each date.
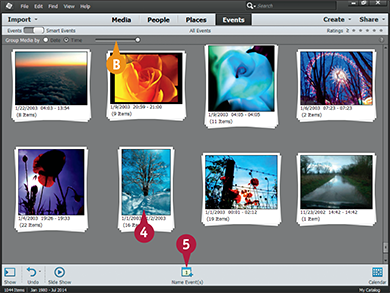
B You can click and drag the slider to set the time/date range used to create the groups.
Drag to the right to use shorter lengths of time. Drag to the left to use longer.
Click any group, or multi-select any group of groups with +click (+click on a Mac).
Click Name Event(s) to convert the group into a custom event.
The Name Event dialog box opens.

Type a name for the event.
Photoshop Elements sets a start and end date for your event based on the import times of the photos.
C You can click the calendar icons to change the start and end dates.
D You can type a description of the event here.
Click OK.
Photoshop Elements saves the event.

Click here to view custom Events instead of Smart Events.
Photoshop Elements displays custom Events.
E The new event appears in the grid.
You can double-click the event to view its photos.
TIP
How can I filter my events by date?
In the Events view, click Calendar at the bottom of the Organizer workspace.
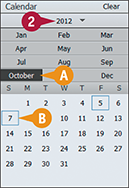
Click the year menu to select a year.
A To filter by month, you can click a month. Months with events are highlighted.
B To filter by day, you can click a day. Days with events are highlighted.
Photoshop Elements displays the events you select.
Work with People, Place, and Event Tags
When you create People, Places, or Events for your photos, Photoshop Elements automatically creates tags for you. You can use the Tags search panel to see which photos include them.
You can select more than one tag at once. For example, you can select a Place tag and then select People tags to see photos that include those people at that place.
Work with People, Place, and Event Tags

In the Organizer, click Tags/Info.
Click Tags.
Click People Tags if the people tag list is not already open.
People-related tags appear.
A You can click a tag to view photos tagged with that person’s name.
B People tags are marked with  .
.
Note: If you cannot see an icon, confirm that View ⇒ Details is checked and move the Zoom slider in the toolbar.
Deselect any People tags, and click Places Tags if the Places tag list is not already open.
Place-related tags appear.
Note: Place tags are pre-grouped by country, area, city, and specific location.
C Each place is associated with a set of location tags. Click through the closed tags to view a specific location tag.
D You can click any Place tag to view photos at that location.
E Place tags are marked by  .
.
Deselect any Place tags, and click Events Tags if the Event tag list is not already open.
Event-related tags appear.
Each event defined in your photos is associated with a tag.

F You can click any Event tag to view photos of that event ( becomes ).
G Event tags are marked by an event icon .

H You can select more than one tag to find combinations of people, places, and events.
I Photoshop Elements displays photos that combine the tags you select.
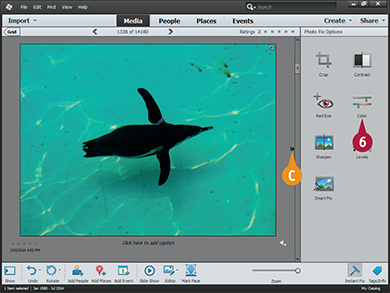
Apply an Instant Fix
You can optimize color, lighting, and make other basic edits in the Organizer using the Instant Fix tools. This is a good way to make simple improvements without loading the Editor.
Most of the fixes are one-click improvements with no settings. They work on many photos, but may not give good results on photos with unusual lighting. After you apply a fix, the Organizer saves the photo with the original in a version set. See Chapter 3 for more about version sets.
Apply an Instant Fix
In the Organizer, click the photo you want to fix.

Click Instant Fix.
The Photo Fix Options panel opens.
Click an instant fix, such as Crop.
The Crop Photo dialog box appears.

Click and drag the edges and corners of the crop tool to set the area of the photo you want to keep.
A You can click the crop menu to select various standard width/height ratios.
Click Done.
B You can click Cancel to exit the tool without cropping.
Photoshop Elements crops the photo.
C Photoshop Elements adds the edited photo to a version set and displays the open version set icon ( ).
).
Note: For more on version sets, see Chapter 3.
Click another instant fix such as Color.
Photoshop Elements fixes the color.

TIPS
How do I rotate a photo in the Organizer?
You can click to select a photo and then click Rotate at the bottom of the Organizer workspace to rotate the photo counterclockwise. You can click the Rotate button’s menu triangle () to open a menu with a clockwise rotate command.
How do I undo Instant Fix changes?
You can click Undo at the bottom of the Organizer workspace. If you performed multiple changes in the Instant Fix panel, you must click Undo multiple times to undo them.
Stack Photos
You can save screen space in the Organizer by grouping related photos into stacks. The Organizer shows the top photo in a stack and hides the others. You can select photos manually before stacking them, or you can ask Photoshop Elements to suggest stacks by searching your collection for similar photos.
Stack Photos
Create a Stack

+click or +click (+click on a Mac) to select the photos you want to stack.

Right-click one of the selected photos.
Click Stack ⇒ Stack Selected Photos.
A You can click Automatically Suggest Photo Stacks to have Photoshop Elements suggest stacks based on photographic similarity.

B Photoshop Elements stacks the photos you selected. The photo you right-clicked appears on top of the stack.
C The stack is marked with a stack icon ( ).
).
D You can click  to expand the stack.
The Organizer shows the photos in the stack.
You can click  to close the stack.

Right-click a photo in a stack. If the stack is collapsed, right-click the top photo.
Click Stack ⇒ Unstack Photos.
Photoshop Elements deletes the stack. The photos reappear as separate item in the Organizer.
TIPS
How do I automatically stack photos as I import them?
In the main menu click Get Photos and Videos ⇒ From Files and Folders.
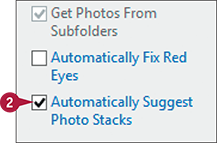
In the dialog box that opens, click Automatically Suggest Photo Stacks ( changes to
  ).
).
When you import the photos, Photoshop Elements suggests groups of photos to be stacked based on their photographic similarity.
Search for Similar Photos
You can search for photos with similar colors and shapes. This can be useful for finding related shots in a large catalog, or for more creative applications, such as finding similar images for a collage.
The search tool includes a slider that can be set to look for matching colors, matching shapes, or a mix of the two. Color searches are more accurate and take less time, but shape searches can produce some surprisingly close hits.
Search for Similar Photos
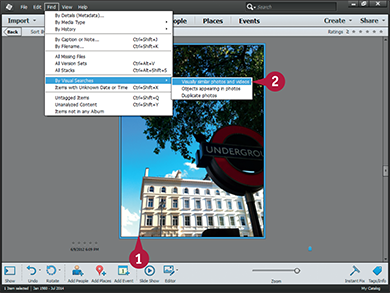
Click a photo to select it as a search target.
Click Find ⇒ By Visual Searches ⇒ Visually similar photos and videos.
Note: You can click Objects appearing in photos to search for images containing similar objects.
Note: If a dialog box appears asking if you want to index your photos, click OK, Start Indexing. Indexing makes searches faster and more accurate.
Photoshop Elements finds similar photos and lists them.
A The target photo appears first.
B Each photo includes a percentage to show how closely it matches the target.
Click and drag the slider to the left to look for similar colors.
Photoshop Elements finds photos with similar colors.
Click and drag the slider to the right to look for similar shapes and textures.
Photoshop Elements finds photos with similar shapes and textures.
Note: In this example, the search finds more photos with foliage after it runs out of photos with similar shapes. Color differences are ignored.
C You can click All Media to clear the search.
TIP
Can I search for more than one target at a time?
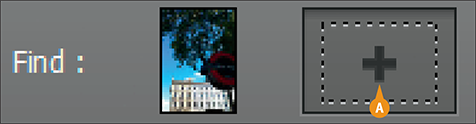
Yes. When the search results appear, you can drag another photo to the empty box (A) to add it as a target. If you drag the top few hits to the Find: area you can narrow a search and make it more precise.