
WHAT IT TAKES
TIME: 1 day
SKILL LEVEL: Beginner to intermediate
Like a traditional woodworker’s bench, this workbench offers a large, rock-solid work surface and plenty of storage space below. But because it’s built mostly from ready-made components, constructing this bench doesn’t take much time or skill. If you have a little experience with simple hand and power tools, you can complete it in an afternoon.
You’ll find everything you need for this project at home centers. You can use any combination of cabinets that add up to a width of less than 80 in. (the length of the door used for the top). Shown here is a 60-in. sink base cabinet and an 18-in. drawer unit. Buy a solid-core door rather than a flimsy hollow-core door for the top. Although the cabinets shown here are oak, a mahogany (lauan) door was used. If you choose unfinished rather than prefinished cabinets, and construction-grade plywood rather than oak for the back, your cost will be about $400. That’s not exactly cheap, but you’d have to spend at least twice as much to buy a workbench of comparable size, storage capacity and durability.
Set the cabinets on their faces on a drop cloth and cut off the pedestal that forms the toe-kick under the cabinet (Photo 1). Pull the front toe-kick off. Make sure that the cut leaves at least a 3/4-in. space for the 1x4 filler strips that the plywood is attached to so that the weight of the workbench is carried by the sides of the cabinets. We removed the pedestal mostly to keep the height of the workbench at about 36 in. You can skip this step if the workbench stays in one place or you don’t mind a high workbench.
Lay the door on cardboard or a drop cloth and set the two cabinets upside down on top of it so you can join them on a perfectly flat surface. Shim any low spots under the door so it stays flat. Attach the filler strips under the cabinets, predrilling and screwing up through the base with 1-1/4-in. screws (see Figure A). Align the cabinet stiles, then screw the cabinets together with 2-1/2-in. screws at the top and bottom (Photo 2).
Use a shim and a clamp to hold the cabinet sides parallel (Photo 2). Cut a 3/4-in. plywood base the same length as the assembled cabinets but 1/2 in. wider. Mount the base flush with the front of the cabinets and overhanging the back by 1/2 in. (This provides a lip for the back to rest on.) Predrill and screw on the casters with lag screws 1 in. back from the edges, placing the locking wheels in front. Glue and screw two 2x4s to the plywood behind the farthest turn of the front wheels to keep the center of the workbench from sagging (Photo 3).
Tip the base upright and lock the wheels. Set the plywood back on the base’s lip (Photo 4) and fasten it to the cabinets with 3/4-in. pan head screws from inside (cabinets with thicker backs may require a different size screw). The plywood back strengthens the workbench and provides a base for shelving and hooks.
Set the solid-core door on top of the base. Center the door from side to side, then leave a 1-1/2-in. overhang in front to create an edge for clamping.
Attach the workbench top at the corner braces as shown in Photo 5. Screw on additional angle brackets to the front and back if needed for more strength.
Sand any rough edges on the door, then add shelves to the sides and back. If you need to compensate for an uneven garage floor, jam shims or wedges under the bench after you roll it into position.

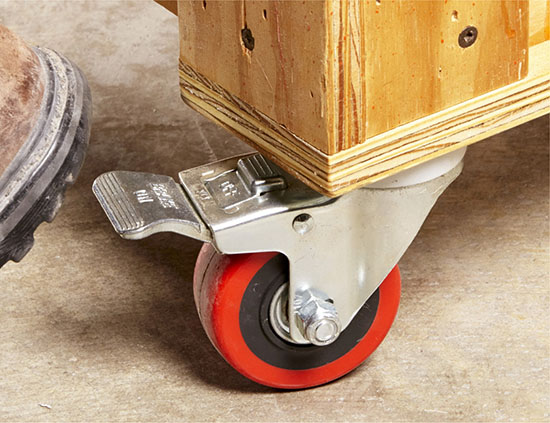
Swiveling casters often come with built-in locks. No surprise there, but did you know that there are two different kinds of locks?
A standard lock prevents the wheel from turning but doesn’t stop the caster from rotating around its plate or stem. A cart or machine with these casters won’t roll away when locked, but it will jiggle when pushed. If you put them on a cabinet supporting a tool, a workbench or anything else that has to lock down solid, you’ll be sorely disappointed.
A double lock, shown at left, totally freezes the caster. The wheel won’t turn and the caster won’t rotate. Put a set of 3-in. double-lock casters on a heavy cabinetmaker’s bench, and you’ll be very pleased with the results. When you’re working, the bench will hardly wiggle at all. Locked, it’s stable; unlocked, it’s mobile. That’s the best of both worlds.
