There are many variables at play in capturing infrared images, so don’t plow head first into digital infrared. Before paying to have a camera converted for infrared capture, read through this book to glean vital guidance that will help you avoid pitfalls and make your quest easier.
Pictured here are the three cameras I have had converted to infrared by Spencer’s Camera & Photo (www.spencerscamera.com). I placed my first “big girl” digital camera (a Nikon D200) on the sacrificial infrared block in 2010 by having it converted to black & white with an 830nm internal filter. I use this camera with the kit lens that accompanied it, a Nikkor 18–70mm. You’ll understand why once you’ve read chapter 5. I found infrared so rewarding that I decided to rescue my Nikon D300 from futile eBay sales attempts and had a 665nm “amplified color” filter installed.
After converting two cameras within the space of one year, I learned the advantage of converting a mirrorless camera to infrared. “You mean you had your new camera converted?” my photographer friends asked in amazement. I have never looked back.
The full-spectrum infrared-converted Olympus OM-D EM-5 is shown here with three external filters; one for Ultra-Blue color, one for black & white infrared images, and one that allows for capture of normal colors in the visible light spectrum.
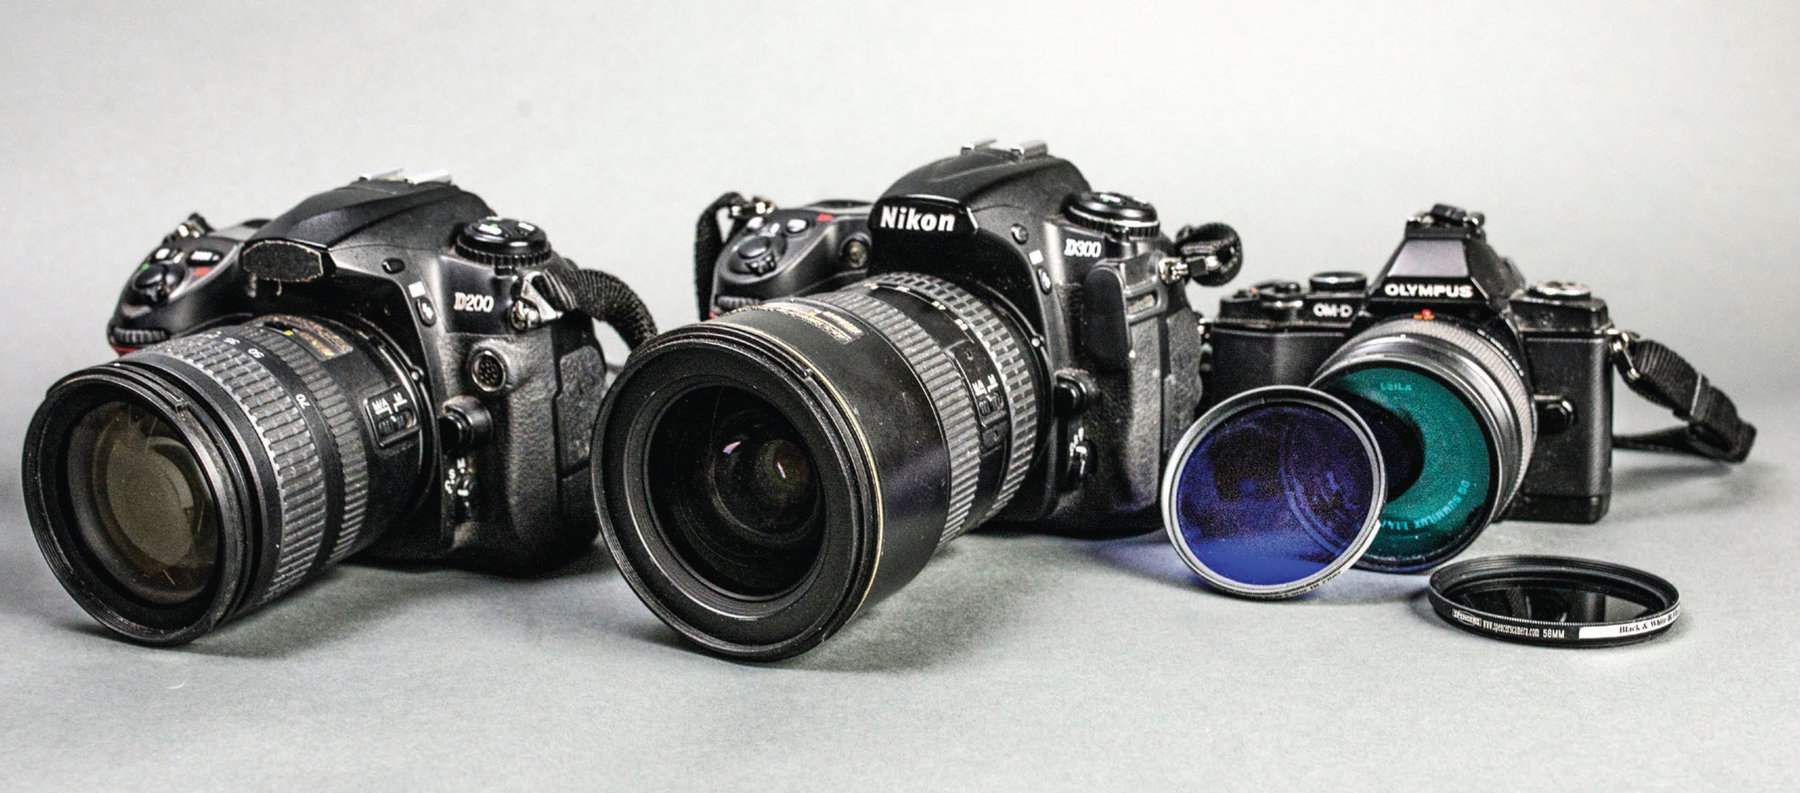
One infrared conversion grew to three. I now have a Nikon D200 to 830nm, D300 to 665nm, and Olympus OM-D EM-5 mirrorless micro four-thirds camera to full-spectrum infrared with a 830nm black & white filter, 710nm Ultra-Blue color filter, and a filter to convert the camera back to normal visible light capture. The lenses shown are 18–70mm, 17–55mm, and 25mm (50mm for the four-thirds camera), respectively.
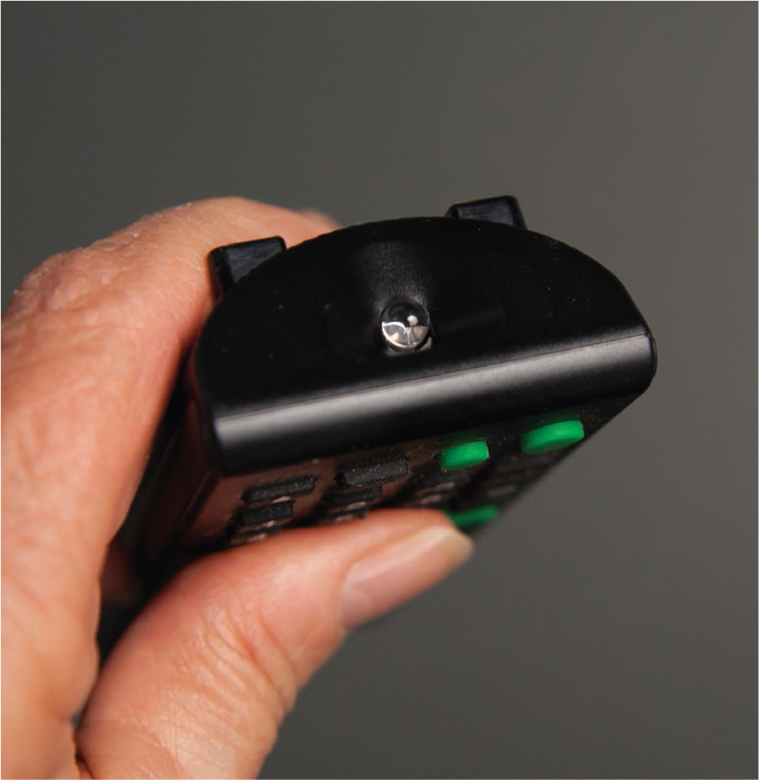
Locate any garden-variety TV or BluRay remote control.

If your camera has live view, activate it to show the scene in front of you.
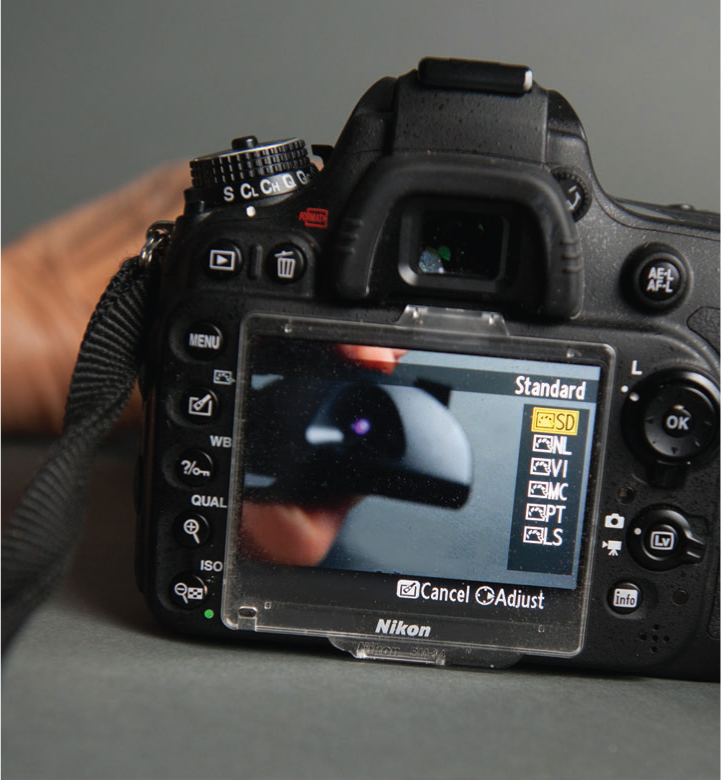
Point the remote at the lens and press any button on the TV remote. If you can see a red or pinkish glow on your LCD screen, your camera can see infrared.
Five Things to Consider Before Converting Your Camera
Here are five factors to consider before having a camera converted to capture infrared:
1. Do you want to capture black & white or color infrared images? Black & white capture may be a good starting point—it tends to be a little easier to manage than color infrared.
2. If you want to capture color infrared images, you will need to decide what type of infrared color appeals to you. (The filter guide on pages 34–36 will help you determine which type of filter to have installed.)
3. Some cameras can be converted to capture the full spectrum of infrared wavelengths. You can attach screw-on filters to your lens, in this case, so you can create a range of infrared image results.
4. Focus recalibration will need to be performed when your camera is converted to digital infrared capture.
5. You will need to white balance your camera for each filter you use or attach. (Note: Converted Canon cameras are easier to white balance than Nikon cameras.)
“Some cameras can be converted to capture the full spectrum of infrared wavelengths.”
But Wait!
• A camera does not have to undergo conversion to capture infrared wavelengths. You can create a black & white infrared image with an external filter (like the R72) attached to your lens. However, getting good results requires a labor-intensive process (described in chapter 4). The tiresome procedure may be useful for those who are not convinced to go the digital conversion route.
• Some digital cameras on the market today are designed to capture both infrared and visible light (this is not a well-advertised fact). Certain models can capture longer wavelengths of light for specialty use such as astronomy and forensic work. Panasonic Lumix, Leica, and Sigma manufacture infrared-capable cameras that don’t need conversion.
• Dual-use cameras (conventional plus infrared imaging in one body) might only capture infrared light when set to Program or Auto mode. Other adaptations or additions may be necessary with dual-use cameras.
Geeky DIY infrared extremists have tried using the dark plastic film from inside an old floppy disk taped to the lens to capture infrared. Most people who have tried it say it doesn’t work. Don’t bother.
Test Your Camera for Infrared Capability
If a digital camera can “see” infrared wavelengths, it can be converted to capture infrared. All you have to do is decide which camera to pull out of retirement, test it, and have an infrared filter installed (or use an appropriate external infrared filter on the lens).
The first step is to determine whether your camera can capture infrared wavelengths. Most digital cameras can see infrared, but this test, illustrated by the images on page 21, will confirm it.
1. Locate a TV or DVD/BluRay remote control.
2. Conduct this test in subdued light, if possible.
3. Inspect each end of the remote to locate the little bulb or tiny flat plastic window. This is the area from which the remote sends a signal (usually infrared) to your TV. (Note: You won’t be able to see anything when looking into that end when the button is pressed.)
4. Set your camera to live view and point the remote at your camera’s lens. Press any button on the remote while looking at the camera’s LCD panel. If your camera does not offer the live view option, take a photo, then review the captured image on the LCD.
5. If you see a red or pink glow in the live view image or in the captured photo, your camera can see infrared.
“Most DSLR cameras are sensitive to light waves in the range of approximately 330nm to 1250nm.”
The Process of Converting a Camera to Infrared
Most DSLR cameras are sensitive to light waves in the range of approximately 330nm to 1250nm. As mentioned earlier, digital cameras can see infrared but contain a blocking device (also called low pass, hot mirror, or cutoff filter) that sits in front of the sensor. To ensure that the camera can capture infrared light, a skilled technician must remove the blocking filter and replace it with a filter that allows only infrared light to pass through to the sensor.
The cost to have a camera converted for infrared capture will vary depending on the type of camera and the company performing the work. The average conversion cost is $250 to $350—up to $1000 or more for high-end “breeds” like Hasselblad. Generally speaking, full-frame conversions cost more than converting cropped-sensor cameras. Spencer’s Camera & Photo uses only the highest-quality filters and other parts in their installations. On their website (www.spencerscamera.com) you will find a conversion price list for nearly every non-pocket-sized camera manufactured—along with a host of other useful infrared information pertaining to infrared photography.
Converting a camera to infrared is best left to a pro. Following the do-it-yourself instructions provided on the Internet is not advisable because of possible injury or death (to you or your camera). Still not convinced? Here is a look at the steps involved:
1. Watch an instructional video.
2. Be innately comfortable with handling tiny, sensitive electrical components (while wearing white gloves). Warning! Magnetized screwdrivers or other tools can cause damage.
3. Take extreme anti-static precautions.
4. Carefully set aside minuscule parts where they won’t get lost.
5. Disassemble your camera to reach the sensor in an enclosed, ultraclean environment.
6. Carefully remove the infrared-blocking filter and replace it with the infrared filter obtained from a camera-conversion company.
7. Use special glue to keep the new filter in place.
8. Don’t break freakishly thin parts.
9. Deal with destructive elements such as dust, hairs, or other stray particles.
10. Put your camera back together again in proper working order.
11. Focus reconfiguration is critical. Do that too, providing you know how.
If you try infrared conversion on your own and make a mistake, having everything put back together by an infrared conversion specialist will cost more than having the conversion done by an expert in the first place. Clarence Spencer of Spencer’s Camera & Photo relates horror stories of jumbled up camera parts brought to him in plastic bags. These are a nightmare to reassemble with the possibility of parts going missing in transit. More often than one would think, he receives cameras for redo that have already been sent to another conversion company but either had been damaged during conversion or simply did not function correctly after the camera had been returned to the owner.
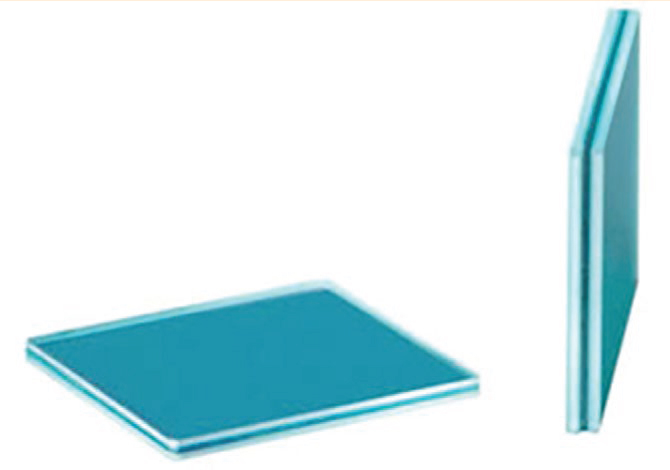
This small rectangle is the infrared blocker that is removed from the camera and replaced with a filter that enables infrared wavelengths to reach the sensor.
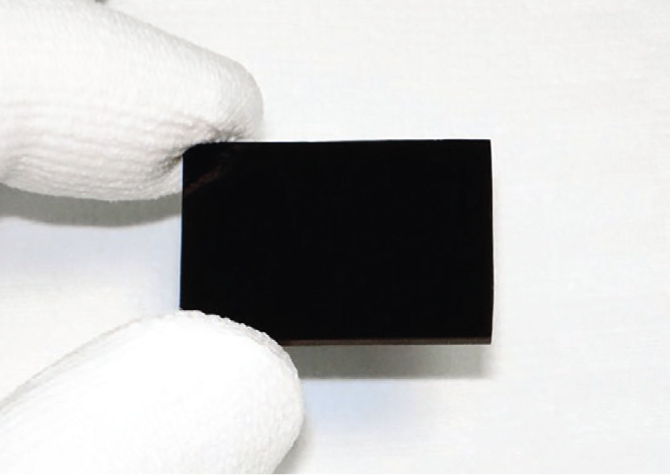
The 830nm infrared filter looks black, but it’s actually a very dark red.
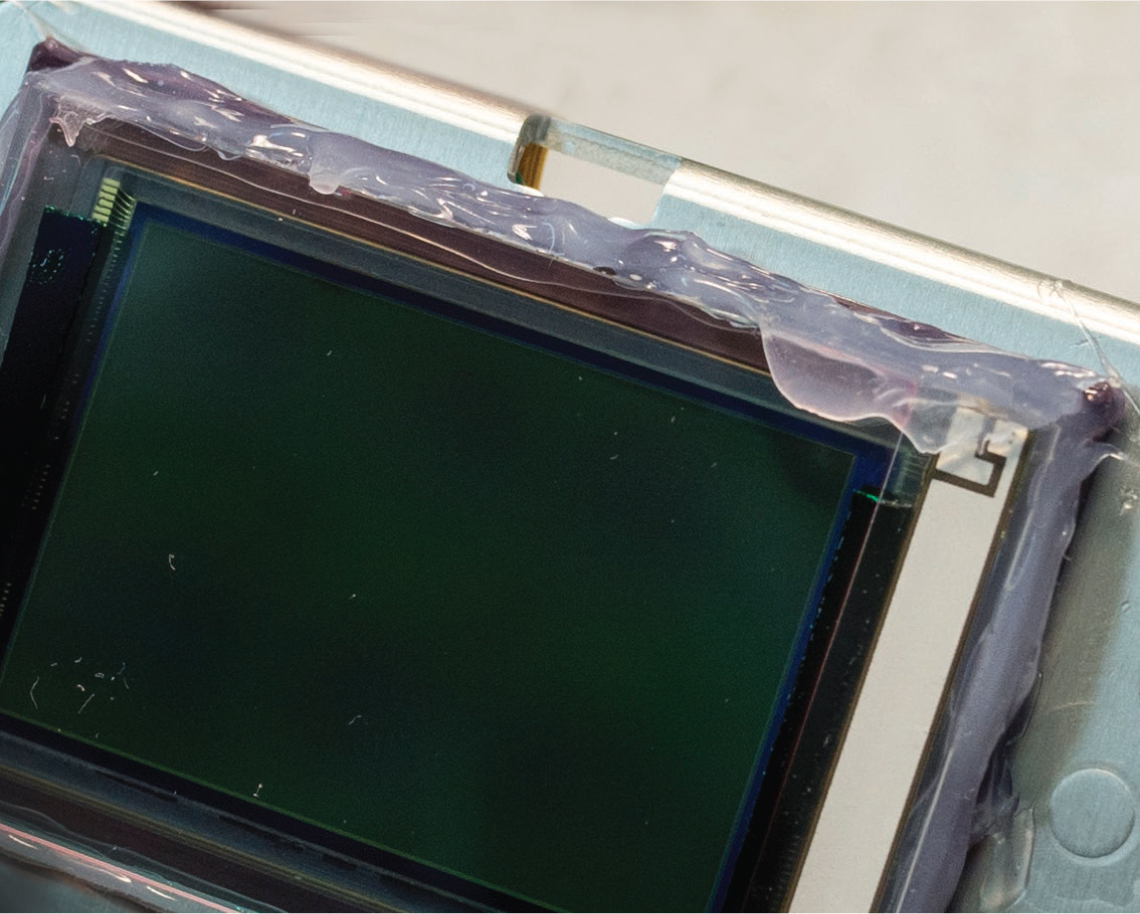
Schlocky gluing of an infrared filter to an image sensor is only one of the alarming problems found by Clarence Spencer of Spencer’s Camera & Photo when cameras are sent to him after undergoing conversions by another company. I personally photographed this dirty sensor with oozing glue and broken parts. Other cameras were stacked in boxes on the floor, awaiting repair of work done by other companies that should have done it right in the first place.

Photo by Scott Nelson.
“Generally speaking, full-frame conversions cost more than converting cropped-sensor cameras.”

Photo by Alex Morgan.
I have heard sordid tales about the work done by some camera-conversion companies. As such, I can only recommend a company in which I have 100 percent confidence—Spencer’s Camera & Photo. Below are a few resources available in the United States. Do your own reconnaissance before sending your camera away for conversion.
Don’t hesitate to call a company whose services you are considering prior to shipping your camera to them. Infrared is foreign territory for many photographers, so technicians usually welcome inquiries and offer suggestions for the camera or filter installation that will be best suited to an individual’s needs.
It is also worth noting that many shops have an inventory of converted cameras for purchase “off the shelf.”
“If you are not certain that infrared is for you, don’t invest heavily at the outset.”
But Wait!
• Infrared results will vary and inconsistencies abound.
• Image sensors are manufactured to conform to a certain visual standard and to provide consistent results for normal, visible-light photography. When the infrared-blocking filter is removed from the camera, all bets are off. Your camera’s warranty will be void as well.
• The same filter may provide different results from one camera to the next.
• The lenses you use for visible-light photography may not deliver the same quality results when used with an infrared-converted camera.
• Compact cameras tend to show the greatest number of variations in the images produced.
Which Camera Should You Have Converted?
When all is said and done, some cameras are higher achievers than others in the infrared conversion world. In general, Canon cameras are a better fit for color-infrared conversion than Nikons. One of the main reasons is that Canons are easier to coax into white balancing after they have been converted to infrared. That doesn’t mean that Nikons should not be offered up on the conversion altar. The good news is that once the correct white balance has been performed, it does not have to be repeated (unless it is changed in the meantime).
If you are not certain that infrared is for you, don’t invest heavily at the outset. Carefully weigh the advantages and disadvantages of the various options that are available. Wedding photographers seem to get the most bang for their buck with infrared images, as these unique images can make for a dramatic presentation to the bride and groom.
Repurpose a Retired Camera
You could just sacrifice any old camera. This may be the cheapest option, but your old camera might not perform well with infrared. On the other hand, it might be great! Check out the pros and cons of different camera features as they relate to infrared in this book. Don’t have an old camera? Purchase one on the Internet (just be sure it doesn’t have too many shutter actuations).
DSLR Camera with a Cropped Sensor
Cropped-sensor DSLRs are a good candidate for infrared conversion, but if you have the option, convert a camera with a full-frame sensor instead. If converting a camera for astrophotography, you might want to consider a cropped-sensor camera, as it is a light-weight option; this can be a beneficial when you must rely on a long, heavy lens.
DSLR Camera with a Full-Frame Sensor
Having a DSLR with a full-frame image sensor converted for infrared capture is the best bet for those who wish to produce high-quality, fine art photos. Remember, the larger the sensor, the more expensive it will be to convert.
Mirrorless Four-Thirds Camera
If you want to capture a few “wow” shots at weddings, consider converting a mirrorless four-thirds format camera. A mirrorless camera is smaller than a DSLR and is easy to pack along with all the other photo gear required for a special event. With an appropriate lens, the images captured with a converted mirrorless camera should be more than acceptable for an album. Get this little gem converted to full spectrum infrared so that you have the flexibility to capture color or black & white infrared images by switching screw-on lens filters.
Point-and-Shoot Pocket Camera
Don’t even think about converting a point-and-shoot camera.
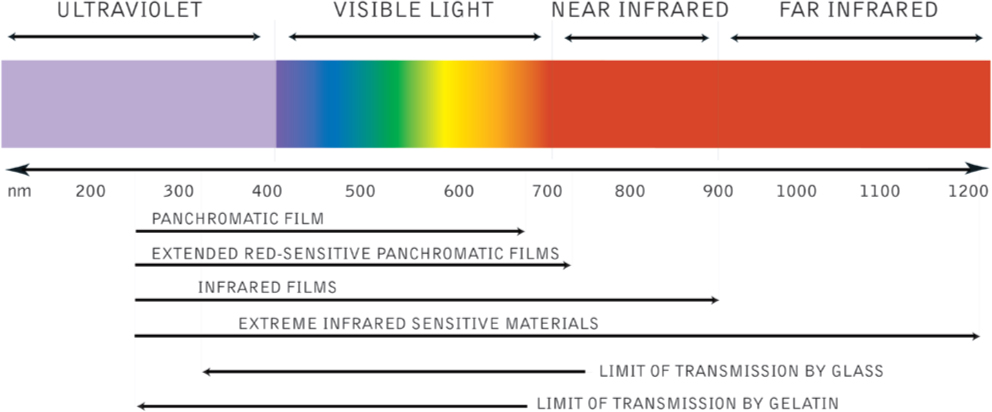
The electromagnetic spectrum chart puts wavelengths into perspective. Visible light is next to infrared, almost in the middle of the spectrum, with ultraviolet on one end and far infrared on the other.