AN EARTH PLASTER IS ANY MIX in which clay is used as the binder. The clay is combined with variable proportions of sand and chopped straw, and occasionally with a smaller percentage of other materials, to impart particular properties. We call this an “earth plaster” because the clay and sand, which usually make up the great bulk of the mix, traditionally come directly out of the ground—often from the building site. On some lucky sites, the native subsoil is a mix of these materials, already combined in the proper proportions! Throughout this chapter, the terms “clay plaster,” “earth plaster,” and “mud plaster” will be used interchangeably.
Advantages of Earth Plaster
When used on a building’s exterior in wet climates, earthen plasters must be substantially protected by site and building features. When attention is paid to these details, and for any interior work, clay-based plasters hold many advantages for cold-climate bale builders. First and most important, they have history on their side; this history teaches us that earth plasters are quite vapor permeable, that they help regulate the interior moisture level of a building, and that they seem to protect straw from moisture damage. Earth plasters are relatively easy to work with, and cleanup is simple. They form a beautiful plaster on their own, are compatible with lime, and dampen sound better than any other plaster. The materials possess a low embodied energy. They are nontoxic and reusable, and are usually quite inexpensive.
History on Its Side
Our long-term experience with cold-climate straw bale construction is limited to less than fifty buildings. These are found mostly in the relatively dry Sand Hills and plains regions of west-00 ern Nebraska, with scattered examples sprinkled throughout similar areas of North America. So, looking at the technique from a historical point of view, we cannot conclusively determine that straw bale construction is appropriate to wetter climates.
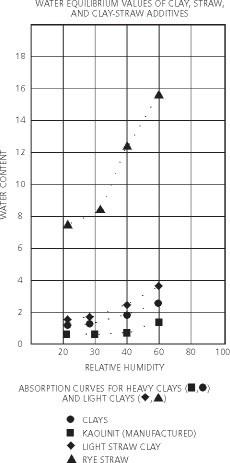
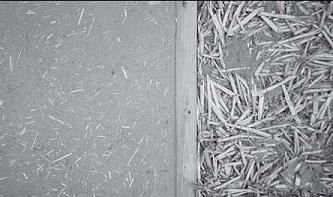
Moisture content of clay and straw.
Straw combined with clay, on the other hand, has centuries of history behind it. The wall panels of many of the famous German half-timbered buildings are composed of light clay, which is a straw-clay mix. The cob buildings of Britain and northern Europe, many of which also date back hundreds of years, are composed of a mixture of earth and straw. A third historical technique hails from Denmark. The old-time Danes, needing insulation in their walls but lacking balers, wrapped straw around hazel sticks; these were then set into grooves in the frame, forming a substrate on which to apply clay and lime plasters.
Except in situations where the recent addition of cement stucco has caused a deterioration of the underlying material, the straw component of these walls can typically be found to be in fine shape. (See chapter 15, “Beyond the Bale.”)
PROTECTION OF STRAW
While bale walls are quite different from these traditional walls, one thing they can have in common is the use of clay to keep the straw dry. Clay possesses several properties that allow it to act as a preservative for straw, wood, and other biode-gradable materials. The first, and possibly the most important, is that regardless of relative humidity levels, the moisture content of clay will be lower than that of the straw around it (see graph).1 If you look at the graph, you can see how the moisture content of plain rye straw increases dramatically with an in-crease in relative humidity, while the moisture content of both pure clays and straw light-clays rise only slightly. This makes a clear case for the ability of clay to protect straw with which it is thoroughly mixed (as in light-clay walls), but it also im-plies that clay plaster, since it will always be drier than the bale that it covers, will constantly be sucking moisture out of the straw. Later in this chapter, we will also talk a bit about ways of moving bale construction closer to these historical models. (See “Making Bale Buildings More Like Traditional Buildings,” later in this chapter.)
VAPOR PERMEABILITY AND
MOISTURE REGULATION
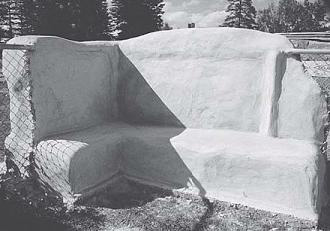
Though permeability varies somewhat between clays, as a group they are quite open to the passage of vapor. According to Volhard,2 clay plasters are even somewhat more vapor permeable than lime plasters. This trait would seem to be borne out by an experiment carried out by the Steens, on an unroofed landscape wall. Half of the top of this wall was finished in 5 to 6 inches of clay-straw plaster, the other half in 2 to 3 inches of clay with 2 to 3 inches of lime-sand over it. When they dismantled the wall in September following a wet summer (18 inches of rain in three months), the straw below the clay-covered section was clearly much drier than that below the 2. Ibid. p. 51 . lime-covered section. The same pattern was observed in the straw on the faces of the wall. Also, the plaster on the clay-covered half of the wall was drier than that on the lime-covered half. It seems likely that two factors combined to create this situation: The clay cap must have let in less water than the lime cap, and it must also have allowed whatever moisture did get in to dry out more quickly. Bill adds that over the course of the summer, the clay section always seemed to dry between rains, while the lime cap pretty well remained wet. It makes sense that if the lime was saturated, or even damp, it would not be capable of drawing much moisture out from the straw. If the clay section consistently dried, on the other hand, it would then draw moisture from the bales, and pass it on to the exterior.
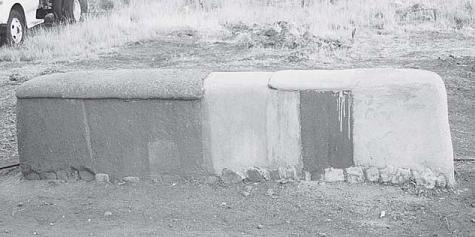
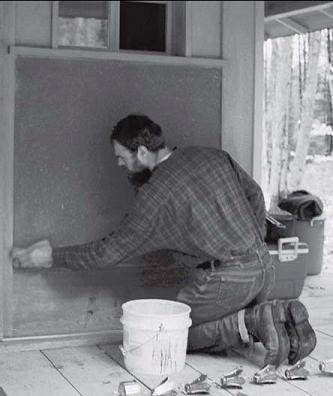
The Steens’ earth- and lime-covered test wall. When it was dismantled, the straw under the earthen section was found to be drier than the straw under the lime section.
Many European earth builders also claim that clay has the ability to moderate interior moisture levels, by taking on vapor when production is high (such as when a family showers and cooks breakfast in the morning) and releasing it when the level drops (such as when everyone leaves for the day). Franz Volhard agrees, adding that while the high vapor permeability and low equi-librium moisture content of clay are important, the main factor is the speed with which clay gives up moisture. According to German tests, it releases water vapor much more quickly than other building materials.3 This means that a clay interior plaster should work in concert with a house’s ventilation system to smooth out the peaks and valleys of internal relative humidity, contribut-ing to good indoor air quality.
COMPATIBILITY WITH LIME
All of this prattling on about clay being more vapor permeable than lime should not be read as a case against lime plaster. In the historical record, clay and lime stand side by side; examples abound of lime-rendered earthen buildings, and of limewashes over clay plasters. The Steens’ example is an extreme one, as neither clay nor lime (nor cement, for that matter!) should be used in a horizontal position in a cold or wet climate.
Under normal conditions, the two materials work very well together. Lime plasters and renders are clearly permeable enough to prevent problems behind them on a wall, whether applied directly on the straw or over a clay substrate. Indeed, a base coat of clay plaster, followed by two or three coats of lime plaster, may turn out to be the best system for cold-climate bale buildings. (See “Making Bale Buildings More Like traditional Buildings,” later in this chapter.)
Workability
Clay is not caustic, like cement or lime; neither does it push your work pace, by constantly threatening to set up. People just seem to gravitate toward clay plaster. It is the ultimate in elemental materials, and more than any other kind of construction work, building with clay feels like being a kid at play. Because the material is minimally processed, it takes a good deal of skill to achieve a fine, hard finish. Just getting the stuff on the wall, however, is easy, and inviting. Once you’ve put your hands in that mud mix you don’t feel like doing any other type of plaster.
Clay Walls
and
Mummified
Straw
Some people assume that the straw in an earthen wall will rot away over time. Our research shows the contrary. After its initial drying period (which may take months), and assuming no unintended moisture sources (from the ground or a leaking roof), a cob wall maintains a fairly constant and low moisture level, even in very rainy places such as Britain. Kept below 24 percent moisture content, and encased in the oxygen-poor environment of the cob wall, the straw will not become a hospitable home for the microorganisms that cause rot. Essentially, the straw is mummified inside the wall. We have broken into cob walls 150 years old in New Zealand and found the straw still yellow and apparently as strong as when the wall was built.”4
Carving potential and ease of remodeling are additional positive qualities of earth plasters. Because it is not chemically set, clay is relatively easy to remove when a section of wall is to be modified. Hardened earth plaster can be rewetted, and chiseled away with the claw of a framing hammer. The simplest technique is to chew out the plaster at the perimeter of the area to be removed; the remaining bale-and-plaster panel can then be cut out as a unit, and recycled as mulch. No waste!
EASY CLEANUP
Immaculate (or timely) cleaning of tools is much less crucial with clay than with cement, gypsum, or lime work. The mix also need not be used up as soon as it is made. In fact, with an earth plaster, you want to let the material sit around for a half day or more before you use it. This time allows the clay and straw to fully soften, which makes them more plastic. It also increases the binding capability of the clay; as it rests in a moistened state, the particles separate more thoroughly, which means that they can do a better job of locking around the sand grains and straw fibers.
Demonstration of the carving potential with earth plaster, from a workshop at Athena and Bill Steen’s Canelo Project in Arizona.
BUILDING UP AND FILLING IN
In addition to the above-mentioned advantages of using clay-based plasters to actually cover the walls, clay is also a great binder in mixes with high straw content, for semistructural applications. Clay-based plaster can be used to build up shelves or sculptures in walls. It can also serve as a good filler for larger gaps in walls, regardless of which plaster is to follow. When packed into the hollows that some-times form where the corners of bales meet, clay becomes a strong support for plaster that otherwise would need to be applied on some sort of netting. This type of solid filling forms a much firmer plaster substrate than loose straw, even if the straw is covered by netting.

Once you’ve put your hands in that mud mix, you won’t feel like using any other type of plaster.
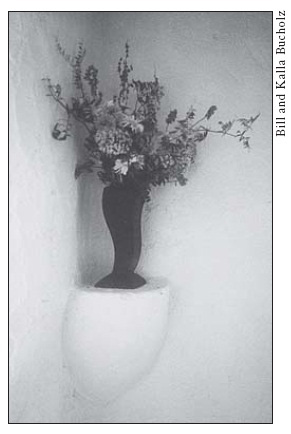
Kalla Bucholz’s shelf, built up of an earth-straw mix.
Beauty
We think earthen walls are very beautiful. Many colors (and not only earth tones!) are possible, thanks to the many colored clays available at pottery supply houses. It is also possible to rub pigments into the finish, to create a mottled effect. If the finish surface is worked properly, it takes on a leathery look that is very soft and inviting. Beeswax can also be rubbed in, to create a deep luster. The sand component of the plaster will often contain flecks of mica, which lend a sparkle to the wall. The bits of milled straw that appear on the surface also shine slightly. An earthen plaster is definitely the most alive of all available finishes.
Quiet
Because it doesn’t finish as hard as cement or lime, a clay-plastered room will not sound so bright as these other options. This is especially helpful in music rooms, TV rooms, or any space with a poured concrete floor.
Environmentally Friendly
While cement is produced at a temperature of 1,200°F (650°C), and lime at 1,650°F (900°C), clay is used in an unrefined state, direct from the ground. It is sometimes dried in the sun and powdered in a hammermill, but this is the only processing required. So, unless the materials have been hauled a tremendous distance, a clay-based plaster can be produced with relatively little energy input.
Clay is nontoxic. Unlike most building materials, it is actually good for the skin! Excess clay, sand, and straw can be added to the local soil in a field or garden. At the end of the useful service life of the building, an earth plaster can be rewetted and used on another project, or it can accompany the bales to the compost pile.
Straw fibers shining in the surface of an earth plaster.
Inexpensive
Clay is an inexpensive material, typically sell-ing for $5 to $15 per yard. Trucking can get pricey, of course, so it is worth the trouble to find a good local source. As it is a common material, in many areas it is possible to dig it straight out of the ground, on or near the site. While it will often be difficult to find a pure clay, a clay-rich subsoil, which is quite suitable for plaster, might be readily available.
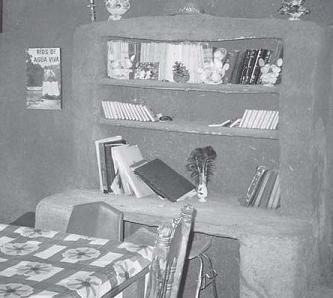
Shelves and bench of straw-clay mix, built by local people in Ciudad Obregon, Mexico, in collabora-tion with the Canelo Project.
Disadvantages of Earth Plaster
Far and away the greatest limitation to using clay plaster in wet climates is the fact that it is not well suited to serious weather exposure. Second is the general lack of experienced tradespeople. Identifying clay can be a tricky matter as well, and different clays will have different binding qualities. Processing the raw clay can be labor intensive. Because clay plasters are not as hard as others, they cannot take quite the same level of abuse. Finally, mold during drying is some-times an issue in wet conditions.
Weather Exposure/Maintenance
Clay does not undergo any kind of chemical setting process; the bond between particles in an earth plaster is a mechanical one. This means that clay plaster has a limited ability to shed really serious weather. As the surface of the plaster adsorbs water, clay particles can come loose from the plaster matrix, and be carried away by water running down the wall. When enough clay has been washed off, sand particles can begin to dislodge as well, and a general erosion can begin. This is a slow process, taking a number of years if the plaster has been applied well. (Well, in this case, means such that its surface is compacted and closed, so that water cannot easily soak in.)
Traditionally, there have been three answers to the problem of clay plaster’s vulnerability to the elements. Number one, of course, is maintenance. In the pueblos of the American Southwest, women traditionally applied a fresh coat of mud to their walls every year. This approach worked impeccably, for centuries. Second, in some wetter and colder climates, clay plasters have been treated with limewash, as a protective paint, or covered with a lime-sand plaster. Third, in dry climates, including a high proportion of straw in the finish coat also helps: the straw re-inforces the plaster against erosion, slows the progress of water down the wall (thereby reducing its erosive power), and acts like many tiny dripsills, diverting a portion of the water away from the wall, into the air. This approach really only works in dry or warm climates, however; in wet and cold climates, the straw will absorb water and then freeze, blowing bits of plaster off the wall. (See the “Straw Daubs” sidebar.)
Straw Daubs:
How Fiber
Cuts Erosion
in Mud
Plasters5
The greatest threat to an unprotected mud-plastered wall is erosion by water. Storms may unleash violent torrents that are intense mechanisms of destruction. Water flowing down a vertical surface, unless it is deflected from a straight downward path, will rap-idly cut a channel out of mud plaster and threaten to expose straw bales underneath. One method of countering the flow of water erosion is to break the velocity of the downward flow of water. This may be done by redirecting water rivulets so that, instead of flowing straight down, they are forced to follow a random labyrinthine path to the wall base. Straw, properly mixed and applied in a mud render, is an effective device to retard erosion.
“While watching the women of Taos Pueblo remud a wall, I noticed that the mud was thrown onto the surface and then, using the heel of the hand, worked upward in a low arching motion away from the body. The print was that of a half-rainbow. The straw in the mix was no more than 2 inches long and most of the pieces, as a result of the hand motion, were embedded either horizontally or only a few degrees off the horizontal. When I looked at a wall that had not been remudded for several years I saw the efficacy of the technology. A rivulet beginning at parapet height encountered a barrier across its path and was diverted to one side. A few inches below, it was again di-verted, and in some cases divided by the straw in the plaster. The downward velocity of water was broken, and erosion reduced.
“The same result can be achieved by using a hawk and trowel to apply the mud rendering. By ‘cutting’ the mud on the hawk away from the body using the edge of a trowel, the straw fibers are aligned per-pendicular to the plane of the trowel. By cutting three or four times, most of the straw is aligned similarly. Then, by turning the hawk 90 degrees so that the alignment is parallel to the body, and ‘cutting and lifting’ the mud onto the trowel and applying it in vertical paths, the straw is embedded generally parallel to the ground. Again, the length of the straw is critical to the success of the render: long fibers won’t align. One and a half to two inches is optimum length.”
(Note: While straw daubing is an exciting technique for dry or warm climates, it is not a good idea in cold and wet climates. During spring and fall, and even on some winter days, the straw will be able to absorb water from daytime rains and then freeze at night, causing the plaster to blow off the wall.)
Lack of Experienced People
In North America, there is very little tradition of earth plaster in cold-climate regions. It was somewhat common in early New England, but even there it was generally used as a backing coat for lime, or as a temporary plaster, until the owner could save enough money to afford lime. Even in northern Europe, where the material has a long history, experienced practitioners are not common, today. While getting the mud on the wall is easy, working the finish so that it is good and hard requires some experience. This is an important feature of weather resistance on exterior work, and crucial to the plaster’s ability to take normal abuse, on interior work. Hopefully, this infrastructure will develop and spread, as bale construction gains in popularity.
Difficulties in Clay Identification
Clay is not always useful clay, and clay is definitely not silt. In the field, it can be difficult to tell the difference between clay and silt. If you ask any road crewman in Paul’s section of New England about clay, he will tell you the stuff is everywhere, as often as not running in bands along the margins of each town road. In reality, the nearest clay deposits of any significance are at least two hours away. These road workers are plagued by silt. What silt and clay share is a cer-tain imperviousness to water; for a person whose job is to get water off of roads and into the ground, the difference between silt and clay is of little significance. For plaster work, on the other hand, the difference is of primary impor-tance, as silt is basically useless. Differentiation between the two is very important, but it can be difficult. (See “Clay vs. Silt,” later in this chapter.)
Compounding this problem is the fact that not all clays are alike. Some bind better than others, some are more expansive than others. Often they come mixed with sand and silt and stones as a subsoil; this needs to be screened before samples can be made. In Germany and some parts of the American Southwest, milled clay, and even readymade plaster mixes, are available by bag and bulk, delivered to the building site. The development of such an infrastructure across the rest of North America would make clay plasters much more accessible to people who are not already experienced with them. Somehow, it doesn’t seem as if the demand for such products exists quite yet. . . .
Processing Raw Material
Processing clay is sometimes easy, and sometimes hard. Most clays, if used green from the ground, can be reduced to slip in a mortar mixer or bucket without too much trouble. They can also be soaked in water, in a pit, and slowly softened. Unfortunately, using clay green out of the ground is not usually practical; as it sits at the site or around the excavation yard, it dries into very hard balls. These cannot be soaked effectively, because the outer layers swell as they take on water, blocking water entry to the interior.
In many cases, therefore, the material must either be pounded into small pieces and sifted through a fairly fine screen, or run through a hammermill. Both of these processes are rather labor intensive; the milling also requires an in-vestment in equipment. For this reason again, affordable bagged clay would be a great boon. (See “Commercial Clay Sources,” later in this chapter.)
Abuse
Earth plaster is much more solid than most people would assume. For instance, it would be harder to put your foot through a properly mudded bale wall than through a stick-and-sheetrock wall. At the same time, however, earth plaster is not always as tough as more processed materials. For instance, it may gouge a bit if struck firmly with a sharp object, such as a chair back. Patch-ing is easy, though on a wall of homogeneous color, the patch will probably show. On the whole, properly applied clay plasters seem capable of with-standing normal wear and tear. For that subset of the population who are agents of entropy, however, another plaster might be a better choice.
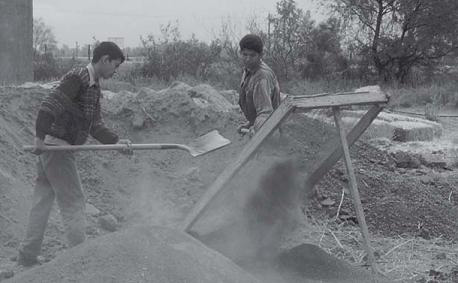
Sifting clay through a screen.
Mold
In climates that are particularly moist during the building season, mold growth can be a problem in wet earth plaster. Mold occurs when a period of rainy weather prevents the plaster from dry-ing. Paul has a hunch that the mold may actually enter the mix in the straw. In the few projects where he has seen any degree of mold, it has always seemed to be centered in the straw component. It may be, therefore, that by keeping the straw completely dry, mold can be prevented. “Completely dry” does not mean on the ground, covered by a tarp. It means indoors, or, if outdoors, on top of a sheet of plastic, with at least one layer of poly and one tarp over the top.
Paul did have one experience with a very intense growth of mold in a clay plaster. Plaster work on this particular project commenced toward the end of a summer that had seen no rain for two months. Mold spores of all sorts were dormant, and waiting for moisture to begin their growth. Rain came like crazy, beginning the very weekend that plastering began. Much of the straw pile was soaked through the tarp, and the pile sat upon bare ground. Though we tried to avoid using obviously wet straw in the mix, we had a multicolored bloom of mold all over the walls of the building. Straws that were exposed on the surface supported the strongest growth. As no mold appeared in any pure clay, or in any of the slips that were in various stages of drying in buckets and on the ground all around the site, it seems reasonable to conclude that the damp straw was the culprit.
Mold is less of an issue in a clay plaster that is stabilized with lime, as the alkalinity of the lime creates an atmosphere that is not conducive to biological activity. A light bloom on an unstabilized wall can usually be killed by spraying hydrogen peroxide onto the walls; a dilute bleach solution is also effective. Paul has also used limewash for this purpose. It may be that by soaking the straw in a borate solution before adding it to the mix, that mold may be prevented entirely. Before trying this, however, make samples to determine if the borate will affect the quality of the finished plaster.
Design Issues with Clay
Clay plasters can work exceptionally well on interiors in cold climates, if the materials are chosen and applied well. They can also work well on exteriors, under some circumstances. Before discussing the matters that affect both sides of the wall, let’s have a look at the main exterior issue: protecting the wall from the erosive effects of water.
Protective Architectural and Site Features
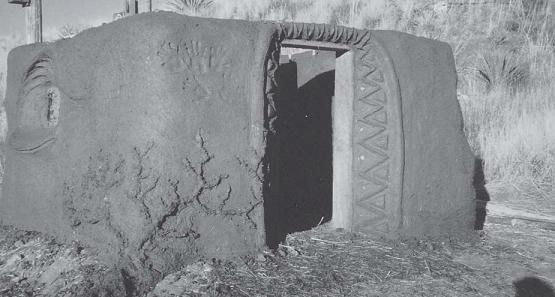
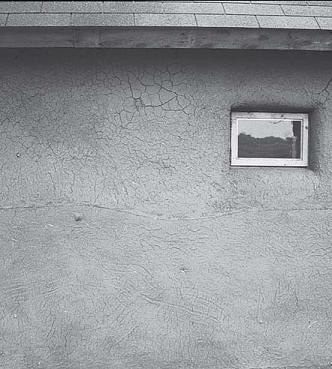
In reality, those features that are required to reduce the maintenance on an exterior clay plaster are the same features that will protect any exte-rior. Erosion of the plaster is mainly prevented by building sufficient overhangs and other archi features, and by choosing a site that offers some protection. For one-story structures this is quite simple, but creative details must be applied for two or more stories. Porches and lean-to utility structures have been a popular response to that problem. On Pat Kirk and Dick Starbuck’s retreat house, the second story is completely under the roof. A wrap-around verandah protects the first-story walls, and the gable ends are finished in wood. Combine these features with a wooded site, and it is safe to say that the clay-plastered walls of this building will not need attention for many years.
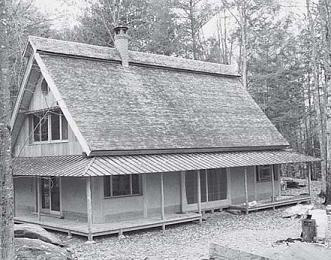
The wooded site and wrap-around porch roof protect the clay-plastered exterior walls of the Kirk/Starbuck house.
Another interesting design feature, found particularly on old European buildings, would be to recess the lower-story walls to give additional protection against wind-driven rain. This also has the advantage of breaking up the facade of the wall, bringing it down to a more human scale. These design features, though they seem limiting, often result in interesting and unusual buildings. Such an approach ensures bale walls that are very safe from moisture damage, as little rain will be hitting them, and they will have ample opportunity to dry, through the very permeable clay plaster.
Compatibility with Exterior Render
By this point in this book, it should be obvious that if clay plaster is used on the interior of a building, something at least as permeable (clay, lime, or wood siding) should be used on the ex-terior. Avoiding trapping moisture in the walls should be a main preoccupation of the straw bale designer; whether this appears as liquid water from the exterior or water vapor from the inte-rior, it is crucial that it be allowed to escape.
Clay vs. Silt
Because clay and silt are both very small particles, they both feel slippery when wetted and rubbed between the fingers, and they both, if deposited thickly and purely enough, form a surface through which water will not readily pass. This is where the similarities end. Clay particles are flat, and when put into solution and then dried, they have a tendency to curl. This is why spilled clay slip always forms little curved flakes as it dries; it is also why clay makes a good binder. When water is added to clay, the particles separate from each other. When sand and/or chopped straw is added, the clay particles spread out, covering the grains of sand and the straws. The material is applied to the wall and begins to dry; as it does so, the clay particles start to stick back to each other, but they also curl around microscopic rough points on the surfaces of the sand and straw, binding the material together.
According to William Bryant Logan, “clay is plastic because it is made of infinitesimal plates that slide one across the other, held loosely in place by intervening layers of chemically combined water. It is very hard to pull the plates apart, but comparatively easy to slide them one across the other—as anyone who has tried to walk in the sticky gumbo-till clays that some-times cover the face of the Earth can tell you. It can be almost impossible to lift your foot out of the suckling mass of the clay, while when you try to slide it forward, you may find it shoots ahead, leaving you sitting on your rump.”6
Silt particles, on the other hand, are round. This allows them to feel slippery between the fingers, but obviously means that they are of little use in binding materials together. Though not as fine as clay, silt is fine enough that if a mix includes too much of it, it will interfere with the bond between clay and sand or straw. Silt also does not have nearly the ability to move moisture that clay does, so the most vaporpermeable earthen plasters will be those in which the lowest percentage of silt has snuck into the mix.
Different Clays, Different Qualities
Clays come under many names: illite, montmor-illonite, kaolin, imogolite, bentonite; the list goes on. Each has a different chemistry and physical structure. Indeed, under an electron microscope, a Georgia kaolin will look different from an Iowa kaolin, and the many kaolins from China will each have their own distinct characteristics. Not surprisingly, these microscopic differences in shape and chemistry lead to noticeable differences in the three main working properties of clay: stickiness, plasticity, and expansiveness. The best clays for plaster are very plastic and very sticky, and minimally expansive. The fact that bentonite expands to nineteen times its dry volume when fully hydrated makes it very useful for below-grade waterproofing, but pretty useless for plaster. One could store a small fortune in jellybeans in the cracks of a bentonite plaster.
Because clays are so variable, finding clay does not mean that you have found a good clay for plaster. Most will work—extreme examples such as bentonite are rare—but the proportions of the mix and the hardness of the finished product will definitely vary, from material to material. This is part of the fun in working with preindustrial materials; in each new location, you must figure out how best to proceed, with what you have on hand.
Commercial Clay Sources
Far and away the easiest, most trouble-free method of procuring clay suitable for plaster work is to buy it from someone who knows what they are talking about. Clay can be purchased in bags from pottery suppliers. This is typically the most expensive way to buy clay, but since this dry, milled material is very easy to work with, it can save substantially on processing time, and therefore on labor costs. Suppliers who know their product well should be able to give you some idea of the stickiness and expansiveness of various clays. Your best bet is to ask which three or four clays might best suit your project; you can then bring home a bag of each, and begin making samples. Even if you use native clay for the bulk of the plaster, there is a good chance you will find yourself at the potter’s supply when it comes time for finish work. This is the place to find clay in a multitude of colors, including white.
If your project is located in a clay-rich area, there is a good chance that somebody has capitalized on selling something that is just lying around, and is mining it for a commercial purpose. Pottery clay must come from somewhere, as must bricks. These materials are often very pure clays, so if you can find a factory that produces either one, you probably need look no farther. It may even be possible to purchase milled material in bulk through one of these sources, which will be substantially less expensive than buying it in bags. (It will also be less energy intensive, thanks to the shorter transportation distance.)
Clay is also used commercially in the construction of tennis courts, for lining ponds and other water-retention facilities, and for capping land-fills. These applications do not require as pure a clay as pottery or bricks, however, so the material may possess a higher silt content. In all of the above cases (including the pottery and brick suppliers!), it is imperative that you test the material for clay content before having any deliv-ered to the site. If you can’t make it out to the yard, offer to pay for the shipping if they will mail you a coffee can full of material. Coffee cans seem to accumulate wherever heavy equipment is operated, so this shouldn’t be a problem.
The key thing to remember is that, in this chapter and on the plaster site that it hopes to accurately represent, the distinction between clay and silt matters tremendously. In the world of the excavation contractor or sand and gravel yard, clay and silt are basically the same thing. So, when he tells you he’s got clay, he means some undefined combination of clay and silt, maybe with some sand and gravel mixed in. When he tells you he’s got pure clay, he means there isn’t much sand in it. If you take delivery of a load that turns out not to be clay, it’s pretty much your own fault, as your definition is a departure from the industry standard. This is why you need to check out the material, well in ad-vance of the time when it needs to be delivered to the site.
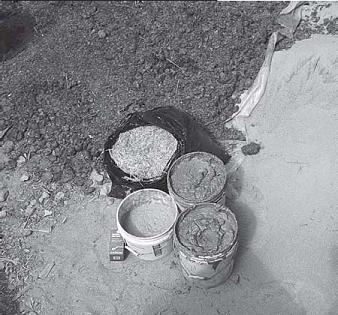
The primary ingredients in most earth plasters are clay, sand, and chopped straw. Wheat paste and manure are two common additives.
Of course, it’s not always feasible to purchase material from one of these sources. Even when it is, who wouldn’t be attracted by the idea of reusing the excavated soil from the house site? It may be that every bit of soil that comes out of the cellar hole can be reused. As everyone knows, a soil is constituted of successive strata of different materials. The upper portion is the topsoil; on good land (maybe not the best place for a house, eh?) it may go as much as 2 feet deep. Because topsoil often contains a high percentage of decomposed organic matter, it is not suitable for plaster work. The best use for this soil will be for building up the garden, or for the growing medium in a living roof.
The ideal soil for earth plasters may be found underneath the topsoil, if it contains enough clay and not too much silt. Since the components of soil vary considerably from site to site and some- times between locations on the same site, there is no other way of determining if a soil is appropriate for construction purposes than by testing it for its clay content. You can conduct various tests and it is advisable to do as many of them as necessary, until you have a pretty clear idea of the soil makeup. Samples will then reveal the working properties of the material.
Finding and Evaluating Soils
for Mud Plasters
Virgin clay can be found in two forms: in relatively pure deposits (where it might be mixed with silt, and maybe a small percentage of sand or gravel), or as a component of a subsoil mix. Pure deposits are generally found in marine areas or past or present river bottoms (in Massachusetts this means that unless you are a corpo-ration of some size, you risk a heavy fine for even thinking about mining them). Clay-rich subsoils are found in former seabeds, or occasionally in areas whose native geology was augmented by the munificence of passing glaciers.
Testing Pure Deposits
If you believe you have found a pure deposit, either on the site, in the wild, or among the moun-tains and monsters at the excavation yard, you can perform three simple tests to get an initial sense of whether it is suitable material.
LEG TEST
The leg test is the most obvious test in the world, which came to Paul in the shower, at the end of a long day of mixing plaster: Wet a small amount of the material in question, and rub it on your leg. Once it dries, try to rub it off. If it possesses a high percentage of a good-quality clay, it will only powder off slowly, and only upon very vig-orous rubbing. In fact, it should be easier to remove the material by peeling than rubbing, and if your legs are of the hairy sort, this will be quite painful. If the material is silty, rubbing will turn it painlessly to powder.
This test works best when you can compare the material in question to a clay of known qual-ity, which can be rubbed onto your other leg as a control. If you can get someone to send you an envelope of clay that has been used successfully for plaster work, then you can compare the sample in question to that material. Otherwise, your best bet may be to get a bit of material from a local potter.
WORM TEST
Take a small handful of the material and roll it between your hands until it is the size of a nightcrawler, about 4 inches long by the thick-ness of a pencil. Bend it into a U shape. If it can make the bend without cracking, it probably has a high clay content. If it cracks at all, it’s probably too high in silt for plaster purposes.
DROP TEST
Frank Andreson of Pro-clay, Brownfield, Maine, recommends dropping a thoroughly dried ball of the material in question from a height of 6 meters (20 feet.) If it shatters into many small fragments upon impact, it’s too silty. If t breaks into only a few pieces, it’s probably a suitable clay.
POTTER TEST
Take your sample to a potter, and ask them what they think of it. Potters are generally quite decent people, and most of them are really into clay. It shouldn’t be hard to find one who will take some interest in your project, especially if your satchel of earth is accompanied by one of cookies. In clay-rich areas, it should be easy to find some potters who have at least experimented with digging their own material. Ask around among the potters in the phone book, they’ll tell you where to find these kindred spirits. These people can be the most experienced at clay identification, and they might also be willing to tell you where to dig to find the best material.
Testing Clay-Rich Subsoil
Subsoils that contain clay, silt, sand, and gravel in various proportions are much more common than true clay deposits. If you are hoping to use the soil from the site, this is what you are most likely to find. Because the relative proportion of these components will influence the properties of the plaster, we must begin our testing by es-tabling the percentage of each material in the sample. The ideal proportions of a traditional clay and sand earthen plaster are from 15 to 35 percent clay, 55 to 75 percent sand (some gravel may be tolerated depending on the type of plaster), a maximum of 10 percent silt and a maximum of 3 percent organic matter. What you need to do is find out whether this soil contains a high enough percentage of clay, versus sand or silt.
THE JAR TEST
Paul likes to do the jar test two ways, the first giving an idea of the percentage of clay and silt in the entire soil, and the second giving a closer sense of the ratio of silt to clay. Each test requires two cups or so of raw, relatively dry material. For the first test, pick out all grains of sand or gravel larger than about  of an inch. Crush any balls of clay with a piece of wood. (Instead of picking grains, you can run the material through a
  - or -inch screen, after crushing the clay.) Place a cup of the resulting material in a quart jar, add a tablespoon of sea salt, fill three-quarters of the way with water, and shake vigorously for a minute or two, until the particles are all separated.
Further
Soil
Tests
Because the properties of soil components are highly variable, the initial tests described above do not always result in a clear determination. Here is a further round of tests taken from the books Handbook for Building Homes of Earth and The Rammed Earth House that will help to classify your soil.
Visual Tests
The appearance of a soil can tell you some important things about it. First spread the dried soil out in a thin layer on a flat surface. Then roughly separate the sand and gravel sizes by hand.
Do this by putting all of the particles, from the largest down to the smallest that you can see with the unaided eye, in one pile. This will be the sands and gravels. What is left (normally this will be very fine powderlike materials) will be the silts and clay.
If the sand and gravel piles together are bigger, you have a sand or a gravel soil. Decide which it is by putting all of the particles larger than  -inch (gravels) in one pile and all of the smaller particles (sands) in another pile. The soil is gravelly if the gravel pile is biggest and sandy if the sand pile is biggest. Remember which it is.
Here is what you do if you have a sandy or gravelly soil:
Take a small handful of the entire sample (not just the sand and gravel), get it moist but not soupy, squeeze it into a ball, and let it dry in the sun. If it falls apart as it dries, call it “clean.” Clean sands and gravels are not suitable for earth houses unless they are mixed with other materials.
Here is what you do if you have a silt-clay soil or a sand or gravel that is not clean:
Take the entire sample and collect all of the soil that is smaller than medium sand ( inch) by sifting t through a very fine screen or a piece of coarse cloth. The tests described below should be made with this fine material.
Wet Shaking Test
Take enough of the soil to form a ball the size of a small hen’s egg and moisten it with water. The ball should have just enough water in it so that it will hold together but not stick to your fingers. Flatten the ball slightly in your palm and shake the ball vigorously. This is done by jarring the hand against some firm object or against the other hand until the shaking brings water to the surface of the sample. The soil may have a smooth, shiny, or “livery” appearance when this happens. (What you are looking for is to see how fast the water comes to the surface and gives the livery appearance.) Then squeeze the sample between your thumb and forefinger to see whether or not the water disappears.
The following are terms used in describing the speed of the above reaction:
1. Rapid Reaction. When it takes only five to ten taps to bring water to the surface, this is called a rapid reaction. Squeezing the sample should cause the water to disap-pear immediately so the surface looks dull. Opening the hand quickly should accom-plish the same result. Continued pressure causes the sample to crack and finally crumble. This type of reaction is typical of very fine sands and coarse silts. Even a little bit of clay will keep the reaction from being rapid.
2. Sluggish (or slow) Reaction. When it takes twenty to thirty taps to bring the water to the surface, you have a sluggish reaction. Squeezing the sample after it has been shaken will not cause it to crack and crumble. Instead, it will flatten out like a ball of putty. This shows that the soil has some clay in it.
3. Very Slow or No Reaction. Some soils will not show any reaction to the shaking test, no matter how long you shake them. The longer it takes to show a reaction, the more clay the soil contains. These soils will require the other tests described below before you can proceed.
Bite Test
This a quick and useful way of identifying sand, silt, or clay. Take a small pinch of the soil and grind it lightly between your teeth. Identify the soils as follows:
1. Sandy Soils. The sharp, hard particles of sand will grate between your teeth and create an objectionable feeling. Even very fine sands will do this.
2. Silty Soils. Silt grains are much smaller than sand particles and, although they will still grate between the teeth, they are not particularly objectionable. They feel a lot smoother than sands.
3. Clayey soils. The clay grains are not gritty at all. Instead, they feel smooth and powdery like flour between the teeth. You will find that a dry pat of soil with a lot of clay in it will tend to stick when lightly touched to your tongue.
Shine Test
Take a pat of either dry or moist soil and rub it with your fingernail or the flat side of a knife blade. If the soil contains silt or sand—even with the remainder being clay—the surface will remain dull. A soil that has a lot of clay in it will become quite shiny.
Hand-Washing Test
You can tell a lot about a soil in the way it washes off your hands. Wet clayey soils feel soapy or slick, and they are hard to wash off. Silty soils feel powdery like flour, but they are not too difficult to wash off. Sandy soils rinse off easily.
Odor Test
Organic soils have a musty odor, especially when freshly dug. You get the same odor for dry organic soils by wetting and then heating them. Don’t use these soils for earth walls.
Simple Touch Test
By just touching a sample of soil it is possible to evaluate its basic composition.
Take a soil sample and remove by hand the grains bigger than  inch (5 mm), then crumble the sample between fingers and palm to determine the rough dimensions of the components:
1. Silt. The dry silt particles will also give a rough feeling but smoother and moist silt has some plasticity.
2. Sand. The dry sand particles give a rough feeling.
3. Clay. Dry clay comes in lumps or coarse grains and are hard to crush. Moist clay is plastic and sticks to the fingers. Silty and sandy soils make an audible crispy sound when rubbed together near the ear between thumb and index finger.
Unaided Eye Tests
By a simple glance at a sample of soil it is possible to determine roughly the relative proportions and sizes of the bigger particles and, by deduction, of the finest. However, the finest visible particles are  inch (0.80 mm), and clay and silt particles are invisible.
Color is important in classifying soils. Olive green and light brown to black colors mean organic soils. Red and dark brown colors may come from iron in the soil. Soils with a lot of coral, limerock, gypsum, and caliche may be white or some shade of gray.
For the second test, crush any clay balls, and run the material through a piece of old window screening. This will remove all but the finest sand. Add a cup to a quart jar, and proceed as above. After an hour, the sand in both jars should have settled to the bottom, and the silt will be deposited on top of it. (This is domesticated geology.) The clay will still be in suspension. Carefully mark the outside of the second jar at the top of the silt layer, as this line will often be difficult to discern once the clay has settled. After eight to twelve hours, the clay will have come out of suspension, and the water should be clear. The thickness of each layer should correspond to the proportion of each material.
The goal of this test is to determine whether the soil, once the unsuitably large particles are removed, will contain enough clay to work as a plaster. Too much clay is no problem, as sand is ubiquitous and cheap, and can always be added. The key is to consider the relationship between the two jars. Look at number two, first. Ignoring the sand in this jar, what is the ratio of clay to silt? This material should be at least 80 percent clay; any less and it will probably not make a strong plaster. Now look at jar number one. The required ratio of clay/silt to sand will vary, according to the ratio of clay to silt. If very little silt is present, a mixture as low as 15 to 20 percent clay/silt to sand might work. If the percentage of silt is higher, as much as 40 percent may be required to make a strong plaster.
LEG, WORM, AND POTTER TESTS
If the results of the jar test look promising, then pass some more material through the window screen, and try some of the tests described above. If these look good, it’s time to move on to mak-ing samples!
Preparing Earth Plasters
Earth is the most common wall material on the planet, and there are as many mixes for mud plaster as there are earth-building cultures. We can safely say, therefore, that no recipe is set in stone. We will concentrate our attention on the two types of clay plaster that have been used successfully over straw bale walls. These are clay-sand and clay-straw plasters.
Clay and Sand Plaster
In most traditional recipes from Europe and North America, an earthen plaster is composed of a ratio of 1 part clay to 2 to 4 parts sand, the percentage varying between coats and with the specific qualities of the clay. One or so parts of chopped or milled straw is usually added to the mix, to give it some tensile strength. The sand forms the main structure of the plaster, grains ranging in size from or inches and down for the backing coats, to inch or less for the finish. It is crucial that the sand be sharp, and that particle size be well graded (see “Sand,” in chapter 10, for a more detailed explanation).
This bench was built during a workshop with Michel Bergeron. It looked good after completion, but over the following winter the plaster started to crumble, and we realized that the binder in our mix was silt, rather than clay as we had presumed.
The ratio of sand to clay depends upon the stickiness and expansiveness of the clay, and also on the percentage of silt in the mix. When the “clay” portion of the mix is actually a combination of clay and silt, more will have to be used, as the silt does not help with binding. What happens when the percentages of the various components are off?
Too much clay: The plaster will have a tendency to crack severely, taking on the look of a dry lake bed. The base coat can have a greater proportion of clay to help it stick firmly to the bale substrate; excess cracking in this coat is acceptable, as it will not usually telegraph out through the succeeding layers.
Too much sand: The clay binder will not hold all the sand particles together and as a result the plaster will be very brittle when dry. Finish coats will tend to have a maximum sand content, to prevent cracking.
Too much silt or organic matter: This makes a crumbly, powdery, unstable mix that will not be able to take even the normal amount of abuse, will be especially vulnerable to water, and will decay with time. Some silt in the base coats would be acceptable, but it should be avoided completely in finish work. If your local material is silty, buy some bagged clay for the finish coat. It won’t cost much.
Clay and Straw Plaster
In their work with the “Casas que Cantan” owner-built housing initiative in Ciudad Obregon, Mexico, Bill and Athena Steen (and their local collaborators) came up with a plaster recipe that seems to work particularly well over straw bale walls. This plaster is based on a clay slip about the consistency of a milkshake, one part of which is mixed with 4 or so parts of chopped straw, and, optionally, 1 or 2 parts of sand. The resulting plaster has an incredible tensile strength, and works extremely well as a fill coat, applied in a thick-ness of ½ to 2 inches over the entire wall. Paul has used this mix as the base coat on several projects (see “Making Bale Buildings More Like Traditional Buildings,” later in this chapter) and has found it to work extremely well.
The main advantages of straw plaster, over a more traditional sand plaster, are that it can eas-ily be applied with bare hands (this is especially true of the no-sand version), that it can be built out to substantial depths without slumping, and that it is very sticky and malleable, and therefore easily worked into the face of the bale. Because the straw resists perfect smoothing, this plaster forms a rough surface, leaving an excellent key for succeeding coats, be they of clay or lime. This is an ideal material for building sculptural features into the face of the wall. The drawback to this method is that mold can be a serious issue in humid climate.
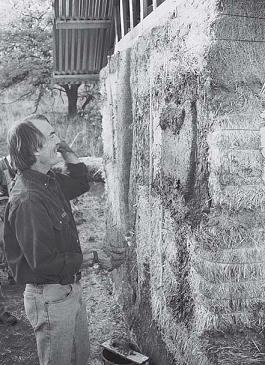
Bill Steen tosses handfuls of straw-clay plaster at a bale wall.
With its excellent surface for sculpting, straw-clay plaster receives an international vote of approval.
Making Clay Slip
If you are working with a relatively pure clay, it is often best to mix it into a thick slip, and then mix this material with the sand and/or straw. By making the slip in advance, the clay is allowed maximum time for the adsorption of water, resulting in a stickier, more plastic material that requires less mixing time.
With some clays, it is possible to break up chunks with a shovel or sledgehammer (depending on dryness), add water, and after a very short time begin mixing. Mixing can be done by hand in a tub or bucket, with a joint compound paddle on a drill (in a bucket), or in a mortar mixer. The drill method is typically the most effective of these, especially if the clay is allowed to soak for a half hour or more, in the bucket, before drill-ing begins. This process requires a heavy duty drill and someone to operate it, resources that are not available on every site. Some clays that retain dry pebbles through this process will respond to being soaked for several days; this can take place in buckets, or on a larger scale in a pit built of bales and lined with polyethylene. The most stubborn of clays, in which the outer particles in any given ball will expand upon contact with water, sealing access to the interior, will either need to be milled to a powder before water is added, or mixed in a mortar mixer, with some sand.
Sand is effective at grinding down pebbles of clay, exposing successive layers to water. It is a slow process, and therefore often not practical on a site with only one mortar mixer, which needs to remain constantly engaged in produc-ing plaster. (This is a second benefit of the drill method; while the mixer is churning up a batch of plaster, the mix master can be producing slip for the next batch.) For soils that already contain a high percentage of sand, it is really the only mixing option. Luckily, sand-clay soils (as opposed to purer clay deposits) usually tend not to chunk up as badly as the purer clay. Where they do, soaking may be an option. If neither direct mixing nor soaking works with a clay soil, you’re probably out of luck. When none of these techniques will work smoothly with a pure clay, you can always use a hammermill.
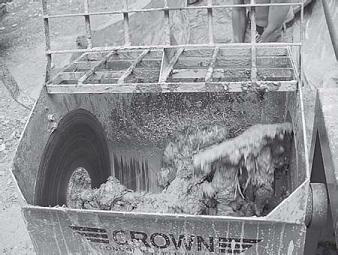
The Hammermill
After the mortar mixer, this is the clay plasterer’s most useful piece of equipment. A hammermill is one of several varieties of chpper/shredder. It has a horizontal shaft with lots of steel bars hung from it. When the shaft rotates, the bars swing around and utterly destroy anything that you might put down the throat of the machine, except for wet clay. It makes sand out of rocks (you should not think we are advocating making your own sand), but wet clay sticks to the side walls and eventually causes the whole thing to gum up. A good hammermill has interchangeable exit screens; the size of the openings determines the fineness of the grind. Milling clay requires a screen of about inch.
From conversations with local farm equipment rehabilitators, Paul is fairly sure that such a machine is available on a larger scale, which would run by power take-off from a tractor. The ideal mill would grind dry clay as quickly as a person could shovel it in; this would substantially reduce the labor time involved in making usable material of stubborn clays.

Grinding clay in a hammermill.This machine mills straw, as well.
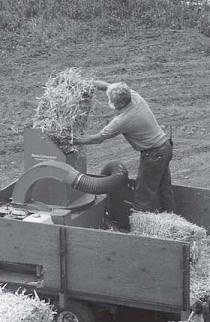
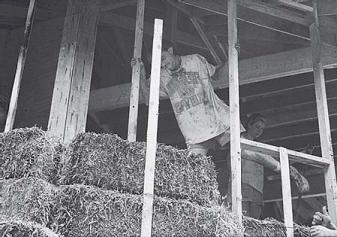
The “bale chopper” ate forty bales in an hour and a half.
Chopping Straw
Straw can be chopped in many ways: manually with an axe, a machete or any similar hand tool on a chopping block; with a chain saw; with a weed whacker in a bucket; or with a lawnmower, inside a plywood trough. These methods typically reduce the straw to a length of two to three inches, and partially demolish the tubular shape. This straw is suitable for the base coats of sand plasters, and for clay and straw plaster. For finish work, it should be sifted through 1/4- or even 1/8-inch screens.
A hammermill makes the best straw, especially for finish work. Using a  -inch screen, it consistently mills to a length of 1½ inches or so, and completely breaks down the tubular structure, result-ing in strips of fiber that are each less than
  inch wide. Paul has also come across a machine specifically designed for this job, known, of course, as the “bale chopper.” This baby chews up whole bales and spits out chopped straw. It is probably designed to make bedding for animal stalls, but we found it in the possession of a local landscape company that uses it for mulching. It processed forty bales in an hour and a half! The finished product was not so fine, 2 to 3 inches long and maybe half of the tubes broken up, but this worked fine for a straw-clay plaster.Where we needed smaller fibers, the hammermill was able to process this chopped material much faster than long straw.
Additives
Over the millennia, many different compounds have been added to earth plaster to induce various properties. We recommend that you begin with the basics, and add these materials only if they turn out to be necessary. Samples are the best way to determine whether your plaster will need such bolstering.
WHEAT PASTE
Wheat paste is a protein-based glue, which helps bind plaster, and can also make it harder. It is most conveniently (and rather inexpensively) purchased as wallpaper paste. We have had success with it at a ratio of one-half of a 6-ounce bag per two 5-gallon buckets of very stiff clay slip. This material wants to be mixed with water in advance, a gallon or two for a half bag of paste. It should be mixed thoroughly (with a joint-compound mixer or large whisk) and allowed to sit for a half-hour or more before it is incorporated into the mix. This allows time for the paste to fully hydrate.
Wheat paste can also be made from white flour, or better yet, from high-gluten flour. Remember, it’s the protein that we want here, so carbohydrates, bran, and the like, do nothing but provide food for unwelcome guests. Flour is even less expensive than wallpaper paste, but it must be boiled for twenty to thirty minutes, with constant stirring to prevent sticking, before it is ready to use. The flour should first be whisked into some cold water (this prevents clumping), then mixed into the boiling water. It’s ready when it turns thick and gelatinous.
MANURE
Manure (usually from cows or horses) has been a plaster ingredient for longer than anyone can remember. In some exterior plaster recipes, it makes up more than half the total volume. Compounds in the manure add weather-shedding and binding qualities, and the fine fibers act in a manner similar to straw, providing tensile strength to the plaster. Fresh manure can be added directly to the mix, while dry material must be soaked in water first. Fresh material is believed to be better at imparting water proofing qualities. We have had good luck substitut-ing manure for as much as half the straw in a mix, and others have used it to entirely replace the straw.
LIME STABILIZATION
Lime stabilization of clay plaster is a very exciting field, which has been underexplored by straw bale and other natural builders. The lime actually combines chemically with the clay particles, ultimately forming a harder plaster with improved water resistance. The addition of lime also creates an environment that is less hospitable to mold growth. Here’s how Stafford Holmes and Michael Wingate describe the process:
Lime will react with the clay minerals—mainly kaolinte, montmorillonite, and illite—in two ways. The first and most important reaction is for the calcium in the lime to substitute for the exchangeable alkali elements such as sodium and potassium that exist, together with water molecules, between the thin sheets of the alumino-silicate crystal structure of the clay minerals. . . . The clay particles will no longer remain in their original dispersed state, but will flocculate to form coarser agglomerates of clay.The soil therefore becomes less plastic, will absorb less moisture, and compacts more readily to give an increased compressive strength.
With time, another and more important reaction occurs in which the calcium combines chemically with the silica and alumina in the clay mineral. This follows dissolution of the clay minerals and their recombination to form complex aluminum and calcium silicates. It is a low grade of pozzolanic reaction, for which moisture must be present, and which can be accelerated by a higher temperature. The product is a bind-ing material, comprising insoluble calcium sili-cate and silica gel. This binding material is also the main mineral produced when water is added to Portland cement. In addition, and in conjunction with the above reactions, carbonation occurs. The lime reacts with carbon dioxide from the air to form carbonated elements. [See chapter 11, “Lime Plaster.”]
There is an optimum quantity of lime for each soil. Generally it ranges between 3 and 10 percent, tending to be at the middle of this scale for soils containing an optimum clay fraction.7
Clearly, experimentation must be carried out on any given site, in order to determine the appropriate ratio of lime to other ingredients. Paul has had good luck using lime to stabilize materials whose silt content would otherwise have been too high to make a suitable plaster. In the two cases where he has used this technique, samples (between 3:1 and 4:1 clay/silt:lime) yielded a binder that, when mixed with sand and milled straw, produced a very hard plaster.
Mixing Clay and Sand Plaster
If slip has already been produced, this is added to the mixer, first. If you are beginning with a dry clay, allow it to soak in water at the bottom of the mixer for a few minutes (or as long as an hour, depending on the clay), before starting the motor. If you crank up the machine before ad-sorption begins in earnest, some clays will ball up on the paddles, and refuse to go into suspen-sion. If you are working with a sand-clay soil, it is also best to allow this to soak for a while, before disturbing it. Once the machine is going, put the sand in. If the slip is very stiff (such that it is almost a solid), you will probably need to add water, to combine the clay with the sand without overworking the mixer. Still, you will want to keep the mix fairly dry at first, so the sand can help grind up any unsoftened pebbles of clay. Wheat paste, manure, lime, or any other additives should be added next. As the clay, sand, and any additives combine, straw can be added by handfuls, and water as needed. It’s a good idea to soak the straw for a half-hour or more before adding it to the mix; this reduces the amount of water it will take on later, making the moisture level of the finished plaster more stable. Lime-water is a good soaking medium, as it will inhibit any mold spores that might be on the straw.
Once the materials look like they are becom-ing homogeneous and the water level is about right, the mixer can be left alone for fifteen or twenty minutes, to thoroughly combine the various ingredients into a sweet-smelling mud pie! All of this can also be done in a wheelbarrow or mason’s mixing boat, of course. This is honest work, but a lot of it. If having a mixer on site through the entire project is not an option, rent-ing one at the beginning of each week and stock-piling material might just be the best bet.
A mortar mixer makes short work of combining plaster ingredients.
Mixing Clay and Straw Plaster
Mixing straw plaster is very easy. Clay is made into a slip as above, though it is much thinner, about the consistency of a milkshake. Chopped straw is added to this material at a rate of four or five parts per part of clay. A part or two of sand can also be included, though it is optional. The ideal ratio will yield a product that is sticky and holds together well, but does not have a lot of extra slip globbing out of it. A few samples will make the desired consistency quite clear. make the des
This material can be mixed very quickly in a mortar mixer. Mixing by hand, in a mortar tray, is also quite practical. During a work party, large volumes of plaster can be cranked out by people in bare feet. The technique is to alternately stomp and lift the material, adding clay or straw as necessary to achieve a properly sticky mix.
Samples
The ideal plaster mix will vary from site to site, so the only way to really get a sense of your local materials is to begin working with them. If the project is on a tight schedule, it is best to begin making samples several weeks before the plaster phase will begin in earnest. This will allow time to be sure that the materials at hand will work suitably, and to refine mixes over several generations of experimentation.
With any given soil, the most efficient sam-pling method is to make four or six initial patches, using varying ratios of sand to clay. These can be put on at a half-inch of thickness or so, and evaluated for cracking and hardness, as they dry. The ideal mix will strike a balance between stickiness (imparted by the clay) and excessive cracking (caused by too much clay). What you are looking for is the leanest mix that will still bond well to the bales, and still hold together.
Mixing straw plaster the old-fashioned way, by foot! Volunteers of all ages enjoy this, and can rapidly produce large volumes of plaster.
Clay content has a major effect on cracking. The mix used on the upper half of this wall was too rich; the bottom half is about right.
Once the proper ratio of sand to clay has been determined, it may be worth trying one or more of the additives described above, to determine whether they make any noticeable improvement in the plaster. We’ll say it again: If the basic ingredients do the job, then don’t mess with them. Additives are only necessary if the fully dried samples show the basic mix to be too powdery, or not hard enough.
Application
Preparing different mixes for different coats is a common practice in earth plaster work. The base will probably want to be a bit richer in clay (or be clay-straw) in order to achieve a better bond to the bales. It will probably also be looser than the succeeding coats, which makes it easier to work into the straw. Both of these factors will cause cracking, but that’s acceptable, as the surface is usually scored anyway to create a better key for the second coat. The only real rules for the first coat are that the plaster wants to be worked into the straw, and that it doesn’t want to be crumbly, when dried. Finer details can wait until later coats.
It is usually best to apply the first coat by hand, to a thickness of 1/4 to 1/2 inch over the entire wall. The fingers are used to work the material between chunks of bale, while the heel of the hand is used to create pressure, forcing the plaster into the wall. Trowels also work on very uniform bales; on hairier bales the many protruding straws tend to fling the material back in your face, or to get between the plaster and the wall, preventing a good bond. One great benefit of using the clay-straw plaster for the first coat is that it is much easier on the hands. Rubber gloves are also an option, though they reduce dexterity a bit. Depending on the mix, it may be possible to fill deep hollows with this coat, though it is often easier to spread a thin layer over the entire wall, and then come back with a fill coat of dryer material, to bring up the low spots. Clay-straw plaster is superb for this filling job. Once it has stiffened, the first coat, and any subsequent fill-ing, is scored or scratched.
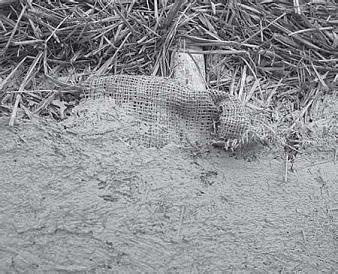
Burlap can be used to reinforce clay plaster where it spans over wood.
The best working consistency for the second coat is described by Michael Smith in The Cobber’s Companion. “When you grab a handful [of the mix], it should stick more to itself than to your hands, but when you throw it against a cob wall [or the first coat on a straw bale wall] from a distance of several yards, most of it should stick. If it doesn’t behave this way, adjust the mix by adding more water (if it doesn’t level itself in the wheelbarrow), more sand (if it sticks to your hands), more clay (if it doesn’t stick to the wall), or more chopped straw (if it is too loose).”8 This coat can be applied by hand or trowel. Those who are skilled with it will find the trowel faster at this point. When this coat has stiffened, it is rubbed down with a sponge, creating a somewhat coarse texture for the finish to adhere to.
The finish usually receives a finer sand than the backing coats. Sifting through window screening works well. The finish coat is applied, usually by trowel, in a layer of 1/8 inch or less. Any straw included in this mix should be finely milled. As the material dries, the surface should be remoistened and retroweled, as many times as is necessary to prevent cracking. The finest, most closed surface is produced by polishing with 3- or 4-inch-diameter plastic circles, cut from yogurt containers. Careful polishing brings clay to the surface, creating a leathery look. Colored clays and mica can also be added to this coat. The combination of mica, straw, and the supple clay finish make for a very beautiful wall.
LINSEED OIL
Linseed oil can be painted onto a finished exterior surface, to increase its weather resistance to some extent. Presumably, it also reduces the vapor permeability. Justin Idoine did this on a less-protected portion of the Kirk/Starbuck house, and it seems to have worked well.
LIMEWASH
Limewash can be applied to a clay plaster in much the same way as it is applied to a lime plaster. Successive coats may be required to achieve a uniform shade. (See “Limewash,” in chapter 11.)
The finish coat can be worked with a sponge to remove a layer of clay and bring out the golden flecks of chopped straw.
ALIS
An alis is an interior clay paint, made of wheat paste, colored clay, and sometimes masonry pig-ments. As in a finish plaster, milled straw or mica can also be added, for relief. “Fill a clean, 5-gallon bucket  full with flour paste and add water until it is about
  full. Add about 3 quarts of powdered clay, 1 quart of fine sand, and 1 or 2 quarts of mica powder. According to Carole (Crews, of Gourmet Adobe, Taos, N.M., who made up this recipe), ‘These proportions may be varied depending on the wall surface and the clay used. Use more sand if the clay cracks, less if a finer alis is preferred.’ Keep adding and stirring until the mix is the consistency of medium cream.”9 The alis is then painted onto the wall. When it is nearly dry, it can be rubbed with a soft sponge to polish the surface and expose the straw and mica.
Making Bale Buildings More Like
Traditional Buildings
Early in this chapter we mentioned cob, light clay, and an old Danish technique of wrapping straw around hazel sticks. All of these techniques have three things in common. First, the straw is kept in intimate contact with clay, which seems to modify swings in moisture levels and assist in the passage of vapor. Second, exterior coatings were typically of lime, wood, or clay, all of which are quite vapor permeable. Third, deterioration began on a large scale only with the introduc-tion of modern, supposedly maintenance-free finishing materials, such as cement stucco.
The major difference between bale walls and these other walls is that in the latter, the straw is everywhere in contact with clay. Since clay seems to act as a preservative to straw, this may turn out to be a very significant difference. Thus, the big question is, is there any way to get some clay into the bales? Eric Thompson and Naoto Inoe at the Foundation for Biodynamic Shelter in Skyler, Virginia, have made some efforts in this direction. They have dunked bales of straw into a tank of slip, while sucking the air out of the bales through a tube attached to a powerful fan. They found that they could control the depth to which the clay was drawn into the bales, and generally aimed for 4 to 6 inches of penetration. Since all surfaces of the bale are coated in this method, bales so prepared would have to be dried before being stacked into the wall, to prevent mold from forming deep inside the wall, along the wet joints. They could be bonded together with a thin bead of clay mortar along each edge. A fringe benefit of this technique is that the bale surface becomes much more rigid. This makes plastering easier, and reduces the thickness of plaster required to form a solid wall.
Another variation on this idea comes from Tom Rijven, who is originally from the Netherlands, but now works in France. Tom dunks the inner and outer faces of his bales in a clay slip before laying them into the wall. This practice provides four benefits. First of all, it allows clay to work into the outer inch or two of the bale surface, where it can protect the straw from moisture damage, and increase the bale’s resistance to airflow. Second, because some clay laps 2 or 3 inches around the corners of the bales, it glues the bales together, forming a very solid wall. Third, it creates a surface to which the first coat of plaster can easily bond. Fourth, it protects the bales from any weather that might blow in before the wall is plastered.
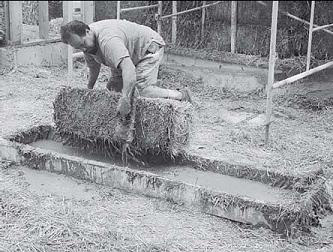
Justin Idoine dunks each face of a bale in a trough of wood and plastic, then trowels off the extra slip.
Installing slip-covered bales can be a muddy job.
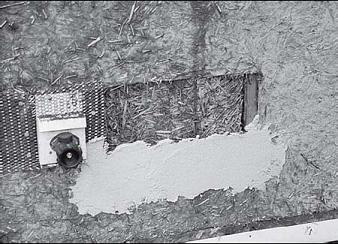
A contemporary approach modeled on historical techniques. Bales were dunked in clay slip, then plastered first with clay-straw and secondly with lime plaster, subsequently to be limewashed. Note the structural stud, and the flashing and wire lath around the spigot’s mounting block.
In our latest projects, GreenSpace has been working toward a wall system modeled on his-torical straw building techniques. The first step, borrowed from Tom Rijven, is dipping the bales. They can be left to dry before they are installed, or they can be placed in the wall while still wet. Immediate placement allows the bales to be glued together, and small gaps filled, by the slip; the drawback to this method is that it is very messy, eventually resulting in a floor that is rather slippery and somewhat dangerous. A better method may be to allow the bales to dry, then glue them together with slip.
The next layer is the base coat of plaster ½ to 1 inch thick. We tend to work with a clay-straw plaster when the application will be by volunteer hands, and with a clay-sand-straw plaster when the material will be pumped on by a machine. At this point, the bale wall has been made somewhat like a light-clay or cob wall. It is very stiff, as the thick earthen plaster dries quite hard. It is now ready for its protective coating. We have generally used ½ to inches of lime-sand plaster (applied in 2 or 3 coats) followed by limewash, inside and out. The interior could easily be finished in clay, as could the exterior, on the right site.

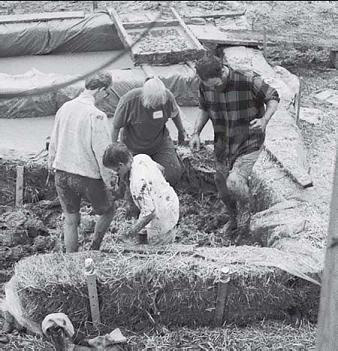
“Tanks” made of bales and plastic sheeting contain slips of two different consistencies—a thin one for dipping bales and a thick one for plaster—and also delineate an area for mixing the plaster.
This system is quite vapor permeable. It also possesses a tremendous potential for drying any water that might appear by condensation at the back side of the exterior plaster. The highly ab-sorptive clay and lime plasters will readily draw in this water, and then give it off by evaporation to the outside air. This method also maximizes the value of volunteer labor; if the group is large enough, the base coat plaster can go on as the bales go in. People of all sizes, ages, and skill levels find jobs suited to them; nobody is standing around trying to figure out where they fit in, and everybody feels useful and has a great time. The bales are immediately protected from weather and fire. When the professional plasterers show up to trowel on the lime, they find a solid base that accepts plaster quickly, and which doesn’t spring it back in their faces. They are very happy to leave their goggles at home.
Of course, this being bale construction, we certainly have some questions about this system. It’s messy. It’s labor intensive, though less so than the traditional systems on which it is modeled. As Rob Tom has pointed out, from a structural point of view, it is not clear that putting the harder lime over the softer clay is a good idea. It is a general rule in construction that as layers move outward from the load-bearing structure, rigidity should decrease, and flexibility increase. (This is exactly the problem with cement stucco; it is more stiff and brittle than most substrates, so as they move, it cracks.) There is no way to know, in advance, whether this arrangement will cause problems. If so, whether they manifest themselves in five years, fifty years, or five hundred years depends on maintenance, the site, whether some jerk comes and nails vinyl siding over the whole thing, and who knows what else. We also don’t really know whether dipping or dunking the bales introduces enough clay to rep-licate the characteristics of traditional walls. It would seem that the areas nearest the wall surfaces will experience the most moisture activity, but we do not yet have enough testing data to know for sure. Maybe the bales should be filled to their center with clay. This would require a lot of material, and would significantly reduce the Rvalue of the wall. It might also be difficult to dry bales that were so thoroughly saturated, not to mention the difficulty of moving them around.
Clay has a long history in cold-climate construction. Those who can separate quality from grandeur will recognize it as a glorious history. More than any other two materials, clay and straw just go together. Clay binds and preserves straw, while straw gives clay structure and tensile strength. Where good materials can be found, earth plaster can be a tremendous complement to straw bale walls.
1 . Excerpted from Franz Volhard, Leichtlehmbau: alter Baustoff— nueu Technik (Light straw-clay construction: old material—new technique) 5th ed., C.F. Muller (1995).
2 . Ibid. p. 51.
3 . Ibid, p. 54
4 . Michael G. Smith, The Cobber’s Companion, 1998 (Cottage Grove, Ore: Cob Cottage Co.). p. 23.
5 . Ed Crocker, “Staw Daubs: How Fiber Cuts Erosion in Mud Plaster” The Last Straw, no. 9 (spring 1995) : p. 11.
6 . William Bryant Logan, Dirt: The Ecstatic Skin of the Earth. (New York: Riverhead Books, 1995), pp. 130–131.
7 . Stafford Holmes and Michael Wingate, Building with Lime: A Practical Introduction (London: Intermediate Technology Publications, 1997), p. 153.
8 . Michael G. Smith, The Cobber’s Companion (Cottage Grove, Ore.: Cob Cottage Company 1998), p. 115.
9 . Ibid, p. 120.