Through frigid winter cold and sweltering summer heat, we expect our homes to keep us comfortable within a fairly small temperature range—around 72 degrees F (22 degrees C), give or take a few degrees. You can’t change the weather, but there are factors you can control. A well-insulated, leak-free structure is the first goal. Properly sized and well-maintained heating, cooling and ventilation systems are close seconds. Energy-smart personal habits rank right up there, too.
For starters, see if your local utility company offers an energy-audit service to find out exactly where your home is losing heat. Or do your own audit by moving through your home and searching out all drafts, cold (or hot) surfaces, improper humidity and stale air.
When you’ve located your home’s problem areas, get busy. This chapter is full of home-comfort ideas. Many low-cost, energy-saving jobs can be done in a weekend, with tools and skills you have, and provide measurable improvements. If you’re remodeling or adding a room, seize the opportunity to make energy-saving improvements.

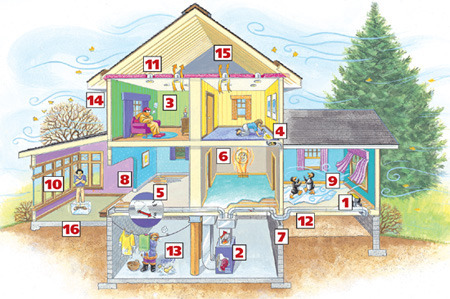
1. Register is closed.
2. Furnace filter is dirty or clogged.
3. Drapes and furniture block heat flow.
4. Ducts are clogged with debris.
5. Ductwork dampers are improperly adjusted.
6. Thermostat is located in a warm area.
7. Duct has too many bends or is undersized.
8. Too few or no cold-air returns exist.
9. Windows are drafty.
10. New addition is designed with too many windows.
11. Attic or walls are poorly insulated.
12. Floor over crawl space is cold.
13. Basement is cold.
14. No air chutes, or poorly installed ones, to vent the roof cavity.
15. Heat loss occurs due to leaks.
16. Floor is uninsulated.
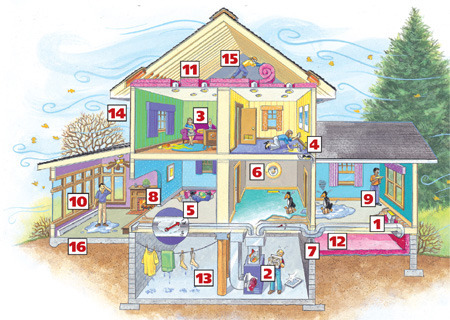
1. Open heat registers.
2. Change the furnace filter.
3. Rearrange furniture and modify drapes to increase airflow.
4. Remove or vacuum debris as far as you can reach.
5. Adjust dampers for optimum airflow.
6. Close registers in close proximity to thermostat or move thermostat.
7. Install larger or more ducts, when possible.
8. Shorten door slightly or add louvers to increase airflow.
9. Caulk and weather strip; add storm windows.
10. Add supplemental heat, like electric baseboards and gas fireplaces.
11. Increase attic and wall insulation.
12. Insulate crawl space area.
13. Insulate rim joists and basement; add more heat registers.
14. Install attic vent chutes to reduce attic moisture.
15. Seal air leaks to attic.
16. Encourage better air mixing with ceiling fan; add pad and carpet.
The capacity of an insulating material to resist heat flow is called its R-value. The higher the material’s R-value, the better it insulates. Recommended R-values differ for various parts of your home and vary by region. Check with your local utility company or insulation manufacturer’s literature.
Type |
R-Value per Inch |
Cost |
Pros & Cons |
|
R-3.0 to R-3.8 |
Low |
Pros: Easy-to-install batts press into place; made in standard stud and joist widths; available with Kraft paper facing attached. |
|
R-2.2 to R-4.0 |
Low |
Pros: Better coverage in irregular spaces and over trusses; can be poured or blown into walls. |
|
R-5.2 |
High |
Pros: High compressive strength; great performance underground. |
|
R-3.8 to R-4.3 |
Medium |
Pros: Lowest-cost among foams. |
Sprayed urethane foam |
R-6.0 to R-7.3 |
High |
Pros: Makes a tough, seamless thermal and vapor barrier; covers irregular surfaces; adds structural strength |
Note: To convert R-value to metric RSI values, divide the R-value by 5.679.
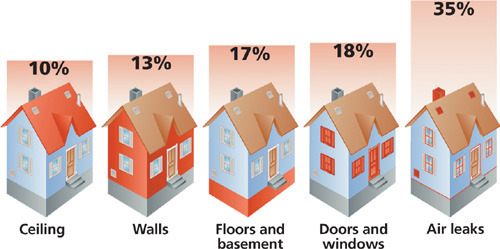
To improve your home’s energy efficiency while making the best use of your time and money, take a look at where heat loss typically occurs. Focus first on the simple steps that provide the biggest benefit. Air leaks—especially those in the attic—are responsible for the majority of a home’s heat loss, followed by poor-performing windows and doors. Next on the list of energy wasters is heat loss through floors, foundations and basements. Since walls account for only about 13 percent of the heat loss in a house—and retrofitting wall insulation is difficult and expensive—this area may be lower on your priority list. Curbing heat loss through the ceiling is often the easiest approach, because attic insulation is inexpensive and easy to add.
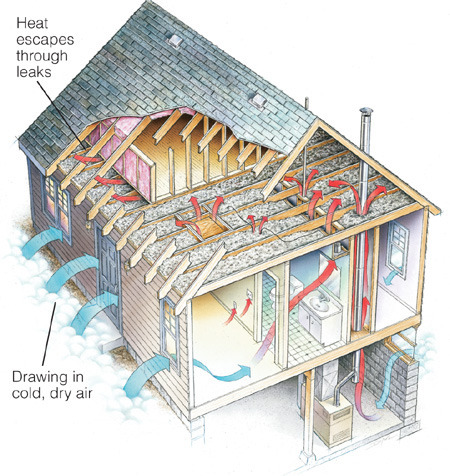
The typical house has many small air leaks in the ceiling. Their area, when combined, can be equivalent to the size of a small chimney. The drafting this creates pulls heated air out through the attic and sucks cool air in from around windows and doors. This is also a primary cause of ice dams. Plumbing vents, open soffits, recessed lights, spaces between joists and the attic hatch are all areas that can benefit from sealing and insulating.
Properly installed wall insulation makes your home more comfortable year-round. In the winter, your home will be warmer with more pleasant humidity levels and, in the summer, your air conditioner will work more efficiently.
The best time to insulate is during construction or remodeling when you have clear access to the wall framing and gaps around windows and doors. Fill the cavities completely and seal all potential leaks. Do it right! Even small gaps can reduce energy efficiency by 25 percent. Note that fiberglass can irritate skin, eyes and lungs. Wear a long-sleeved shirt, long pants, safety goggles and a two-strap dust-particle mask rated for insulation.
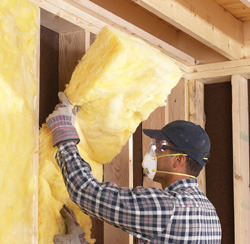
Push batts into place and completely fill cavity, leaving no voids or gaps. Batts should be cut slightly longer and wider than the space to ensure a tight fit.
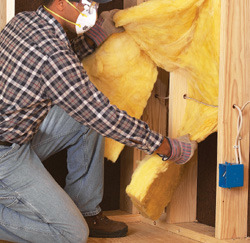
Split batts to fit around both sides of electrical wiring. Pull fiberglass batts apart at the desired thickness, press into place and rejoin.

Cut batts for installation by pressing a straightedge down on the batt at the desired width and use it to guide the utility knife. Remember to cut batts slightly oversize.
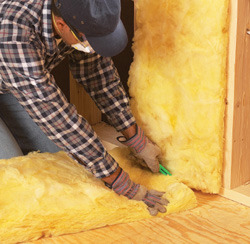
Cut batts in place by positioning the top and cutting to length against the bottom plate. Cut slightly long to ensure a tight fit.
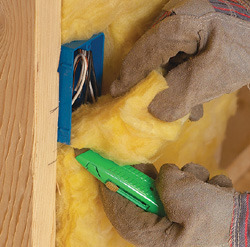
Split and cut to fit tightly behind electrical boxes. Slide the back half behind the box. Then closely cut the front half to fit tightly around the box.
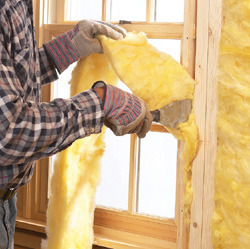
Insulate around windows and doors by snugly tucking fiberglass into the back of the cavity, and then filling the remaining space with low-expansion foam.
Vapor retarders, often referred to as vapor barriers, limit the movement of warm, moist air into the wall cavity, where it can lessen the effectiveness of insulation and can promote mold growth.
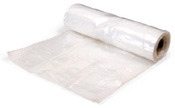
Plastic sheeting. Use 6-mil plastic sheeting to cover unfaced fiberglass batts. Overlap and tape seams to reduce air leakage. Fire-retardant and reinforced varieties are available.
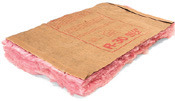
Kraft-faced paper. Kraft-faced paper batts allow you to secure batts in individual stud cavities using a staple gun. It must be covered for fire-prevention purposes and isn’t as effective or seamless as plastic sheeting.
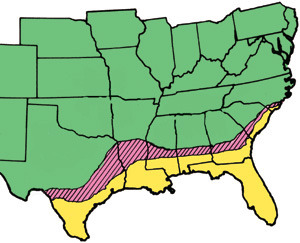
Vapor barrier zones. The green states and all areas north and west are cold climate zones that require an interior vapor barrier. Pink indicates fringe climates, and yellow indicates humid climates where an interior vapor barrier is not needed.
If your older house lacks wall insulation, you can add it by blowing it in. The basic procedure is to drill holes in walls, blow in insulation and plug the holes. Because of the mess, it’s often better to work from outside. Some pros remove a single strip of siding and blow the top half of the stud cavity (it will usually stay put) followed by the bottom half. Others will drill two or more sets of holes. If your home is brick, you’ll have to work inside. Stucco is hard to patch, so consider an inside job there, too.
Cellulose paper treated with a fire retardant is a common loose-fill insulation. It’s sold at lumberyards and home centers, which will usually rent or lend you a blowing machine. When blown into walls at the proper density, cellulose can reduce air leakage as much as 33 percent. Make sure the product you buy is code-approved.
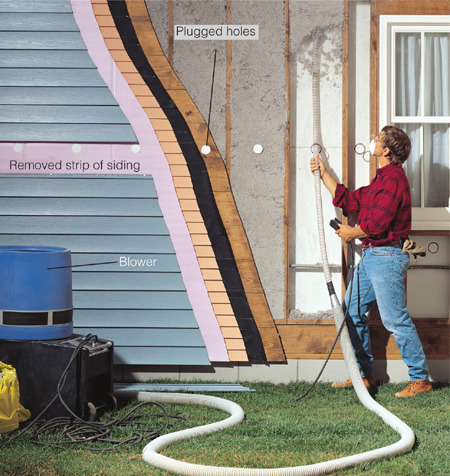
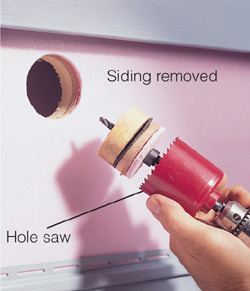
Drill access holes. Using a hole saw, cut holes in each stud cavity. Some pros remove a single strip of siding in the middle of each wall, blow the top half of the cavity first and then blow the bottom half. Others bore holes at the top and midpoints and blow insulation downward.
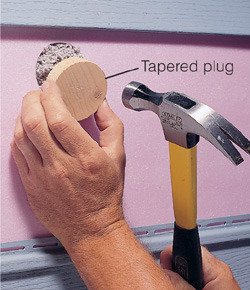
Plug holes. Tapered plugs are available in standard sizes to match your hole saw. If possible, choose cork or plastic plugs; they fit and seal better than wood. Tap in plugs until they’re flush with the siding or wall sheathing. Caulk them in place for a tight seal.
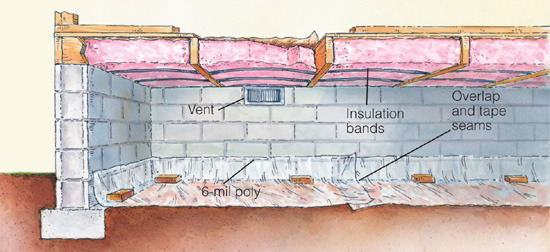
To warm your feet, you can wear thicker socks, but a more permanent solution is to insulate crawl spaces. The standard procedure is to insulate ceilings of unheated crawl spaces and walls of heated crawl spaces. (Check with your building inspector about venting.) If you’re using Kraft-faced batts in cold climates, install them with the paper up against the floorboards. Cut each batt oversize for a tight fit; then secure it in place using friction-fit insulation bands or staple wire mesh (chicken wire) or house wrap to the bottom of joists.
To ensure the effectiveness of insulation and prevent mold growth, keep it dry. Ground moisture is the main source of humidity in crawl spaces, so cover dirt floors with 6-mil plastic sheeting. Overlap generously and tape seams; hold edges down with bricks, long boards or other heavy objects.
It’s dusty, dirty work, but sealing and insulating your attic is an extremely effective way to cut your energy bills. The average attic has gaps around pipes, chimneys, walls and light fixtures that waste your energy dollar.
For little money and a day’s labor, you can seal these gaps. To find leaks, set a fan in an open window, aiming it to blow inward and sealing it tightly with tape and cardboard. Close all other doors, windows and ducts leading to the outside. Turn the fan on high to pressurize your house. Go into the attic to feel for drafts and look for insulation being blown around.

Vermiculite Insulation Alert
Some attics have vermiculite insulation—a lightweight, pea-size, flaky gray mineral—which may contain asbestos. Don’t disturb it unless you’ve had it tested by an approved lab.
Put on protective gear and clothing, then seal any large open joist cavities and the areas above stairwells, soffits and dropped ceilings.
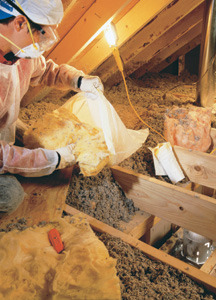
1 Cut a square piece of unfaced fiberglass batt, fold it into a plastic garbage bag, punch a few holes on the cold side, and stuff it into the top of each open soffit cavity.
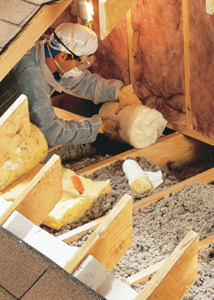
2 Cut a larger rectangle of fiberglass batt, place it into a garbage bag, fold and stuff it into the joist space under kneewalls.
Insulate around furnace or water-heater flues to stop air leaks. The pipe gets hot, so install a heat shield to protect the insulation.
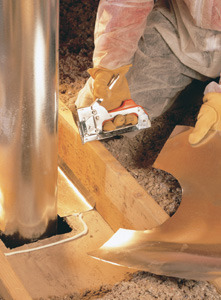
1 Cut aluminum flashing to fit around the flue, press it into a bead of latex caulk and staple it down. Overlap all the seams generously.
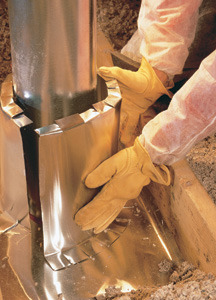
2 Create a collar to prevent insulation from contacting the flue: Cut slots and bend tabs in. Wrap the collar around the flue and staple it down.
Seal openings around plumbing vent pipes and electrical wires with expanding foam. It works well, but it’s messy stuff, so wear latex gloves.
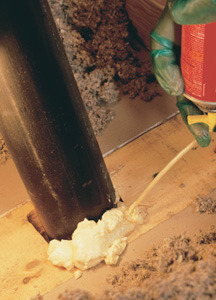
1 Stuff strips of fiberglass batts into gaps as backing. Then follow the directions on a can of expanding foam to fill the gap completely.
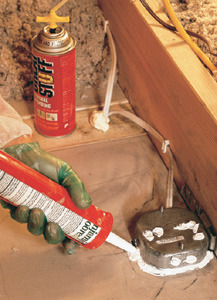
2 Fill wiring and plumbing holes with expanding foam. Caulk around electrical boxes, fill the holes with caulk and replace insulation.
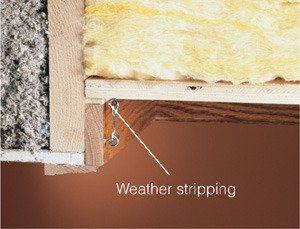
Seal the attic hatch door by installing foam weather stripping and using hook-and-eye fasteners to hold the door airtight.
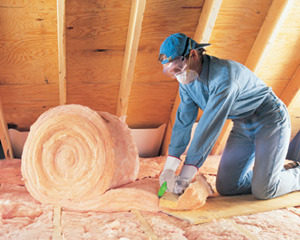
Fill joist, rafter and stud spaces with fiberglass batts. In cold climates, install overlapping layers.
Good ventilation helps dissipate attic moisture and hot air in spring, summer and fall. It curbs mildew growth and structural rot, extends shingle life, prevents ice dams and, in summer, reduces cooling costs. To create airflow, place vents in the soffits or low on the roof to let fresh air in and add vents at or near the ridge to let air escape. Most building codes require 1 sq. ft. (.09 sq. m) of screened venting for each 150 sq. ft. (14 sq. m) of attic, ideally split half and half between lower and upper roof vents.
Use air chutes over exterior walls to keep the airflow pathway open, and in winter, make sure roof vents aren’t blocked by snow (use a snow rake). In sunny climates, consult your local building inspector about adding a radiant barrier of shiny foil to the rafters’ bottom edges to keep the attic cooler.
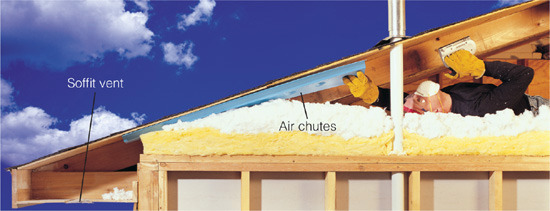
The standard way of providing lower roof ventilation is with soffit vents. Rectangular vents are easy to install anytime; continuous soffit vents are most easily installed during new construction.
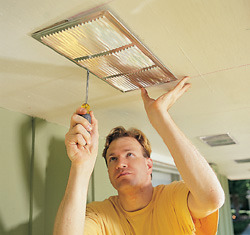
Rectangular vents. Drill starter holes, cut an opening between rafters using a jigsaw and attach the vent with self-tapping screws. Angle the louvers toward the house to block snow and debris—and to look better, too.

Continuous vents. These allow an even ventilation along the eaves but are difficult to retrofit in existing soffits. Be sure to leave a strong strip of plywood on both sides, at least the width of your palm.
Attic heat rises and escapes through roof vents. The best time to add them is during reroofing, but they can be added any time to improve ventilation.

Roof cans. These are best for hip and pyramid roofs with a short ridge line. To install, cut through the shingles and sheathing, slip the tops of the vents under shingles, nail them down in front and seal by cementing shingles over the side flanges.
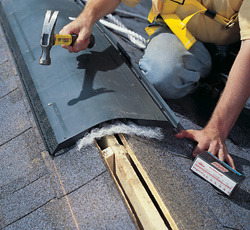
Ridge vents. These blend into the roof, distribute ventilation evenly along the ridge and are frequently used for vaulted or cathedral ceilings. To install the type shown, cut and remove a strip of shingles and sheathing along the ridge, nail down the vent and cover it with ridge cap shingles.
Gable and turbine vents can be less effective than other methods at consistently moving air. Both depend on wind speed; gable vents are affected by wind direction, too.
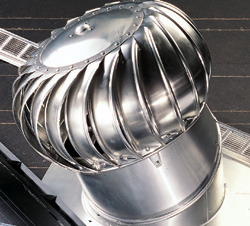
Turbine vent. Mount these near the roof’s ridge, on the least-visible side. When the wind blows, they spin and the turbine acts as an exhaust fan. They can be very effective but have a limited effect on hot, still days, and unbalanced units can be noisy.
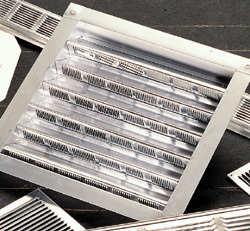
Gable vent. These are inexpensive and they leave the roof uncluttered. However, they are poor performers, as they tend to circulate air only near the gables. They work much better when used to supplement other vents.
If your bathroom fan is noisy, underpowered or broken, you can install a new one yourself. If access isn’t a problem, the job can be completed in less than a day and requires only basic carpentry and electrical skills. While you’re at it, upgrade to a new-generation fan—they’re more powerful, more efficient and virtually silent. This job will reward you every morning with a quieter bathroom and a clear mirror.
You’ll need basic hand tools, a power drill and a jigsaw. The basic steps include creating a larger opening, installing or retrofitting ductwork and installing the roof or wall vent.
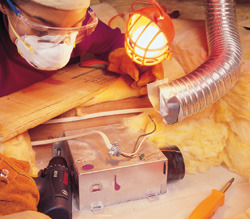
1 Turn off power at the main panel. In the attic, unscrew the fan housing, detach old cable and disconnect wiring. Remove tape, clamps or screws securing the ductwork.
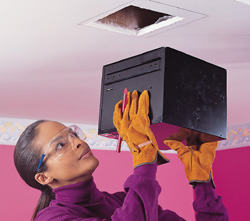
2 Hold the new fan housing in place. Check to make certain there are no obstacles. Cut or enlarge the opening with a drywall saw. Screw the housing to a joist and caulk seams.
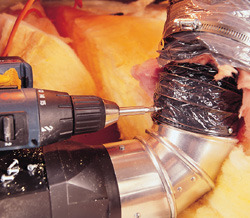
3 Screw an elbow to the fan’s exhaust port using self-tapping screws. Attach flexible ductwork to the elbow. Use insulated ductwork to reduce noise and condensation.
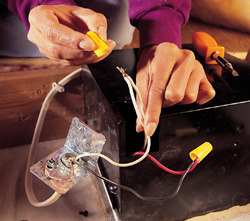
4 Remove the cover plate at the electrical splice box and pull out the wires. Twist the wires together and secure them with connectors according to the manufacturer’s directions.
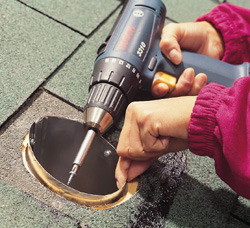
5 Enlarge the existing vent hole if required and pull the duct’s end about 3/4 in. (2 cm) above the roof surface. Secure it to roof sheathing with sheet-metal screws and caulk around the gap.
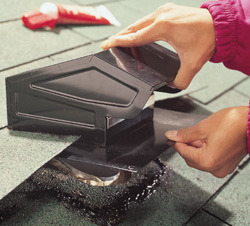
6 Slide the new vent cap under shingles to check the fit. Remove, apply roofing cement to shingles where nailing flanges will rest and nail in place.
Vented kitchen-range hoods exhaust smoke, grease, heat, odors, combustion products and moisture generated by cooking. By installing a combination range hood/microwave oven, you can unclutter your counters and clear the air.
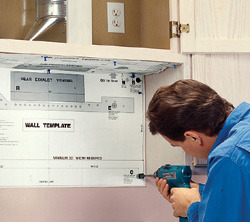
Drill mounting holes by following the directions and template supplied with the new vent. Electrical and duct connections are similar to bathroom fans.

Beware of Backdrafts
Studies show that the combination of a well-sealed, energy-efficient house, a high-volume kitchen exhaust fan and certain combustion appliances can be dangerous. Powerful exhaust fans can move so much air that they can pull dangerous furnace and water heater combustion gases down the chimney and into your living space. Two possible solutions are to provide a dedicated combustion air supply to the furnace room or install sealed combustion equipment that brings in its own combustion air.
A defective dryer vent can allow drafts, bugs and mice into your home. In less than an hour and at a reasonable price, you can replace it with a sturdier unit that is easier to clean, seals out vermin, reduces the risk of fire and saves energy.
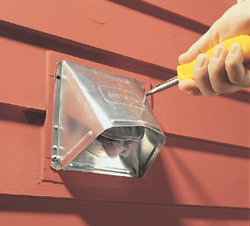
1 Remove the old vent by unscrewing the four corners. Pull out the vent far enough to access the hose clamps and loosen them. Vacuum lint from the old duct.
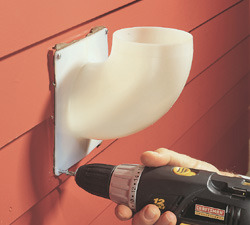
2 Connect your old ducting to a metal duct collar and insert that into the bottom of the new elbow. Caulk the new elbow mounting base and screw it to the house with galvanized screws.
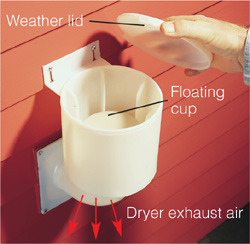
3 Slide the vent body onto the elbow and screw it to the house with galvanized screws. Drop the vent closer, or cup, onto the vent body and add the weather lid. Clean every 90 days.
Tightly built homes can experience problems with lingering odors, stale air and high humidity, resulting in damaging condensation. Generally, these problems can be solved with ordinary ventilation or by cracking open a window. If you live in a moderately cold climate with high utility rates, and conventional methods don’t solve your problem, your home may be a candidate for a heat-recovery ventilator (HRV), also called an air-to-air heat exchanger.
Compared to opening a window, an HRV provides continuously controlled ventilation. Heat from stale exhaust air is used to temper the incoming air so fresh air enters your home closer to room temperature; about 70 percent of the heat is transferred. The air streams don’t mingle or contaminate one another, but weave and bypass one another through a series of chambers. Operating costs are about the same as those for a 100-watt lightbulb.
Most HRVs are designed to ventilate the entire home. Typically, four to eight supply-and-return ducts connect to the HRV. The ideal system exhausts air from moisture-laden rooms, such as the kitchen, bathrooms and laundry room, and dumps the fresh air into a closet, hallway or other space where the cooler air and increased movement won’t affect comfort. Adding this kind of whole-house ventilator can be expensive and is normally done by a professional.
It is also possible to install a small, plug-in, single-room HRV on an exterior wall or in a window. Some models include multiple filters that clean the air as well. For the most effective air mixing, install a wall-mounted unit high on an outside wall, but avoid mounting it up against the ceiling. Keep it away from thermostats and seating areas, in a spot where some fan noise and cool air movement won’t be a bother.
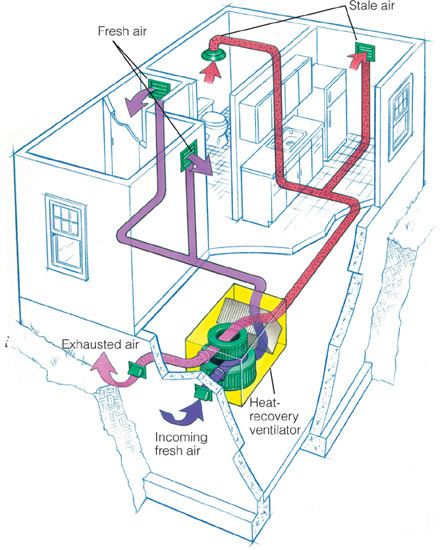
How a heat-recovery ventilator works. In an HRV, one fan exhausts stale, moisture-laden indoor air while another draws in fresh outside air. Both air streams pass each other, separately, through a core of many thin metal or plastic surfaces. As it passes through the core, exhaust air from the house transmits its heat through core walls or fins to the cooler outside air coming in. A heater can be added to a supply duct in some systems to further warm the incoming air during severely cold weather. In summer-operating mode, HRVs work in reverse. A drain carries away any condensate.
Heating systems convert fuel or energy into heat and distribute it throughout the house. Regardless of the type, they all do the same job: keep our homes warm and comfortable. Heating systems differ mainly in the fuels they use and in the ways they generate and distribute the heat.
The most common whole-house systems are warm air and hot water. In both cases, air or a liquid is heated in a furnace or boiler and sent to the various parts of the house through ducts, pipes or tubes. The heated air in a warm-air system is blown into the rooms through ducts and registers. In hot-water systems, water or steam heats radiators, convectors or even the house’s floors, ceilings or walls; these in turn give off their heat to the rooms. The furnace of a warm-air system and the boiler in the other systems have a burner that can be fueled by gas, oil, propane, butane, electricity, even wood or coal, depending upon their availability and the local preference. Other systems heat the home entirely by electricity, as in electrical radiant heat and baseboard convectors.
Heat pumps extract heat from outside air and pump it indoors. Solar panels, fireplaces, wood-burning stoves and space heaters are also used. Generally, these heat sources provide auxiliary heat to supplement a whole-house system, although they may be all you need in warmer climates where only occasional heating is required.
One or more thermostats control a whole-house system. The thermostat may also perform other functions, such as controlling the forced-air system blower fans or hot-water system valves.
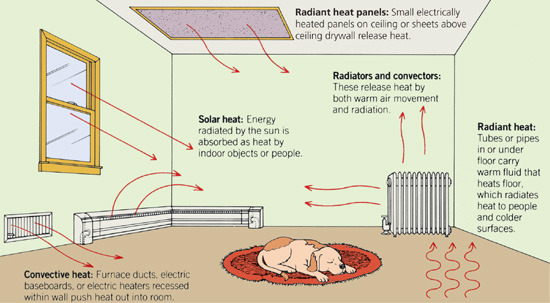
System |
Heat Delivered By |
Means of Distribution |
Most Common Fuels |
Pros |
Cons |
Warm air |
Forced convection blower |
Natural gas, fuel oil, propane, or electricity |
Ductwork from furnace, electric heaters mounted on exterior walls or recessed into interior walls |
Can also filter, humidify and air-condition. Rooms heat quickly. Wall heaters are inexpensive. |
Large ductwork required. Fans can be noisy, can circulate mold and other allergens. Require regular-filter changes. |
Hot water |
Convection, or convection and radiation |
Natural gas, fuel oil, propane, or electricity |
Pipes and convectors or radiators |
Efficient and quiet. Holds steady temperatures. Boiler can be small. |
Slower temperature rise. Radiators or convectors take floor or wall space. |
Steam |
Convection, or convection and radiation |
Natural gas, fuel oil, propane, or electricity |
Pipes and radiators |
Efficient and hot. Warms rooms quickly. Boilers can be small. |
Can be noisy. Radiators can be hot to the touch. Boiler systems are tricky to maintain. |
Radiant heat |
Radiation, or radiation and convection |
Gas, oil, propane, butane for floor systems; electricity for ceiling systems and exposed panels; wood and coal for stoves |
Pipes or tubes in or under floors, wiring within plaster or above wall-board, panels mounted on ceilings or walls, firebox and flue pipe for stoves |
Quiet, even heating. Embedded systems make floors pleasantly warm. Hydronic systems can use most-efficient energy source or fuel. |
Slow to warm up and cool down. Expensive to install initially. Embedded elements or pipes are very difficult to repair. |
Forced-air systems are relatively inexpensive to purchase and easy to maintain, making them one of the most popular types of whole-house heating. Because their design includes air ducts throughout the house, you have the option to add whole-house air-conditioning, humidification and air cleaning to the system.
A forced-air system contains five main elements: a furnace, a network of distribution ducts, registers on walls or floors, an exhaust flue and a thermostat. A motor-powered blower circulates air through the system. A few old furnaces still use gravity circulation, which relies on the natural convection created by the buoyancy of hot air and the fact that cold air falls. These systems have larger ducts and no blower.
Homes with ductwork can leak noticeably more air and require more heating and cooling energy than homes without ductwork. The reason is that forced air creates pressure differences within the house that can draw in outside air, force air out through cracks in the house or pull outside air in through cracks in the house, all of which waste heat.
To make sure your warm-air system works efficiently, clean or replace the filter regularly and follow the furnace tune-up steps on the following pages. Also, be sure your system has enough return ducts—at least one per level. In addition, seal all seams in ductwork, and insulate ducts in unheated spaces. For improved comfort, adjust dampers and registers to balance heat distribution. Some furnaces and thermostats allow you to run the blower constantly at a low speed. It costs more for the electricity to run the blower, but your house will be more comfortable and evenly heated, and your burner may run less.
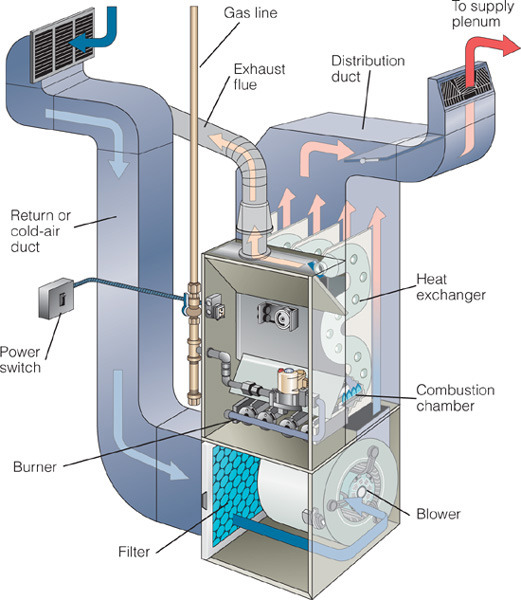
How a furnace works. The thermostat sends a signal to the burner located inside the combustion chamber, which heats the outside of the heat exchanger. When the heat exchanger gets hot, the blower starts and pulls cool air into cold-air registers, through the cold-air return ducts, to the furnace. The return air goes through a filter to keep the blower clean. The air then passes through the inside of the heat exchanger, where it is warmed, safe from the burner combustion gases, which exit through the exhaust flue. Warm air is carried through the supply plenum and distribution ducts to warm-air supply registers in rooms.
Top-of-the-line furnace models can operate at very high levels of efficiency—95 percent or more. Their design features a second heat exchanger to draw usable heat from the exhaust gases. The cooler exhaust gas can then be routed through a small vent, often of PVC pipe, through an outside wall—no conventional chimney is required. They also have a sealed combustion chamber and draw air from the outside, rather than inside. The downside is that the initial cost is greater and extra water-condensate from the exhaust must be piped or pumped to a drain.
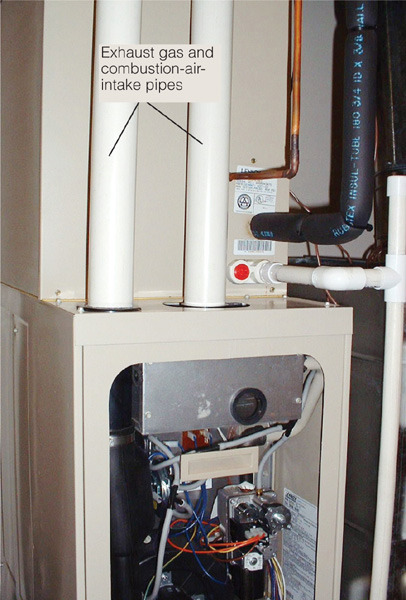
When it comes to furnaces, an ounce of prevention truly is worth a pound of cure. Simple maintenance will cut heating bills, prolong furnace life and make your home warmer and safer. To help prevent furnace trouble, follow these simple steps that will keep it in top shape. This maintenance operation normally takes an hour or two and costs only a few dollars, which is pretty inexpensive insurance. Put it on your calendar each year, at least a month before the heating season begins.
Caution: Turn off gas and power at the furnace before you start.
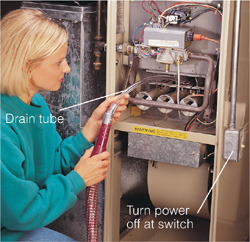
Vacuum burners and furnace base. With electrical power and gas off, vacuum the burners and the furnace base. To reach way in back, tape a drain tube to the vacuum hose.
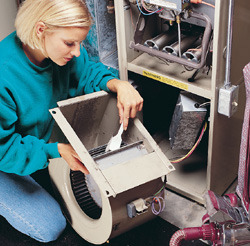
Clean blower blades. Remove bolts holding the blower in place, lift the blower out and use a vacuum and small brush to clean the blades. Take care not to stress wiring or disturb fan blade counterweights.
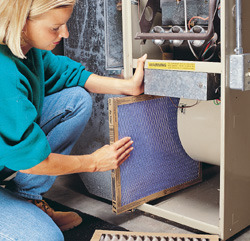
Change filter. Change the filter every one to three months. Inexpensive fiberglass filters will protect the blower and blower motor; check the manual before installing more restrictive, higher-efficiency filters.
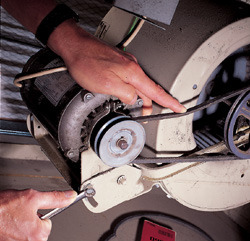
Inspect belt. Belts need periodic adjustment or replacement. Inspect for cracks or frayed areas. Tension a new belt so that it deflects about the thickness of a finger.
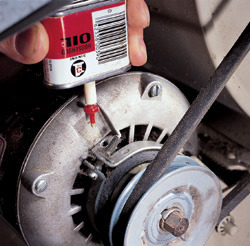
Oil bearings. Some older furnaces have two motor and two blower shaft bearings that need oiling every year. Clean around oil caps, remove and apply two to three drops of oil—but no more!
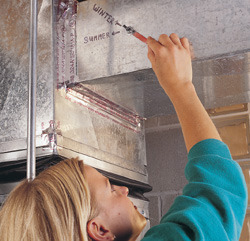
Adjust dampers. If your ducts serve both heating and air-conditioning duties, they may have marked settings for seasonal adjustments. Rotate the damper handles to adjust.
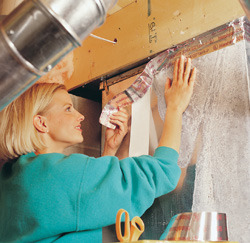
Seal leaky ducts. Special metal tape is available for sealing leaky ducts. High-temperature silicone works, too. Return air ducts are especially important to seal.

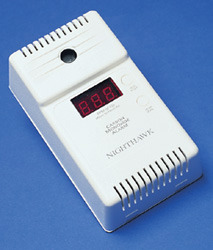
CO Alarms—Get One!
Install an approved carbon-monoxide alarm near sleeping rooms on each floor and test them regularly. They are inexpensive, so don’t wait. Carbon monoxide is a colorless, odorless gas sometimes produced by malfunctioning flues and fuel-burning appliances, such as oil-, gas- and wood-burning furnaces, stoves and fireplaces. If carbon monoxide spills into your home in high enough concentrations, it can be fatal. Plug alarms into outlets or directly wire them into the electrical system. Position alarms on walls, away from drafts and solvents.
Round ductwork comes in preformed but unconnected sections. You can cut it before snapping the edges together or cut it in the round, as shown below. Gloves are a must when cutting, shaping or installing any ductwork.
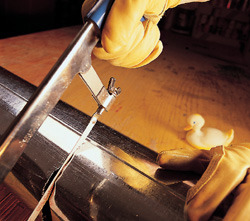
1 Start the cut by making a slit with a screwdriver (see below) then cut the perimeter with aviation snips. Cut through the seam with a hacksaw, as shown here.
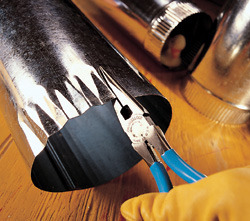
2 You can create a male-end by using a specialized crimping tool or a needle-nose pliers with a series of pinches and light twists.
Heated air from the main furnace supply duct is usually delivered by way of smaller round ducts. Create the opening in the main distribution duct for the takeoff collar, as shown below.
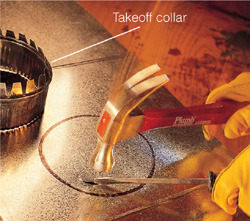
1 Lay out the collar’s size and location. Drive a screwdriver blade inside the area to be cut out and twist it to make room for your snips.
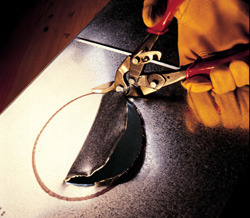
2 Use your left- and right-hand aviation snips to cut the hole. Carefully follow the circle so the collar fits snugly.
Two specialty items can help solve some tricky forced-air heating problems. A duct booster is an add-on fan that helps deliver extra air to rooms located far from the furnace. Always turn off power before making electrical connections. For difficult-to-reach or unusual connections, use flex duct.
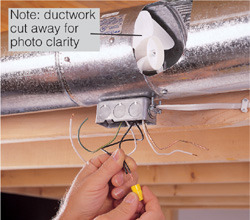
Duct booster. Locate unit as near as possible to the cold room. You can wire it to a manually controlled switch or furnace’s blower-fan wiring. Shut off power while working.
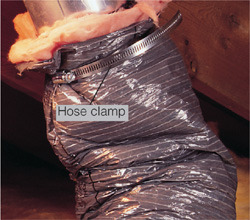
Flex duct. For short runs of up to 5 ft. (1.5 m) or to connect ductwork in tight spaces, insulated flex duct is the ticket. You can attach it securely with hose clamps.
Which Filter?
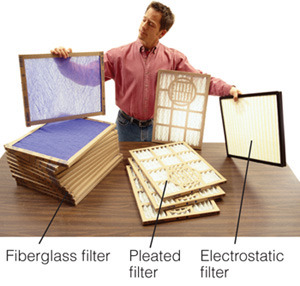
Walk down the aisles of your local home center or hardware store and you’ll find furnace filters ranging in price from under $1 to $40 or more. What’s the difference?
The least expensive woven fiberglass filters screen out some pollen and mold spores but mostly keep dirt and debris from damaging your blower motor.
Accordion-like pleated filters have a larger surface area, meaning they can capture smaller particles for longer periods of time without impeding the airflow of your furnace.
The more expensive, higher efficiency electrostatic filters can filter out and magnetically attract contaminants, including bacteria, dander, odors and smoke particles. Consider these if you have household members with allergies or asthma.
Many filters carry a minimum efficiency reporting value (MERV) rating, which basically indicates their effectiveness. The higher the MERV rating, the higher a filter’s effectiveness.
Remember, changing filters isn’t only a heating-season chore. Many blower motors work at a higher speed in air-conditioning mode than in heating mode, which means you should clean or change your filters more often in the summer. A clogged filter will make both your furnace and air conditioner work harder and less efficiently.
In a hot-water, or hydronic, heating system, water is heated in a gas, oil or electric boiler and circulated through pipes to radiators or their modern counterpart, convectors, located in the rooms. Radiators and convectors are designed with many fins, folds or tubes that add up to a large surface area, which allows them to give off considerable heat to the room. Various piping arrangements are used, as illustrated below.
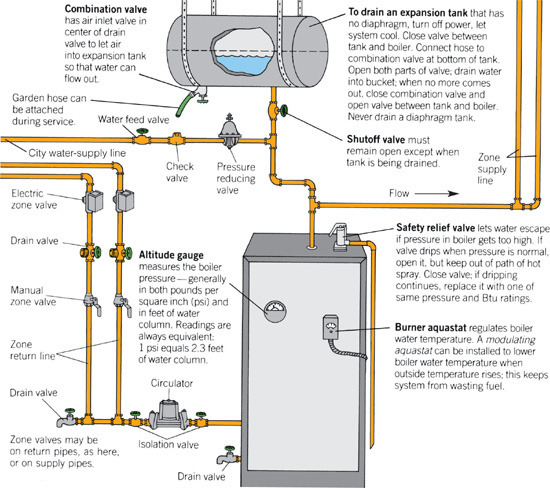
A pump called a circulator drives the water through the pipes and convectors whenever the thermostat calls for heat. It’s usually positioned near the boiler in the return line; however, it’s better positioned on the supply line, pumping away from the expansion tank. This allows for a quieter system and fewer air-binding problems with the radiators and convectors. A flow-control valve keeps the water from flowing when the pump is not operating; this keeps the system from overheating the convectors. Some older systems have no circulator but rely on the principle that water expands and becomes lighter when heated. The lighter hot water rises through the pipes and replaces the cooler, heavier water, which is pulled down through the return pipes by gravity.
Water expands when it is heated. Without room for expansion, pressure could build up rapidly, causing the safety relief valve to open. To prevent pressure buildup, an airtight expansion tank is installed near the boiler. As water in the system heats, it expands safely into the tank. If over time the expansion tank fills, excess water escapes through the safety relief valve on top of the boiler. Older types of tanks must be drained when they get too full of water; newer tanks have an elastic diaphragm separating the air from the water and should be drained only by a boiler specialist or plumber.
Improving efficiency. To reduce heat loss, insulate any pipes that run through crawl spaces or other unheated areas. To help balance heat throughout the house, adjust shutoff valves on individual radiators or convectors (no cost) or install separate thermostatic valves (more expensive).
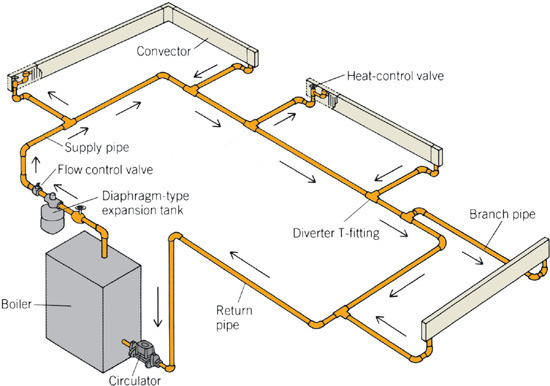
One-pipe system. In a one-pipe system, the supply pipe carries hot water past the convectors or radiators and back to the boiler. Convectors connect to the supply pipe by short branch pipes. When a convector’s heat-control valve opens, a special T-fitting diverts some water from the main line into the branch line. If a convector is shut off, hot water bypasses that branch and proceeds to the next one. The single-pipe system is most often used in small- and medium-size houses.
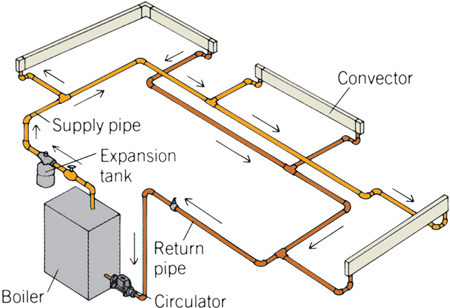
Two-pipe system. Best for large houses, this system uses one pipe to carry hot water to convectors or radiators and another to return water to the boiler. Cooler return water flows through a separate pipe, not through the convectors, so the supply water remains hotter as it travels to the far ends of the system.
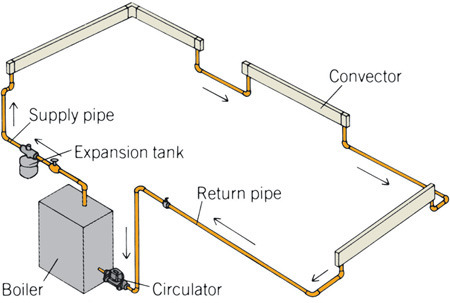
Series-loop system. In this simplest hot-water system, one pipe runs from the boiler through each convector or radiator (in one end, out the other) and back to the boiler in an uninterrupted loop. You cannot turn off one convector in the loop without shutting them all off, but a system may have two or more loops.
To save energy, a hot-water system can be divided into zones. This lets you make occupied rooms warm while keeping others cooler. Typically, a two-zone system combines living areas, kitchen and bathrooms in one zone and bedrooms in another.
Zones are created by running branch lines off a main supply pipe to each desired zone and adding thermostatic zone valves in each branch to turn the hot-water supply on or off. One boiler and one circulator (or two of each in large houses) are used with multiple zone valves. Alternatively, a separate circulator can be used for each zone, eliminating zone valves.
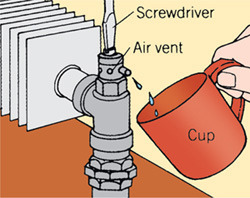
Trapped air prevents hot-water flow to a radiator or convector. Open an air vent (some require a special key) until water spurts out; catch it in a cup. Be careful, it’s hot! Start with the convector at the lowest level if more than one is cool.
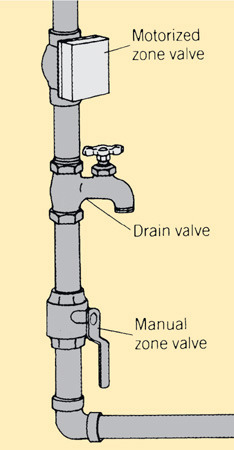
Valves. When venting a convector, open its zone valve, if any, by turning it manually or by setting the thermostat in that zone to well above room temperature. After venting air from the system, check the boiler pressure. Add water, if necessary, to restore pressure to 12 pounds per sq. in. (psi) or recommended pressure. If a water feed line has a manual valve but no automatic fill valve or pressure-reducing valve, close the manual valve when the recommended pressure has been reached.
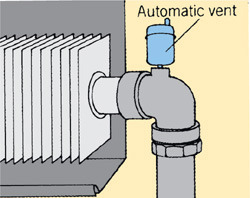
An automatic vent valve slowly releases air from a convector as the system fills with water, ensuring good flow and even heat. The vent should be kept clean. If it drips water, replace it.
Metal convectors and radiators give up part of their warmth by radiation, but most of the heat comes from convection-air circulating past the hot metal. Generally found only in older systems, radiators are made of cast-iron tubing. Convectors, much lighter in weight, are either grilled cabinets or long, low baseboards. Inside they contain thin-wall copper or steel tubing surrounded by metal fins that increase the surface area. You can replace one or more radiators with convectors, as in the steps below, but use dielectric fittings to connect pipes of different metals. Make certain the replacement convector’s output rating matches that of the radiator you’re removing.
Vent all the convectors or radiators in the system to ensure maximum efficiency. Never place anything on or in front of a convector or radiator; it could obstruct the airflow. If you paint a convector or radiator, use standard paint; metallic paint will substantially reduce the heat transfer. Dust also cuts down on efficiency; vacuum convectors and radiators regularly. Straighten bent convector fins with needle-nose pliers and be sure that the convector covers are not bent or misaligned.
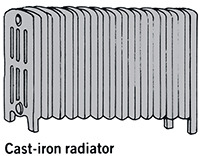
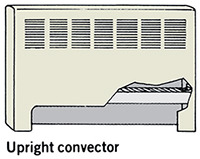

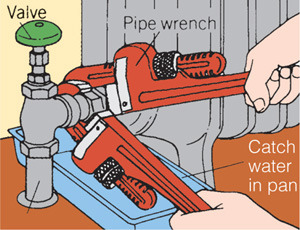
1 Turn off system and let cool. Close feed valve and open radiator valves. Attach hose to boiler drain valve, open radiator vent and drain water. Use pipe wrenches (or propane torch, if soldered) to remove radiator.
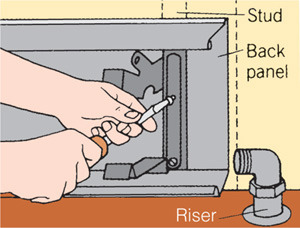
2 Align baseboard convector with riser pipes and align convector’s back panel so it can be screwed directly into studs. Mark position for back-panel screw holes, drill pilot holes and screw into place.
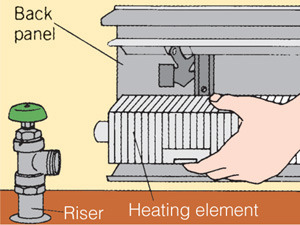
3 Install the finned heating element on back panel. Clean riser threads using a wire brush; wipe with a clean rag and wrap with pipe tape. If riser is too far away, add needed extensions and fittings.
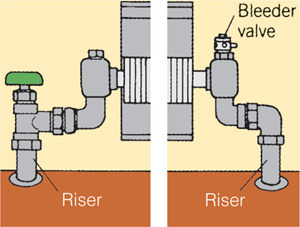
4 Make plumbing connections. Open inlet valve, attach convector cover, turn on water and flush out boiler. Close boiler drain valve; fill boiler. Turn system on and wait a bit; then vent system.

A New Face in Radiators
The two most common complaints about radiators are that they take up too much floor space and that they’re less than attractive. Fortunately, there are radiators on the market that address both complaints.
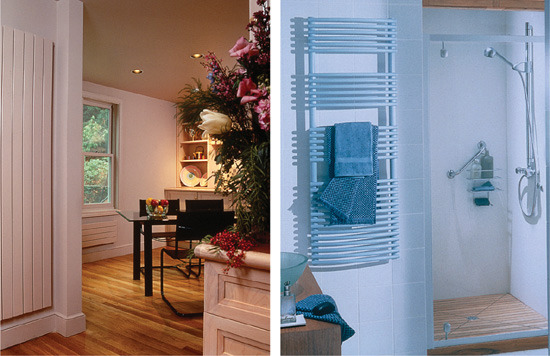
The wall mounted, vertical panel radiators (left) are available in a wide variety of colors and sizes and are ideal for entry-ways and other rooms where floor space is limited. The European-style towel radiators (right) provide both even heat and the luxury of warm, dry towels and bathrobes. These hydronic units can be used to replace fin-tube or cast-iron radiators and are compatible with most closed loop, forced-hot-water heating systems. Electric versions are also available.
Most electrical and plumbing systems can accommodate the additional demands of a room addition, especially if that room is something other than a kitchen or bathroom. But heating systems are another matter. In many cases furnaces and boilers are sized to handle the demands of the existing house and not much more.
Even if the heat plant does have the extra capacity to handle an addition, getting the heat there can present more obstacles. Heat ducts are large and best run without a lot of twists and turns, radiator pipes can freeze if run through uninsulated spaces. So looking at alternatives is wise.
If it’s a family room, office or bedroom addition, consider installing a gas fireplace. You’ll need to install a gas line and chimney, but you’ll get ambiance and heat in one shot. If it’s a bathroom, laundry room or entryway with a tile floor, consider installing in-the-floor electric resistance heat (see here). It requires fishing just a single wire from your circuit box to the new addition.
The following are a few other options and considerations:
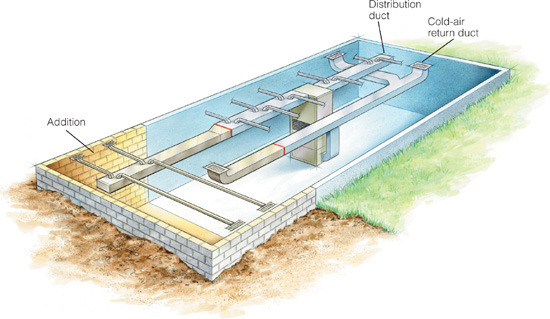
If the furnace and blower have excess capacity and the main trunk line runs near the addition, you can tap into it. However, calculating a furnace’s excess capacity and balancing the system are activities best left to a pro. The system must remain balanced so you may also need to install an additional return-air duct.
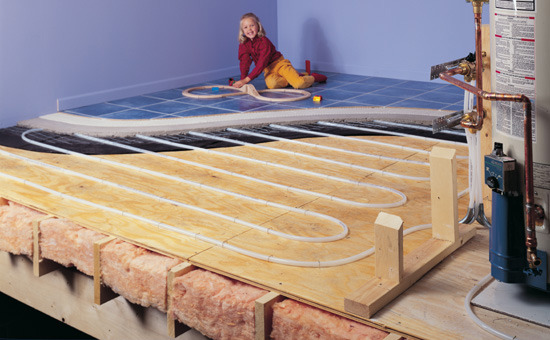
If you have space for a dedicated water heater (never mix domestic hot water with heating water since this can breed dangerous bacteria) or your boiler has excess capacity, consider adding a hydronic radiant system. Heat is delivered via warm water or fluid pumped through a system of mixing valves, water pipes or tubing embedded in a lightweight concrete or dry-tamped mortar. The system is quiet, there are no heat registers or baseboards to take up space, and heat is delivered to what are usually the coldest body parts—your feet. Check local codes; water heaters are not approved for this use in some areas.
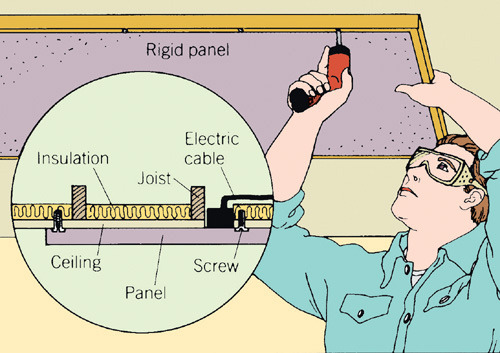
If you can fish wires from your existing circuit box to your new addition—something you’ll almost surely be doing anyway—you can consider a wide range of electric-resistant heat options. The radiant heating panels shown here come in standard sizes and mount on any flat surface—so they’re easy to add to an existing ceiling or wall without major remodeling. Rigid panels are typically made of fiberglass insulation board with an aluminum frame and a textured surface, and contain a heating element that is charged by either 120 or 240V. Follow manufacturer’s recommendations for installing and wiring a thermostat designed for your panels.
Steam systems heat water in a boiler until it vaporizes and rises through pipes to radiators and convectors that radiate heat into the room. When the steam hits the cooler radiator surfaces, it condenses and the water runs back to the boiler. As steam rises in the pipes, quick-release air vents let air escape from the main steam lines and individual radiators. As the steam advances, pressure forces the air out of the vents. (Change a vent that spits or drips water, leaks steam or fails to open.)
Steam systems come in two basic types. In a two-pipe system, the steam flows through one set of pipes and the condensate, water, returns through another. In a one-pipe system (like the one shown below), the steam and water travel through the same pipe in opposite directions.
When water is heated to steam, pressure builds in the boiler. Check the pressure gauge just after the boiler switches off. If it is far above the recommended pressure setting (generally 2 psi or less), have the boiler pressure control replaced immediately. Boilers also have a pressure safety valve that will open before an unsafe pressure level is reached. Test yours regularly. Another safety feature: The low-water cutoff turns off the burner if the water in the boiler falls below a safe level. Release about a quart of water from the low-water cutoff once a week. Do this while the burner is operating to make sure that it shuts off. Be careful, though, the water is very hot.
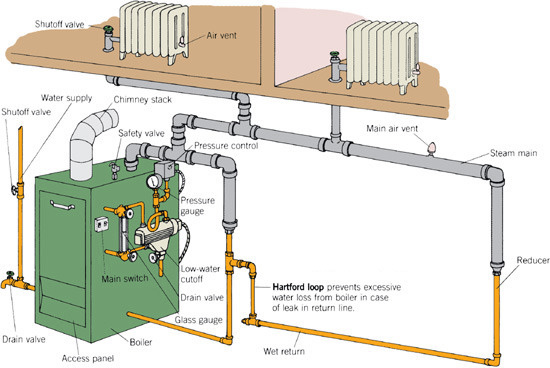
In one-pipe system pipe must be big enough to accommodate both water and steam, and it must slope downward to drain water back to boiler. Water trapped in pipe will block incoming steam, causing it to condense before reaching radiators. Resulting temperature differentials cause metal to expand and contract rapidly, making loud knocking noises.
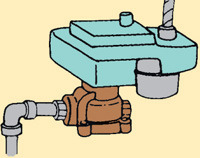
Automatic water feeder is on some boilers; replace it if water level falls and boiler doesn’t refill.
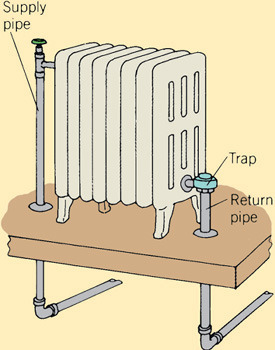
Steam Trap On some two-pipe steam systems, each radiator is fitted with a steam trap (instead of an air vent). The trap holds steam inside the radiator until it gives up all its heat. If return pipes feel very hot or if steam comes out of main air vent in great quantities, one or more traps may be defective; have them checked. If a trap leaks, steam will pass directly into return pipe and be wasted; replace leaky trap.
Steam systems operate at high temperature. Regular maintenance improves efficiency and, more importantly, ensures your family’s safety. Have the system checked annually by a service person. If the system operates poorly, call a professional. Malfunctions can be difficult to pinpoint without special equipment.
Radiators require a free flow of air to work efficiently. Don’t block them with furniture, and cover them only with special vented covers. Vacuum radiators often. Inspect exposed piping runs for breaks or gaps in insulation, but be careful, as some old systems used asbestos. You can perform some simple maintenance steps by following the procedures shown here.
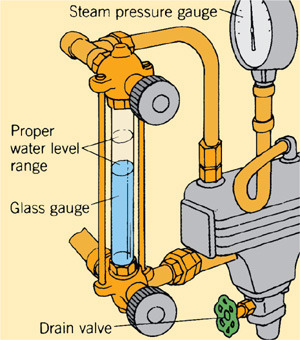
Check water level when boiler is off, every l0 to 14 days in cold weather. If water level is less than halfway up glass gauge, open water-supply valve after the boiler has been shut off for an hour or so, until water reaches the proper level.
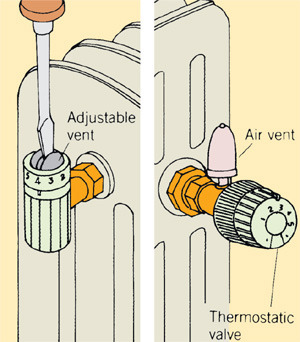
Check air vents for clogging by listening for a hissing sound and checking radiator for heat. If valve is adjustable, open fully when checking. Replace clogged vent with one of the same size. If a room overheats, add a thermostatic valve to radiator.
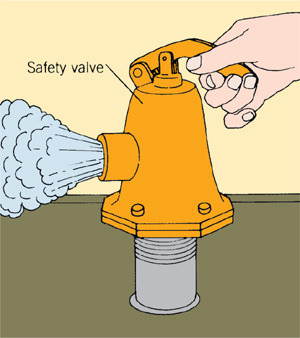
Check safety valve once a year. With boiler running, pull up lever and let small amount of steam escape. Watch that valve reseals and doesn’t leak. If it sticks or is clogged, shut off power and have the valve replaced.
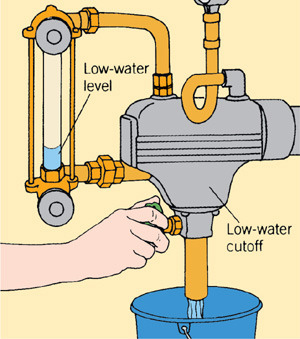
Flush low-water cutoff once a week in heating season to prevent sediment buildup. Turn down the thermostat, put a bucket under the pipe, open the valve and let water run until it’s clear. Be careful; water will be hot. Close valve; refill boiler to proper level.
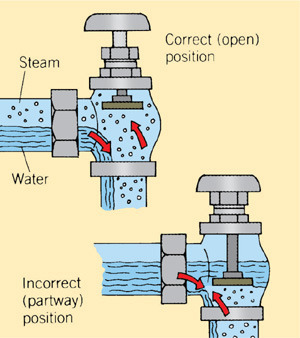
Prevent knocking in a one-pipe system by opening or closing valves fully. Because steam enters and water leaves through same valve, a half-closed valve mixes water and steam, causing knocking at the valve.
In one-pipe radiator, tip end opposite pipe a bit higher to keep water from collecting at bottom and blocking incoming steam. If radiator has height-adjustment bolts in legs, simply loosen them; otherwise slide shims or checkers under legs.
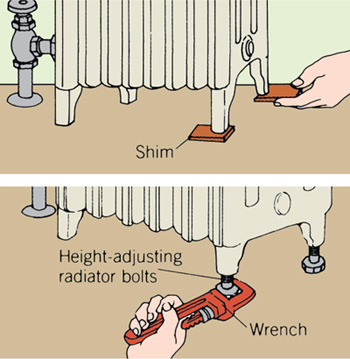
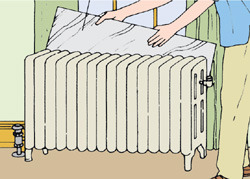
Increase radiator efficiency by sliding a reflector between it and outside wall to reflect heat back into room and keep it from being lost to outside wall. You can buy insulated reflectors or make them with corrugated cardboard and aluminum foil.
A gas burner is designed to efficiently burn propane or natural gas to heat water or air in a boiler or furnace. When the thermostat calls for heat, it signals the burner control to open a valve, sending gas to the burner ports, where it mixes with air and is ignited by the pilot light or electronic ignition. Burning gas heats the heat exchanger containing air or water. Combustion gases escape through a vent pipe. A draft diverter hood on the vent pipe or furnace outlet stops air currents from blowing out the pilot light. A thermocouple stops gas flow if the pilot light goes out.
Energy efficiency. If you significantly improve your home’s energy efficiency, you may be able to reduce furnace output. Talk to an expert about reducing the size of the burner’s orifice. To allow an efficient flow of gases, keep the burners and air shutters free of dust and dirt. If you want to convert an oil burner to a gas burner, look into a power burner because it uses less gas.
Maintenance. Have a heating contractor or the utility company inspect, test, adjust and clean the burner as needed every year. To clean the burner yourself, turn off its main gas valve and electric power. Slide the burners out; some disassembly, twisting or lifting may be required. If the pilot and thermocouple are attached to a burner, remove them. Clean the burners, air shutters and combustion chamber with a stiff brush, then vacuum. Unplug gas ports carefully with a toothpick.
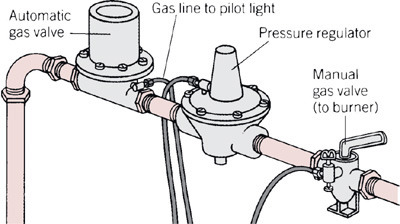
The gas train. An automatic gas valve regulates flow of gas supplied to burner; an automatic pressure regulator controls gas pressure. In newer systems, they are combined in a combination control. A pressure regulator is supplied by the utility company in areas where gas pressure is medium to high. Do not try to adjust the regulator yourself; call the utility for service.
Caution: Make sure the burner has an adequate air supply; an outside air source is best. Don’t relight the pilot light or make any repairs if you smell gas. Close the main valve and call the gas company from a neighbor’s house. Don’t operate any electrical switches.
To burn gas efficiently, the air and gas mixture should be adjusted until flame burns as shown in bottom picture.

Wrong. Not enough primary air; yellow tip, lazy inner flame.
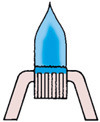
Wrong. Too much primary air; sharp, blue, hard inner flame.
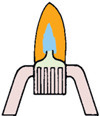
Right. Soft blue-green inner flame.
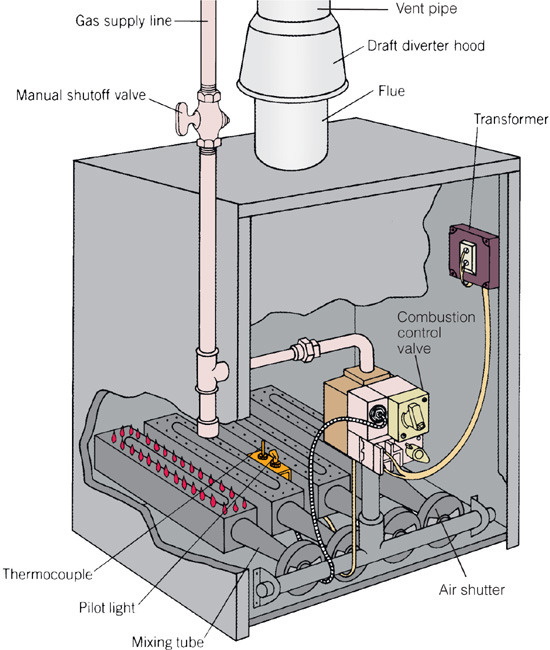
How It Works. When the thermostat calls for heat, it signals the burner control to open a valve, sending gas into the ports in the burners. There the gas mixes with air and is ignited by a pilot light or electronic ignition. Burning gas heats the heat exchanger, the chamber containing air or water. Combustion gases escape through a vent pipe.
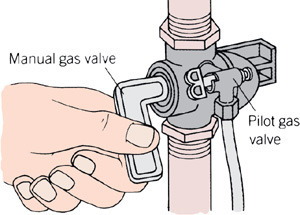
Relighting a pilot. For an older burner, turn the manual gas valve and pilot gas valve to “off.” After airing the burner 5 minutes, turn the pilot gas valve to “on.” Press in the red button on the switch for one minute while lighting the pilot. If pilot doesn’t light, wait five minutes, then repeat steps. If it still doesn’t light, replace thermocouple (see below) or call the gas company.
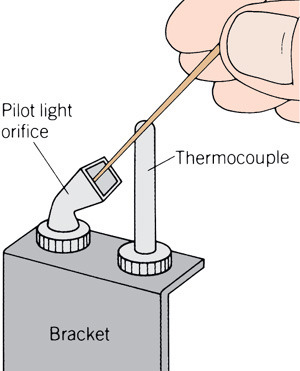
Cleaning the pilot orifice. If the pilot doesn’t light, its orifice or air-shutter orifice may be clogged. Turn off the main shutoff valve and electrical switch. Remove the access panel by unscrewing its bracket. Carefully clean orifice with a toothpick. Remove debris from the edges with a cotton swab or paintbrush.
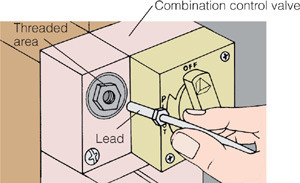
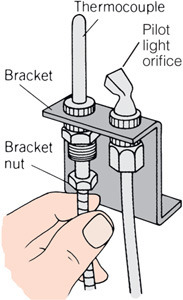
Turn off gas knob (or manual and pilot gas valves) and power to burner. Air 5 to 10 minutes. Unscrew lead from combination control valve; wipe threaded area with clean rag. Unscrew nut holding thermocouple to bracket. Fasten new thermocouple to bracket, lead to control valve.
Of the several oil-burner varieties, the gun-type high-pressure oil burner is the most common. The oil burner is usually bolted to the outside of the furnace. In addition to a thermostat, an oil burner has a primary control relay connected to a flame sensor. It shuts off the burner if the oil spray doesn’t ignite, preventing dangerous oil buildup.
Maintenance. Before each heating season, have your system checked, cleaned and adjusted by a service person; it’s not a do-it-yourself project. Keep the burner area clean. Periodically vacuum with a crevice tool in the openings that admit air to the burner’s blower. Do not sweep dirt under the burner.
Increasing efficiency. If there is an observation window, look at the flame; it should be bright yellow and produce no smoke. If it’s dark orange or sooty, or if you can see smoke exiting from the chimney outside, have the burner adjusted.
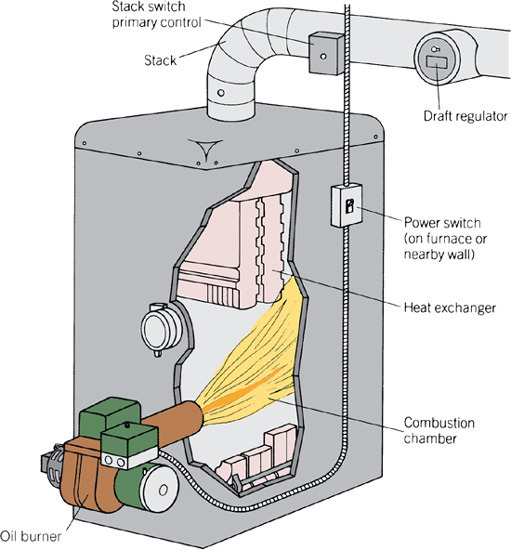
The oil burner is usually bolted to the outside of the furnace or boiler, but sometimes it’s inside the jacket. In this case, a removable metal panel provides access to the burner. If you have a service contract, think twice before doing any work on the burner. Most contracts are voided if you work on the burner.
Note: A modern oil burner uses a flame-sighting control (built into the burner itself) instead of a stack switch.
The thermostat is the bridge between a home’s climate-control system and the comfort of its occupants. The core component of this mechanical-type, temperature-sensitive switch is a bimetallic coil composed of two thin metal strips. Fluctuations in temperature cause the coil’s metal strips to expand or contract, automatically tripping a switch to turn the climate-control system on or off. Most older thermostats control only a furnace or boiler and often have a simple rotary dial or a lever to set the desired temperature threshold. Modern versions perform the same function for an air-conditioning unit as well, and most are programmable so you can preset selected temperatures for certain times of the day or week. Most thermostats work on low-voltage current, usually provided by a transformer on the furnace.

Setback Thermostats
A setback thermostat lets you set varying temperature controls ahead of time; newer units offer electronic programming. By allowing an empty house to get warmer or cooler than normal and adjusting the temperature only when occupants are due or at home, energy consumption is reduced. Some people even adjust them to save energy while they’re sleeping. These thermostats can pay for themselves in short order.
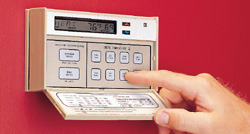
If your thermostat doesn’t function properly or doesn’t offer programmable features, you can replace it with a new one, provided it operates on the same voltage and is compatible with your climate-control system. Most gas or oil forced-air furnaces and air-conditioning units can operate with modern programmable thermostats, but heat pumps, electric baseboard heaters and some other systems require special features. Always shut off the power to the furnace and air-conditioning unit before making repairs such as this, even with low-voltage systems. Be aware that upgrading to a more versatile or full-featured thermostat may also require replacing the wire feed. (You may have to have a professional installer run new cable for you.) Note the model or specifications of any appliance that’s thermostatically controlled (furnace, air conditioner or humidifier) and have that information with you when you shop for a new thermostat. Verify that the new unit has the programmable features you want, plus a manual override you can use without altering the program settings.
Location. If the thermostat’s current location creates false readings from nearby heat sources, sunlight or drafts, reroute the wire feed to another spot. Choose an inside wall; keep it away from fireplaces, heat-generating appliances or drafty windows, and don’t place it above a heat register.
How to do it. Turn off power to the furnace. Disconnect your old thermostat and tie the wire feed into a loop or clip it with a clothespin to keep it from slipping back through the hole in the wall. The wires should be color-coded, but if they’re not, use tape tags to mark the letters of the terminals to which they were attached. Affix the new mounting plate to the wall with screws and anchors; then make the wire connections (and set the programming) according to the installation instructions provided with your thermostat. One final note: If your old thermostat contains mercury (look for a small glass tube with a shiny silver ball inside), don’t throw it in the trash. Mercury is toxic, so the thermostat should be brought to a recovery facility or a hazardous-waste disposal site.
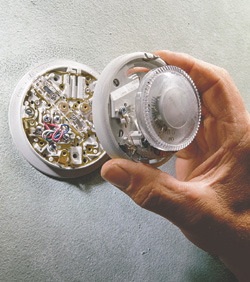
1 Turn off the system power, mark the wires to identify their correct terminal and disconnect the old thermostat. Dispose of the old unit properly.
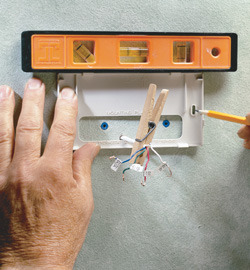
2 Level the new mounting plate on the wall and mark the fastener locations. Use drywall anchors and screws to secure the plate firmly.
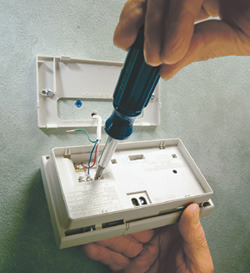
3 Using lettered tape tags to keep track of new hookups, connect the wires to the terminal screws of the new thermostat, then snap onto mounting plate.
A thermostat that’s not working properly doesn’t always need to be replaced. As with almost any mechanical object with moving or adjustable parts, sometimes a tune-up is all that’s required.
First, check the thermometer, which has to be calibrated accurately to trigger the system on and off as required. Place another accurate thermometer next to the thermostat and adjust the setting; with some types, you use a screwdriver to turn a shaft in the center of the bimetallic coil, but other versions require a wrench or pliers to turn a nut behind the coil.
The next step is leveling the thermostat itself to ensure that the mercury switch functions accurately.
Finally, set the anticipator. This device controls the on-off cycling by compensating for the heat or cooled air that has yet to make its way through the system. It’s like turning off a stove burner and letting the residual heat in the pan finish cooking the food. The net effect is a more consistently modulated temperature range.
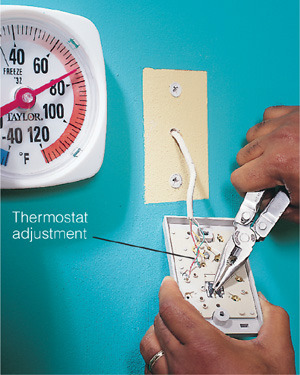
1 Like a bathroom scale that occasionally needs recalibration to true zero to record an accurate weight, the thermometer provides the benchmark readings that control the thermostat’s automatic functioning. Follow the instructions in the thermostat manual if it’s available; otherwise, look for an adjustment screw or nut behind the bimetallic coil.
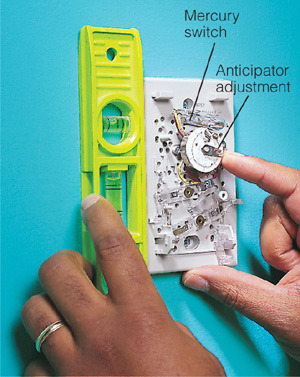
2 The thermostat’s switch is often a glass tube containing mercury, which, when tilted by the movement of the bimetallic coil, flows to connect a pair of electrodes. This connection turns the system on. Leveling the thermostat provides the base, or off, position for the switch. The anticipator adjusts via a lever and dial to control on-off cycling intervals.
In-line thermostats are used to control single appliances, typically an electric wall or baseboard heater. Newer electronic thermostats maintain a more even temperature by cycling on and off more frequently and sending only the required amount of power to maintain the desired temperature. Some electric heaters consume a large amount of current and require their own dedicated 240-volt circuit; check with the heater’s manufacturer and your local building officials before installing and wiring one of these units.
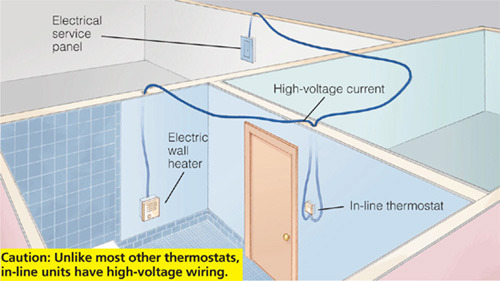
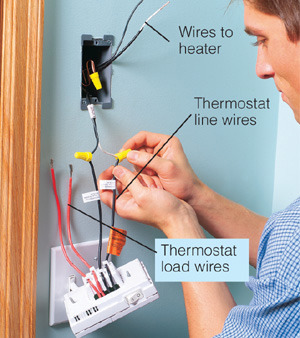
How they work. Although individual units can vary, the basic wiring for an in-line thermostat is, in most cases, similar in principle to that of a wall switch. The thermostat shown here is a 240-volt unit with two wire leads for connecting to the incoming wiring, called the line wires, and two wire leads, called the load wires, that connect to the lines going to the wall heater. Unlike in a standard wall switch, however, the direction of current travel is critical. Whereas a switch merely has to complete the wire loop to get current to flow and turn on a light fixture, for example, an in-line thermostat has to receive incoming current at the correct terminal(s) and send it out through the correct terminal(s). Always shut off power at the circuit panel before working on or installing an in-line thermostat.
Cove heaters offer an effective means of heating individual rooms—especially bathrooms. But to many people, they seem like a counterintuitive solution. We know hot air rises, so why put the heater near the ceiling and expect it to heat the floor? The answer lies in the nature of radiant heat. Convection heaters heat air, which rises when warmed, but radiant heaters heat objects directly, not the space between them. A cove heater transmits its heat energy directly to the floor, so tile and other hard surfaces are ideal recipients, acting as a sort of thermal bank to store and release the heat.
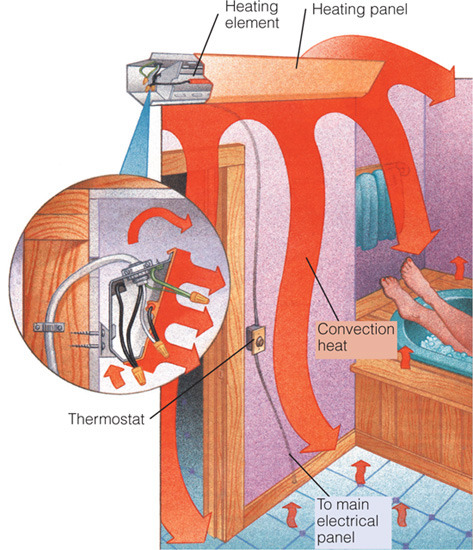
Cove heaters, requiring relatively simple routing of wires in the wall, come in a variety of lengths and can be controlled by a wall-mounted timer or thermostat. Insulated floors are best at holding the heat.
Wall heaters can be convection or radiant units and, though most are electric, some models use propane or natural gas. Electric units often require a dedicated electrical circuit, one that has no other load except the heater. Most are intended for heating a single room and will operate on 120-volt current for smaller areas, such as bathrooms, or on 220-volt current. The general guideline for heater capacity is to allow at least 10 watts of heating power for every sq. ft. (110 watts per sq. m) of floor area, unless there’s already a primary heat source in the room. If you don’t find anything that provides that exact ratio, install one with the next larger size or rating.
Installing a wall heater requires cutting open the wall surface between two studs and running wiring to the opening, typically through the top or bottom plate of the wall. Most wall heaters have a built-in thermostat or timer with adjustment controls right on the front panel, so wiring a separate wall thermostat isn’t necessary. You’ll also have to add horizontal 2x4 blocking above and below the heater housing. The blocking provides a secure mount and also a backing surface for the drywall around the opening’s perimeter.
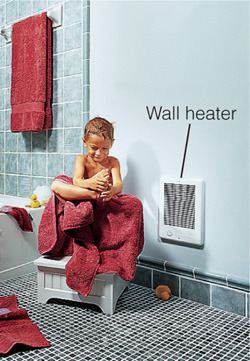
Bathrooms are an ideal application for wall heaters. Radiant versions heat one or more electric coils and have a reflective back panel to channel the heat energy into the room. Convection units have a fan mounted behind the heating coil and actively circulate heated air. Most units require their own electrical circuit, so plan to run new wiring and add a circuit breaker to your main electrical panel (a substantial job). Avoid installing them in exterior wall cavities.
Positioning supplemental heat sources low helps keep feet warm, a benchmark for comfort. Baseboard heaters are long, slender units that provide passive convection heat via an electric-wire element or a coil of copper tubing that circulates hot water. Kick-space heaters are fan-forced convection units that fit inside a cabinet toe-kick.

Baseboard. Too slender to accommodate an internal fan, a baseboard heater relies on passive convection to draw cool air from just above the floor. The air rises as it flows past the long core of heating fins and exits through a vent along the top of the heater.
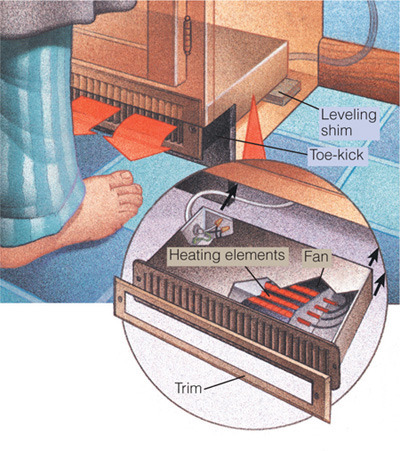
Toe-kick. If your bathroom has a vanity cabinet with a recessed toe-kick, you can usually add an electric toe-kick heater. Some feature integral thermostats but require that you bend or kneel to adjust the controls.
Problem |
Possible Cause |
Solution |
No heat |
Thermostat is set too low. |
Adjust thermostat until heat goes on. |
|
Draperies or furnishings block airflow. |
Remove the obstruction(s). |
|
Circuit breaker tripped or fuse is blown. |
Switch the breaker to on or replace fuse. |
|
Circuit breaker trips again; new fuse melts. |
Check for short-circuit in wiring. |
|
Resistance wire in heating element is defective. |
Turn off circuit breaker to heater and check wire with continuity tester; replace element with one of same voltage rating. |
|
Wiring connections inside heater are loose. |
Turn off circuit breaker or pull fuse to heater circuit; check and tighten all connections. |
|
House wiring is defective. |
Have an electrician check wiring. |
Heater cycles on and off frequently |
Draperies, furniture or debris block airflow. |
Remove the obstruction(s). |
Heater will not shut off |
Heat loss from room is greater than heater’s capacity. |
Close doors and windows. Add weather stripping and/or insulation. Supplement with additional heaters. |
Heater emits smoke or odors |
Thermostat is defective. |
Rotate thermostat knob to lowest setting; if heater continues to run, replace thermostat. |
|
Dust, dirt or lint have accumulated inside. |
Vacuum heater using an extension tool. |
Fan doesn’t operate on fan-equipped heater |
Blades are jammed. |
Turn off power to heater; remove cover and inspect. Remove any obstruction(s). |
|
Wires are not connected to fan motor. |
Turn off power to heater; connect fan wires. |
|
Fan motor is defective. |
Use volt-ohm meter to see whether current is reaching motor. If so, replace motor; if not, check wiring, switch and circuit breaker. |
Fan rotates but no heat is produced |
Resistance wiring in heating element is defective. |
Turn off circuit breaker to heater or check wire with continuity tester. Replace element with one of the same voltage rating. |
|
Wiring connections inside heater are loose. |
Turn off circuit breaker to heater; check and tighten all wire connections. |
Caution: Before making any repair, unplug heater or turn off power to heater.
Permanent electric convection heaters come in three types; recessed wall-mount or floor-mount units, kick-space units, and baseboard units.
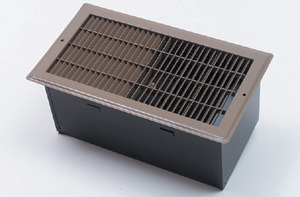
Recessed heaters nest between wall studs or floor joists and feature a fan and either a built-in or in-line thermostat.
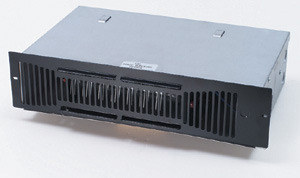
Toe-kick space heaters are designed to fit in the space under a kitchen base cabinet or a bath vanity cabinet. These units provide fan-forced heat.
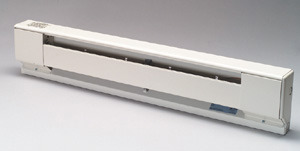
Baseboard heaters rely on natural convection, drawing cool air in through the lower slot. The heated air flows out the top slot.

Sizing an Electric Heater
Electric heaters for single rooms are rated according to their energy consumption, with ratings typically ranging from 750 to 5,000 watts.
The first step in selecting the right size of heater is to determine the floor area; simply multiply the room’s length by its width. To determine heater size for a room with normal ceiling height, figure on about 10 watts per sq. ft. (110 watts per sq. m).
Factors, such as climate, location of room, number of exterior walls, and amount of insulation can greatly effect these numbers.

Prevent Fires
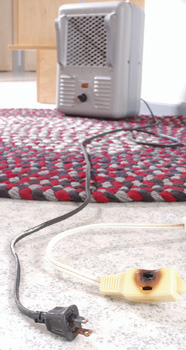
Although they are usually of lower wattage than built-in units, portable heaters are responsible for more residential fires. Undersize or damaged extension cords can result in overheated wires and arcing current. For safety, always plug the heater directly into a wall outlet. Always keep heaters away from flammable materials or objects.
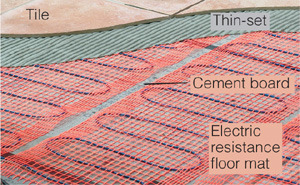
Tile floors are popular in bathrooms for their practicality and durability, but even in mild climates, they tend to be too cold for bare feet. Imagine the comfort of stepping out of the shower onto a warm floor, and you’ll understand why in-floor electric heating systems have become so popular. For small residential spaces, such as bathrooms, simple electric-heating mats borrow the principle of commercial hydronic (water-filled tubing) systems to provide a reliable, affordable heat source.
Embedded in the thin-set mortar used to secure the tile, these mats feature a continuous loop of resistance heating cable amid a thin plastic mesh. There are different systems and types of heating cable available, so shop around. Like other heaters, the system can be controlled by a thermostat, a timer or even an on-off wall switch. Be extra cautious during installation to avoid nicking any wires. Insulate under floor, if possible.
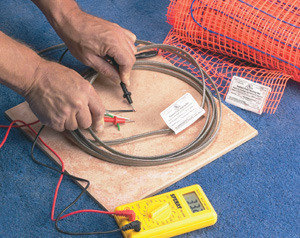
1 Test the heating cable with a volt-ohm meter to make sure the resistance reading is within 10 percent of the rating on the product label. If it’s not, check the manufacturer’s instructions before you proceed.
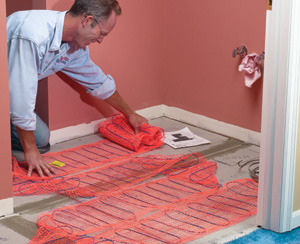
2 After laying a cement-board subfloor, test-fit the mat, making sure the heating cable is at least 4 in. (10 cm) away from any walls, fixtures or cabinets. Do not cut the heating cable or allow it to overlap itself.
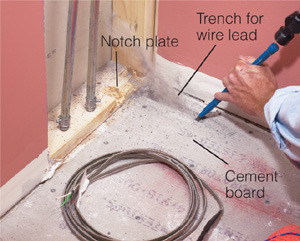
3 Chisel a shallow trench in the cement board near the wall where the line wiring is, to make room for the mat’s thicker wire lead. Also notch the bottom plate for the thermostat cable and power lead.
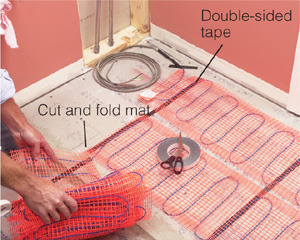
4 Secure the mat to the cement board sub-floor with double-sided tape. At the end of each run, cut the mat, not the heating cable itself, so you can fold it over and reverse direction to start the next course.
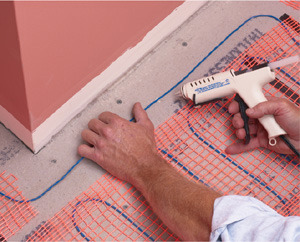
5 For sections where the mat won’t fit, such as around a fixture, cut the plastic mesh away and secure the heating cable to the floor with hot-melt glue. Glue down any loose ends or humps in the mat, too.
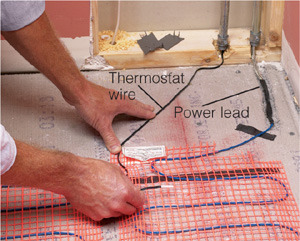
6 Feed the power lead and the thermostat wire through the conduit and to a wall-mounted electrical box. Connect the power lead to the house wiring (it may require a new circuit) and install the thermostat wire and sensor.
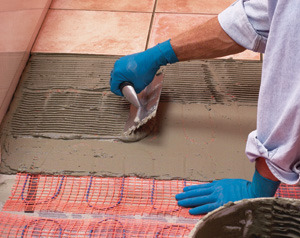
7 With the mat secured, use a notched trowel to apply thin-set mortar to cover it and provide a bed for the tile. Take care to avoid nicking or cutting the heating cable with the trowel’s sharp edges.
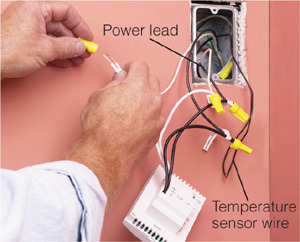
8 After setting the tile and doing another continuity-resistance test, wire the wall thermostat. Shut off power to the thermostat while you’re working on it. Let mortar cure one week before turning on the current.
As reliable as most of them are, the systems commonly used to provide heat to our homes all cost money to operate and come from outside sources. Whether they rely on electricity, natural gas, propane or heating oil, the cost and sometimes availability of their fuel can vary widely with the regional, economic, even political forces that are out of a homeowner’s control. Solar energy offers a “free,” inexhaustible source of heat energy, but it doesn’t provide the same consistency and control that conventional systems provide. Although it is possible to harvest solar energy for storage in battery systems or link a solar collector-converter to a commercial power grid, the simplest gains can be had from passive solar systems, which convert the sun’s energy directly into usable interior heat. Even on cold winter days, the sun’s energy can be captured to provide heat for a home.
An effective passive solar-heating system relies on two primary conditions, aside from the basic requirement of daylight. First is a clear surface, like glass, that allows the passage of solar energy into the interior space. Second is a storage feature that can absorb that energy so the space doesn’t overheat, then release it later when the sun goes down and temperatures drop. A material with this ability to store and release heat energy is said to have thermal mass. Water is a common example, as is almost any masonry material, especially concrete or brick. Other features that help make a sun-warmed space more livable allow you to control the rate of heat gain and release; roof overhangs and venting windows are two common examples.
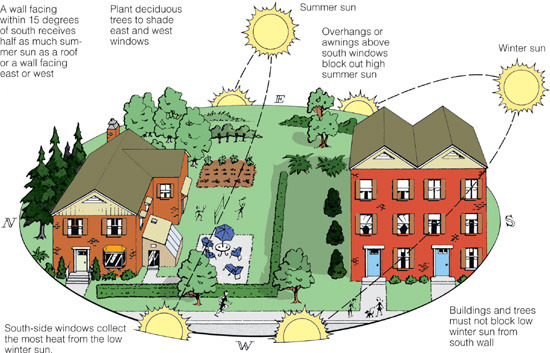
In North America, passive solar features are normally installed on the south side of a structure. This prevents overheating during the summer months when overhangs block out the high summer sun and captures more energy during winter months, when the earth’s orbit causes the sun to appear lower in the sky. Solar features are sometimes costly to retrofit onto an existing home, and the rate of financial return is sometimes slow, but energy savings and a light-filled interior environment are two good reasons to welcome solar energy where possible.

Sun-powered Heat, Electricity and Light
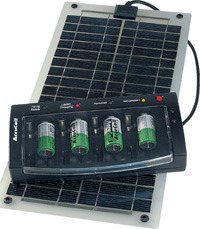
Despite decades of interest and product development, solar technology is still largely an emerging industry. Some applications show increasing promise; photovoltaic panels, like the one shown for charging batteries, now feature a flexible thin-film technology and are more efficient at converting sunlight into electricity. Many solar technologies remain supplemental rather than primary energy systems, especially for controlling home climates. Rooftop water-heating systems and south-facing sun spaces still represent the most practical applications of passive solar gain. As these simple technologies improve, they will likely contribute a higher percentage of a home’s energy needs. Expect increased performance and decreased costs eventually, as well as a wider range of products and applications.
Tracking down solar products can start with familiar sources, such as your local Yellow Pages or business directory under “Solar Products and Services” or through Internet searches. There already exists a solar-energy trade show, called Solar Power, as well as a trade group, the Solar Energy Industries Association (SEIA), that can direct consumers to solar-powered products for residential use.
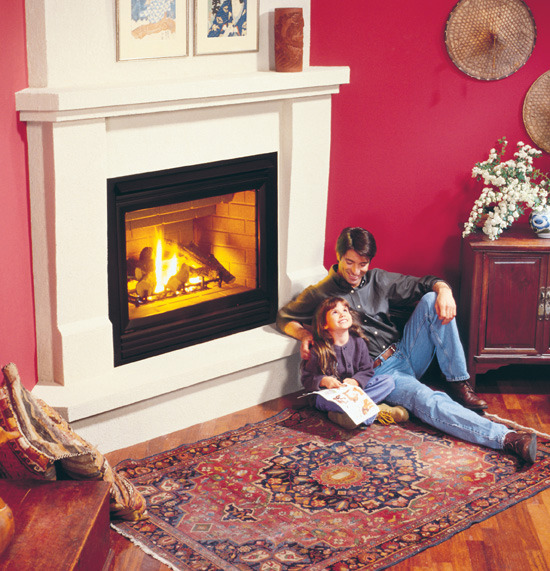
There’s no denying that a fireplace adds character and ambience to a home’s interior, but when the traditional coal- or wood-burning fireplace lost its central-heating role to the automatic furnace, many homes went hearthless. Retrofitting a traditional masonry fireplace in most of those homes is an expensive and complicated project, but a modular metal fireplace that burns gas can provide a convincing substitute, without the need for a heavy, expensive masonry chimney. Most units operate with the flick of a wall switch or remote control, and optional blower units expand their heating ranges by actively distributing heated air into the room.
Aside from their simpler, more affordable installation, direct-vent gas fireplaces eliminate the need to haul firewood through the house or clean out ashes, and more flexibility in locating the unit. The insulated metal duct that exhausts hot gases and brings in combustion air can usually be installed through either an exterior wall or the roof.
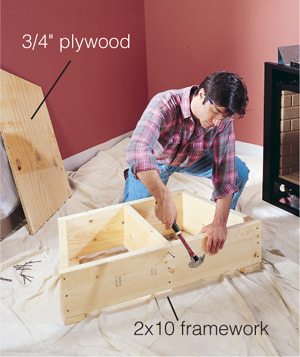
1 After mocking up the fireplace in several locations or test-fitting the unit itself, use framing lumber to construct a base platform the same size as the fireplace module. Fit a 3/4-in. plywood top onto the base and fasten it with screws. Slide it temporarily into position to check the fit against the wall or corner.
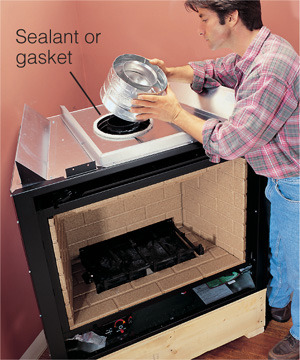
2 With the necessary sealant, which is typically a stove cement, rope gasket or high-temperature silicone caulk, fit the first vent-pipe section in place. Fasten it securely according to the instructions and add the next fitting. In this installation, it’s a 90° elbow with a straight pipe extension on the back end.
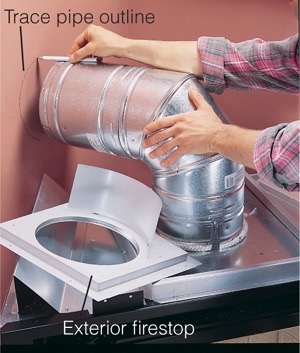
3 Mark an outline of the vent pipe on the wall surface and temporarily move the fireplace out of the way. Cut a 12-in. (30-cm) square opening around the vent-pipe location; add blocking and a header around the opening. If a wall stud obstructs the path, cut a larger opening to alter the framing, as shown in Step 4.
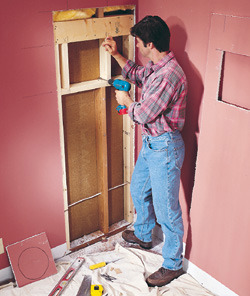
4 Drill holes at the corners of the square vent opening, penetrating the exterior wall sheathing and siding. This transfers the opening to the outer face of the wall so you can cut through the siding and sheathing. Next, fit the outer fire-stop and cap against the siding and trace the outline; cut through only the siding.
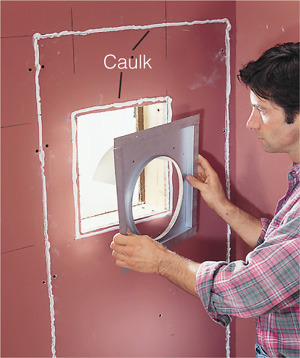
5 Replace the wall insulation and patch the interior wall surface—a rough patch is fine if you’ll add a fireplace surround and mantle to cover the area. Apply a bead of caulk around the patch and around the perimeter of the vent opening; press the interior fire-stop into the caulk and fasten it to the wall with screws.
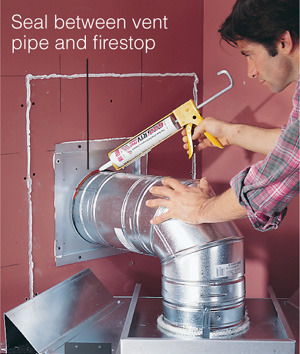
6 Move the fireplace unit into position and insert the interior vent pipe through to connect with the exterior fire-stop. The procedure for making the vent-pipe connection can vary with the manufacturer and model, so follow the instructions provided. Seal around the vent pipe with a bead of high-temperature silicone caulk.
7 Slide the exterior vent fitting (a combination fire-stop and cap) onto the pipe coming through the wall. If necessary, install a metal drip cap under the siding, as shown here, and use screws to fasten the fire-stop flange to the wall. Use caulk to seal the joints between the siding and the metal flange.
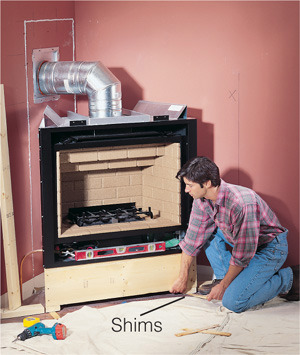
8 After installing the required gas and electrical lines (we suggest you hire pros for this), level and fasten the wood platform. Using the illustration below (after step 12) as a guide, frame the remaining structure for the fireplace surround. The detailing can vary from the example shown, as long as you provide a nailing base for the drywall.
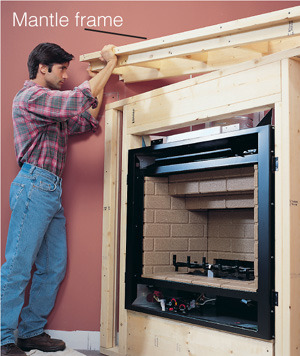
9 The mantle frame is the next assembly required to complete the structural framework for the fireplace surround. Slide it into position atop the main façade frame and fasten it with screws. Follow this step by installing the angled frame pieces at each end; then build and install the hearth extension and upper wall frame.
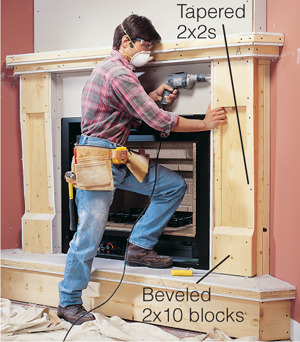
10 Cut the column parts from 2x10 and 2x2 stock and screw them to the lower wall frame of the surround. Note that the vertical 2x2 cleats taper to a point at their lower end and that the lower 2x10 block is beveled 45° on its upper edge. When complete, fasten drywall over the entire assembly.
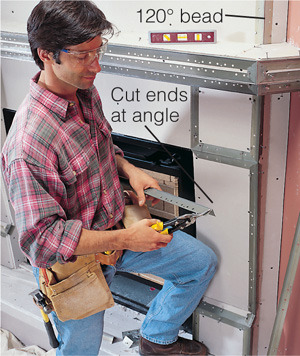
11 Cover all the outside corners with metal drywall corner bead. Where two or more corner beads meet, cut angles at the ends to form a point so the flanges don’t interfere with each other. Nail the bead tight with drywall nails. For corners greater than 90°, install a special 120° metal bead.
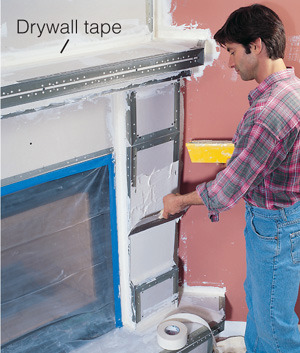
12 At inside corners, embed paper drywall tape in joint compound and apply the compound to all surfaces to cover the joints and corner bead. Let dry; then sand and repeat one or two applications until joints and surfaces are smooth and flat. If desired, apply a troweled or sponged texture, prime and paint.
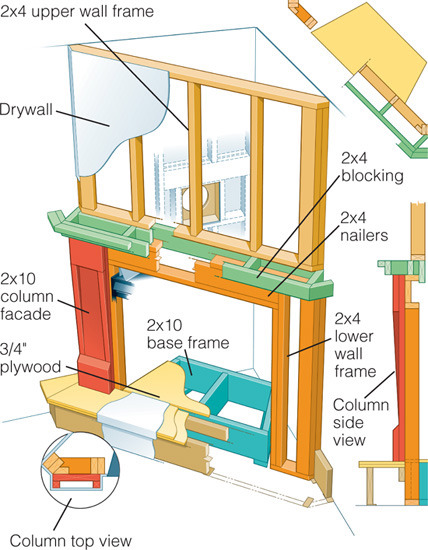
Fireplace surround details. This illustration reveals the basic framing components of the fireplace surround, mantle and hearth. Make certain to follow the manufacturer’s guidelines, which specify safe clearances from combustible materials.

No-vent Gas Fireplaces
No-vent, or vent-free, gas fireplaces represent the simplest route to getting a fireplace, but they aren’t legal everywhere because of air-quality concerns. Like a gas kitchen range, they burn natural gas or propane and do it so cleanly that the tiny amounts of combustion by-products generated don’t require a vent. These units have an oxygen-depletion sensor that automatically shuts the gas off if the oxygen level in the room falls below 18 percent; many also integrate carbon-monoxide detectors. Air circulates around the firebox by natural convection, but the heat output is modest.
A freestanding wood-burning stove can provide much of the ambience of a traditional masonry fireplace and do so with efficiency ratings as high as 75 percent compared with a fireplace’s low or even negative efficiencies. Some stoves can burn with their doors open, but all provide the most heat when closed and properly vented. Part of the key to their efficient heat transfer is the amount of exposed surface area; lined with firebrick and built of heavy steel plate or cast iron, a wood stove’s firebox radiates heat in all directions, warming surrounding objects and surfaces. For safety, minimum clearances for combustible materials are mandated by codes and manufacturers (see examples below).
Relative to a fireplace, a woodstove offers much more control over combustion air intake and burn rates, but for peak efficiency and lower emissions, the smoke-exhaust temperature should stay between 300°F and 400°F (150°C and 200°C). For this reason, don’t buy more stove capacity than the space requires. It’s better to install a smaller stove and burn it hot rather than burn a too-large stove slowly to avoid overheating the room. Also, don’t slow-burn a stove to make the fire last through the night; instead, install a masonry surround with enough thermal mass to store and release the heat after the fire burns out.
You’ll get the most efficiency by burning seasoned hardwood or manufactured pellets made from compressed sawdust. Never burn unseasoned “green” wood, railroad ties, pressure-treated lumber or plastics in a woodstove.

Cleaner Burning Woodstoves
Only about half the potential energy from a fire comes from the wood; the rest lies in the heated gases we call smoke. Newer woodstoves feature a catalytic combustor, similar to the devices used for reducing emissions in automobile exhaust, that reburns the smoke to extract heat energy and reduce airborne pollutants. Often required by law, many of these stoves produce only 2 to 5 grams of smoke per hour—a 95-percent reduction.
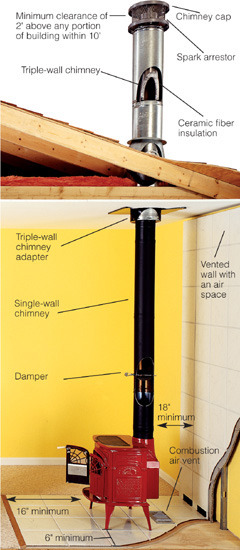
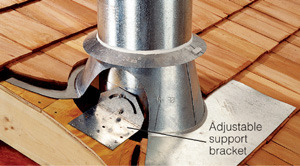
Where the stove chimney exits the roof, an adjustable support bracket positions it to maintain a 2-in. (5-cm) clearance from combustibles. Flashings and caulk keep rainfall at bay.
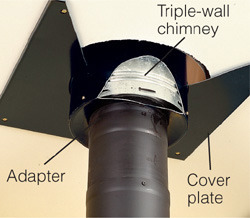
Entering the ceiling, the single-wall stove pipe must be fitted with an adapter to connect to a triple-wall chimney or other approved insulated chimney. Cover plates can include decorative trim or a simple flange to cover the clearance hole in the ceiling.
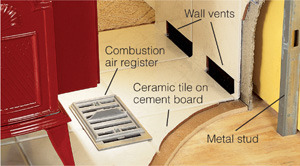
Surfaces below and behind the stove should be noncombustible materials, such as ceramic tile or masonry. A floor register provides outside combustion air. The wall surface features a vented air space for keeping the wall cool.
A heat pump is a refrigerant system, much like an air conditioner or refrigerator, that can both heat and cool your home. Most heat pumps are split systems, with an outdoor coil, an indoor coil and a compressor. During the winter, the system extracts low-grade heat from outdoors and transfers it indoors. During the summer, the heat pump is reversed, absorbing unwanted heat from indoors and sending it outdoors. A thermostat, ducts and blowers control and distribute the warm and cool air.
Although it is hard to imagine squeezing any useful heat energy from 30°F (-1°C) wintertime air, a refrigerant at -20°F (-29°C) will be warmed when circulated through the outdoor coil in air that is 50°F (27°C) warmer. During this cycle, the compressor and fans consume energy to deliver the heat. The ratio of the amount of heat delivered to the amount of energy consumed is called the coefficient of performance (COP). Depending on the outdoor temperature, the COP of a good heat pump in the heating season ranges from 1.0 to 3.0—meaning 1 to 3 BTUs of heat delivered per BTU of electricity consumed. Most heat pumps are slightly more efficient during the cooling season.
Other rating systems used for heat pumps are the heating season performance factor (HSPF) and the season energy efficiency ratio (SEER). These ratings use the watt as a unit of measure and are simply 3.4 times the size of the COP because there are 3.4 BTUs per watt.
As outdoor temperatures fall, a heat pump’s heating capacity declines, although high-quality units can still extract heat with outdoor temperatures as low as 9°F (-13°C). To compensate, supplementary electric heating elements switch on at the crossover point, which is the point at which an air-source heat pump does not have enough heating capacity to satisfy a home’s needs.
Have a heat pump serviced annually by a qualified contractor. In addition, routinely vacuum the indoor coil, change the blower filter and wash the outdoor coil with a hose.
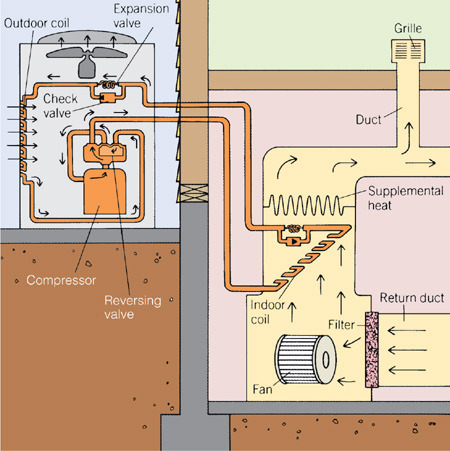
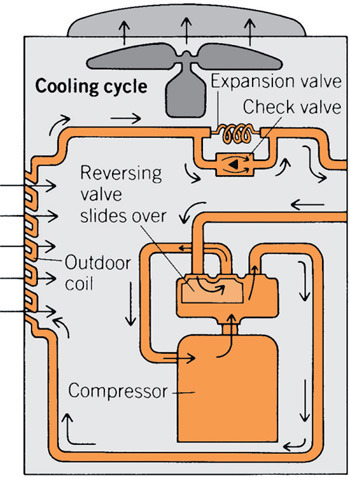
In heating cycle, refrigerant passes through outdoor coil as gas, drawing heat from air. Gas moves to compressor, where high pressure raises its temperature. Compressed gas moves to indoor coil, where it releases heat and condenses into liquid. Expansion valve allows liquid to move from high pressure to low, lowers temperature and vaporizing again. For cooling, a valve reverses the system.
Problems |
Possible Solutions |
Frost on outdoor coil in winter and on indoor coil in summer; irregular defrosting patterns. |
Buildup is a normal function of humidity, temperature and coil design. Keep coils and condenser clean. Replace filter because more airflow reduces defrost cycle length. If problem persists, check manual to locate and clean airflow sensing tube. |
Refrigerant leaking red dye. |
Call for repair. If unattended, a leak can lead to compressor failure. |
Odors when heat pump kicks on. |
Check that drip pan, which catches condensate from indoor unit, is draining. |
Inadequate heat in very cold weather. |
Unit may be undersize. Shut off vents in unused rooms. Consider adding duct boosters or auxiliary heaters. Supplementary heating coil may need replacing. |
Frequent on-off cycling. |
Check thermostat; it could be broken or have an improperly set anticipator. |
Cold air from register blowing onto frequently used seating places. |
Adjust diffusers to direct air away from seating; seal any ductwork in attic or crawl space; have in-line supplementary heater installed in problem duct. |
Frequent compressor burnout. |
Mismatched indoor and outdoor units. Have contractor evaluate system as a whole. |
Most heat pumps extract heat from the air, but some use heat from water for heating or cooling. In a water-based system, the pipes may be submerged in a lake or stream. But, since groundwater temperatures vary less than lake and stream water, the most common type uses well water brought to the heat pump and either discharged or reinjected into another well, as shown below.
Though much more expensive to install, heat pumps that rely on ground and water temperatures are vastly more efficient than air systems, because ground and water temperatures don’t go to the extremes of air temperatures. Check local building codes about regulations in your area.
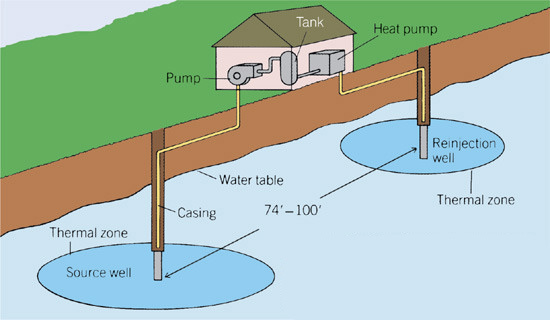
In some water-based systems, well water is brought to the heat pump and then either discharged or reinjected into another well. In other systems, fluid is pumped through piping that is submerged in a lake or stream.

Improve Efficiency
An air screen greatly improves a heat pump’s cooling efficiency in the summer, especially in warm, humid climates. It shades the outdoor condensing coil to make it possible for the cooling coil to dissipate heat faster. In the winter, remove the screen to better capture the sun’s warming rays.
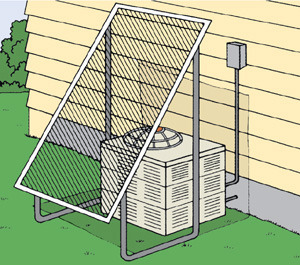
Ground-source heat pumps, also called geothermal systems, tap into the huge storehouse of energy contained in the earth by removing heat stored in the soil and transferring it into your house, making these systems extremely efficient. Whereas the best gas furnaces run at 92-percent efficiency, geothermal units run at a whopping 300-percent efficiency, because they’re tapping into and transferring existing heat rather than burning fuel to create it.
Geothermal systems have three main components: the ground loop that gathers heat, the heat pump that condenses the heat and the duct system that distributes the heat. The ground loop can be one of two varieties. Closed-loop systems circulate an antifreeze solution through polyethylene pipe buried at least 6 ft. (2 m) underground, where year-round temperatures hover at around 55°F (13°C). Open-loop systems rely on a supply of water, usually well water, rather than antifreeze. Water is circulated through the heat pump, heat is extracted and the cooled water is discharged, usually to a pond.
The heat is absorbed by a refrigerant, which is compressed and rises in temperature to about 160°F (71°C). Air passing over a heat exchanger is warmed and distributed throughout the home through a network of ducts, similar to a forced-air system.
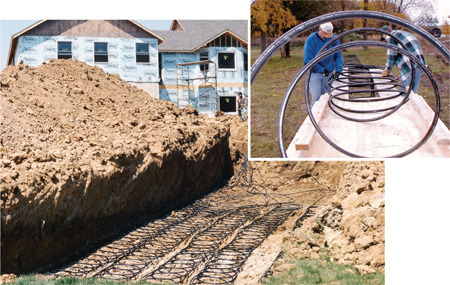
Geothermal pipe can be buried in trenches, circulated beneath ponds or run in a series of deep, vertical well holes. The pipe can be installed in straight, parallel lines or coiled like a Slinky toy. The earth warms the antifreeze mixture or water, the heat is withdrawn by the heat pump and the cycle repeats. The earth around the pipe slowly cools, but never to the point that the system stops working. Summer sun reheats the earth for the next heating season.
Keeping your home cool during the heat of summer requires a multifaceted approach to maximize comfort and energy savings. About 25 percent of the summer heat that enters a house comes through the windows, another 25 percent seeps through cracks and 20 percent enters through walls and ceilings. Most of the rest is generated inside by cooking, bathing and heat-producing lights and appliances.
For most homes, the first line of defense is air-conditioning, but these systems can be expensive to operate. To reduce energy costs, don’t rely on air-conditioning alone to make your home comfortable. Take the steps shown in the checklist below to help keep the heat out.
Air-conditioners cool, dehumidify and filter the air. They can be bought to condition a single room (see here) or the whole house (here). In areas where nights are cool and dry, a whole-house fan (see here) can cool a house at a fraction of the cost of air-conditioning.
If you live in a dry climate, consider air conditioning your home with an evaporative cooler. These coolers use the natural process of water evaporation to cool indoor air at a fraction of the cost of refrigerated air. They contain a blower, fibrous pads, a small pump and a water reservoir. When the unit is operating, the pump draws water from the reservoir and distributes it to the pads to keep them saturated. The blower draws outside air through the pads to cool it, forcing the cooled air into the house and the warm, stale air out.

Cooling with shade. Before air-conditioning, shade was the best defense against summertime heat. Today, shade has taken a back seat to the on-demand predictability and convenience of air-conditioning in homes, workplaces and cars. But don’t dismiss shading strategies as outdated; they will still provide plenty of comfort and energy savings. Shade can reduce your air-conditioning bill by as much as one-third and will make your yard cooler and more pleasant as well.
The sun’s path dictates the best placement for shading devices. The west and south sides of a home are hardest hit by the summer sun. During the heat of the day, the south side takes the brunt of the sun’s rays. In the late afternoon and evening, when temperatures are highest, the west side becomes the victim.
Landscape shading blocks the sun before it hits your house, so it’s a great house-cooling strategy. For maximum energy savings, place trees and other foliage so the house is shaded in summer but not in winter. Moderate-size trees block late morning and early evening sun. Tall trees placed fairly close to the house cast shade over the roof during midday hours.
Energy-efficient roof design should include overhangs, awnings and porch roofs to shade the south walls and windows during the middle of the day.
No one shading device or landscaping idea is best for every home. But basic shading principles will help you choose what fits your home’s style, your local climate and your budget.
Steps, both simple and complex, can go a long way in lowering your home’s cooling costs. Check out these areas; they can go a long way in lowering your home’s cooling costs.
□ Attic ventilation moves hot air out. Ridge, gable and soffit vents provide passive movement. Whole-house fans provide mechanical means for removing hot air.
□ Adequate insulation in the attic and exterior walls keeps out heat, as well as cold.
□ Deciduous trees on the south and west sides of a house provide shade in summer but allow passive solar heating in winter.
□ Use ceiling or other fans to provide a chill effect while reducing air-conditioning costs.
□ Replace incandescent light bulbs with compact fluorescent bulbs to cut energy consumption and reduce heat output.
□ Protect sunny windows with drapes, shades, blinds, awnings or heat-reflecting film.
□ Install thermal windows with low-E glass and argon gas.
□ Seal around windows and doors to keep hot air from seeping in.
□ When it’s time to replace, consider installing light-colored shingles to reduce attic temperatures.
□ Choose light-colored paint which reflects heat better than dark-colored paint.
Whole-house fans are an economical, energy-efficient alternative to air-conditioning. In some regions, it may be the only cooling mechanism you need; in others, it can shorten the length of time you need to run your air conditioner and save hundreds of dollars annually.
Capacity. Whole-house fans come in different sizes to accommodate different attic construction and house sizes. Increase the convenience by installing a timer or thermostat. Fans are sold according to their cubic feet per minute (CFM) capacity, which indicates how much air they move. Depending on the climate, you need a fan that will change the air in your house every two to three minutes. To determine the CFM requirement, take the total above-ground square footage and multiply it by three for moderate climates or four for warmer climates.
Location. For this type of fan to work effectively, install it in a central location on the upper level of the house; usually the hallway that leads to the bedrooms. Check for obstructions in the attic after you’ve determined the best location. In cold climates, make certain the units can be tightly sealed and insulated during heating season.
Operation. Use a whole-house fan only when the outside temperature is cooler than the inside temperature. To use it, shut off the air-conditioning and, in the rooms you want cooled, open the windows about 2 to 3 in. (5 to 7.5 cm) and block open the doors.
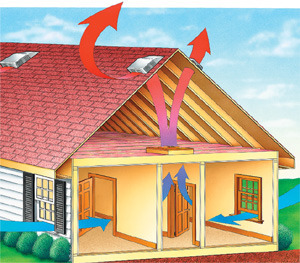
How attic fans cool. Attic fans cool by pulling cooler, outside air in through windows that are open by 2 to 3 in. (5 to 7.5 cm) and drawing the warm air in the house up into the attic. The warm air in the attic then exhausts under pressure through vents in the roof.
Caution: Don’t use the fan when windows are closed. This will cause interior air to be exhausted without being replaced with fresh outside air. When this happens, back-drafting can occur, which means deadly carbon monoxide fumes given off by water heaters and other gas-burning appliances may be drawn into your home rather than exhausted through their venting systems.
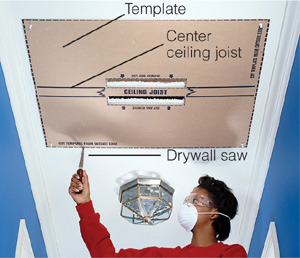
1 Locate center ceiling joist for fan location and cut out a slot on either side. Align and position template on center ceiling joist and, after checking for obstructions, cut completely around outer edge. Remove drywall.
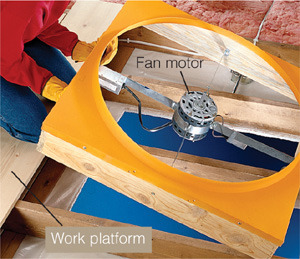
2 Position the fan by placing its motor over the center ceiling joist with fan edges aligned with the drywall cutout. Place plywood or lumber across joists for a comfortable work platform.
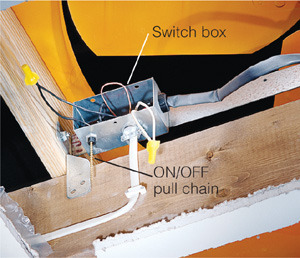
3 Mount the switch box to the ceiling joist. Run cable from a new circuit or nearby power source and make connections. The switch box may contain a pull chain for operation or you can install a wall switch.
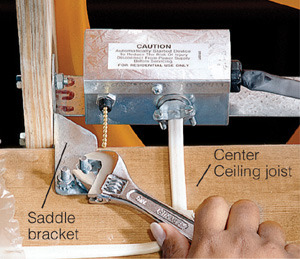
4 Secure saddle brackets to the center ceiling joist with nuts and bolts. Make sure the fan is centered before you drill holes in the joist.
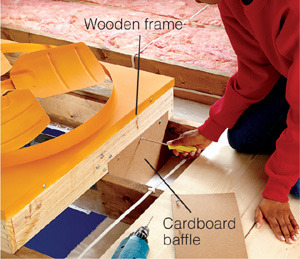
5 Fill the gap between the ceiling and fan frame with cardboard baffles; some manufacturers supply them. Cut baffles to fit between ceiling joists and screw the baffles to the fan frame. Cut insulation to fit up to the baffles.
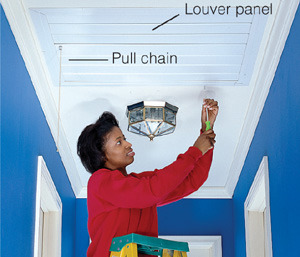
6 Attach the louver panel to the ceiling with screws into the joist and drywall anchors into the drywall. Louvers are drawn upward when fan is turned on and weighted to shut tightly when the fan is off.
The components of a room air conditioner are essentially the same as those of a central air-conditioning unit, except they’re contained in a compact box that can be mounted to a window or through a wall. Individual room units are less expensive to install in an existing home than a central system, especially if there is no ductwork. Because room air conditioners can be controlled on a room-by-room basis, they may also be more energy-efficient than a central system.
Room air conditioners are labeled with an energy efficiency ratio (EER). The EER is calculated by dividing the unit’s capacity, in BTUs per hour, by the number of watts of electrical energy needed to run it. Efficient room units will have an EER of 9 or higher.
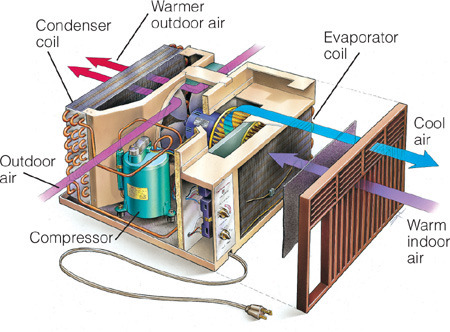
How a room air conditioner works. Every air conditioner contains two coils, which are composed of panels of aluminum fins and loops of copper tubing. A compressor circulates refrigerant through both of the coils. One fan draws room air across the evaporator coil, where the air is cooled and dehumidified. Another fan blows outdoor air over the condenser coil, where the heat absorbed from the indoor air is ejected. A barrier with a door separates indoor air from outdoor air.
Window-mounted air conditioners work best with double-hung windows. Measure the window opening before purchasing a unit. Many units cannot be removed from the casing, as shown below, and must be installed fully assembled.
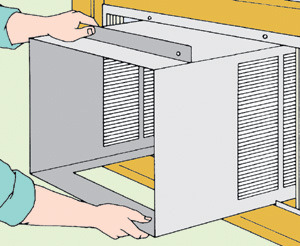
1 Remove air conditioner from its casing. Slide the casing into the window opening and screw it into the sill and sash. The casing must tilt slightly toward the outdoors so condensate will drain away from window.
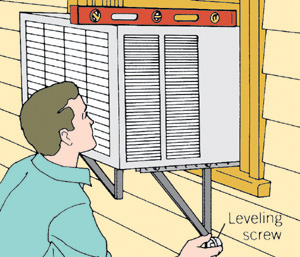
2 If casing extends more than 12 in. (30 cm) beyond the outside sill, it needs exterior bracing to support it. Fasten bracing to the wall and adjust the pitch with leveling screw.
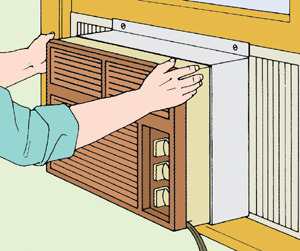
3 Slide the air conditioner into its casing. Most units require two people to install. Seal around the casing and the gap between upper and lower sashes with foam rubber. Install expandable curtain for side gap.
The advantage of a wall unit is that you can choose an optimum location, preferably on an eastern or northern wall out of the heat of the sun. The disadvantage is it takes significantly more effort to install.
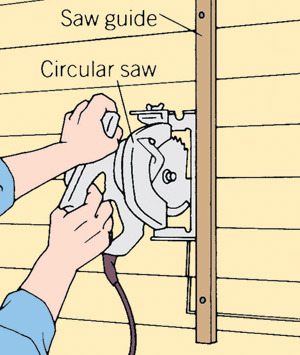
1 Outline the cutout on the exterior wall. Make the cutout 1/4 in. (3 mm) higher and wider than the air-conditioner casing. Nail a straightedge to the wall as a guide and saw through the sheathing and siding. From inside, cut back studs above and below the opening to make room for header, sill and jamb that will create the opening.
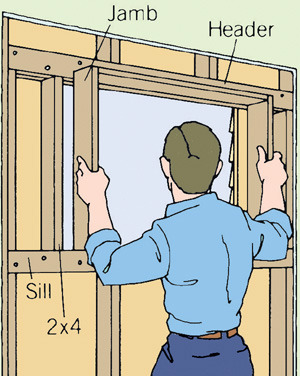
2 Frame air-conditioner opening as you would a window. Attach a header and sill to the existing wall frame and add 2x4 side jambs. Inside dimensions of the finished jamb are the same as those of the outside wall cutout. Jamb thickness is equal to stud width plus interior sheathing. Slip the jamb into the rough opening and fasten.
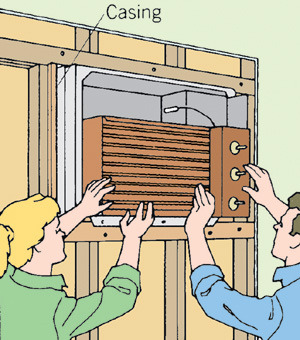
3 Install the unit using the same steps as for window units. Screw the casing into the finished jamb and slide the air conditioner into the casing. Always lift the air conditioner from the base pan on the bottom; never pull or lift from the plastic parts. Take care not to damage fins or electrical wiring. Seal around exterior and interior of the unit. Cover in winter.
The secret to room air-conditioner maintenance is simply good, regular cleaning. When an air conditioner doesn’t seem to cool well, most people assume the coolant needs recharging. But most often the culprit is dirt, a problem solved by cleaning the coils.
Room air conditioners, like central air conditioners, have two sets of coils. A coil is an arrangement of fins and tubes for efficient heat transfer. The condenser coil is on the outside and the evaporator coil is on the inside. Keeping these coils clean is 90 percent of the battle in keeping your air conditioner operating efficiently.
The most important maintenance steps are easy, but if this is the first time you’ve cleaned the unit, allow about half a day to pull things apart and put them back together. To clean it properly, you’ll have to remove the unit from its window or wall opening. Air conditioners can be very heavy, so recruit some help before you begin.
Unplug the unit and lift it from the opening. Remove the front cover and lift off the case, following your instruction manual, to expose the compressor, fan motor and evaporator coils. If you have a well-sealed wall unit, you may want to leave the casing in place and slide out the air conditioner to work on it.
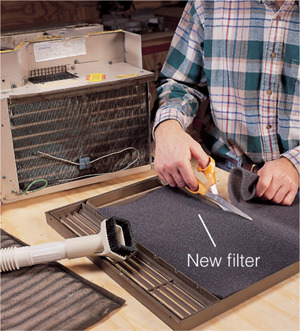
Vacuum the fins. Vacuum evaporator fins with a soft brush attachment. The evaporator coil is protected by a filter; replace it or wash and reuse the old one.
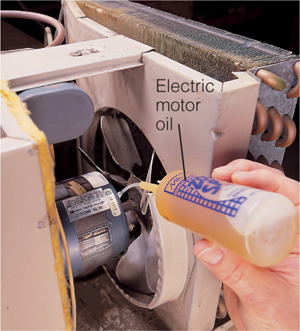
Lubricate the motor. Lubricate the motor with five drops of electric-motor oil (oil made specifically for electric motors), if you can find oil ports. Check owner’s manual for specific lubrication instructions. Don’t apply too much oil—more is not always better.
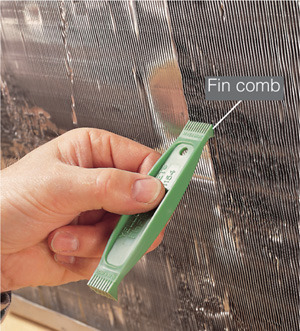
Straighten bent fins. Straighten bent fins. Fins are delicate and can easily bend when you handle the unit. Straighten bent fins with a special, inexpensive plastic fin comb to improve air circulation. You can use fin combs on outdoor units of central air conditioners, too.
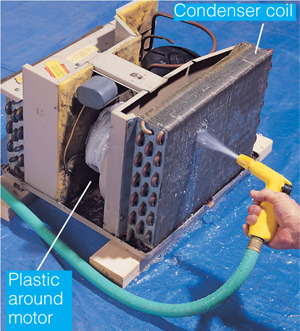
Wash condenser coil. Wash the condenser coil with a spray of water from outside inward. Cover the fan motor with plastic to keep it dry. Rinse and wipe up as much dirt and crud as possible from the bottom pan, making sure drain holes or overflows are open.
A split air conditioner is similar to a conventional window air conditioner except that its operations are split in half. The unit that contains the noisy compressor is usually on the ground outside the house. Refrigerant lines connect it to an indoor air handler, or condenser, that’s typically mounted to a wall or ceiling in the area you wish to cool. A very quiet fan blows room air over the cool coils to distribute the conditioned air.
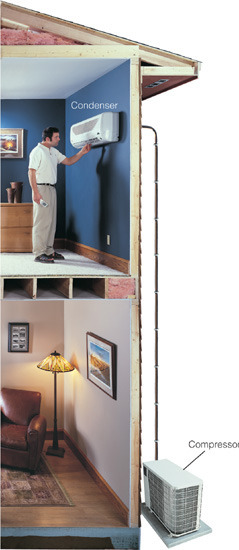
A central air-conditioning system circulates cool air throughout the house with a network of ducts. Typically, these same ducts are used for heat distribution in winter. When the thermostat calls for cooling, the outdoor compressor switches on and circulates refrigerant through both coils. The furnace blower forces indoor air through the evaporator coil, where it is cooled, dehumidified, and then circulated throughout the house. Heat taken from the indoor air stream is transferred to the condenser coil and then to the outdoor air.
When adding a cooling system to a home that already has forced-air heating, central air-conditioning is often less expensive and far more convenient than equipping every room with an individual wall or window unit. However, if your home has no ductwork, you will have to add it. Large ducts can be installed economically in an open basement, crawl space or attic, but when walls and ceilings have to be opened, the cost can become prohibitively expensive. A pressurized or high-velocity system, which distributes air through small, easier-to-install pipes that can be run through standard 2x4 walls rather than ducts, is another option worth considering.
Central air conditioners usually range from 1 to 1-2/3 tons for every 1,000 sq. ft. (93 sq. m) of living area. However, the amount and quality of insulation and the amount and location of window area also effect sizing requirements. Accurate sizing is critical. An oversize unit will cycle excessively, causing inefficient operation, shortened compressor life and inadequate dehumidification. Your best bet is to have a professional size the unit.
Central air conditioners are labeled with a seasonal energy efficiency ratio (SEER) number. The higher the SEER number, the more efficient the unit. Although 10 is suitable for most locations you may want to check whether a unit with a higher rating is worth the added expense: in some areas regulations require more efficient units. Compare the unit’s price plus installation costs with the money you can save in energy costs to determine the payback period. Utility companies can help determine an accurate figure and sometimes offer rebate incentives for installing higher-efficiency units.
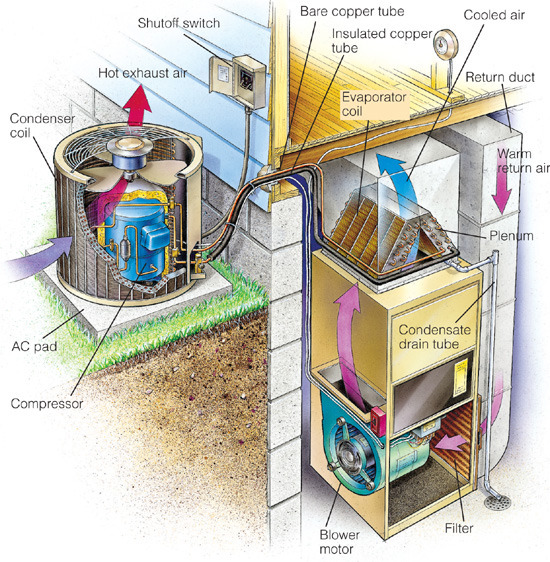
How a central air conditioner works. The two main parts of a central air system are the outdoor compressor with a condenser coil and an indoor evaporator coil that’s located in the plenum above the furnace blower. Two copper tubes, one bare and one insulated, connect the two coils and transfer refrigerant between them. If you have a heat pump, both tubes will be insulated.
Refrigerant in the copper tubes absorbs heat at the evaporator coil inside, cools indoor air, and then releases heat at the condenser coil outdoors. To carry away that heat, the fan inside the condenser coil sucks air through the fins.
As a result of this process, the fan pulls dirt and debris with it. Dust, leaves, dead grass and anything else that collects on the fins will block airflow and reduce the unit’s efficiency. Grass clippings thrown by a lawn mower, “cotton” from cottonwood trees and dandelions are particularly guilty offenders.
Cutting the Power
Begin the maintenance of your central air-conditioning unit by shutting off the 240-volt power at the shutoff box. It’s usually outside within sight of the outdoor unit. Some shutoffs simply pull out; others have a handle to pull down or a fuse to remove. If there isn’t an outdoor shutoff, turn off the outdoor unit’s power at the circuit breaker on the main electrical panel.
When the power to your compressor is shut off for more than four hours, follow these steps when restoring power. First, move the switch from “cool” to “off” at the thermostat. Second, switch power back on and let the outdoor unit sit for 24 hours to allow the warming element to warm up the compressor’s lubricant. Finally, switch the thermostat to cooling mode, then set the temperature to turn on the outdoor unit.
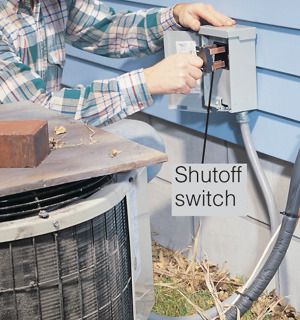
Few routine chores will pay off more handsomely, both in comfort and in dollars saved, than a simple air-conditioner cleaning. In fact, most air-conditioner failures can be attributed to poor maintenance. The photos below show you how to clean your central air conditioner, but they don’t show all the steps needed for maintenance and inspection.
Disconnect power to your compressor (see above). The compressor and its motor sit inside the coil. They’re usually sealed and won’t need maintenance. However, if you have an older compressor that’s belt-driven by a separate motor, lubricate the motor through its oil ports. In every case, keep an eye out for dark drip marks on the bottom of the compressor case or pad. This may indicate an oil or coolant leak that requires professional attention.
You usually don’t have easy access to the evaporator coil that’s inside the plenum. If you can get to it, vacuum the bottom side of its fins with a soft brush attachment. Otherwise, have a pro clean it every few years. To best prevent dust buildup on the evaporator coil, replace the furnace filter regularly and vacuum any dust in the blower cabinet.
The evaporator coil in the plenum dehumidifies your indoor air as it cools it. The water that condenses on the coil flows out through a condensation tube. Keeping this tube clear is key to preventing minor floods. In some homes, a small condensate pump is used to pump the water out of the home. If you have a pump, test it by pouring water in it’s pan before the start of each cooling season.
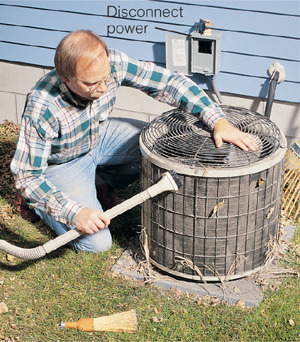
1 Shut off power. Vacuum condenser fins with soft-bristle brush. Fins are delicate, so avoid bending them. Clear away debris that blocks airflow through coil. You may have to remove protective metal case to get at fins.
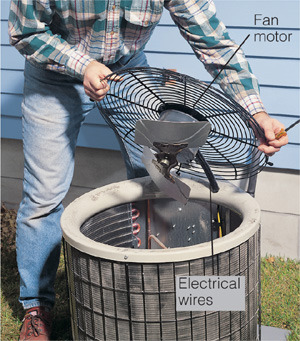
2 Unscrew top grill and hold it open. The fan and motor will usually come out with the grill, so support it carefully to avoid stretching electrical wires and stressing connections. Avoid hitting fan motor with direct spray of water.
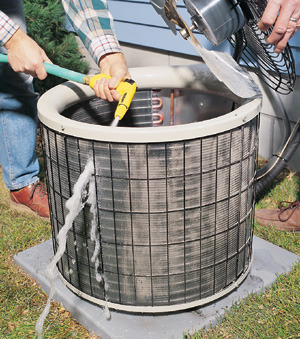
3 Spray fins with a garden hose from inside outward to clear any dirt. Remove debris that has collected on the bottom. Evict mice and other critters that might have moved in over the winter, then screw top back on.
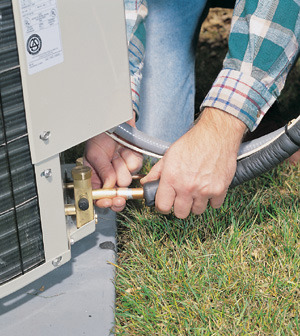
4 Turn power back on (see “Cutting Power”) and adjust thermostat so unit comes on. Listen for odd noises that might indicate problems. After 10 minutes, feel the refrigerant pipes’ bare metal. Insulated pipe should feel cool and bare pipe warm.
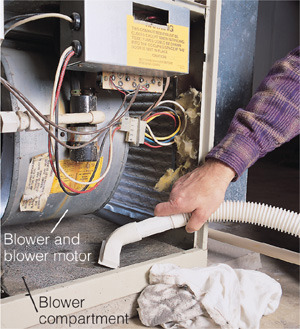
5 Open the blower compartment, with power turned off, and lubricate any accessible ports on blower motor with five drops of electric-motor oil. Vacuum any dust that has collected in the blower compartment.
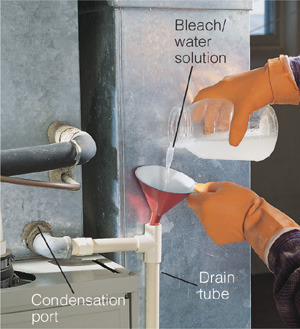
6 Check condensate drain for sludge and algae growth. To kill algae, pour 1 part bleach to 16 parts water solution through rigid tubes. Remove and clean flexible tubes. If possible, poke a wire into the drain port to clear it.
Maintaining the humidity level in your home does a few important things. If you have wood floors or delicate wood furniture, it helps control the natural expansion and contraction cycles that wood undergoes through humidity changes. Removing excess humidity also makes it easier to cool your home and discourages the growth of mold and mildew. If you have a central air conditioner, you already have a whole-house dehumidifier, but damp basement areas sometimes require additional dehumidification.
In a dehumidifier, condensate is directed to a container that you drain by hand or that may have a drain hose option. It should also have a humidistat that automatically turns off the unit when the air reaches a preset dryness level and an overflow-prevention switch that turns the unit off when the drain pan is full.
For a dehumidifier to work well, shut windows and doors. Also, large-capacity dehumidifiers are the most efficient. They continue to work in lower humidity and in lower temperatures than smaller units.
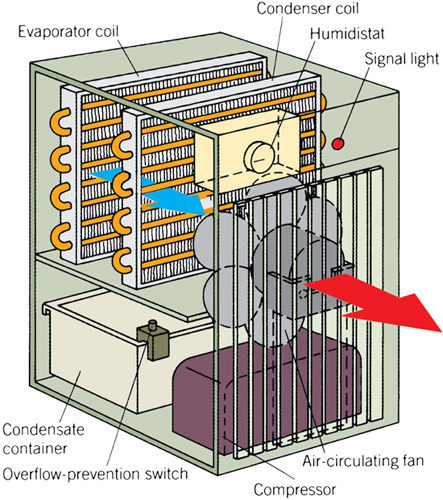
As summer approaches, improve your dehumidifier’s performance and efficiency by conducting a seasonal checkup. One reason condenser coils ice up is that accumulated dust insulates them and reduces their cooling efficiency, forcing the condenser to work overtime. If your unit has a washable filter, clean it and all plastic parts on or inside the unit with warm water and mild detergent.
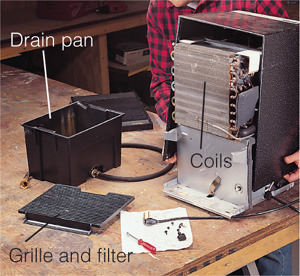
1 Unplug the unit before disassembling it. Consult your owner’s manual for specific maintenance procedures. Scrub mineral scale out of the drain pan and, if used, check the hose for kinks.
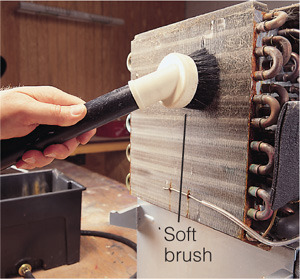
2 Vacuum condenser coils and other parts inside the dehumidifier; then wash coils down with warm water and mild detergent. After washing, thoroughly rinse and dry coils.
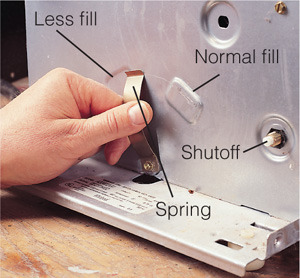
3 Correct drain pan spillover, if necessary, by changing position of pressure spring to the “less fill” position. When the pan is full, the spring fully deflects, activating a shutoff switch and killing power to the unit.
If your dehumidifier doesn’t hum to life when you turn the humidistat switch on, first check to see that it’s plugged into a working outlet. If it’s getting power, unplug it and test to see whether the switch is bad.
Test for bad switches on appliances with either a continuity tester or a multimeter. If you need a new humidistat switch, call appliance stores to find the right one. When handling the new switch, avoid damaging the piece of plastic that is stretched inside the switch; it acts as a humidity sensor.
Remove the front panel of the dehumidifier chassis by pulling off the knob on the humidistat switch and loosening the panel screws. Release the switch’s mounting bracket by unscrewing it. To avoid confusion later, label the two switch wires, for example, “red to front,” before disconnecting them.
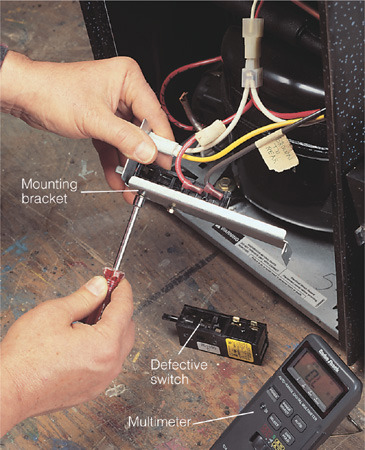
Adding moisture to dry heated air in winter can ease dry throats, reduce static electricity, stabilize wood furniture and floors, and allow you to lower the thermostat a few degrees and still feel warm. Unfortunately, the process can also spew white mineral dust, molds and bacteria into the air if you are not meticulous in following the manufacturer’s instructions, although some newer units have a self-cleaning feature.
Three basic types of portable humidifiers exist: evaporative, ultrasonic cool mist and warm mist. Evaporative units blow room air over a rotating belt of dampened sponge. These are particularly prone to mineral, mold and bacteria buildup. Ultrasonic cool-mist units use high-frequency vibration to break water into tiny droplets that are impelled into the air as a mist. These require frequent cleaning and use of distilled water to avoid buildup problems. Warm-mist units first heat a reservoir of water before dispersing it as a warm mist. Heating the water distills out minerals and kills bacteria and molds, reducing some of the humidifier maintenance problems.
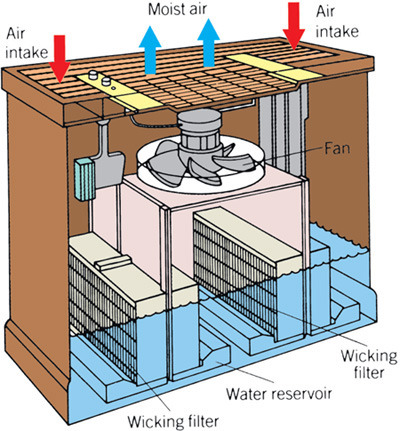
Evaporative humidifiers use filters to trap minerals in water and to act as wicks in drawing water up to the fan, which sends moisture into the air. Replace filters as recommended.
Periodically, you need to remove the mineral scale that builds up on a warm-mist humidifier’s electrical heating element and in the water reservoir pan. The more fouled a heater element becomes with mineral scale, the less efficiently it vaporizes water. Clean off accumulated scale, as shown below, to keep a humidifier running efficiently. Finally, work carefully around the heating element so it doesn’t get damaged.
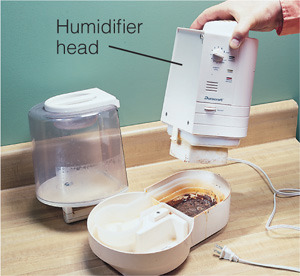
1 Unplug the humidifier, empty the water tank and pull off the humidifier head to reveal the reservoir pan. Empty out the water, loose mineral scale and sludge, give the pan a quick scouring and rinse it well.
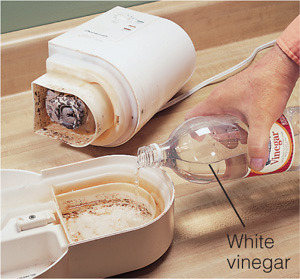
2 Fill the reservoir pan with white vinegar and reinstall the humidifier head. Leave the humidifier unplugged and soak the heater element in vinegar overnight to loosen mineral scale.
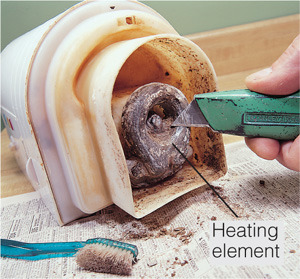
3 Scrape mineral scale off the heater element using a utility knife and toothbrush. It’s not necessary to scrape it down to bare metal everywhere to accomplish your task.
A central, or whole-house, humidifier offers the optimum in convenience, effectiveness and low maintenance if you need to humidify dry, winter air. Installing a central humidifier involves several skills: cutting sheet metal, electrical wiring and plumbing.
This type mounts on the heating ductwork near the blower on both furnaces and heat pumps. If your home has no ductwork or is heated by hot water or electric baseboard heat, you can’t use a central humidifier.
Whenever your furnace blower switches on, the low-voltage electrical circuit that operates the humidifier also turns on. The humidifier itself operates when the humidistat, which is a moisture-sensing device mounted in a room, senses the air in your home is too dry. If you have condensation buildup on your windows, turn the humidistat lower. Check your owner’s manual for any required seasonal adjustments.
To check the humidifier’s operation, open the water-supply valve, make sure it has power and open the damper. Turn the humidistat up to high and adjust the thermostat so the furnace blower switches on. After a few minutes, you should see water coming out of the drain tube. Note: Saddle valves may not be code-compliant in all areas.
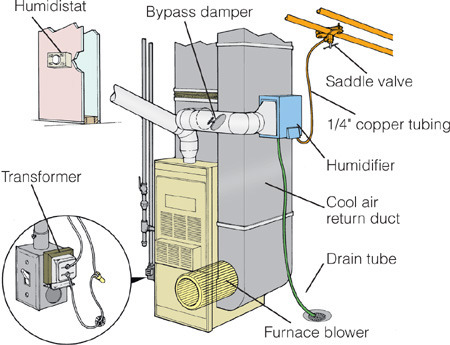
Although often associated with new construction and expensive homes, central vacuum systems can be installed in an existing home. Unfinished basements and attics simplify the task by allowing good access.
Central vacuums are quieter and more efficient than even the best portable machine. The long hose makes stair cleaning easier, and attachments are available for any cleaning task. But the most compelling reason to consider a central vacuum system is indoor air quality.
Research suggests that the dust and dander floating around our homes contributes to any number of health problems, including asthma. The filters in most standard portable vacuums remove only the largest, least dangerous particles, spewing the rest back into the air. A central vacuum, on the other hand, can be exhausted to the outdoors so all the dust it picks up leaves your house.
Choose a motor size to match the cleaning power you want, not the size of your house. Vacuum motor power is expressed as water lift, or suction power, and cubic feet (cubic meters) of airflow per minute.
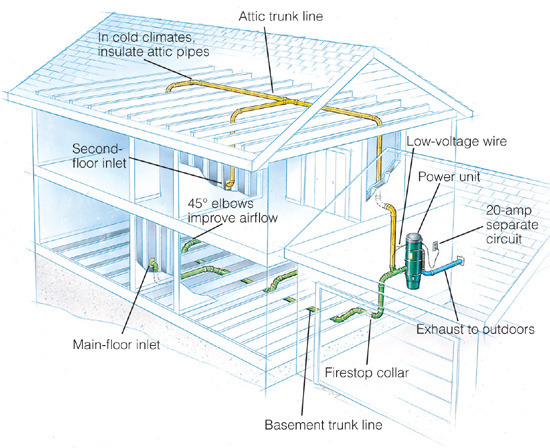
When installing a central vacuum system, plan pipe routes to avoid obstacles. First choose a place for the power unit. An attached garage or utility room is the usual location. Check the instructions for power requirements and hire an electrician to add a separate circuit or additional outlet, if necessary.
If you plan to use a power head attachment with rotating roller brushes, make sure there’s an electrical outlet within 6 ft. (2 m) of each inlet valve. The inlet valves must be connected to the main trunk line, located in either the attic or basement.
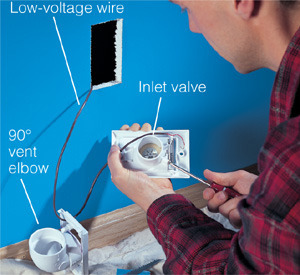
Inlet valve. Inlet valves are located so long flexible hose reaches all areas easily. Plugging the hose into a valve activates the system.
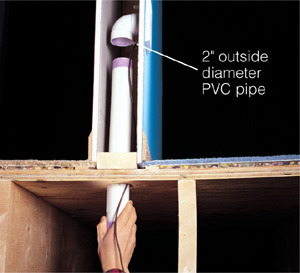
Pipe. A network of 2-in. thin-walled PVC pipe, manufactured for central vacuums, carries debris to a canister in power unit.
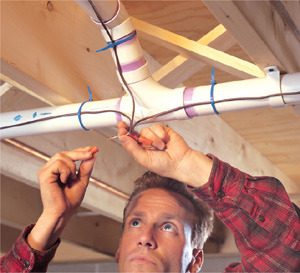
Low-voltage wiring. This wiring, installed alongside pipes and attached to inlet valves, switches on the power unit when the hose is plugged in.
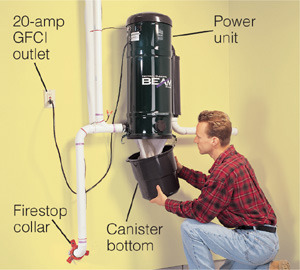
Power unit. The power unit is located in an attached garage or basement to reduce noise level and is plugged into a standard 20-amp ground-fault circuit-interrupter outlet.
As houses have become better sealed for energy efficiency, concern about indoor air quality has grown. Common indoor pollutants—dust, pollen, bacteria, viruses, spores, animal dander and tobacco smoke—not only effect people but can clog and interfere with electronic equipment and heating and cooling systems.
Good housekeeping, including frequent vacuuming with a high-quality, high-filtration vacuum is the first requirement. Removing dust-trapping furnishings, such as deep-pile carpeting and heavy, dust-trapping draperies, may help those with severe reactions. If you’re still suffering or you want to reduce such airborne contaminants as smoke and pollen, try an electronic air cleaner. These appliances offer relief by a process called electronic precipitation (see below).
Installed in the return-air duct of a heating and air-conditioning system, an air cleaner will extend the life of that equipment and other electronic equipment in your home. For houses with other kinds of heating or cooling systems, there are a variety of room-size models.
To maintain the cleaner’s prefilter and plate, clean them monthly by scrubbing them or running them through a dishwasher. Also, electronic air cleaners produce ozone, a respiratory irritant also produced by hair dryers and power tools. High airflow dilutes the ozone and good maintenance minimizes it.
Some indoor pollutants are still best removed by ventilation. To clear out smoke, unpleasant odors or noxious gases, open a window or turn on exhaust fans.
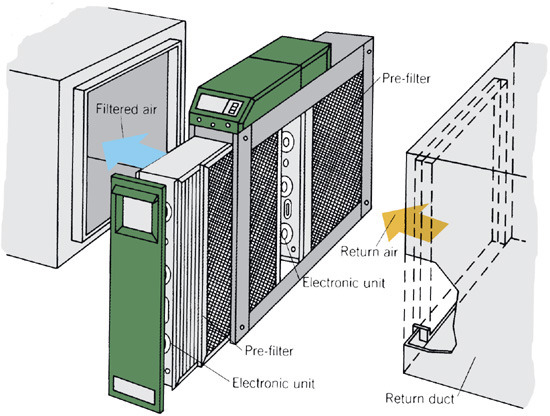
An electronic air cleaner cleans by a process called electronic precipitation in which a prefilter first screens out large particles. Next, in the electronic unit, small particles are electrically charged and collected on a plate that acts like a magnet. This plate and prefilter must be cleaned monthly.
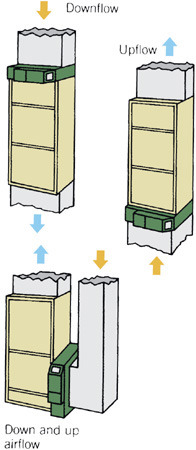
Location. Units can be mounted vertically or horizontally in a return air duct with up or down airflow.

A Breath of Fresh Air
When it comes to filtering the air in your home, the best performance for the money comes from electronic air cleaners, like the one shown below. The installed price of a central electronic air cleaner can be high, but operating costs are very low. Furthermore, since these cleaners replace the filter in your heating and air system, manufacturers claim that you can cut air-conditioning costs by up to 10 percent, because an air cleaner keeps the evaporator coil clean. The most convenient electronic cleaners have easy-to-remove collectors that are simple to clean; a necessary step for good performance.
Electrostatic filters and pleated filters (see “Which Filter?”) are inexpensive, easy to install and usually just replace your existing furnace filter. Neither type requires an electrical hookup; however, their performance is only marginally better than that of ordinary filters.
High-efficiency particulate air (HEPA) cleaners are the most effective and expensive approach. They have a huge surface area and hundreds of small folds packed into a small space and they remove even the smallest particles, like viruses. However, the installed cost of a whole-house HEPA-cleaner system can easily exceed $1,000 and the operating costs can be significant.
If a central air cleaner isn’t feasible, the best portable models are nearly as effective, at least for a single room. Buy one with a cubic feet per minute (CFM) rating that will give you four changes of air per hour in the room where the unit is located.
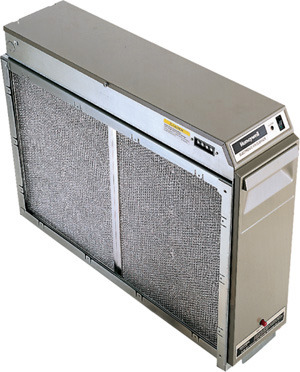
Normally, a water heater is so reliable and maintenance free, you can practically ignore it. On average, it takes about 13 years for one to go bad, but with faithful maintenance, it can last indefinitely.
Rust is the terminal disease for a water heater. Once it eats through the steel tank and causes it to leak, you have to replace the unit. Although the tank’s inside surface has a glass coating baked onto it, this coating eventually cracks and rust begins. Failure typically begins around the tank-pipe joints, at the welds or on the bottom where sediment collects.
Heavy sedimentation from the minerals in the water, especially hard water, causes sediment to pile up on the bottom and trap heat from a gas burner, raising the temperature on the bottom higher than normal and stressing the steel tank and glass coating. On gas units, you can detect this problem by a rumbling or popping sound that occurs soon after the burner comes on.
The best defense against sediment buildup is to annually drain the tank through the drain valve and flush it according to the directions in your owner’s manual. Unfortunately, many manufacturers use cheap drain valves, so plan to replace it with a more reliable ball-type valve during the first cleaning.
Besides the glass coating, your water heater’s other defense against rust is a special rod called a sacrificial anode (see illustrations) made of magnesium or sometimes aluminum. The anode helps stop the chemical reaction that causes the steel tank to rust. In the process, the anode itself corrodes, or sacrifices, itself. Anodes typically last five years or longer, and some heaters have two to prolong the water heater’s life. Replacing them generally requires a professional.
How they work. In most water heaters, cold water enters the bottom of the storage tank through a dip tube, where the water is heated to about 120°F to 140°F (50°C to 60°C) until there’s a demand for it. Hot water then exits the tank at the top, pushed out by the pressure of incoming cold water. On the cold side inlet, the valve is open so there’s always water pressure in the tank. Since hot water is more buoyant than cold, it rises to the top and remains somewhat separate until the cold is heated. A thermostat near the bottom senses when cold water arrives and automatically switches on the heating device.
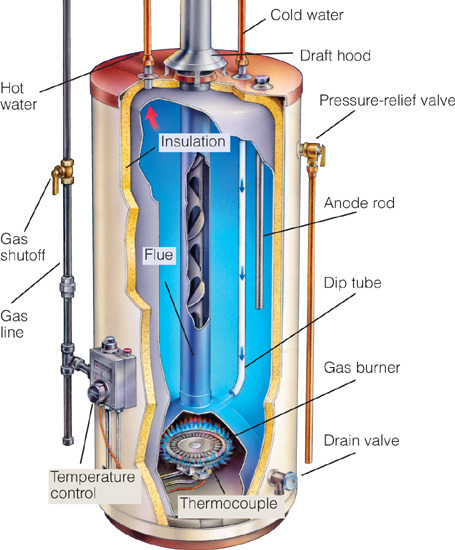
Gas heaters must be vented through a flue or a power vent. The base of this vent’s draft hood is an excellent place to check for back-drafting problems. Because gas heaters heat water more quickly than electric models, they tend to be smaller. The most common problem with a gas heater is a failed thermocouple (see below).
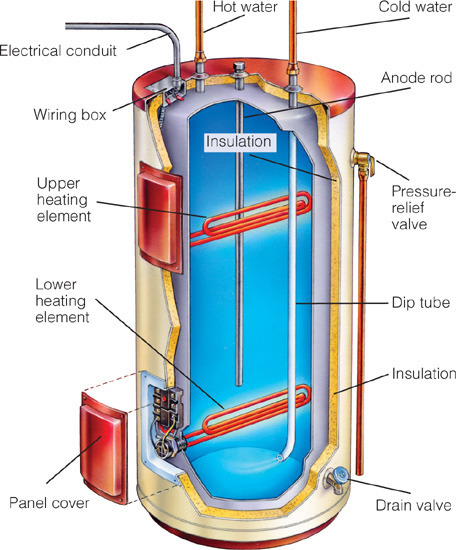
Electric heaters use one, or more often two, heating elements. If an electric heater has two elements, the upper element acts as a supplemental heater that only operates during heavy demand; consequently, it rarely fails. Electric heaters take longer to heat the water, tend to be larger and cost more to operate. However, not requiring a venting system makes them significantly easier to install.
Inside the burner compartment of your gas water heater, right in front of the pilot light, is a small metal cylinder called a thermocouple (unless you have a unit with electronic ignition). The thermocouple is a safety device that senses when the pilot light is burning. If the pilot light goes out, the thermocouple signals the gas valve to remain closed until the pilot light is relit. If your burner is shut off and the pilot light refuses to stay lit, a worn-out thermocouple is the likely culprit. Remove the old thermocouple, measure it and buy the same size replacement at a hardware store. Also, take the opportunity to clean the burner while it’s out. Before beginning, turn off the gas to the water heater and turn the temperature control valve to OFF.
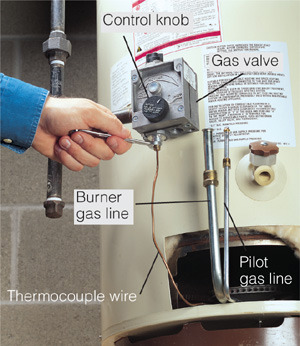
1 Remove the burner by disconnecting the burner gas line, pilot gas line and thermocouple. Pull lines out of the gas valve and remove the burner.
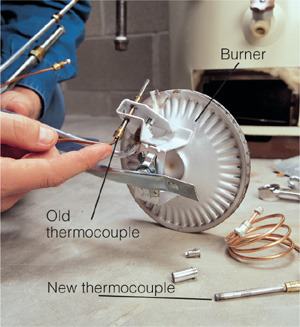
2 Slide the old thermocouple out and push the new one in. Note the position and mounting details of the old thermocouple and install the new one the same way.

3 Reinstall the burner and reconnect the gas lines and thermocouple to the gas valve. Tighten the nuts with moderate pressure and test the gas connections for leaks by coating joints with soapy water and checking for bubbling.
If you have an electric water heater that suddenly produces only lukewarm water, it’s very likely a heating element has gone bad. Since the lower element in a dual-element unit does 90 percent of the heating, that one usually wears out first.
First, shut off power to the water heater, remove access panels and use a voltage-sensing device to make absolutely certain there’s no power running through any of the wires.
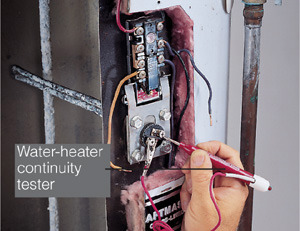
1 Shut off power. Disconnect two wires attached to the element and use a water-heater continuity tester to test each one. No light indicates a burned-out element.
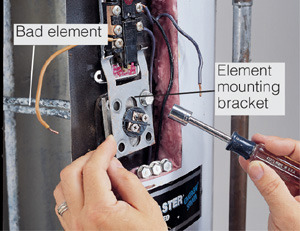
2 Shut off the cold-water supply and drain water from the tank. Remove the bad element by removing the bolts holding its mounting bracket to the tank.
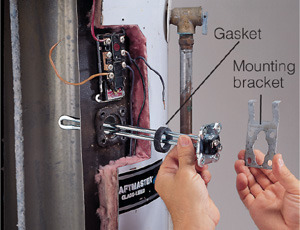
3 Replace the element with one that exactly matches the wattage, voltage, length and mounting style of the old one. Install the new element and gasket, close drain and refill tank.

Tankless Water Heaters
Tankless water heaters, also called instant or on-demand, don’t heat and store 40 or 50 gal. (150 or 190 l) of water like conventional heaters. Instead, as water is needed, it’s heated with a blast of gas or electric resistance heat.
Tankless heaters have some substantial advantages. They can fit into small spaces. They have great longevity and will provide limitless hot water as long as they’re not overtaxed. And they save energy, because they don’t have to keep water hot while it’s not being used.
The disadvantages of tankless units are that they’re expensive and may require larger gas or electric lines and vents for installation. They are also foreign to some repair people, and only the largest units can keep pace while filling a large indoor bathtub or if several showers are being taken at one time.
If history has taught us anything, it’s that we can’t predict what will happen to energy prices or what will happen with the weather. As homeowners, the best thing we can do is position ourselves and our homes so we don’t consume more energy than we absolutely have to. The key is to be prepared.
This book is loaded with energy-saving advice and projects; here are a few more ideas that will help stretch your dollar even further. The happy benefit to all this effort is that not only will you save money and energy, but your home will be a more comfortable place to be.
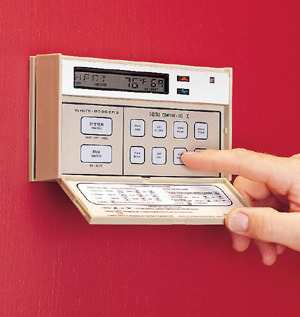
Digital thermostat. Install a digital thermostat that you program to automatically adjust settings for optimum savings. Depending on the season, set it so it lowers or raises temperatures while you’re at work or while you sleep. During vacations, set it to hold a constant energy-saving temperature.
Fluorescent bulbs. Replace lightbulbs used more than two hours per day with compact fluorescent bulbs. Fluorescent bulbs last longer, use only one-third as much energy to produce equivalent light and don’t add to the heat load during the cooling season.
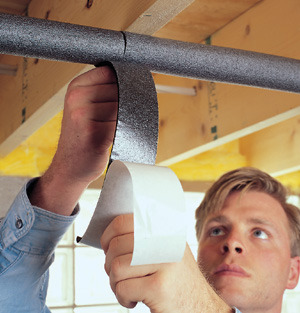
Pipe insulation. Tightly insulate pipes with foam pipe insulation, especially those running to dishwashers, clothes washers and other appliances with cycling loads. Hot water in the pipes will retain heat longer when running through cool areas, and the pipes won’t radiate heat into areas you don’t want heated.
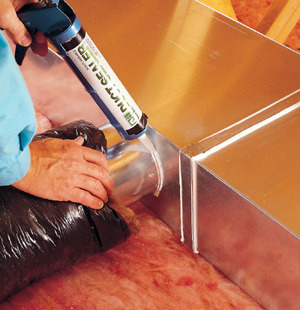
Seal ducts. Seal the joints of heating and cooling ducts near the furnace and those that run through attics and basements with pure silicone or metal ducting tape. Sealing ducts will save energy and help prevent condensation problems.
Motion sensors. Install light controls, such as motion sensors, photocell switches and timers, to automatically shut off lights when they’re not needed. Motion sensors are even available for interior light switches.
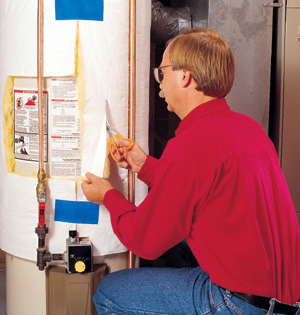
Water-heater blankets. Wrap the tank of your gas-burning water heater in a special fiberglass blanket to decrease heat loss. Check the owner’s manual to make sure a blanket is recommended for your model.
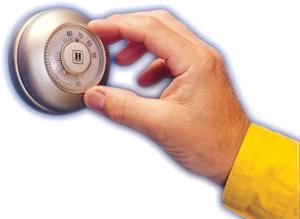
1. Set the thermostat lower at night during winter.
2. While on vacation, lower the water-heater temperature and raise or lower the heating and air thermostat, depending on the season.
3. Seal unused fireplace dampers with a plastic bag stuffed with insulation.
4. During sunny winter days, open southern shades and blinds for passive solar heat.
5. Close doors, registers and dampers in unused rooms.
6. Clean furnace blower, air-conditioner coils and refrigerator coils with a soft brush and vacuum cleaner.
7. Turn off lights not in use, reduce bulb wattage and use a dimmer switch when possible.
8. Fill clothes and dishwashers to capacity before operating.
9. Skip the dishwasher’s drying cycle.
10. Regularly clean all furnace, air-conditioner, dryer lint, humidifier and dehumidifier filters.
11. Cook more efficiently using microwaves, slow-cookers, pressure cookers and toaster ovens.
12. Look into off-peak energy-usage programs that local utility companies may offer.
13. In warm weather, set the thermostat higher and rely more on ceiling and table fans for cooling.
14. Lower water-heater setting to 120 degrees F (50 degrees C) for both energy savings and safety.
15. Ventilate and cool your home with window or whole-house fans during cooler hours.