Types of Windows
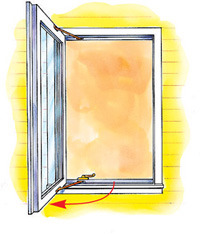
Casement windows have hinged sashes that swing from the side. They offer a large opening relative to window size, making them a good choice for egress windows, ventilation and viewing. A casement seals better than other window types because of its full-perimeter gasket and locking system. Screens are on the window’s interior side.
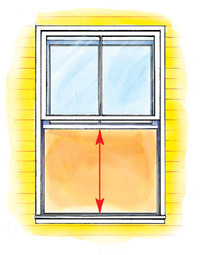
Double-hung windows have vertically sliding sashes and a traditional look. The two separate sashes offer smaller viewing areas and a style that often complements more traditional homes. Some have a tilt-in feature that makes cleaning easier. An outer screen or storm window offers the glass some protection from the elements.
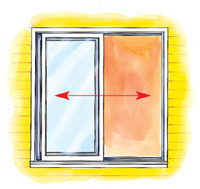
Gliding windows, or gliders, have horizontally sliding sashes. The easiest type to operate, gliders are also the most affordable. But the rolling-sliding action means they don’t seal as well as casement or double-hung windows and the bottom track tends to gather dirt.
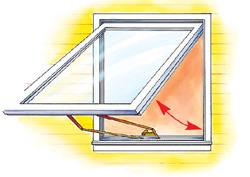
Awning windows have top-hinged sashes. Normally wider than they are high, they are often used for ventilation or light, not for viewing. Usually, they work best above or below other windows, above doors or in basements or bathrooms.
The parts related to a double-hung window are common to most other window types. The window’s structural support, the frame, consists of jambs, stops, sill and stool (inside sill), and the exterior brick mold. The sash includes the rails, stiles, muntins (if present) and lites (glass panes). The glass layer is called glazing; a window may be single-, double- or triple-glazed.
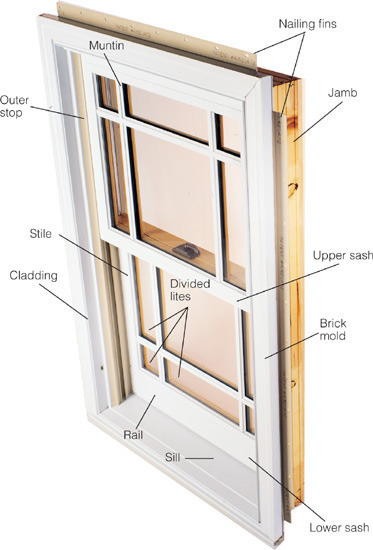
Outside view. Modern windows differ from older types in three key ways: (1) The sash weights are gone; (2) the exterior parts are clad with low-maintenance material; and (3) nailing fins, which may be removed, are added to ease installation.
Older double-hung windows have sashes that move up and down in channels. The sash position is controlled by counterweights concealed behind the side jambs.

Inner view. The sash weights are held by sash cords that run over a pulley and are attached to each side of each sash.
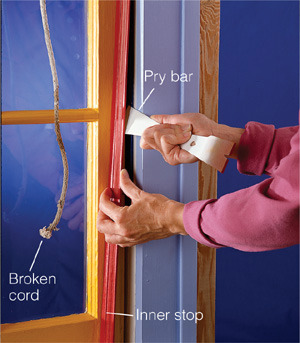
1 Unscrew or pry out inner stop using a putty knife or pry bar. If you have metal weather stripping, carefully remove and save it. Pull bottom sash out from frame. Remove knotted sash cord (or chain) from channel in side of window sash.
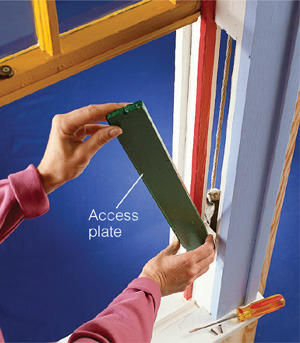
2 Unscrew or pry out access plate in jamb to expose the weights. The plate must come out at an angle, not straight out. If the plate is painted stuck, score around it with a utility knife. If it’s still stuck, attach a drywall screw in the center and pull out with pliers.
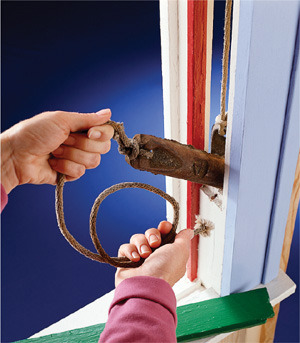
3 Pull out weight and broken cord. The new cord should be the same thickness as the old. To help feed the cord, use a piece of strong string. Tie a bent nail to one end of string to serve as a weight and direct it over the pulley. Firmly tie other string end to new cord.
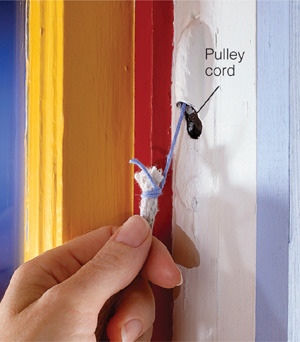
4 Feed cord over pulley, pull it down and tie it to the old weight. Rest sash on the sill, pull cord down until weight bumps pulley, and thread cord through channel on the side of the sash. Cut cord 2 in. (5 cm) longer than sash channel. Tie tight knot in cord end and push in hole at bottom of sash channel. Replace sash and inner stop.
If you don’t want to spend time replacing broken sash cords, you can repair the window using a spring-tension device. You have two tension device options: the butterfly and the window spring. To install a butterfly, open the sash fully, push one butterfly wing between the sash and jamb and nail or screw it in place. If the window still doesn’t stay open, place another butterfly in the other jamb. To install a window spring, which is the more attractive option, lower the sash, insert the spring between it and the jamb, and screw it in place. Again, use two springs if necessary.
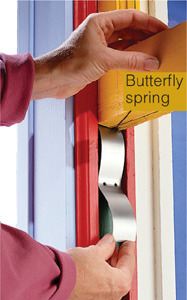
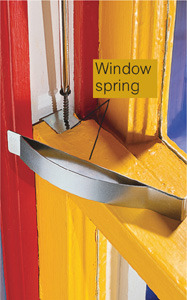
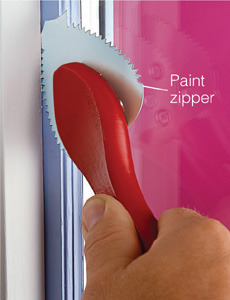
Do not use force, other than a slight tap with your hand against the sash, to open a stuck window. Look for and repair obstructions in the side jambs, such as loose weather stripping or stops. If the window is painted shut, free it carefully using a paint zipper between the sash and the frame, as shown.
Installing vinyl track inserts in older double-hung windows is an economical option that improves the windows’ operation and lets you retain the original sashes’ charm. To do this, the inserts replace the function of the sash cords and weights with a counterweight spring held in a vinyl track. The original sashes snap into the new vinyl track, and the springs allow them to lift easily. Plus, you can then snap out the sashes to gain the easy-cleaning feature of modern double-hung windows. This repair’s drawback is that it does little to improve the windows’ energy efficiency.
You can complete this project with basic tools and little experience in a few hours per window once sashes and tracks are on hand. Begin by using a framing square to check that the window frames are square. Use the tip of a screwdriver to examine the frame and sashes for rot.
If your sashes and frames are in good shape, find a window dealer who will trim and groove the original sashes and sell the vinyl tracks. Also, have the dealer install the counterweight catches on the bottom of the sashes and cut the vinyl tracks to length. If the vinyl tracks are available in more than one color, choose one that blends with the window and trim.
Before installing the new vinyl tracks, remove the counterbalance access plates and fill the cavity with blown-in or minimally expanding foam insulation.
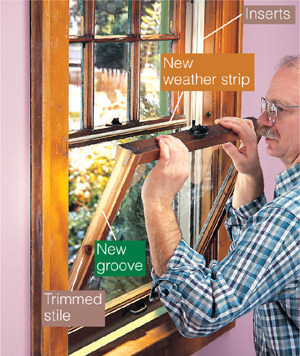
With the sash stiles trimmed and grooved, the original sashes snap into the spring-loaded vinyl track inserts.

Counterweight springs do the same job as the old sash weights and cords, but more reliably. Improve the seal between the sashes by adding weather stripping to the sash rail.
Visitors often praise older, double-hung windows for their authenticity, but if you live with their draftiness, sticky sashes and high maintenance, it’s more difficult to say nice things about this original equipment. The simplest option to permanently solve these problems is to install vinyl replacement inserts. You won’t have to remove any exterior trim or interior casing, and the inserts come as an assembled unit, complete with frame, tracks and sashes. The biggest drawback to these replacements is that, because the window will have two frames, you will lose some viewing area.
First, check your old window frames to make sure they’re rot free and within 1/4 in. (6 mm) of level across the sill. Order the inserts 1/2 in. (12 mm) smaller (height and width) than the original frame opening of the sash tracks (not the stops). If the opening is not square, order the largest window that will fit in the non-square opening. To install the inserts, remove the old sashes, sash cord covers, inner stops and parting strips. Save the inner stops and cut the sash cords. Remove the weight-access hole covers and fill the entire area behind the jambs with insulation.
Using shims and a level that will fit inside the frame, establish a level base for the insert across the sill. Set the insert into the frame, pushing it against the outer stop. Insulate the gaps between the insert and the old frame. Caulk the exterior with sealant between the insert and outer stop. In cold climates, caulk the interior as well. Finally, reinstall the inner stops.
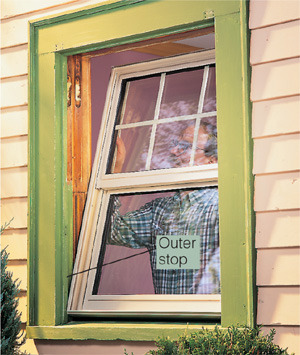
To install a vinyl replacement insert, remove the old sashes, sash cord covers, inner stops and parting strips. Install the insert against the original outer stops, level it, insulate the gaps and reinstall the inner stops.
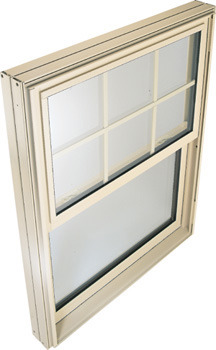
Vinyl inserts provide an easy-to-install, draft-free window with insulated glass that operates smoothly.
Window sash kits let you replace just the sashes without removing the interior trim or tearing out the frame. The new sashes are custom-made to fit your existing frame opening, are airtight, come with insulated glass and allow you to do the entire job from inside. Accurate measurements are essential for a proper fit (see instructions in box below).
As with one-piece inserts, sash kits’ big advantage is ease of installation. The job can be completed from the inside in a few hours per window without disturbing your trim or wall covering. Unlike one-piece inserts, you don’t have an extra frame that reduces your viewing area, and you can order wooden sashes with muntins or grilles to retain your home’s traditional look.
Paint or stain the wooden sashes before installation. Also, follow the manufacturer’s instructions; each brand has specific steps to follow to ensure that your sashes fit properly.
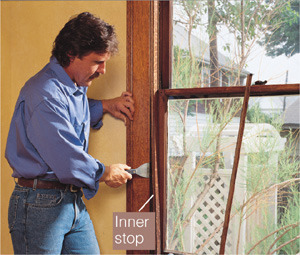
1 Check the frame for rot, and repair any rotted areas. Remove inner stop carefully with a putty knife or pry bar. Remove parting strip on jamb between sashes.
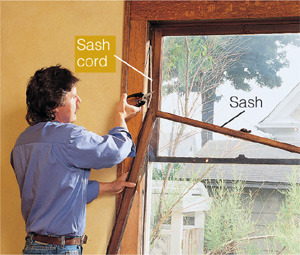
2 Detach the lower sash by angling it out of the opening. Cut sash cords and remove sash. Remove the upper sash and cut sash cords.
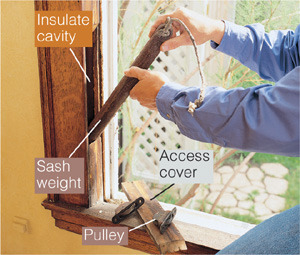
3 Remove access hole covers, weights, cords and the pulleys at the top of the jamb. Fill the entire area behind jamb with minimally expanding sprayed foam or blown-in insulation.
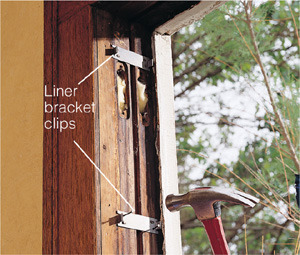
4 Install jamb liner bracket clips, following the manufacturer’s instructions for the number of clips needed and required spacing.
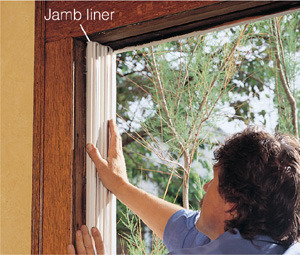
5 Snap vinyl jamb liner in place over brackets. Jamb liner provides an airtight track for the new sashes.
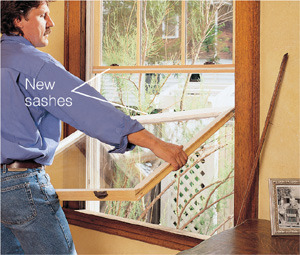
6 Install new sashes, starting with the upper sash. Follow instructions for locking the lift mechanisms located in jamb liner. If new sashes tilt out, make sure they tilt properly.

Before you order new window sashes, take accurate measurements to ensure a good fit. Measure top to bottom on both sides, and side to side at the top, middle and bottom of the sash opening. Check the opening for square, as well.
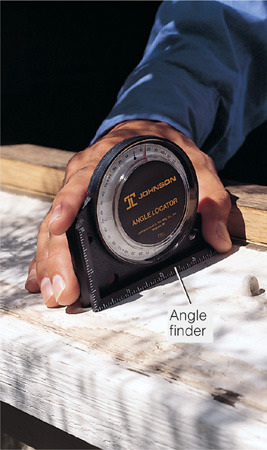
You also need to know the angle, or bevel, of the windowsill. The bottom rail of the new lower sash and the bottom edge of the vinyl jamb liners must match the sill’s angle. If they don’t, the sash won’t seal properly and the jamb liners won’t fit. To measure this angle, use an angle finder, available at home centers and hardware stores.
Most replacement-window manufacturers can build whatever size sash you need, and some, but not all, can match the original pattern of lites (individual panes) in each sash.
Casement and awning windows rely on little mechanisms called operators. When a window doesn’t operate properly, first make sure it isn’t painted shut. Next, remove the crank handle and cover. If the operator is in good shape, clean and lubricate it. If the inside gears are worn or damaged, replace the operator, as shown.
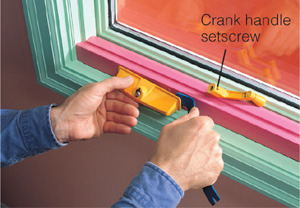
1 Remove crank handle and gently pull off cover. If your cover is permanently bonded to the operator, go to the next step.
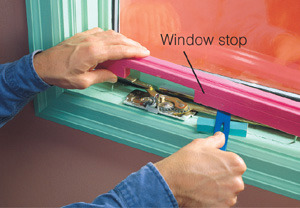
2 Pry up the stop that hides operator arms. Partially open window; then press down on operator arm so roller slips out of the exit notch on the sash track.
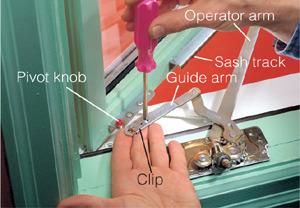
3 Slide guide arm clip off pivot knob. Remove screws, replace operator and reconnect it to window by reversing steps 1 and 2.
When a window crank handle wears out, replace the handle or install a more window-blind-friendly, low-profile T-handle. Before shopping for a replacement, check the window brand. Window manufacturers make unique operator shaft sizes that won’t fit other companies’ window handles. If you can’t find the right handle, generic replacement kits have assorted shaft adapters that fit most window brands.
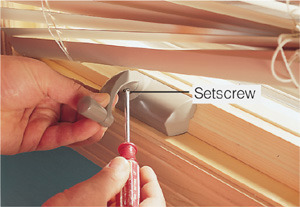
1 Remove the old handle by loosening setscrew with small straight-blade screwdriver.
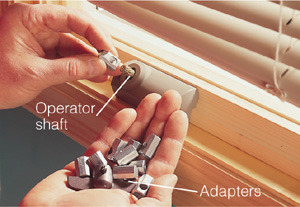
2 Select adapter that fits tightly over your window opener’s shaft and slide it in place.
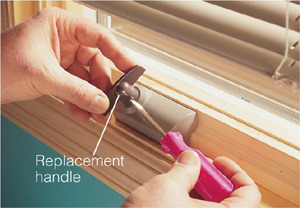
3 Install new handle and tighten setscrew. Note: T-handles are more difficult to operate than crank handles.
Casement window sashes bind or stick because of swelling from humidity, house settling or excessively packed insulation around the window. A little preventive maintenance—sealing or painting bare wood and lubricating moving parts—helps limit swelling and the chances of binding. For a stuck sash, first make sure the window isn’t painted shut. To free up painted-shut windows, run a paint zipper (see here) between the sash and frame. For other binding problems, follow these steps, as shown.

1 Slip carbon paper between the sash and frame in several places as you open and close the window to determine where binding occurs. Binding points will show up as carbon marks on the sash’s side.
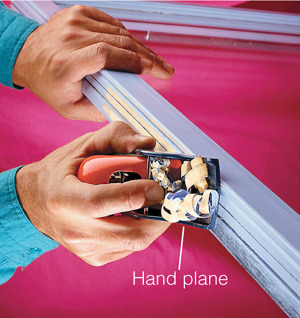
2 Level high spots that bind, using a hand plane or belt sander. Removing just a few shavings is enough to free most windows.
A typical gliding window consists of sashes that move horizontally; in some cases one is stationary. The sash is guided by upper and lower tracks. Usually a groove in the sash’s bottom rail fits over a ridge in the track. Some sashes may have additional nylon glides or rollers that ride on the ridge.
A glider’s bottom track is a dust catcher. Keep it clean with regular vacuuming and an occasional scrubbing. For hardened dirt on metal or wood, use detergent and fine steel wool or an abrasive sponge. Lubricate the track and upper channel with spray silicone. Aluminum sashes can become spotted with oxidation deposits (similar to rust). These are easily removed by washing with a mild abrasive cleaner or with fine steel wool and detergent. A light coat of automobile paste wax will help prevent oxidation in the future.
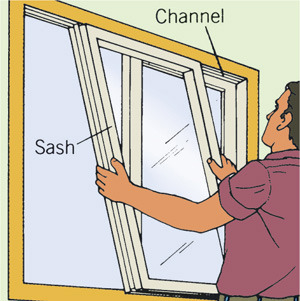
To remove or replace a sash, unlock it and slide it to the window’s center. Grasping the sides, push the sash straight up into the upper channel and swing the bottom out toward the interior. Then pull the sash down out of the upper channel.
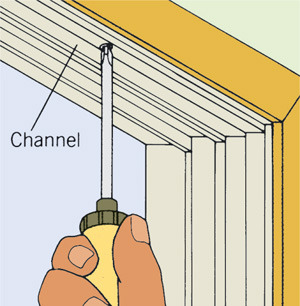
If the sash doesn’t come out easily, tighten screws in the upper channel. Pulling up the upper channel should provide enough room to remove sash.
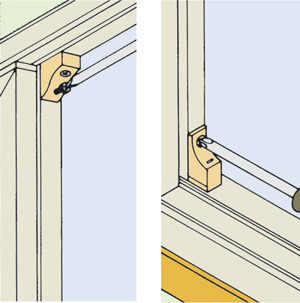
Remove a fixed sash by unscrewing corner brackets at its top and bottom. Unscrew the bumper from the track and slide the fixed sash to the center. Lift the sash up and tilt it toward the outdoors to remove it. To replace sashes, reverse these steps.
While rarely used as the primary windows in a home, jalousie windows can be a good choice for an enclosed porch because they allow maximum ventilation. The windows are opened and closed by a system of pivots and levers driven by a crank handle. If the window becomes difficult to operate, lubricate the moving parts with a silicone spray. In a jalousie window, the side with the crank handle is the active side; the opposite side is the fixed side. If the pivot mechanism is damaged, you may need to replace the entire active side.
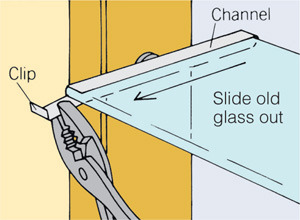
1 To replace a louver, open window until louvers are horizontal. With pliers, gently press back clips just enough to release glass.
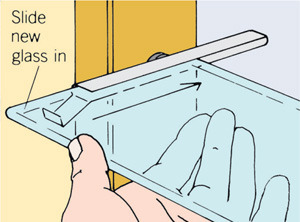
2 Slide new glass into channels. Bend clip ends into their original shape to hold glass firmly in place.
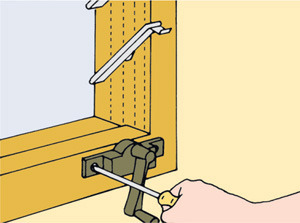
To replace a pivot mechanism, remove all louvers. Unscrew active side unit from jamb and install new unit. Use a level to align channels with those in the fixed side.
Epoxy is the perfect repair material for windowsills and door jambs that are difficult to remove and for moldings that would be expensive to duplicate. It bonds permanently and is formulated to flex and move with the wood. The repair shown here utilizes a liquid consolidant (usually sold alongside the epoxy) to stabilize the wood and a two-part puttylike epoxy to rebuild the missing sections. Both products are available at well-stocked hardware stores.
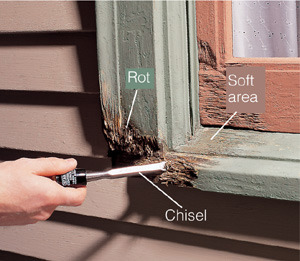
1 Probe rot-damaged areas to determine how far decay extends. Gouge or scrape away the large chunks of loose, spongy wood. Scrape paint away from other soft areas.
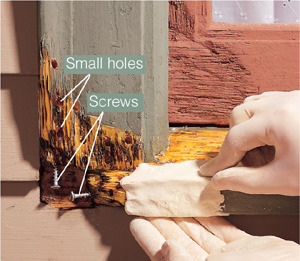
2 Drill 1/4 in. (6 mm) holes and soak repair area with consolidant. Drive screws to strengthen large repairs in corners. Rebuild one piece of wood at a time using epoxy filler.
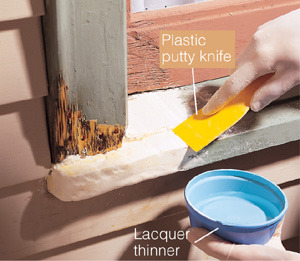
3 Before it hardens, smooth the filler with a putty knife that’s soaked in lacquer thinner to prevent sticking. For best bond, apply filler when consolidant is tacky, not fully hardened.
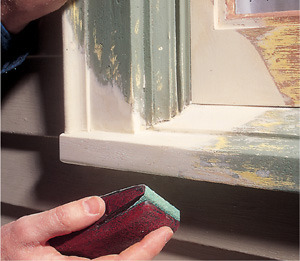
4 Sand epoxy smooth using custom sanding block with 100-grit paper. Filler looks best primed and painted but can also be stained.
Epoxy filler is even strong enough to rebuild the entire corner of a rotted sash. Remove the sash. Support it by attaching a diagonal brace that won’t interfere with the repair area, and then build the form.
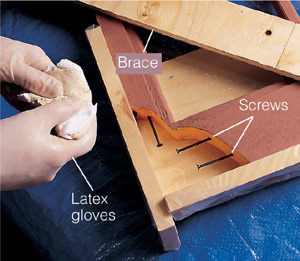
1 Cut away rotted section with a jigsaw and drive screws into rail and stile. Build form, wrap it in 4-mil plastic sheeting and screw form to sash.
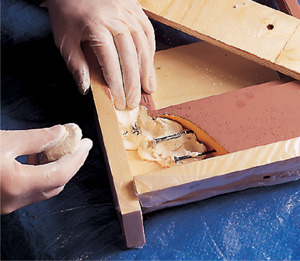
2 Soak cut surfaces with consolidant. Pack filler into form, building it up in layers to eliminate voids. Shape repair using a putty knife dipped in lacquer thinner.
Help rebuilt moldings blend in by smoothing the repair with a shaping block made from auto body filler. Begin by coating a section of undamaged molding with a release agent, such as car wax or cooking spray.
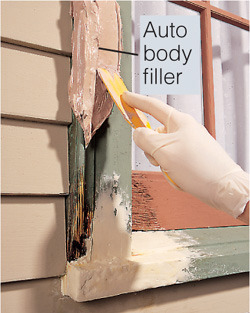
1 Mix auto body filler. With a putty knife, smear it thickly over surface of solid section of molding and edges. Coat all surfaces with release agent beforehand.

2 After 10 minutes, pop off hardened filler with putty knife. Square ends of shaping block. Use solvent to wipe away remaining release agent on molding.
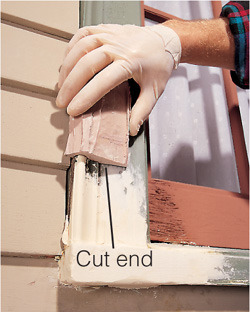
3 Overfill repair area with epoxy. Wet shaping block with lacquer thinner and work it over epoxy until it matches existing profile. After epoxy cures, sand repair smooth.
You can leave a sash in place or remove it to replace a single pane of glass. Order glass 1/8 in. (3 mm) smaller than the opening. Explore the option of installing thicker double-strength instead of single-strength glass.
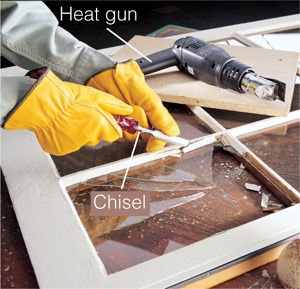
1 Remove broken glass by scraping away old glazing. Soften difficult compound using a heat gun. Be careful not to cut into the wood while working. Under the old compound, you’ll find tiny metal tabs, called glazing points. Remove these with a pliers.
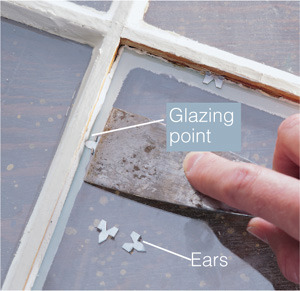
2 Line the sash opening with a thin bead of glazing compound and firmly press new glass into place. Secure glass by placing glazing points every 4 in. (10 cm) around perimeter. Use points with ears and press into place with putty knife.
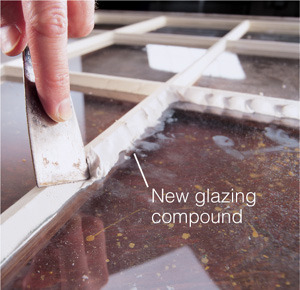
3 Apply compound around edges of glass and smooth using a flexible putty knife. Wet the knife occasionally so it doesn’t stick to the compound. Let putty cure for at least a week before painting.
Insulated glass can get broken or lose the seal between the panes and permanently fog. Start by taking the entire sash to a shop that repairs windows. They’ll measure the size and thickness of the insulating unit, help you identify the manufacturer, determine whether a window is still under warranty and discuss energy-efficient replacement options. Manufacturers use one of the three methods for installing the sealed units. Savvy do-it-yourselfers can repair the units themselves. Sometimes it’s easier and cheaper to replace the entire sash.
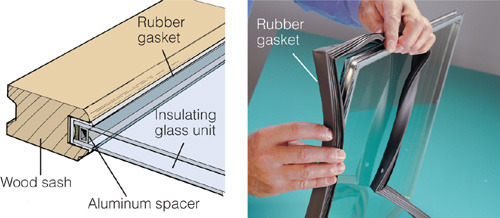
Gasket method. With sash removed, take out screws that hold horizontal rails and vertical stiles together. Tap frame loose from gasket and glass with wooden block and hammer. Remove old gasket from faulty pane and install it on a new glass double-pane unit. Push two frame pieces together around the gasket and fasten the frame back together. Seal any gaps in corners using clear silicone.
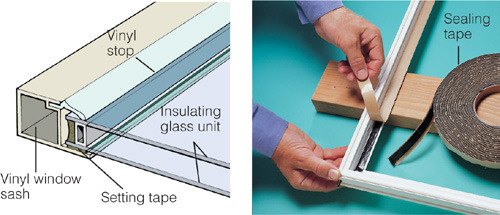
Adhesive tape method. Pry out stops using a putty knife. Flip window over and slice through tape bond with a utility knife blade. Scrape old tape and clean lip with adhesive solvent. Lay new sealing tape in place. Position spacing blocks against one side of frame, position glass against blocks and carefully drop it in place. Replace stops and seal gaps with clear silicone.
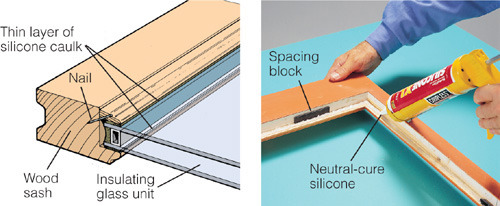
Caulk method. Carefully pry off wood stops. Flip window over and cut caulk with a utility knife. If necessary, break window after covering it with carpet. Soften adhesive using a heat gun, and then scrape and clean edges. Position spacing blocks, apply bead of neutral-cure silicone to frame and drop in new glass unit. Apply silicone to glass’s stop side and reinstall stops.
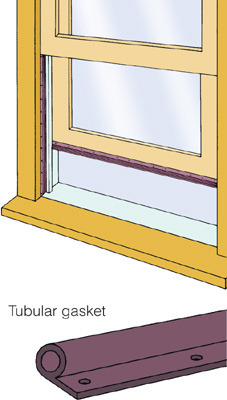
Tubular gaskets are made of vinyl or rubber and are durable and effective even when the gaps around windows or doors are uneven. Applied from the outside, gaskets remain pliable in subzero temperatures. When applied to the window’s outside sash frames, they can make double-hung and gliding windows more airtight. Although they offer a tighter seal than metal strips, gaskets are very visible.
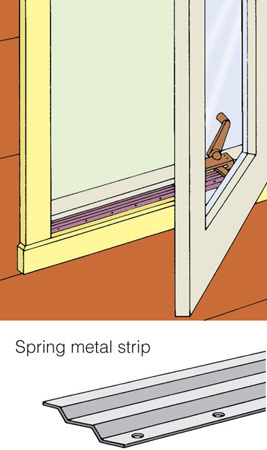
Made of bronze, stainless steel, vinyl or aluminum, these long-lasting strips fit unobtrusively in window or door channels and use pressure to create a seal. However, they may make doors or windows hard to open.
Wood casement windows can be inconspicuously sealed with strips applied to the sash channels with the nailing flange facing outward. In a double-hung window, the metal strips can seal the sash sides while tubular gaskets seal the horizontal joints.
If your windows let in too much heat in the summer and too much cold in the winter, a simple, affordable option to improve their efficiency is to apply low-E or tinting film. Low-E films offer these major benefits:
▪ Like reflective and nonreflective films, low-E films virtually eliminate the ultraviolet ray penetration, helping reduce fading problems, while doing little to affect window visibility.
▪ They reduce heat gain from the outside in the summer.
▪ During the winter, they reduce heat loss by 60 percent.
▪ Glare is reduced by filtering 50 to 60 percent of the incoming light.
▪ In the case of a broken window, the film helps hold the pieces of glass together.
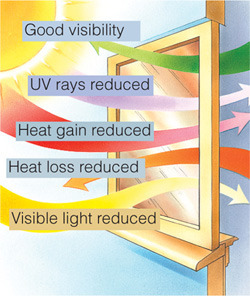
Low-E films reflect both outside summer heat and inside winter heat and offer fade protection.
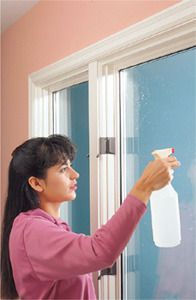
1 Clean windows thoroughly. Spray window with wetting solution following manufacturer’s directions.
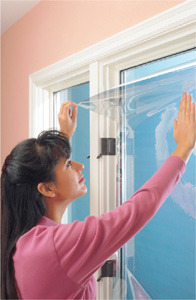
2 Position film on dampened window, making sure it overlaps sash on all sides.
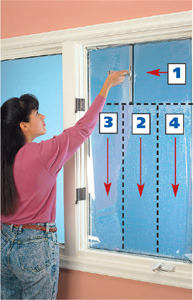
3 Spray film surface with wetting solution. Make a single squeegee pass across the top, then use vertical passes down.
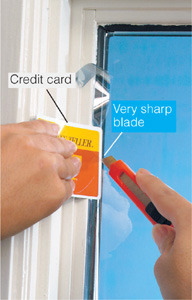
4 Trim excess film using a credit card shield and very sharp utility knife. After trimming, wet and squeegee a second time.
Buying windows isn’t easy. Dozens of options concerning construction, efficiency, durability, type, size and style make window shopping a sizable research project. The charts at right will help you with some of these decisions.
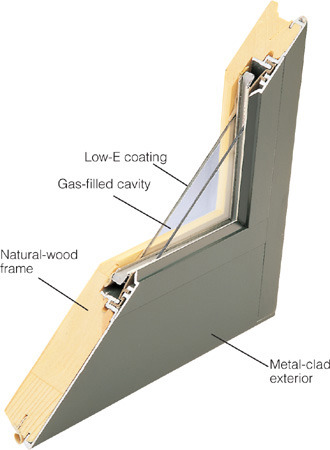
The basic construction of most premium windows is usually wood, with surfaces exposed to the elements clad in metal, or a foam-insulation core clad in vinyl. The double-pane unit has two layers of glass with a space between the layers filled with an insulating, inert gas. Inside, the glass layers are often coated with a low-E film to reflect heat.
U-value, or ER ratings in Canada, indicates the rate of heat loss of a window assembly. The U-factor ratings generally fall between 0.20 and 1.20; the lower the U-value, the greater a window’s resistance to heat flow, and the better the insulating value.
Note: Windows and the techniques for installing them vary greatly according to manufacturer and locale. Extreme climates require extremely careful installation to minimize energy loss and possible damage from moisture. Always install windows based on information from the manufacturer and local building codes.
All window framing materials have their pros and cons. Wood provides a warm look and is very repairable; however, it’s prone to rot and insect damage and expands and contracts with humidity changes. Vinyl is low maintenance and a good insulator, but it expands and contracts with temperature changes and becomes brittle in extreme cold and with prolonged sun exposure. The best windows combine materials to utilize the best qualities of each.
Frame Material |
Energy Efficiency |
Longevity |
Maintenance |
Cost |
All wood |
good |
good |
high |
medium |
Vinyl or aluminum clad |
excellent |
excellent |
low |
high |
All aluminum |
poor |
good |
low |
low |
Thermal break aluminum |
good |
good |
low |
low |
All vinyl or fiberglass |
excellent |
good |
low |
low (vinyl) high (fiberglass) |
Insulation-filled vinyl |
excellent |
good |
low |
medium |
Single, double and triple glazing refers to the number of layers of glass in a sash. Double- and triple-glazed windows may have low-E film with air or a dense gas (argon or krypton) between the layers to inhibit heat flow. These inert gases slow the exchange of heat or cold between the panes. R-value is a measure of the material’s resistance to heat flow; the higher, the better.
Glass Type |
R-Value |
Pros |
Cons |
Single layer |
0.7 |
lightweight, easy to repair |
poor insulator, poor security |
Double layer |
2.0 |
readily available, affordable, medium weight |
fair insulator, seals can break |
Triple layer |
3.0 to 3.5 |
good insulator, good security |
very heavy, expensive, not readily available |
Double layer, low-E |
2.0 to 4.0 |
reflects outside heat and inside heat |
reduces light, seals can break |
Double layer, gas-filled |
2.0 to 4.0 |
excellent insulator, good cost-to-benefit ratio |
seals can break, causing fogging |
Double layer, low-E gas-filled |
2.5 to 4.5 |
reflects inside and outside heat, excellent insulator |
reduces light, seals can break |
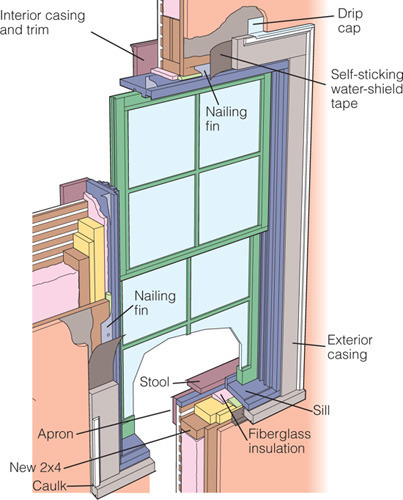
Replacing a window isn’t as difficult as you might think. In some ways, the biggest challenge is to order the correct size, and to do that, you need to know the size of your rough opening and the thickness of your exterior walls. The rough opening refers to the width and height of the wall opening after the entire window is removed. As a rule, the rough opening should be 3/4 in. (19 mm) wider and taller than the new window.
Most new windows are held in place by exterior nailing fins, but don’t rely on the nailing fins to keep out water. Instead, use a combination of self-sticking water-shield tape, drip caps and polyurethane caulk. Insulate the gaps between window and opening with fiberglass or minimally expanding foam, taking care not to bow the window jamb. Apply primer to all sides and cut ends of exterior trim before you install the trim.
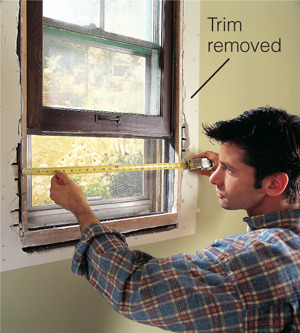
1 Measure the opening’s width and height. Measure jamb depth based on wall thickness, plus drywall and sheathing, but not siding material.
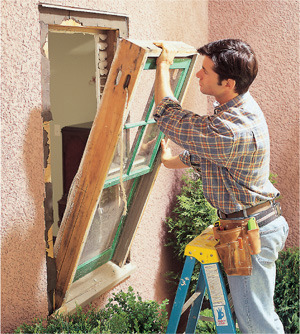
2 Tear out old window. Pry off exterior trim. If window frame is nailed to wall frame, cut nails using a reciprocating saw.
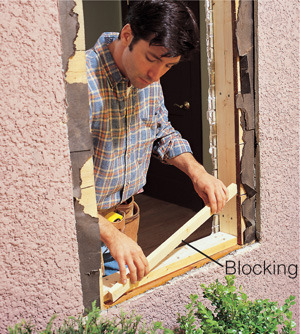
3 Nail wood blocking to bottom and sides, if necessary, to adjust rough opening’s size. Channels left from sash weights need to be filled.
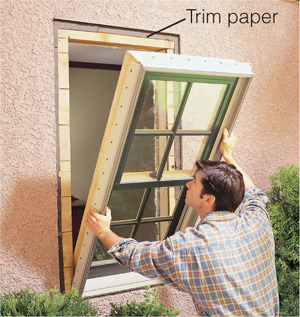
4 Set new window in opening. Caulk behind nailing fins. Trim building paper to improve seal. Center the window in the opening.
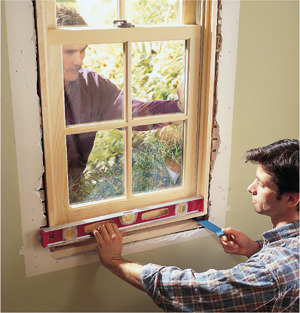
5 Level the window with pairs of shims and check with a level. Have a helper hold the window while you complete this step.
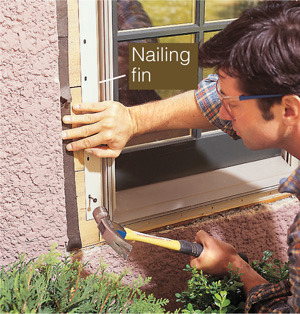
6 Secure nailing fins in lower corners, double-check windowsill is level and centered. Measure window diagonally to check square.
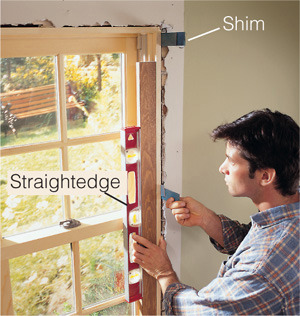
7 Use a level to check side jambs are plumb and finish nailing fins. Use a straightedge and pairs of shims to straighten bowed side jambs.
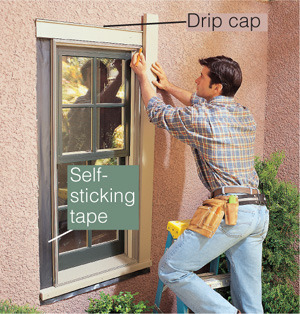
8 Apply self-sticking water shield. Slide drip cap behind siding at top. Attach exterior trim and seal joints between trim, siding and window.
Stop pesky insects from invading your home by replacing torn screens. It’s a simple and inexpensive project that requires only a few simple, inexpensive tools. For interior spaces that tend to overheat, consider using sun-shading material for the replacement screen. If the old moldings on wood frame screens are rotted, missing or split, replace them. Prime and paint the replacement moldings before installation and, if necessary, paint and patch wood screen frames while the screening is off.
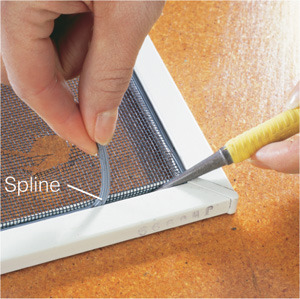
1 Dig out the old spline with a nail set or awl. Remove old screen. Use either fiberglass or metal replacement screening. Metal screening is stronger, but it can dent and is harder to manage.
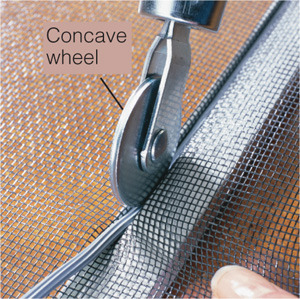
2 Align the new screen grid to the frame’s side so it goes in square. Beginning at one corner, seat the new spline in a channel on one side with the concave wheel of a screening tool.
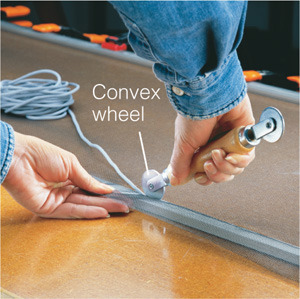
3 Clamp side of finished frame to work surface. Pull screen tight on opposite side and insert spline down that side. Complete two other sides the same way. Re-press entire spline with screening tool’s convex wheel.
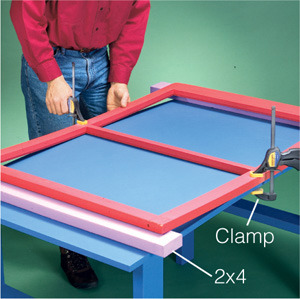
1 Remove screen molding after cutting paint bond between molding and screen frame. Pull staples or nails and remove old screening. Gently bow screen frame by propping up both ends on 2x4 blocks, then gradually apply pressure with clamps in middle of frame.
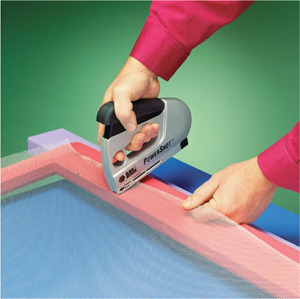
2 Staple new screen to top and bottom frame rails. Cut screen so it extends 1 in. (2.5 cm) on all sides beyond the molding. Remove clamps so frame straightens and pulls screen taut; staple the two remaining sides.
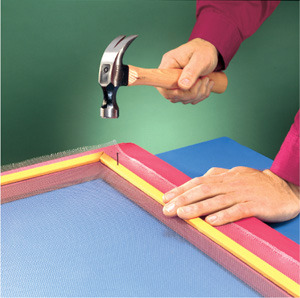
3 Nail the moldings back in place with small finish nails or brads every 6 in. (15 cm). Cut away excess screening with utility knife using the molding edge as a guide.
Combination storm windows offer many benefits. They improve a window’s thermal efficiency, improve security by adding a layer of protection, help protect primary windows against rain and hail, and act as a screen to allow ventilation. Some standard-size units are available at home centers; others must be special ordered.
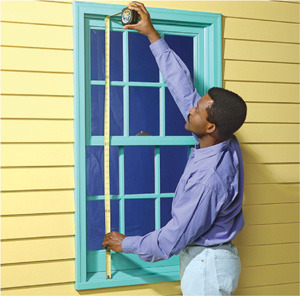
1 Measure existing window at inside edges of brick molding and order windows. Predrill holes along outer edges of storm window frame 2 in. (5 cm) from each corner and every 12 in. (30 cm) between.
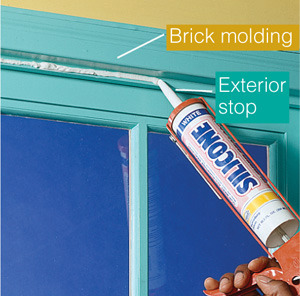
2 Test-fit the storm window. Use a belt sander to trim its lip, if necessary. Don’t twist the window out of square to make it fit or it won’t operate properly. Now apply a bead of silicone along the openings’ top and sides but not the bottom.

3 Position storm windows in openings. Lift window as high as possible, then lower expansion seal at bottom. Attach window with screws. Make sure moisture can pass freely through weep holes at bottom.
A window is the second choice of entry for a burglar—first choice if it’s unlocked. A burglar usually won’t risk the noise of breaking glass to release a lock, especially when two or three layers of glass are present. Window style makes a difference as well. A casement window is difficult to open from the outside, but a double-hung window, even one that’s latched, can be fairly easy to open. The following techniques will help make your windows more secure against intruders.
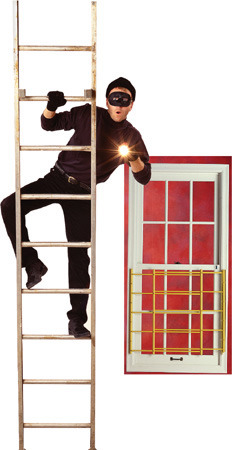
Burglar bars. For maximum window security, and if local fire codes permit, mount steel burglar bars to the wall framing on the inside of the window. The bars latch into a mounting bracket but can swing out of the way for an emergency exit.
To deter or delay intruders, install additional locking devices on your double-hung windows. Don’t rely solely on the clamshell, or butterfly, latch often found on double-hung windows. These latches are not really locks, but are meant to draw the sashes together to reduce drafts and rattling.
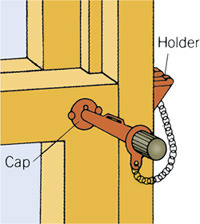
Locking pin. Improvise a lock by drilling a hole through the interior sash and partway into exterior sash. Then insert a bolt, dowel or locking pin. Drill the hole slightly larger than the pinning device for easy removal. Install one pin on each side of sash. Manufactured locking pins have a more finished look and a holder for the pin when it’s not in use.
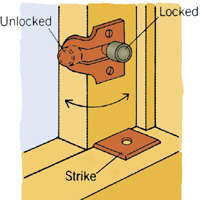
Ventilating lock. These locks remain engaged but also allow the window to be opened slightly for ventilation. Screw lock to stile of upper sash a short distance above the rail. Screw strike plate to top rail of lower sash. Attach one lock to each side of sash. Move lock to inside position for full window operation.
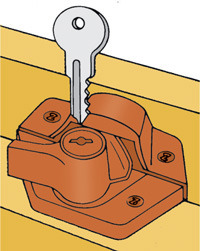
Key turnbuckle. Remove clamshell latch. Mount new lock with one-way screws. If possible, get matched keyed locks from a single manufacturer so one key fits all locks. For emergencies, keep a key near each window, hidden from outside view, and another set for backup.
Gliding windows, like double-hung windows, have sliding sashes, making them easier to jimmy open without breaking the glass. The key to improving sliding windows’ security is to prevent the sliding sash from sliding or being lifted out.
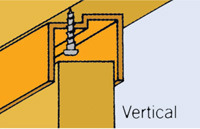
Screw stop. A screw installed vertically in the top channel prevents a sash from being lifted out (top). A horizontal screw (bottom) keeps sash from sliding.
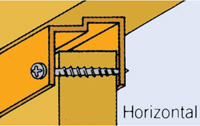
Caution: If a gliding window acts as an egress window, do not use the horizontal screw method. Instead, use one of the stops shown below.
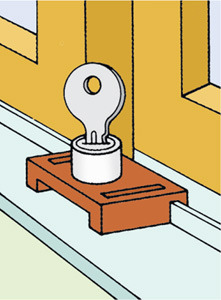
Key track stop. A small slot in this stop fits over the window track. A key anchors the lock in position. If possible, get matched keyed locks from a single manufacturer so one key fits all locks. For emergencies, keep a key near each window, hidden from outside view.
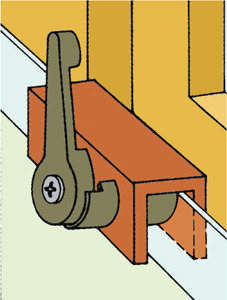
Track stop. Use a track stop to stop a sliding sash from sliding. Slip track stop over window track and turn handle clockwise to tighten bolt.
When doors swing freely, latch easily and firmly, have an even gap around the edges of the slab and close with a solid “thunk” instead of a rattle, the impression given is that of a solidly constructed home in good condition.
Doors come in standard widths of 24, 28, 30, 32 and 36 in. and are referred to in a “feet and inches” format (for instance, a 30-in. door is labeled 2′ 6″). The measurement refers to the slab or door only, not the frame. Nonstandard sizes can be ordered. For easiest installation, buy a pre-hung door—already hinged in its jamb. Pay particular attention to the door swing (see below) and jamb depth. The pre-hung door’s jamb should be as wide as the wall is thick when you add up wall framing, drywall and/or sheathing thicknesses. Also, for exterior use, have the door bored for the lock-set and the deadbolt.
Left-hand door
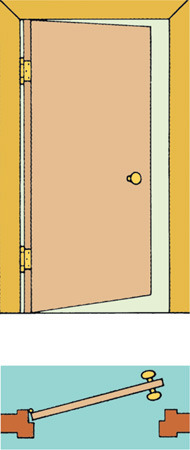
Right-hand door
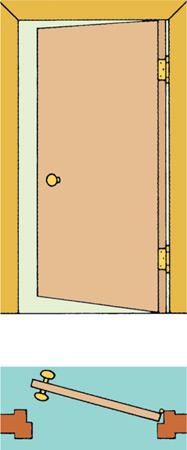
Determining swing. Stand with your back against the door jamb containing the hinges. If the door swings the same way your left arm does as it swings outward, it’s considered a left-hand door. If it swings to the right, it’s a right-hand door.
Doors come in three basic types—solid wood, solid core or hollow core—all of which may be bought pre-hung. The solid core may be wood, steel or insulating foam. The core of a hollow-core door is usually cardboard. Hollow-core interior doors are lighter and less expensive than solid-core doors but also less durable and less fire resistant.
Exterior doors must be solid wood or solid core. For the most part, wood exterior doors have been replaced by steel and fiberglass to eliminate the main weakness of wood—its vulnerability to the weather. However, steel doors aren’t perfect. They can warp from excessive heat, especially if they’re painted a dark color and covered by a storm door.
To make them more attractive, manufacturers mold steel or fiberglass skins to mimic traditional wood doors. Some fiberglass skins even have wood-grain patterns that can be stained to look like real wood.
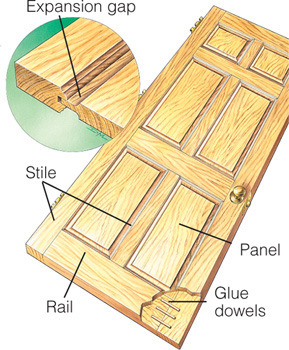
Wood-panel doors consist of rails, stiles and panels assembled in one operation. Gaps between the panels and the stiles and rails allow the panels to expand and contract with humidity changes, reducing the chances of a door binding or cracking due to swelling.
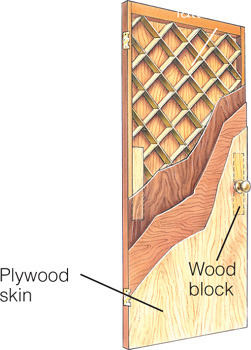
Hollow-core doors are built around a cardboard-lattice core. Wood blocks support the knobs and latch. A hollow-core door is light yet stable, making it easy to install and perfectly suited for interior use. It’s not a good choice for an exterior door. The solid framework around the edges is fairly narrow, limiting how far you can cut the door down to fit smaller openings. Hollow-core doors often have two hinges.
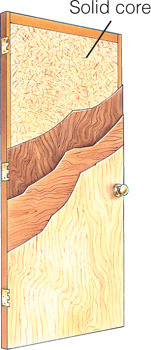
Solid-core flush doors have wood cores sandwiched and glued between two plywood, or sometimes hardboard, skins. The cores may be made from particleboard or short blocks of wood glued together. Solid core doors are easy to shorten, and the door slabs are usually supported by three hinges.
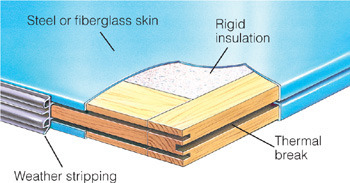
Steel and fiberglass skins make exterior doors more durable and maintenance-free than wood doors. A rigid insulation core provides superior insulation over wood. The thermal break keeps the inside steel skin from developing a film of condensation or frost.
For drafty exterior doors, quality weather stripping offers a quick, affordable, long-lasting solution to eliminate drafts and increase comfort. Weather stripping kits are readily available and include two side strips, a top strip and fasteners. The foam type shown below is easy to install, provides an effective seal and retains its flexibility for a long life. The key to positioning the new weather stripping is to shove it against the door so it compresses slightly along the strip’s entire length. But if you compress it too much, the door won’t latch when you close it.
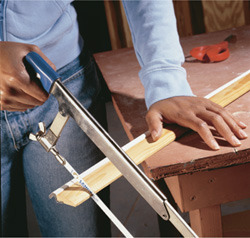
1 Cut the foam part of the weather stripping with sharp scissors; then cut the wood flange with a fine-tooth saw. Cut side pieces to fit profile of top piece.
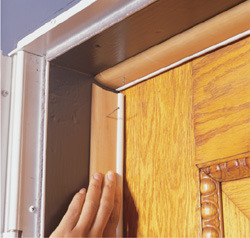
2 Position the weather stripping so the entire length seals to door. Tack it in place. Test the door to make sure foam seals but doesn’t interfere with the door’s operation.

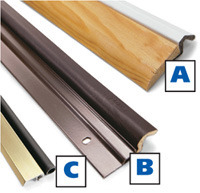
Finding new weather stripping to match the exact profile of the old can be difficult; however, the common types shown here work well for most exterior doors. The wrapped foam type, whether combined with wood (A) or metal (B), is durable, retains its shape, withstands abrasions and conforms to a wide range of gaps. The metal flange (B) with screw slots is more adjustable than the wood flange (A).
The vinyl or silicone bulb (C) won’t cover gaps as well as wrapped foam, but it has a smaller profile with a cleaner look. For steel doors, look for a magnetic-seal replacement kit (see here).
To get the right threshold gasket, remove your old gasket and take it to the hardware store with you. The gasket has two splines that fit into the grooves cut into the wood threshold. Cut the new gasket to the right length using a utility knife.
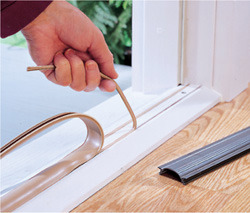
1 Remove old gasket. Splines will likely tear off and stay behind. Pry splines out with a narrow screwdriver or chisel. Clean out grooves.
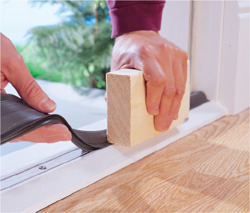
2 Press new splines into grooves using your finger. Bear down with block of wood to finish the job.
You may need a door sweep if you see daylight or feel a draft coming under the shut door. An adjustable face-mount sweep with a flexible flap is easy to install. To cut the sweep to length, cut the flap with a utility knife; then cut the flange with a hacksaw.
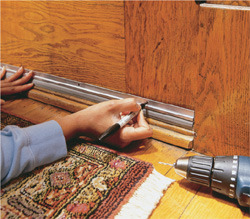
1 Position sweep with vinyl flap lightly touching threshold. Mark screw positions and drill pilot holes.
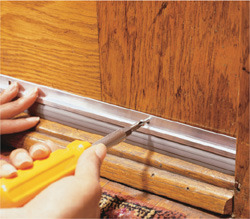
2 Push sweep down against threshold and drive screws. Open and close door to test seal.
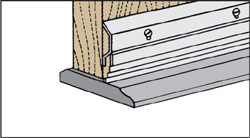
Door sweep has a rigid flange screwed to the door bottom and a flexible flap that seals against the threshold. If floor surface is even with or close in height to the threshold, don’t use a sweep.
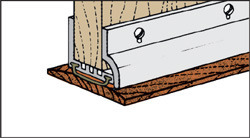
Door shoe is a U-shaped metal frame with a vinyl gasket under it that slides onto the door bottom. The gasket seals the threshold. Door may need trimming to fit.
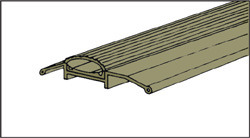
Threshold gasket is a vinyl gasket inserted into channels in a threshold’s center. To seal, vinyl presses against the door’s bottom when closed.
Most modern entry doors use a compression weather stripping held in a slot in the stop portion of the doorjamb. This jamb weather stripping can be a simple compression strip or a magnetic strip for the strike side of a steel door. Look at the door and note the style of weather stripping on all three sides before going to the hardware store to pick up replacement seals.
The old weather stripping will usually be tacked into place with small brads so the door doesn’t pull the magnetic strip out when it opens. Don’t remove the old brads; you’ll risk damaging the jamb while trying to remove them or driving them through. Instead, push them back or cut them off, as shown in step 3.
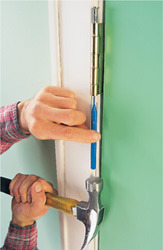
1 Remove the door slab only if replacing the bottom-mount door sweep. To remove door, tap out hinge pins with nail set or 3-1/2-in. nail. Work from bottom to top.
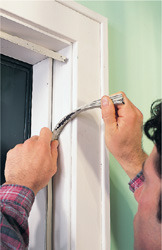
2 Unzip old damaged weather stripping, pulling it through brads that hold it in.
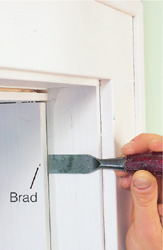
3 Cut off brads with an old chisel or push them all the way back into the groove using a screwdriver.
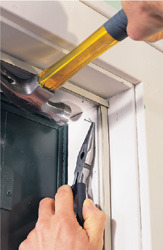
4 Cut new weather stripping to length. Install weather stripping and pin it with new brads positioned near old ones. Hold brads with needle-nose pliers to make starting them easier.
In most areas, an entry door to an attached garage must be fire-rated and have a self-closing device—either self-closing hinges or a door closer.
Door closers work well for doors that have hard-to-match hinges or trim that will interfere with the larger barrel of a self-closing hinge. Drilling templates and installation instructions come with the closer.
Self-closing hinges look much like ordinary hinges except they have a bigger barrel to house the internal spring that makes them self-closing. Most doors require one or two of these to close properly. To find the right size, take the original middle hinge to the hardware store and find self-closing hinges with screw plates the same size. Switch hinges one at a time so you won’t have to remove the door.
Adjust the self-closing device so the door closes and latches on its own from a wide-open position.
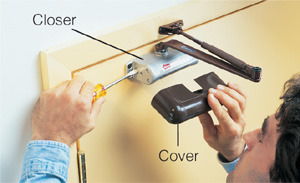
Door closer. Adjust tension on a door closer using the adjusting screw found on the barrel of the closer.
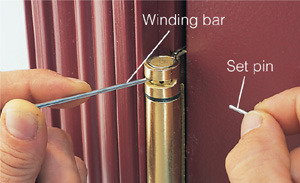
Self-closing hinge. Adjust tension by tightening the spring with the winding bar and inserting the set pin in the hole provided.
The hardest part about replacing a bottom-mount sweep is removing the door slab. If you’re replacing a sweep on a wood door, apply a bead of caulk along the length of the door bottom and staple on the entire replacement sweep. If the door operates too stiffly, adjust the threshold—usually a wood strip that can be raised or lowered—by turning the four or five large screwheads.
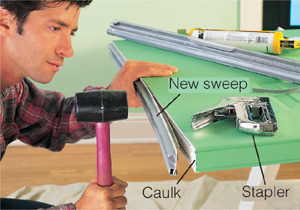
Peel out the old door sweep. Caulk ends of door bottom. Tap in replacement sweep and secure ends with staples.
Installing a heavy-duty deadbolt is one of the least expensive and most effective security measures you can take. Single-cylinder deadbolts, keyed on one side, will work fine for most situations. Use double-cylinder deadbolts, which are keyed on two sides, only if everyone in the household knows where the key is stored and leaves it there.
To install the strongest deadbolt, do these three things: (1) buy a Grade 1 security deadbolt; (2) install an all-metal strike box and long screws to spread the impact of an attempted forced entry; (3) use a rectangular faceplate—not a round one that doesn’t require chiseling.
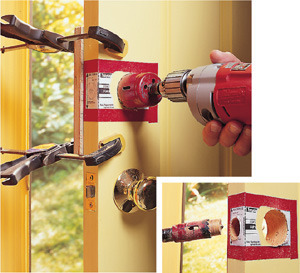
1 Tape the manufacturer-provided template to door so center will be 6 in. (15 cm) above center of the handset. Drill out cylinder hole with 2-1/8-in. hole saw. Buy a deadbolt with same setback (distance from its center to the door edge) as the handset.
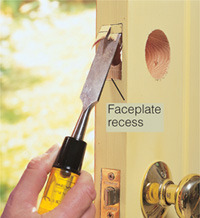
2 Chisel out recess for faceplate with sharp chisel so faceplate will rest flush with door edge. Score vertical edges beforehand with utility knife or chisel to avoid accidentally splitting door with chisel.
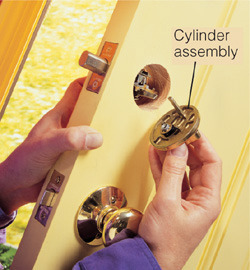
3 Install bolt mechanism into door. Unless installed in a steel door, always use a rectangular faceplate for a stronger setup. Assemble cylinder parts following manufacturer’s instructions. Coat bolt end with lipstick to mark strike box location on jamb.
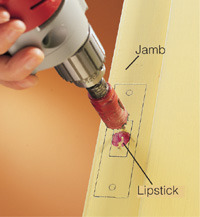
4 Mark profile of strike plate on jamb. Drill out series of holes for strike box recess. Chisel out recess for strike box and plate. To accommodate a heavy-duty strike box, drill all the way through the doorjamb.
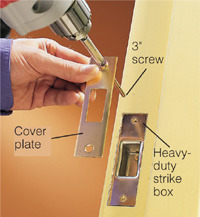
5 Secure strike box and cover plate to jamb and 2x4 frame behind it using heavy-duty screws. Drill pilot holes for screws. Generally, jamb will have hollow space behind it, so go slowly to avoid warping jamb by driving screws in too deep.
In a cylinder lock, a cylindrical plug is housed in a cylindrical shell. Five or six holes, or pin chambers, are drilled through both the plug and shell. Inside each pin chamber sits a bottom pin, top pin and spring. The top pin sits partway between the plug and cylinder shell, preventing the plug from turning. When the correct key is inserted, the pins align to a point where the plug can rotate.
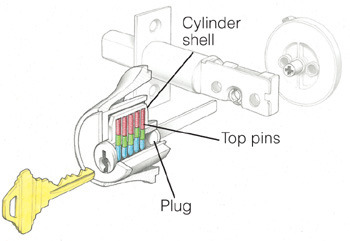
Locked deadbolt. When a cylinder is locked, the top pins protrude partway into the plug to prevent the plug from turning.
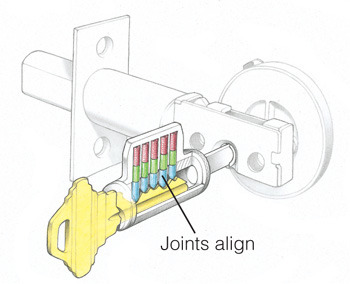
Inserted key. The key lifts each set of pins so the joints between the top and bottom pins align with the plug’s outer surface.
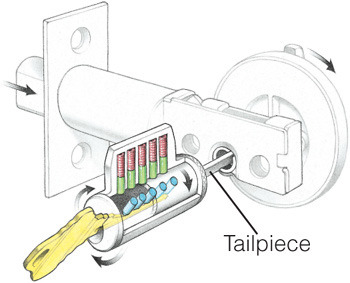
Unlocked deadbolt. With the pins aligned, the plug can rotate, turning the tailpiece, which retracts the bolt so the door can open.
Unless you’re the first occupant of a property, you can never be sure how many copies of the keys exist. Fortunately, you can use a rekeying kit to rekey a lock like a pro. These kits are available at hardware stores for most lock brands but are not interchangeable; you’ll have to buy a kit for each brand of lock used in your home. The kits will rekey up to six locks for the same key. They work on entrance and deadbolt locks and usually come with two keys and all the tools you’ll need, except a screwdriver.
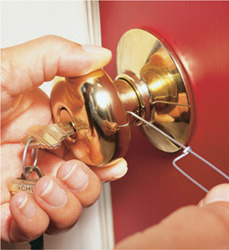
1 Press the wire tool, included in the kit, into knob hole and depress knob clip. Pull knob off door.
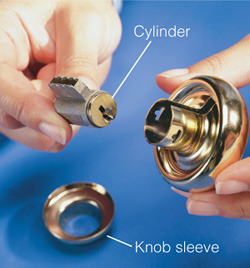
2 Force the cylinder out the back of the knob assembly to pop off the knob sleeve and remove the cylinder.
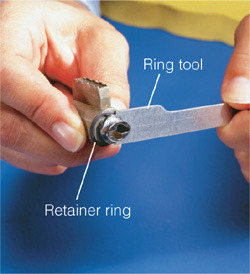
3 Push retainer ring tool against retainer ring to pop it off cylinder. Set ring aside so you can reuse it.
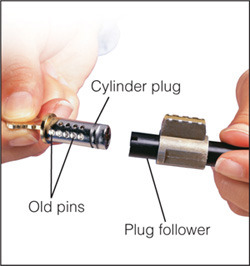
4 Insert old key and turn it either left or right. Remove plug by pushing plug follower, supplied in the kit, through the cylinder. Make sure to keep constant pressure between plug and follower so top pins and springs don’t pop out.
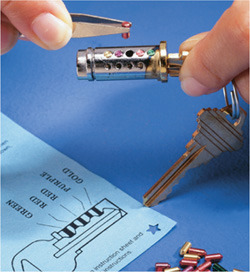
5 Dump out old pins and insert new key. Match new colored pins to color code on the kit’s instruction sheet. Install pins using tweezers or needle-nose pliers. When new pins are in, do the previous steps in reverse to reassemble the lock.
When deadbolts, latches and their strike plates are misaligned, doors sometimes won’t stay latched or can’t be locked without a hard shove. Sometimes the cause is new weather stripping that pushes too hard against the slab. Other times, the door slab may sag, causing the latch or bolt to catch on the bottom of the strike-plate throat. If the simple fixes don’t help, you may need to move the strike plate slightly.
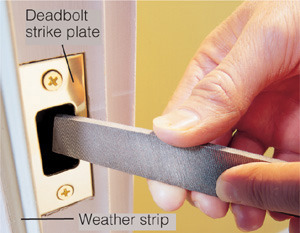
File the inside edge of the strike plate if the door latch won’t engage without a hard shove.
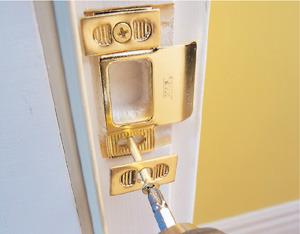
Install an adjustable strike plate for cases of severe misalignment.
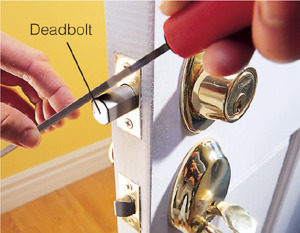
Round off edges of deadbolt using a file for a slight misalignment.
It doesn’t matter what kind of entry door you have—wood, fiberglass or solid steel. If the hinges and strike plate are secured with wimpy screws to wimpy wood jambs, they won’t offer enough resistance to the efforts of a determined intruder. Here are two quick steps you can take to help strengthen your door:
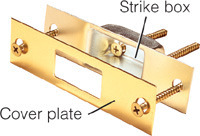
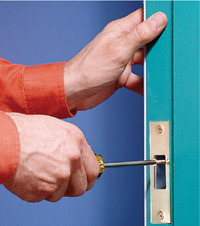
Reinforced strike boxes can be used to replace existing dead-bolt strike plates. Enlarge hole as well as the cover plate recess to accommodate the larger strike box. Install two extra-long screws through back of metal strike box into wall framework. Also secure cover plate with long screws.
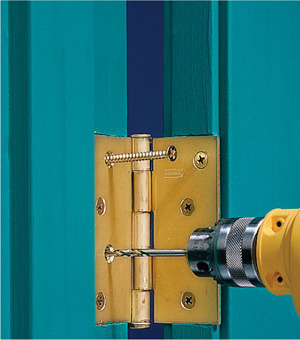
Reinforce hinges by driving 3-in. screws through hinges and doorjamb into the 2x4 framework. Predrill holes to avoid splitting jamb and ease driving of screws. Take caution not to warp jamb when driving screws.
Install a door reinforcer on your entry or garage service doors to help discourage break-ins. Reinforcers are three-sided metal plates that encase and strengthen a door around the latch—the door’s most vulnerable area. You can also buy reinforcers that strengthen deadbolts. A reinforcer extends the door edge about 1/32 in. (1 mm) and may rub the door frame of a tight-fitting door. If so, slightly deepen the hinge mortises with a chisel to widen the gap at the latch.
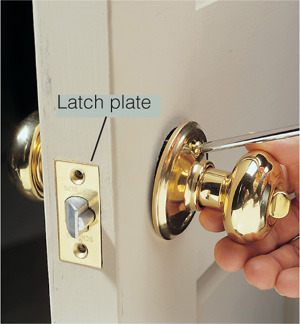
1 Measure setback (the distance between door edge and center of handset), thickness of door, and handset hole diameter. Buy a reinforcer that fits all those measurements. Unscrew and remove handset. Also take out latch-plate screws, but leave latch in place.
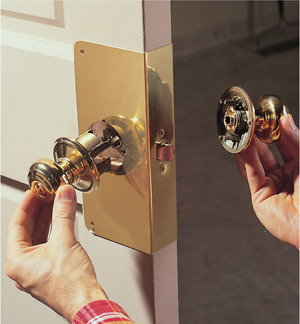
2 Slide reinforcer plate onto door. Secure it to latch with screws provided and remount the handset. Drill pilot holes in both corners of plate on both sides of door slab and install screws. Before drilling, dimple metal with nail set at hole position. This helps prevent drill bit from drifting on slick metal.

Tiny peepholes don’t always clearly show you who’s there, and strangers can hide out of view. Avoid this uncertainty by installing a wide-angled viewer, designed to fit any door up to 2 in. (5 cm) thick.
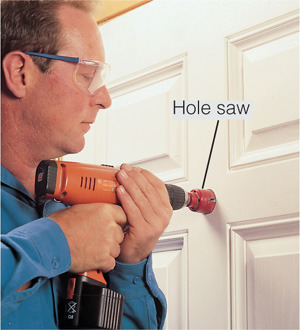
1 Mark viewer’s position on door at the best height for all the home’s occupants. Use the correct size hole saw to drill through from inside until pilot bit emerges through outside. Finish boring hole from outside to avoid splintering. Sand edges of hole.
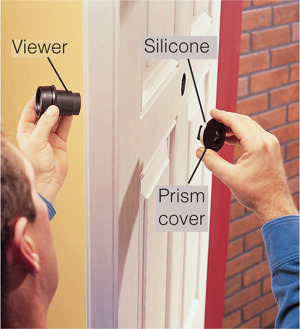
2 Screw viewer body clockwise into prism cover, while holding it level. For metal or fiberglass doors, trim small plastic spikes off the exterior prism cover. Secure cover to door with a bead of silicone. Mount wide-angled viewer so the viewer body faces indoors.
You can install a pre-hung exterior door in a single day. It comes already hinged into its preassembled jamb—complete with threshold and weather stripping—so you get a smooth-swinging, weather-tight fit without all the fuss. Follow local building and energy codes during installation.
Your new door has to be the same nominal size as your existing door. For a larger door or one with added sidelights, you have to rebuild the rough opening.
In some cases, the existing door has a thick threshold that rests directly on the joists. This means you have to build up the sill (the surface the threshold rests on). Unfortunately, there’s no way to know how much you’ll have to raise the sill until you’ve removed the old threshold and measured the rough opening top to bottom.
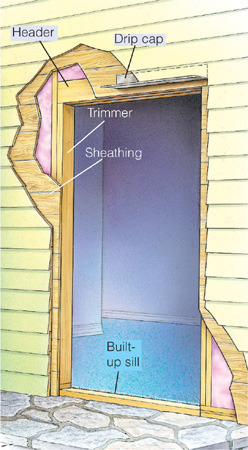
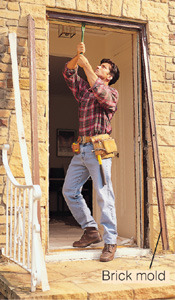
1 Remove old door, brick mold and jamb with pry bar. If you have a drip cap above the door, leave it in place. If not, install one. If exterior trim isn’t brick mold, remove it carefully so it can be reused.
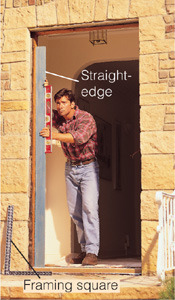
2 Hold a level and straightedge against sides, top and bottom of rough opening. Check corners for square. This offers a picture of how plumb and level the opening is and where you may need to make adjustments.
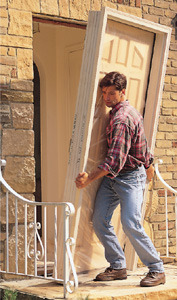
3 Set the pre-hung door into rough opening for trial fit.
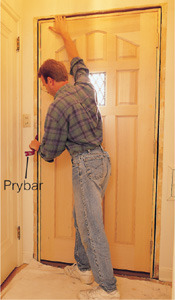
4 Use temporary shims and pry bar to center and level door in opening. Make sure jamb is flush with wall all around and that gaps between the door slab and jambs are consistent along top and sides.
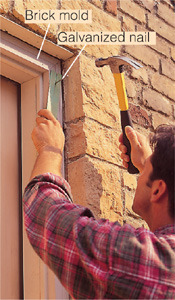
5 Tilt door out and lay three heavy beads of silicone on sill and a bead around rough opening behind brick mold. Set jamb back in place and position correctly. Attach brick mold with 3-in. galvanized finish nails.
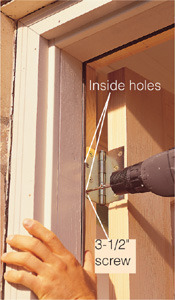
6 Secure jamb with 3-1/2-in. screws. First, insert shims behind screw positions to stiffen jamb. Install four screws on strike side hidden behind weather stripping. Use two screws on inside holes of each hinge.
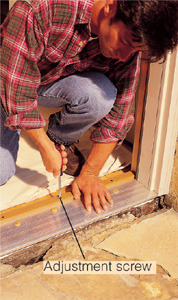
7 Adjust threshold height using adjustment screws so door sweep seals tightly. Insulate gap around jamb with fiberglass or minimally expanding foam. Seal gaps around brick mold with caulk.
Replacing an old sliding patio door with new hinged French doors can improve your home’s appearance, energy efficiency and security. It’s a big-impact project, but one that is relatively simple to do, provided you select a new, fully assembled door unit that is close in size to your old one.
In choosing a door type, consider the room’s size and arrangement. Is there enough room for a door, or doors, to swing into the room without disrupting how you want to use the space? Out-swinging doors are available. Also, find out whether a screen and door hardware are included in the price and what options you have. The hardware may or may not include keyed locks and deadbolts. While most screens are outside-mount, some sliders offer inside-mount screens. Also, look for a low U-rating for optimal energy efficiency.
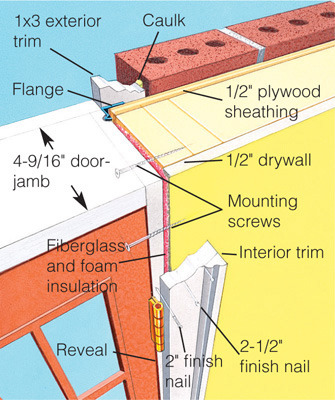
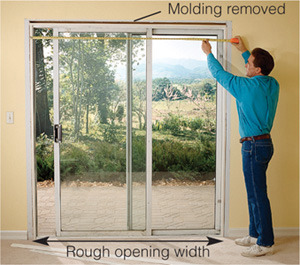
1 Measure width and height of door’s rough opening. Remove interior casing to get exact measurement. Purchase or order a new door that will fit rough opening and leave only a 3/8 to 1 in. (1 to 3 cm) gap around frame.
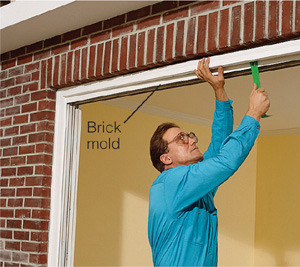
2 Lift and pull sliding panel of door to remove it. Unscrew brackets that hold stationary panel and remove it. Pry off exterior moldings or trim using pry bar. Cut through nails and remove frame.
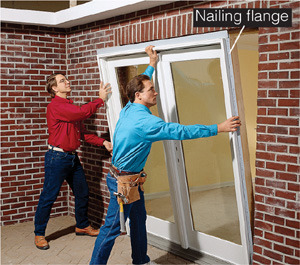
3 Test-fit new door as you would an exterior door (see previous steps). Apply two heavy beads of silicone on rough opening sill. Center door in opening and use screws in upper corners to temporarily hold it.

4 Level door and use shims near hinges to hold it in position. If bottom of door needs to be raised or leveled, create a level sill with shims or plywood before permanently installing door.
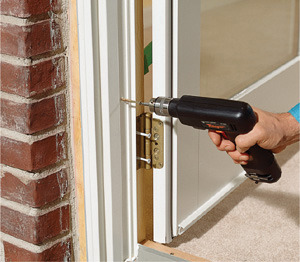
5 For hinged patio doors, install extra-long screws through the doorjamb and inside hinge holes into wall framing and secure nailing flange. For sliding doors, follow the manufacturer’s instructions for securing door.
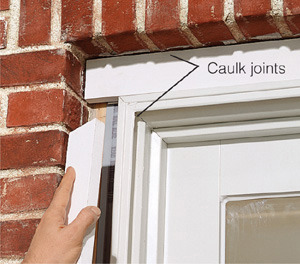
6 Cut exterior trim to fill gap between door frame and siding material. Prime back of trim. Install top trim board first, then side pieces. Caulk joints between trim and siding and door frame.

7 Install door hardware. Many French doors have a three-point locking system to secure door at top, bottom and middle.
Whether you want to increase the size of an existing door or window or create a new opening, if the wall you’re cutting into supports the roof or floor above, you must provide temporary support during the operation. To provide that support, build a shoring wall within 2 ft. (60 cm) of the exterior wall.
The wall should extend beyond the edges of the new opening with temporary studs positioned under each floor joist or roof member above. Protect surface finishes with protective plywood plates tacked to the floor and ceiling by finish nails. Tack the temporary wall’s top and bottom plates to the plywood. Note: Make sure there is solid support beneath the new trimmers.
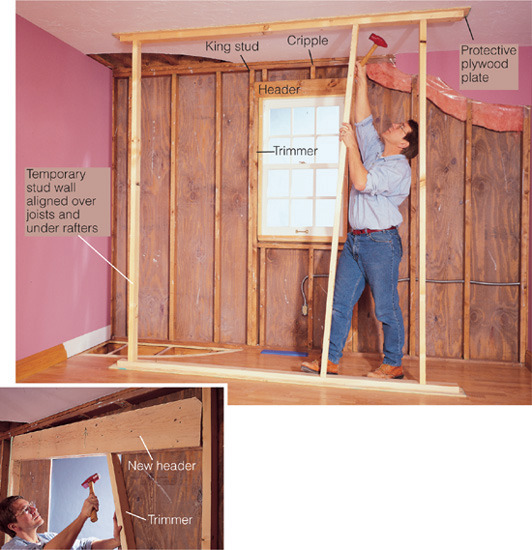
Locate floor joists (below and above, if applicable) and mark locations on plates for temporary wall. Measure for each temporary stud and cut them slightly longer than measurement. Wedge and hammer studs between horizontal plates directly over joists. Remove exterior wall framing to create opening and install king studs and one trimmer. Place one end of new header on installed trimmer and use other trimmer to wedge it up into place. Finish framing opening, remove temporary wall and cut exterior sheathing for new opening.
Sliding doors can develop problems due to dirty threshold tracks, misaligned latches and poorly adjusted or worn rollers. In general, these problems are simple and inexpensive to correct. If you need to remove the door, lower the rollers, center the door in the opening, lift, the tilt out the bottom first.
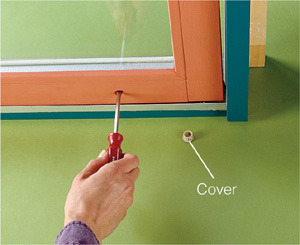
Adjusting rollers. Remove cover over adjustment screw. Adjust roller so door is plumb, just clears threshold, rolls smoothly and latches correctly.
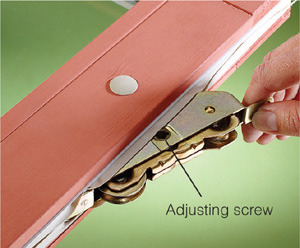
Replacing rollers. Unscrew old roller and work it out of the frame. If possible, use a replacement roller with metal wheels. To install it, follow the removal steps in reverse. Reinstall door and adjust rollers.
Patio screen-door rollers can also stop rolling, break or wear flat. Roller wheels usually mount in the bottom of the door frame. After removing the door, check the upper and lower tracks and straighten them if they are bent. If the screen-door frame is loose, tighten the corner screws.
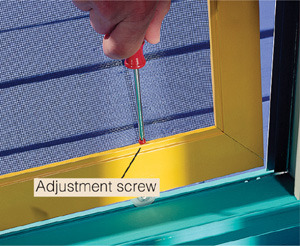
Adjusting wheels. Set wheel adjustment screws so door aligns top and bottom and side to side with its surrounding frame.
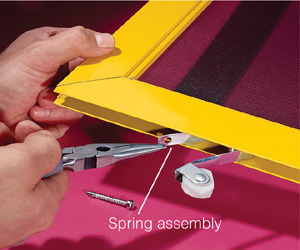
Replacing wheels. Remove adjustment screw to remove wheel and spring assembly. Replace wheel and install door by lifting top into track, then popping wheels over the bottom track.
Installing a new interior door is a bit like taking dancing lessons with a partner with two left feet. Fortunately, modern pre-hung doors, with the hinges already mounted on the door and jamb, make this task fairly simple, even if you’ve never hung a door before.
Begin by determining the swing and measuring the door you’re replacing to see if it’s a standard size (see here). If it’s not standard, you may have to special order a replacement. If you don’t like the direction the current door swings, use this opportunity to change it. With the new door(s) in hand, use these tips and the following instructions to help smooth the way:
▪ Prefinish the door and jamb, including all edges (even the bottom) to minimize warping, before you install it.
▪ Let the new door follow the wall’s plane, even if the wall is slightly out of plumb; otherwise, you’ll have problems when you install the trim.
▪ Unless you’re planning to replace all the doors and trim, salvage the original trim to avoid the hassle of matching new trim to the old.
▪ Remove any fragile objects, such as pictures and mirrors, that hang on nearby walls.
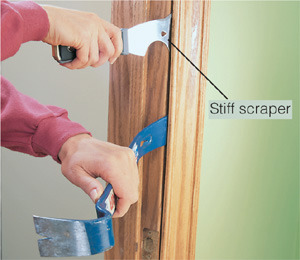
1 Pry off old trim carefully with a stiff scraper and flat bar. To avoid splitting corners, start about two-thirds of the way down one side and work up, around top and down other side.
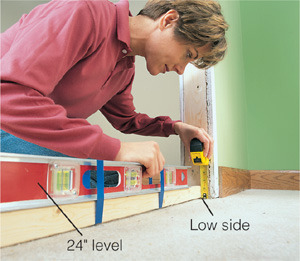
2 Check levelness of floor threshold using a straightedge that’s the same width as the rough opening. Measure any variance so you can adjust length of side jambs so top jamb will be level.
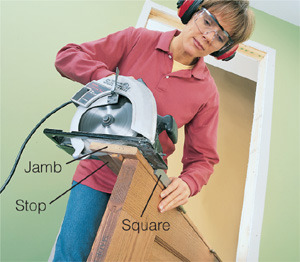
3 Cut bottom of side jambs, adjusting for level, so new door will fit in rough opening and door slab will clear flooring by 1/4 to 1/2 in. (6 to 12 mm). Set blade depth, then cut jamb and stop, using square as a guide.
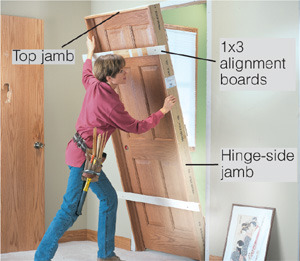
4 Attach alignment boards to jamb edges on non-swinging side to help level and position door. Push door into position. Boards act as stop to align new jamb with drywall surface.
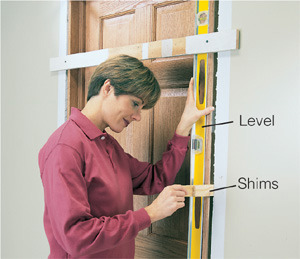
5 Measure and position bottom of hinge-side jamb so trim, when reinstalled, will fit correctly against baseboard. Add pairs of shims on each side of top jamb to plumb hinge-side jamb.
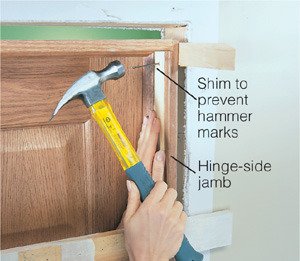
6 Place first nail near top of hinge-side jamb and through shims. Add pairs of shims and nails at bottom and middle of hinge side, checking for plumb and straightness.
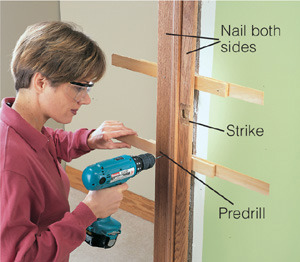
7 Add shims along strike side to leave even gap between door slab and jamb. Shim and nail strike side at top, bottom and near the strike. If 2x4 frame is twisted, use shims to adjust jamb.
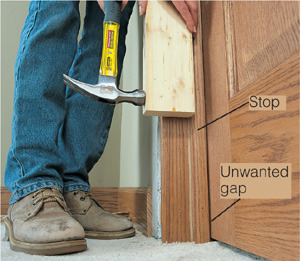
8 Install handset and adjust strike side stop (which is usually lightly stapled) with softwood block so it lines up with door’s face when it’s closed. Renail stop to jamb through predrilled holes.
If you have a nonstandard-sized door, want to install a salvaged antique door or don’t want to remove the old trim and jamb, hang just the door slab when you replace your door. Some door slabs come with a beveled edge (see “Strike side” illustration below) on the strike side to ease closing, but most have two square edges and can be hinged on either side.
The first task is to cut the new door to fit into the old, frequently unsquare, jambs. Usually, the side jambs remain parallel but the top jamb (step 1) is out of square with the sides. To adjust a panel door’s width by more than 1/2 in. (12 mm), remove equal amounts from both sides.
Be especially careful drilling holes for the handset. The trick is to install the latch so it catches the old strike plate. To complete this step, consider renting a hole-drilling jig for locksets.
There’s plenty of room for errors and miscalculations, so “measure twice, cut once” and work carefully.
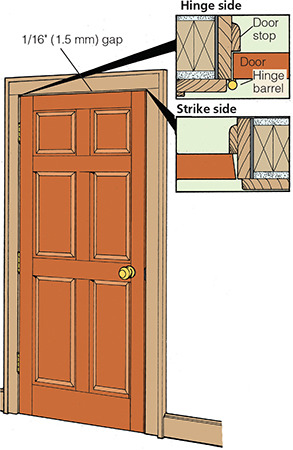
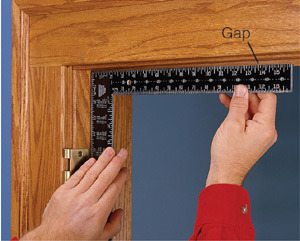
1 Set framing square against hinge-side jamb and top jamb to measure gap, if any. You can use stiff cardboard as a template to get the angle correct and transfer angle to slab.
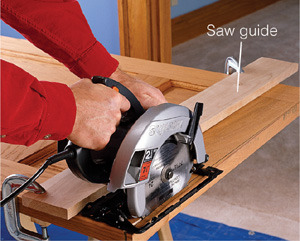
2 Deeply score top of door just inside the cutline using a sharp utility knife to avoid chipping. Using saw guide, cut slightly outside scored line with circular saw. Use sandpaper to slightly round all cut edges.
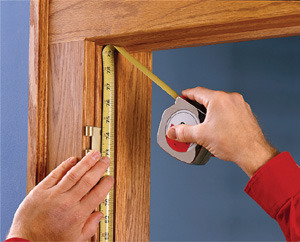
3 Measure hinged-jamb height, subtract clearances at top and bottom and cut door bottom to that height. Make sure to measure down on the slab’s correct side before cutting.
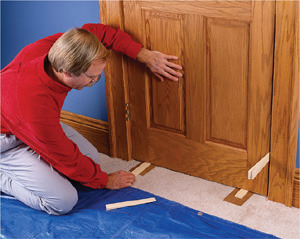
4 Wedge new door against hinged jamb and shim it upward about the thickness of a quarter from top jamb.
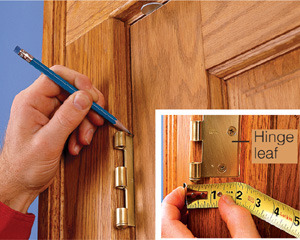
5 Mark hinge locations using a sharp pencil or utility knife. Measure width that the hinge leaf is inset into the jamb. Transfer this dimension to the door’s edge.
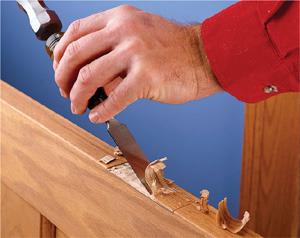
6 Hold hinge leaf in place and score outline with utility knife. Chisel mortise for hinge leaf as deep as leaf is thick. Set leaf in place and use awl to mark the centers of screw holes.
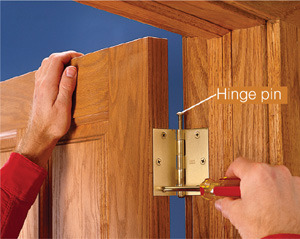
7 Predrill hinge screw holes. Attach leaf, leaving screws slightly loose. Connect leaves with hinge pins and tighten screws. Close door and check gaps.
Screw holes, especially for the top hinges and for heavy doors, often become stripped, and you can’t tighten the screws. To hold the screws firmly, you’ll need to plug the hole before resecuring the hinge.
Another option (second step, below) is to drive a longer screw, angled slightly to bite into the stud, through the hinge hole into the wall framing.
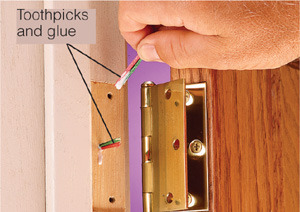
1 Coat toothpicks, matchsticks or a golf tee with glue, then force them into old screw holes. Trim ends flush when glue dries.
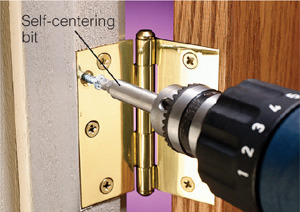
2 Drill new pilot holes and drive screws. Use a self-centering drill bit so screws are centered and heads lie flush with surface.
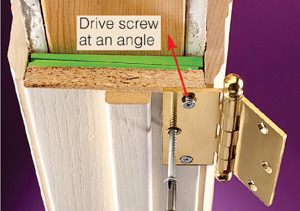
Longer-screw fix. Drive long screws through hinge hole into stud behind jamb. Angle screws through outer holes toward the stop.
When a door binds and catches and the hinges are tight, try these simple fixes before cutting: For a slightly sticking door, a light sanding may be adequate. A solid whack with a hammer on a block of wood along the strike side of the frame may widen the opening enough to free the door. If not, try this fix.
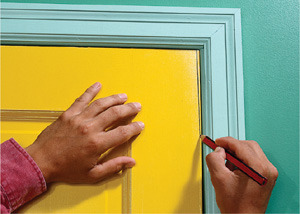
1 Mark edge of door where it rubs against frame to allow 1/16 to 1/8 in. (1.5 to 3 mm) gap between slab and frame.
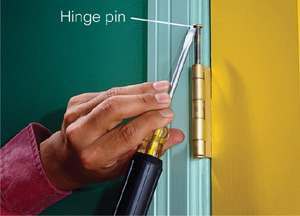
2 Remove hinge pins, place slab across cushioned sawhorses and, if necessary, remove handset.
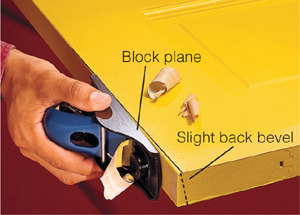
3 Plane or sand door edge, creating a slight back bevel where door meets stop. Seal or paint exposed wood and replace door.
When doors bind on the strike side’s bottom edge, the lower jamb has probably shifted or pulled loose from its nails, resulting in an out-of-plumb opening. To reset jamb, loosen the casing’s bottom section and renail jamb with 3-in. finish nails. As you recess the nail heads, keep closing the door to check for the proper gap so you don’t overcorrect.
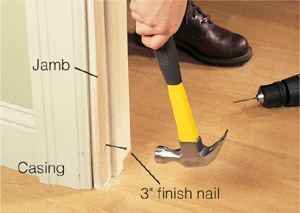
Pry out lower section of casing. Install shims if necessary and nail jamb through shims.

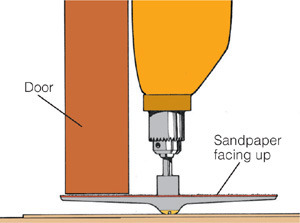
To fix a slightly dragging door without removing it, use a sanding disc, reversing the disc so the sandpaper faces the drill. Protect the floor with cardboard or scrap plastic laminate, and sand the door’s bottom. Sanding works only if you need to shave off only a small amount. To reseal the raw wood, put finish or paint on scrap carpet and slide it along the bottom of the door.
When new flooring, such as a carpet with a thicker pad, makes doors drag, shortening the door is required. Cutting down hollow-core doors is often more involved than solid-core doors. In either case, the biggest potential problem you’ll face is remembering which end of the door to cut. Cutting the top of the door only creates a bigger problem.
First, remove the door from the jamb by removing the hinge pins. Measure the amount to be removed from the bottom. Use a straightedge and sharp utility knife to deeply score just inside cutline. This will minimize chipping while you cut. Use a circular saw equipped with a sharp blade to make the cut just outside the scored line.
Hollow-core doors have a thin base piece that is often removed or becomes too thin when you cut down the door. Save this piece and reinstall it (see second photo below) by first pushing the cardboard mesh back into the door far enough for the fill piece to fit. After gluing, clamp the door skin to the fill piece.
When the door is correctly sized, seal the bottom edge to prevent warpage before you reinstall the door.
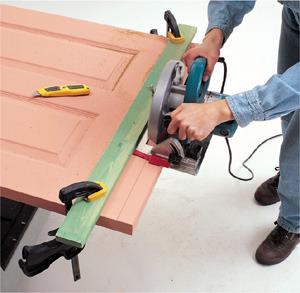
All doors. Using your circular saw’s guide, cut slightly outside scored line. Apply tape to the bottom of the saw to protect the door surface. Sand a bevel around all cut edges.
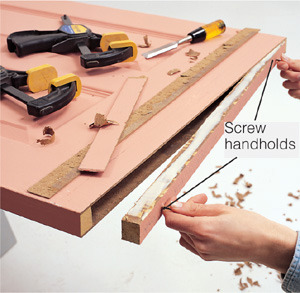
Hollow-core doors. Use a sharp chisel to scrape glue and door skin off base piece, attach drywall screws for temporary handholds, coat it with glue and reinstall. Seal door bottom.
A well-adjusted door should hit the stop and latch at the same time to remain tight and prevent rattling. Use the two fixes shown here to solve most rattling problems. Before adjusting the stop, cut through any paint or varnish on both sides with a utility knife so the stop can break free cleanly.
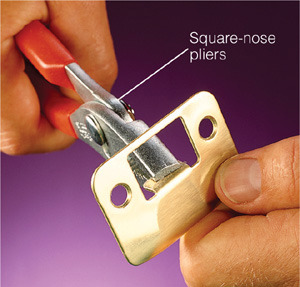
Fix 1. Bend flange in strike plate with square-nose pliers to hold door slab more tightly against the doorstop.
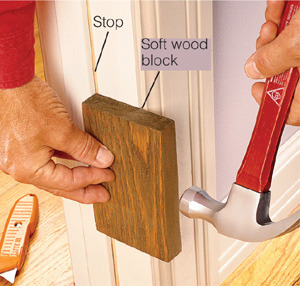
Fix 2. Adjust stop by tapping it with a soft wood block, so it lies flush with door face. Renail stop after adjusting.
When a door doesn’t stay shut, check the wear marks on the strike plate to see how the latch hits it. Adjust the latch hole accordingly.
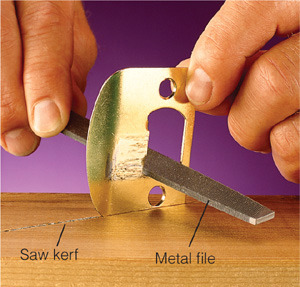
File the latch hole slightly larger until the latch catches. Use a saw kerf in a scrap of wood to hold the strike plate steady.
To “stretch” a solid-wood, rail-and-stile door slab, the add-on piece should be the same thickness and have the same grain direction as the slab.
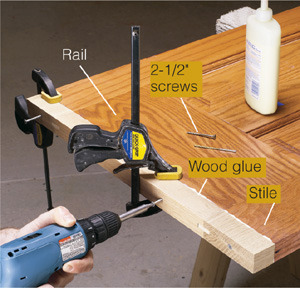
Construct an add-on from three separate pieces, matching the species, width, thickness and grain direction of stiles and rail.
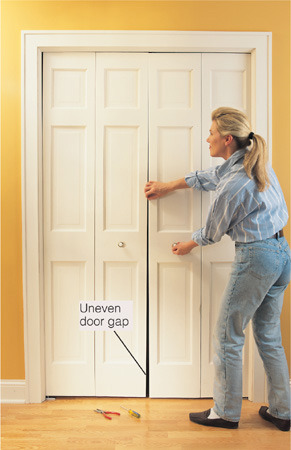
Bifold doors start running a little ragged after a few hundred uses. They stick, rub and don’t align. Fortunately, adjustable brackets on most doors make tuning them a simple matter. Furthermore, bifold door replacement parts are fairly universal and available at hardware stores and home centers.
Properly adjusted bifold doors have an even vertical gap between doors and an even horizontal space along the top. Also, the door slabs should open and close easily and not scrape on the jambs or floor.
You can’t always get the doors perfectly adjusted on all four sides, especially if the opening is out of square. If this is the case, get the highly visible gaps between the doors and the top even and leave uneven spaces along the side jambs or floor.
After the doors are fine-tuned, spray a little silicone lubricant on the track for a smooth glide.
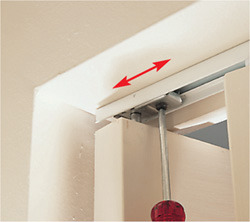
Top adjustment. Loosen the setscrew on top bracket and slide bracket slightly along track to adjust door spacing. Retighten setscrew.
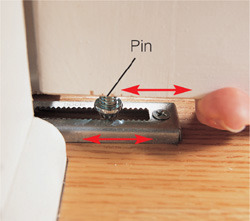
Bottom adjustment. Lift the door and move pin in bottom bracket to adjust gaps between the doors and between the doors and jambs.
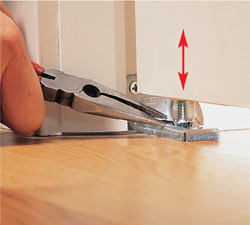
Height adjustment. Screw pin longer or shorter to adjust height. If necessary, remove the door, or take weight off pin using shims or prybar under door.
A bifold door that wobbles or jerks as you open it might have a loose bottom bracket. When the brackets are installed over concrete or ceramic tile, the floor screw often is not installed, leading to a wiggling bracket especially if the bracket is mounted to a drywall jamb. Heavy solid-wood or mirrored doors are particularly prone to this problem.
For the firmest repair, fasten the bracket to the floor using a masonry anchor.
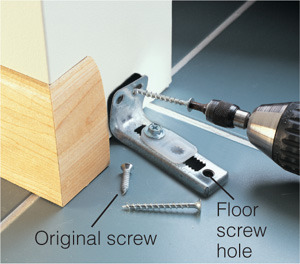
Longer screws. Anchor bracket using longer screws into the jamb. Using a drill and masonry bit, install a concrete screw in the floor.
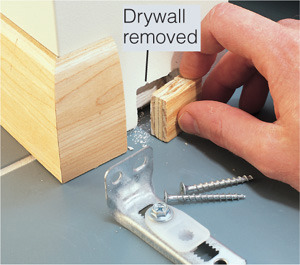
Solid block. Cut out damaged drywall. Fill hole with plywood block and re-anchor bracket.
When a door pivot breaks loose and cracks the edge of the door slab’s edge, you can save the door with a repair bracket that provides a firm base for the pivot pin. Remove the door and, if the slab is cracked, glue it. Install the repair bracket following manufacturer’s directions and, if necessary, readjust the door height.
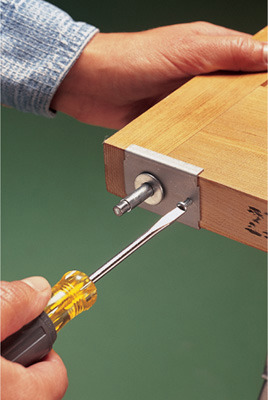
What most people notice first in an older or well-crafted home is the woodwork. The rich details give these homes a certain inviting, elegant character. You can add this same special touch to a family room, dining room or your whole house by changing your door and window casing and installing wider baseboards.
A wide variety of hardwood trim is available through your home center or lumberyard. This premilled trim is the way to go if you’re still developing your woodworking skills or don’t own a tablesaw.
Milling your own trim will save money and expand your options. The back-band and post-and-lintel styles require only basic tablesaw and router skills.
Before you begin, check the distances to any light switch covers to see whether the casing will fit or the electrical boxes need to be shifted. Also, look at adjoining walls, especially at hallway ends, to determine whether tight corners will interfere with the plans.
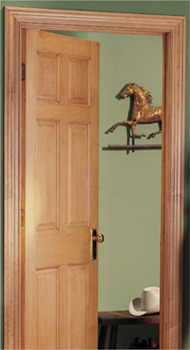
Use mitered corners to achieve a contemporary look. Many wide, thick, elegant trim styles are available that look great with mitered corners. The mitered style offers two big advantages—speed and fewer tools (no tablesaw). Installing mitered trim generally goes faster since it involves fewer parts and cuts and you don’t have to mill or sand the trim. The big challenge is creating perfect mitered casing corners in openings that are out-of-square.
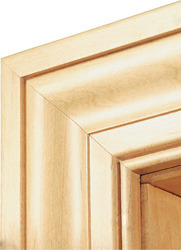
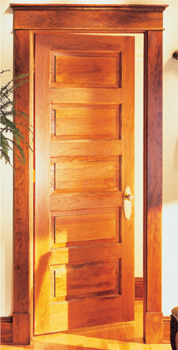
This multipiece style echoes the style used in homes around the turn of the 20th century. The 1x4 side casings have eased edges, and the slightly wider head casing has squared edges and ends. The upper part, called the lintel, often has four components: a small round-edged fillet, the head casing, the ogee molding and a cap, with rounded edges and ends extending past the head casing. Side trim terminates with plinth blocks that rest on the floor.
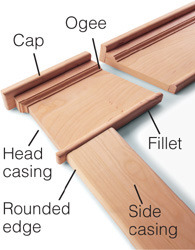
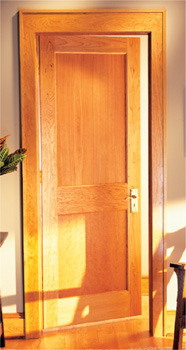
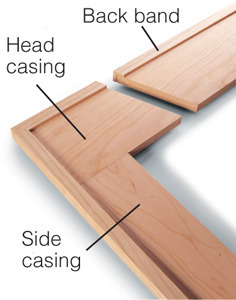
The simple lines of the back-band method meshes perfectly with Arts and Crafts architecture and furniture. The wide, flat face of the primary casing boards showcase the wood’s grain rather than the casing’s shape. The side casing boards are often 1x4s, the head casing is a 1x6 and the back band is an L-shaped strip either created with a tablesaw or purchased.
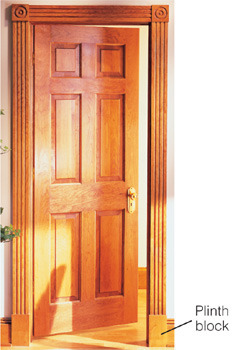
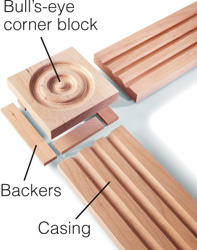
The classical style shown here consists of three parts: square corner blocks, fluted casing and plinth blocks that rest on the floor. Corner blocks of various styles and species can be purchased at larger lumberyards and home centers, special ordered from a millwork store or created with a router and templates. Glue thin backers to the corner and plinth blocks so they stand out slightly from the casing.
Installing trim isn’t very difficult, especially if you have enough patience to get the details right and a power miter saw with a sharp blade to make clean cuts. It’s a deeply rewarding project that adds value to your home and helps put your own lasting imprint on its character. Use these tips and instructions to help you succeed.
▪ Prefinish all sides of the trim before installation. Finishing the back helps stabilize the wood during humidity changes.
▪ Use a power miter saw with a 40-tooth or finer carbide blade to make the angled cuts.
▪ To reduce legwork, set up the miter saw in the room you’re trimming and protect the floor with a tarp.
▪ Make small adjustments when cutting angles to fit. Even 0.25° can make a big difference.
▪ Match wood so grain pattern is similar at the joints.
▪ Predrill all nail holes to avoid splitting. Small drill bits break easily. Use the same size nail you’re driving, with the head snipped off, as a substitute drill bit. Use a power nailer, if you have one.
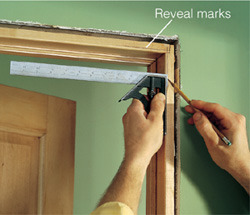
1 Mark reveal line 3/16 in. (5 mm) from jamb edge using a combination square. Use a sharp pencil to position marks in corners and regularly along jamb edge.
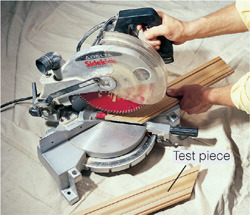
2 Cut two test pieces of casing at opposing 45° angles on a miter saw. Use test pieces to check the casing’s fit on each corner of the doorjamb.
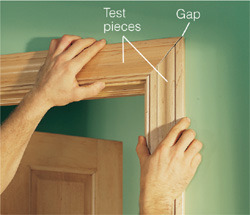
3 Hold test pieces on reveal marks. If the joint is even slightly open at top or bottom of miter, adjust angle on miter saw. Recut test pieces until the joint is tight.
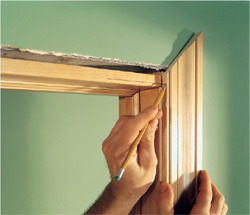
4 Cut side casing about 1/2 in. (13 mm) overlong and hold it in place along reveal marks. Use a sharp pencil to transfer reveal mark from head jamb to side casing. Make final cut.
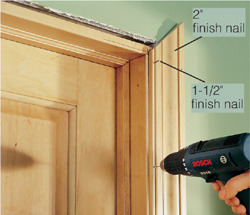
5 Holding the casing in position, predrill and nail inside edge with 1-1/2-in. finish nails every 12 to 16 in. (30 to 40 mm). On outside edge, predrill for 2-in. finish nails. Nail 1 in. (2.5 cm) away from board ends.
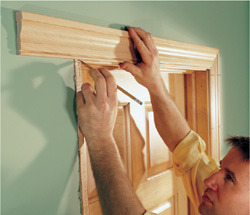
6 Cut end of top casing that mates with side casing after determining correct angle with test piece. Position casing, mark length, cut it, glue first mitered end and tack it up.
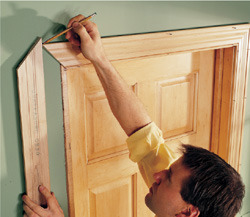
7 Cut second side casing 1 in. (2 cm) overlong and hold it against top casing backward and parallel to doorjamb. Cut casing slightly long, check fit and trim it to final length.
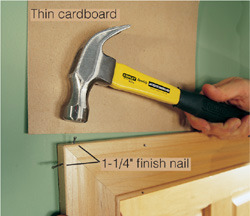
8 Align miters and predrill holes for finish nails—one from the top and one from the side. Protect the wall with cardboard. Apply glue; then drive corner nails slowly, alternating between nails.
Installing trim around a window requires the same techniques and tips as you use when trimming a door. The primary difference is that if you use the picture-frame method, you have two more mitered corners to sweat over and no simple butt joints at the floor.
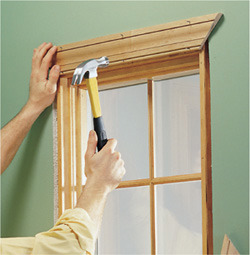
1 Trim window by starting with top casing. Mark reveal lines around jamb edges. Use test pieces to gauge angles. Cut and tack top casing, then fit sides and install sides. If possible, place nails in dark portion of wood grain to make holes less noticeable. Glue all miters.
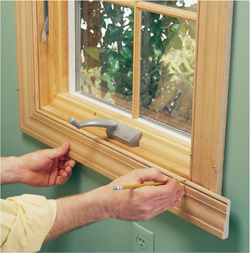
2 Fit one miter on bottom, then overlap opposite miter and mark it. Cut miter 1/8 in. (3 mm) overlong, slide casing into place and trim it gradually, checking the fit frequently.
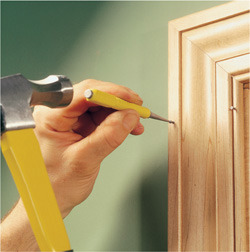
3 Tap nails just below surface using nail set. After sealing, fill holes with colored putty to match wood color or stain. Mix shades of putty to get a good match.
Classic window trim includes a piece of trim called the window stool that sits on top of the rough opening’s sill. Typically, the stool board is a 1x4 notched to fit flush with the drywall and window jambs.
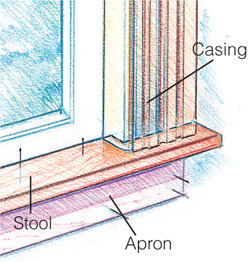
How it all fits. The stool and apron are installed first. Side casing, and sometimes jamb extensions, sit on top of stool. Stool extends about 3/4 in. (20 mm) beyond casing; all exposed edges can be rounded or beveled by a router. Use same routed edge on apron underneath. The apron’s ends can be slightly angled.
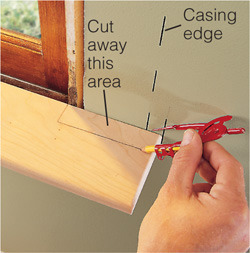
1 Mark stool notches by setting compass 1/8 in. (3 mm) less than the distance from the edge of the stool to the window sash, and by scribing the cutline. Cut out notch using jigsaw and test fit.
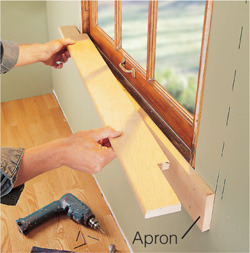
2 Cut an apron that extends to casing edge marks. Rout edges same as stool and use 2-1/2-in. finish nails to nail apron to framing behind drywall. Place stool over apron and framing sill. Nail stool to both with 2-in. finish nails.
The secret to tight-fitting miter joints is knowing how to adjust the cuts to make them conform to out-of-square openings, uneven drywall and recessed jambs. Use the first tip below if your saw won’t cut angles greater than 45 degrees or is difficult to fine-tune.
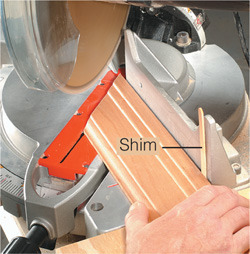
For out-of-square corners. For a gap on outside of miter, place shim against fence at point farthest from blade. Hold molding tight against fence and shim and shave miter. Move shim closer to blade for greater angle. For inside gaps, adjust saw to less than 45°. Cut molding pieces overlong until correct fit is achieved.
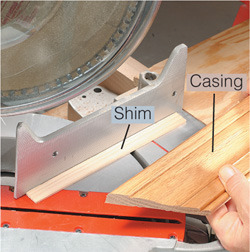
For recessed jambs. Trim back drywall using a utility knife until molding no longer rocks when set against jamb and drywall. Mash and flatten drywall with hammer, if necessary. Set shim(s) under back of casing and shave miter. For proud jambs, place shim under the mitered end of casing and shave the cut.

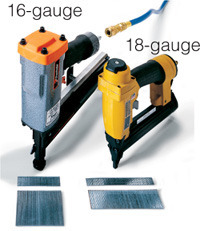
Air, or pneumatic, nailers speed the job, reduce the chance of splitting and eliminate hammer marks. Use a 16-gauge nailer for securing casings to the wall; a smaller 18-gauge brad nailer for securing casings to the edge of the jamb.
Installing a high-quality storm door not only dresses up an entryway but will help keep your house warmer in the winter, breezier and bug free in the summer and a little more secure all year ’round. The basic installation techniques are the same for all storm doors, but read and follow the manufacturer’s instructions.
To order the correct door for your entry, determine the width by measuring between the inside edges of the brick mold, top, middle and bottom, and determine the height by measuring between the entry door’s threshold and the brick mold on top. An adjustable expander strip accommodates variations in height. A storm door should be hinged on the same side as the entry door. Fortunately, most storm doors are “ambidextrous” and can be mounted as either a left or right swing.
For easiest installation, follow these tips:
▪ Before installing the door, paint the brick mold.
▪ Remove any glass inserts before you begin.
▪ Keep the expander strip pushed up until all other steps are complete.
▪ Don’t warp the frame by overdriving jamb screws.
Caution: A door exposed to direct sunlight shouldn’t be tightly weather stripped. Trapped heat can warp vinyl trim and even distort the main door.
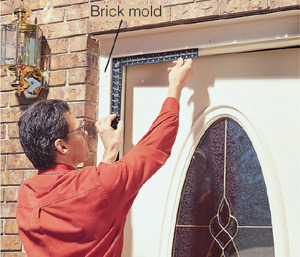
1 Check hinge-side brick-mold opening for square to see if it’s the low side or high side. Measure hinge-side height from top of threshold to top of brick mold.
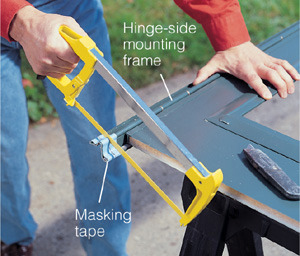
2 Cut the hinge-side mounting frame leg to length using a hacksaw. Angle cut to match threshold angle.
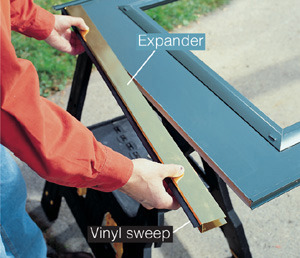
3 Slide vinyl sweep into groove of expander; then slide expander onto door bottom. Pinch ends of sweep groove with pliers to prevent slippage. Center the door in the opening.
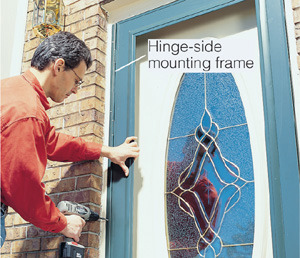
4 Plumb the door and secure the hinge-side mounting frame’s face to the brick mold. Use shims behind frame to fill gaps; then secure jamb side of mounting frame.
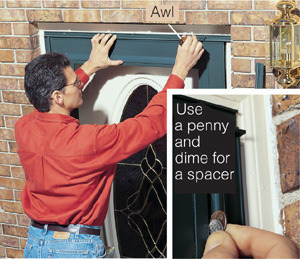
5 Position top mounting frame so the gap between it and door is consistent along entire length. Use a sharp awl to hold one end in place. Attach top mounting frame.

6 Carefully plot position of storm door latch and lock so they won’t collide with entry-door hardware. Check by holding storm door hardware in position before drilling holes.
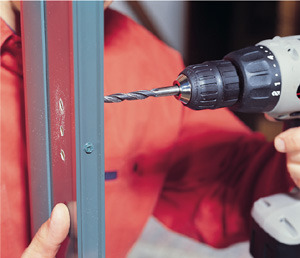
7 Dimple metal with an awl to mark hole locations and to steady drill bit. Remove template and drill hardware holes from both sides to prevent damaging the door’s thin metal skin.
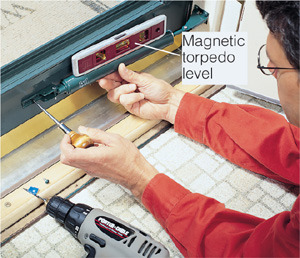
8 Level and install door closer. Heavy-duty storm doors have a closer for top and for bottom. Lower the expander so vinyl sweep contacts threshold.
Storm door closers rarely wear out, but if a strong enough gust of wind catches the door and throws it back hard, the closer usually suffers most. The bracket screws can be pulled out of the jamb, or the plunger shaft can be bent. If the shaft is bent, replace the closer.
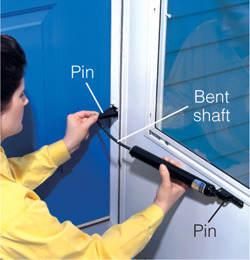
1 Open the door and lock the plunger open. Pull out pin holding plunger in jamb-mounting bracket. Remove pin on other end holding closer to storm door bracket. If brackets are soundly mounted, leave in place and test-fit new closer before replacing brackets.
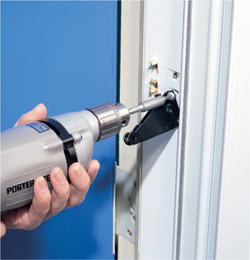
2 Remove old bracket from doorjamb. New mounting bracket will cover minor damage from screw pullout. For serious damage, fill voids with wood putty or epoxy wood filler and sand and paint the jamb before installing a new bracket.
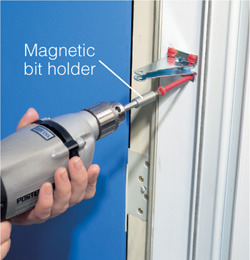
3 Secure new closer bracket to doorjamb and wall framing behind jamb with 3-in. screws. Reinstall the plunger unit.
It’s nice to have a storm door that stays open on its own when you need to move furniture, groceries or trash. But over time, the hold-open washer can lose its grip. Fortunately, 10 minutes is all you need to solve this annoying problem.
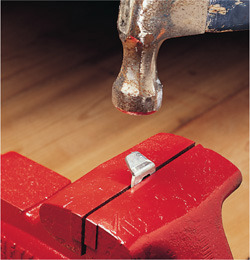
1 Hold the storm door open by clamping locking pliers on plunger shaft against closer tube. Remove pin holding closer to jamb-mounting bracket and pull off washer. Secure washer in vise and bend it over slightly from its previous angle with hammer.
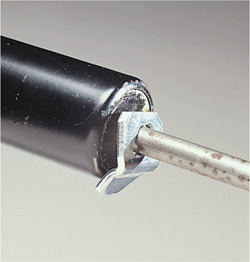
2 Reinstall washer on plunger shaft and test gripping power by pinning closer to mounting bracket. Remove locking pliers and move washer against closer tube and test door. If necessary, remove washer again and bend it until it bites into plunger shaft and holds door open.
Storm door handles are easy to replace, but upgrading to a quality brass handle usually requires new hole locations. Consequently, look for a handle with cover plates that will cover the old holes, and consider adding a matching deadbolt for extra security.
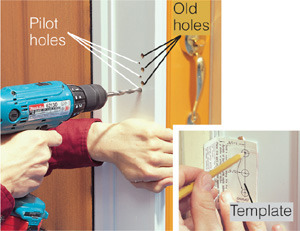
1 Mark door for new hole locations using new handle’s template. Drill small pilot holes through door or mark them with an awl. Then drill holes to the recommended size by drilling through both sides.
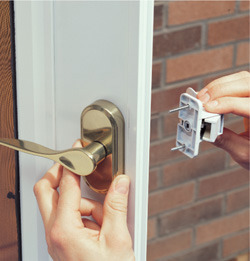
2 Assemble door handle according to the manufacturer’s instructions. Start screws by hand to align with threads. Close door and hold strike plate in position while you mark screw slots. If necessary, use plastic shims provided to shim strike, then attach. Adjust strike until door latches firmly.
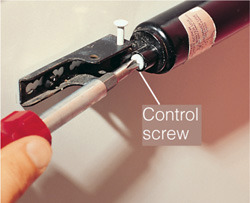
Make adjustments to door closer when you exchange screens for heavier glass storm panels. Move connecting pin into forward hole for winter and rear hole for summer. If necessary, adjust piston pressure with control screw.

You can successfully repaint a banged-up storm door with epoxy appliance paint. Remove the glass and hardware, sand and prime any scratches, fill any dents with auto body filler and repaint.
A garage door is the largest moving object in your house. An older door can weigh from 250 to 450 lbs. (110 to 200 kg). This weight, coupled with antiquated designs and hardware, makes older garage doors a frequent scene of home accidents. New steel garage door designs last longer, insulate better and significantly improve safety. The new doors are lighter, have safer spring systems and often have pinch-resistant joints between the panels. Further, some new door systems allow you to complete the project yourself. Be aware, you should always hire a pro to release the tension on existing torsion-type springs and remove the old door.
Garage doors have one of two types of door springs. Torsion springs (step 8, next page) mount on the header above the door. Extension springs (step 1, inset) float above the roller track. Extension springs are noisier and, without a containment cable, become dangerous, heavy whips when they break. Their primary advantage is that you don’t need the 12 in. (30 cm) of headroom that a torsion spring requires.
Torsion springs have three advantages over extension springs—they’re quieter, safer and easier to fine-tune. Although setting the tension on torsion springs has been very dangerous in the past, several companies now make torsion and extension spring systems with easy, do-it-yourself tensioning.
A standard double door is 7 ft. (213 cm) high by 16 ft. (488 cm) wide. Standard single doors are the same height, but 8 or 9 ft. (244 to 275 cm) wide. Doors are available in wood, fiberglass and steel. Steel doors, like the one shown, are light, maintenance-free, affordable, readily available, and have an insulating value as high as R-19.
Among steel doors, choose from steel only, steel with insulation on the inside and two-sided steel with insulation. Other features that add to the cost are thicker insulation and windows, especially insulated windows. When you replace the door, replace all the hardware and the stop material outside the door with the type that has a rubber weather-strip gasket.
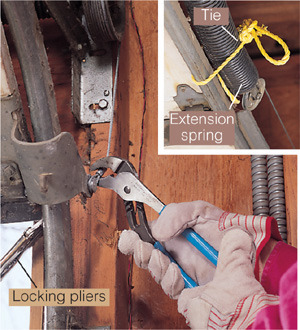
1 Release tension on side-mounted extension springs by lifting door and locking it in place on each side with a pair of locking pliers. Tie extension spring to roller track; then detach cable from bottom bracket with a pair of pliers. Lower a double door by recruiting at least two people to help bear the weight. Before lowering the door, place 2x4 blocks under it to prevent smashing a foot or finger when it’s lowered.
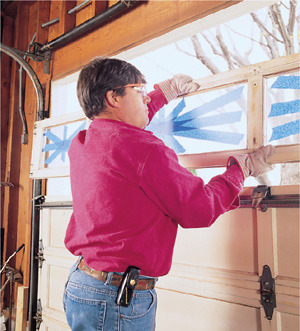
2 Dismantle the door one section at a time by disconnecting rollers and brackets. If you have windows, tape them to control flying shards if they break. With all sections removed, remove old roller tracks and hardware. If your old door has an opener bracket like the one shown in step 4, save it for the new door if it will fit. Your new door kit will not include an opener bracket, and a steel door requires it if you use an opener.
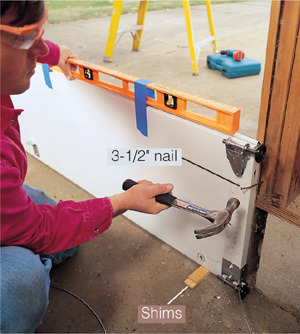
3 Center and level the first section. Door must be level even if floor isn’t, so use shims under section to level it. Rubber gasket on bottom section will fill gaps created by unlevel floor. To hold level in place, tape it to the section. To hold section in place, lightly toe-nail 3-1/2-in. nail into frame and bend it over section. Add brackets and rollers before setting sections in place. Stack one section on top of another, toe-nailing as you go up.
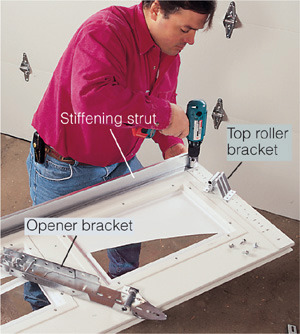
4 Install stiffening strut on top of upper section of steel doors when section is lying flat. To speed assembly, use self-tapping bolts and drill-powered nut driver. Next, install opener bracket (reused or purchased separately) that replaces center bracket between top two sections. Top-section roller brackets mount underneath stiffening strut. Slide the rollers into roller brackets and install top section. Protect door sections from scratches by putting carpet scraps on top of sawhorses.
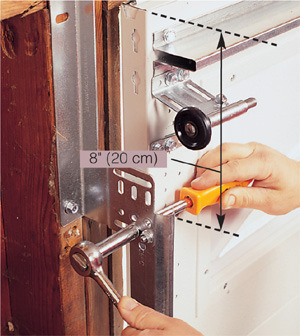
5 Install vertical roller tracks first by wrapping track’s curved lip around rollers. Top of vertical tracks should be approximately 8 in. (20 cm) below top of upper section. Hold bottom of vertical tracks at least 1/8 in. (3 mm) off concrete floor. Wait to install upper tracks until this step is complete. Check level of top section to make sure tops of vertical tracks are level with each other. After leveling and mounting these tracks, install the horizontal upper roller tracks.
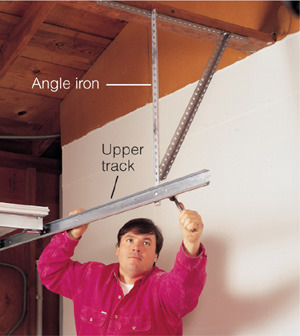
6 Align upper roller tracks by carefully lifting door halfway up. Lock door in place with two locking pliers on tracks. Install supporting brackets on back of rails using perforated angle iron. Install stop bolts, with threads toward the inside of track and at end of each upper track. Stop bolts prevent door from accidentally rolling out the back end of upper tracks.
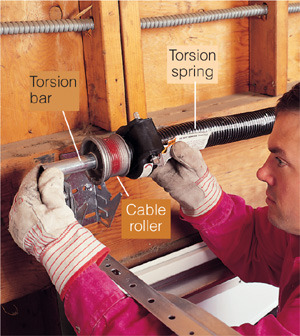
7 Set torsion bar, torsion spring and cable roller in place according to manufacturer’s instructions. Some manufacturers use a single torsion spring for a double door, but others use two. The painted line on the spring acts as a gauge for number of turns you put on the spring. Attach lift cables to brackets on door bottom. If installing extension springs, attach lift cables and containment cables according to manufacturer’s instructions.
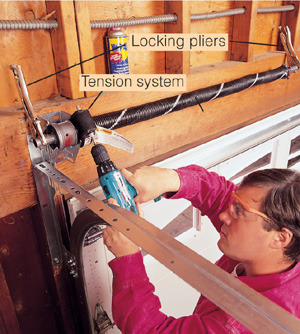
8 Attach locking pliers to torsion bar on both ends of spring to keep bar from turning while adding tension. Apply lubricant to the spring to inhibit rust and reduce metal fatigue. Using your drill, add tension to the spring. Check the tension (door balance) with opener disconnected when lowered halfway. The door should hold its position. If not, adjust tension until door is properly balanced.
Hire a pro, who will use special tools called winding bars to release the tension on an existing torsion spring system. Doing this on your own is extremely dangerous without the right tools and experience.
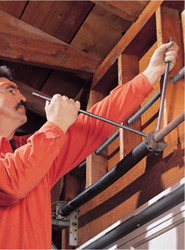
The right door installed with the following qualities in mind can provide decades of safe, reliable service.
Light weight. Newer insulated steel doors, even the heaviest ones, usually weigh less than half that of older doors.
Pinch resistance. The most common injury is a finger that gets smashed, or even amputated, between sections. Look for a door that offers pinch-resistant section designs.
Containment cables. If you have extension springs and don’t plan to replace your door, make sure the springs have containment cables, or install them (see here), to control the spring if it breaks.
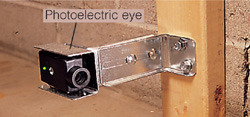
Safe door openers. All openers should have an auto-reverse feature and photoelectric eyes located near the floor on both sides of the door. If the eyes aren’t connected or the beam is interrupted, the door won’t operate.
Securely mounted hardware and rails. Torsion spring brackets should be firmly mounted to the wooden header above the door. Roller-track support brackets and the opener should be firmly mounted to the ceiling.
Annual maintenance. Make an annual check of all parts of your door system.
Opener switch location. Children like to play with automatic door openers, so opener switches should be mounted at least 5 ft. (1.6 m) above the floor.
Installing an automatic garage door opener, equipped with the modern safety features, not only dramatically improves convenience but makes a garage door system safer than one without an opener because manually opening and closing heavy doors is a common cause of accidents.
Openers are available for most garage door types. The opener shown below works with an overhead door, sometimes called a sectional door. Although overhead doors are the most common type, openers can also be installed on one-piece doors, also called “kick-out” doors, in much the same way.
Before installing the opener, perform these five checks to prepare your door system so it’s compatible with an automatic opener:
1. As the door goes up, be sure you have at least 3 in. (7.5 cm) of space above the highest point your door reaches.
2. Verify that you have a grounded electrical outlet within 3 ft. (1 m) of the opener’s motor.
3. Inspect the door hardware for damage or wear (see steps "Checking Rollers and Brackets," below) and make the necessary repairs.
4. Make sure the door is properly balanced (see "Door Maintenance Precautions," below).
5. For fiberglass, hardboard, metal or lightweight wood doors, add a stiffening strut (see step 5, below) to strengthen the top section and prevent damage.
Buy the right opener for your door and follow the manufacturer's installation instructions for your situation. Match the opener’s horsepower to the door’s size. The 1/4-hp openers should be used only on single doors. Use 1/3- or 1/2-hp openers for double doors.
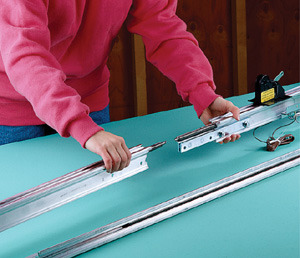
1 Connect rails and power-drive assembly following manufacturer’s instructions. Lubricate chain or screw drive. Fasten header bracket so rail clears torsion spring.
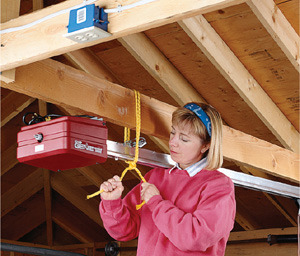
2 After attaching front of rail to header bracket, tie opener in its approximate position with rope.
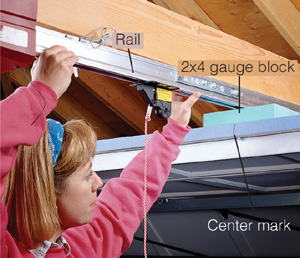
3 Align rail side to side with midpoint of door. Use 2x4 block as gauge to align rail up and down so door clears rail with door in fully open position.
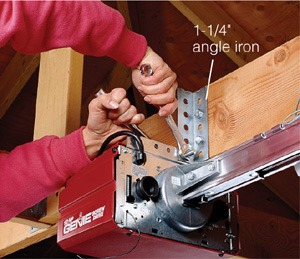
4 Anchor power unit to solid framing using perforated angle iron, lag screws, bolts and nuts.
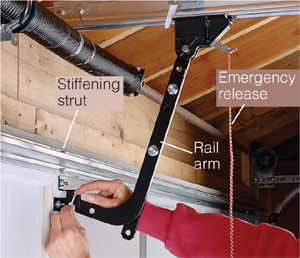
5 Center opener bracket on door. Install stiffening strut on top of upper section to prevent racking door with opener. Attach rail arms to door bracket.
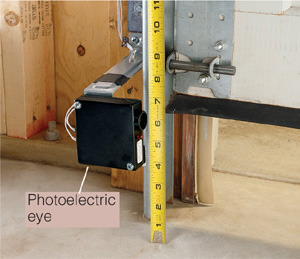
6 Position electric eye 6 in. (15 cm) above floor and clear of roller tracks. Keep wires away from moving parts. The eye stops or reverses opener when an obstruction is detected.

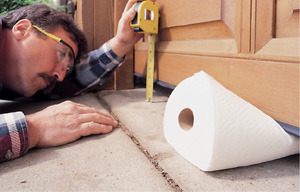
Test your automatic opener’s auto-reverse feature by placing a roll of paper towels directly under the point where the opener is attached to the door. The door should get no closer than 1 in. (2.5 cm) to the ground and should reverse direction two seconds after coming to a stop. If your door opener doesn’t have an auto-reverse feature, buy a new opener.

Perhaps no other part of your home experiences as much wear and tear as the garage door; it can travel up and down more than 1,000 times a year. A neglected door can become as noisy as a locomotive, and pose a significant safety risk to your family, especially your kids. But when kept in good working order, it provides convenience and security. To be safe while working on the door, take the following precautions:
1. Unplug the automatic door opener so it can’t be activated.
2. If the door is open while you’re working, clamp locking pliers onto the roller track below a roller to keep door from dropping.
3. Never remove a lift cable while the door is under tension. If released, the cable can cut like a knife.
4. Never attempt to adjust or release the tension on an overhead door torsion spring. This is a job for garage door professionals only.
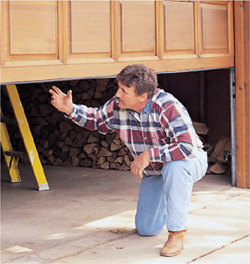
Test door balance by disengaging the door from the opener. You should be able to lower the door halfway and have it hold its position. If the door rides back up or falls, have tension adjusted by a professional.
Because the door moves, hardware can loosen. Inspect and tighten all roller brackets and bolts that hold the rails to the support brackets.
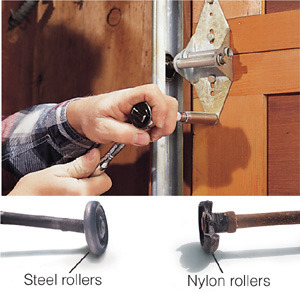
1 Inspect rollers for wear and tear. Nylon rollers tend to crack or chip. On steel rollers, bearings wear and wheels begin to tilt like one shown here. Replace worn rollers by removing roller bracket.
Caution: Do not remove bottom roller bracket.
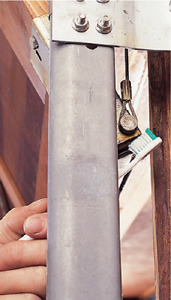
2 Inspect lift cable for wear or corrosion, especially where cable attaches to bottom roller bracket. Clear away the gunk from this area with an old toothbrush to inspect the cable. If necessary, call a professional to replace the cable.
All springs will eventually break because of metal fatigue or corrosion. Annually lubricating your door lift system will extend the life of springs and opener drives by preventing corrosion. Furthermore, it will make both the door and opener operate more smoothly and quietly and help keep openers working in extremely cold conditions.
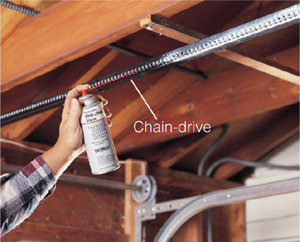
1 Lubricate chain- or screw-drive annually with white lithium grease. Spray-on lithium grease is available at most hardware stores.
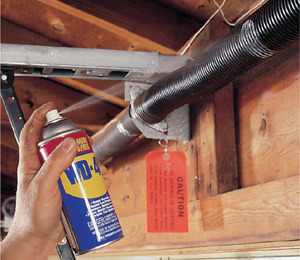
2 Coat overhead torsion springs or extension springs with lubricant, such as WD-40. Don’t wipe off the excess.
If the door comes back up after it hits the floor or doesn’t close or open far enough, you need to adjust the travel on the door opener. Some openers have two setscrews on the back or side of the motor housing, some have knobs on the bottom and others have trip levers on the travel bar that you can reposition.
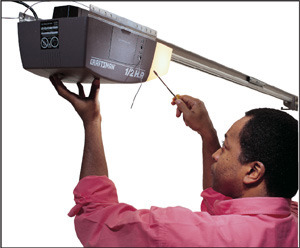
Install a lift handle on both sides of the door to discourage the habit of pulling down on the spaces between the sections—a practice that results in hundreds of crushed fingers every year. Make sure the outside handle will clear the top of the door frame.
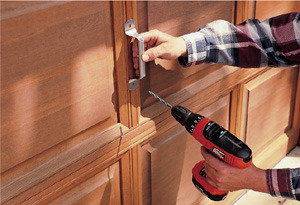
Replace the weather seal on the bottom of your garage door if it’s brittle, worn or torn. Remove wood door seals with a flat pry bar and attach the new seal with 1-in. roofing nails. The hollow rubber weather seal on metal doors is a U-shaped astragal. An astragal is sized according to its width as it lies flat. To further seal a door, replace wood door stops with vinyl stops that have rubber gaskets.
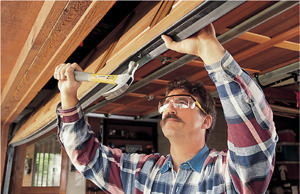
Wood door seals. Install a new seal with wide angle of flange to the inside of the door. Nail one end of seal, pull it taut, nail other end and then nail from the center out.
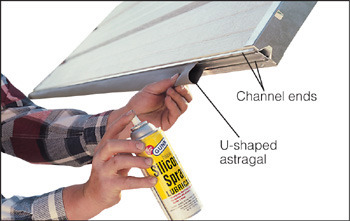
Metal door seals. Use flat-bladed screwdriver to open channel ends and remove rubber astragal. Lubricate channels and install new astragal.
When a concrete slab buckles or sinks, it frequently creates a gap between the garage door and the floor. This gap provides easy access for small creatures and sometimes rainwater and snow. It can also knock the door out of level, creating unnecessary wear and tear on the door’s hardware and automatic opener. Close the gap with one of these two methods:
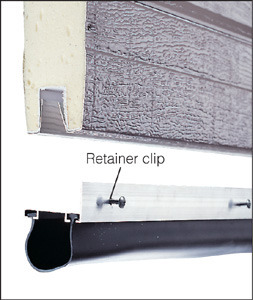
Gap-filling astragals work on metal or wood doors if they are installed in a retainer clip mounted to the door. Astragals are available at garage door supply stores in a variety of widths. These work best if your concrete moves with seasonal changes.
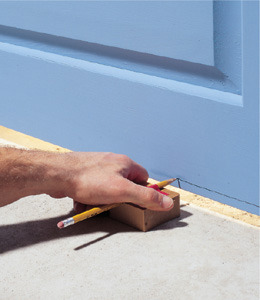
Scribe the bottom of the wood door to fit the concrete. Remove old seal and lower door. Use small wood block that’s the same thickness as the widest part of the gap, tape pencil to it and transfer the concrete’s profile. Cut the door, seal the raw wood and install a new weather seal.
Containment cables should be installed on all extension-spring lift systems. Extension springs are mounted above the roller tracks. Without a containment cable, when an extension spring breaks (and most eventually will), the spring and cable become a heavy, dangerous whip that can smash into cars or unsuspecting victims. These cables contain a broken spring in the space above the track and are inexpensive and readily available at hardware stores.
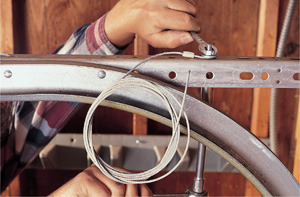
1 Mount an extension spring containment cable by bolting one end to the bracket at the front of the upper rail and feeding the cable through the spring.
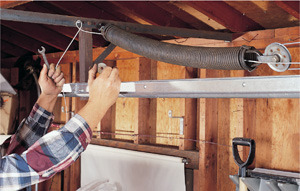
2 Bolt the other end of the cable to the upper support bracket. Make one full loop of cable around the bolt and secure it with a fender washer and locknut.