Understanding Wood
Wood is the material of choice for most home projects, whether it be small repair or grand addition. Durable, easily shaped and available in an array of sizes, shapes and colors, wood is satisfying to work with. For cutting molding, building boxes, applying a fine finish or restoring old furniture like new—this chapter tells you what you need to know to work with wood with confidence.
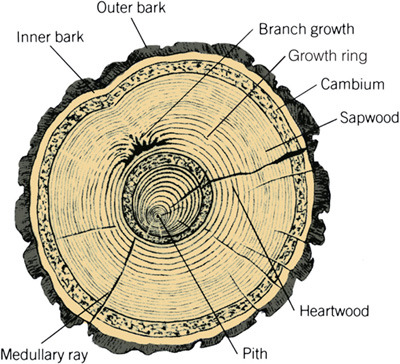
Knowing more about wood helps you select the best material for your projects, and the logical place to start is with the tree. You can see its various parts by simply looking at the end of a log. As the drawing below shows, every tree is surrounded by a layer of protective outer bark. Beneath this is the living, inner bark, which transports nutrients throughout the tree. Next comes the cambium, a sheath of dividing cells that form more wood and more inner bark. Below this is the stuff we use for our projects: an outer band of sapwood, the growing section that transports sap from the roots to the leaves, and a core of inactive heartwood. In the very center is the pith, an unstable and typically unusable section of wood. Growth rings—one ring per year—mark the yearly growth, with more closely spaced rings generally denoting stronger wood. Crosswise to the rings and radiating from the pith are medullary rays, which are sought after in some wood species for their distinctive markings on finished wood.
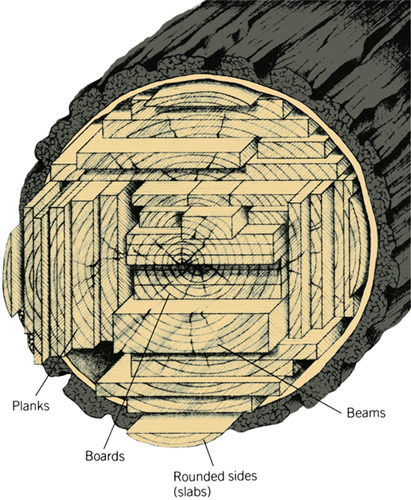
Cutting planks from a log involves a series of choices for sawyers as they rotate the log relative to the blade. Outer planks, or slabs, have rounded sides and are usually culled from the pile. The remaining wood is cut into thick or thin stock of varying widths.
Timber into lumber. Little is wasted when timber turns into lumber. The bark is used as fuel and, with some types, as mulch. The rounded sides, or slash, are ground into flakes or fibers for manufacturing chipboard and fiberboard panels. The remainder is cut into boards of varying widths and thicknesses, depending on the log and the needs of the mill or buyer. Center cuts, which typically contain the pith, are often sawn into large rectangular beams and used for construction or landscaping lumber.
Plainsawn vs. Quartersawn
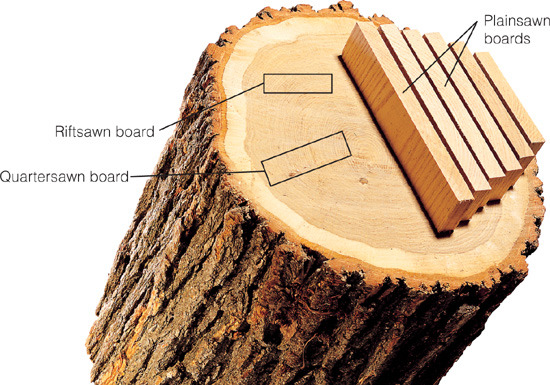
Most logs are sawn consecutively through their lengths to produce plainsawn boards, marked by curved growth rings on their ends. This cutting sequence produces wide boards and makes good use of the log, but the stock is prone to cupping and shrinking. Boards cut like pieces of a pie and with rings that run 90 degrees to their wide faces are quartersawn and have straighter, more even grain that’s more stable. The hitch? Quartersawn boards are narrower and cost more because of the less-efficient cutting approach. Between these two types of cuts are riftsawn boards, with end grain angling roughly 45 degrees to the face.
Lumber
Boards
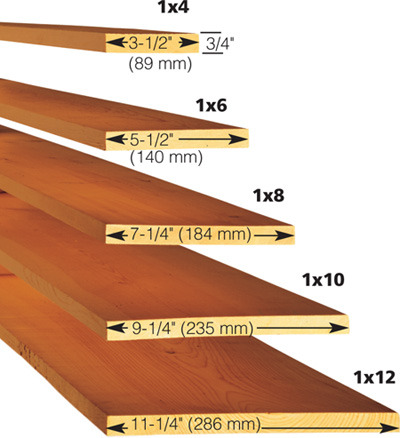
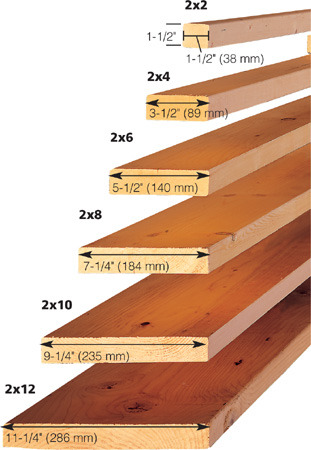
You’ll find wonderfully smooth board lumber at your local lumberyard or home center. Stock planed on both faces, typically to 3/4 in. thick, and ripped straight and parallel on two edges, is called S4S or surfaced on four sides. This material, and dimensional lumber (see below, "Dimensional Lumber"), are best used for construction-type projects. Boards are sold in nominal sizes, in other words, the thickness and width measured when cut at the mill. Shrinkage and planing make the true size smaller, as illustrated below. The length, however, is the actual measurement. Most boards found at home centers are softwood, such as pine, fir, spruce, cedar and redwood, with occasional hardwood boards of poplar, maple and red oak. Board lumber is perfect for quick projects because cutting it into parts is a snap.
Dealing with Defects
Board lumber usually contains any number of defects, such as knots, splits and other blemishes. Although higher-grade lumber contains fewer flaws (see here), you should always inspect your wood before cutting project parts. Luckily, removing these blemishes is easy when you know where and what to look for. Common defects and how to deal with them are shown below.
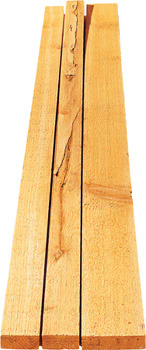
Shake consists of long splits or loose flaps, often deep in the surface. Rip away flawed areas to leave usable material.
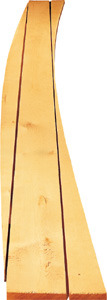
Crook, a curved edge, can be marked with a string and straightened with a circular saw or hand plane. Finish by ripping the opposite edge parallel.
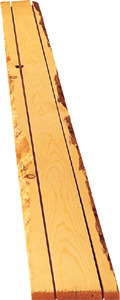
Wane, the rough, barky outer edge of the tree, provides a rustic, natural look. For uniform edges, rip it off on the tablesaw.
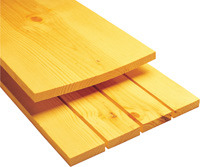
Cup, a concave or convex curve across the face, can be diminished by ripping the board into multiple, narrower strips to reduce the overall cup.
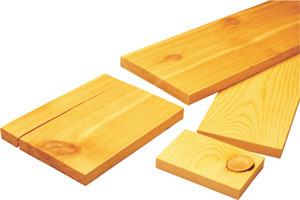
Splits and knots are easily trimmed when they’re near ends. Tight knots can add visual interest; trim away loose knots or reinforce with epoxy.
Dimensional Lumber
Lumberyards and home centers carry softwoods in standard dimensions and lengths, called dimensional lumber. Stock is planed to a nominal 2-in. or 4-in. thickness, for instance, a 2x4, 2x10 or 4x4. Actual dimensions are shown below. Cut from fir, spruce, pine, hemlock and larch, dimensional lumber is used for protected structural framing. More weather-resistant species, such as cedar, redwood and cypress, are sold for outdoor use. You’ll find such defects as splits and knots but, unless severe, they rarely affect its structural use. Pick the straightest stock you can find, but don’t sweat small curves.
Hardwoods
Hardwoods come from deciduous trees, those that seasonally shed their leaves, such as oak, ash and birch. Hardwoods are usually stronger and longer-lasting than softwoods, but they also cost more. They have better surface-finishing properties, and they can be cut, joined and turned as successfully as softwoods, provided your tools are razor sharp. Hardwoods are the best choice for making fine furniture. Not all hardwoods are available at lumberyards. You may have to locate a special dealer (check in the Yellow Pages under “Lumber”) or order from a woodworking supply catalog.
Grading
Most lumberyards follow very specific grading guidelines. Grades are based on sound or blemish-free pieces 1 in. wide x 1 ft. long that can be cut from a board. The basic grades, in descending order of quality, are FAS, FAS-1, No. 1 and No. 2.
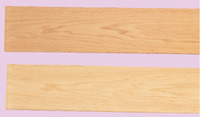
FAS
Firsts and seconds |
Both sides are mostly clear and without knots or splits. Used for fine furniture and solid moldings. |
|
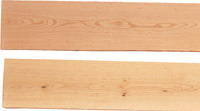
FAS-1
Firsts and seconds on one face |
One side is nearly clear; one side has minor defects, such as small knots or worm holes. Used for fine furniture if cut carefully around blemishes. |
|
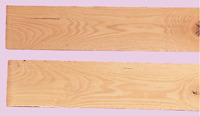
No. 1
Number one common |
Both sides have minor defects, such as small splits or sound knots. Most blemishes can be cut away. Good for furniture and cabinetry. |
|
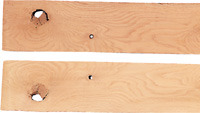
No. 2
Number two common |
Both sides have defects, such as loose or missing knots and splits. Good for lesser-grade cabinets, construction or projects demanding wood with character. |
|
Species
Hundreds of hardwood species are sold throughout the country, some nationally and others only regionally. Domestic hardwoods grow in North America; imported hardwoods grow in the tropics and other regions.
The price of domestic wood varies greatly according to area. If the species you choose is grown locally, it’s usually less expensive.


Rough Lumber
Rough lumber is sold with uneven surfaces full of saw marks that require subsequent smoothing. Its nominal sizes differ from those of dimensional lumber. Thickness is in quarters of an inch, beginning at one inch; width and length are always random, or depending on the maximum a log will yield.
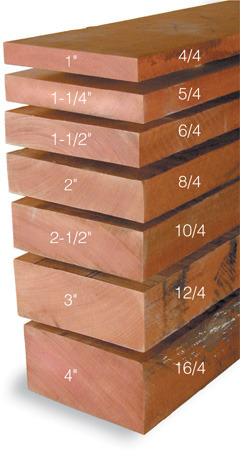
The thinnest rough-cut boards are described as 4/4 (pronounced “four-quarter”) or stock that’s roughly 1 in. thick. Boards are sold in increasingly thicker dimensions by 1/4-in. increments, up to 16/4, which is a 4-in.-thick board. Figure on losing at least 3/16 in. from planing to get flat, smooth surfaces and squared edges.

Board Feet
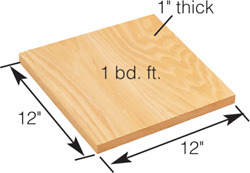
Since roughsawn lumber comes in random widths and lengths, you must buy it by volume or by board feet. You can calculate how much wood you’re buying by using the following board-foot formula: width (in inches) x length (in feet) x thickness (in inches) ÷ 12 = total board feet (bd. ft.).
Drying Lumber
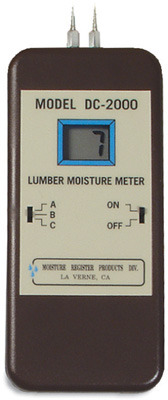
Most of us work with kiln-dried lumber. But you can save money and stock up on wood by stacking freshly cut lumber in a pile so air can get around it. Air-drying lumber can take a year or more and you may lose up to 10 percent to drying defects. But given time and a fresh supply of wood, you’ll get good results. Buy a moisture meter (below) to monitor the moisture content (MC) in the stack. Air drying reduces stock’s moisture levels to around 20 percent MC. After this, stack it indoors for several weeks to dry to 6 to 8 percent MC.
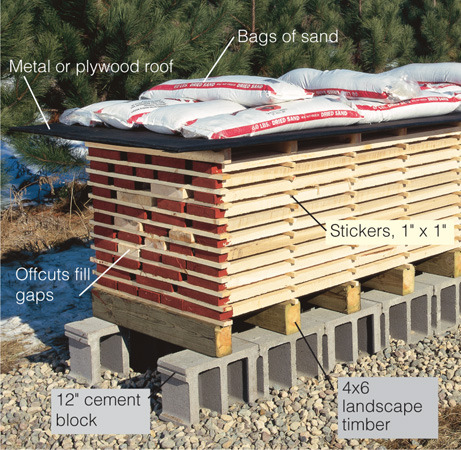
Build the stack on level ground in an open area away from shade. Place gravel over landscaping cloth, then level blocks on gravel, and position timbers every 16 in. (40 cm). Coat ends of lumber with paint or commercial end-sealer. Begin with dry wood stickers, add a course of lumber, add more stickers directly above and so on. Stack to a reasonable height, then cap with a plywood roof and weights.
Planing Lumber
Many lumberyards will plane your roughsawn lumber smooth for a small fee. To save money and gain more control over the process, you can do it yourself with a thickness planer. Floor-model planers are expensive but can take heavy cuts. Benchtop planers (below) cost less and work just as well, although planing occurs more slowly because you can’t cut as deeply with each pass. Using your shop vacuum to collect shavings will help keep the mess under control.
A thickness planer is best used alongside a jointer because roughsawn lumber needs to be flat on one side before it’s thickness-planed. You can rent time on a jointer at a cabinetmaking shop or ask a woodworking friend to flatten your material. It’s possible to skip the jointing process and plane rough stock with good results, especially if you crosscut a long board into shorter lengths after planing, which minimizes overall warp.
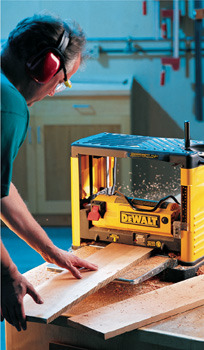
For equal-thickness boards, plane all stock at the same time. Place the flattened side down (or cupped, if it isn’t jointed) on the bed to plane the top rough side. When the top is smooth, flip the stock over and plane the opposite side. Continue flipping boards after each pass, removing equal amounts from each side until you’ve planed them to the desired thickness.
Moldings
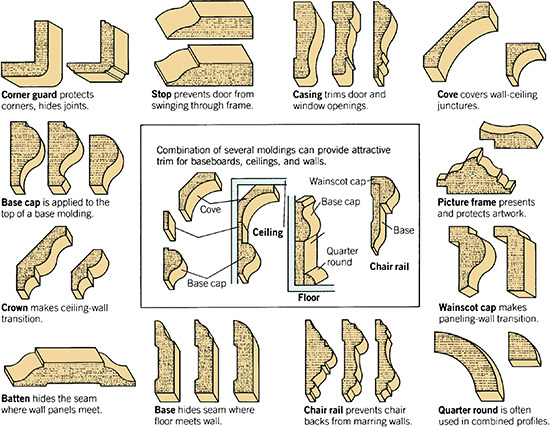
Wood moldings are just the ticket to dress up an otherwise plain cabinet or lackluster room and are often used to hide construction seams, for instance, at door openings or where a floor meets a wall.
An assortment of softwood moldings, typically made from clear pine but sometimes from oak and maple, are available at lumberyards and home centers in lengths up to a maximum of 16 ft. Width varies depending on the profile. Moldings made from hardwood, such as cherry or walnut, are more expensive and are usually special-ordered. Picture-frame moldings, with a recess in which the picture rests, can be purchased in a wide range of styles at a frame shop.
Purchase more molding than you need in case you err in cutting. Save money by buying lesser-grade stock if you plan to paint it, which will hide the flaws, such as color variations or knots.

Measuring and Cutting Moldings
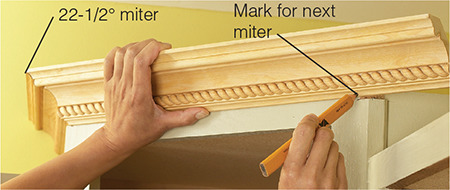
Mark moldings while holding them in place instead of measuring, and then install them in sequence. Position mitered pieces together, then mark the other end for the next miter cut.
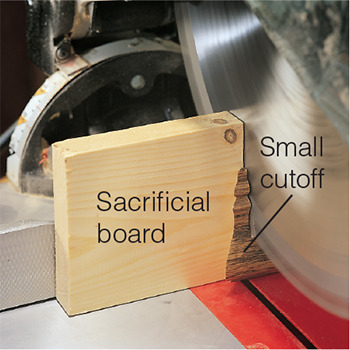
Cut small pieces safely by backing them up with a sacrificial board. Hold the saw down after making the cut until the blade comes to a complete stop.
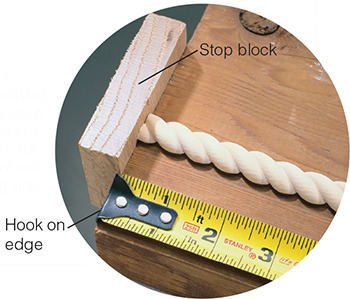
Measure long, floppy moldings by butting them against a stop screwed to the end of a long board. Hook the tape over the board and mark the cutting line.
Plywood
Hardwood Plywood
Made from thin layers of wood, or plies, plywood is cheaper and lighter than most solid wood. Sheets are strong, flexible and don’t shrink or expand in the way solid wood does. Best of all, it’s readily available at home centers in wide, smooth sheets, making it convenient for cabinet parts and wall paneling. Hardwood plywood has outer plies of super-thin veneer made from hardwood, such as birch, oak or walnut. Veneer-core plywood is common, but other cores such as medium-density fiberboard (MDF), particleboard or strips of solid wood are available. Sheets range in thickness from 1/8 in. to 3/4 in. (3 to 19 mm) and are typically 4 ft. x 8 ft. (1,220 x 2,440 mm), although longer panels can be special-ordered.
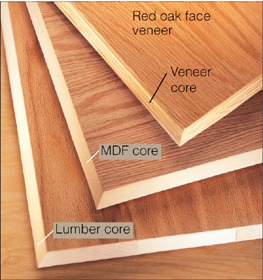
Hardwood plywood has face veneers of thin hardwood. You can choose from a variety of cores, including common and more stable veneer core, cheaper particleboard and MDF cores, or stiffer, screw-holding lumber core.
Rotary Cut vs. Plain-Sliced
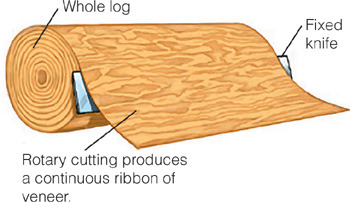
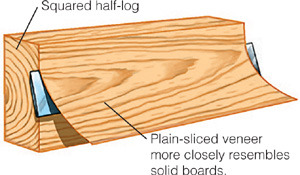
Hardwood plywood comes with two types of outer veneers. Rotary-cut veneers have a wilder, more open and distorted grain pattern and are the most economical choice. Plain-sliced veneers have a more natural, boardlike grain pattern and are typically created by gluing layers of veneer side by side to create the standard 48 in. width. Plain-sliced plywood commands a premium price and is popular for higher-quality work. Some sheets are available with plain-sliced veneer on the good-face side and rotary-cut material on the back.
Softwood Plywood
Commonly called construction plywood, softwood plywood has outer veneers of softwood, such as fir, with inner plies of softwood, hardwood or both. These 4x8 sheets come in thicknesses from 1/4 in. to 3/4 in. and are often used in place of wide construction lumber. You can buy interior plywood for indoor projects, such as subflooring or paneling, or get an exterior grade that withstands the weather, for instance, for outdoor sheathing or sign-making. Sheets are graded alphabetically, with the highest grade having smooth, paintable surfaces free from knotholes and other defects.
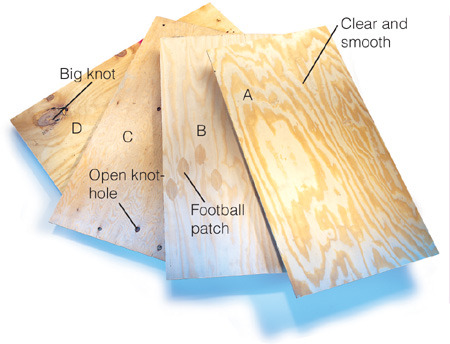
Construction plywood is graded by letter, from A to D. Higher-grade (A) sheets have smoother surface veneers, while lower-quality (D) panels may contain splits and large, open knots. In Canada, the grading runs from A (highest grade) to C (lowest).
Plywood vs. Oriented Strand Board
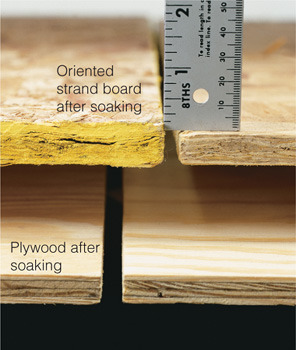
Like softwood plywood, oriented strand board (OSB) is made for subflooring, sheathing and other construction. It’s less expensive, yet very similar in strength and durability. It weighs about the same, can span equal distances and offers similar nail-holding abilities. Its textured surface is less slippery on roofs and some panels have regularly-spaced lines to help with nailing. One drawback is OSB’s tendency to swell when exposed to moisture—then remain swollen when dry. The solution? Store it in a dry place and cover it with tarpaper or siding as soon as possible.
Accurate Marking and Measuring
Angles
Precise marking and measuring is the key to successful projects, and dealing with angles is often the biggest hurdle. Sometimes all it takes is simple math to calculate a desired miter angle; other times the right technique and the appropriate tool make the job go smoothly.
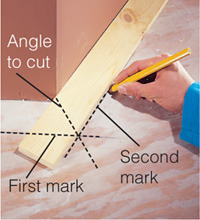
1 To find the exact angle to cut any miter, lay a scrap of wood against the wall and mark the outside edge. Then move the board around the corner and mark again.
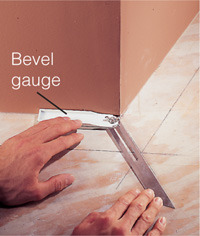
2 Adjust a bevel gauge until it matches the angle. Use the gauge to transfer the angle to a board, protractor, miter saw or other tool.
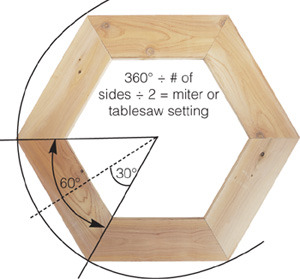
Polygons require the right miter angle on board ends to join successfully. To determine the miter angle of any polygon, such as a six-sided frame, divide the number of sides by 360°, then divide that by 2. In the example shown, 30 is the miter angle setting for your miter saw or other saw.
Curves
Curves add flair to your work but can be challenging to mark. Drawing them freehand usually results in irregular arcs, and the results are usually unsatisfactory. To generate a consistent or fair curve, try tracing around some of the circles that surround you: lids from jars or cans, toy or bicycle wheels or any round item in your house that can easily be traced with a pencil.
After marking the curve, cut out the part as close to your line as possible with a jigsaw or on the bandsaw. Then carefully sand the curve until your eye deems it’s fair. For really large circles or arcs of a circle, try one of the techniques below.
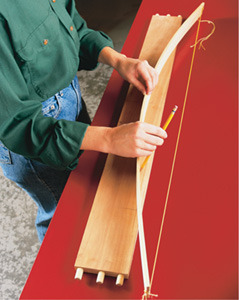
Arcs are easy to draw using a piece of thin, straight-grained wood. Drill a small hole in one end and cut a V-notch into the opposite end. Tie string to the hole, then bend the strip to the desired curve and lock it in place by tying a knot in the string and slipping it into the V-notch. Trace the stick to create your arc.
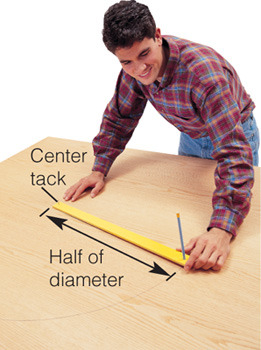
Circles of practically any diameter are possible with a homemade trammel. Drill a hole for a pencil in one end of a stick and tack the other end where you want the center of the circle. The distance between the pencil hole and the tack should equal half the circle’s diameter, its radius. Simply spin the trammel to draw the circle.
Assembly
Assembling your work can spell disaster if you forget which part goes where—especially after you’ve spread glue and can’t turn back. To make assembly goof-proof, it pays for you to learn how to mark your work to keep track of its order.
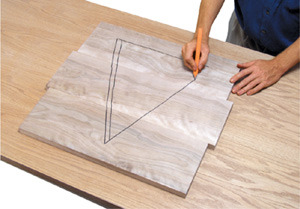
Boards. Use a triangle when laying out boards edge to edge. This way, you can separate the boards for gluing or later assembly and never lose track of their order.
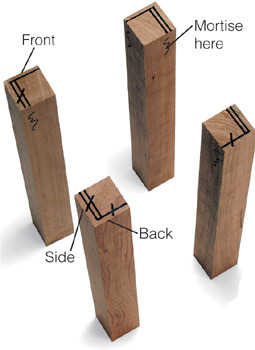
Legs. The marks shown here let you keep track of not only the front, back and sides of your legs, but the outside and inside and where the joints go. Marking the tops means you won’t lose your bearings during subsequent tapering, bandsawing or smoothing operations.
Woodworking Joints
You can use many methods to join wood, including simply butting parts together, overlapping them and adding fasteners, such as nails or screws, or cutting precise, interlocking angles. The joints you choose will depend on your own abilities and the tools at hand, as well as the strength and appearance you need for a project. The best rule of thumb when selecting a joint is to keep it simple, but keep it strong. Think twice about using a complex dovetail joint when a simple butt joint will do.
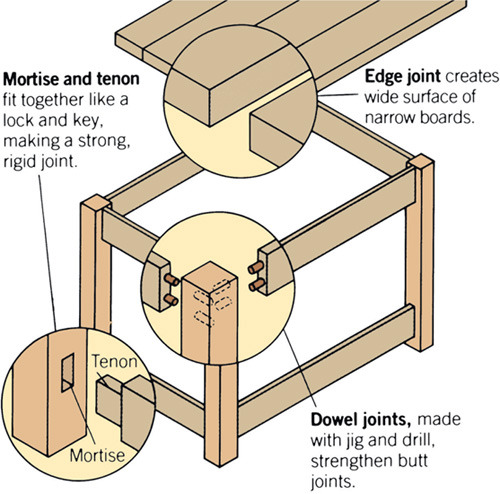
This simple table shows examples of many joinery options. The top, made from multiple narrow boards, is glued together using edge joints, which require only straight, flat surfaces that are square to their faces, plus a good coat of glue. The top rails are joined to the legs using dowels. Stronger mortise-and-tenon joints are shown being used to connect the lower stretcher rails to the legs. When assembled, both types of joints prevent the frame from racking or twisting.
Corner Butt Joints
Joints that butt together at corners are quick to assemble and don’t require particularly precise fitting. They do, however, need strengthening with glue and fasteners, such as screws, corner blocks, metal plates or shop-made gussets. That’s because all these joints involve joining end grain to either face or side grain, and the open pores of end-grain wood make a poor glue joint.
Use fasteners of the correct size. Oversize screws will split stock; undersize ones won’t adequately support the joint. With any type of joint in which you’re gluing several parts simultaneously, practice the clamping procedure before you apply the glue.
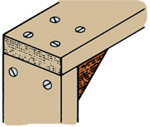
Triangular block, glued and screwed in place, stabilizes inside corner.
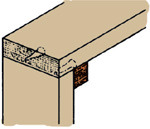
Square block can be attached from inside if you don’t want screws to show.
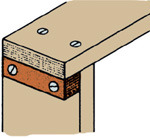
Outside glue block supports joint without obstructing inside corner.
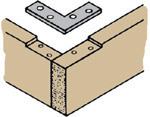
Flat metal corner plate set in recess provides smooth surface across joint.
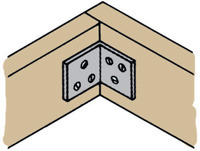
Inside corner brace pulls corner together; supports best if used on all corners.
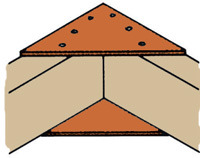
Triangular gussets of 1/4-in. plywood, glued and nailed in place, produce rigid joints.
Overlapping Joints
Overlapping joints are among the easiest to construct and can be strengthened by adding glue and fasteners, typically screws. Notching the piece to form full or half-lap joints that interlock and overlap increases strength by providing shoulders that resist racking. However, it’s still a good idea to use both glue and fasteners to reinforce the joint. In addition to its superior strength, a lap joint is a good way to produce flush surfaces for a neater appearance.
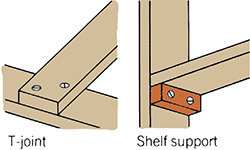
T-joints. A T-joint requires no cutting. Place one piece across the other at the desired angle and fasten them with glue and nails or other fasteners. Though strong, the joint is somewhat crude and best used for temporary or hidden construction. Shelf supports, a form of T-joint, are easily assembled. Glue and screw small wooden blocks to the uprights; then simply rest or secure the shelf in position on the blocks.
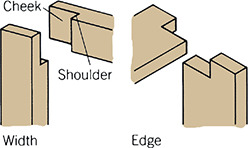
Lap joints. Full and half-lap joints connect width to width, edge to edge or edge to width. In a full lap, a thick piece is notched to receive the entire thickness of a thinner piece. In a half lap, pieces of equal thickness are notched to half their thickness and interlock flush when joined. Cut them in the middle of each board, called a cross lap, at the ends in an end lap, or from one end to one middle in a middle lap.
Dadoes
A dado is a channel cut across the grain; when cut with the grain, it’s called a groove. The adjoining member can be the full thickness of the board or it can be rabbeted (see here) along its end. A through dado goes completely across a board; a stopped dado stops short of the edge to conceal the joint. The joint is perfect for case shelves, partitions and drawers, because it resists twisting and warping.

Blade Guard Alert!
Most guards must be removed for non-through cuts, so be careful to keep fingers well clear of the cutting action. Use push sticks and push shoes whenever possible.
Router Method
You can mill dadoes or grooves with this simple T-square jig, a router and a straight bit. Use a framing square to square the jig when you make it, and rout into the right side of the jig’s leg to establish the position of the dado. If you’re joining 3/4-in. plywood, which is slightly thinner than solid wood, use a special 23/32-in. bit for a snug fit.
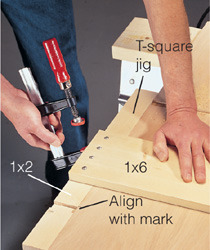
1 Align the dado cut on the jig with the dado marks on your board and clamp both ends of the jig to the workpiece. Make sure the jig is slightly longer than your workpiece is wide.
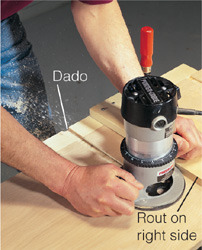
2 Set the desired depth of cut, and guide the router across the jig’s leg and workpiece. Keep the router on the right side of the jig and push away from you so the bit pulls the router against the jig, rather than pushing away from it.
Tablesaw Method
The tablesaw cuts dadoes with ease. You can use either a standard blade or a special dado blade, which is a set of thinner blades you stack together to the desired dado width. Set the dado depth by measuring how far the blade projects from the saw’s surface. Radial-arm saws can also accommodate dado blades.
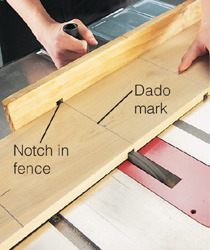
A dado blade is the quickest way to cut dadoes. Screw a 2-in.-high (5-cm-high) wood fence to your miter gauge, cut a deep notch in the fence and then align a mark on the top side of your workpiece with the notch to accurately make the cut.
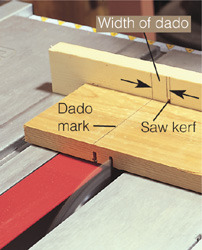
A standard blade can cut great dadoes by way of successive cuts. Saw a kerf in a fence screwed to your miter gauge and mark the dado width. Cut the first dado by aligning the workpiece’s dado mark with the kerf. Cut the second shoulder by aligning the mark to the fence mark. Finish by making several passes between the shoulders.
Circular Saw Method
A circular saw cuts serviceable if somewhat rough dadoes. To speed things up, try ganging your parts together side by side to cut the dadoes at one time. Set the dado depth by lowering the saw’s base. To guide the saw for the outside shoulder cuts, you can use a jig similar to the router T-square or a carpenter’s square.
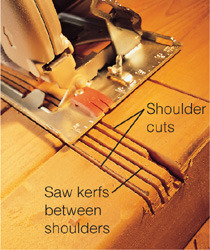
1 Make the left and right outside shoulder cuts first by guiding the edge of the saw with a large square or a T-square. Then cut kerfs between the shoulders by pushing the saw freehand, leaving 1/8-in. (3-mm) strips of wood. Don’t fret if the inner kerfs aren’t straight.
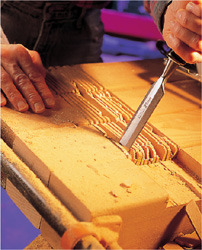
2 Break out the waste by levering a chisel between the kerfs. Finish up by paring the bottom smooth with a sharp chisel.
Rabbets
Often combined with dadoes or grooves to form interlocking joints, rabbets are L-shaped tongues cut along a board’s edges, either across or with the grain. The joint increases the number of gluing surfaces and provides one or more shoulders to help resist racking.
Rabbets are handy for insetting cabinet backs or drawer bottoms into rabbeted case or drawer sides or for making corner joints on boxes, such as cabinets or drawers.
When laying out the joint, be sure to leave enough tongue thickness for strength. It’s common to cut the depth of a rabbet about half or two-thirds of the board’s thickness. Be sure to set up your cutters so they cut squarely, allowing you to mill square shoulders for a strong, tight fit.
Router Method
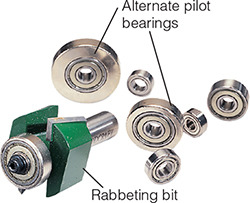
One of the easiest ways to cut rabbets is to rout them using a special rabbeting bit that automatically cuts the perfect width. The bit comes with different pilot bearings that let you adjust the width of cut by simply installing the correct bearing on the same bit.
Start by selecting a bearing that will cut a groove that’s as wide as the thickness of the part you’re joining. Adjust the router height for the desired rabbet depth. Clamp the workpiece to the bench. For deep rabbets, adjust the router and make a series of gradually deeper passes.
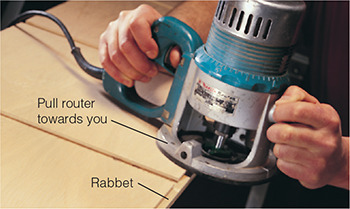
Make sure the bit’s bearing bears against the edge of the work, then move the router from left to right to rout the rabbet.
Dado Blade Method
Rabbets are a snap with a dado blade if you clamp a wood fence to the rip fence to cover a portion of the blade.
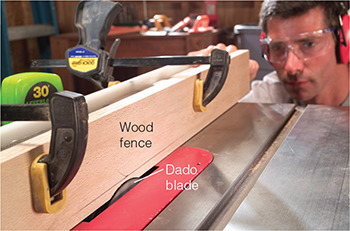
1 With a wood fence securely clamped to the saw’s rip fence and over part of the blade, slowly raise the spinning blade until it cuts into the fence.
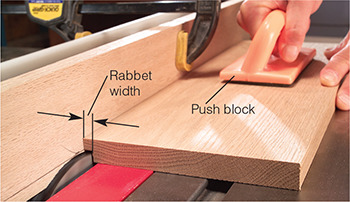
2 Adjust the fence for the desired width of cut and lower the blade for the rabbet depth. Make the cut using a push block, keeping the stock snug against the fence as you push.
Standard Blade Method
A standard tablesaw blade cuts excellent rabbets—especially if you build a jig to guide the work. The jig is a simple box-type arrangement made from plywood, with a tall fence that’s square to the saw table. You clamp the workpiece to the jig, and then push the entire assembly past the blade.
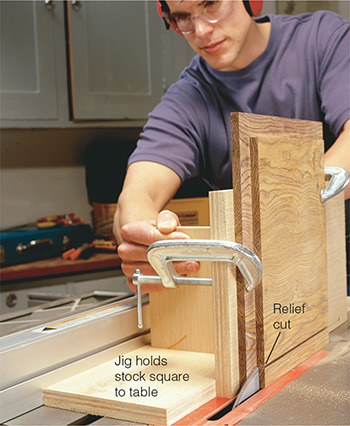
First make relief cuts by laying the stock flat on the table and guiding the work against the rip fence. Then stand the work on edge, clamp it to the jig and rip off the waste by pushing the assembly past the blade.
Mortise and Tenon
These sturdy interlocking joints are the mainstay of furniture, particularly when joining frame pieces, such as doors, face frames, table bases and chairs. Although a mortise-and-tenon joint usually joins two pieces at right angles, if you plan carefully, they can unite boards at virtually any angle.
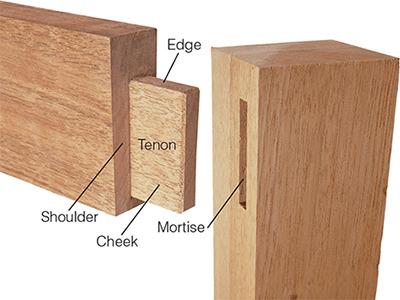
The mortise is the hole portion of the joint and is typically cut in the upright leg, or stile, of the work. The tenon is the tongue that’s cut in the adjoining member, or rail. A tenon is described by its three dimensions: The shoulder, which defines its length; the cheek, which refers to width; and the edge, which refers to thickness.
A mortise for leg-and-rail construction should be half as deep as the stock is wide. The tenon should be as close to one-third of the stock’s thickness as possible and, if blind (see below), about 1/16 in. (1.5 mm) shorter than the mortise is deep, to ensure the shoulders meet tightly. The fit dictates the joint’s success: The tenon should be snug enough to require tapping by hand or with a light hammer, but not so loose that it falls into the mortise.
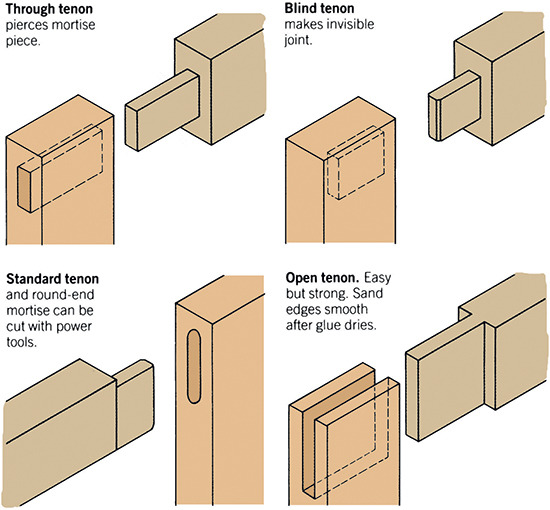
Cutting Mortises
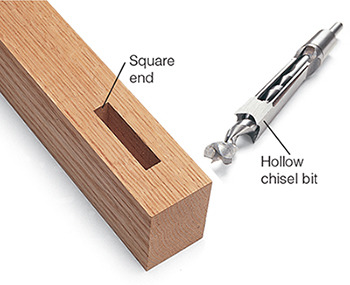
It’s best to cut the mortise first, then fit the tenon. Hollow-chisel bits that work in a drill press or dedicated mortising machine create square-ended mortises that fit square tenons. Use the machine by setting the depth of cut and then drilling a uniform series of holes into the edge of the stock to the desired length of the mortise.
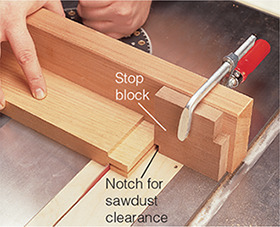
Cutting Tenons
Lay out the cheeks so they fit the exact width of the mortise. Stand the stock vertically on the tablesaw to cut the cheeks, using a similar jig as when rabbeting (see here). Then crosscut the shoulders by guiding the work against a fence attached to your miter gauge. A stop block aligns the work so your shoulders are the perfect length.
Dovetail and Box
Dovetails
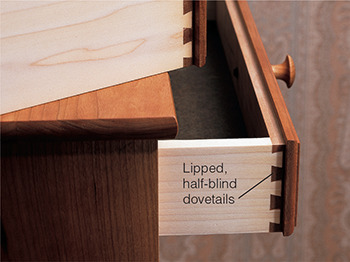
Decorative and durable, dovetail joints have flared pins and tails that interlock. Because they resist being pulled apart, dovetails are ideal for furniture parts under stress, such as cabinet boxes and drawers.
Dovetails are commonly made in two styles: through dovetails and half-blind dovetails. Though they can be cut by hand, a router dovetail jig makes cutting the joint foolproof; most come with excellent instructions.
To make a corner joint for a drawer, start by routing the tails in the sides; then cut the pins in the front to complete the joint.
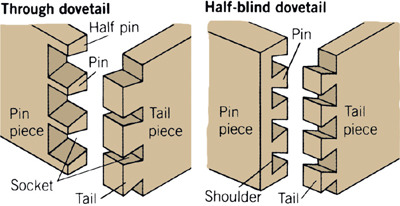
Through dovetails, the stronger of the two types, are a good choice when you want to expose the joint, such as on a cabinet. Only one-half of the joint is visible with half-blind dovetails, making them a good choice for drawers or wherever you want to conceal the joint.
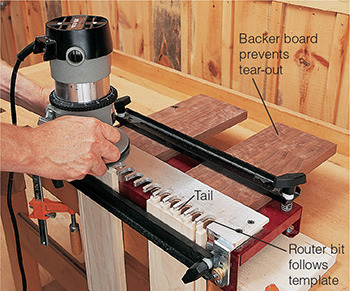
Drawer sides. Clamp the stock vertically in the jig and move the router from left to right to shape the tails.
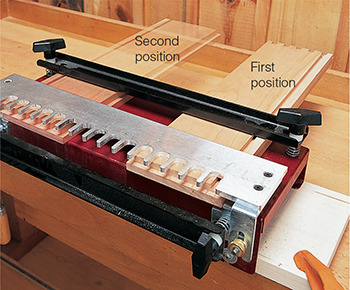
Drawer front. Cut the pins on one end by aligning the stock to the right of the jig. Cut the opposite pins with the stock to the left.
Box Joints
Also called finger joints, the fingers and slots of box joints provide a large gluing area and create a strong joint. Sort of a simplified dovetail, box joints don’t have the same flared connection, but they’re decorative and a good choice for corner joints, such as box-type constructions.
Make the fingers and slots exactly the same width and make them as long as the stock is thick. Simplify the task by using a dado blade adjusted to the width of a finger and attaching a wood fence to your miter gauge. Glue a wood pin into a notch in the fence, equal to the size of a finger and longer by about 1 in. (2.5 cm).
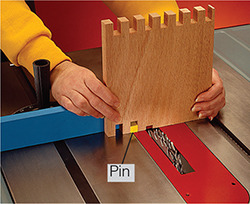
1 With a pin jig screwed to the miter gauge, cut the slots by leapfrogging the most recently cut slot onto the pin, then cutting the next one.
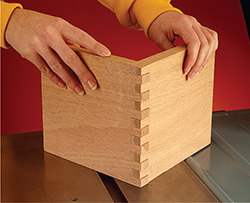
2 Assemble and check for a tight joint. To alter the fit, shift the jig slightly left or right on the miter gauge.
Biscuit Joinery
Fast, strong, invisible and virtually foolproof, biscuit joints can replace box or dovetail joints, mortise-and-tenon, or dowels joints in many situations without sacrificing strength.
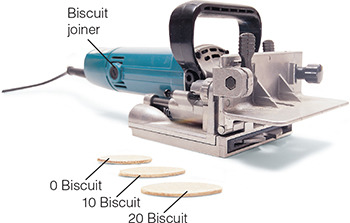
The biscuit, made from compressed beech, is shaped like a flat football and comes in three sizes. You cut half-moon slots in adjoining pieces with a biscuit joiner. Squirt white or yellow water-based glue into the slots, slip in the biscuit and clamp. The glue swells the biscuit, locking the joint even if the slots are slightly oversize. The biscuit’s elliptical shape allows some lateral movement to help align the joint before the glue sets.
The biscuit joiner is like a small circular saw with a horizontally mounted blade. A good joiner will have a conveniently located on-off switch and a fence that adjusts easily—and locks securely—for right-angled or mitered joints. The fence helps center the slot and holds the blade parallel to the work. After setting up the cut, just plunge the blade into the workpiece to cut a slot. Simple.
Face-frame Joint
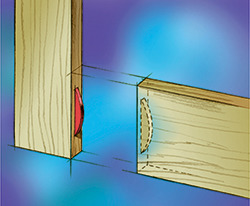
This joint works for door frames, but only for lightweight doors. As with all biscuit joints, position the boards in exactly the position they’ll be joined and mark across the joint with a pencil. Adjust the joiner’s cutting depth for the biscuit’s size and position the fence to cut in the center of the stock.

Clamp the stock to the bench, align the mark on the joiner with the mark on the stock and plunge to cut a slot.
Edge-to-edge Joint
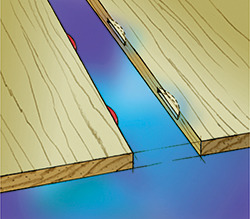
When joining long areas, as in an edge-to-edge joint, keep the slots about 2 in. (5 cm) away from the ends of the boards and space them every 6 to 8 in. (15 to 20 cm). While biscuits add strength to this joint, they’re particularly helpful in aligning the parts during glue-up.
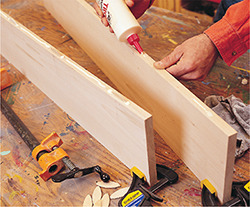
Apply yellow or white glue inside each slot so the biscuit will be completely coated when inserted. Then run a bead of glue along the edge and clamp.
T-joint
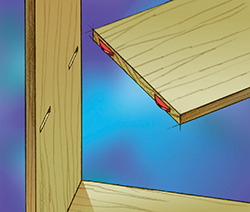
Case joints, such as T-joints or corner joints, are simple to cut. Mark for slots, and draw lines on both sides of the midboard connection in the T-joint. Cut the end slots with the work vertical in a bench vise. Use a fence clamped to one of your layout lines to create the slot in the middle of the adjoining board.
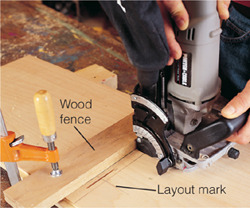
To slot the middle of a board, clamp a fence to one side of the joint. Adjust the joiner’s base, position it against the fence, align guide marks, and plunge.
Pocket Screws
If cabinetmaking intimidates you, pocket screws can be a welcome relief from tedious joint cutting and fancy tools. Armed with a drilling jig and a handful of pocket screws, you can quickly master all sorts of tight-fitting frame and case joinery.
Pocket joinery is best described as a screw version of toe-nailing, where boards are joined by angling a fastener through the edge of one into the other. A drilling jig and special stepped drill bit allow you to drill the precise holes this joinery system requires. You’ll need a square-drive bit, special pocket screws, which have narrow shanks and low-profile, square-drive heads.
The downside to pocket joinery is the ugly, oblong holes you’ll leave on the backside of your work. But they’re easily filled with wood plugs (below) made in several species expressly for this purpose.
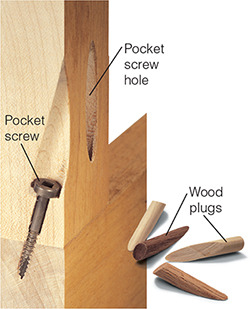
Face-frame Joints
Face frames or door frames are easy to make using pocket screws. Be sure to use at least two screws per joint to prevent twisting. Generally, a 1-1/4-in.-long screw is best when connecting 3/4-in. stock.
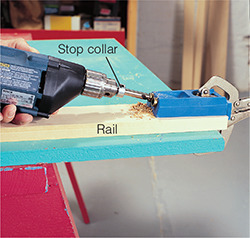
1 Clamp the jig to the end of the rail. Drive the stepped bit through the jig and into the workpiece until it stops against the stop collar.
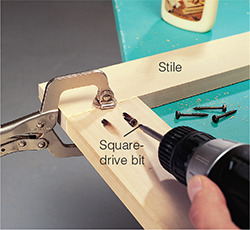
2 Apply glue, align and clamp the joint, and drive the self-tapping screws through the rail and into the stile.
Edge-to-face Joints
You can assemble an entire cabinet with pocket screws in a matter of minutes. As with biscuit joints, you’ll need to mark layout lines for midpanel joints and space screws every 6 to 8 in. (15 to 20 cm) for strength.
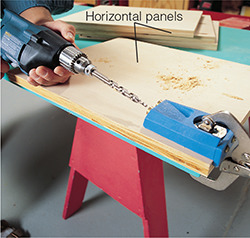
1 Clamp the jig to the end of each horizontal shelf panel and drill the pocket holes.
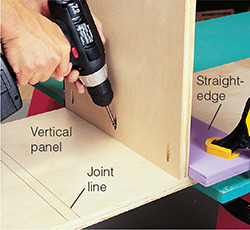
2 Position the horizontal panel on the joint lines of the vertical case-side panel, clamp a straightedge to one side to align the shelf and drive all the screws.
Corner Joints
Pocket screws do wonders holding corner joints for drawers, cabinets or other boxes. Using the drilling jig, bore holes in the drawer ends (or cabinet top and bottom), glue and assemble with screws.
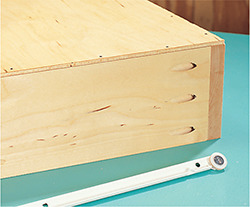
Edge Joints
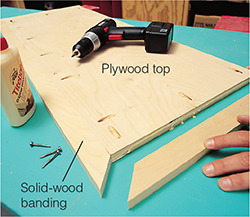
Hide raw plywood edges by screwing wood banding around its perimeter. Use the drilling jig to bore holes in the plywood, miter the banding to fit, add glue and assemble with screws.
Dowels
Correctly made, dowel joints are nearly as strong as mortise-and-tenon joints. Dowel joints connect all sorts of frames, such as doors and face frames, and casework, such as cabinets and other boxes. They require careful workmanship and a few simple tools.
The tricky part is aligning and drilling the holes precisely because you drill complementary holes in each piece. Using a doweling jig solves the problem of drilling the first set of holes, since it guides the drill bit in an exact pattern. To locate the matching holes, you can use dowel centers, which are metal plugs with centered points that fit into the previously drilled holes and prick the adjoining piece to mark its hole locations.
Use at least two dowels per joint to prevent twist. Dowel diameter should be one-third to one-half the thickness of the thinnest piece of wood being joined. Length should be 1-1/4 times the thickness of the thinnest piece. Be sure to drill the holes 1/8 in. (3 mm) deeper than half the dowel’s length. And use fluted dowels, which are scored or grooved, so air and excess glue can escape.
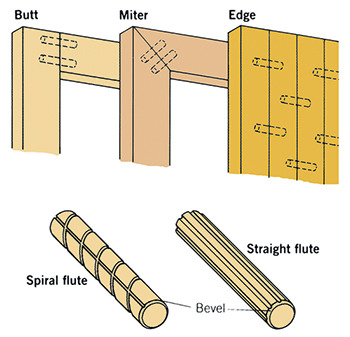
Dowels can connect many types of joints, including square and mitered frame joints, edge-to-edge joints and edge-to-face joints, such as where a case side meets a bottom or top. Fluted dowels make strong connections and are better suited for dowel joints than smooth-sided dowel rods.
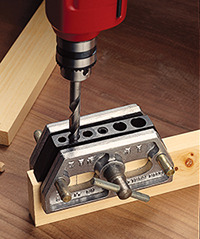
Drill dowel holes using a doweling jig, which guides a drill bit squarely through hardened steel bushings. Most jigs will grasp edges and ends via an integral clamping mechanism.
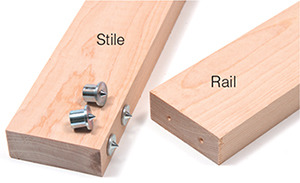
Transfer dowel hole locations using dowel centers, made from hardened steel with sharp center points. Drop the centers into holes drilled in the stile, align the adjoining piece over the joint and tap it to mark the hole locations in the rail.

Better Doweling
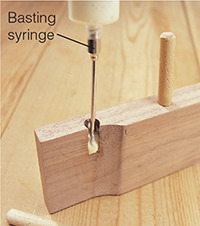
To coat dowel holes quickly and without a mess, use a basting syringe. Pour glue into the syringe, insert the needle into the hole, press the plunger and rotate the syringe to apply an even coat. When finished, pour out remaining glue, fill syringe with water and press plunger to clean needle and needle tip.
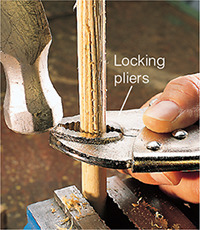
Make your own fluted dowels from an ordinary dowel rod. Grasp the end of a rod in a metal vise, clamp locking pliers at the free end and tap them with a hammer so they slide down the rod. Unlock, rotate the pliers, relock and repeat the procedure to cut flutes on other parts of the rod.
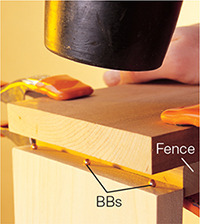
Try BBs for marking complementary dowel holes in both pieces instead of dowel centers. First, use a nail to prick holes in one piece for the BBs to nest in. Then clamp a fence to the adjoining board to align the joint and tap its surface with a rubber mallet. The BBs will make dents in the second board for centering the drill bit.
Miters
Miters are any angled cut on the ends or edges of parts; the most common is 45 degrees so the adjoining pieces connect at a right angle. Cutting a miter is simple if you use a miter saw or a jig for the tablesaw. The real trick, even for seasoned woodworkers, is to glue the joint successfully without gaps.
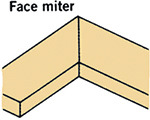
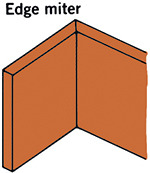
Miters can be cut either across the face of the stock, called a face miter, or along the edge, for an edge miter. Face mitering is more common, for instance, for picture frames, doors and moldings. Edge miters are useful for cabinet corner joints and other box-type constructions.
Most mitered surfaces are end grain, which does a poor job of holding glue. That’s why you need to strengthen the joint with nails, dowels, biscuits or splines. The exception to this is an edge miter whose mating area is either long-grain wood or plywood, which has enough long grain to make a satisfactory glue joint.
Gluing Miter Joints
Gluing miters is risky, since end-grain pores suck in glue but too much glue makes parts slip. To ensure success, lightly precoat joints with glue, let it get tacky, apply a second wet coat and clamp.
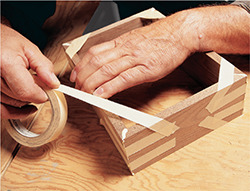
Masking tape makes a great clamp because it stretches to provide tension and removes easily after the glue has dried. Stick one end to one side of the miter, pull the tape to stretch it over the joint and press it to the opposite side.
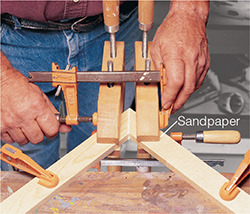
Clamp combinations are often the best solution. Place strips of 60-grit sticky-back sandpaper in the jaws of two handscrews and clamp them parallel and on either side of the joint line. Draw the joint closed by clamping across the handscrews with bar clamps on top and bottom.
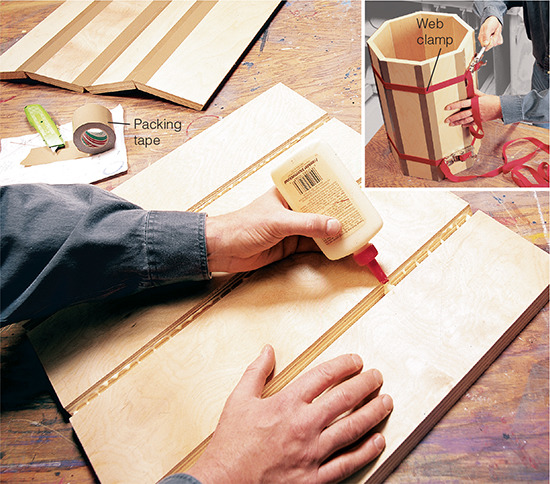
Packing tape and clamps can pull big edge miters together without fuss. Position the parts outside-face up with the joints together and run tape along each joint. Turn the parts over, apply glue into the miters, assemble vertically and secure with web clamps.
Splined Miters
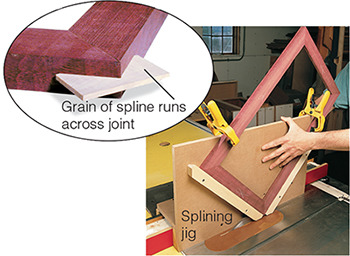
Wood splines make picture-frame miters strong while adding decorative flair. You can make the splines from any wood you like, and glue them into slots cut in the frame. To cut the slots, make a V-shaped jig that rides over your rip fence with a tall fence that holds the frame parallel with the blade and at 45 degrees to the table. Cut the slots in the glued-up frame, glue in oversized splines and trim them flush.
Edge Joints
To make a wide panel from narrower boards, edge-joining is the answer. Properly cut and glued edge joints form a bond stronger than solid wood. The keys are creating straight, smooth, square edges and then gluing up in a logical manner.
First, cut the boards so the panel will be about 1 in. (2.5 cm) oversize in length and width—you’ll trim it to size after glue-up. Arrange the boards as they’ll be joined. Decide whether to alternate the end-grain rings (see step 1, below) and check that the grain harmonizes along the joint lines. Then sand the faces of each board and draw a triangle across the joints.
Edges can be jointed with hand or power tools. A jointer requires the least effort, but a tablesaw, router or hand plane will work, too. Don’t sand the edges; they’ll be smooth but not flat. Stack the boards to inspect the joints.
After jointing, dry-clamp the panel to test your setup. When you’re ready, you have two options: Glue-up the entire panel at once or glue one joint at a time. The second method is slower but easier when making really wide panels. Spread glue on each edge, lightly clamp the boards, level the joints by hand and tighten the clamps.
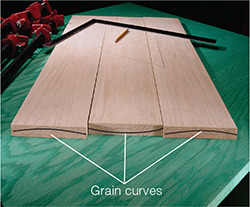
1 Alternate the end grain to minimize any future warp. However, if the panel will be held by a framework, such as a door frame or table base, disregard the end grain and place the best-looking faces up.
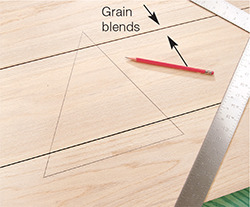
2 Arrange the grain pattern between boards and smooth each face with 100- and 120-grit sandpaper. To keep track of the orientation, draw a triangle across the joints.
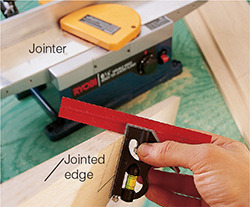
3 Use a jointer, tablesaw, router or hand plane to create a straight, smooth edge that’s square to the board’s face. Check for 90° using a small square.
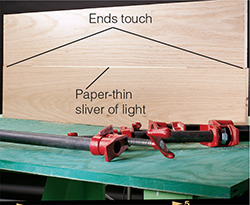
4 Place the joints together and check for straightness by shining a light from behind. The best joints show no light or a thin gap along the middle. Gaps on the ends require rejointing.
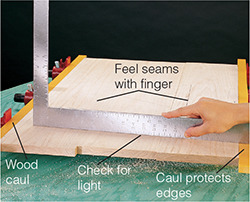
5 Practice clamping without glue, lining up the joints with your finger. Check for flatness with a straightedge and rejoint if necessary. Wood cauls on either side distribute pressure and cushion edges.
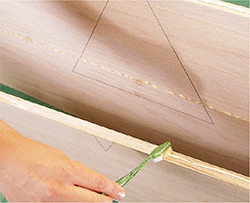
6 Run a bead of glue on both surfaces to be joined and spread it with a water-dampened toothbrush. Both edges should be wet with glue but not thickly coated.
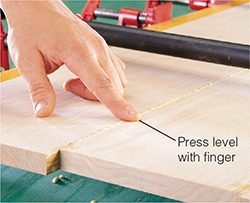
7 Position boards in clamps and gently tighten the middle clamp. Press a finger into the glue line, loosen the clamp and level the joint. Add more clamps, alternating above and below, until the joints are level and closed.
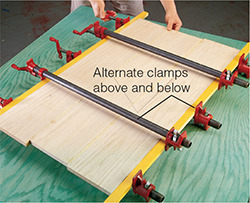
8 After the joints are level and all clamps are tight, reposition them one at a time so each clamp jaw is centered on the thickness of the boards. After 30 minutes, scrape off the dry but pliable glue using a chisel.
Creating Curves
Laminating
Curves add distinction to your work and can be a lot of fun to make. To bend what is normally a very stiff material, you can saw wood into thin, pliable strips and then glue them together using a two-part, curved form. The dried glue holds the curve.
Strips 1/16 to 1/8 in. (1.5 to 3 mm) thick bend best and are easily sawn on the tablesaw and planed using a thickness planer. (A planer produces smooth surfaces that glue-up stronger and more uniformly.)
Make the form from plywood or particleboard. Use a small paint roller to apply glue to all the strips, place them in the form and clamp. Leave the clamps on for at least eight hours.
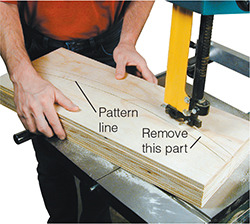
1 Face-glue sheets of plywood to the thickness of the curved part and draw the desired curve on one face. Cut the form apart on the bandsaw, sawing on each side of the pattern line. Smooth the sawn curves with sandpaper wrapped around a curved block of wood or using a spindle sander.
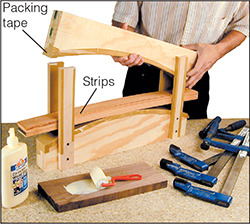
2 Screw wood uprights to the bottom form to keep the strips and top form aligned, and apply packing tape to the inside of the forms and uprights to resist glue. Coat the strips evenly with glue and place them on the bottom form, then position the top form over the strips.
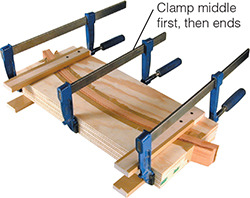
3 Lay the form flat on the bench and lightly clamp across the middle of the assembly. Add clamps to either side, tightening each clamp in sequence until all the joints are closed. Let the glue-up dry for eight hours before you remove the clamps.
Kerfing
Cutting a series of evenly spaced kerfs into one side of a board lets you bend even the thickest woods.
Select a straight-grained piece without knots to avoid breakage and to achieve a consistent bend. Raise the tablesaw blade until it’s 1/16 to 1/8 in. (1.5 to 3 mm) below the thickness of the stock. Space the kerfs about 1/2 in. (12 mm) apart and, guided by the miter gauge, make the cuts. Closer spacing allows for a tighter bend. If using plywood, cut just to the final layer of veneer.
After kerfing, glue or nail the part to a curved framework or other structure to maintain the bend. Or fill the kerfs with epoxy and clamp the part temporarily into a curve until the adhesive sets.
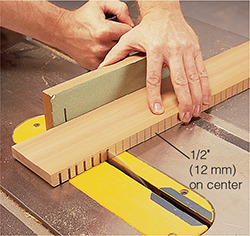
1 Lay out evenly spaced lines along the board and raise the tablesaw blade until it’s slightly below the surface of the stock. Using the miter gauge, cut a series of kerfs into the bottom of the board. If the outboard end gets floppy during cutting, support it with a stand placed beside the saw table.
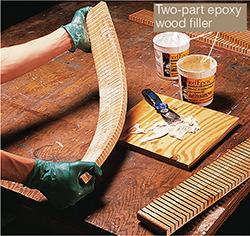
2 To glue the board into a permanent curve, fill the saw kerfs with two-part epoxy wood filler and bend the board to the desired curve. You can hold it in place with clamps or temporarily nail it to a curved structure until the adhesive sets.
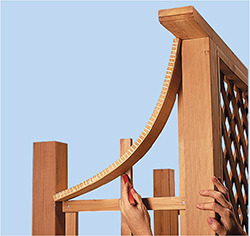
3 Installing the curved part to its final structure can help hold the curve while the adhesive sets. If you don’t use epoxy, you’ll need to brace the part so it remains stiff enough to hold the curve. Cover the sawn side with veneer or paint the board to conceal your kerfed handiwork.
Woodworking Jigs
To speed your work and ensure accuracy, it’s worth building some hard-working jigs designed for all the major machines, including the miter saw, tablesaw, drill press and router. These clever shop-made devices make your tools more versatile and your woodworking more enjoyable.
When building jigs, use quality materials, such as straight-grained wood, hardwood plywood and MDF, and cut and assemble parts precisely. Time spent now will pay big dividends later in the accuracy of your jigs and projects.
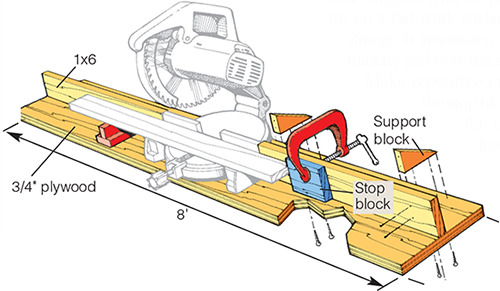
Miter Saw Table Jig
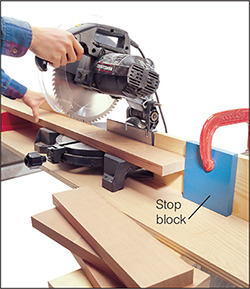
This crosscutting station lets you tackle long boards with ease. Plus, accurate multiple cuts to the same length are possible, thanks to the jig’s adjustable stop block.
Screw your saw to the base with its fence aligned with the jig’s fences and set up on a flat work surface. If mobility or storage is necessary, simply unscrew the saw and stow the station separately. Make repetitive cuts by clamping the stop block to the fence at the desired distance from the blade.
Tablesaw Miter Jig
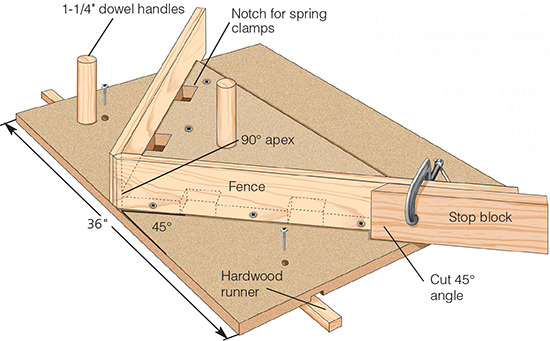
This sled-type jig is simple to construct and turns your tablesaw into a highly accurate mitering machine for cutting picture-frame and other square miter joints.
Cut the runner so it slides in your miter slot without wiggling. Mill the dado so the base overhangs the saw’s cutline, attach the runner and trim the overhanging edge by running the assembly past the blade. Add the triangular fence support, making sure its apex is precisely at 90 degrees, and use a combination square to establish its 45-degree orientation on the base. Fasten the fences, handles and stop block, and you’re ready for mitering.
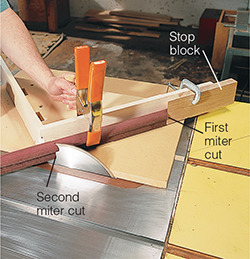
After cutting the first miter using the fence facing you, butt that mitered end against the stop block on the opposite fence, clamp the board in place and make the second miter cut.
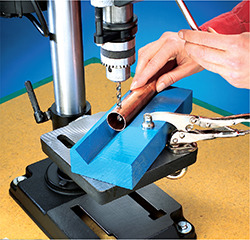
Drill Press V-Jig
Drilling holes in round stock, such as dowels and pipes, is dicey without help. This simple V-shaped block, made on the tablesaw, lends a stable hand.
Use the jig by centering the point of the V directly below the drill bit and clamping the jig in place. Then position your work and bore the holes.
Router Jigs
The jigs and techniques shown below allow you to shape unique parts using a handheld router. With some of these devices, you can switch bits, using a different profile and the same jig to create an entirely new look. That’s part of the versatility of router jigs.
When making a cut, be sure to move the router in the correct direction to avoid having the bit catch and pull the router off course or away from the guide. The important thing is to always move it against the rotation of the bit, not with it. This keeps bits and fences snug against the work for a cleaner, safer cut.
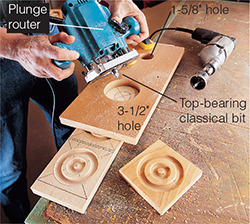
Bull’s-eye corner blocks are perfect for decorating door casings and cabinet trim. To make the outer ring, clamp the jig so its larger hole is centered over the work, plunge the bearing-guided bit into the wood and move the router in a clockwise pass. Next, rotate the jig and center the small hole to rout the inner ring, making this second cut using the same bit.
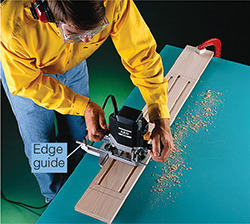
Stopped flutes are a snap to rout with a plunge router, core box bit and edge guide. Draw square start and stop lines across the stock, and adjust the edge guide so the first pass cuts the two outer flutes. Starting at one line, plunge the bit and push the router until you reach the opposite line. Reset the guide to cut the middle flutes and repeat.
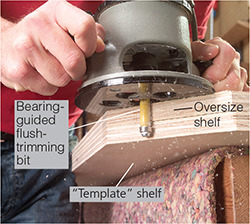
Template routing lets you rout multiples from one original, such as a stack of intricately shaped shelves. Make a template shelf and cut the rest 1/8 in. (3 mm) oversize. Clamp template to oversize shelves so edges extend past template. Adjust bearing-guided flush-trimming bit so bearing contacts template and rout the new shelf to the contours of the original.
Router-Table Jigs
The router table is often more convenient than a handheld router for routing small or skinny parts or taking big cuts. When you equip it with the right jigs, the router table becomes even more versatile.
As with handheld routing, be mindful of the bit’s rotation and the direction you feed the work. The rotation is reversed with the router mounted upside down. Feed against the bit’s rotation, otherwise the bit can grab and the workpiece might scoot away.
Caution: Work carefully around exposed bits and use guards whenever possible. Make jigs and workpieces oversize so you have more room to keep your hands clear of the cutters.
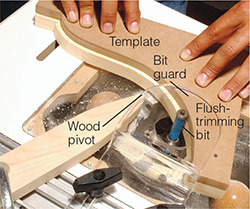
Patterns are easily routed with a template and a flush-trimming bit. The technique is similar to handheld template routing (above) but works better for small parts. Shape the template precisely, then tack it to an oversize workpiece. Clamp a pivot, such as a pointed stick, to the table. Rotate the template around the pivot and onto the bit’s bearing. Then safely rout freehand around the template.
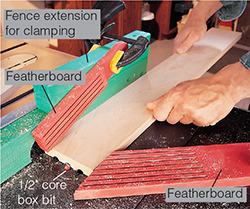
Full flutes for a door casing or cabinet trim are best cut on the router table. Mount a core box bit and set up featherboards (store-bought or homemade boards with flexible “fingers”) to press the work down and into the bit. Adjust the fence to cut the first outer flute, then reverse the workpiece end-for-end to rout the opposite outer flute. Move the fence once more to cut a center flute.
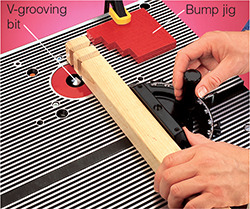
Bump jigs are great for many projects. Clamp this one to the table to rout a series of V-grooves into a leg without measuring or resetting a fence. Cut steps in the jig so they correspond to the distance between grooves. Using a miter gauge, butt the work against the first step to make the first cut. Rotate the work to cut the remaining three faces. Then move to the next step to cut the next groove, and so on.
Cabinets and Boxes
The humble box is the building block for all casework. Add shelves, drawers and doors hung on hinges, and you’ve created handsome and functional cabinets.
There are two kinds of boxes: solid panel, in which the case is made from slabs of solid wood or plywood, and frame-and-panel, a skeleton of frames joined to each other, with panels inside each frame. Either type of box can be frameless or have a face frame attached to the front.
Corner joints can be dovetailed, mitered or rabbeted as shown in the example below. You can use dadoes, grooves and rabbets for interior partitions and backs. The back, which is usually plywood, adds rigidity.
Regardless of the type and style of cabinet you make, do all interior work, such as cutting shelf dadoes, before final assembly. Door and drawer hardware can be fitted after assembly.
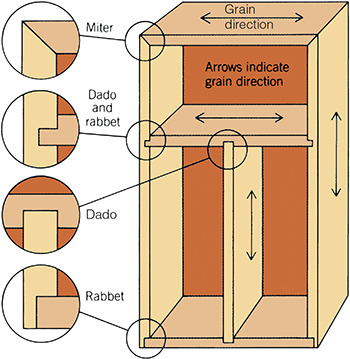
Strong joints can be created numerous ways, as this example shows. Rabbets and dadoes firmly lock the pieces together. Miters provide a wide gluing surface while hiding end grain.
Basic Face-frame Cabinet
Building a simple wall cabinet provides a good foundation for making more complex variations, including kitchen cabinets, vanities and bookcases. This 3/4-in.-thick plywood box is joined with dadoes and rabbets. The face frame adds strength while covering the raw plywood edges.
Start by rough-cutting the plywood parts about 1 in. (2.5 cm) oversize; then trim their coarse factory edges. After ripping each panel to width, crosscut to length using a tablesaw sled, circular saw with straightedge guide or other method.
Mill dadoes and rabbets and use a brad-point bit to drill holes in the sides for an adjustable shelf. Guide the bit with a commercial shelf-hole jig or make a jig from hardwood scrap predrilled with peg-size holes.
Assemble the case, checking for square. Build the face frame using pocket screws (see here), making it 1/8 in. (3 mm) wider than the case. Glue the frame to the case so it overhangs, or is flush with, the sides depending on your design.
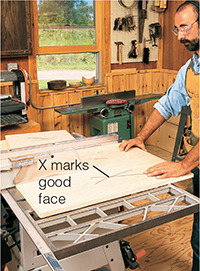
1 Use a 60- to 80-tooth alternate-top bevel blade for a high-quality edge right off the saw. Rip parts to width using the rip fence, keeping the good side up. This places any tear-out on the bottom, which is the inside of the cabinet.
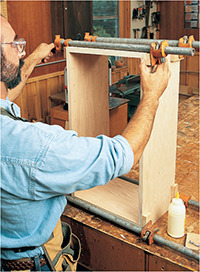
2 Assemble the case, keeping the front edges flush. Clamp pads protect the wood surface. Use just enough glue to cover the joint surfaces, similar to applying paint. Old plastic honey bottles make easy-to-use glue bottles.
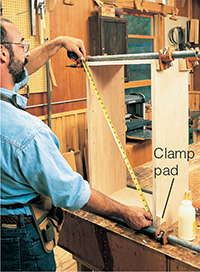
3 Check the cabinet for square by measuring from corner to corner. The two dimensions should be the same. If they’re not, squeeze the long diagonal by hand until the two diagonals match.
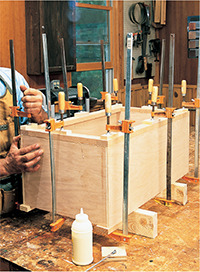
4 Glue and clamp the face frame to the case. Use clamp pads and be careful not to crush the rabbets on the back. The face frame can slightly overhang the inside, outside or selected edges, depending on how it will be used. Or it can be trimmed flush on all or selected sides using a router or plane after the glue has dried.
Drawers
A box within a box, well-made drawers are a triumph of planning and layout. Build the cabinet first; then size the drawer to the case opening. For metal drawer slides, subtract 1 in. (25 mm) from the opening’s width and about 1/4 in. (6 mm) for height.
You can use rabbets and grooves throughout or use dadoes at the rear and dovetails or box joints at the front for extra strength. A false-front drawer makes it easier to fit the front for even visual gaps, or reveals.
Rabbeted Corners
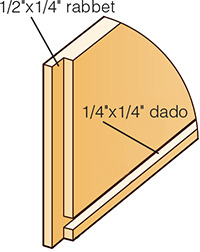
Rabbeted drawers are the simplest to make. Cut grooves around the box sides to house the bottom. Mill rabbets in the sides to secure the front and back. Glue and nail or staple the rabbet joints for strength.
Box-joint Corners
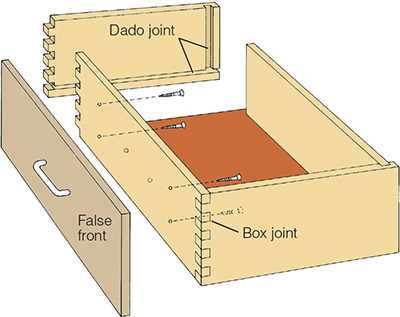
Box-joint corners (see here) are time consuming to make but create a sturdy, attractive joint.
Basic Construction
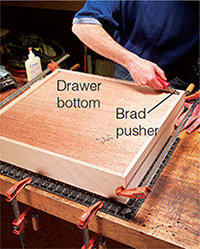
1 Glue, assemble and square the drawer box. With clamps in place, nudge the box against a framing square and push a brad through the bottom near each corner. Let the glue dry before you mount the hardware.
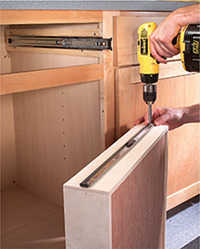
2 Side-mounted slides separate for easy mounting. Screw the cabinet member inside the case, through the horizontal slots in the slide. Screw the drawer member to the drawer side using the vertical slots. Adjust the drawer’s fit before adding more screws.
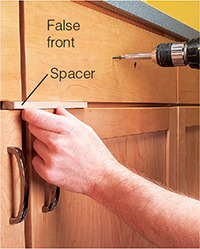
3 Use a spacer to position the drawer front evenly. Drive temporary screws through the existing hardware holes and into the drawer box. Then pull out the drawer and attach the front with permanent screws from inside.
Legs
Leg-to-rail Joints
Chairs, tables and other frame-type furniture rely on leg-to-rail joints for strength, as do frame-and-panel cabinets, such as a dresser. Styles of leg-and-rail joints range from utilitarian to elaborate.
Fine furniture calls for hidden mortises and tenons, but dowel joints are very strong, especially if you add corner blocks or braces. If you forgo glue, you can disassemble and reassemble the joint as needed.
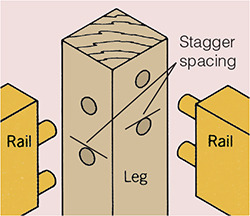
Dowels. Install two or more dowels per rail for strength and to resist twist. To keep dowels from colliding, stagger spacing on each side of leg. For knock-down furniture, reinforce each unglued joint with a brace or block.
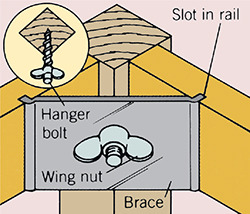
Metal corner brace. These can be used to firm or reinforce a wobbly chair or table leg. To install, saw slots perpendicular to the inside face of rails. Slide brace into slots, drill pilot hole for hanger bolt, install bolt and tighten wing nut.
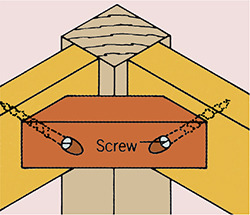
Wood corner block. Miter block to match angle of assembled joints for added stability. Block can replace metal corner brace if hanger bolt is added. Assemble joint first, then position block. Drill pilot holes for screws.
Raised-panel Doors
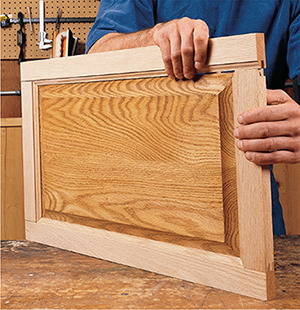
You can use frame-and-panel construction, with its distinctive raised panel, for casework as well as doors. The wide, solid-wood panel can expand and contract freely because it’s housed, without glue in its grooves, in the frame, while the frame holds it flat. No cracks, no warp, no problem.
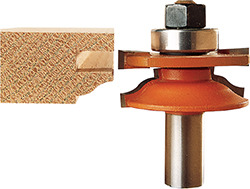
A two-piece matched router bit set, also called rail-and-stile cutters, lets you easily cut the frame joints on a router table. Then you shape the edge of the panel using another specialized bit.
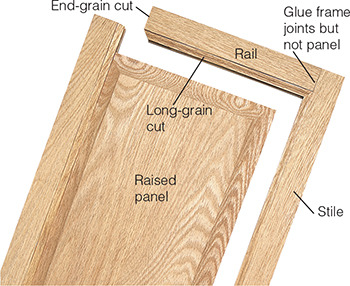
End-grain Cuts
Mill all the end-grain cuts first. A 1-1/2-hp router works fine for the frame joints, and 1/2-in. shank cutters provide the smoothest cuts.
Use 3/4- to 7/8-in. stock and make all the rail cuts with the stock facing down. Build a simple sled with a clamp for making the end-grain cuts. Adjust the bit height by taking test cuts on scrap, fine-tuning the cut until it resembles the profile shown below.
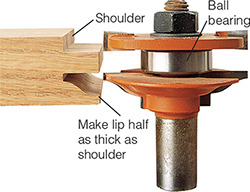
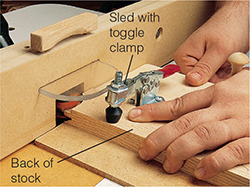
End-grain cuts. With the router table fence even with the bit’s bearing, run the sled and workpiece past the bit to shape the end grain. The sled’s fence registers the work and prevents blowing out or splintering the long grain at the back.
Long-grain Cuts
With a two-piece matched set, you remove the first cutter and install the long-grain cutter to rout the profile along the inside of both the rails and stiles.
Set the bit height by using one of the previously milled rails to line up the cutter. Use featherboards clamped to the router fence to help hold down your piece and a push stick to move it through. Again, machine the parts with the back side facing up.
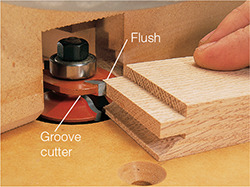
Long-grain cuts. Use a milled rail to adjust the bit height on the long-grained cutter, lining up the top of the groove cutter with the tongue on the rail. When bit height is set, use a push stick and featherboards to rout the profile along the edges of the rails and the stiles.
Raised-panel Cuts
Dry-fit the frame to measure the opening for the panel, adding the combined depth of two grooves, then subtracting 1/8 in. (3 mm) from the width to allow for expansion across the panel.
Use a 2-hp or larger, variable-speed router, slowing its speed to around 10,000 rpm. Align the tongue of a milled rail with the gap in the panel-raising bit. Make at least two successively deeper passes to rout the profile.
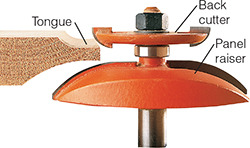
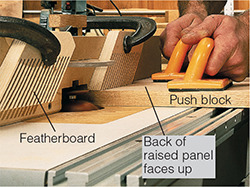
Raised-panel cuts. With the back side up, make the first pass on all four sides with the fence about 1/4 in. (6 mm) out from the bit’s bearing, routing the end grain first. Readjust the fence flush with the bearing and make a second, final pass on all four sides.
Hinges
A world of choice exists when it comes to hinging doors. The simplest hinges attach to the outside of cabinets and doors, such as butt hinges, which can be surface-mounted or recessed. Choose overlay hinges for doors that overlap a face frame. Partially inset hinges are for lipped doors.

Euro-style Hinges
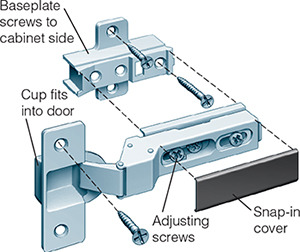
European hinges, also called cup hinges, are easy to install and totally adjustable. They’re concealed from view, but beware: When you open a door, their bulky size is immediately apparent inside.
Use the drill press and a 35-mm bit to drill two holes in the back of the door. (You can use a 1-3/8-in. Forstner bit in a pinch.) Screw the cup part of the hinge to the door, screw the baseplate to the cabinet and connect the two. The best part? Simply fine-tune the door’s fit with a screwdriver.
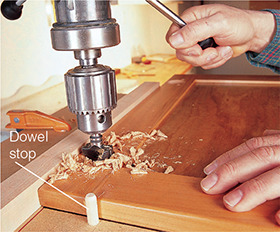
1 Drill the cup holes 1/2 in. (13 mm) deep and 1/8 in. (3 mm) from the edge of the door. To position the door, use a jig fitted with a fence and a pin clamped to the drill-press table.
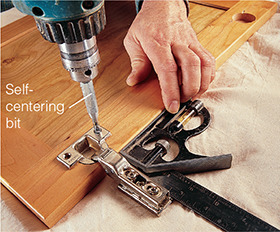
2 Use a square to align the hinge perpendicular to the door. A 7/64-in. self-centering bit drills perfectly centered pilot holes to the correct depth for screws.
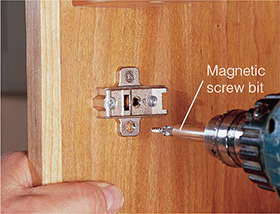
3 Lay out the baseplate location on the inside of the cabinet and fasten it with four screws. A magnetic bit makes it easier to position and drive the small screws.
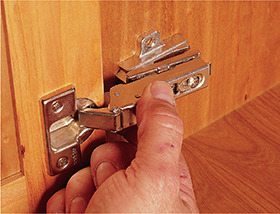
4 Clip—or screw, depending on the style of hinge—the door to the baseplate. Adjust the screws on the baseplate to fine-tune the door’s height, depth and width relative to the cabinet.
Pulls
As with hinges, there’s no end to the variety of door and drawer pulls. This simple jig lets you mount machine-screw pulls without fuss by drilling accurate holes for the screws.
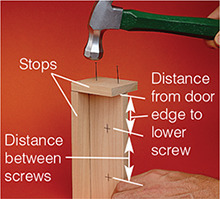
1 Build the jig so the hole spacing is equal to that of the pulls and centered on the vertical stile. Then nail it together.
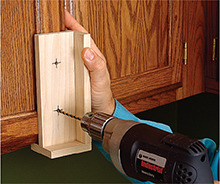
2 Use the jig to drill holes in cabinet doors. Flip over the jig to drill opposite-hinged doors; turn it upside down to drill lower cabinet doors.
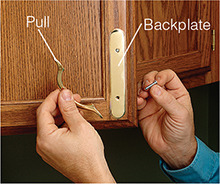
3 Install a backplate if desired. Secure the pull from the back with a pair of machine screws.
Fixing Woodworking Mistakes
We’ve all done it: a screw hole accidentally drilled too deep, an out-of-level chair or cabinet that wobbles, an ugly knothole right where everyone can see it. Relax. Good woodworkers know how to fix these glitches. Here are some tried-and-true methods for covering your tracks.
Problem: Slipping bits
Router bits can slip in the collet, ruining the cut—or worse.
Solution
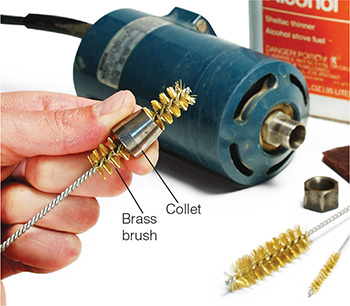
Remove burrs from bit shanks using extra-fine emery sandpaper. Use an abrasive nylon pad and solvent to clean resin or dirt from shanks and the outside of the collet, then scrub the inside with a brass tubing brush. If the collet is scored, buy a new one.
Problem: Rocking furniture
When you build a cabinet or chair slightly out of square (it’s OK; we all do it), one of the legs may not touch the floor. The result? Rocking furniture.
Solution #1
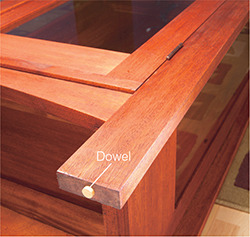
Drill a hole in the bottom of the leg and glue in a length of dowel long enough to keep the cabinet from rocking.
Solution #2
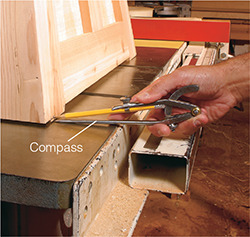
Place the piece on a flat surface, like your tablesaw. Set a compass to the widest gap, run a line around each foot and trim the feet to the line.
Problem: Saw marks
Cutting dowels and other protrusions flush to a surface leaves score marks on the work.
Solution
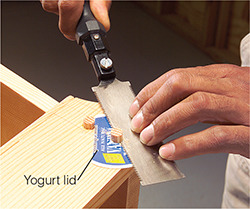
Cut the rim off of a yogurt lid and drill a hole in the middle, then place this over the work while sawing. Thin cardboard or playing cards work well, too.
Problem: Holes of uneven depth
Wrapping tape around a drill bit indicates the right hole depth, but you might drill too deeply if the tape creeps up the bit or frays during drilling.
Solution
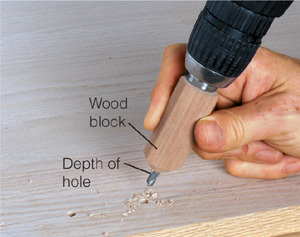
For a reliable drill-bit depth-stop, drill a slightly oversized hole through a block of wood cut to the correct length and slip it over your bit.
Problem: Naughty knots
Loose or missing knots leave unsightly voids in your work surface.
Solution #1
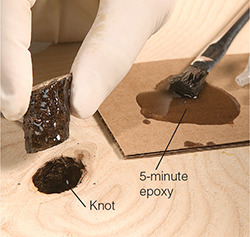
For a loose knot, first remove it, then scrape away any wayward bark from the knot and the hole. Spread some five-minute epoxy on the knot and tap it back into place.
Solution #2
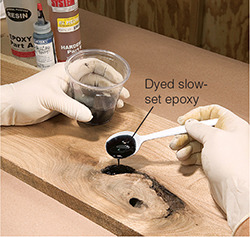
Fill voids with slow-set epoxy, which dries slowly enough to allow air bubbles to escape. Color the epoxy with a few drops of concentrated dye, slightly overfill the hole and sand flush when hardened.
Stripping Furniture
Stripping wood is a great way to resurrect those attic and flea-market finds—and you can do it safely and effectively with the right stripper and the proper setup. Tools and supplies are simple, but suitable precautions are necessary.
Safety is paramount. Wear long clothing under an apron, don splash-proof goggles and put on neoprene gloves with the cuffs turned out. Work in a well-ventilated area—outdoors is good—and wear an activated-carbon respirator with working cartridges. Then get ready to reclaim a jewel from the muck!
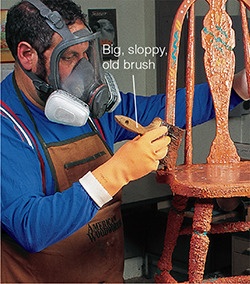
1 First, remove any hardware. Then apply the stripper in a thick layer, 1/8 to 1/4 in. (3 to 6 mm) thick. Semipaste strippers work best on vertical surfaces because they cling.
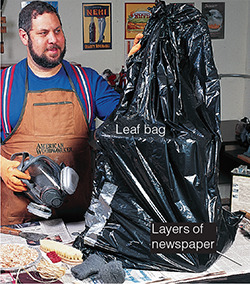
2 Seal your piece in a plastic leaf bag and let it sit from an hour to overnight, depending on the brand of stripper. If the work is too big, use polyethylene sheeting to cover it.
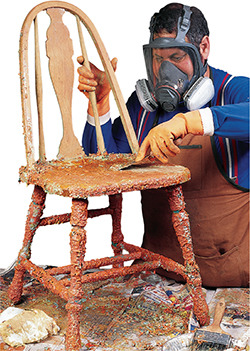
3 Scoop off the finish using a putty knife with a dull edge and rounded corners. Spread out the gunk on newspaper to let it dry before you dispose of it. If finish remains, recoat and strip again.
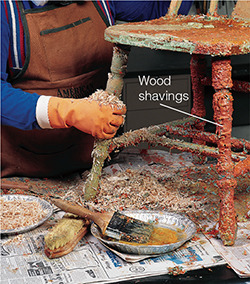
4 Wood shavings help scrub sludge from turnings, carvings and other crevices. Other useful tools for nooks and crannies include string, plastic scrub brushes and pointed dowels.
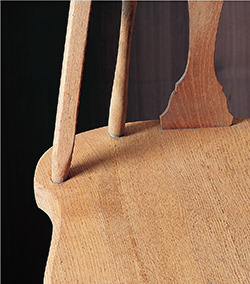
5 Wash the wood clean with the recommended solvent to remove any bits of paint and any remaining stripper. Then do a final wash with one cup of ammonia in a quart of water.

How Fast? How Safe?
Except for refinishers, which work on only shellac and lacquer, most strippers remove just about any finish. Choose a stripper based on its speed and safety. A good rule of thumb is that the slower it works, the safer it is. Above all, read and follow directions carefully.
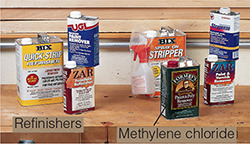
Fast. Refinishers are flammable and work only on lacquer and shellac. Methylene chloride strippers are nonflammable and work fast, but they have harmful vapors.
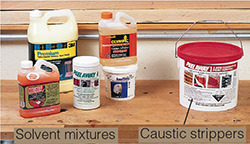
Medium fast. Solvent mixtures require thicker coats and work relatively fast. Don’t leave caustic strippers on too long or you’ll damage the wood.
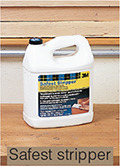
Slow. Most effective on oil-based paint and polyurethane, this is the safest-to-use stripper, but it can take as long as 24 hours to soften a finish. Since it’s water-based, it can raise wood grain and loosen veneer.
Sanding
Before Finishing
Sanding might be a chore, but it’s critical to a fine finish, because any blemishes in the wood will be magnified when you apply the first coat. With the right approach, you can make the job go more smoothly.
When should you sand? Sometimes it’s best to sand before cutting joints or gluing pieces together, as when preparing boards for gluing together into a panel (see “Edge Joints”). As long as you don’t compromise your joinery, sanding before assembly makes sense.
However, some work is easier to smooth after assembly, such as parts joined cross-grain, like the corner joints in a door frame. Here, the joints will need minor leveling, so sanding after glue-up is most effective.
When possible, it’s important to sand in the direction of the grain to avoid cross-grain scratch marks. And be sure to sand through a succession of grits. If you skip a grit, you risk leaving deep scratches.
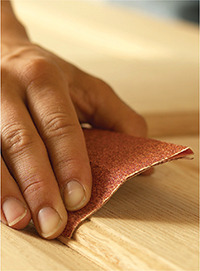
Coarse to fine. Whether you’re sanding by hand or with a power tool, start with 80-grit to remove blemishes. Then use 120-grit, 180-grit and finally 220-grit. Exact grits aren’t vital (100 to 150 to 220 works, too), but be sure to progress in steps so you remove the deeper scratches and leave finer scratches each time.
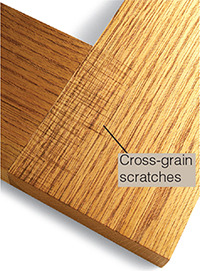
Working with the grain. Sand with the grain when hand-sanding or using a belt sander. Scratches are hard to see when they run parallel to the grain. But even the lightest scratches across the grain (as shown) are painfully obvious, especially after staining.
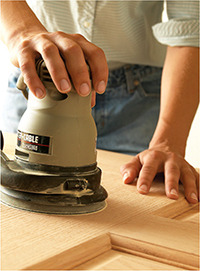
Invisible scratches. A random-orbit sander leaves scratches that are practically invisible, so you can sand across joints where the grain changes direction. Move slowly (about 1 in. / 2.5 cm per second) and apply light pressure. Otherwise, you’ll get swirl marks.
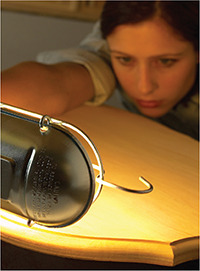
Inspection. Before applying a stain or finish, turn out the lights and shine a light at a low angle across the wood to reveal imperfections. Mark problem areas with masking tape or a pencil and sand them out.
Between Finishes
Sanding after each coat of finish (except the last coat) rubs out any imperfections, such as drips or runs, and roughens the surface for better adhesion of subsequent coats.
In general, sanding finishes goes quickly; it’s more like wiping the surface than sanding it. It’s best to employ a light touch so you don’t rub through the previous coat and to use very fine grit—400 or finer.
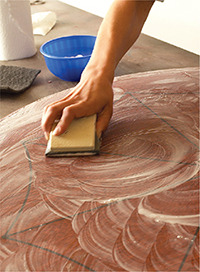
Wet-dry sandpaper. Sand between coats with 400-grit wet-dry sandpaper, which won’t fall apart when it gets wet. A little water provides lubrication and keeps the finish from clogging the paper. Grain direction isn’t important, because you’re sanding finish, not wood. When you’re done, wipe away the residue with a damp rag.
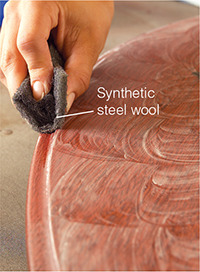
Synthetic steel wool. Use an abrasive nylon pad, also called synthetic steel wool, to sand contoured or otherwise shaped areas, such as routed edges, complex moldings or turnings. The pad conforms easily to the curve and is safer than steel wool, which deposits fibers that can cause stains in the finish.
Wood Preparations
Filling
For a glass-smooth finish, sometimes called a “piano finish” or a filled finish, you can apply multiple finish coats. But open-pored woods, such as mahogany, walnut, teak, ash, oak, rosewood and others have large, open pores that no amount of finish will fill reliably. Instead, you need to use a pore filler first and then apply the finish.
Pore filler, also called semipaste filler, is a thick mixture you apply to bare wood either to fill its pores or to add color contrast. (Don’t use wood putty, a thicker concoction meant only for filling gouges or dents.) For most applications, it’s best to use a waterborne filler.
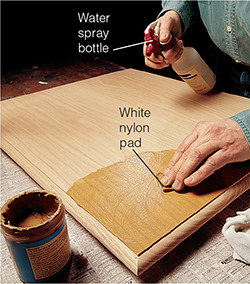
1 Work the filler into the pores by rubbing with a white nylon pad, the finest of the nylon abrasives. If the filler sets up too fast, spray it with water to keep it workable.
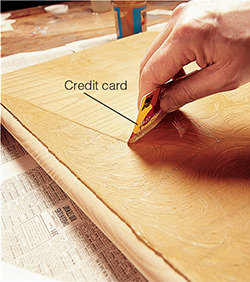
2 Scrape excess filler slurry from the surface while it’s still wet. A credit card makes a great squeegee. Let the filler dry completely before sanding.
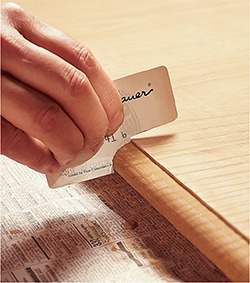
3 Clean a contoured edge using a credit card cut to match the profile. Then sand the dried filler, wipe off dust using a cloth dampened with water, and apply the finish of your choice.
Sealing
An uneven tone in wood, called blotching, is typical when staining many softwoods, such as pine or redwood, and is due to uneven densities in the wood. Even a few hardwoods, such as birch and maple, suffer the same fate. In addition, pine and other softwoods undergo grain reversal, in which the softer earlywood soaks up more stain than harder latewood.
To overcome these visual blemishes, apply a wood conditioner first, which seals the wood’s surface so your stain goes on more evenly. Keep in mind that sealing the wood will lighten the finish, so you’ll need a darker stain to achieve the same effect.
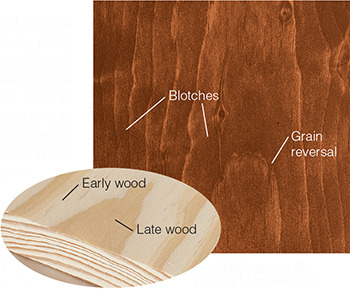
Staining usually causes blotches and always makes pine’s porous earlywood darker than its dense latewood, just the opposite of unstained pine (inset). This transformation is called grain reversal.
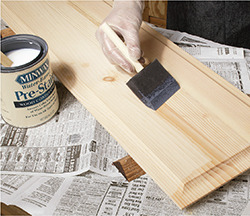
Conditioner. Brush on two coats of waterborne conditioner. With each application, keep the surface wet for three to five minutes, then wipe off excess. Let the conditioner dry, and sand with 400-grit sandpaper.
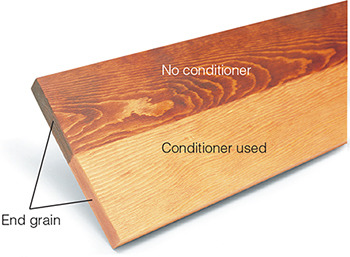
Sealing. Sealing the wood with conditioner gives you a more even finish but lightens its overall tone. To prevent end grain from becoming darker than the face of the wood, give it a double dose of conditioner.
Staining
Stains add color, providing a richer look to bland woods. Plus, they can unify mismatched colors, such as uneven tones or bands of sapwood.
The final color depends on the wood—even two pieces of the same species can stain differently—and the finish. Experimentation is key.
Penetrating stains, such as aniline dyes, add pure, clear color without obscuring the grain. Work fast, because they absorb quickly into the wood. Pigmented stains, such as oil-based wiping stains, are easy to apply, but deposit larger particles that can muddy the grain. Gel stains combine the advantages of both: They’re almost foolproof, absorb evenly and allow the grain to remain visible.
Tips for a Top-notch Stain Job
■ Wear old clothing, a shop apron and gloves, and work on an old bench or cover it with thin plywood. Stains are difficult to remove—from you or from the wood.
■ Mix custom colors by combining two or more stains of the same brand and type.
■ When making your own colors, mix enough to finish the entire project. You won’t be able to get an exact match later if you come up short.
■ To test stains on existing work, such as an old table, apply the color first in an inconspicuous area, such as under the top.
■ Thoroughly stir oil-based stains to dissolve the pigment that’s usually sitting on the bottom of the can.
■ When applying oil-based stains, wipe the wood with mineral spirits just before staining to ease and even stain distribution.
■ Try spraying penetrating stains, which gets them on the surfaces more quickly. You’ll get more even coverage with fewer overlap marks.
■ Use alcohol-soluble stains for touch-up. They’re easy to pinpoint and they dry almost instantly.
■ Place used oil-soaked rags in a flameproof, water-filled container to prevent spontaneous combustion.
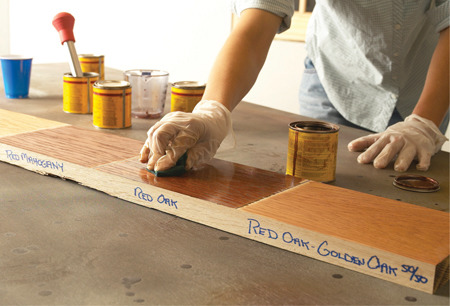
Test. Test your stains on scraps of wood from your project that have even been sanded using the same process. Note the type and amount of stain you use and be sure to apply a few finish coats to get a feel for its final color.
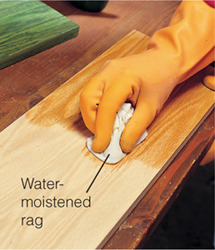
Prewet. When using water-soluble stains, raise the grain first with a damp rag. Sand it smooth when dry, and then stain. Now the water in the stain won’t raise the grain.
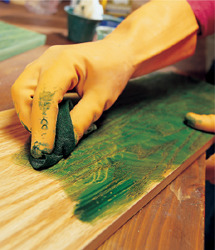
Rub. With wiping stains, rub the stain into the wood using a soft, clean cotton rag. Stain in any direction you wish, but always make the last pass in the direction of the grain. If you need to remove excess stain, use a rag that has a small amount of stain on it.
What Are Dyes and Glazes?
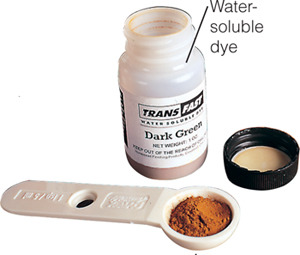
Dyes and glazes are stains of a different sort. Dyes are tiny color particles—much smaller than those in pigmented stains— sold either in powder form or as a liquid. They’re great for making custom colors or for staining without obscuring the grain.
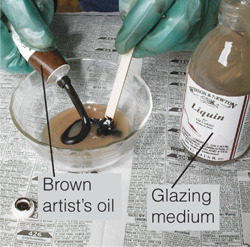
Glazes are heavy-bodied pigment-type stains that you apply over a sealed surface to add tone and uniformity. Their thick, workable consistency lets you “age” a piece to make it look old. Glazes come premixed or you can make your own by combining artist’s oil with a glazing medium.

Stain Saver
Recycle your empty pump-type spray bottle for spraying wiping stains. Spray a small section at a time, then wipe. It’s a great way to reach intricate areas, such as spindles, and you’ll use less stain than you would brushing.
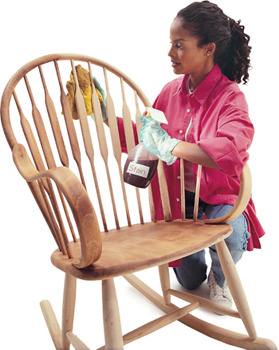
Polyurethane

Polyurethane is a film finish that’s built up in layers over the wood and is hard to beat for durability. This makes it excellent for high-wear areas, such as tabletops or floors.
Waterborne and oil-based polyurethanes are applied in a similar manner, although each has its pros and cons. (See “Water-based vs. Oil-based,” below.) Tools for applying oil-based polyurethane are simple: a good quality natural-bristle brush, a well-ventilated space and some patience.
Sand the wood up through 220-grit (see here). Remove dust with a shop vacuum, followed by a wipe-down using a rag dampened with mineral spirits.
Finish the wood in four (possibly five!) steps. First, seal it with a thinned mixture of two parts polyurethane to one part mineral spirits. Next, apply a full-strength coat. After 24 hours, wet-sand the surface. Then apply the final coat. If the last coat is rough, polish it out using rubbing compound.
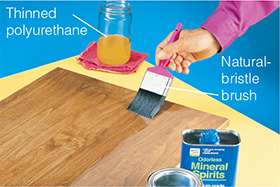
1 For the first sealer coat, thin oil-based polyurethane with mineral spirits two parts to one part. Brush the sealer on with a natural-bristle brush using long, even strokes.
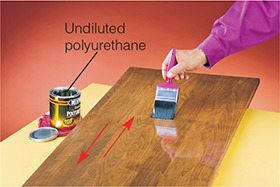
2 Use full-strength polyurethane for the second and third coats. After wetting the entire surface, go back and overlap each stroke following the direction of the grain.
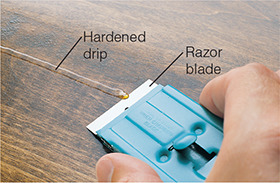
3 Wait at least 12 hours before slicing off any dried drips with a razor blade, being careful not to cut below the surface. Small blemishes will disappear after you wet-sand the finish.
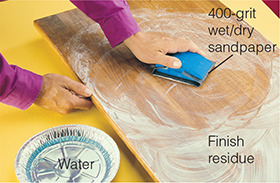
4 After 24 hours, wet-sand with 400-grit sandpaper, using a circular motion to remove bumps and blemishes. Use plenty of water and a light touch to avoid cutting through the finish.
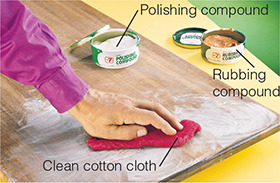
5 If you need to sand the final coat to remove flaws, polish it out with automotive rubbing compound. For greater luster, follow with a polishing compound.

Water-based vs. Oil-based
Both water-based and oil-based polyurethanes offer good protection. The biggest difference is in appearance. Although milky in the can, water-based polyurethanes go on clear. Some people consider them cold looking, especially on darker woods like walnut. Oil-based polyurethanes impart a rich, amber glow, which can highlight certain woods, such as oak or yellow pine.
Working with water-based polyurethanes offers some big advantages. They don’t emit strong odors the way oil-based does and they dry fast (two hours vs. 24 hours for oil-based), allowing you to apply several coats in a day and use the room that night. Plus, they clean up with water.
But there are trade-offs. You’ll have to apply more finish with water-based: Four coats (vs. two or three coats for oil-based) are recommended for floors. And you may have to recoat more often. Plus, you’ll pay more for water-based.
Regardless of which type you choose, you’ll prolong the protective life of any finish by eliminating dirt and grime. Dust furniture, sweep or vacuum floors often and put throw rugs in high-traffic areas.
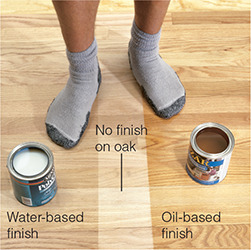
Oil Finishes
Penetrating oil finishes are popular because they’re easy to use. They provide a close-to-the-wood effect, soaking into the surface instead of laying on top, as film finishes do.
Oil finishes are actually oil-varnish blends, often called Danish oils. Don’t confuse them with natural oils, like boiled linseed oil or pure tung oil, or with nondrying oils, such as mineral or vegetable oil. When oil finishes cure, they seal pores and protect wood from dust, dirt and wear.
Application is simple: Soak the wood with a brush or rag, wipe off any excess and let dry eight hours before you recoat. Sand lightly between coats, applying three to four coats, and you’re done.
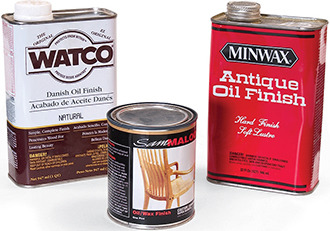
Oil finishes, which are technically a blend of oil and varnish thinned with mineral spirits, are extremely easy to apply. They impart a more natural look with a satin sheen, but offer only moderate protection from scratches, water and stains.
Caution: Oil-soaked rags can ignite spontaneously because of heat buildup. Place used rags in a fireproof container or spread them outdoors to dry thoroughly before you dispose of them.
Pros |
Cons |
• Oil finishes can be wiped on and wiped off without worrying about dust. |
• The finish can bleed back out of the pores while the surface is wet, requiring vigilant rewiping. |
• You feel—and see—the wood instead of the finish. |
• You can renew a worn-out finish by simply sanding lightly and recoating. |
• The super-thin mixture builds up less than varnishes and film finishes do, offering minimal protection in hard-wear or high-moisture areas. |
|
Working Tips
Flood surface using a rag or brush, let stand for five minutes and wipe excess before the finish becomes tacky. Continue wiping any oil that bleeds back to the surface.
To smooth the surface while you apply an oil finish, wet-sand after the first sealer coat. Smooth the dried finish by rubbing with paste wax or rubbing compound.

Oil or Oil/Varnish?
Natural oils, like tung and linseed, make wood look rich and beautiful, but because they soak into the wood, instead of sitting on the surface, they don’t offer much protection.
Oil/varnish blends are easy to apply, look good and offer more protection than natural oil, but less than straight varnish.
Varnish
Varnish, a film-type finish, offers excellent protection and adds a warm glow to woods. Two types exist: straight varnishes, which offer superior protection and are made from a blend of resin, oil and solvents, and wiping varnishes, which are simply thinner versions that can be wiped on instead of applied with a brush.
Wiping varnishes require three to four coats and are similar to oil finishes, except you wipe on thin coats and leave each coat alone without wiping away excess. Regular varnishes are brushed on the same way as polyurethane (see here), which itself is a form of varnish. Their thicker consistency allows you to achieve the same effect in only a couple coats.
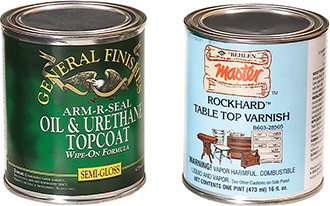
Wiping varnishes (left side) are thinned-down versions that let you wipe instead of brush them on, but you’ll need to apply more coats to achieve the same finish thickness. Regular varnishes (right side) build quickly with a few coats and protect wood while adding a glossy look.
Pros |
Cons |
• Varnishes, including wiping varnish when it’s applied in multiple coats, offer good moisture and wear protection. |
• Varnish takes six to 24 hours to dry, so keep work areas clean to avoid dust contamination. |
• Spar varnishes can be used outside on doors and patio furniture to protect against the elements. |
• Air bubbles can spoil a varnish finish if you don’t use a good brush and proper brushing technique. |
Working Tips
Use lint-free cloths—washed cotton works great—for applying wiping varnishes. Fold the cloth into a ball, dampen it with finish and wipe on light coats, overlapping each stroke with the grain of the wood. Don’t go back over the finish or you’ll leave marks.
Thin the first coat of regular varnish 25 percent to 50 percent with mineral spirits. Apply subsequent coats full-strength. Use a natural-bristle brush with flagged ends and a chisel shape.
Allow coats to cure—six to 24 hours, depending on type and brand—before smoothing with fine sandpaper. Rubbing with paste wax or rubbing compound will help smooth the final surface.
Lacquer
Lacquer is the standard film finish in the woodworking industry, because it’s fast to apply, offers long-lasting protection and looks great. You can take advantage of these attributes at home by using a can of spray lacquer or investing in spraying equipment and setting up a ventilated place to spray, such as a garage with a fan directing fumes outside.
The nice thing about lacquer is its super-fast drying time. You can spray multiple coats, sanding between each and have an entire piece finished in a day. If spraying is not an option, you can buy brushing lacquers that let you brush on coats almost as effectively as spraying.
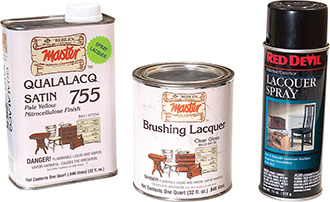
Lacquer is a quick-drying finish that looks best when sprayed on, which you can do with a spray can or with an air compressor, spray gun and hoses. Brushing lacquer dries almost as quickly as spray lacquer, allowing you to finish a piece in a day.
Pros |
Cons |
• Lacquer dries fast, so you can apply multiple coats quickly. |
• Professional results require outlay for spray equipment, such as a midsize air compressor with regulator, fluid and air hoses, and a spray gun. |
• It sands easily and goes on smooth, especially when spraying. |
• You need to work in a well-ventilated space to remove overspray fumes. |
• Three to four coats provide adequate protection and sheen. |
• Good spray technique requires practice. |
Working Tips
Dust is not a big problem with lacquer because it dries so fast, but be sure the surface you spray is clean so you don’t accidentally trap particles in the finish.
If necessary, thin lacquer with lacquer thinner so it flows easily from the gun without causing drips or “orange peel,” a series of pockmarks in the finish that resemble the fruit’s rind.
When possible, spray an entire piece at once so the wet finish “melts” together and flows uniformly. Start from the “bad side” and move to the “good,” for instance, from the underside of a table to its top, overlapping each spray stroke by about one quarter.
Shellac
Something of a “miracle” finish, shellac has a lot going for it. It’s all natural, dries in under an hour, imparts glossy depth and clarity, and is easy to repair, making it a favorite among musical-instrument makers. Shellac will seal stains, grease, soot, odors, silicone, wood sap and knots and is compatible over and under almost all finishes except polyurethanes.
Shellac’s biggest downside is its poor resistance to alcohol, so avoid it for bar tops or tabletops. It’s best to make shellac yourself using dewaxed shellac flakes dissolved in denatured alcohol. A 1-lb. cut—1 lb. of flakes to 1 gal. of alcohol—works best for brushing or wiping.
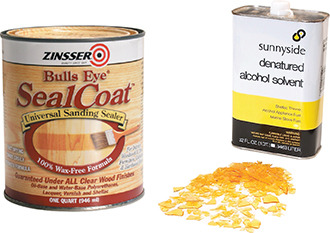
Shellac, a favorite brush-on finish, is easy to work with and adds beautiful clarity and depth to just about any wood. You can buy premixed dewaxed shellac or make your own from flakes dissolved in alcohol.
Pros |
Cons |
• Nontoxic when dry, shellac is a perfect finish for children’s toys or furniture. |
• Shellac offers poor resistance to alcohol; avoid using it for bar tops or anywhere drinks are spilled. |
• It’s a good sealer coat for covering blemishes or for applying under problem finishes. |
• Shellac mixture must be fresh for its dried film to retain moisture resistance. |
Working Tips
Keep shellac fresh by mixing it yourself and storing it in an opaque glass or plastic container in a cool, dry place.
The best way to apply shellac is to brush it, although wiping is possible with practice. Use a soft, natural-bristle brush and flow the finish onto the wood slowly and evenly. Don’t rebrush or you’ll leave marks.
Wait two hours between coats and scuff-sand only if the surface isn’t smooth. Three coats provide a nice finish.
Furniture Finishes
Ten to 15 years of everyday use takes its toll on furniture, even if you’re careful and your children are angels. The following pages offer some quick-fix techniques that don’t require exotic tools or skills for sprucing up finished pieces.
We’re not talking about refinishing. Think furniture “triage,” or methods for keeping your furniture looking and working great for many years to come. After all, if it’s well made, it’s worth keeping in the family!
Cleaning
Cleaning dirty furniture can revitalize a piece. But first, make certain you know what type of finish you have.
Most pieces 50 years or younger are finished with lacquer or polyurethane. You’ll find shellac on older furniture. Beware of solvents that soften or destroy existing finishes: Alcohol will dissolve shellac and soften lacquer. Lacquer thinner will dissolve lacquer but wrinkle polyurethane. Mineral spirits is harmless to all finishes, especially when used as a cleaning agent.
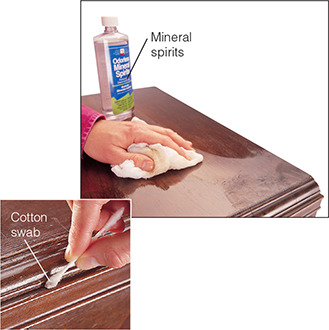
Soak a coarse, clean cloth (or a cotton swab for crevices) with mineral spirits to remove wax build-up and dirt. Keep cleaning until the swab or cloth no longer picks up dirt. Then make a final wash using a fresh rag.
Light Scratches
You can easily remove light scratches in the finish itself, as long as they don’t go all the way into the wood.
Rub the scratch with super-fine steel wool saturated with clear Danish oil. Go easy on edges and corners, which wear through quickly, and don’t cut into any stain below the clear finish. Clean the entire surface with mineral spirits to remove all excess oil. Allow to dry and spray a top coat of lacquer to blend it all together.
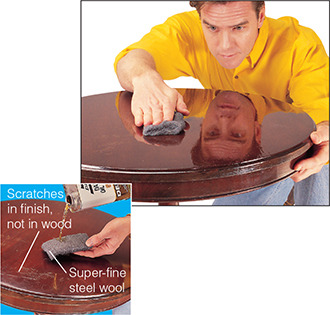
Work the scratch with the grain using oil and steel wool and rub the surrounding area as well to blend it in. Wipe off excess oil, clean with mineral spirits and let it dry. Finish by spraying the entire area with a coat of lacquer.
Deep Scratches
Deep scratches that go through the finish and expose bare wood will disappear when touched up with permanent markers. To get an exact match, pick from a range of colored markers at an art supply store.
Try dotting the ink into the scratch, letting it dry, then evening out the color by stroking lightly with the tip. For hairline cracks, use a fine-tipped marker and keep the ink only on the scratch.
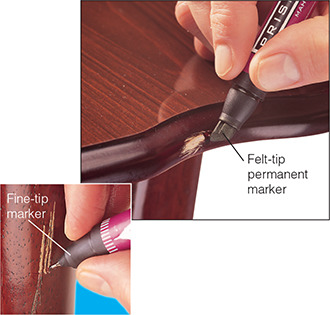
Hide scratches with colored markers. For best coverage, dot the ink onto the scratch and then blend it with the tip. Touch up thin scratches with fine-tipped markers.
Gouges
You can fix a gouge in a light-wear area, such as a table leg, with putty sticks sold at hardware stores. Buy several colors, shave them into flakes and blend them together until you get a good color match.
Apply the putty with a rounded stick; then smooth the surface and wipe the excess with a cloth. Use a permanent marker to color the thin, light-colored line of bare wood. Apply a seal coat of shellac, followed by lacquer.
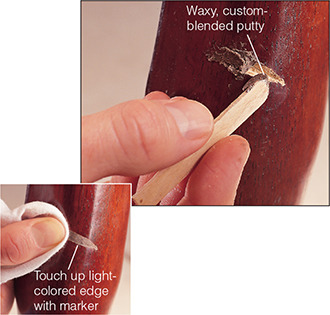
Pack wax putty into the gouge with a stick, then use a cloth to wipe away excess and smooth the surface. Use a marker to touch up any bare wood. Seal the waxy surface with a few passes of shellac; follow with spray lacquer.
Reviving a Finish
Before you strip your furniture, consider reviving its finish. It may only be hidden by grime, compounded by nicks and water rings—and easily restored.
Examine the piece. Cracked or “alligatored” finishes can’t be revived. You can remove white water rings; black rings require stripping. Light and even deep scratches can be disguised.
First, clean the finish with mineral spirits. Then touch up gouges with putty sticks, color any scratches with markers and rub out rings with steel wool and rubbing compound.
Recoat the surface with spray lacquer, let it dry and rub it out using 0000 steel wool and rubbing compound. Finally, protect the finish with paste wax.
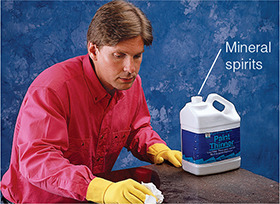
1 Clean all surfaces with a cloth soaked in mineral spirits, then touch up gouges and nicks with putty and markers. Use rubbing compound and steel wool to rub out white water rings in the affected areas only.
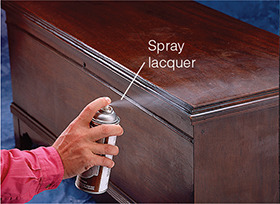
2 Recoat the surface with spray lacquer, using overlapping strokes and applying three to five coats. Afterward, let the lacquer dry fully, which may take a day or more.
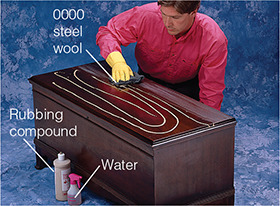
3 Rub the entire surface with rubbing compound and 0000 steel wool. Rub firmly and with the grain, thinning the slurry lightly with water as needed. Wipe clean with a damp rag and repeat if necessary.
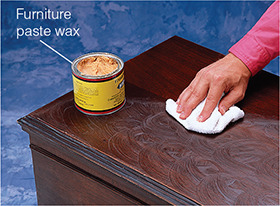
4 Protect the surface and make it more scratch-resistant by waxing the finish with paste wax. Rub a generous amount of wax onto the surface; then use a clean cloth to buff and remove all excess.
Deep Damage
You can fix deep dents using some simple tools and a bit of artistry. First fill the dent with auto body filler, which dries super hard and doesn’t shrink. Slightly overfill and, before it fully hardens, use a chisel to shave the filler flush.
Before coloring, and again between each layer, seal the repair with shellac, letting you see the true color. To match the surrounding area, mix some powdered pigment with shellac and dab it on the filler with a brush.
Use a darker color and a fine brush to add grain lines to the repair, “erasing” them with steel wool and starting over if necessary. Seal with a few more coats of shellac, and then topcoat with the appropriate finish.
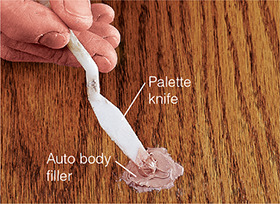
1 Fill the center of the hole with auto body filler, working it firmly to the edges. Try to mound the filler as much as possible, and let it begin to harden.
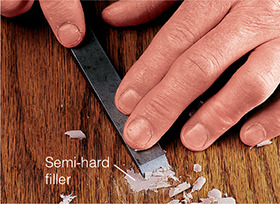
2 Before it fully cures, shave the filler flush with the surface using a razor-sharp chisel. Then dab a sealer coat of shellac onto the patched area.
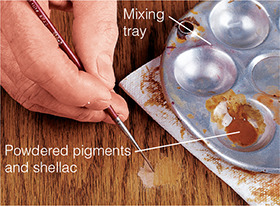
3 Color the patch a shade lighter than the surrounding area’s background color, using an opaque mix of powdered pigments mixed with shellac.
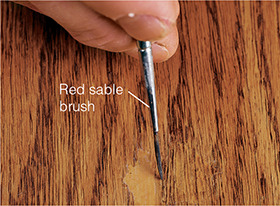
4 Add grain lines with a fine artist’s brush. Use a darker color and try to connect the wood’s grain across the patch. You might see the repair, but your friends won’t!
Solid Wood Repairs
Cracked Tabletop
Split tabletops are all too common. Fortunately, they’re a snap to repair.
Sometimes you can pry the crack open, inject or force in glue and clamp it closed. But distorted fibers and grime often prevent the crack from closing.
The surest fix is to clamp a straightedge to guide a circular saw down the center of the crack, to separate the top in two. Then glue the halves back together with clamps or wedges.
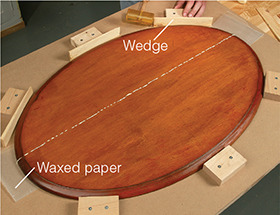
Round tops. Squeeze together curved tops with blocks and wedges. Screw blocks to plywood and drive in shims to apply pressure.
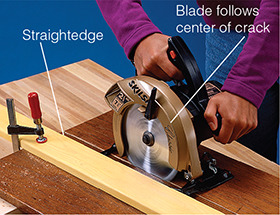
1 Saw the top in two, using a straightedge for cutting along the center of the crack. It may take two or three passes to remove the blemish.
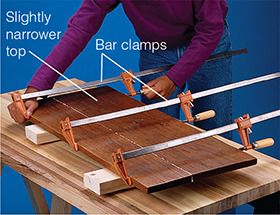
2 Spread glue on each half, and clamp them together until the glue dries. Drill new mounting holes and reinstall the top to its base.

Glues for Repairs
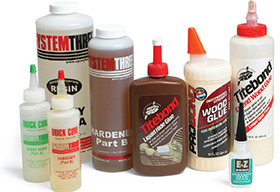
Yellow or white glue is plenty strong for most repairs, but others are better for special situations.
Slow-set glues, such as liquid hide glue or Titebond’s Extend, are handy when you need more time for complex assemblies.
Fast glues like cyanoacrylate (Super Glue) are perfect for small repairs because they set in seconds, letting you hold awkward shapes in place instead of using clamps.
Gap-filling two-part epoxies will fill and support a loose joint. Don’t use polyurethanes: they fill, but without much strength.
Table Leg Support Block
Wood corner blocks have a nasty tendency of letting go after years of hard use. To make a new one, dismount the leg, pull out the old block and use it as a template to trace its shape onto a fresh piece of hardwood, such as oak or maple.
Test-fit the new block, then glue it in place and reinstall the leg and hardware.
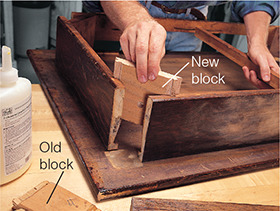
Nicked Corner
To restore a nicked corner or table edge, make a straight or L-shaped mold (depending on the repair) and clamp the mold to the table with plastic wrap in between to prevent the clamp from sticking.
Fill the missing area with wood putty or auto body filler. When the filler has hardened slightly, remove the mold and shave the repair flush to the surface with a chisel. Paint on a wood grain pattern and refinish.
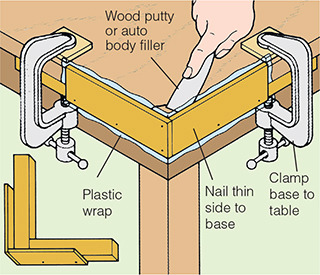
Broken Corner
Rebuild a broken corner by patching it with a precisely cut piece of similar wood, carefully choosing color and orienting grain lines.
Use a router and straight bit or a sharp chisel to create a smooth bed for the patch, making sure to leave square edges so the patch butts up tightly. Glue and clamp the patch in place. Sand the edges flush after the glue dries.
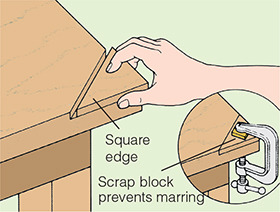
Veneer Repairs
Missing Pieces
Replacing small sections of chipped or damaged veneer is easy to do. Pieces of veneer are readily available in a variety of species from mail-order or retail woodworking suppliers.
For replacing large sheets, such as the top of an entire chest, it’s best to use regular white or yellow glue and to place a sheet of plywood topped with weights; books or concrete blocks work great for pressing the veneer. For large sheets, cut the veneer oversize so all the edges overhang, then trim flush after gluing.
For small repairs, you can use contact cement, which sticks without clamping. After you’ve cut a small patch, spread contact cement on both surfaces being joined. Let the glue become dry to the touch before pressing the patch down.
Regardless of the size of the patch, finish by staining to match and applying your favorite topcoat.
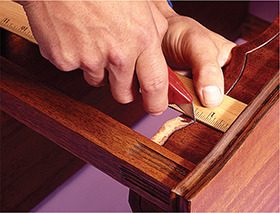
1 Straighten the edges of the damaged area with a ruler and utility knife, cutting parallel to the grain as much as possible to hide the seam.
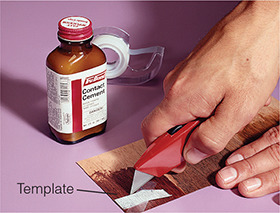
2 Cut an exact replica of the chipped area from a template. Make the template from a paper rubbing of the damaged spot, using the side of a pencil point.
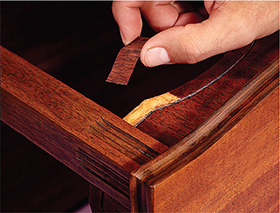
3 Test-fit the patch and trim if necessary. Apply contact cement to both surfaces, let the glue dry and press the veneer in place.
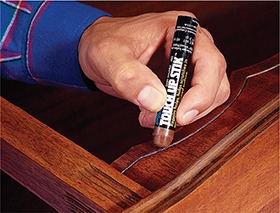
4 Stain veneer to match. Then apply a coat of oil, varnish, lacquer or shellac. After the finish dries, touch up seams with a wax putty stick.
Blisters
It’s common to find blistered or bubbled veneer in the middle of a veneered piece. In fact, you can detect unsound veneer by lightly tapping the surface with your finger, listening for a change in sound. A hollow note reveals loose veneer.
If heat and steam won’t restick the veneer (see “Lifted Veneer,” below), slit the area with a craft or utility knife along the wood’s grain. Use a glue syringe, available from woodworking catalogs, to inject glue into the slit.
Press the bubble down by hand to distribute the glue and remove any excess with a damp rag. Then place some waxed paper and scrap wood over the area and lay weights on top.
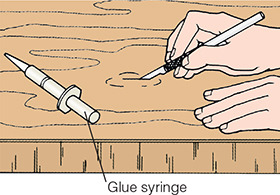
Lifted Veneer
Lifted veneer can be readily glued back in place. If the veneer is old, it’s probably glued with hide glue, which you can restick using heat and moisture. Place a damp cloth on the damaged area, turn a household iron on low and press the veneer flat.
If the iron doesn’t work, carefully lift the veneer and scrape off as much old glue as possible. Use a small brush to apply liquid hide glue. Then clamp the veneer flat with a scrap of wood.
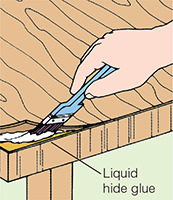
1 Pry up the loose veneer and scrape off old glue with a razor blade. If the glue isn’t hide glue, scrape vigilantly. With hide glue, simply remove any big clumps. Apply a thin coat of fresh hide glue to the core and the underside of the veneer.
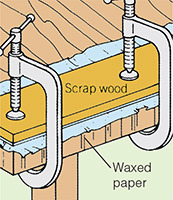
2 Press the veneer back in place and use a damp rag to remove any excess glue. Then position a sheet of waxed paper over the repair, extending it past the damaged area. Clamp a piece of scrap wood over the top and allow the glue to dry for 12 hours.
Regluing Furniture
Chairs
Chairs probably need fixing more than any other type of furniture—particularly when they start to wobble. Here’s how to tighten up things.
Start by labeling all the parts and then disassemble any loose joints. If necessary, take the whole chair apart.
Carefully scrape all the old glue from tenons and holes. Be persistent, because new glue won’t stick to old yellow or white glue. If the original adhesive was hide glue, you’re in luck: Simply soften it first with hot water and then scrape.
Make or replace any missing or broken parts, such as turned spindles. If a tenon fits loosely, ”fatten” it by gluing a wood shaving or two around it.
Once all the parts fit, reglue the chair using liquid hide glue. Then fill any chips or nail holes and touch-up the finish.
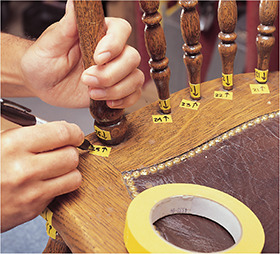
1 Make reassembly a breeze by labeling all the joints beforehand with bits of masking tape. Use arrows to indicate alignment of mating parts. Then remove any nails or other connecting hardware.
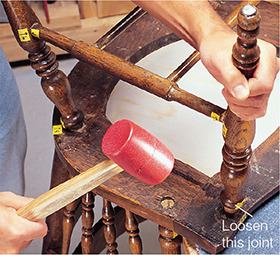
2 Loosen stubborn joints by laying the chair on a padded workbench and giving the joint a sound rap with a rubber mallet. If necessary, take apart intact joints to gain access to loose ones for regluing.
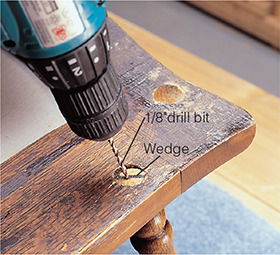
3 Remove wedges from wedged joints by drilling a series of 1/8-in. (3-mm) holes along the wedge. Pick out the remaining pieces of the wedge using an awl, a narrow chisel or a screwdriver.
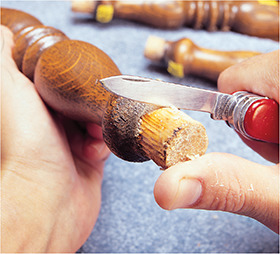
4 Scrape all the old glue from tenons with a pocketknife or utility knife. Don’t remove wood fibers or you’ll reduce the tenon’s diameter and loosen the joint.
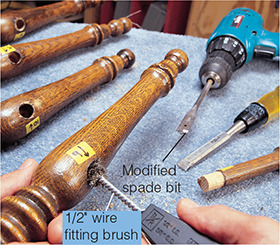
5 Remove old glue from the sides and bottom of the holes. File down the point of a spade bit or use a small chisel to clean out holes. Clean remaining bits with a plumber’s fitting brush.
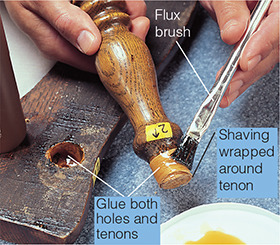
6 Repair bad-fitting joints by applying liquid hide glue to the tenon and wrapping a thin wood shaving or a piece of veneer around it. Let the glue dry. During reassembly, spread hide glue on both parts of every joint.
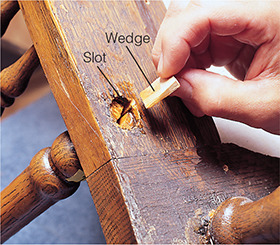
7 Fit glued parts together by tapping with a mallet, beginning with the legs. To secure wedged tenons, cut a small wedge from scrap wood and apply glue to the wedge and its slot. Then tap the wedge into the slot.
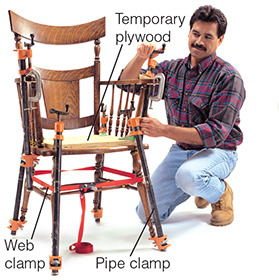
8 Pull glued joints together with clamps. Cut wedges to direct the clamping pressure in line with the joints, holding them with C-clamps. Use web clamps or tightly-stretched bicycle inner tubes to draw parts together.
Loose Joints
There are shortcuts that might prevent you from having to disassemble an entire piece just to fix a few loose joints.
You can repair loose joints from the outside, by adding dowels through both parts of a joint or by injecting gap-filling epoxy into the joint. If a single leg or stretcher is loose, try removing that part only. Then enlarge the tenon by wrapping it with a shaving.
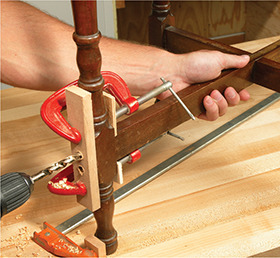
1 Drill a pair of holes through the joint. First, drill holes in a block and then clamp the block to the joint to guide the bit and prevent tear-out. Use another clamp to keep the joint from spreading as you drill.
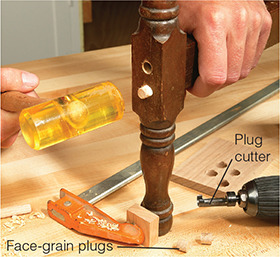
2 Glue and drive dowels through the joint. Set the dowels deep enough so you can conceal the holes with glued-in plugs.
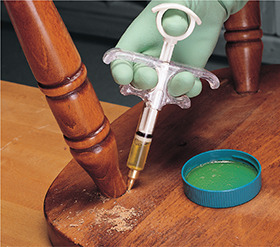
Epoxy. Drill a 1/8-in. (3-mm) hole diagonally into the hole, then pump slow-setting epoxy into the joint with a glue syringe. Wiggle the joint as you inject the epoxy to distribute the adhesive around the tenon.
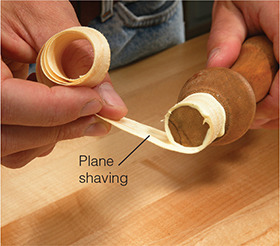
Shaving. Enlarge a loose tenon to get a good fit by wrapping it with a shaving from your plane. Keep in mind that wear and shrinkage turn round holes into ovals, so be sure to sand and shape the new tenon to fit.
Table Legs
Tables may not get as much abuse as chairs, but it’s not unusual for one to break when kicked or moved. To repair the joint, save any fractured pieces, and remove old dowels by drilling them out.
Glue fractured parts back together, positioning them in their original order and wrapping them with masking tape until the glue dries. Then install fresh dowels with glue and clamp the joint.
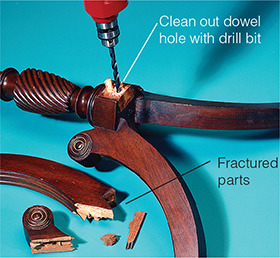
1 Be sure to save even small shattered pieces so you can glue them back together. Drill out broken dowels using a bit the same diameter as the dowel.
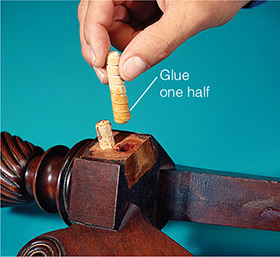
2 Scrape all old glue from the surfaces of the joint. Then apply fresh glue to one half of each dowel’s length and tap or push them into the holes.
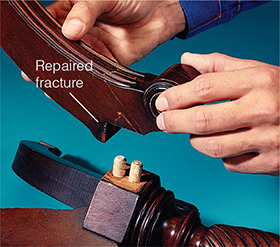
3 Be sure the fractured repair is sound and the glue has dried before you reassemble. Apply glue to all the joint surfaces, including the dowels, and carefully fit the part back together.
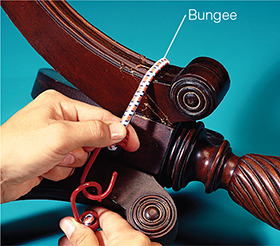
4 If regular clamps won’t work or fit, use a bungee cord or band clamp to pull the parts together. Let the glue dry overnight. Then fill any visual blemishes with putty and touch up the finish.
Outdoor Furniture Repairs
Lawn Chairs
Resurrect your comfy lawn chair by replacing its broken or frayed nylon webbing. Rolls large enough to reweb one chair are available at hardware stores and home centers.
Remove the fasteners that hold the webbing straps. Measure from hole to hole and add 3-1/2 in. (9 cm). Cut each strap to length, folding its ends into triangles. Attach using the original hardware, and your favorite chair is as good as new—maybe even better!
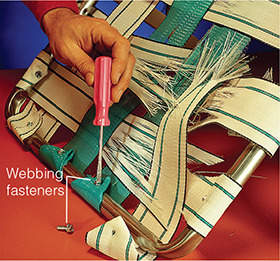
1 Remove the fasteners and old webbing straps from the chair frame. Save the screws for reattaching the new straps.
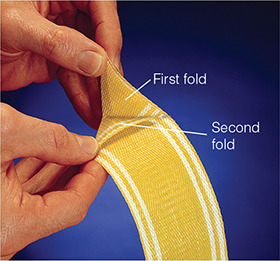
2 Double-fold each end of the strap to create a strong, four-layer-thick triangle, through which you insert the fastener.
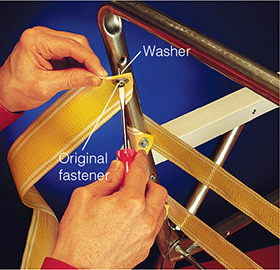
3 Poke a hole through the strap with an awl. Install screws through the strap and into holes in frame. A washer strengthens the connection.
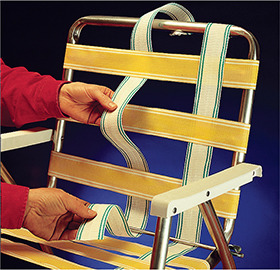
4 Secure all the straps in one direction first. Then weave the second set over and under the first and secure it to the chair frame.
Wicker
Repairing wicker furniture is easier than you might think. You can buy the material, whether it’s cane, fiber rush, Oriental seagrass, rattan, reed or willow, by looking under wicker or rattan in the Yellow Pages or on the Internet. Be sure to soak the material in warm water for 30 minutes to make it more pliable before you work with it.
To fix a damaged, unraveled area, remove the loose strip and tack its free end to the furniture’s frame. Tack a new piece near the old strip, and wrap it tightly around the frame. Tack the trailing end and add glue.
To plug the gaps where woven strips are missing in seats, seat backs and cabinet panels, first cut away damaged material from the underside, back or inside. Cut a new piece 1 in. (2.5 cm) longer than the original and weave it following the existing pattern.
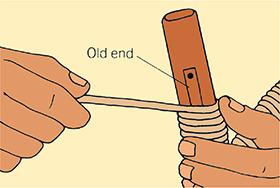
1 Fix a broken strip by cutting off the old piece and tacking down its end. Near the old end, tuck and tack down new end. Wind new piece tightly and evenly around frame.
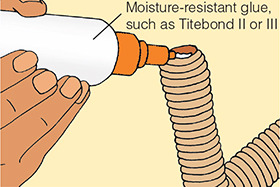
2 To finish, tuck the end under the final turn and tack it in place. Snip off the end flush and apply glue around the end of the wrap.
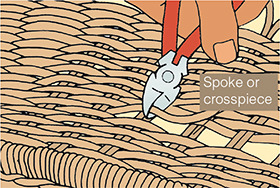
3 Weave a new strand by first cutting away the old one with wire cutters, working from the underside. Let the spokes support the cut ends. Cut a new piece 1 in. (2.5 cm) longer than the old piece.
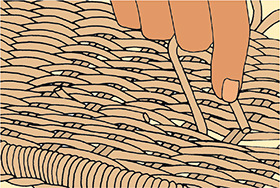
4 Starting on the underside, weave the new strip over and under spokes, following the pattern and pulling tightly as you weave. Snip ends and tuck them against the spokes.
Recaning
Most caned chairs less than 60 years old can be recaned using machine-woven sheet cane, which is far easier than hand-weaving individual cane. In fact, you can use the material to reseat any cane chair that has a groove in which to secure a spline.
All you need is sheet cane, a length of spline sized to the width of the groove and about 10 caning wedges. (Look in the Yellow Pages or search the Internet under “Wicker” or “Rattan” for materials.)
The photos below show the caning process. After you’ve installed the new cane, give it a light coat of lacquer and let it sit for two days before putting it to use.
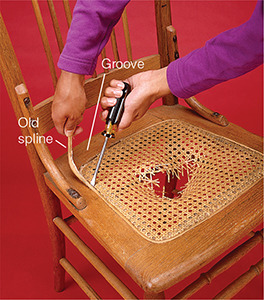
1 Pry up the old spline with a screwdriver, after you have sliced alongside it on both sides with a utility knife to break the glue joint. Then remove the old cane.
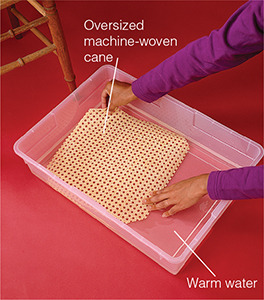
2 Cut the new cane so it extends 1 in. (2.5 cm) past the chair groove on all sides. Soak the sheet in warm water for an hour. Then place the smooth or shiny side up on the chair frame.
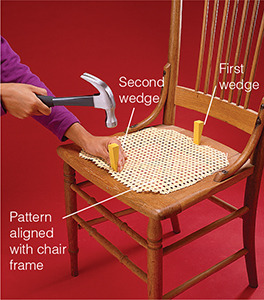
3 Starting at the back, drive in a caning wedge. Drive a second wedge in front, stretching the sheet slightly and checking that the pattern runs straight and square across the seat.
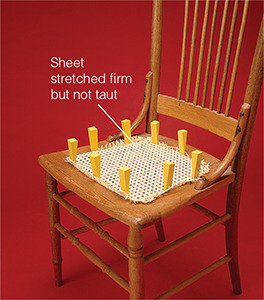
4 Install wedges around the entire seat. If the cane starts to dry out, give it a mist of water from a spray bottle. Use the tip of a spare wedge to press the remaining cane into the groove, then remove the wedges.
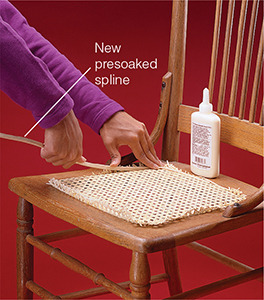
5 Soak the rough-cut spline in water for 15 minutes. Run a bead of yellow glue into the groove, and press the new spline into place. If the groove has square corners, miter-cut the spline and install it in four separate sections.
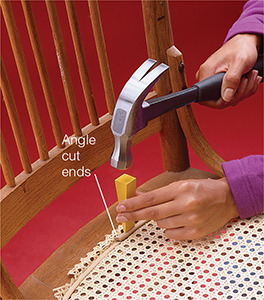
6 Trim the end of the spline and tap it into the groove using a wedge. Cut an angle on the ends of the spline with a utility knife so they meet at a tight joint. Go back around the entire spline and retap it until it’s flush with the seat.
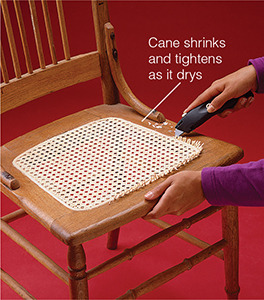
7 Trim excess cane with a utility knife. Let sit for two days to allow cane to dry fully; it will shrink and pull tight to the frame. Sand with 220-grit sandpaper; then spray with lacquer.
Re-covering a Chair
Worn or dated chairs with removable “wraparound” seats are a snap to renew. If the seat is in good shape, you can add new fabric and batting right over the old, as shown.
If the old padding is lumpy, remove it, cut a piece of foam the exact shape of the seat and apply it along with the new batting and fabric.
Most fabric stores carry batting and foam, and you can select cotton or synthetic fabrics in a variety of colors or patterns. Polished cotton, with the pattern printed on the surface, is less durable than other fabric options.
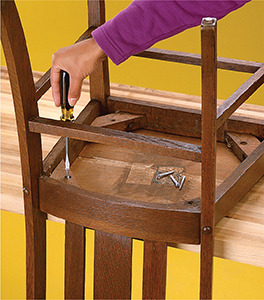
1 Remove the chair bottom by taking out the screws that secure it to the frame. Save the screws for reassembly later.
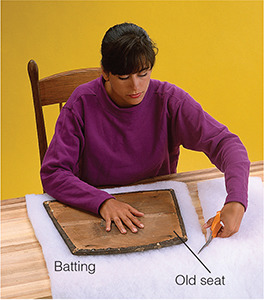
2 Cut new batting about 2 in. (5 cm) oversize on all sides, using the seat bottom as a pattern.
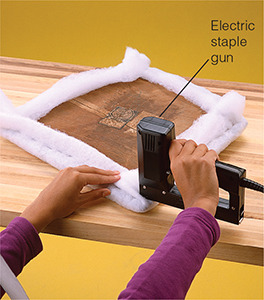
3 Secure the batting by pulling it tightly around the seat and fastening with 1/4-in. staples. Trim any excess.
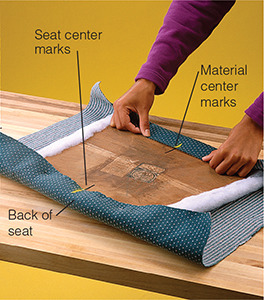
4 Mark centerlines on the chair bottom and the fabric. Align them so the fabric runs straight from front to back.
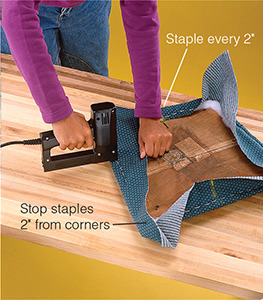
5 Staple fabric in place, completing the front edge first, back edge next and the two sides last. Start stapling at the center and work toward the corners. Flip the seat often to make sure the pattern is running straight.
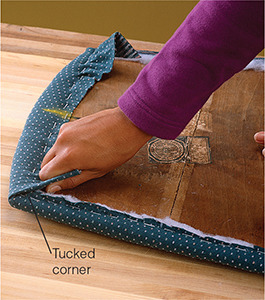
6 Fold fabric at the corners; then secure with staples. Trim excess using sharp scissors after all the corners are complete.
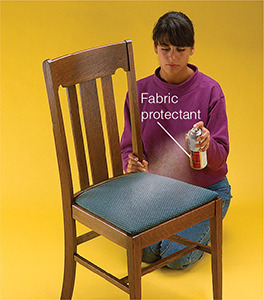
7 Protect the new upholstery from stains, spills and sunlight by spraying it with one of the many fabric protectants available.


