RICE, GRAIN, AND BEAN DISHES
WHITE RICE
(ARROZ BLANCO)
Serves 4
White rice is, of course, a staple throughout Latin America. Even in its most basic incarnation, Mexicans give it distinction in the form of sautéed onion and garlic. Sautéing the rice imparts a nutty flavor. Now get ready for some of the tastiest basic white rice in the western hemisphere.
1 tablespoon olive oil or vegetable oil
1 small onion, finely chopped
1 clove garlic, minced
1½ cups long-grain white rice (like Uncle Ben’s)
2½ cups chicken or vegetable stock
½ teaspoon salt
1. Heat the oil in a large heavy saucepan. Add the onion and cook over medium heat for 2 minutes, stirring with a wooden spoon. Add the garlic and continue cooking until the onion is soft and translucent but not brown, 2 minutes more, stirring as needed. Add the rice and cook until the grains are shiny and aromatic, 2 minutes.
2. Add the stock and salt and bring to a boil. Reduce the heat to the lowest setting. Cover the pan and cook until the rice is tender, 18 minutes. Do not stir. Check the rice after 15 minutes; if it appears too wet, partially uncover the pot to let some of the liquid evaporate.
3. Remove the rice from the heat and uncover. Drape a dishcloth over the pot and cover the rice again. Let stand for 2 minutes. Fluff the rice with a fork and serve at once.
309 CALORIES PER SERVING; 6 G PROTEIN; 4 G FAT; 1 G SATURATED FAT; 62 G CARBOHYDRATE; 282 MG SODIUM; 0 MG CHOLESTEROL
MEXICAN-STYLE RICE
(ARROZ A LA MEXICANA)
Serves 4
It’s hard to imagine a Mexican meal without a mound of this red-hued rice. And if you’re accustomed to restaurant versions—made with bottled salsa—this one, bursting with the brash flavors of fresh tomato, garlic, onion, cilantro, and chilies, will come as a revelation. Remember that the rice will only be as good as the raw materials, so try to use luscious ripe tomatoes. If you like your rice with a little heat, don’t bother to seed the chili.
1 ripe red tomato, stemmed and quartered
¼ white onion (about 2 ounces)
1 clove garlic
1 fresh jalapeño chili, seeded
3 sprigs cilantro
1 teaspoon salt
1 tablespoon canola oil
1½ cups long-grain white rice
1 (1-inch) piece cinnamon stick (optional)
1½ cups chicken stock or water
1. Place the tomato, onion, garlic, jalapeño, cilantro, and salt in a blender and purée to a smooth paste.
2. Heat the oil in a large pot. Add the rice and cinnamon stick and cook over medium heat until the rice grains are shiny, 2 to 3 minutes, stirring with a wooden spoon.
3. Increase the heat to high. Stir in the tomato mixture and bring to a boil. Reduce the heat to medium and cook the rice without stirring until most of the tomato liquid has evaporated and holes appear in the surface of the rice. Add the stock or water and bring to a boil.
4. Tightly cover the pot and reduce the heat to low. Cook the rice, without stirring, until it is tender, about 18 minutes. Check the rice after 15 minutes; if it looks too wet, leave the lid ajar to allow some of the excess liquid to evaporate. If it looks too dry, add a tablespoon or so of stock or water.
5. Remove the pan from the heat and uncover. Drape a dishcloth over the pot and cover the rice again. Let the rice stand for 2 minutes. Fluff the rice with a fork and serve at once.
303 CALORIES PER SERVING; 6 G PROTEIN; 4 G FAT; 1 G SATURATED FAT; 60 G CARBOHYDRATE; 547 MG SODIUM; 0 MG CHOLESTEROL
Note: The cinnamon stick isn’t traditional, but I like its spicy sweetness. I’ve made it optional.
RICE WITH SHRIMP
(ARROZ CON CAMARONES)
Serves 4
Part pilaf and part stew, this simple rice dish turns up throughout coastal Mexico. When it comes to making a quick, colorful, satisfying supper, few dishes can top it. The rice gets a double blast of flavor, first from the fish stock, which is simmered with the shrimp shells for extra richness, then from the roasted tomato salsa. For extra color, you could add 16 to 20 mussels.
1 pound large shrimp, peeled and deveined (save the shells)
2 cups fish stock (see here) or bottled clam broth
2 ripe red tomatoes
½ medium white onion, cut in half
2 to 4 jalapeño chilies
3 cloves garlic
½ cup chopped fresh cilantro
1 teaspoon salt, or to taste
freshly ground black pepper
1 tablespoon extra-virgin olive oil
1½ cups long-grain white rice
½ teaspoon ground cumin
1. Wash the shrimp and blot dry. Place the fish stock and shrimp shells in a saucepan and gently simmer, covered, for 10 minutes.
2. Roast the tomatoes, onion, chilies, and garlic in a comal or frying pan over medium heat until nicely browned on all sides: 8 to 10 minutes for the tomatoes and onions, 4 to 6 minutes for the chilies and garlic; or roast under the broiler or on a barbecue grill. Transfer to a plate to cool. Seed the chilies. (For a spicier rice dish, leave the seeds in the chilies.) Place the roasted vegetables in a blender with two thirds of the cilantro and the salt and pepper and purée to a smooth paste.
3. Heat the oil in a large, nonstick frying pan or deep sauté pan. Add the rice and cumin and fry over medium-high heat until the rice grains are shiny, about 2 minutes. Add the tomato mixture and bring to a rolling boil. Strain in the fish stock and bring to a boil. Stir in the shrimp and bring to a boil.
4. Reduce the heat to its lowest setting and cover the pan. Cook until the rice is tender and the shrimp is done, 18 to 20 minutes. Remove the pan from the heat and uncover. Drape a dishcloth over the pot and cover the rice again. Let stand for 2 minutes. Add the remaining cilantro and salt and pepper to taste, stirring them into the rice and fluffing it with a fork. Serve at once.
440 CALORIES PER SERVING; 29 G PROTEIN; 6 G FAT; 1 G SATURATED FAT; 65 G CARBOHYDRATE; 719 MG SODIUM; 172 MG CHOLESTEROL
GREEN RICE
(ARROZ VERDE)
Serves 4
Rice is a relatively recent import to Mexico (it arrived with the Spanish), but few cuisines make such extensive or colorful use of this nourishing grain. Here’s a green rice traditionally served at festivals and celebrations. The rice owes its offbeat hue and distinctive flavor to the addition of spinach, parsley, cilantro, and scallions.
salt
10 spinach leaves, washed and stemmed (or ¼ cup cooked frozen spinach)
¼ cup fresh parsley leaves
¼ cup fresh cilantro leaves
1 poblano chili, roasted, peeled, and seeded
2¼ cups chicken stock
freshly ground black pepper
1½ tablespoons olive oil
4 scallions, finely chopped
1 stalk celery, finely chopped
1 clove garlic, minced
1 cup long-grain white rice
1. Bring 2 cups of salted water to a rolling boil. Add the spinach, parsley, and cilantro and cook for 1 minute. Drain in a colander, rinse well with cold water, and drain again. Squeeze the spinach and herbs between your fingers to wring out any excess liquid.
2. Place the herbs in a blender with the chili and ¼ cup of the chicken stock. Purée until smooth. Add the remaining chicken stock and salt and pepper to taste.
3. Heat the oil in a nonstick sauté pan. Add the scallions, celery, and garlic and cook over medium heat until soft but not brown, about 3 minutes. Add the rice and cook until the grains are shiny, about 1 minute. Stir in the stock-herb mixture and bring to a boil.
4. Reduce the heat to the lowest setting and cover the pan. Cook the rice until it’s tender, about 18 minutes. Check after 15 minutes: If the rice looks too soupy, set the lid ajar to allow the excess cooking liquid to evaporate. If the rice seems too dry, add a little water. Remove the rice from the heat and uncover. Drape a dishcloth over the pot and cover the rice again. Let stand for 2 minutes. Fluff the rice with a fork, adding salt and pepper to taste, and serve at once.
238 CALORIES PER SERVING; 5 G PROTEIN; 6 G FAT; 1 G SATURATED FAT; 42 G CARBOHYDRATE; 35 MG SODIUM; 0 MG CHOLESTEROL
WILD RICE STUFFING
Serves 6 to 8
Wild rice is something of a culinary misnomer, being neither wild (it’s cultivated in paddies) nor rice (botanically speaking, it’s an aquatic grass seed). Nevertheless, it’s a uniquely American food—it was first harvested by the Indians of Minnesota. I like to presoak the rice to shorten the cooking time. You can omit this step and lengthen the cooking time, but you’ll have to add more water.
2 cups wild rice
1 firm apple (such as a Granny Smith), peeled and finely diced
1 teaspoon lemon juice
2 ears fresh corn (1 cup kernels)
1½ tablespoons olive oil
1 large onion, finely chopped (1 cup)
3 stalks celery, finely chopped
3 cloves garlic, minced (1 tablespoon)
4–5 cups water or chicken stock (approximately)
1 small green bell pepper, cored, seeded, and cut into ½-inch dice
1 small red bell pepper, cored, seeded, and cut into ½-inch dice
1 small yellow bell pepper, cored, seeded, and cut into ½-inch dice (optional)
2 tablespoons finely chopped fresh herbs (sage, thyme, basil, oregano, parsley, and/or chives)
2 tablespoons freshly grated Parmigiano-Reggiano, or other Parmesan-style cheese (optional)
salt and freshly ground black pepper
Rinse the wild rice in a strainer with cold water and drain. Soak the rice in cold water to cover for at least 4 hours. Drain again. Toss the apple pieces with the lemon juice to prevent browning. If using fresh corn, cut the kernels off the cobs.
Heat the oil in a large, heavy saucepan. Add the onion, celery, and garlic, and cook over medium heat for 3 to 4 minutes, or until soft but not brown. Stir in the rice and 4 cups water, and bring to a boil. Reduce the heat and simmer for 20 minutes.
Stir in the peppers, apple, and corn, and continue simmering, uncovered, for 10 minutes, or until the rice is tender but not too soft. If the rice begins to dry out, add more water. If the rice is too wet, increase the heat to high to evaporate the excess water.
Just before serving, stir in the herbs, cheese (if using), salt, and pepper. The stuffing should be highly seasoned.
Note: This stuffing can be simmered until done and then baked inside a turkey, chicken, or game hens, but I usually prepare it ahead of time and warm it in a baking dish on the side.
216 CALORIES PER SERVING; 7 G PROTEIN; 3 G FAT; 42 G CARBOHYDRATE; 25 MG SODIUM; 0 MG CHOLESTEROL
HERB RISOTTO
Serves 4
Risotto is the rice dish that thinks it’s pasta. My low-fat risotto calls for less butter and cheese than the traditional recipe. To boost the flavor, I add chopped fresh herbs or saffron. Arborio rice is a starchy, short-grain rice that has the unique ability to absorb 5 times its volume in liquid without becoming mushy. It is widely available at gourmet shops and Italian markets. You can also use short-grain Valencia, which is found at Hispanic markets.
1 tablespoon olive oil
1 onion or 2 leeks, finely chopped (about 1 cup)
1 clove garlic, minced (1 teaspoon)
1½ cups arborio rice
½ cup dry white wine
5–6 cups chicken stock (here), heated to simmering
¼ cup chopped fresh herbs (or ¼ teaspoon saffron threads soaked in 1 tablespoon warm water)
¼–½ cup freshly grated Parmigiano-Reggiano (or other Parmesan-style cheese)
salt and freshly ground black pepper
Heat the oil in a large saucepan over medium heat. Cook the onion and garlic for 3 to 4 minutes, or until soft but not brown, stirring well. Stir in the rice and cook for 1 minute, or until all the grains are shiny. (Do not wash arborio rice. You need the starch to thicken the sauce.)
Add the wine and bring to a boil, stirring steadily. When most of the wine is absorbed, add ½ cup stock. Cook the rice at a gentle simmer, stirring steadily. When most of the liquid is absorbed, add another ½ cup stock. Continue adding the stock, ½ cup at a time, until 5 cups are used up. If the rice is still hard, add ½ to 1 cup more stock. Add the herbs or saffron during the last 3 minutes of cooking. The whole process should take 18 to 20 minutes. Properly prepared risotto will be soft and creamy, but you should still be able to taste the individual grains of rice.
Remove the pan from the heat and stir in the cheese, salt, and pepper. Serve immediately. Guests may wait for risotto, but risotto does not wait for the guests!
400 CALORIES PER SERVING; 14 G PROTEIN; 7 G FAT; 62 G CARBOHYDRATE; 1,094 MG SODIUM; 5 MG CHOLESTEROL

Herb Risotto
RISOTTO WITH SAFFRON AND SQUASH BLOSSOMS
Serves 6 as a first course or side dish, 4 as an entrée
Risotto originated in the Po Valley in northern Italy, where its invention, so legend goes, is associated with a stained-glass window maker named Valarius. The master craftsman achieved exceptionally brilliant colors by adding saffron to his paints. One day, at the wedding of Valarius’s daughter, one of his apprentices persuaded the cook to add saffron to the rice. Soon the guests were eating a first for the region, a mountain of saffron-colored rice. Valarius pronounced the dish “risus optimus,” Latin for “excellent rice.” The words were eventually shortened to risotto. To this day, saffron-flavored risotto remains a Milanese specialty.
In addition to saffron, traditional risotto alla milanese contains poached marrow, an admittedly tasty ingredient that is off the charts in terms of fat and cholesterol. I’ve replaced the marrow with another popular northern Italian risotto ingredient: zucchini blossoms. These are available in Italian markets and greengrocers in early summer. But don’t worry if you can’t find zucchini blossoms: saffron risotto is plenty delicious by itself.
½ teaspoon saffron threads
1½ tablespoons extra-virgin olive oil
1 medium onion, finely chopped (1 cup)
1 clove garlic, minced
1½ cups arborio rice
½ cup dry white wine
5 to 6 cups Chicken Stock (here) or Basic Vegetable Stock (here), heated to simmering in another pot
8 to 10 zucchini or squash blossoms, washed, patted dry, and cut crosswise into ½-inch slices
¼ to ½ cup freshly grated Parmigiano-Reggiano cheese
salt and freshly ground black pepper
1. Place the saffron threads in a small bowl and pulverize them with the end of a wooden spoon. Add 1 tablespoon hot water and let stand for 10 minutes.
2. Meanwhile, heat the olive oil in a large, heavy saucepan (preferably nonstick) over medium heat. Cook the onion and garlic until soft and translucent but not brown, about 4 minutes. Stir in the rice, and cook for 1 minute, or until all the grains are shiny.
3. Add the wine and bring to a boil, stirring constantly. Add the saffron. When most of the wine is absorbed, add the first ½ cup stock. Cook the rice at a brisk simmer, stirring steadily. When most of the liquid is absorbed, add another ½ cup stock. Gradually add salt and pepper as you add the stock. Continue adding the stock, ½ cup at a time, until 5 cups are used up. Stir in the zucchini blossoms after 12 minutes of cooking. If the rice is still hard, add ½ to 1 more cup stock. When ready, the risotto will have a creamy sauce, but the individual grains of rice will still be discernible. Remove the pan from the heat. You’ll need about 18 minutes of cooking in all.
4. Stir in the cheese, and salt and pepper to taste. Serve at once.
281 CALORIES PER SERVING;* 7 G PROTEIN; 7 G FAT; 2 G SATURATED FAT; 43 G CARBOHYDRATE; 909 MG SODIUM; 18 MG CHOLESTEROL
SEAFOOD RISOTTO
Serves 6 as a first course or side dish, 4 as an entrée
Black mussels, white squid, and pink shrimp make this one of the prettiest risottos in Italy. For a more extravagant risotto, you could add clams, scallops, and/or lobster tails.
1½ pounds mussels
1 pound cleaned squid (calamari) (see box here)
1 pound large shrimp
2 medium onions, finely chopped
4 cloves garlic, minced
½ cup finely chopped flat-leaf parsley
1½ cups dry white wine
5 to 6 cups Fish Stock (here), Chicken Stock (here), or bottled clam broth (juice)
½ teaspoon saffron threads
1½ tablespoons extra-virgin olive oil
1½ cups arborio rice
salt and freshly ground black pepper
1. Scrub the mussels, discarding any with cracked shells or shells that fail to close when tapped. Remove any threads that may cluster at the hinge of the mussel shells (pull them out with needlenose pliers). Cut the squid bodies crosswise into ¼-inch rings. Leave the heads (tentacle sections) whole. Peel and devein the shrimp, reserving the shells.
2. Place 1 chopped onion, 2 garlic cloves, and 3 tablespoons parsley in a large saucepan with the shrimp shells and wine. Bring to a boil. Add the mussels and tightly cover the pan. Cook the mussels over high heat until the shells are open and the mussels are cooked: about 8 minutes. Stir the mussels once or twice to allow the shells on the bottom to open. Transfer the mussels with a slotted spoon to a colander over a bowl to drain and cool.
3. When the mussels are cool, take ½ of them out of the shells, discard the shells, and place with the squid and shrimp. Leave the remaining mussels in the shell for garnish. Strain the mussel cooking liquid through a strainer lined with cheesecloth or a paper towel into a large measuring cup. Add enough fish stock to obtain 6 cups liquid. Place this liquid in a pot and bring to a simmer. Place the saffron threads in a small bowl and pulverize them with the end of a wooden spoon. Add 1 tablespoon hot broth and let stand for 10 minutes.
4. Heat the olive oil in a large heavy saucepan (preferably nonstick) over medium heat. Cook the remaining onion, 2 cloves garlic, and 3 tablespoons parsley until soft and translucent but not brown, about 4 minutes. Stir in the rice and cook for 1 minute, or until all the grains are shiny.
5. Add ½ cup mussel broth mixture and the saffron and bring to a boil, stirring steadily. When most of the liquid is absorbed, add another ½ cup broth. Gradually add salt and pepper as you add the broth. Cook the rice at a brisk simmer. Continue adding the broth, ½ cup at a time, until 5 cups are used up. If the rice is still hard, add ½ to 1 more cup broth. When ready, the risotto will have a creamy sauce, but the individual grains of rice should still be discernible. You’ll need about 18 minutes of cooking in all.
6. The last 5 minutes, stir in the shrimp. The last 3 minutes, stir in the squid. When both are cooked, stir in the shelled mussels and salt and pepper to taste. Warm the mussels in the shells in any remaining broth. Transfer the risotto to plates or a platter and garnish with the mussels in the shells. Sprinkle with the remaining 2 tablespoons parsley and serve at once.
440 CALORIES PER SERVING;* 34 G PROTEIN; 6 G FAT; 1 G SATURATED FAT; 69 G CARBOHYDRATE; 268 MG SODIUM; 311 MG CHOLESTEROL
ARANCINE
(SICILIAN STUFFED RICE “FRITTERS”)
Makes 28 to 30 arancine, which will serve 8 to 10
Arancine means “little oranges.” With a little imagination, these round, golden brown rice fritters from Sicily do, indeed, resemble tiny citrus fruits. My low-fat version features a filling of sautéed vegetables instead of the traditional ground beef. (For a virtually no-fat version of the dish, you could roast or grill the vegetables instead of sautéing them.) There are two ways to cook the arancine: sautéed in a little olive oil or “bake-fried” in a hot oven. If your fat budget allows it, go for the former, which produces crisper, more succulent fritters. But bake-frying makes tasty arancine, as well. This dish is a great way to use up leftover risotto.
1 batch basic risotto (here)
FOR THE FILLING:
2 to 3 teaspoons extra-virgin olive oil
½ small onion, minced
1 clove garlic, minced
½ red bell pepper, cut into the finest imaginable dice
½ yellow bell pepper, cut into the finest imaginable dice
2 teaspoons drained chopped capers
1 tablespoon tomato paste
salt and freshly ground black pepper
TO FINISH THE ARANCINE:
1 egg plus 4 egg whites (or ¾ cup egg substitute), lightly beaten with a fork
approximately 1 cup toasted bread crumbs
1 to 2 tablespoons extra-virgin olive oil (if sautéing the fritters) or
spray olive oil (if baking)
1. Prepare the risotto and let cool completely. Prepare the filling. Heat the olive oil in a nonstick frying pan. Add the onion, garlic, and bell peppers. Cook over medium heat until peppers are tender and most of the juices have evaporated, about 5 minutes. Add the capers and tomato paste and cook for 2 minutes. Add salt and pepper to taste. Let the mixture cool to room temperature.
2. Pinch off a walnut-size piece of risotto mixture and roll it into a ball between the palms of your hands. (Wet your hands with a little water to prevent sticking.) Make a deep depression in one side of the ball with your thumb. Place a tiny spoonful of filling in the depression. Pinch the hole shut and roll the rice back into a round ball. Repeat until all the risotto and filling are used up. The recipe can be prepared ahead to this stage. Place the beaten egg mixture in one shallow bowl, the bread crumbs in another.
3a. If pan-frying the arancine, flatten each ball between the palms of your hands into a thick pancake. (OK, this is no longer an orange shape, but it facilitates pan-frying.) Dip each fritter first in egg mixture, then in crumbs, shaking off the excess. Heat 1 tablespoon olive oil in a nonstick frying pan. Cook the arancine over medium-high heat until crusty and golden brown on both sides, 2 to 4 minutes per side, turning with a spatula. Work in several batches to avoid crowding the pan, adding oil as needed. Drain the arancine on paper towels, sprinkle with a little more salt and pepper, and serve at once.
3b. If bake-frying the arancine, preheat the oven to 425°F. Dip the arancine in egg, then in crumbs, as described above, shaking off the excess. Bake-fried arancine can be left as balls. Arrange them on a nonstick baking sheet sprayed with oil. Generously spray or brush the sides and tops of the arancine with oil. Bake the arancine until sizzling hot and lightly browned, 10 to 15 minutes. Transfer to a platter and serve at once.
249 CALORIES PER SERVING; 10 G PROTEIN; 6 G FAT; 1 G SATURATED FAT; 36 G CARBOHYDRATE; 395 MG SODIUM; 23 MG CHOLESTEROL
BASIC POLENTA
Polenta has very ancient roots in Italy, although its primary ingredient—cornmeal—didn’t arrive until the sixteenth century (after a Genoese sea captain named Columbus set sail for a shorter route to Asia and happened upon the Americas!). Polenta seems to have originated with the Etruscans as a sort of porridge called puls or pulmentum. Corn, like tomatoes, may have been a New World food, but it was adopted by northern Italians with gusto. Following are two polenta recipes: one for a firm polenta you can cut into fanciful shapes for grilling, the other for a soft polenta you can eat like mashed potatoes. Over the years, I’ve found that the best way to prevent lumps is to make a slurry by dissolving the cornmeal in a few cups cold water, rather than adding it directly to boiling liquid. For extra flavor, you could cook the polenta in chicken or vegetable broth instead of water.
FIRM POLENTA
Serves 6 to 8 as an appetizer, 4 as an entrée
This polenta is prepared ahead of time, poured onto an oiled baking sheet to harden, and cut into fanciful shapes for baking, broiling, or grilling. There are lots of possibilities for sauces here, including Sugo di Pomodoro (here).
2 cups coarse yellow cornmeal, preferably stone-ground
7 cups water, Chicken Stock (here), or Basic Vegetable Stock (here)
salt and freshly ground black pepper
½ to 1 tablespoon extra-virgin olive oil or butter for cooking (optional)
1. In a mixing bowl, combine the cornmeal with 2 cups cold water and whisk to a smooth paste. Bring the remaining 5 cups water to a boil in a large heavy saucepan (preferably nonstick). Add the cornmeal mixture to the boiling water in a thin stream, whisking steadily. Boil the polenta over high heat, whisking steadily, until thick, 2 to 3 minutes. Add a little salt and pepper.
2. Reduce the heat to medium or medium-low and gently simmer the polenta until the mixture thickens enough to pull away from the sides of the pan. It should be the consistency of soft ice cream. It isn’t necessary to whisk the polenta continuously, but you should give it a stir every 5 minutes or so. As the polenta thickens, switch from a whisk to a wooden spoon for stirring. The whole cooking process will take 30 to 40 minutes. Correct the seasoning, adding salt and pepper to taste; the polenta should be highly seasoned.
3. You can certainly eat the polenta at this stage and it will be delicious. But tradition calls for pouring it onto a baking sheet that’s been lightly brushed or sprayed with oil, then covering it with plastic wrap and chilling it until firm, 2 to 3 hours. The polenta is then cut into strips, squares, rectangles, stars, or other shapes with a knife or cookie cutter.
4. To reheat the polenta for serving, bake it in a baking dish with a sauce on top, sauté it in a little olive oil or butter in a nonstick frying pan, or brush it with oil and grill it. I particularly like grilling, as the polenta picks up a smoky flavor.
147 CALORIES PER SERVING;* 3 G PROTEIN; 1.5 G FAT; 0 G SATURATED FAT; 31 G CARBOHYDRATE; 14 MG SODIUM; 0 MG CHOLESTEROL
CREAM OF WHEAT POLENTA
Serves 4
This dish was inspired by the semolina dumplings of Rome. Cream of Wheat may not be a traditional Italian ingredient (although it resembles semolina), but it produces a lovely, light polenta. It has the added advantage over cornmeal-based polenta of requiring only 5 minutes preparation time. Below are two variations on a theme of polenta. You can use quick-cooking Cream of Wheat for this recipe, but do not use instant.
2 cups skim, 1 percent, or 2 percent milk, or low-fat half-and-half
½ cup quick-cooking Cream of Wheat
¼ cup freshly grated Parmigiano-Reggiano cheese
salt and freshly ground black pepper
spray oil
1 tablespoon extra-virgin olive oil or butter (optional)
1. Bring the milk to a simmer in a heavy saucepan. Add the Cream of Wheat in a thin stream, whisking steadily. Simmer the mixture over medium heat until cooked and thick, about 5 minutes, whisking steadily to obtain a smooth consistency. Whisk in the cheese and salt and pepper to taste.
2. Transfer the mixture to a pie pan lightly sprayed with oil. Let cool to room temperature, then cover with plastic wrap and chill for at least 3 hours.
3. To serve, cut the polenta into wedges. Heat the olive oil or butter in a nonstick frying pan. Pan-fry the polenta wedges until lightly browned on each side, 2 to 3 minutes per side. Alternatively, lightly brush the top of the polenta with the 1 tablespoon oil and broil until lightly browned. Alternatively, brush the polenta wedges on both sides with oil and lightly brown on a preheated grill.
148 CALORIES PER SERVING; 9 G PROTEIN; 2 G FAT; 1 G SATURATED FAT; 22 G CARBOHYDRATE; 235 MG SODIUM; 7 MG CHOLESTEROL
QUICK-COOK COUSCOUS
Serves 4
Couscous is often described as a grain, but it’s actually a type of pasta made by mixing flour and water and forcing the dough through a sieve. The tiny pellets that result make a delectable, light, healthy starch. This is the quickest, easiest way to cook couscous, and although the individual grains aren’t quite as light as when they are steamed (see the next recipe), the overall convenience of this method makes up for it. Most recipes call for lots of butter, but here celery, currants, and pine nuts bolster the flavor without the fat.
1 tablespoon olive oil
1 small onion, finely chopped (½ cup)
1 stalk celery, finely chopped
3 tablespoons currants
2 tablespoons pine nuts
1 cup couscous
1½ cups chicken stock or water
salt and freshly ground black pepper
Heat the oil in a heavy saucepan. Add the onion, celery, currants, and pine nuts, and cook over medium heat for 3 to 4 minutes, or until the onion is soft but not brown. Stir in the couscous and cook for 1 minute, or until lightly toasted.
Add the stock, salt, and pepper. Bring the mixture to a boil, stirring gently. Cover the pan, remove it from the heat, and let the couscous stand for 5 minutes. Just before serving, fluff the couscous with a fork and correct the seasoning. Serve at once.
353 CALORIES PER SERVING; 12 G PROTEIN; 8 G FAT; 58 G CARBOHYDRATE; 407 MG SODIUM; 0 MG CHOLESTEROL
COUSCOUS—TRADITIONAL METHOD
Serves 8 to 10
If you want to experience couscous in all its glory, try this method, which uses a series of steamings and soakings to swell the grains to four times their original size. This recipe is loosely modeled on Paula Wolfert’s method for preparing Moroccan-style couscous. It tastes similar to Quick-Cook Couscous (see previous recipe) but is much lighter. A couscousiere is a large pot bowed out in the middle like a barrel, with a steamer that fits in the top. Calphalon makes one; other models are available at cookware shops. Alternatively, you can rig up a steamer using 2 large saucepans and 2 large strainers or colanders. Serve with Chicken Tagine (here).
3 cups couscous (1½ pounds)
salt and freshly ground black pepper
2 cups skim milk
2 cups cold water
Start 4 to 5 hours or even a day before you plan to serve the dish. Place the couscous in a strainer and rinse thoroughly under cold water. Spread it out in a large roasting pan and let it dry for 10 minutes. Gently rake the couscous with your fingers, lifting and sifting, to break up any lumps.
In the bottom of a couscousiere or in 2 large saucepans, bring 3 inches salted water to a boil over high heat. Set the steamer or colanders on top; the fit should be snug. (To guarantee a tight fit, wrap the base of the steamer with wet, rolled paper towels.) Add the couscous and steam for 15 minutes, or until hot and moist. Remove the couscousiere from the heat (leave the water in it) and dump the couscous back into the roasting pan.
Spread out the couscous using a long-pronged fork. Sprinkle it with salt, pepper, and 1 cup milk. Gently rake the couscous with the fork, stirring and sifting to break up any lumps. Sprinkle on the remaining milk and rake again. Let the couscous stand for 1 hour, or until no longer wet to the touch, raking occasionally to break up lumps.
Replenish the water in the couscousiere or saucepans.
Return the couscous to the couscousiere or colanders, and steam for another 15 minutes. Dump it back into the roasting pan and gradually rake in 1 cup cold water. Sprinkle on the remaining water and rake again.
Let the couscous dry for 1 hour, or until no longer wet to the touch. Rake it occasionally to break up any lumps. The couscous can be prepared to this point up to 24 hours in advance. Cover it with a dish towel and set it aside at room temperature. (For longer than 6 hours, cover and refrigerate.)
About 20 minutes before serving, wet your hands and rake the couscous again to break up any lumps. Return it to the couscousiere and steam for 20 minutes. Some people like to do the third steaming over a stew.
Note: This couscous may be softer than what you’re accustomed to. Unlike other pasta, it isn’t supposed to be eaten al dente. It’s also extremely mild; the flavor comes from the stew served on top of it.
281 CALORIES PER SERVING; 11 G PROTEIN; .6 G FAT; 56 G CARBOHYDRATE; 305 MG SODIUM; 1 MG CHOLESTEROL
QUINOA PILAF
Serves 4 to 6
Quinoa (pronounced KEEN-wa) is a grain native to the Andes Mountains, where it has been cultivated for 5,000 years. It contains more protein than wheat, oats, millet, rye, and barley. Unlike most grains, it is rich in lysine, an essential amino acid seldom found in the vegetable kingdom.
1 cup quinoa
1 tablespoon olive oil
1 small onion, finely chopped
1 stalk celery, finely chopped
2 tablespoons pine nuts (optional)
2 cups chicken stock or water
salt and freshly ground black pepper
Place the quinoa in a strainer, rinse with cold water, and drain. Heat the oil in a saucepan or sauté pan. Add the onion, celery, and pine nuts, and cook over medium heat for 2 to 3 minutes, or until the onion is soft but not brown. Add the quinoa and toast for 30 seconds.
Add the stock, salt, and pepper, and bring to a boil. Reduce the heat to a low simmer and cover the pan. Cook the quinoa for 15 to 20 minutes, or until all the liquid is absorbed and the grain is tender. Fluff with a fork and correct the seasoning. Serve at once.
277 CALORIES PER SERVING; 11 G PROTEIN; 7 G FAT; 42 G CARBOHYDRATE; 542 MG SODIUM; 0 MG CHOLESTEROL

Quinoa Pilaf
POSOLE A LA MEXICANA
Serves 4
Few people in the United States have tasted hominy (posole) if they don’t live in the South or Southwest. Even in these regions, this hulled parched corn is generally served for breakfast (grits are nothing more than ground-up hominy). Here’s a Mexican-style hominy—electrified with garlic and cilantro—that you can serve as a starch or a side dish. For the sake of convenience, I call for canned hominy (which is available at select supermarkets).
1¾ cups cooked hominy (one 14½-ounce can)
1 tablespoon canola oil
½ white onion, thinly sliced
2 cloves garlic, minced
3 scallions, white part minced, green part thinly sliced
½ teaspoon ground cumin
½ teaspoon dried oregano
¼ teaspoon ground cinnamon
1 tomato, peeled, seeded, and chopped
¼ cup chopped fresh cilantro
½ cup chicken stock
salt and freshly ground black pepper
1 lime, cut into wedges
1. If you are using canned hominy, drain it well in a strainer, rinse with cold water, drain well again, and set aside.
2. Heat the oil in a nonstick frying pan. Add the onion, garlic, scallion whites, cumin, oregano, and cinnamon and cook over medium heat until the onions are lightly browned, 4 to 6 minutes, stirring with a wooden spoon. Increase the heat to high and add the tomato. Cook for 1 minute.
3. Stir in the cilantro, scallion greens, stock, and hominy. Cook over high heat until most of the stock is absorbed and the hominy is richly flavored, about 4 minutes. Add salt and pepper to taste. Serve at once, with lime wedges for garnish.
116 CALORIES PER SERVING; 3 G PROTEIN; 5 G FAT; 1 G SATURATED FAT; 19 G CARBOHYDRATE; 216 MG SODIUM; 0 MG CHOLESTEROL
RED PORK AND CHICKEN POSOLE
(HOMINY STEW)
Serves 4
Posole (hominy) is one of the most satisfying corn preparations ever to grace a fork. Popular in Mexico and the American South and Southwest, it’s virtually ignored in the rest of the United States. This is a shame, for few grains offer a more inviting texture (softly chewy) or flavor (starchy and cornlike, with a pleasing grainy sweetness). Here’s a traditional northern Mexican way of serving posole: stewed with chicken and pork and spiced up with cinnamon, cumin, and chili powder. For speed and convenience, this recipe calls for canned hominy, which is available at select supermarkets.
1 tablespoon lard or vegetable oil
1 medium white onion, finely chopped
3 cloves garlic, finely chopped
1 tablespoon pure New Mexican or guajillo chili powder
1 teaspoon dried oregano (preferably Mexican)
½ teaspoon ground cumin (or to taste)
¼ teaspoon ground cinnamon
⅛ teaspoon ground cloves
1 bay leaf
1 tomato, cut in half, seeded, and grated
6 ounces boneless, skinless chicken breast, cut into 1-inch cubes
6 ounces pork loin or tenderloin, cut into 1-inch cubes
5 cups chicken broth or water, or as needed
3½ cups cooked hominy or 2 (14½-ounce) cans hominy, drained and rinsed
salt and freshly ground black pepper
FOR THE GARNISH:
½ ripe avocado, cut into ½-inch dice
1 teaspoon fresh lime juice
1 ripe tomato, seeded and cut into ¼-inch dice
½ white onion, cut into ¼-inch dice
¼ cup chopped scallions (green part only)
¼ cup chopped cilantro
¼ cup sliced radishes
1 lime, cut into wedges
1. Heat the lard or oil in a large, nonstick sauté pan. Add the onion and garlic and cook over medium heat until the onions begin to brown, 3 to 4 minutes. Add the chili powder, oregano, cumin, cinnamon, cloves, and bay leaf and cook for 1 minute. Increase the heat to high and add the tomato. Cook until the tomato juices evaporate, 1 minute. Stir in the chicken and pork and cook until lightly browned, 3 to 4 minutes more.
2. Add the chicken broth and bring to a boil. Reduce the heat and gently simmer the mixture until the chicken and pork are tender, 20 to 30 minutes. Stir in the hominy for the last 10 minutes. Remove and discard the bay leaf. Correct the seasoning, adding salt and pepper to taste; the posole should be highly seasoned.
3. Meanwhile, toss the avocado with the lime juice and place in a small bowl. Arrange the tomato, onion, scallions, cilantro, and radishes in small individual bowls. Alternatively, arrange the vegetables in small mounds on a platter.
4. Serve the posole in shallow bowls, garnishing each serving with a wedge of lime. Serve the avocado, tomato, onion, scallions, cilantro, and radishes on the side with spoons for sprinkling the garnishes over the posole.
345 CALORIES PER SERVING; 27 G PROTEIN; 10 G FAT; 3 G SATURATED FAT; 36 G CARBOHYDRATE; 377 MG SODIUM; 63 MG CHOLESTEROL
HEALTHY BAKED BEANS
Serves 8 to 10
This traditional New England dish is usually made with artery-clogging doses of bacon or salt pork. I’ve reworked the recipe using smoked turkey for flavor and apple cider instead of pork fat for moistness. My favorite bean for baking is the anasazi, a handsome red-and-white speckled bean that is high in minerals and protein.
1 pound anasazi or other dried beans
1 pound skinless smoked turkey or chicken
1 tablespoon olive oil
1 large onion, finely chopped
2 cloves garlic, minced (2 teaspoons)
1 tablespoon minced fresh ginger
1 or 2 jalapeño chilies, seeded and minced
2 cups apple cider
1 cup cider vinegar
1 cup water
¼ cup molasses (or to taste)
¼ cup brown sugar
1 tablespoon dry mustard
1 tablespoon Dijon-style mustard
2 bay leaves
1 teaspoon dried thyme
¼ teaspoon ground allspice
⅛ teaspoon ground cloves
salt and freshly ground black pepper
Pick through the beans, removing any twigs or stones. Wash the beans well and soak them overnight in a large bowl with cold water to cover.
The next day, cut the turkey into ½-inch dice. Heat the oil in a frying pan and cook the onion, garlic, ginger, and chilies over medium heat for 4 to 5 minutes, or until golden brown. Preheat the oven to 300°F.
Transfer the onion mixture to a bean pot or casserole dish. Drain the beans and add them to the pot. Stir in the remaining ingredients. Tightly cover the pot and bake for 3 hours, or until the beans are very tender. Stir the beans from time to time, adding liquid as necessary to keep them covered. Leave the pot uncovered for the last 30 minutes to allow the beans to brown and excess liquid to evaporate. Baked beans should be moist but not soupy.
Just before serving, correct the seasoning. The beans should be a little sweet, a tiny bit sour, and faintly spicy. Add brown sugar, vinegar, mustard, salt, and pepper to taste.
396 CALORIES PER SERVING; 22 G PROTEIN; 9 G FAT; 62 G CARBOHYDRATE; 35 MG SODIUM; 0 MG CHOLESTEROL
STEWED PINTO BEANS WITH EPAZOTE
(FRIJOLES DE OLLA)
Makes 5 to 6 cups, enough to serve 6
An olla is an earthenware pot—the kind traditionally used to cook beans in Mexico, where it would be nestled in the coals of a wood fire. Even if you use a more modern metal pot and a gas or electric burner, the combination of flavors—earthy beans, smoky lard, aromatic onion, and pungent epazote—will raise these simple stewed beans to something on the level of art. Epazote is one of the most distinctive seasonings in the Mexican pantry—a ragged-edged, green-leafed herb with a piny, pleasantly bitter, antiseptic taste. Besides the virtue of its unique flavor, it’s said to reduce the tendency of beans to cause flatulence. Will your frijoles de olla be terrible without epazote? Of course not. But to achieve the authentic flavor, do make an effort to find this distinctive herb.
2 cups dried pinto beans (about 12 ounces)
1 bay leaf
½ small onion
1 clove
1 tablespoon lard (see Note below) or 1 slice (1 ounce) Canadian bacon, minced
1 clove garlic, peeled
7 to 8 cups water
2 sprigs fresh epazote
1 to 2 whole serrano chilies (optional)
salt and freshly ground black pepper
fresh tortillas
1. Spread the beans on a baking sheet and pick through them, removing any twigs or pebbles. Transfer the beans to a colander and rinse well with cold water.
2. Place the beans in a bowl with enough cold water to cover by 2 inches. Soak the beans in the refrigerator at least 4 hours or as long as overnight. Discard any beans that float on the surface. Drain the beans in the colander and rinse well.
3. Pin the bay leaf to the onion with the clove. Place the soaked beans in a large heavy pot with the lard, onion, garlic, and 7 cups of water. Gradually bring the beans to a boil, reduce the heat, loosely cover the pot, and simmer the beans for 1 hour. Add fresh water as needed, to keep the beans covered by 1 inch of liquid.
4. Add the epazote and the optional serrano chilies and continue simmering until the beans are very tender. (You should be able to squish one easily between your thumb and forefinger.) Uncover the pot for the last 15 minutes, to let some of the cooking liquid evaporate. (The beans should be covered by at least ½ inch of broth.) Using a slotted spoon, remove and discard the onion, garlic, and epazote. Season the beans with salt and pepper to taste.
5. Serve the beans with their broth in earthenware bowls, with fresh tortillas for dipping in the broth.
Note: For the best results, use soupy, freshly rendered lard—the kind you’d get at a neighborhood carniceria. Alternatively, a slice of Canadian bacon will give you a similar smoky pork flavor with less fat.
245 CALORIES PER SERVING; 14 G PROTEIN; 3 G FAT; 1 G SATURATED FAT; 42 G CARBOHYDRATE; 16 MG SODIUM; 2 MG CHOLESTEROL
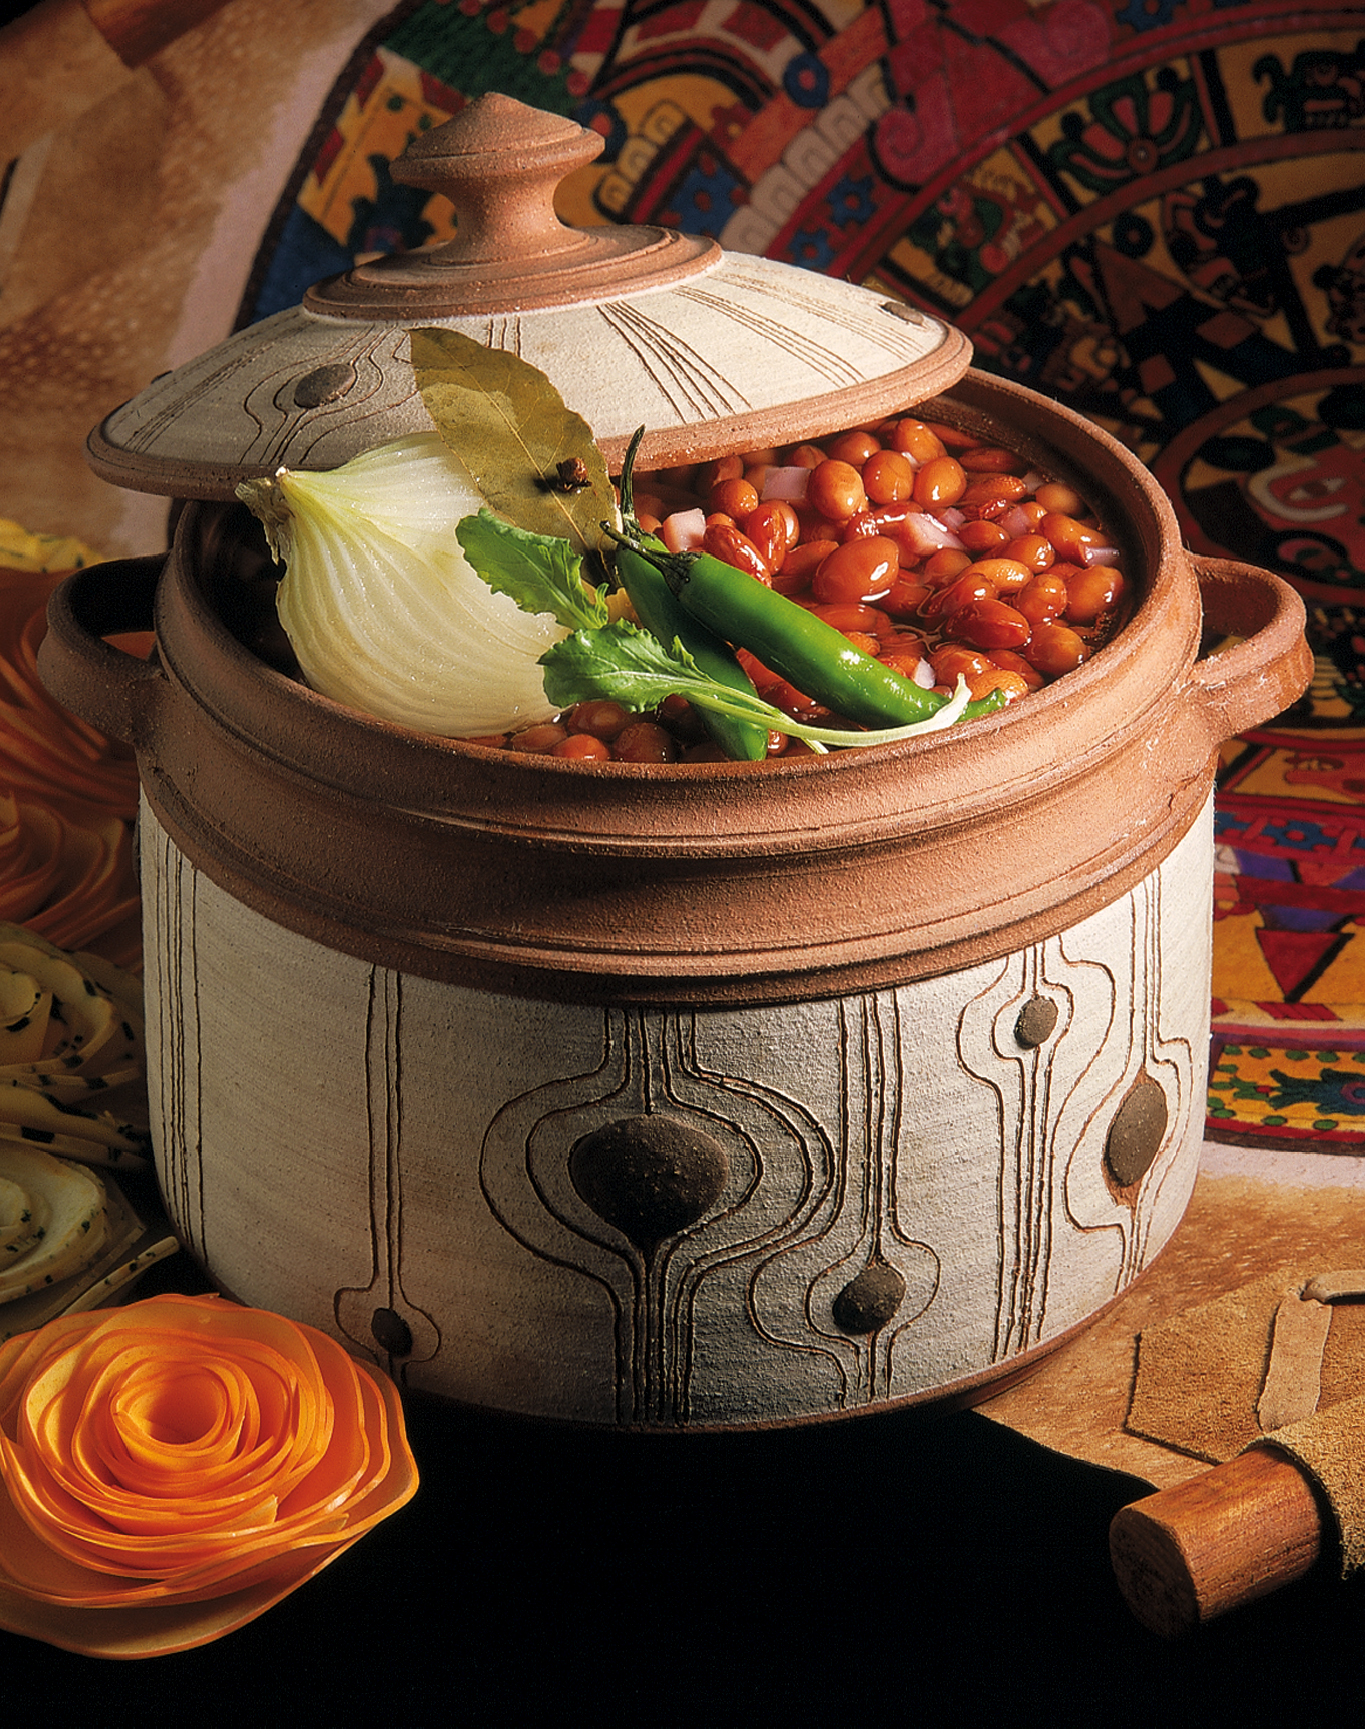
Stewed Pinto Beans with Epazote (Frijoles De Olla)
COWBOY-STYLE PINTO BEANS
(CHARROS)
Serves 4 to 6
Charros—cowboy-style pinto beans—are Mexico’s answer to baked beans, a popular accompaniment to the grilled beef so popular in northern Mexico. The traditional recipe owes its smoky campfire flavor to a generous dose of bacon and bacon fat. My low-fat version uses Canadian bacon, which has all of the smoke flavor of conventional bacon and virtually a fraction of the fat. For speed and convenience I call for canned pinto beans, but you can certainly cook the beans from scratch, following the frijoles de olla recipe here.
4 cups cooked pinto beans (two 15-ounce cans)
1 tablespoon lard or olive oil
1 medium onion, minced
2 cloves garlic, minced
2 ounces (2 slices ) Canadian bacon, finely chopped
1 large ripe tomato, seeded and finely chopped (for extra richness, roast the tomato in a comal before chopping)
1 cup beer
1 cup chicken stock or bean cooking liquid
1 to 2 tablespoons chopped pickled jalapeño chilies, or to taste
½ cup chopped fresh cilantro
salt and freshly ground black pepper
1. Drain the beans, rinse well, and drain again. Heat the lard in a large heavy saucepan. Add the onion, garlic, and bacon and cook over medium heat until the onion is nicely browned, about 5 minutes. Increase the heat to high and add the tomato. Cook until the tomato juices are evaporated.
2. Stir in the beans, beer, stock, jalapeño, and half the cilantro. Briskly simmer the beans until they are richly flavored and most of the cooking liquid has been absorbed, 10 to 15 minutes. Stir in the remaining cilantro and correct the seasoning, adding salt and pepper to taste.
345 CALORIES PER SERVING;* 19 G PROTEIN; 6 G FAT; 2 G SATURATED FAT; 53 G CARBOHYDRATE; 266 MG SODIUM; 11 MG CHOLESTEROL
REFRIED BEANS
(FRIJOLES REFRITOS)
Makes about 3 cups, enough to serve 6
What can compare to Mexican refried beans? Properly prepared, they’re soft and satisfying, rib-sticking, fluffy, and creamy. To make the beans soft and creamy, I beat in chicken stock, which reinforces the meat flavor.
2 corn tortillas
1 tablespoon lard or olive oil
1 small onion, minced
2 to 3 cloves garlic, minced
1 ounce (1 slice) Canadian bacon, minced
2 (15-ounce) cans pinto beans, drained, rinsed under cold water, and drained again
½ to 1 cup chicken or vegetable stock
salt and freshly ground black pepper
2 tablespoons finely grated queso añejo, queso fresco, feta cheese, or Parmesan cheese
1. Preheat the oven to 350°F. Cut the tortillas into strips 1 inch wide. Arrange the strips on a baking sheet and bake until lightly browned, about 10 minutes. Transfer the strips to a cake rack to cool; they’ll crisp as they cool.
2. Heat the lard in a nonstick frying pan. Add the onion, garlic, and Canadian bacon and cook over medium heat until just lightly browned, about 5 minutes.
3. Stir half the beans into the onion mixture. With a bean masher or potato masher, mash the beans to a smooth paste. Add the remaining beans and mash to a smooth paste. Stir in ½ cup of the stock and fry the beans until they are thick but creamy, 8 to 10 minutes, stirring with a wooden spoon. If the beans are too thick, add more stock. (The consistency should be that of soft ice cream.) Correct the seasoning, adding salt and pepper to taste.
4. Mound the refried beans on a platter. Sprinkle the top with grated cheese. Stand the tortilla chips upright in the beans. Serve at once.
231 CALORIES PER SERVING; 12 G PROTEIN; 5 G FAT; 1 G SATURATED FAT; 36 G CARBOHYDRATE; 107 MG SODIUM; 9 MG CHOLESTEROL
FAVA BEAN MASH WITH BITTER GREENS
Serves 6 to 8
This dish kept turning up on a trip through southern Italy. One restaurant made it with chicory, another with dandelion greens. Yet a third restaurant used arugula. I’ve even found an Umbrian version made with broccoli rabe and fava beans. I’ve tried to incorporate the different versions into a single recipe that can be prepared ahead and makes an attractive vegetable dish. The main recipe includes instructions for cooking the beans from scratch. Perfectly tasty results can be obtained with canned beans in a lot less time (see Note).
1¼ cups dried fava beans or small lima beans
1 medium onion, peeled and quartered
1 carrot, peeled and cut into 1-inch pieces
1 celery stalk, cut into 1-inch pieces
1 slice dense white bread, crusts removed, diced
½ clove garlic, minced
1 tablespoon extra-virgin olive oil
¼ to ½ cup Basic Vegetable Stock (here) or Chicken Stock (here)
salt and freshly ground black pepper
FOR THE GREENS:
salt
1 pound broccoli rabe, dandelion greens, or chicory, or 2 bunches arugula
1 tablespoon extra-virgin olive oil
2 cloves garlic, smashed with the side of a knife or cleaver and peeled
1. Spread the beans on a baking sheet and pick through them, removing any twigs, stones, or misshapen beans. Soak the beans for at least 4 hours, preferably overnight, in cold water to cover.
2. The next day, drain and rinse the beans. Place them in a large, heavy, deep pot with the onion, carrot, celery, and 2 quarts water. Bring the beans to a boil. Reduce the heat to medium, and gently simmer the beans, loosely covered, until soft, about 1½ hours. Drain the beans in a colander. Note: The cooking time can be shortened considerably by using a pressure cooker.
3. Purée the beans (with the cooking vegetables), the bread, and garlic in a food processor. Add the olive oil and enough vegetable stock to obtain a light, fluffy purée. Add salt and pepper to taste. Spoon this purée into an attractive ovenproof baking dish just large enough to hold a ½-inch-deep layer of purée. (I use a 8-inch oval dish. For ease in cleaning, lightly spray the dish with oil first.)
4. Prepare the greens: Bring 2 quarts salted water to a boil in a large saucepan. Wash the greens in a deep bowl of cold water, holding them by the stems, plunging them up and down. Change the water, as necessary, until completely free of grit or sand. Trim any tough stems off the greens. If using broccoli rabe, dandelion greens, or chicory, cook them in the boiling salted water until just tender, 2 to 3 minutes. Drain in a colander, refresh under cold water, and drain well. Blot them dry and cut crosswise into ½-inch strips. If using arugula, skip the parboiling.
5. Heat the olive oil in a nonstick frying pan. Add the garlic and cook over high heat until just beginning to brown, about 1 minute. Add the greens and cook until thoroughly heated, about 2 minutes. Correct the seasoning, adding salt and pepper to taste. Spoon the greens over the bean purée. If all the ingredients are hot, you can serve them right away. Alternatively, bake the dish in a 400°F. oven until the ingredients are thoroughly heated, about 10 minutes.
Note: To make this dish with canned beans, use 2 15-ounce cans cannellini (white kidney) beans. Drain the beans in a strainer and rinse well. Start the recipe at step 3.
225 CALORIES PER SERVING;* 12 G PROTEIN; 6 G FAT; 0.8 G SATURATED FAT; 35 G CARBOHYDRATE; 53 MG SODIUM; 0 MG CHOLESTEROL