Chapter 3
Capturing Macros and Close-ups
IN THIS CHAPTER
 Getting into macro and close-up photography
Tips for taking effective macros and close-ups
Working with different types of lenses
Using special close-up accessories
Macros and close-up photos tend to evoke “oohs” and “aahs” from us because they give us a vantage point we don’t normally see. Small bugs become huge. Hidden details become visible. The mundane becomes magical. You can literally see the hair on a fly’s backside. I’ve packed this chapter with information about macro and close-up photography so that you can see it in action. Take advantage of the tips and techniques I share to help you get started and capture amazingly cool photos. Finally, shop for accessories that will help you shoot close-ups with normal lenses. Enjoy!
Defining Macro and Close-up Photography
Technically, macro photography relies on special lenses called macro lenses. (Nikon calls them micro lenses.) Macro lenses have two defining characteristics:
-
Reproduction ratio: Macro lenses focus objects on the sensor closer to their actual size than non-macro lenses. This is called the reproduction ratio. Ideally, macro lenses should have a one-to-one ratio. Some even enlarge objects by having a greater than one-to-one ratio. However, many macro lenses don’t offer this type of reproduction ratio; if they do, it may not be available throughout the lens’s entire focus range.
 Not all macro lenses have the same reproduction ratios. When you’re shopping for a macro lens, look carefully at its specifications. That way you avoid buying a lens labeled “macro” that falls short in the reproduction ratio category.
- Close focusing distance: Macro lenses can focus at very close ranges. Most normal lenses have close focusing distances around a foot, or between one and two feet. Telephoto lens close focusing distances may be several feet. Macro lens close focusing distances may only be a few inches.
Both of these characteristics make focal length less obviously important to macro photography than other types. Focal length is still important in determining the angle of view you will get, and therefore you should pay attention to it. However, unlike telephoto lenses, focal length isn’t a good measure of how powerful a macro lens is. Therefore, you can find macro primes (those with a fixed focal length) in a whole range of focal lengths.
Close-up photography is a less technically restrictive pursuit. Anything you photograph from a relatively close perspective qualifies. As with macro photography, the point of a close-up is to zoom in or get close enough to the subject to make it appear large. You can use any lens you want.
Regardless of how you take your macros and close-ups, you can always zoom in even further when you process the photos in software. That's a great advantage of having a camera with a few million pixels to spare around the edges.
Shooting at Close Ranges
Macro lenses and normal lenses fitted with the right accessories can focus on objects much closer than standard zoom or prime lenses. Depending on the lens you're using, you may be able to position yourself exceptionally close to your subject.
I've done just that in Figure 3-1. This is a photo of one of my kids' toys (just like the ones I used to play with). He's the one throwing the hand grenade. I put him down on the table and snuck up on him real close to take this shot. He appears to be happy with his work and his uniform fits him like a glove. I took this photo in a studio setting, so I had a lot of bright lights shining from several angles.
Light and using the viewfinder can sometimes be problematic when this close. If you can't see what's happening through your viewfinder, switch to Live View. You may have to increase the ISO speed to brighten the scene on the monitor. This also helps if you manually focus, if needed.
Managing Depth of Field
When you move close to your subjects, aperture isn't the only factor that affects depth of field. At these ranges, the depth of field shrinks, regardless of what setting you choose. Keep in mind that the settings you’re used to won’t produce the same results.
When shooting macros or close-up work I often work with apertures set to f/16 or smaller. This increases the depth of field enough so that my subjects are reasonably sharp. The depth of field is still small, however. When it's a problem, I rely on positioning to manage depth of field. Rather than shoot at an angle, I try to flatten my angle so that what I am interested in is on the same plane. Figure 3-1 is a good example of this.
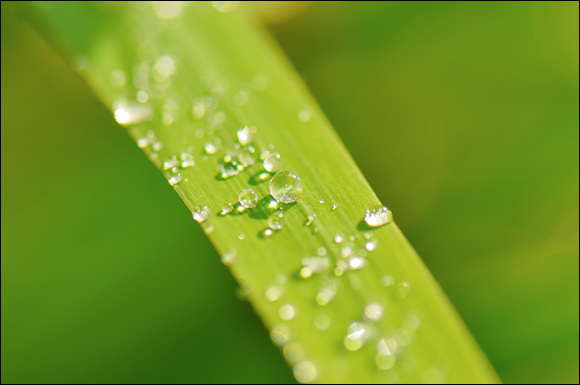
Of course, you can have fun either way. Figure 3-2 shows rain droplets on a leaf. The depth of field is incredibly narrow — only a few small water droplets deep. In this case, that makes the photo much more interesting.
 Working with very shallow depths of field can make focusing difficult. Add in camera weight and subjects that may not stay still for long, and you've got a real challenge. When that happens, relax and take a deep breath. Switch off your targeting computer and trust yourself, as Obi-Wan suggests. Focus the lens as best you can, then take your hand off the focus ring. Move the camera until the scene looks best, and take the photo.
Shooting Handheld (with a Flash)
You can set up a base camp and mount your camera on a tripod to shoot flowers, but bugs move. They flit here and there. When I set up my camera on its tripod and zero in on a flower, all the bugs chose the other flowers to land on. Hmm. If that happens to you, ditch the tripod and stalk bugs on foot with a long focal length macro lens.
Figure 3-3 illustrates a good example of a handheld shot where everything seemed to work perfectly. The image of the fly is sharp, colorful, and in focus. If you look carefully, you can see my reflection in the fly's body segments. The brighter spots are from the external flash I used to help light the scene, which I shot in the late afternoon. I set the aperture to f/11 as a compromise between having a decent depth of field and needing more light, and I raised the ISO marginally. Even with those changes, the shutter speed was a paltry 1/60 second. Thankfully, the macro lens had vibration reduction.
The long focal length I used helped, too. I had the amazing Micro-NIKKOR 105mm f/2.8G lens mounted, and if that wasn’t enough, the TC-20E III 2x teleconverter attached. The total 35mm equivalent focal length was 210mm. This let me position myself and the lens farther away from the fly than, say, a 60mm macro. A longer macro is better for photographing skittish, stinging, or dangerous insects that are likely to fly away or attack you when you’re too close.
Exposure can sometimes be a problem when you stop down (set a smaller aperture). If necessary, raise ISO or use a flash, if possible.
Take breaks more often when you’re shooting handheld macros, especially if you're outside in the heat. The weight of the camera and macro lens will tire you out faster. While this may not seem like such a big deal, remember that you’re focusing on such tiny items that any camera movement can knock you out of the focal plane. Keeping elements steady is difficult, even with fast shutter speeds and vibration reduction turned on.
If you're patient in the right situation (for example, you have a bird feeder within close range that gets regular visits) you can set up your camera on a tripod and pretend that you’re on safari.
Maximizing Shutter Speed
If you’re shooting bugs, you have to be able to handle movement. One bee I tracked flitted diligently from flower to flower to flower. (That’s what bees do.) Every time she landed, I had to locate her, reposition myself and the camera, and then frame, refocus, and shoot before she buzzed away.
If you’re shooting either inanimate or slow-moving objects, tracking, framing, and focusing get easier. Figure 3-4 shows a bug that moved more deliberately. I was able to follow him for quite some time before he left. I stopped down to f/22 to maximize the depth of field and increased shutter speed to 1/400 second. This kept most of the beetle in focus and froze his movement. To make up for the lost light, I increased ISO to 1600. I didn’t use a flash. The morning light was very strong.
Shooting in Controlled Conditions
When you’re working inside your studio (refer to wherever you shoot as your studio, whether it's your dining room table, kitchen counter, a corner of the basement, or a 20x20 outbuilding), you have much more control over your setup and lighting. You don’t have to worry about the sun, wind, flying bugs, or a camera that grows heavier with every photo you take.
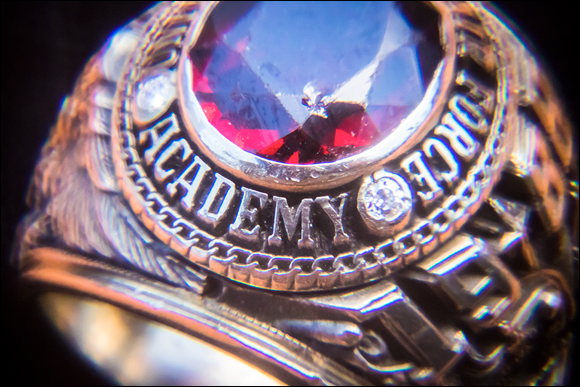
Figure 3-5 shows a close-up of my class ring that I took with a Holga digital SLR lens and 60mm macro attachment. I perched the ring in a ring box with a black velvet interior to stabilize it for the photo. You’re seeing about an inch (2.54 cm) from left to right. Interesting rings and other jewelry make great subjects for macro photography.
When you’re in the studio, mount your camera on a tripod to ensure stability. This also lets you make the shutter speed as slow as you need.
My preferences when shooting in-studio run like this:
- Continuous lighting: I’ve rigged up several homemade soft boxes (a soft cover than diffuses light) to light the scene. I know exactly what the ISO, shutter speed, and aperture need to be before I even turn on the camera. This comes from shooting hundreds of shots in the same location with the same lighting and setup.
- Manual focus: The best way to focus in a studio setting, with the camera mounted on a tripod, is to switch to your camera's Live View mode and zoom in using the LCD monitor's controls. This enables you to very precisely focus using whatever part of the scene you wish. If you use autofocus, you should select and use a single AF point. Position it over the spot that you want to be in the area that is in focus.
-
Focus rail: 2- and 4-way focus rails are ruler-looking devices that incorporate racks, pinions, and rails that enable you to focus very accurately. Mount your camera to the rail and focus using the rail’s fine-focusing adjustment knobs. Use with a tripod for best results. 2-way rails move forward and backward. 4-way rails also move side to side, enabling you to alter the composition slightly.
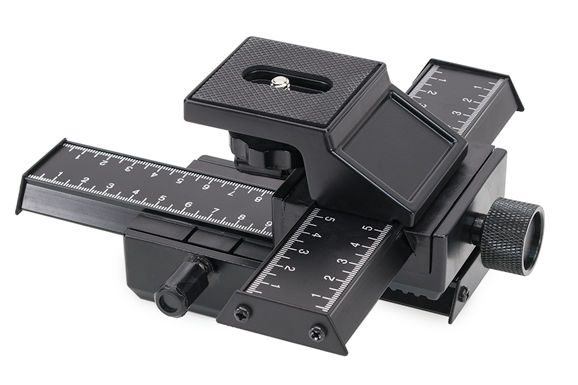
Figure 3-6 shows an inexpensive 4-way rail that I picked up to experiment with. If you’re on the fence and want to try it out without spending hundreds of dollars, I encourage you to take this approach to see whether or not you like working with it. If you do, you can always go out and buy a better model.
- Dusting and taping: I always brush and blow dust off my subjects, but it’s impossible to remove all traces of dust and miscellaneous fibers. Use blown air and masking tape as well. When you’re shooting small subjects, be prepared to remove a lot of dust using your favorite photo editor.
Your other challenges are mainly lighting and depth of field. Here are some additional lighting pointers:
- No flash: You can shoot macros in a studio without using a flash. The character of the lighting is different than with a flash, though, and you may struggle to find the right white balance. Try setting a custom white balance or take several test shots to get it right.
- Pop-up flash: Don’t even bother unless you have a very short macro lens. The longer the lens and the shorter the distance to the subject, the more distance you need to move the flash away from the camera to keep the lens from casting a huge shadow over everything. Pop-up flashes won’t work in these cases.
-
External flash: Seriously consider investing in an external flash or Speedlight/Speedlite. When you mount one on your camera's hot shoe, the flash can clear the lens in most situations. You can also get a ring light, specifically designed to light close subjects unobtrusively.
Ideally, you can position the flash away from the camera but stay connected using a sync or flash cord. (Wireless is even better.) From there, creatively design the photo and position the flash away from the lens. When you’re working at very close ranges, it can mean the difference between lighting your subject or not.
-
More complicated lighting setups: The possibilities that arise from using extra gear are endless. You’ll be able to patiently work your craft and design the shots you want. It’s incredible fun and very rewarding!
Because your goal is to shed light on your subject, be as flexible as possible.
Relaxing Your Angle of View
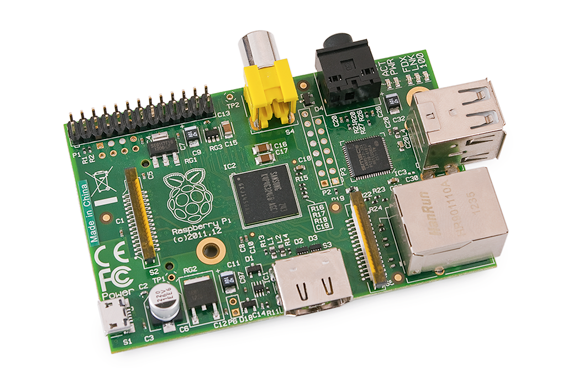
Not all macros or close-ups need to be microscopic wonders. Depending on the lens you're working with and the distance you are from your subject, you may enjoy shooting close-ups of larger subjects. Figure 3-7 is a shot of my son's Raspberry Pi, an amazing little computer packed onto a small circuit board. While smaller than a typical computer, it’s far larger than a bee, ring, and many other close-up subjects.
Shooting Close-ups with Everyday Lenses
While true macro photography requires special lenses, you can shoot close-ups with just about any lens you have. All you need to do is look for scenes that you want to zoom in on. Figure 3-8 is a shot I took with a very nice 50mm prime lens and inexpensive Nikon camera. I arranged the candles on a tray and set them on my bed (of all places) to take the shot. I set the aperture to f/1.4 and was pretty close to the candles, which kept the depth of field nice and shallow. The background candles are pleasantly blurred. Overall, this is an excellent illustration that proves that it’s possible to shoot great close-ups with what you have on hand.
Using Telephoto Lenses
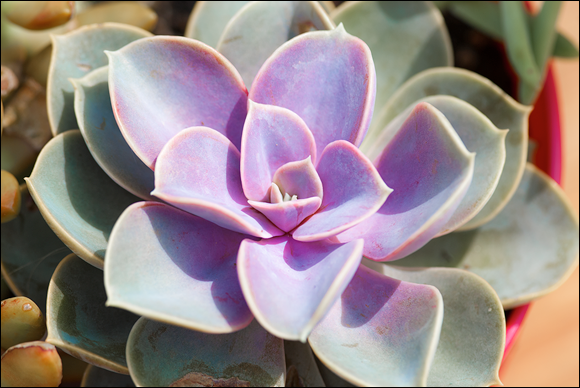
Although telephoto lenses excel at photographing distant objects, you can also use them to take nice-looking close-ups. Figure 3-9 is a close-up of a succulent we bought one summer to liven up our home. I was using a 300mm telephoto lens to take other photos, and on the spur of the moment decided to try some close-ups. I grabbed this plant and put it on our picnic table outside. I had to stand away from it to get the lens to focus, but the result is one of my favorite photos. The strong light enabled me to use a low ISO and quick shutter speed of 1/500 second. Fast shutter speeds are important with lenses that have very long focal lengths because they help you shoot shake-free photos.
Using Holga Lenses
I’m a huge fan of the Holga digital SLR lens and accessories. The Holga lens is a cheap, plastic, fixed-aperture manual focus lens developed for the popular Holga film cameras. You can customize the basic lens with macro and close-up attachments like those shown in Figure 3-10.
While shooting with Holga lenses requires a lot of manual effort (focusing and calculating exposure), it’s worth it for me. Figure 3-11 shows a stunning macro taken with the 30mm macro attachment. It really shows off the capabilities of attachments like this. I have more on Holga lenses in Book 2, Chapter 5.
Shooting with Special Accessories
If you don’t have a macro lens, I recommend looking into some special accessories for standard lenses. They typically make shooting close-ups easy and rewarding by making a standard lenses act like a macro lens. Most of the techniques used to shoot with these accessories are the same or similar to what you would do with a macro lens. You can use many of these accessories with your favorite macro lens for even more macro-tastic power.
Using a teleconverter
Teleconverters are tubes with optical (and sometimes electronic) elements that attach between the lens and your camera. Attach the lens to the teleconverter, and mount the combined unit to the camera. They increase the focal length of your lens by a set amount — normally between 1.4 and 2 times. Because light must pass through another lens, you may need to raise the exposure to offset the loss of light if shooting in manual mode. Figure 3-12 shows an older TC-201 2x teleconverter from Nikon.
Teleconverters can be finicky. Make sure your lens and camera are compatible. Newer and better versions communicate information between the camera and lens and even autofocus. Cheaper versions may not have very good optics.
However, you can take great photos with teleconverters, especially if you’re using a decent lens. Figure 3-13 shows a photo of some BBs I took with the TC-201 2x teleconverter and vintage (1981) Zoom-NIKKOR 35-70mm f/3.5 AI-s manual focus lens. That adds up to 140mm of old-fashioned macro goodness mounted on a new digital SLR.
Using extension tubes
Extension tubes are open tubes. One end connects to your lens, extending the front toward the subject. The other end connects to the camera. This has the effect of shrinking the close-focus distance you’re able to achieve and increasing the reproduction ratio of the lens.
Despite what it seems, extension tubes don’t merely increase the lens’s focal length. That's what teleconverters do. It also isn’t like putting a magnifying glass up to the lens. That's what diopters do. Extension tubes move the focal plane of the lens away from where it should be, which means that you have to move closer to the subject to compensate. This has the effect of increasing the reproduction ratio.
Because extension tubes don’t have lenses inside them, you don't have to worry about degrading the optical quality of the lens you mount them to. You may, however, experience pronounced light falloff (where more distant objects quickly become darker) and vignetting (where photo corners are darker than the center) when using a tube. When using an extension tube, you are also unable to focus out as far as you could without it. This is the opposite of how lenses normally work. Typically, you’re always able to focus on infinity but can’t get too close to your subject. Extension tubes reverse this.
Figure 3-14 shows an inexpensive extension tube set from Zeikos. Most sets come with three different size tubes. This set has a 12mm, 20mm, and 36mm. You can mix and match them to create different magnification ratios. For example, if you use the 12 and 36mm tubes with a 50mm lens, the magnification ratio is just over 1.0 if the focus is set to half a meter. Figure 3-15 shows a macro taken with a 50mm lens on a cropped-frame camera and extension tubes. It's George Washington's face from a dollar bill.
One consequence of how the magnification factor is calculated (I won't bore you with the formulas) is that it decreases as you increase the focal length of your lens. In other words, if you use the same extension tube with a 35mm lens and then a 50mm lens, the 35mm photo will have the greater magnification. Therefore, remember to use shorter lenses to get greater magnification when paired with extension tubes (the same rule applies to reversing rings, discussed in a later section).
Using diopters
If you don't want the hassle of putting extension tubes between your lens and the camera, try screwing in one or more diopters on the front of the lens. A diopter is like corrective glasses that magnify the subject. Diopters work with any lens that can accept screw-in filters. They don’t interfere with shooting modes, autofocus, or other camera features that rely on communicating with the lens (unlike extension tubes and some teleconverters). They can be mixed and matched to increase the amount of magnification. As with all filters, though, they can cost a lot. You either need a step-up adapter or a complete set of diopters for any lens you may want to use that takes a different filter size.
Figure 3-16 shows a Hoya close-up filter set. It came with three filters of different strengths: +1, +2, and +4. In this shot, one is mounted on a Nikon 18–55mm lens with the help of a step-up ring. This allows me to standardize all my filters to 77mm. All I need to do is get another step-up ring (an adapter that mounts a larger filter on a smaller lens) if I get a new lens that doesn't match what I already have.
As you can see, a diopter is an optical element. The glass is very important. Take care of them by always keeping them in a protective case and cleaning them regularly. Cheaper filters will degrade your photos more than a high-quality set.
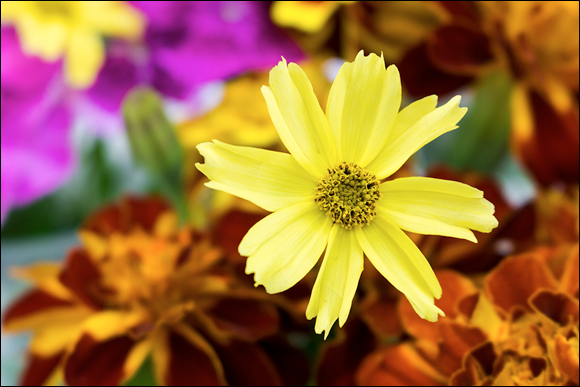
Figure 3-17 shows a nice shot of some flowers I took with a diopter attached to the standard kit lens mounted on a Canon dSLR. I zoomed in to 55mm and the diopter took care of the rest.
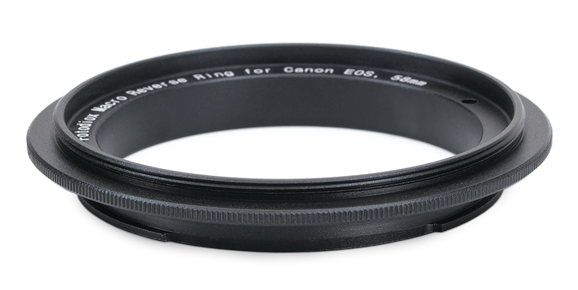
Using reverse rings
Reverse rings are a totally cool way of having fun with macro and close-up photography. They enable you to mount a lens on your dSLR backward. One side of the reverse ring adapter (see Figure 3-18) has very fine threads that screw onto the front of your lens just like a filter. They aren’t necessarily fragile, but it’s possible to cross-thread the ring when screwing it onto your lens. If you feel it resist before it’s fully screwed in, back the ring out and restart to make sure you have it threaded correctly. As long as you handle it with the same care as a filter, you’ll be fine. The other side, which is a lens mount, attaches to your camera like a lens.
If you want to pick up a reverse adapter rings, match the adapter with the filter size on the lens you want to use.
Despite being awesome, however, there are a few caveats to reverse rings: Because the lens is mounted backward on the camera, the camera and lens are not able to communicate mechanically or electronically. Therefore, autofocus is not an option — you must manually focus or move either yourself or your subject. Focus rails are a great help because you don’t have to mess with the lens or move anything around to get a good solid focus.
One beneficial quirk of this type of approach is that you can use any lens that has the same filter diameter as the reverse adapter you’re using. This is exceptionally liberating. Use old NIKKOR lenses on Canons, Pentax, or Sony cameras. Pick up as many inexpensive reverse adapters as you need to mount your best lenses in reverse.
Lenses that do not have a manual aperture control are more difficult to use because the camera can’t communicate with the lens when it’s mounted backward. Because of this, older manual focus lenses with aperture rings are ideal. It’s easy to change the aperture by twisting the right ring. I have a few old Nikon AI and AI-s lenses that I use all the time for this purpose. Their aperture rings make controlling exposure easier. I took the shot in Figure 3-19 using this setup: a Canon dSLR and an old Nikon 50mm manual focus lens.
Canon users have developed a unique workaround that allows you to lock in an aperture. Here’s how: Mount the lens, turn the camera on, and then select aperture-priority mode. Set the aperture you want to use. Then, if your camera has one, press and hold the Depth of Field Preview button. While holding it down, press the lens-release button and carefully remove the lens — with the camera still powered up. The aperture will remain set in the lens. Yes, it’s clunky. Yes, it’s inconvenient. If you want to shoot with a stopped-down aperture, however, it works. I recommend experimenting and finding a favorite aperture that you want to use for most of your shots, and sticking with it. That way you won’t have to go through this process more than one or two times during a shoot.
Using a macro bellows
Macro bellows work just like extension tubes but are made of flexible material and can be extended to varying distances. One end of the bellows mounts to your camera like a lens would. You mount your lens to the far end and extend it to the distance you want. Professional-level bellows are very expensive. There are inexpensive models, however, that you can use to decide whether or not this is something you want to experiment with.