Chapter 5
Exploring Other Lenses
IN THIS CHAPTER
 Fisheye
Tilt-shift
Pinhole
Lensbaby
Holga
Diana F+
Before I finish the minibook on lenses, I would like to encourage you to seek out alternative designs. Even though a lens must fit your camera body, not every lens has to fit the same mold. In fact, you can have a lot of fun with creative lenses or accessories like the ones I showcase in this chapter. The wide range of different and sometimes exotic lenses really sets dSLRs apart from smartphones, tablets, and other types of digital imaging devices.
One note: You may want to mount your camera on a tripod or monopod for support when using some of these lenses. It depends on what you’re photographing, whether the shutter speed is too low for handheld shots, and when you want to take your time composing the scene or focusing precisely. For example, I typically use a tripod when shooting macros with Holga lenses, setting up detailed tilt-shift shots, when shooting long-exposure shots with a pinhole lens, and when I’m in my studio.
Fisheye Lenses
On the extreme end of the wide-angle spectrum are fisheye lenses. Just like their wide-angle relatives, they're incredibly fun to use. The (roughly) 180-degree diagonal angle of view puts a whole new twist on taking unique photos.
 Be careful when looking for fisheye lenses to use on a cropped-frame dSLR. Fisheye lenses have been around for a long time, and they were designed with full-frame cameras in mind. This means that you will not get the complete, circular, fisheye effect when you mount a full-frame fisheye lens on your APS-C image sensor. It takes more oomph than many lenses have to squeeze the scene onto a smaller sized sensor. For example, the AF Fisheye-NIKKOR 16mm f/2.8 lens sounds nice, but it has an effective focal length of a whopping 24mm when mounted on a cropped-frame Nikon dSLR, and therefore only a 107-degree angle of view. The AF DX Fisheye-NIKKOR 10.5mm f/2.8G ED, on the other hand, was designed specifically for DX (cropped-frame) Nikon cameras, and has a 180-degree picture angle. Having said that, the 10.5mm fisheye lens is called a “frame-filling” fisheye lens by Nikon, which means that you won’t see the circular fisheye effect with this lens either. Because I really like the circular image that some fisheye lenses produce, I looked for an alternative solution.
Although not traditional fisheye lenses (from stem to stern, so to speak), you can purchase screw-in fisheye optics that widen the field of view so much that they achieve a fisheye or near-fisheye effect. They range in price, but all are relatively inexpensive. The Opteka HD2 0.20x AF Fisheye Lens, shown in Figure 5-1, lists for just under $40. I heartily recommend trying out this solution in lieu of buying an expensive fisheye lens. In fact, all the fisheye photos in this chapter were shot with this optic. There are a few things you should be aware of, however, before you start:
- Screw-in optics mount to the front of existing lenses. You must buy one that is compatible with the filter size of the lens you want to use. Some optics have multiple step-rings that enable you to mount them to different lenses. For example, the Opteka set I purchased has a native thread of 52mm and comes with three rings (one of which is shown in Figure 5-1 leaning against the main lens): 55 to 52mm, 58 to 52mm, and 67 to 52mm. I can use any lens in my closet that has one of these four filter sizes (52mm, 55mm, 58m, or 67mm).
-
You’ll need to find the effective focal length of the optic. Multiply the magnification factor of the optic by your camera’s crop factor by the focal length of the lens you want to attach it to. For example, a 0.20x optic mounted on a 1.6x Canon cropped-frame camera using a 16mm lens equals 5.12mm. If you zoom in to 55mm, the resulting effective focal length is 17.6mm.
From this you can see that you should purchase an optic with a low magnification factor and use it on a wide-angle lens (or in that range of a zoom lens) to achieve the greatest fisheye effect you can.
Figure 5-2 shows a scenic lake scene I shot looking out along a pier. I was standing on the beach and took special care to not show any sand. With such a vast angle of view it’s harder than you might think to keep your feet and other items you don’t normally have to worry about out of the photos. The far side of the lake shows off the curve of the lens while the pier looks relatively normal, although it looks small because the wide angle seems to push it away from the camera.
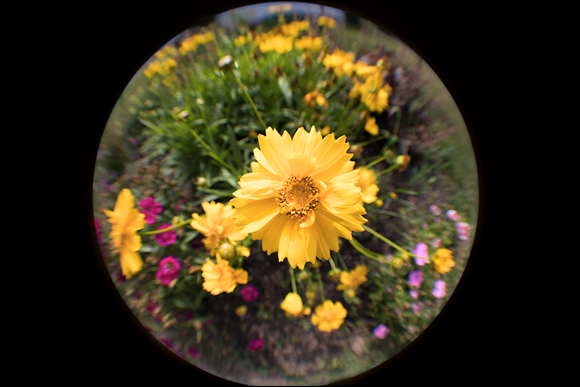
Figure 5-3 shows off the circular effect of the fisheye lens. It’s our shower curtain, which certainly sounds like an odd thing to photograph for a book. However, the small squares on the curtain provide a great point of reference because they illustrate what should be straight. They are 11/16 of an inch, or about 18mm square, and arranged in relatively orderly columns and rows.
 Don't lock yourself into one mode of thinking. Take your fisheye lens and photograph everything you can with it.
The fisheye lens causes the center of the photo to bulge out. It also bends all the vertical and horizontal lines toward a central vanishing point along each axis. While not the greatest tool to take precise architectural photos, I love it.
The flower I photographed in Figure 5-4 shows what happens when you get really close to an object. It dominates the center of the scene, but because the lens has such a wide effective focal length, there’s plenty of space on the sides for everything else. My feet are almost in the photo at the bottom, and the bottom quarter of our neighbor’s garage is visible at the top. Notice that even though I’m using a standard kit zoom lens and inexpensive screw-in optic, the flower looks sharp and very clear.
Although I have not shown this aspect of using a fisheye lens, another completely viable approach is to take extreme wide-angle shots with a fisheye lens and remove the distortion in software. You’ll get nice photos with extreme angles of view that are impossible to take with most other lenses.
Tilt-Shift Lenses
Tilt-shift lenses are special-purpose lenses with two distinct features:
- They tilt. The front of the lens swivels, or tilts, to point at an angle. This angles the focal plane so that the area of sharp focus is no longer perpendicular to the axis of the lens. The depth of field changes from rectangular, running at an equal depth across the image, to a wedge shape. The wedge actually gets larger as it extends farther from the camera, causing the depth of field to increase.
- And shift. The lens shifts up or down while pointing in the same direction. Tilt-shift lenses have a larger image circle than normal lenses. This means they project a larger image of the world (you guessed it — it’s circular) inside the camera that goes well past the borders of the image sensor. It’s like putting a large round tablecloth on a small rectangular table. Shifting the lens moves a different part of the view as seen by the lens onto the camera’s image sensor to be captured during an exposure.
Figure 5-5 shows the Canon TS-E 24mm f/3.5 II, tilted to the left, but not shifted. Notice the knobs and markings on the lens. Operating a tilt-shift lens requires you to set the amount of tilt and shift you want applied and then lock it down. If you’re using a tripod or shooting in a studio you can set up the lens very precisely using all the helpful information on the lens. Tilt-shift lenses require you to use manual focus. I took all the tilt-shift photos in this section with this lens. It’s an amazing, although heavy, lens that captures great photos even when not tilted or shifted.
Manually focusing is probably the greatest challenge to using this type of lens unless you are already proficient in it.
Canon also offers 17mm, 45mm, and 90mm versions. Nikon has three tilt-shift lenses at these focal lengths: 24mm, 45mm, and 85mm. Other manufacturers offer various tilt-shift lenses, such as Rokinon and Samyang. Often, they are the same lens, simply rebranded. Arax also makes tilt-shift lenses in several focal lengths.
Remember, tilt-shift lenses were originally created for 35mm film cameras. The range of available focal lengths are therefore optimized for full-frame dSLR image sensors. The 45mm Canon tilt-shift lens acts like a 72mm near-telephoto lens on a Canon cropped-frame dSLR. The 24mm lens, on the other hand, sits at 38mm on a cropped-frame camera, so it feels like a normal lens. The 17mm lens would allow you to shoot wide-angle shots with an effective focal length of 27mm.
Tilt-shift lenses have long been used by photographers to photograph buildings and other scenes to eliminate perspective distortion. When you point your camera up, vertical lines in the scene converge rather than run parallel. Shifting a tilt-shift lens helps counteract this effect. Shifting the lens also enables you to shoot panoramas without ever having to move the camera.
Tilt-shift lenses have an artistic nature to them as well, which is what I want to focus on. You can create interesting depth of field effects using the tilt feature of the lens. Figure 5-6 shows a friendly game of sand volleyball underway at camp. The sun was shining nicely. A nice breeze was blowing. It was an idyllic scene. I tilted the lens so that the girl in the pink shirt was the primary focal point. You can see the depth of field extending from her to the opponents on the other side of the net and into the trees.
Figure 5-7 is a totally different shot. I took this photo of the first floor elevator doors at my favorite parking garage at a local university. I was able to get the left door to be nicely in focus while blurring the right door by tilting the lens. The unusual depth of field plays mind games on us. We think what we’re seeing is from a model or small diorama when in fact it’s a full-sized set of elevator doors.
Finally, the scene in Figure 5-8 presents another shot that looks miniaturized. Rather than a close-up of a set of elevator doors, this scene (shot with the same lens) features buildings that I photographed diagonally from across the street in a quaint little town in Michigan. I tilted the lens, angled the camera a bit, and focused on the building on the corner.
Holga Lenses
Holga makes digital SLR lenses (available from different outlets) that are simple, inexpensive, and plastic. In 1981, Holga began manufacturing a 120mm medium-format film camera called the Holga 120S. It was so unlike anything else that people considered it a toy camera. However, that toy camera that often leaked light took amazingly cool, analog, sometimes messy photos.
The Holga digital SLR lens is derived from the lens on the original camera. It has a rough focal length of 60mm (in full-frame terms), a fixed aperture of f/8, and has very rudimentary manual focus. You’ll have to use your camera’s manual shooting mode too.
Aside from the main lens, shown in Figure 5-9, Holga makes a remarkable number of attachments that mount onto the front of the lens. They include macro and close-up lenses, telephoto, wide-angle, fisheye, and filter accessories. There is even a pinhole lens. Pick things up à la carte or buy kits with the add-ons you want.
I have to say that, although these lenses are cheap plastic and you have to guess at the initial exposure settings and experiment some, I love playing around with them. I’ve taken many photos with my Holga lenses and feature several of them in this book.
Pay attention to the focus distance set on the lens. There are five different symbols, each representing different subjects and distances. Focus before you frame the shot, as it’s hard to turn the lens when looking through the viewfinder. Basically, I set the focus distances that matches the scene I plan on shooting, take the shots I want, and only change the focus distance when I change scenes.
Figure 5-10 is a scene from a local university. I was taking photos of buildings and other things when I decided to station myself along one of the main walkways and photograph the students coming and going. Although this shot doesn’t have many people in it, the main focus of attention is a young woman in silhouette walking away from me. This is one of my favorite shots that I have taken with the basic Holga lens.
I boosted the ISO to 800 to have a quick exposure time of 1/500 second. That guaranteed a crisp photo of moving subjects and no camera shake from me. I used an additional in-camera filter to blur portions of the scene, accentuate the color, and boost the contrast.
The bridge shown in Figure 5-11 shows a completely different scene shot with the same basic digital Holga lens. I got up early one foggy morning and was taking photos around the base of a bridge near where I live. The water level is low and the light is very subtle. I framed the scene from behind some tree branches, which adds to the moody effect.
Holga lenses need a lot of light. If you’re not out in bright sunlight, expect to raise the ISO. I had to raise the ISO to 6400 to take this shot, and still couldn’t make the shutter speed any faster than 1/60 without underexposing the scene.
Finally, Figure 5-12 shows an example of a macro shot. I slipped the 30mm macro attachment onto the front of the basic Holga lens, and used a tripod to set this shot up. When working with close-ups and macros, it helps to frame the scene using Live View. I raised the ISO through the roof so that I could see and focus, then switched to the viewfinder and lowered the ISO to take the shot. Of course, focusing with a Holga lens is harder than a normal lens, so more often than not I use a 4-way focus rail (see Book 2, Chapter 3). If you don’t have one, you can also move the subject (I have, and it’s pretty effective). Shooting macros and close-ups with Holga lenses is incredibly fun and very rewarding.
Lensbaby Lenses
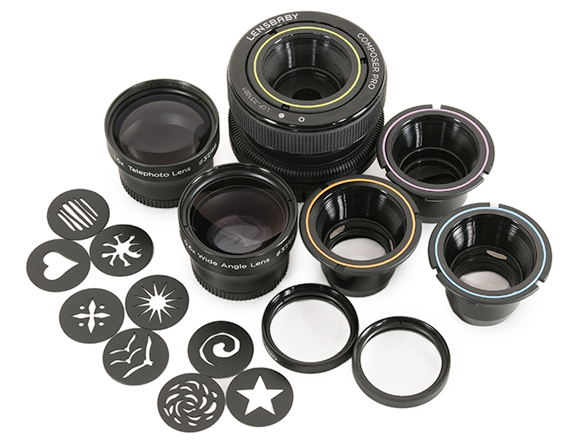
Lensbaby (visit www.lensbaby.com and have a look ’round) has created several unique and creative lenses and accessories for digital SLRs. Its main creative lineup features the Composer Pro, shown in Figure 5-13, which is a manual focus tilt-swivel lens body that accepts removable add-ons like the Double Glass, Single Glass, and Plastic Optics. They continually come out with additional lens bodies and optics, like the Composer Pro II (an upgrade to the Composer Pro, featuring metal body), Edge 50 Optic, Sweet 35 Optic, Circular Fisheye, and Velvet 56. These aren’t traditional lenses, but they aren’t toys. They act and feel solid.
I shot Figure 5-14 using the Composer Pro with the Double-Glass Optic installed. Tilting the lens up and to the right a bit let me move the circle of sharp focus where I wanted it. The words in this poster of the United States Declaration of Independence that aren't in this sweet spot are blurred, which is the main effect this lens offers.
While the newer optics feature built-in apertures, part of the charm of the older optics is that you control the aperture by manually swapping out aperture disks. While changing from f/4.0 to f/2.8 might be a hassle to some, it allows you to use creative aperture disks with cutouts for special effects. Figure 5-15 shows a star effect caused by light reflecting off of several silver votive holders.
Pinhole Lenses
Pinhole lenses aren’t really lenses at all. They are simply covers with small holes that allow light into the camera to strike the image sensor. Figure 5-16 shows a pinhole lens that I picked up from Lenox Laser.
You can, of course, create your own. I’ve found a very effective approach that involves drilling a larger hole in the cap, then taping aluminum foil over it (you can also use part of an aluminum can that you cut for the purpose). I then use a small straight pin to carefully prick the foil in the center to make the hole. There are technical details about this that I won’t go into. However, the size of the hole matters, depending on the brand of camera you’re using and the size of the image sensor. Make sure to use an extra body cap that you don’t mind putting a hole in.
Once again, I should point out that you will experience a pretty big difference between using a standard pinhole lens on a full-frame dSLR versus a cropped-frame body. Normal pinhole lenses have a wide-angle look on full-frame cameras. They appear normal and in some cases approach telephoto angles of view on cropped-frame cameras. The pinhole lens shown in Figure 5-15 has a focal length of about 45mm. I took a ruler out and measured the distance from the image sensor plane mark on top of the camera to the lens mount. This comes out to a focal length of almost 68mm in 35mm equivalent terms.
The idea of using a hole this way can be traced back to the beginnings of photography in the form of a camera obscura, close to a thousand years ago. At some point it became clear that smaller holes created sharper images.
The challenges of pinhole photography are twofold. First, the aperture is so small it’s hard to see the scene in order to compose. Second, you have to determine the proper exposure for each scene by trial and error. However, given the same conditions, once you settle on an ISO and an exposure time, you can easily repeat them for follow-on shots.
Figure 5-17 shows a photo I took with the Lenox Laser lens on a Nikon APS-C dSLR. It’s soft, but not to the point of distraction. I processed the photo in Adobe Lightroom to make it look a bit older. I also left in the dark spots, which are caused by dust on the image sensor. Normally these spots are fuzzy and you may never notice them. I think they add to the nostalgic effect in this photo. It was a bright day, so I used a shutter speed of 1.3 seconds and an ISO of 100.
Diana F+ Lenses
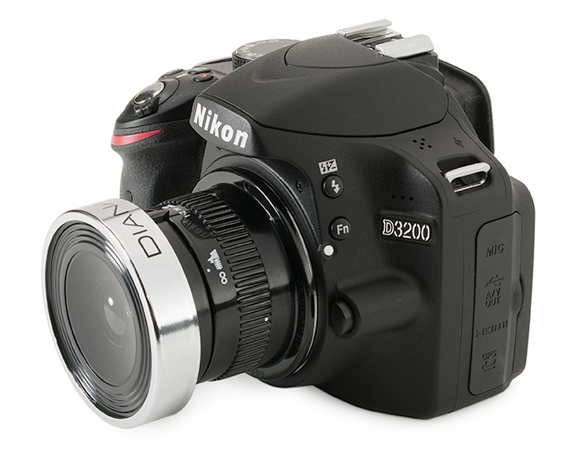
Plastic Diana cameras were introduced in the 1960s and have made a real comeback in recent years. While the cameras themselves use film (just like Holga cameras), you can mount the lenses on a dSLR with the right adapter. Figure 5-18 shows the fisheye lens mounted on a cropped-frame dSLR.
One note of advice regarding the Diana lens focal lengths: Use the widest angles possible for normal fields of view. The Diana lenses are designed to be used on film cameras whose 120 film is much larger than a cropped-frame dSLR sensor (in fact, far larger than 35mm film and full-frame image sensors). You're only going to see a small portion of what the lens can truly capture. I recommend the fisheye lens as a most practical focal length for dSLRs.
I took the photo shown in Figure 5-19 with the fisheye lens attached to a Nikon APS-C dSLR and Nikon F-mount adapter. I used an external flash held to the side with the help of an off-camera hot shoe cord (see Book 4, Chapter 3). The result is amazing, and I hope inspires you to try out creative lenses like Diana F+ with your dSLR. I’ve certainly had fun!