In digital photography, everything seems to revolve around advanced computer technology. I'm not necessarily complaining. It's just that this reality can lull you into thinking that there was never any other way to take a picture. There were, and there are, and it has nothing to do with the Stone Age. Filters, although decidedly analog, are real. You can hold them in your hand. They clink musically and take up space in your camera bag. When light passes through them, something physical — not modeled, simulated, or programmed — happens to the light. I don't know about you, but that fascinates me. I want to know more.
Learning about Filters
The trouble is, standing in front of a large filter display in a camera shop, or going online and browsing, can be highly intimidating. Questions course through your gray matter. What are these gizmos? How do they work? Should I bother? Which ones are best for me?
In many ways, filters are decidedly simple. You put a filter on your camera's lens and then take photos. Grasping the entire range of possibilities, however, is more of a challenge.
Looking at how filters work
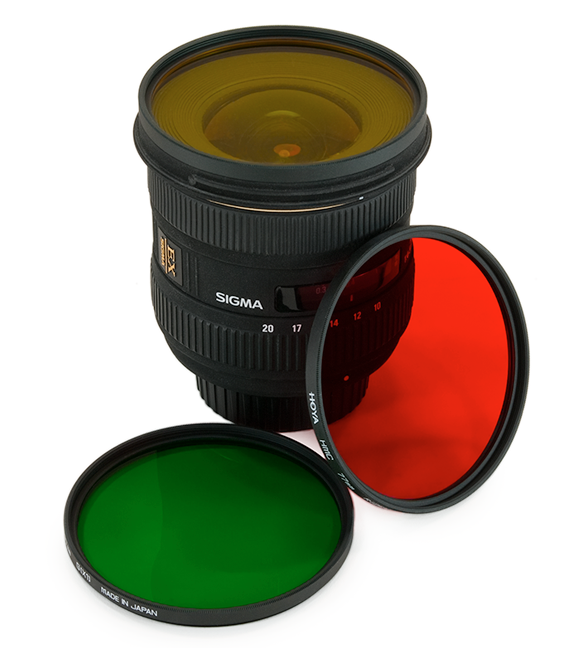
Filters (sometimes called optical or physical filters) work by literally getting in the way. You stick filters on the front of or in your lens (see Figure 5-1) so that light from the outside world has to pass through on its way to the camera's image sensor — simple stuff. As light passes through a filter, something magical happens.
FIGURE 5-1: Light must pass through the filter for it to work its magic.
That magical something is different for each type of filter. Knowing what filters do will help you decide whether to invest the time and energy required to use them. They may solve one or more problems you've been having with your photography.
Change color, tone, and contrast by holding back certain wavelengths of light. Filters can either enhance contrast or reduce or soften contrast. When used in black-and-white photography, color filters transform some colors into dark tones and other colors into lighter tones in the black-and-white image.
Red filters look red because they partially block light from the other side of the color wheel. Red light is allowed to pass through. Blues, greens, and yellows are not, to different degrees.
Darken a scene by making it harder for all light to pass through. You can reduce or balance the exposure. ND filters do this.
Enhance color and contrast by blocking polarized light. A polarizing filter makes it harder for reflected light to pass through by reducing glare and reflections from water, metal, glass, and other smooth surfaces.
Reduce haze by absorbing UV light.
Create different special effects by diffusing or diffracting light.
Create other effects; filters can soften focus, add mist, add a radial zoom, mask areas, add lens reflections, and magnify.
If you’re familiar with software filters and effects, and with common photo-editing tasks, you can make the switch to physical filters quite easily. Think of the tasks you perform using software, and match that up with the physical filter that does the same thing.
Going over filter pros and cons
You don’t have to go out and buy every filter at once. Start with one or two different filters and see what you think.
Having a circular polarizer filter to block annoying reflections is a good first choice if you shoot a lot of these subjects:
Landscapes with water
Buildings with glass sides and windows
Portraits of people who wear glasses
If you shoot inside, or shoot mostly portraits, you’ll benefit from filters that correct white balance.
Consider these benefits to using filters:
They work:Neutral density (ND) grads actually affect the balance of light in the scene. (Grad is a fancy shortening of the term graduated, which means the filter transitions from clear to shaded.) It's real and not emulated, which means you're getting the actual effect. Someone didn't have to program it to come reasonably close to the real thing in software. Having said that, there may be quality differences between filters and brands of filters that affect how well they perform.
Time: Using the right filter on the scene means that you can often spend less time processing and editing your photos.
Creativity: The amount of creativity you can express with filters is staggeringly large. It’s like having a Hollywood special effects division supporting your photo shoot.
Protection: Many use clear or UV filters to protect lenses. It’s cheaper to replace a scratched, cracked, or broken filter than it is a lens. Not only that, if you break a filter you can toss it in the trash and keep shooting immediately. Not so if you scratch your lens.
And consider these challenges:
Quality: Many question the benefit of putting a $20 (or even a $100 filter) in front of a $1,500 lens. Think about it.
Compromise: Some question whether it's worth potentially degrading a photo by making light pass through more stuff to get to the camera's sensor when you can perform most filterlike adjustments in software.
Convenience: You have to carry filters around and they take up space in your camera bag. Software filters are much lighter by comparison.
Fragility: Optical filters (unlike their software counterpart) can get scratched or broken. I've picked up a variety of filter cases to safeguard my investment; you can see them in Figure 5-2. All offer reasonable amounts of protection, just in a different package. Some filters come with soft cases. Others are shipped in hard plastic cases. In my experience, it's harder to fit more than a few hard plastic cases in your camera bag and get at them with any ease.
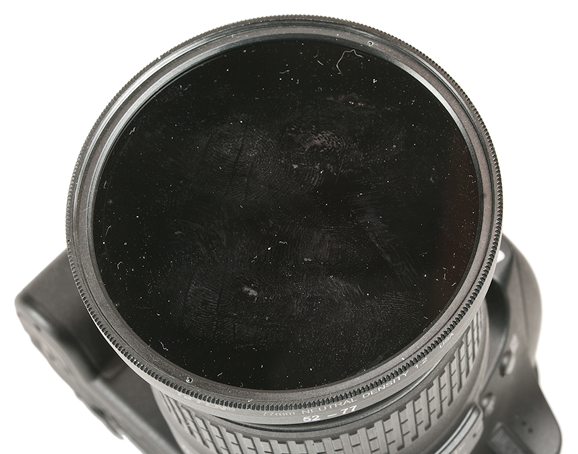
Cleanliness: Filters can get smudged and dirty, as shown in Figure 5-3. It’s easy for this fact to weigh on you and make you not want the extra hassle. I totally understand.
Cost: Filters cost money, which always seems to be in short supply. You’re limited in the number of filters you can buy, the number of lenses you can support with filters, and the number of times you can replace or upgrade them. With programs like Adobe Photoshop, software filters work on every photo in your collection, whether you took it today or five years ago.
Interoperability: Different lens sizes need different filters. Software filters don’t.
Time: Setting up and swapping out filters takes time and effort. Don't underestimate this. To use filters, you really must want to.
The X factor: When you’re using a real filter, you have one chance to get it right. In software, you can try a lot of different filters and effects with the same photo until you’re happy with the result.
FIGURE 5-2: Buy the type of case that fits your needs and your camera bag.
Using filters is easy enough. You may spend a few moments getting set up and deciding what filter you want to use, but you'll soon start taking shots more quickly. When you get the hang of it, you get faster with filters.
Clean your filters at home before heading out on your shoot.
Evaluate the scene and choose a filter.
Decide whether you want to control exposure, color, or use a filter to achieve a special effect.
Most people agree that using more than two or three filters at the same time degrades image quality. Every pane of glass, resin, or polyester is another layer between your expensive lens and the image sensor.
Slide or screw in the filter.
Depending on your filter system, either screw your clean filter into the end of your lens or slide it in the holder. You can find more details in the next section.
Compose, meter, and adjust exposure.
Your filter’s documentation might give specific metering instructions. Experiment and take test shots to fine-tune the exposure.
For graduated filters, the center of the scene should be properly exposed, even with the filter in place. If you’re using spot metering, you may see better results from pre-metering the scene and then mounting the filter. Be prepared to review your photos and adjust, if necessary.
Take the photo and review the photo.
Check exposure, color, glare, and whether the filter has the desired effect.
Correct and start over or stay on course.
If the photo looks good, you're good to go. If not, try to figure out what's causing the problem. Is the filter on the lens correctly? Is this filter right for this scene? Re-examine your starting assumptions, if need be, and question whether you need this or any filter.
Taking Shape with Filter Systems
Filters come in two main flavors:
Circular filters screw into the lens.
Rectangular filters slide into a frame mounted on the lens.
Circular (screw-in)
Circular filters are quite popular and easy to work with. Figure 5-4 shows a small collection of Hoya 77mm black-and-white filters. (I suppose that the terms circular and screw-in are redundant. Can you even turn a square or triangular screw?)
FIGURE 5-4: Circular filters screw into the front of the lens.
Circular filters have three main characteristics:
They are round. This circular piece of glass (some filters are made from other materials) is mounted in a frame. Higher quality filters use metal frames that are quite sturdy.
They screw in. Circular filters screw into the front end of dSLR lenses. Don’t incorrectly thread a filter when you’re mounting it. You might ruin the filter or, worse, damage the threads on your lens. Take your time and, if necessary, back out the filter by turning it counterclockwise until you feel it correct itself. Then get back on track.
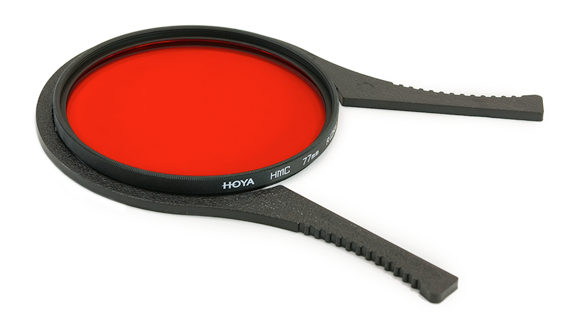
Getting filters on isn’t as much of a problem as getting them off. Handle tough filters with a filter wrench, shown in Figure 5-5. I can’t tell you how many times this wrench has saved me.
They have a specific size. Filters are sized by their diameter (the distance across, going through the center), which is measured in millimeters. This is important. You must match your filter size with your lens. Many lenses have their filter size printed on the front or top. If it's not in either of those places, check your manual.
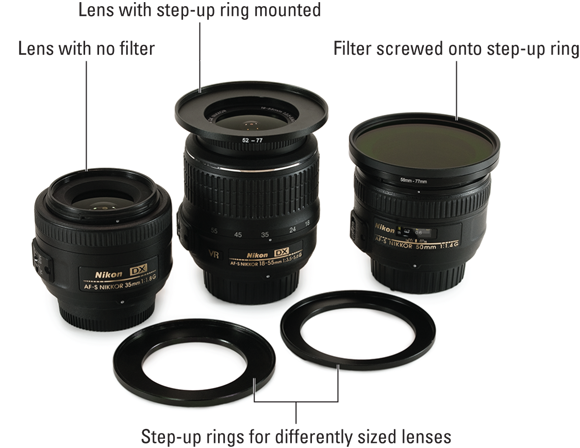
If you want to use filters on multiple lenses that require different filter sizes, buy a single, large filter size and use step-up rings to modify its size. This means you buy a step-up ring for each differently sized lens, but only one size filter. I have four step-up ring sizes (52–77mm, 55–77mm, 58–77mm, and 62–77mm) that let me fit one filter size (77mm) on several lenses, as shown in Figure 5-6. If you go this route, make sure to get step-up rings that are large enough to fit your largest lens.
FIGURE 5-5: This filter wrench makes removing filters a snap.
FIGURE 5-6: Step-up rings reduce the number of filters you have to buy for multiple lens sizes.
Rectangular frame slide-in
The other main filter type relies on a frame mounted to the lens that enables rectangular filters to slide in and out. The advantage of this system is similar to that provided by step-up rings. You buy the frame and enough adapters to mount it on your lenses, but only one set of filters. As long as you have the right adapter ring, you can use the same filters on lenses of many different sizes.
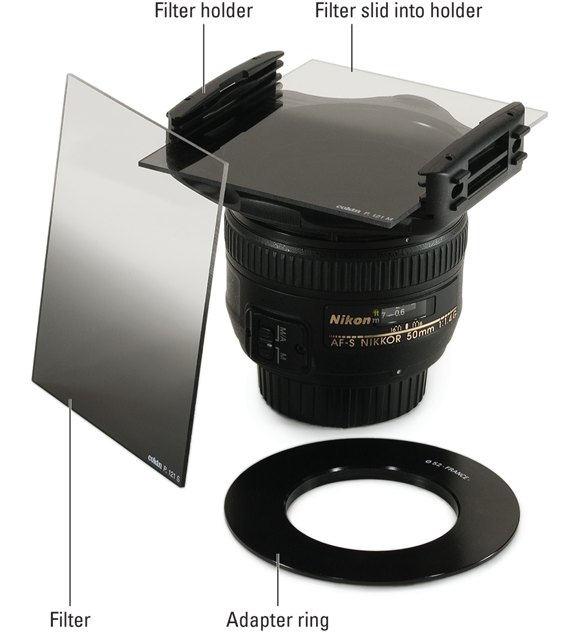
Figure 5-7 shows a filter from Cokin’s Creative Filter System (www.cokin.com) attached to a 35mm lens, along with an extra adapter and filter. Rectangular filter systems have these main parts:
Adapter ring: This piece screws into the filter ring on your lens and has fittings to slide on the filter holder and make a secure attachment. Simply buy the correct adapter for each of your lenses and you’re ready to rock. Read the manual to make sure this type of filter system works with the lenses you want to use it with. Most normal dSLR lenses work fine. You may have to buy a different system for wide-angle lenses.
Filter holder: This element holds one or more filters. The holder slides onto the adapter and snaps securely in place. Filters slide into the holder rather than screw onto the lens, which makes changing them extremely easy. It also makes the filters compatible with many different lenses. Notice in Figure 5-7 that there's room for three filters in this particular adapter.
Rectangular filter: The reason for the entire setup is the filter. It's larger than a screw-in filter and is rectangular. Most rectangular filters don't have frames around them, so be careful when handling them. You can buy filter wallets, sleeves, and boxes for storage.
FIGURE 5-7: Rectangular filters slide into a holder mounted to an adapter that screws onto the lens.
All in all, the rectangular system is ingenious if you have several lenses that take different filter sizes. Having a rectangular filter holder makes a robust filter library more cost effective. However, the size of the mount with filters is bigger and bulkier than the traditional circular screw-in variety.
Using Filters for Different Purposes
This section has information on several different filter types. Browse through them to see what excites you. Think about the photos you normally shoot as you consider whether a filter type is right for you.
The sheer number of filters and filter types can be overwhelming, and getting this straight in your mind can take some time. I summarize many of the problems that filters help solve in Table 5-1. Have fun experimenting with different brands, makes, models, and strengths!
Use ND grad for a neutral effect, or a color grad to emphasize certain colors.
Reduce glare or reflections
Circular polarizer
Rotate to dial in desired effectiveness.
Reduce haze
UV filter
Can also keep on the lens to protect it.
Enhance color
Color or color grad
Effect depends on the color of the filter.
Correct color
Warming, cooling, balancing, or color compensating
Use to adjust white balance or correct tints.
Tone black-and-white photos
Black-and-white filters
Special colored filters that affect how colors are translated into black-and-white tones. Common colors include red, green, yellow, blue, and orange.
Alter contrast
Contrast or other filters
Many filters affect contrast. There are also contrast-specific filters.
Special effects
Fog, haze, stars, mask, close up, mist, diffusion, and more
Experiment with many different types of filters for a range of special effects.
Protective
A protective filter is clear, high-quality glass that protects the lens. You can leave it on your lens all the time. As long as the filter is clean, the photo shouldn’t be affected. The filter essentially serves as a clear lens cover.
If you put a clear protective filter in place, you don’t have to constantly clean your lens. You clean the filter instead, which keeps the lens (and its irreplaceable coating) from accidentally being scratched.
Circular polarizer
Polarized filters act like a good pair of polarized sunglasses: They filter out distracting reflections and glare. The details of how this type of filter works and why are somewhat technical and, honestly, irrelevant to using them. Polarized filters block reflected light (which can even happen in the sky) while allowing natural light to pass through them.
You have to tune, or dial, a polarizing filter by rotating it so that it rejects the reflections you want.
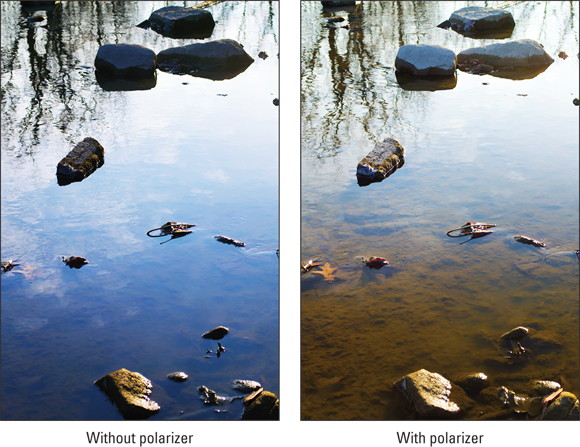
Figure 5-8 shows two photos. I took them looking down at the water in a slow-moving river. The image on the left shows the photo I took without the polarizing filter. The blue sky is reflected in the water. The image on the right shows the photo I took with a circular polarizer filter. The effect is to block the reflections of the sky, which enables you to see details beneath the surface of the water. I find the difference between the two shots amazing.
FIGURE 5-8: Without polarizer: The blue sky reflects off the surface of the water. With polarizer: Details visible beneath the surface.
For complex and technical reasons having to do with beam splitters and the nature of linear versus circular or non-polarized light, digital SLR metering and autofocus sensors are compatible with circular polarizer filters, not linear polarizers.
Ultraviolet (UV)
Sunglasses with ultraviolet (UV) protection are better for your eyes because they block a lot of haze. If exposed to too much UV radiation for too long, you can damage your eyes. Ditto for UV filters: They block UV light, which causes blue haze when you’re shooting around water, into the air, or into the distance. (Think of the phrase purple mountains majesty in the hymn America the Beautiful.) UV filters appear clear. That's because you can't see ultraviolet light.
There’s some debate as to whether digital cameras need UV filters, because most manufacturers build UV and IR protection into their image sensors. In addition, many lenses are coated to reject UV wavelengths. There’s no doubt UV filters work at blocking UV light, but if the lens and the camera can do as good a job, you may not need the filter. Frankly, I took several shots hoping to illustrate how amazing these filters were for this chapter, and I couldn’t tell any difference between using a standard UV filter and not. Some people recommend using UV filters as clear lens protectors, just in case.
Neutral density (ND)
Neutral density (ND) filters darken the scene by blocking light. ND filters come in different strengths, called densities. The density tells you how may exposure stops of light they block. For example, an ND filter with a density of 1.2 blocks 4 EV of light. That means that an aperture of f/1.4 acts like f/8 or a shutter speed of 1/60 acts like 1/1000 second. ND filters are, in essence, a negative exposure control. While that may sound counterintuitive (you’re normally interested in capturing light, not turning it away), it becomes very helpful in at least two situations.
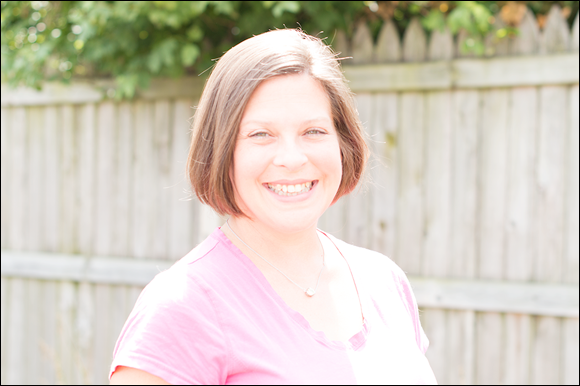
First, they enable you to use large apertures in bright light. For example, if you’re outside during the day and want to take a flash photo, your camera’s flash sync speed limits how fast you can set the shutter speed. If you’re already at ISO 100 and want a wide open aperture for creative reasons, you’re stuck unless you have an ND filter to tone down the lighting. I took the photo of my wife shown in Figure 5-9 to illustrate the worse-case scenario. I used an aperture of f/2.8 to blur the fence behind her, and I didn’t want to compromise. I also used the camera’s built-in flash. I wanted to provide some direct light because the sun was partly behind her. The ISO was at 100 and the flash sync speed limited the shutter speed to 1/200 second. The result? Massive overexposure.
I took another shot, shown in Figure 5-10, with a 0.9 density ND filter screwed into the lens. The result is stunningly obvious. The photo is perfectly exposed. The filter blocked enough light so that the shutter speed could come down to 1/160 second. I kept the aperture at f/2.8 and the ISO at 100. If you want to take creative portraits with fill flash and wide apertures, and don’t have high-speed sync available, use an ND filter.
FIGURE 5-10: She obviously approves of the filter.
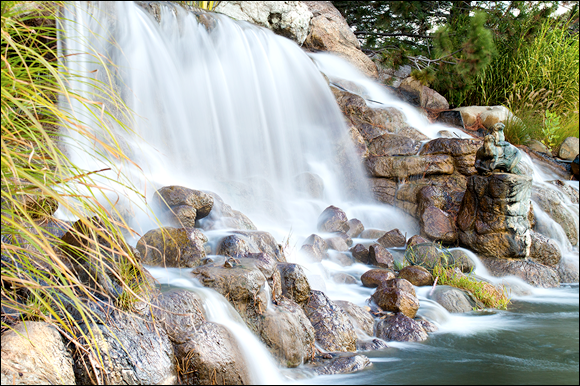
The second reason to use ND filters is that they help you set long exposure times. For example, you may want a long exposure that emphasizes moving water, as shown in Figure 5-11. If that’s the case, grab your ND filters and set the shutter speed as slow as you want.
FIGURE 5-11: Use ND filters for long exposures in bright daylight.
ND graduated
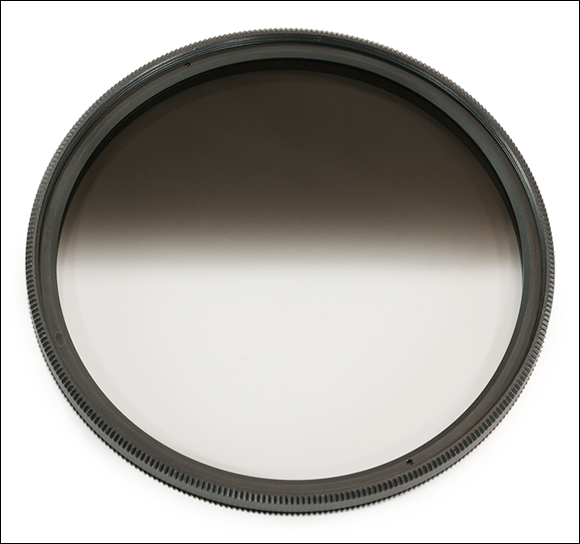
ND graduated (or grad) filters resemble cool-looking aviator sunglasses with a gradient. As you can see from Figure 5-12, they’re darker at the top to tone down light from the sky, and they're clear toward the bottom.
FIGURE 5-12: ND grads are useful in controlling the exposure of bright skies.
With an ND grad filter, you can set longer exposure times for the land.
Figure 5-13 shows part of a late afternoon scene looking out across a river. I shot the photo on the left without a filter and the one on the right with a 0.6 density ND grad. I processed each photo the same. There is not a huge difference, but if you look closely at the water and the bushes, they are brighter in the photo on the right. The filter blocked enough light from the sky to enable the camera to bring up the exposure for the darker areas of the scene. Details are lost in the bushes in the photo on the left, and the reflections of the sky in the water are less clear.
FIGURE 5-13: ND grad filters even the exposure between sky and foreground, which increases the level of detail.
Color filter
Color filters change the color of a scene. I include cooling (making things look bluer) and warming filters (making a scene look more golden) in this color category. Think of them as white balance correction on the front end of your lens.
Color grad filter
A color grad filter combines elements of both color and ND grad filters. Imagine an ND grad filter that isn't gray, but in color. Tiffen makes color grads designed to add color to normal or washed-out shots. Many work at sunrise or sunset, but you can also use them to create special color effects.
Other filters
A ton of filter types are available, in addition to the ones I describe earlier. If you catch the filter bug, visit a store in person or online and check them out. Download a brochure to see before-and-after photos for each type of filter.
In-camera filters
Many dSLRs offer in-camera processing options that mimic optical filters or software filters (some are computerized imitations of photo filters, others are more creative special effects) and retouching techniques that you might do in programs like Adobe Photoshop. Software filters are normally found in an Effects or Filters menu. You can have a lot of fun with the filters that come with applications like Photoshop, and if you want more choices, you can find many more filters online in the form of plugins.
Sony's Picture Effects has several filterlike effects, including High Contrast Mono, Soft Focus, and Rich-Tone Mono. Some Canon dSLRs use Creative Filters, which aren’t identical to most filters, but nonetheless creative. Nikon also has post-processing options called Filter Effects.
Black-and-white filters
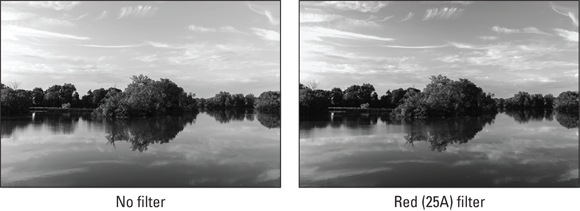
Black-and-white filters enhance contrast and emphasize certain tones by blocking or limiting specific colors (which ones depend on the filter color). They come in several different colors. Red is popular for increasing contrast in landscapes, yellow for balancing contrast between reds and yellows, and green for shooting outdoor monochrome portraits.
The left image in Figure 5-14 shows the monochrome image of a scene I shot without a filter. I took the photo on the right in Figure 5-14 using the red filter. I processed the photos the same. It’s clear that the photo on the right has added contrast and detail in the sky and water.
FIGURE 5-14: The photo on the right, shot with a filter, has additional contrast and detail.
Set your camera to shoot monochrome images when shooting with black-and-white filters. The camera spits out a black-and-white JPEG so you don’t have to do anything else. If you like, save that photo in Raw format also and convert it to black and white yourself (see Book 5, Chapter 4).
Infrared filters
I’ve got good news and bad news for you. First, the good news: Infrared (IR) filters turn your photos into surreal works of art by blocking everything except infrared wavelengths, which are invisible to the naked eye. The bad news is that dSLRs filter out infrared light by varying degrees, which makes it hard to capture infrared images, even with an IR filter.
If you’re curious about IR photography, you can experiment by mounting your camera on a tripod on a bright, sunny day, composing the shot, and then attaching an IR filter (the Hoya R72 is a good IR filter). You’ll have to use long exposure times and raise the ISO. You’ll have to edit the resulting shot to make it look cool.
As an alternative, the folks at Life Pixel Infrared (www.lifepixel.com) can convert your camera so it can shoot handheld IR photos (much like standard photography) without the filter. They take your camera apart and replace the IR-blocking filter that covers the sensor. If you feel up to the do-it-yourself challenge, they also have conversion kits.
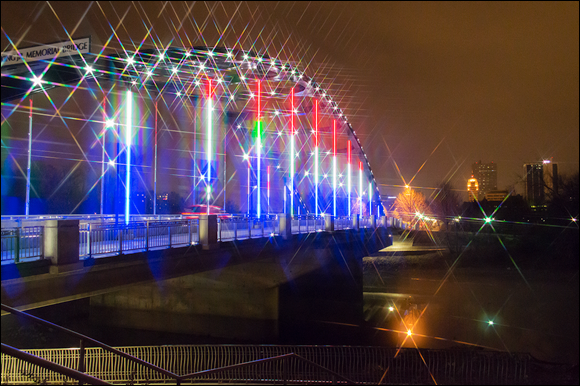
Creative filters: Stars, mist, or haze
Use these filters to exercise your creativity. The sky is the limit. Figure 5-15 shows a photo I took with a Hoya Star-Six filter. The filter is engraved with lines. When light strikes the lines, it produces six-sided stars. I took this shot at night looking out at a well-lit bridge. The filter has transformed the lights on the bridge, the distant buildings, and the water reflections.
FIGURE 5-15: Star effects are very cool; use them wisely.
 Finding out about filters
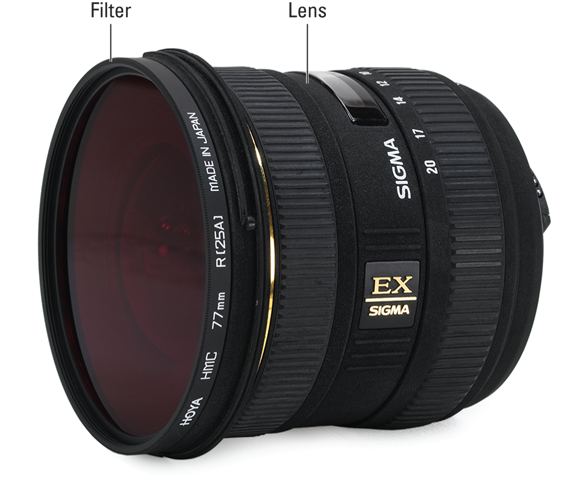
 Red filters look red because they partially block light from the other side of the color wheel. Red light is allowed to pass through. Blues, greens, and yellows are not, to different degrees.
 If you’re familiar with software filters and effects, and with common photo-editing tasks, you can make the switch to physical filters quite easily. Think of the tasks you perform using software, and match that up with the physical filter that does the same thing.
 Fragility: Optical filters (unlike their software counterpart) can get scratched or broken. I've picked up a variety of filter cases to safeguard my investment; you can see them in
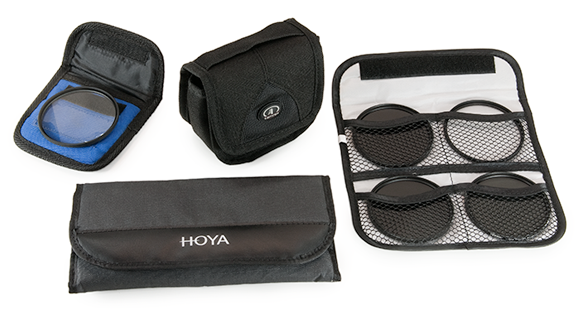
 For complex and technical reasons having to do with beam splitters and the nature of linear versus circular or non-polarized light, digital SLR metering and autofocus sensors are compatible with circular polarizer filters, not linear polarizers.