Chapter 4
Close-ups
IN THIS CHAPTER
 Composing effective close-ups
Increasing shutter speed for crisp shots
Magnifying the scene with diopters
Using a reversing ring for an extreme close-up
Setting up a studio shot
I love zooming in and capturing close-ups. So much so that I’m virtually always on the lookout to capture unique details from a different perspective. Although you don’t have to have anything besides a dSLR and a typical zoom lens (see Book 2, Chapter 1), you can invest in lenses with better close-up potential, and look at a host of other gear that can help you capture close-ups and macros very effectively.
Photographing close-ups is a really fun way to express yourself as a photographer. You’re compelled to focus on smaller details than usual, which encourages you to grow creatively. Over time, you really do start to see things in a different light, whether the photo is of a flower, a bracelet, ice on a door, or a penny.
Join me in this chapter as I discuss five of my favorite close-ups. I walk you through what I did and how it worked.
Zoom In
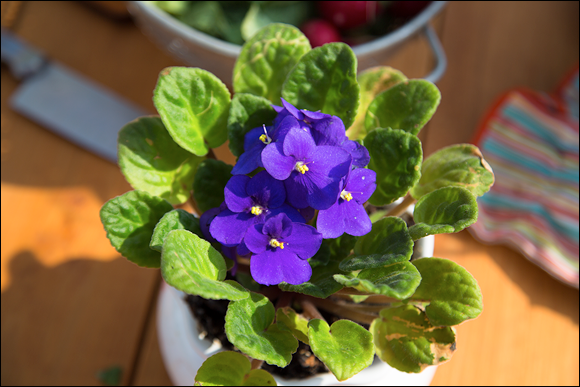
Not every close-up has to be a microscopic examination. As shown in Figure 4-1, they can often be relatively relaxed. My wife was preparing food outside and the early evening light was incredible. It was spring, and we were itching to be outside. Instead of cleaning off the table, I used her tools as props for the background. You can see a knife and a colander of radishes as well as a paper napkin strategically placed around the African violet.
I used a professional Canon full-frame dSLR and lens for this photo. Certainly overkill, but I’m not complaining. I zoomed in to 73mm, which is in the near/medium telephoto range. Other than that, this was very close to a normal handheld shot. The aperture was f/4, shutter speed 1/800, and ISO was only 100.
Keys to this photo:
- Great late-afternoon light is warm and inviting.
- I composed this shot purposefully, choosing my props and positioning them around the central subject to create the scene.
- Near telephoto focal length on a full-frame camera gave me a nice, loose close-up that included more than just the flower.
- No extra gear or effort required; I used what I had immediately available.
Notice Your Surroundings
Along those same lines (working with what you have), I shot the scene in Figure 4-2 without any special equipment. However, in this case I was using a consumer-level Nikon dSLR and 50mm prime lens. You can’t zoom in or out with a prime lens. I had to step closer to my subject to make my subject appear larger. Which I did, and am very happy with the result.
I took this shot in the morning on December 24. It was brutally cold, and ice had formed on one of our storm doors. It wasn’t hard to notice, but you have to take advantage of moments like this and grab a camera. Bracing myself, I got close and angled the camera. I had taken shots with the image sensor of the camera parallel to the ice. They were nice, but I wanted something unique. I used a Nikon APS-C dSLR and 50mm prime lens set to f/3.5 for this shot. The shutter speed was 1/2500 and the ISO was 100.
Keys to this photo:
- Unique depth of field perspective captured by getting close, opening the lens, and angling the camera.
- No special gear or other equipment.
- Handheld with fast shutter speed ensures crisp shot with a lot of sharp details.
- I had to be willing to get a camera and quickly take a shot.
Look for Unique Perspectives
Now it’s time to unleash some extra equipment on you. I captured the close-up of a sunflower shown in Figure 4-3 using a diopter attached to the lens of a consumer-level Canon dSLR. The lens wasn’t anything fancy, just your standard 18-55mm inexpensive kit lens. Diopters magnify things, just like corrective eyeglasses do for people (see Book 2, Chapter 3 for more information on diopters). I love using diopters. They are easy to carry, relatively inexpensive, and if you use a large set with step-down rings, you can use them on many different lenses.
And I love this shot. I shot it late in the day (time always matters) when the light struck it from the side. I zoomed in to 55mm and, with a +10 diopter attached, was able to capture a totally unique perspective of this amazingly colorful plant using a standard zoom lens. The aperture was set to f/6.3 and the ISO rose to 640. Even at f/6.3, the depth of field is very narrow. In a twist of irony, the shutter speed was 1/640 second. I must have had the camera in 640/640/6.3 mode.
Keys to this photo:
- Diopters mounted on a standard zoom lens increased the magnification to make this close-up possible.
- Early evening sunlight illuminates this detailed scene wonderfully.
- Always pay attention to shutter speed when shooting handheld close-ups.
- ISO rose to compensate for smaller aperture and fast shutter speed.
Whatever Works, Works
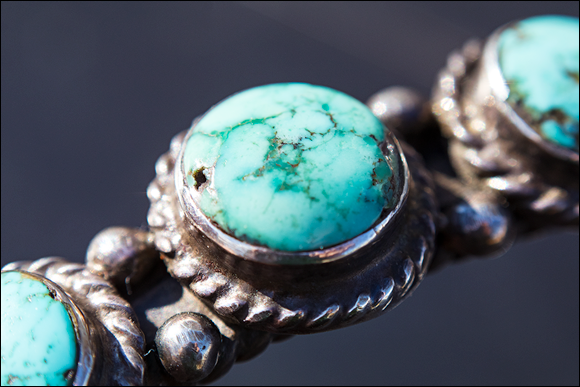
You’re going to laugh at this one. I was experimenting with a few reversing rings. They enable you to mount lenses on your camera backward, which turns normal lenses into close-up/macro lenses. I realize they aren’t everyone’s cuppa tea. You have to manually focus, aperture control can be a problem, and it’s just odd. However, I have some old NIKKOR manual focus lenses that work perfectly with the rings. I can control the aperture on the lens, and even mount them on Canon dSLRs, like I did here.
The funny part is that I was looking for interesting subjects to photograph when I grabbed this turquoise bracelet I bought my wife one year in Texas (that’s another story). She followed me outside to help. We went around the back of the garage and she held the bracelet up against the black trash bin that we have. It worked fantastically as a backdrop and she was able to steady her arm on it. That helped me focus and shoot a crisp photo; see Figure 4-4. I used a Canon APS-C dSLR with 50mm NIKKOR manual focus lens set to f/2. The shutter speed was 1/250 second and the ISO was 200.
Keys to this photo:
- Reversing rings are totally cool but require some effort to use.
- Use what you have to help capture the shot: an old lens, bracelet, and trash bin. As long as it works it doesn’t matter.
- Wide aperture and bright light enabled me to set shutter speed to 1/250 to ensure a sharp photo.
Focus on Small Details
Finally, I present you with President Abraham Lincoln (see Figure 4-5). On a penny, of course. But wow, what a penny. This one has been through some rough times. It’s getting up in years and has a lot of gouges on the surface. I thought it made the perfect subject.
I shot this in my studio using a consumer-level Nikon APS-C dSLR and digital Holga lens. To increase the magnification, I used the 60mm macro attachment that pops onto the main Holga lens. I mounted the camera on a tripod and moved the penny (placed on a piece of wood) back and forth in order to focus. I used Live View to compose the shot, and needed to raise the ISO to 3200 to brighten the scene.
Even though the Holga lens has a small aperture, the depth of field of this shot is very narrow. I focused on the word Liberty and the date so that they would be the sharpest items on the surface of the penny. I could have shot the penny straight on, which would have meant the entire surface would be in focus, but that was a more boring photo. I chose this approach instead.
Keys to this photo:
- Taken with a digital Holga lens with macro attachment.
- Shot in my studio using Live View and a tripod.
- Even with bright lighting, the ISO rose dramatically because of the aperture and nearness of the camera.
- I chose a damaged penny as a more interesting subject.