Chapter 5: Working with Custom Fields
In This Chapter
![]() Understanding what Custom Fields can do for you
Understanding what Custom Fields can do for you
![]() Working with the Custom Fields interface
Working with the Custom Fields interface
![]() Adding custom field codes to your templates
Adding custom field codes to your templates
![]() Using custom fields in a variety of ways
Using custom fields in a variety of ways
In Book IV, Chapter 1, I discuss all the different elements you can add to your blog posts and pages when you publish them. By default, WordPress allows you to give your posts and pages titles and content, to categorize and tag posts, to select a date and time for publishing, and to control the discussion options on a per-post or per-page basis.
However, you may sometimes want to add extra items to your posts — items you may not want to add to every post, necessarily, but that you add often enough to make manually adding them each time you publish a nuisance. These items can include a multitude of things, from telling your readers your current mood to what you’re currently listening to or reading — pretty much anything you can think of.
WordPress gives you the ability to create and add metadata (additional data that can be added to define you and your post) to your posts by using a feature called Custom Fields. In Book IV, Chapter 2, I briefly touch on the Custom Field interface on the Add New Post page on the Dashboard, and in this chapter, I go through Custom Fields in depth by explaining what they are and how to implement them, as well as offering some cool ideas for using Custom Fields on your site.
Understanding Custom Fields
A WordPress template contains static pieces of data that you can count on to appear on your site. These static items include elements such as the title, the content, the date, and so on. But what if you want more? Say you write a weekly book-review post on your site and want to include a listing of recent reviews and accompanying thumbnails of the books; you can, through the use of Custom Fields, without having to retype the list each time you do a review.
 You can add literally thousands of auto-formatted pieces of data (such as book reviews or movie reviews, for example) by adding Custom Fields on your WordPress blog. Okay, so thousands of Custom Fields would be pretty difficult, if not impossible, to manage — my point here is that the Custom Fields feature doesn’t limit you to the number of fields you can add to your site.
You create Custom Fields on a per-post or per-page basis, which means that you can create an unlimited amount of them and add them only to certain posts. They help you create extra data for your posts and pages by using the Custom Fields interface, which is covered in the following section.
So, what can you do with Custom Fields? Really, the only right answer is: anything you want. Your imagination is your only limit when it comes to the different types of data you can add to your posts by using Custom Fields. Custom Fields allow you the flexibility of defining certain pieces of data for each post.
To use Custom Fields, you do need a bit of knowledge about how to navigate through WordPress theme templates because you have to insert a WordPress function tag, with specific parameters, in the body of the template file. Book VI takes you through all the information you need to understand WordPress themes, templates, and template tags — so you may want to hit that minibook before you attempt to apply what I discuss in the rest of this chapter. If you’re already comfortable and familiar with WordPress templates and tags, you probably won’t have any trouble with this chapter at all.
Exploring the Custom Fields Interface
The Custom Fields module appears on both the Add New Post and Add New Page (see Book IV, Chapters 1 and 2) pages on the WordPress Dashboard, below the Post text box, as shown in Figure 5-1.
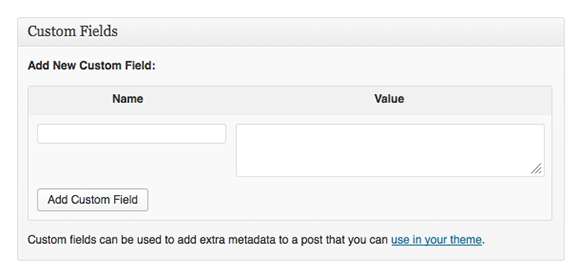
Figure 5-1: The Custom Fields module on the Add New Post page on the Dashboard.
The Custom Fields module has two different text boxes:
 Name: Also known as the Key, you give this name to the Custom Field you're planning to use. The name needs to be unique: It's used in the template tag that you can read about in the section "Adding Custom Fields to Your Template File," later in this chapter. Figure 5-2 shows a Custom Field with the name
 mood.
Value: Assigned to the Custom Field name and displayed in your blog post on your site if you use the template tag that you can also read about in the section "Adding Custom Fields to Your Template File," later in this chapter. In Figure 5-2, the value assigned to the mood (the Custom Field name) is Happy.
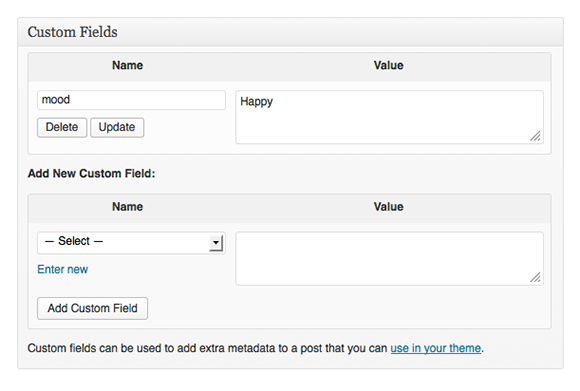
Figure 5-2: Custom Fields that have name and value assigned.
Simply fill out the Name and Value text boxes and then click the Add Custom Field button to add the data to your post or page. Figure 5-2 shows a Custom Field that I added to my post with the Name of mood and with the assigned value Happy. In the section "Adding Custom Fields to Your Template File," later in this chapter, I show you the template tag you need to add to your WordPress theme template in order to display this Custom Field, which appears in my post like this: My Current Mood is: Happy, shown in Figure 5-3, where the Custom Field appears at the end of my post.
You can add multiple Custom Fields to one post. To do so, simply add the name and the value of the Custom Field in the appropriate text boxes on the Add New Post page; then click the Add Custom Field button to assign the data to your post. Do this for each Custom Field you want to add to your post.
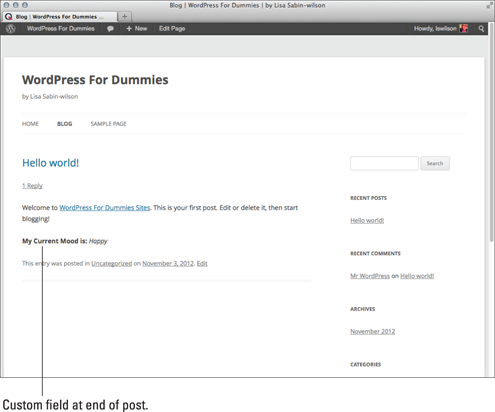
Figure 5-3: A Custom Field output appears in a published post.
 After you add a particular Custom Field (such as the
 mood Custom Field I added in Figure 5-2), you can always add it to future posts. So, you can make a post tomorrow and use the mood Custom Field but assign a different value to it. If tomorrow you assign the value Sad, your post displays My Current Mood is: Sad. You can easily use just that one Custom Field on subsequent posts.
You can access your Custom Fields from the drop-down list below the Name field, as shown in Figure 5-4. You can easily select it again and assign a new value to it in the future, because WordPress saves that Custom Field Key, assuming you may want to use it again sometime in the future.
 Custom Fields are considered extra data, separate from the post content itself, for your blog posts. WordPress refers to Custom Fields as metadata. The Custom Field name and value get stored in the database in the
 wp_postmeta table, which keeps track of which names and values are assigned to each post. See Book II, Chapter 7 for more information about the WordPress database structure and organization of data.
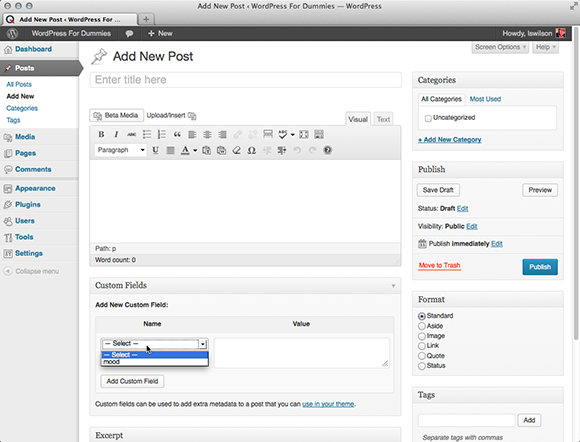
Figure 5-4: Custom Field names are saved and displayed in a drop-down list for future use.
You can find a Custom Fields module on the Add New Page page on the Dashboard, as well, so you can add Custom Fields to either your posts or pages as needed.
Adding Custom Fields to Your Template File
If you followed along in the previous sections and added the mood Custom Field to your own site, notice that the data doesn't appear on your site the way it does on mine. To get the data to display properly, you must open the template files and dig into the code a little bit. If the idea of digging into the code of your template files intimidates you, you can put this section aside and read up on WordPress themes, template files, and template tags in Book VI.
You can add Custom Fields in several ways to your templates in order to display the output of the fields you've set. The easiest way involves using the get_post_meta(); template tag function, which looks like this:
<?php $key="NAME"; echo get_post_meta($post->ID, $key, true); ?>
Here’s how that function breaks down:
<?php: Part of the functions begins PHP. (Every template tag or function needs to first start PHP with <?php. You can read more about basic PHP in Book II, Chapter 3.)
$key="NAME";: Defines the name of the key that you want to appear. You define the name when you add the Custom Field to your post.
echo get_post_meta: Grabs the Custom Field data and displays it on your site.
$post->ID,: A parameter of the get_post_meta function that dynamically defines the specific ID of the post being displayed so that WordPress knows which metadata to display.
$key,: A parameter of the get_post_meta function that gets the value of the Custom Field based on the name, as defined in the $key="NAME"; setting earlier in the code string.
true);: A parameter of the get_post_meta function that tells WordPress to return a single result rather than multiple results. (By default, this parameter is set to true; typically, don't change it unless you're using multiple definitions in the Value setting of your Custom Field.)
?>: Ends the PHP function.
Based on the preceding code, to make the mood Custom Field example, you define the key name as mood (replace the NAME in the preceding code with the word mood); it looks like this:
<?php $key="mood"; echo get_post_meta($post->ID, $key, true); ?>
The part of the functions that says $key="mood"; tells WordPress to return the value for the Custom Field with the Name field of mood.
Entering the code in the template file
So that you can see how to enter the code in your template file, I use the default WordPress theme Twenty Twelve in this section. If you’re using a different theme (and you can find thousands of different WordPress themes available), you need to adapt these instructions to your particular theme.
Follow these steps to add the template tag, along with a little HTML code to make it look nice, to your theme (these steps assume that you've already added the mood Custom Field to your blog post and have assigned a value to it):
1. Log in to your WordPress Dashboard.
2. Click the Editor link on the Appearances menu.
The Edit Themes page loads in the Dashboard, as shown in Figure 5-5.
3. Locate the template files for your theme (in this case, Twenty Twelve).
The available templates are listed on the right side of the Edit Themes page, as shown in Figure 5-5.
4. Click content.php in the list of templates.
The content.php template opens in the text editor on the left side of the screen, where you can edit the template file.
5. Scroll down and locate the template tag that looks like this: <?php the_content() ?>.
6. On the new line underneath the preceding one, type this:
<p><strong>My Current Mood is:</strong><em>
<p> and <strong> open the HTML tags for paragraph and bold text, respectively; followed by the words to display in your template (My Current Mood is:). <em> opens the HTML tag for italics style text, which gets applied to the value. (The </strong> HTML tag closes the bold text display.)
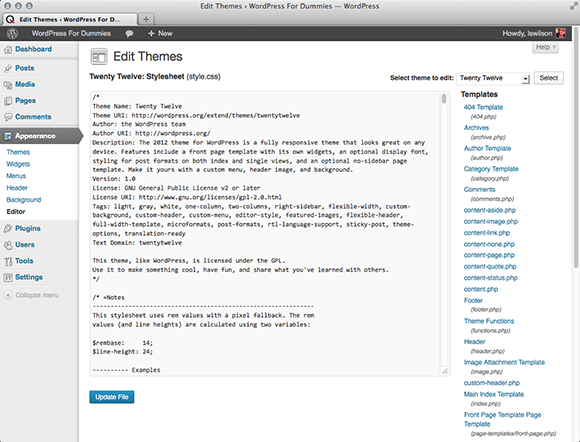
Figure 5-5: The Edit Themes page on the Dashboard.
7. Type the PHP that makes the custom field work:
<?php $key="mood"; echo get_post_meta($post->ID, $key, true); ?>
8. Type </em></p>.
This code closes the HTML tags you opened in Step 6.
9. Click the Update File button.
Located at the bottom of the Edit Themes page, this step saves the changes you made to the content.php file and reloads the page with a message that says your changes have been successfully saved.
10. View your post on your site to see your Custom Field data displayed.
The data should look just like the My Current Mood is: Happy message shown earlier in Figure 5-3.
WordPress now displays your current mood at the bottom of the posts to which you've added the mood Custom Field.
The entire code, put together, should look like this in your template:
<p><strong>My Current Mood is:</strong> <em><?php $key="mood"; echo get_post_meta($post->ID, $key, true); ?></em></p>
 The code is case sensitive, which means that the words you input for the key in your Custom Field need to match case with the
 $key in the code. For example, if you input mood in the Key field, then the code needs to be lowercase, as well: $key="mood". If you attempt to change the case like this: $key="Mood", the code won't work.
You have to add this code for the mood Custom Field only one time; after you add the template function code to your template for the mood Custom Field, you can define your current mood in every post you publish to your site by using the Custom Fields interface.
This example is just one type of Custom Field that you can add to your posts.
Getting WordPress to check for your Custom Field
The previous sections show you how to add the necessary code to your template file to display your Custom Field; however, what if you want to publish a post on which you don't want the mood Custom Field to appear? If you leave your template file as you set it up by following the steps in the previous sections, even if you don't add the mood Custom Field, your blog post displays My Current Mood is: without a mood because you didn't define one.
IF, ELSE
In your daily life, you probably deal with IF, ELSE situations every day, like in these examples:
IF I have a dollar, then I’ll buy coffee, or ELSE I won’t.
IF it’s warm outside, then I’ll take a walk, or ELSE I won’t.
IF I understand this code, then I’ll be happy, or ELSE I won’t.
But you can easily make WordPress check first to see whether the Custom Field is added. If it finds the Custom Field, WordPress displays your mood; if it doesn’t find the Custom Field, WordPress doesn’t display the Custom Field.
If you followed along in the previous sections, the code in your template looks like this:
<p><strong>My Current Mood is:<strong> <em><?php $key="mood"; echo get_post_meta($post->ID, $key, true); ?></em></p>
To make WordPress check to see whether the mood Custom Field exists, add this code to the line above your existing code:
<?php if ( get_post_meta($post->ID, 'mood', true) ) : ?>
Then add this line of code to the line below your existing code:
<?php endif; ?>
Put together, the lines of code in your template should look like this:
<?php if ( get_post_meta($post->ID, 'mood', true) ) : ?>
<p><strong>My Current Mood is:</strong> <em><?php $key="mood"; echo get_post_meta($post->ID, $key, true); ?></em></p>
<?php endif; ?>
The first line is an IF statement and basically asks, "Does the mood key exist for this post?" If it does, the value gets displayed. If it doesn't, WordPress skips over the code, ignoring it completely so that nothing gets displayed for the mood Custom Field. The final line of code simply puts an end to the IF question. See the nearby "IF, ELSE" sidebar to find out about some everyday situations that explain the IF question. Apply this statement to the code you just added to your template and you get this: IF the mood Custom Field exists, then WordPress will display it, or ELSE it won't.
You can find extensive information on working with WordPress template files within your theme in Book VI.
Exploring Different Uses for Custom Fields
In this chapter, I use the example of adding your current mood to your blog posts by using Custom Fields. But you can use Custom Fields to define all sorts of data on your posts and pages; you’re limited only by your imagination when it comes to what kind of data you want to include.
Obviously, I can’t cover every possible use for Custom Fields, but I can give you some ideas that you may want to try on your own site. At the very least, you can implement some of these ideas to get yourself into the flow of using Custom Fields, and they may spark your imagination on what types of data you want to include on your site:
Music: Display the music you're currently listening to. Use the same method I describe in this chapter for your current mood, except create a Custom Field named music. Use the same code template, just define the key as $key="music"; and alter the wording from My Current Mood is: to I am Currently Listening to:.
Books: Same as the mood or music Custom Field, you can display what you're currently reading by creating a Custom Field named book, defining the key in the code as $key="book";, and then altering the wording from My Current Mood is: to I Am Currently Reading:.
Weather: Let your readers know what the weather is like in your little corner of the world by adding your current weather conditions to your published blog posts. Create a Custom Field named weather and use the same code for the template — just define the key as $key="weather"; and alter the wording from My Current Mood is: to Current Weather Conditions:.
If you want to get really fancy with your Custom Fields, you can also define an icon for the different metadata displays. For example, using the mood Custom Field, you can add little emoticons (or smiley-face icons that portray mood) after your mood statement to give a visual cue of your mood, as well as a textual one. Follow these steps to add an emoticon to the mood Custom Field that you add in the previous sections in this chapter:
1. Visit the Posts page on the Dashboard by clicking the Posts link in the left navigation menu.
2. Click the title of the post that you want to edit.
3. Add a new Custom Field by selecting Enter New from the drop-down list and entering mood-icon in the Name text box.
4. Click the Add Media button above the Post text box to open the Add Media window.
The Insert Media window opens, shown in Figure 5-6.
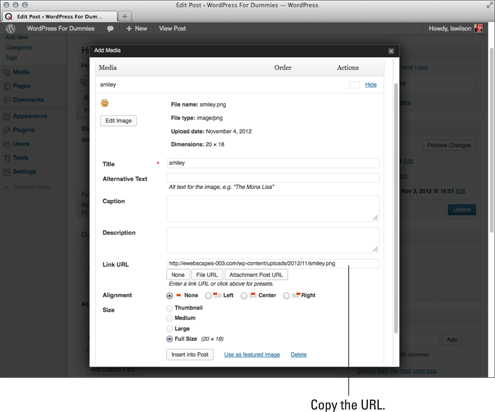
Figure 5-6: The Link URL in the Insert Media window.
5. Click the Select Files button and upload an image from your computer.
See Book IV, Chapter 3 for information on uploading images.
6. From the Link URL text box, copy the file URL of the image you uploaded.
7. Click the X in the top-right corner to close the Insert Media window.
8. Paste the Link URL in the Value text box for the mood-icon Name. (See Figure 5-7.)
9. Click the Add Custom Field button.
The Name and Key values are saved.
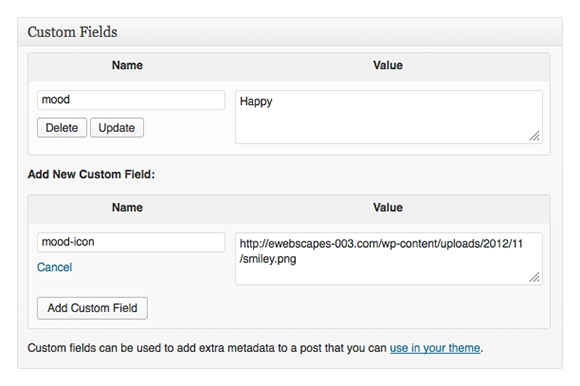
Figure 5-7: Adding a mood icon.
10. Click the Update button in the Publish module.
The changes in your post are saved and updated on your site.
11. Update the function code in your template file to include the new mood icon.
Follow these steps to add that code:
a. Click the Editor link in the Appearance menu on your Dashboard.
b. Click the content.php file.
The content.php template displays in the text box on the left side of the page.
c. Locate the code you added for the mood Custom Field.
d. Before the closing </strong> HTML tag, add the following line of code:
<img src="<?php $key="mood-icon"; echo get_post_meta($post->ID, $key, true); ?>" />
The <img src=" that precedes the Custom Field code is the HTML tag used to display an image on your site. The " /> code that appears after the Custom Field code is part of the HTML tag and it closes the <img src=" HTML tag. I changed the $key to indicate that I'm calling the mood-icon Custom Field.
e. Click the Update File button to save your changes.
f. Visit the post on your site to view your new mood icon.
You can see my mood icon in Figure 5-8.
The entire snippet of code you add in the preceding steps should look like this when put all together (be sure to double-check your work!):
<?php if ( get_post_meta($post->ID, 'mood', true) ) : ?>
<p><strong>My Current Mood is:</strong> <em><?php $key="mood"; echo get_post_meta($post->ID, $key, true); ?></em> <img src="<?php $key="mood-icon"; echo get_post_meta($post->ID, $key, true); ?>" /></strong></p>
<?php endif; ?>
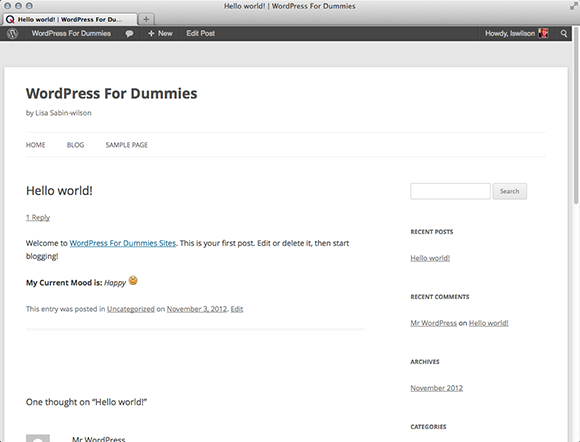
Figure 5-8: I am displaying my current mood with a mood icon.