Appendix B. Intro to Python
As you’ve probably noticed from flipping through the book, all of my scripts for the robot are written in Python. There are some good reasons for this. If you are already a skilled Python aficionado, you can probably skip this portion of the book. On the other hand, if you need a refresher, or if Python is completely new to you, read on for a quick-and-dirty introduction to this powerful language.
Python on the Pi: A History in Four Paragraphs
Python was born in 1989 to Guido van Rossum, who had a crazy idea that programming should be accessible to everybody, not just geeks with broken glasses and pocket protectors. He was working with a language called ABC, and wanted a language that would fix some of its problems and add new features. The result, created over a Christmas holiday, was Python. He continues to have a hand in the development of the language, and has been gifted by the Python community with the title Benevolent Dictator for Life, or BDFL.
Contrary to what some believe, Python is not named after the snake. Rather, it is named for the British comedy troupe Monty Python, of whom van Rossum is a huge fan. (If you have never seen a Monty Python sketch, you should go to YouTube right now and watch a few. I recommend the Dead Parrot sketch, the Ministry of Silly Walks, and the Argument Clinic.) No, you don’t need to be a fan to use the language, but it helps you get some of the in-jokes.
Because of its Monty Python origins, you’ll find references to the comedy
scattered throughout Python. Instead of the common foo and bar example
functions and variable names, you’ll find spam and eggs. “Knights of Ni”
references abound in tutorials and books. Even the integrated development
environment (IDE) called IDLE is named after one of the members (see if you can
guess which one).
As to Python on the Pi, the Pi’s creators (Eben Upton, Rob Mullins, Jack Lang, and Alan Mycroft) wanted a small, cheap computer that anybody could learn to program on. Knowing how simple and how powerful Python was, they included it as the default language on the Pi. Yes, you can program its ARM processor in C or even (if you’re particularly masochistic) assembly language, but after learning about Python, why would you want to?
Using IDLE
Perhaps the best way to get an introduction to the language is by using its real-time development environment, IDLE. On your Raspberry Pi desktop, doubleclick the IDLE icon (Figure B-1).
This opens an interactive screen, as you see in Figure B-2.
Let’s start with the first program any programmer ever learns. In your IDLE prompt, type the following:
print "Hello, world!"
You should be rewarded with:
'Hello, world!'
If you’ve programmed in different languages, you should immediately notice a difference. To print “Hello, world!” in C++, you’d need to type the following:
#include<iostream>usingnamespacestd;intmain(){cout<<"Hello, world!"<<endl;return0;}

Python takes only one line to do the same thing. There’s also a noticeable lack
of semicolons, and opening and closing braces. Python uses indentations and
blank space to delineate blocks of code. If you need to block out an if
statement, for example, you end the statement with a colon (:), and then the
conditional statements are all indented. When the conditional statements end,
the indentation ends.
Lines don’t end with semicolons; rather, when a line is over, it’s just over.
So to illustrate an if block, for example:
ifx<y:"x is less than y""This block of code is now over""This is a new code section."
This has the effect of making Python code much easier to read, and much easier to debug.
As you progress in your programming skills, get in the excellent habit of commenting your code; it makes it easier not only for others to understand it, but also for you to understand your own code when you go back to it after several months of doing something completely different.
Now, back in IDLE, type x = 4.
Then type x and press Enter. You’ll be rewarded with the following:
4
You’ve just defined the variable x as an integer: a variable that can hold a small number (well, a number between 0 and 65533).
Type y = "This is a string". Then type y and press Enter. You’ll be rewarded with the following:
'This is a string'
You’ve just defined the variable y as a string, a collection of characters.
Now, type x + 4 and press Enter. You’ll see:
8
Type y + " and is long" and press Enter, and you’ll see this:
'This is a string and is long'
To finish off this little lesson, type x +" is not a string" and press Enter. You’ll see your first error:
TypeError: unsupported operand type(s) for +:'int' and 'str'
This illustrates that Python is a dynamically typed language. You
don’t need to tell it that x is an integer; it knows from your previous use
of x. It also knows that y is a string, and that you can’t add a string and an
integer to each other. However, if you were to convert the integer to a string,
with str(x) + " is not a string", the result of that command would be:
'4 is not a string'
I’ve mentioned integers and strings. There are also long variables, ones that can hold large numbers (519234L, for example); floats, which can hold what we think of as fractional, decimal, or real numbers (1.2345); and complex, which can hold what mathematicians also refer to as imaginary numbers, that contain the square root of –1. This is often written as i (or in
engineering as j). So, for example, 3.14 times the square root of –1 will be displayed as 3.14j in Python. Python’s standard library allows you to perform all of the standard operations with those numbers: exponentiation, multiplication, division, addition, and subtraction. If you wish to extend your capabilities, you can import the math module for additional functions like floor, ceil, and others.
Python’s other main data types are lists, dictionaries, and tuples. Lists, arguably Python’s most useful data type, are similar to C’s arrays. You declare a list with brackets ([]), and once declared, you can refer to members of a list by their index, starting with 0. For instance, type the following into IDLE:
spam = ["eggs", "ham", "bacon", "beans"]
Then type the following:
spam[2]
and you should be rewarded with this:
'bacon'
List members can be almost anything, including other lists; this is how you construct two- and three-dimensional arrays in Python. Lists are mutable, which means you can change them in place by assigning a new variable to an index (spam[2] = "seven", for example). This differentiates them from strings, which cannot be changed in place, though you can refer to members of a string by index.
Dictionaries are similar to lists, but they have a key:value relationship. You can declare a dictionary by using curly braces, and then refer to its members by key. To illustrate:
shrubbery = {"spam":"eggs", "knight":"ni", "black":"knight"}

shrubbery["knight"]
returns:
'ni'
These are the main components of Python, which you’ll be working with as you program.
Python Scripts
Writing Python code in IDLE is all well and good, and is a good way to practice with the language, but IDLE’s main drawback is that it doesn’t easily let you save your code. When you close it, it’s all over.
For that reason, you’ll be using a text editor to write all of your programs.
There are several camps among Linux programmers regarding the “proper” text
editor to use; the two most popular are Vim and emacs. If you’re familiar
with one of those, great. Vim is preinstalled on the Pi, and you can install
emacs with a simple sudo apt-get install emacs in your terminal. If you’re
not sure, however, or don’t even know what those are, fear not: the Pi also
comes preinstalled with nano, a full-featured editor that’s intuitive and
easy to use. I use emacs, but in this book I’ll refer to my code in
nano for those of you using it.
If you are working on your Pi’s desktop environment (either directly or via a VNC connection), you can also use the Pi’s built-in Leafpad editor (Figure B-3).

Unfortunately, although Leafpad will work fine for writing scripts, it can’t be used from the command line. Because much of your work is done remotely after the Pi is safely ensconced in the rover, you’ll have to get used to another editor.
To write a script, start your chosen text editor. From the command line, you can
type nano test.py.
When you use a command-line editor like nano or emacs, your development
environment will have syntax clues; that is, important Python words like
import and print and def will be color-coded, which can be helpful when
writing unfamiliar code.
Write a short script, such as this one that will print out all even integers between 1 and 100:
forxinrange(100):ifx%2==0:x
Now, save it as even.py and close the script. Back in your terminal, make
sure you’re in the same directory as the script you just wrote and type
python even.py. You should be greeted by a long line of even numbers from 0 to 98.
You can make a Python script executable. In other words, clicking the file in your file manager will execute it, rather than opening it in a text editor. To do that, browse to the file’s location in a terminal. From there, to change test.py to an executable, for instance, type this:
chmod 755 test.py
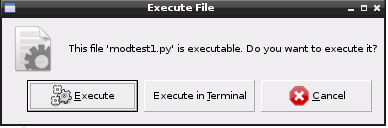
From then on, if you double-click test.py, you will be greeted with a dialog
box like that in Figure B-4. Depending on the file’s output, you can choose to
run it or run it inside a terminal. This can sometimes be a time-saver if you
don’t want to open a terminal to enter python test.py.
That is a breakdown of how to write and execute the Python scripts you’ll need to program your rover. We’ll come across other concepts during the build, such as functions, but I’ll explain those as they arise. Hopefully, this will give you enough of an introduction to the language to let you dive in to the build!