Chapter 2
Configuring Shared Resources
IN THIS CHAPTER
 Understanding the differences between shared folder permissions with file system security
 Sharing resources on Windows Server 2019
 Setting up federated access with Active Directory Federation Services
 Understanding and deploying Active Directory Rights Management Services
One of the most common tasks that a system administrator faces when getting systems on the network is making sure that the resources on those systems are available.
In this chapter, I explain shared folder permissions, printer sharing, and how to share other items of interest from your server. I also explain how to set up Active Directory Federation Services (AD FS), which allows you to use the same authentication source against other entities and applications, as well as configure Active Directory Rights Management Services (AD RMS) to protect documents that you’re sharing internally and externally.
Comparing Share Security with File System Security
Making resources available to your end users without giving them access to the servers the resources are on is a must in organizations. By sharing a folder, you can map a drive to the shared folder for your end users automatically. The end user sees another drive (think home drives or department drives), when in reality it’s a folder that resides on a server. One of the most confusing things for new system administrators is how to share a folder. There are two tabs: Security and Sharing. For an explanation on discretionary access control lists (DACLs) and the different permission levels available on the Security tab and the Share tab, check out Book 5, Chapter 1.
As a best practice, you’ll typically set more open access on the shares, and then restrict access with the New Technology File System (NTFS) permissions on the Security tab. This simplifies administration greatly, and with the Effective Permissions tab, you can check to ensure that users are getting the permissions to the share and its contents that they’re supposed to have.
Shared folder permissions
When you create a share, you create a UNC path (\\servername\sharename) that your users can then use to connect to that folder. The great thing about setting up folder shares is that you can use shares to give your users access to the intended folder, without needing to give them any access to log in to the server.
Security settings on shares tend to have more open permissions, while restrictions are now done on the Security tab and are enforced by the file system.
In Figure 2-1, you can see the share permissions for the Software folder. Notice that everyone has full control.
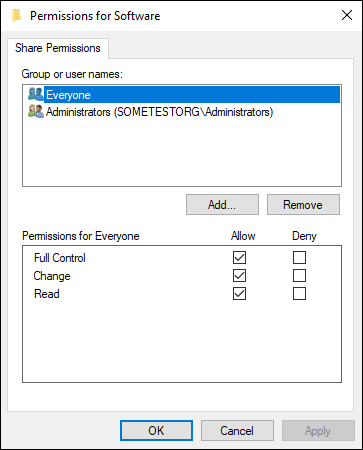
FIGURE 2-1: Share permissions are pretty open in this example. Everyone has full control.
File system security
NTFS was first introduced in 1993, but it didn't gain popularity until quite a bit later. NTFS was the first file system supported by Windows that offered more granular access control. Rather than the three basic permissions provided by shares, it has six permissions that can be assigned: Full Control, Modify, Read & Execute, List Folder Contents, Read, and Write.
The current best practice is to have more open permissions on shares, while using the NTFS file system to restrict access to the folder. The reasoning behind this best practice is that it would be difficult to set both share and NTFS permissions and keep them both in sync. To avoid this issue, you would want to use one over the other. Because NTFS permissions offer more granularity, they’re the logical best choice.
In Figure 2-2, you can see that a user named Kay Smith has Read & Execute, List Folder Contents, and Read for permissions. In the next section, I explain why this is important.
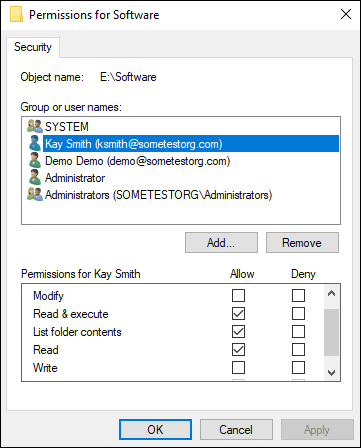
FIGURE 2-2: Here, NTFS permissions set on the Security tab are more restrictive than the share permissions.
Effective permissions validation
Effective permissions refers to the permissions that a user has actually been granted as a combination between file system permissions and share permissions. Securing your shares with NTFS is preferred due to its granularity and the fact that it applies to both local and network access. In either case, the more restrictive permission will apply. If a user does not explicitly have access granted, he’ll be denied access by default. See Table 2-1 for examples of effective permissions.
TABLE 2-1 Effective Permissions
|
Share Permissions |
NTFS Permissions |
Effective Permissions |
|
Read |
Full Control |
Read |
|
Full Control |
Read |
Read |
Now that you have an idea of how effective permissions work, let’s go back to the example that I show you in the previous sections. The share permissions on my server had everyone set to Full Control. The NTFS permissions gave the Kay Smith user much more limited permissions. Check the Effective Permissions tab to see what she actually has:
- Right-click the folder you want to check permissions on and choose Properties.
- Click the Security tab.
- Click Advanced.
- Click the Effective Access tab.
- Fill in the user or group you want to check and then click View Effective Access.
You can see the results for the Kay Smith user in Figure 2-3.
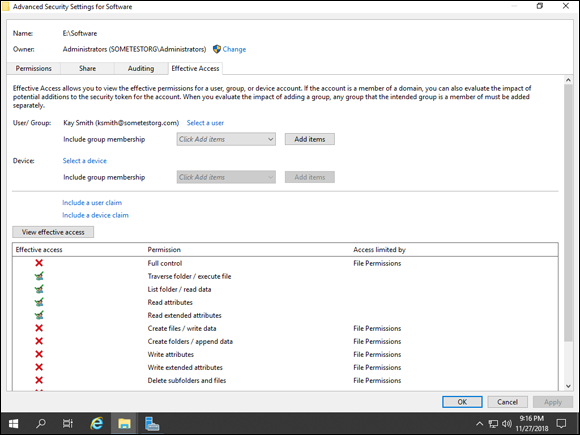
FIGURE 2-3: The Effective Access tab shows you what a user or group actually has for permissions.
The check-marked items are the access that was given to the Kay Smith user on the Security tab. Also, notice that each of the items with a red X says File Permissions under the Access Limited By column.
Sharing Resources
You may want to share other items beyond the typical files and folders. For example, you may want to share device drives or other hardware. In this section, I walk you through a few of the things that you may want to share and explain how to do so.
Storage media
You may need to share access to a DVD drive or an external storage device that is attached to your machine. This is a very simple thing to do. Just follow these steps:
- Open File Explorer, and click This PC.
- Right-click the storage media that you want to share, and choose Give Access To⇒ Advanced Sharing (see Figure 2-4).
- On the Sharing tab, click the Advanced Sharing button.
- Select the Share This Folder check box.
-
Create a more descriptive drive name.
By default, the drive name is the letter of the DVD drive.
- Click Permissions, add whoever you want to have access to the drive, and click OK.
-
Click OK again.
Your drive will be shared.
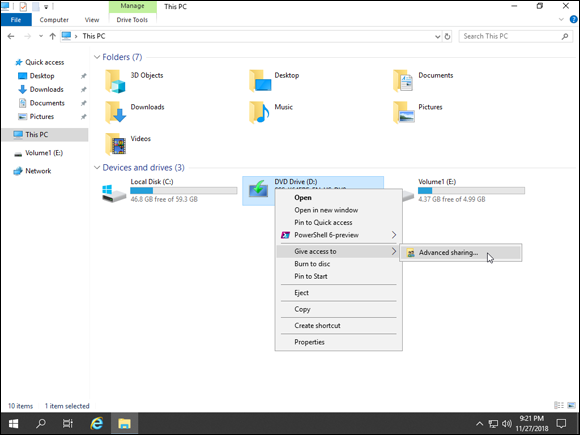
FIGURE 2-4: Sharing a storage device follows similar steps to sharing a folder.
You can tell the storage drive is shared because an icon with two people will show up underneath it after you’ve shared it.
Printers
Sharing a printer is relatively straightforward as well, though the steps are a little different than they are for sharing storage devices. In more than a few organizations, I’ve seen a local printer shared where there was an enterprise-wide print server. You might ask why they were sharing a printer from a workstation rather than use it through the print server. The answer was usually along the lines of a one-off printer.
Follow these steps to share a printer:
- Click Settings and then click Devices.
- Click Printers & Scanners.
- Select the printer you want to share, and click Manage.
-
Click Printer Properties.
The Printer Properties dialog box appears.
- Click the Sharing tab.
- Click Change Sharing Options.
-
Select the Share This Printer check box and choose any other options that you want.
 I recommend keeping Render Print Jobs on Client Computers checked because this will reduce the load on your system when people print.
 - Click OK.
Other resources
How you share other resources will depend on what you want to share. In a Windows Server environment, the options to share should be very similar to what was already covered, so if you understand how to share folders and printers, you should be able to handle any sharing requests that come your way.
Configuring Access with Federated Rights Management
Sharing isn’t always limited to things like folders or hardware. Sometimes you may want to “share” credentials with another entity like using your Active Directory on-premises to authenticate to the Microsoft Azure portal. This isn’t a true sharing, of course. By setting up Active Directory Federation Services (AD FS), you aren’t giving Microsoft your credentials; you’re simply federating a trust.
You may also find that you want to have greater control over your files when they leave your organization. Maybe you want to password encrypt them or force them to expire. You can do these things with Active Directory Rights Management Services (AD RMS).
In this section, I dig into AD FS and AD RMS, explaining what each of these does and how to configure them.
Working with Active Directory Federation Services
If you’ve ever worked with Active Directory before, you probably liked the fact that so many of your internal applications could take advantage of Active Directory, too. Your users were able to use just one username and password to access all the things that they needed to do their jobs. But what about these third-party cloud services that are popping up everywhere? Wouldn’t it be great of your users could use the same usernames and passwords that they know to access these third-party solutions? Great news! They can use their usernames and passwords, in the third-party-supported AD FS.
So, how does AD FS work? Let’s look at the authentication process. Site 1 is your local network where your domain controllers and your AD FS and AD FS Proxy servers live. Site 2 hosts the third-party website you want to authenticate to using your Active Directory credentials. There is a trust set up between Site 1 where you are and Site 2 where you want to access resources. The AD FS server in Site 1 is referred to as the identity provider, because that’s where the authentication takes place. Site 2 is referred to as the trusting party; it relies on the token from AD FS to determine if you’re an authenticated user or not. It works like this:
- You open your browser and type in the URL for Site 2.
- Site 2 redirects the request to the Site 1 AD FS Proxy server, which asks for your username and password.
- After the request is authenticated, the Site 1 Proxy returns you to Site 2 with a token that contains the claims about your user account including your identity.
- You’re logged into Site 2.
At this point, you may be wondering how AD FS fits into a chapter on sharing resources. You aren’t sharing Active Directory after all. When you federate a trust with another organization, you can access that other organization’s resources. In essence, the other organization can share its resources (like a web application) with you without needing you to authenticate separately to its systems.
Now that you know what AD FS is, and the basics of how it works, let’s actually set it up. You need a Secure Sockets Layer (SSL) certificate to finish the configuration. For the purposes of these instructions, I’ll create a self-signed certificate, but you’ll want a certificate from a public certificate authority for an actual production AD FS server.
To install, configure, and test an AD FS server, follow these steps:
- From Server Manager, click Manage and then click Add Roles and Features.
- On the Before You Begin screen, click Next.
- On the Select Installation Type screen, click Next.
- On the Select Destination Server screen, click Next.
- On the Select Server Roles screen, select Active Directory Federation Services, and then click Next.
- On the Select Features screen, click Next.
- On the Active Directory Federation Services (AD FS) screen, click Next.
- On the Confirm Installation Selections screen, click Install.
- Click Close.
The first step is complete: You’ve installed AD FS. To make it useful, though, you need to configure it. Follow these steps:
- Click the flag in Server Manager, and then click Configure the Federation Service on This Server (see Figure 2-5).
- On the Welcome screen, select Create the First Federation Server in a Federation Server Farm, and click Next.
- On the Connect to Active Directory Domain Services screen, enter the name of a Domain Administrator, and click Next.
-
On the Specify Service Properties screen, select the SSL certificate you want to use.
The Federation Service Name will fill in based on the common name on the certificate.
-
Fill in the Federation Service Display Name, and click Next.
On the next screen, you need to create a group managed service account, but this option will most likely be grayed out because the KDS Root Key has not been created. You’ll get an error similar to Figure 2-6.
- Right-click Start, and select Windows PowerShell (Admin).
- Type in the following command, and then press Enter:
Add-KdsRootKey -EffectiveTime (Get-Date).AddHours(-10)The KDS Root Key is created.
 Key Distribution Service (KDS) keys are required for you to be able to generate passwords for Group Managed Service Accounts (gMSAs). A gMSA is a type of service account that is able to manage the synchronization of its password to multiple systems automatically. The service using the gMSA needs to support gMSAs for this to work.
 -
Return to the Active Directory Federation Services Wizard and click OK on the error box.
You may need to click Previous and then click Next to get the option for Create a Group Managed Service Account to be available.
-
Select Create a Group Managed Service Account, type the name you want to use, and click Next.
I’ll use gmsa_adfs.
-
On the Specify Configuration Database screen, select Create a Database on This Server Using Windows Internal Database and click Next.
 In a production environment, you’ll most likely want to select an actual SQL Server to host the database for AD FS. The Windows Internal Database is limited and not very scalable.
 - On the Review Options screen, click Next.
-
On the Pre-requisite Checks screen, click Configure.
The installation screen will show you the progress and any errors it ran into. When it’s complete, you’ll see the Results screen, with the message “This server was successfully configured.”
- Click Close.
- Restart the server for the AD FS role to finish its configuration.
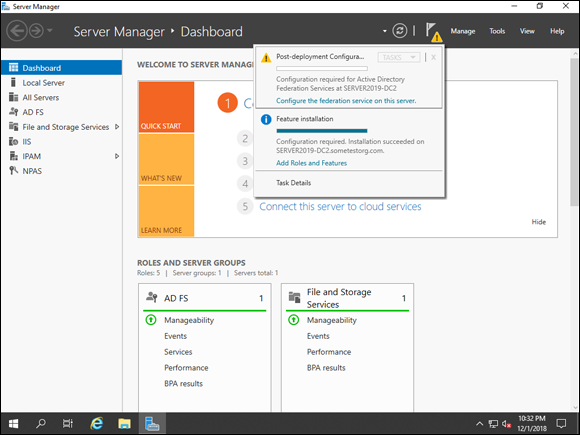
FIGURE 2-5: Configuring the AD FS role after installation.
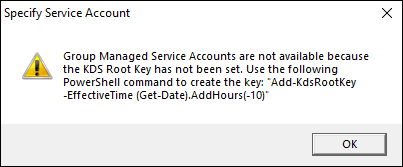
FIGURE 2-6: You will be prompted to create a KDS Root Key if one does not exist.
To make sure that AD FS is up and running, you need to enable the page you’re going to use for testing. Starting in Windows Server 2016, the idpinitiatedsignon.aspx page was disabled by default. Follow these steps:
- Right-click the Start Menu and choose Windows PowerShell (Admin).
- Type in the following command, and press Enter:
Set-AdfsProperties -EnableIdPInitiatedSignonPage $true -
Open Internet Explorer and navigate to
https://ADFS_FQDN/adfs/ls/idpinitiatedSignOn.aspx.You see a screen similar to Figure 2-7 if everything is working properly.
- Click the Sign In button.
-
Enter an Active Directory username and password, and click OK.
You’re presented with a screen that says “You are signed in.”
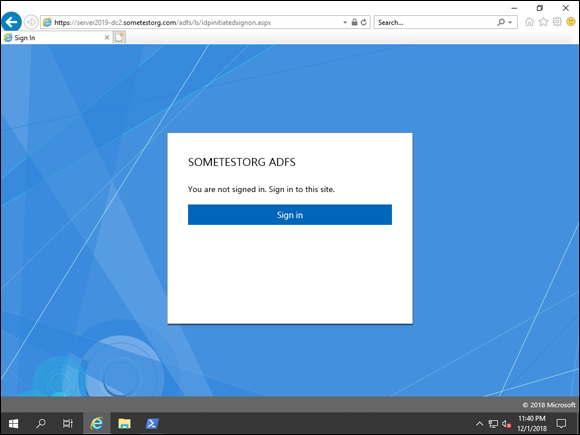
FIGURE 2-7: If everything is configured properly, you get the AD FS login page.
After you’ve confirmed that AD FS is working, you can disable the page you used to test it with by entering the following command:
Set-AdfsProperties -EnableIdPInitiatedSignonPage $false
Working with Active Directory Rights Management Services
AD RMS allows you to provide data protection on documents made in RMS-aware applications like Microsoft Office. This protection can follow the document off-premises and can be applied even when there is no network connection. In short, the data is protected regardless of where it goes. You can set encryption and access expiration requirements. And you can even prevent emails or documents from being copied and pasted or printed.
AD RMS is installed through the already familiar Server Manager interface. Configuration isn’t exceptionally complex either. Follow these steps to get AD RMS up and running in your environment:
- From Server Manager, click Manage and then click Add Roles and Features.
- On the Before You Begin screen, click Next.
- On the Select Installation Type screen, click Next.
- On the Select Destination Server screen, click Next.
- On the Select Server Roles screen, select Active Directory Rights Management Services, click Add Features, and then click Next.
- On the Select Features screen, click Next.
- On the Active Directory Rights Management Services screen, click Next.
- On the Select Role Services screen, accept the default with just AD RMS selected, and click Next.
- On the Confirm Installation Selections screen, click Install.
- Click Close.
Now that you have AD RMS installed, there is some post-install configuration that needs to be done. Follow these steps:
- Click the flag in Server Manager and click the Perform Additional Configuration link shown in Figure 2-8.
- On the Active Directory Rights Management Services screen, click Next.
- On the Create or Join an AD RMS Cluster screen, choose Create a New AD RMS Cluster, and click Next.
-
On the Select Configuration Database screen, enter the name of your SQL server and click Next.
For lab environments, it’s okay to choose Windows Internal Database.
- On the Specify Service Account screen, click Specify, enter the username and password of the service account for AD RMS, click OK, and then click Next.
-
On the Specify Cryptographic Mode screen, select Cryptographic Mode 2 and click Next.
 Unless there is a need for legacy support, you should always choose Cryptographic Mode 2. It has longer private keys (2048 bits) and uses a stronger hashing algorithm. This makes it more difficult for an attacker to break through your encryption because it becomes more time intensive with larger key sizes.
 - On the Specify AD RMS Cluster Key Storage screen, select Use AD RMS Centrally Managed Key Storage and click Next.
- On the next screen, set a password to protect the cluster key, and then click Next.
-
Select the website that you want to use for AD RMS, and then click Next.
In this case, I’ll just use the Default Web Site.
- On the Specify Cluster Address screen, set the Connection Type to Use an SSL-Encrypted Connection, give the cluster a name (this must be a fully qualified domain name), and then click Next.
-
On the Choose a Server Authentication Certificate screen, choose an existing certificate and click Next.
Note that you can create a self-signed certificate or choose a certificate later. If you don’t have a certificate available, select Self-Signed for now and replace it with a valid certificate as soon as possible.
- On the Server Licensor Certificate screen, click Next.
-
On the next screen, leave the default Register the SCP Now selected and click Next.
You’re finally on the Confirmation page!
- If everything looks correct, click Install.
- After installation has finished, click Close.
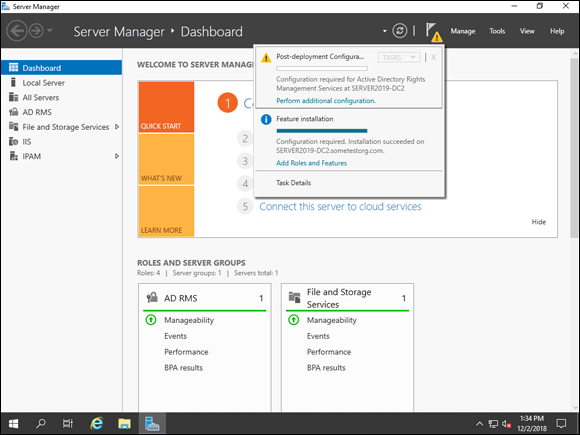
FIGURE 2-8: After AD RMS is installed, you need to configure it.
Now you have AD RMS installed and configured. I’m sure you want to jump right in and start playing around. If you try to open the AD RMS console right now, though, you get an error that says “The request failed with HTTP status 401: Unauthorized.” This happens because a group was created, called AD RMS Enterprise Admins. This group is created locally on the server, and though your account is added to it automatically, you don’t get the benefits of the new permissions until you log out and then log back in. Go ahead and do that now. I’ll wait.
After you’ve logged out and logged back in, Server Manager will launch automatically. Choose Tools ⇒ Active Directory Rights Management Services. You see a console similar to Figure 2-9.
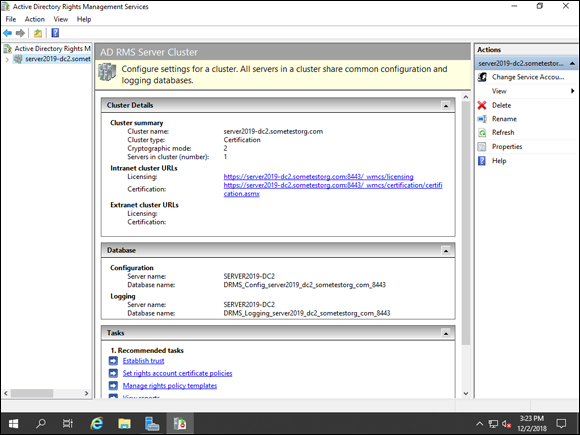
FIGURE 2-9: You can manage AD RMS from the console available through Server Manager’s Tools menu.
Now you need to set up a rights policy template, which is what helps to define any rules and/or conditions that you want to apply to data that is protected by the template. Follow these steps:
- In the Active Directory Rights Management Services console, click Rights Policy Templates in the menu on the left.
- Click Create Distributed Rights Policy Template, shown in Figure 2-10.
- Click Add.
- Fill in the Template Identification Information: Language, Name and Description, click Add, and then click Next.
-
Select the users who can access the protected data and what rights they’ll have.
In my case, I have given my demo user full control, but I’ve given my user Kay Smith very little control, as shown in Figure 2-11.
-
Click Next.
 In a production environment, you would want to assign rights via groups rather than individually named users. The group must have an email address associated with it.
 - In the Content Expiration section, choose Never Expires and click Next.
- On the Specify Extended Policy screen, don’t make any changes. Just click Next.
- On the Specify Revocation Policy page, don’t make any changes. Just click Finish.
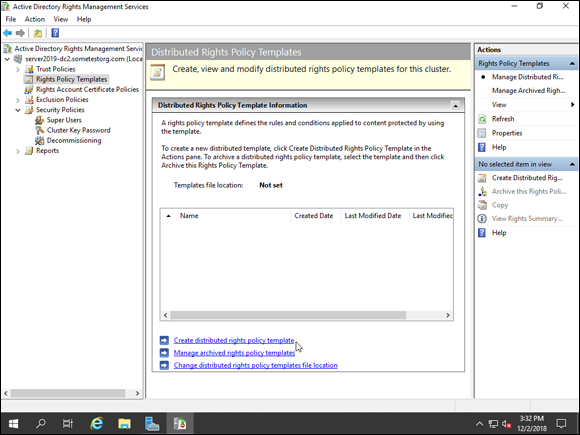
FIGURE 2-10: Creating the Rights Policy Template defines what you want to apply to protected data.
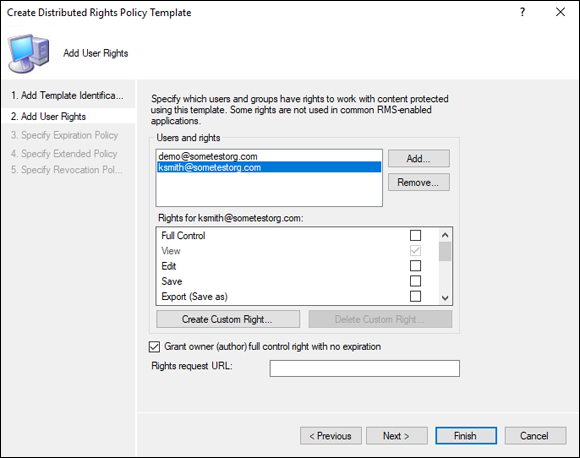
FIGURE 2-11: Ensuring that a user can view but do nothing else is simple with AD RMS.
Now that the rights policy template is created, you need to configure the actual distribution for the template. You do this in PowerShell. To open PowerShell, right-click the Start Menu and click Windows PowerShell (Admin).
First, you’ll create a new directory on a storage drive. You can place this new directory wherever you would like. I’m placing it on C: for this demonstration, but I recommend that you don’t store it on the system drive for a production deployment. Then you need to share the directory to the AD RMS service account. You do this for the AD RMS templates. You can see all the commands from my environment in PowerShell in Figure 2-12.
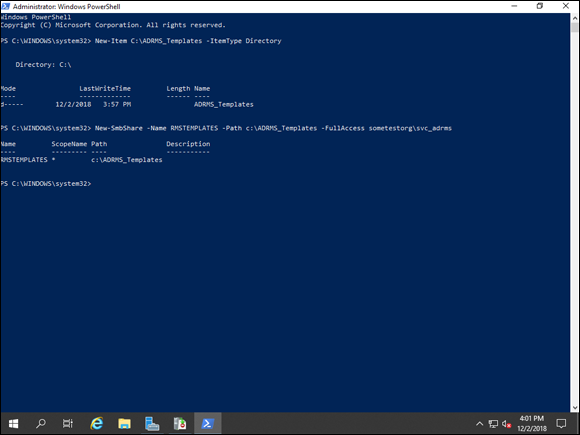
FIGURE 2-12: Creating the folders and the shares is simple through Windows PowerShell/
Now go back to the AD RMS Management Console, where you’ll set up the file location for it to save templates:
- Click Change Distributed Rights Policy Templates File Location.
- Click Enable Export and then type in the UNC path for the folder share, as shown in Figure 2-13.
- Click Apply and then click OK.
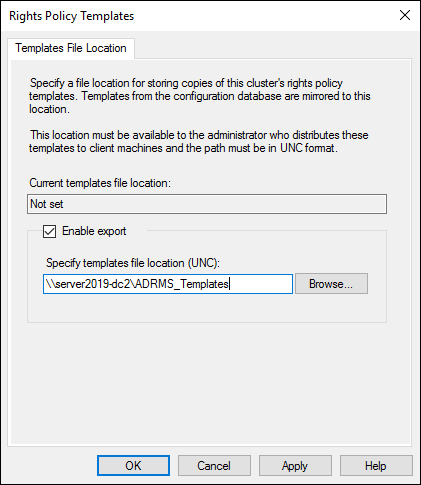
FIGURE 2-13: When the share is created, you need to point AD RMS to where you want the templates exported to.
To verify that this is working, go to your template location. You should see an XML document with the name that you gave it earlier.
Now that the server is set up, your users will be able to restrict access to their documents with the templates you’ve given them access to. When your users want to protect a document in Microsoft Word, for example, they can click the File tab, click Restrict Access, and then click Connect to Rights Management Servers and Get Templates, as shown in Figure 2-14. Templates you’ve defined on the RMS server will display, and your user can choose the appropriate template based on the kind of data that is in the document.
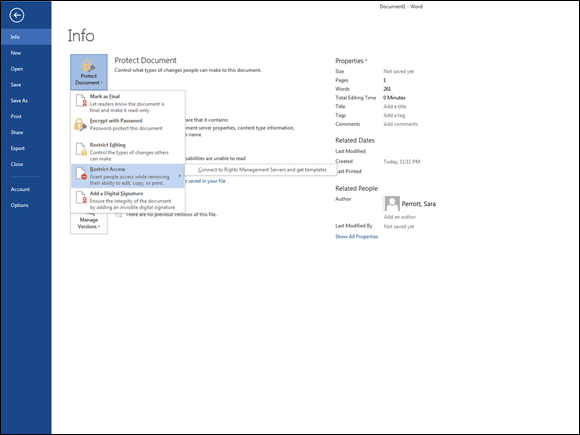
FIGURE 2-14: The Protect Document button allows you to select an RMS template that is defined on your AD RMS server.
 AD FS was designed with a very specific goal in mind: to provide a single sign-on (SSO) experience to your end users to web applications. It works really well for that purpose, and it’s what Microsoft recommends in most cases for authentication with Office365. AD FS was not designed to help authenticate other things that require the more traditional Windows NT token like access to file shares, Exchange Server (email), RDP, or older web applications that don’t understand claims.
 Do not install AD FS on to a domain controller. AD FS proxy servers need to be public facing if you’re using them to authenticate against external resources like Software as a Service (SaaS) providers, and you certainly don’t want a domain controller exposed to the Internet.