Chapter 3
Working with Scripts and Cmdlets
IN THIS CHAPTER
 Examining common scripts and cmdlets
Running PowerShell scripts or cmdlets
Working remotely with PowerShell
Performing administrative tasks with PowerShell scripts
In Chapter 1, I explain what PowerShell is and fill you in on the basics of working with it. In Chapter 2, I tell you a little bit about .NET and its interaction with PowerShell. This chapter is all about putting that information and your skills to use by starting to build out the scripts that you’ll use on a daily basis as a system administrator.
Introducing Common Scripts and Cmdlets
Writing single lines of PowerShell is pretty common when you have administrative tasks that you’re trying to perform, but most of the really useful and powerful PowerShell comes from the ability to put multiple cmdlets into a script.
The Microsoft website has some great reference material for PowerShell. What I find the most beneficial is the Reference link off the main PowerShell site (https://docs.microsoft.com/en-us/powershell/scripting/). When you click the Reference link, you get all the Help pages that you can request from the PowerShell console but in a nice graphical interface. You can find syntax help and examples of how to use the cmdlets.
Each cmdlet is grouped by type, and then listed for you to look through or select. Figure 3-1 shows you an example of what the Connect-PSSession page looks like.
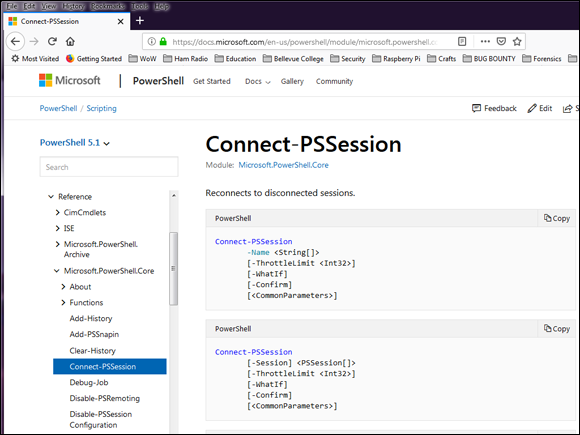
FIGURE 3-1: The Reference page from Microsoft’s website contains hundreds of cmdlets with descriptions, syntax, and examples.
If you want to get more examples to work with, the PowerShell Gallery has thousands of example scripts that you can download and start using. What I love about PowerShell Gallery is that you can search for what you want to download. For instance, I’ve downloaded PowerShell modules written for enterprise-grade firewalls. The vendors only published an API; the community came together and wrote a PowerShell module that allows me to use familiar PowerShell syntax rather than learn the vendor’s API.
Executing Scripts or Cmdlets
For the most part, executing a PowerShell script is not that much different from using a Command Prompt. You can right-click it and choose Run with PowerShell, or you can call it from the PowerShell console. Don’t forget about the execution policy that was discussed in earlier chapters. If your execution policy is not set to where it will allow the desired script to run, then PowerShell will give you an error when you try to execute the script.
When calling it from the console, you can give it the location to the script:
C:\PSTemp\dowhile.ps1
Or you can use the .\ to indicate that you're already in the correct directory:
.\dowhile.ps1
Working with COM objects
You’ll more commonly work with the .NET framework when writing scripts in PowerShell, but you can also work with COM objects. The commands are very similar, but there are syntax differences in how you identify COM objects. This example creates a COM object that represents Internet Explorer, and sets the visible property to $True so that you can see the Internet Explorer window. It sets the URL to the www.dummies.com website.
$IE = New-Object -COMObject InternetExplorer.Application -Property @{Navigate2="www.dummies.com"; Visible = $True}
If you're wondering what properties you have to work with, you can find them as you would with a regular cmdlet. The previous example, for instance, could be typed as follows, to find out the properties that are available:
$IE = New-Object -COMObject InternetExplorer.Application
$IE | Get-Member
Figure 3-2 shows you an example of what the display from Get-Member would be. You can see Navigate2 shows up as one of the methods, and if you scrolled down you would find Visible toward the bottom of the list of properties.
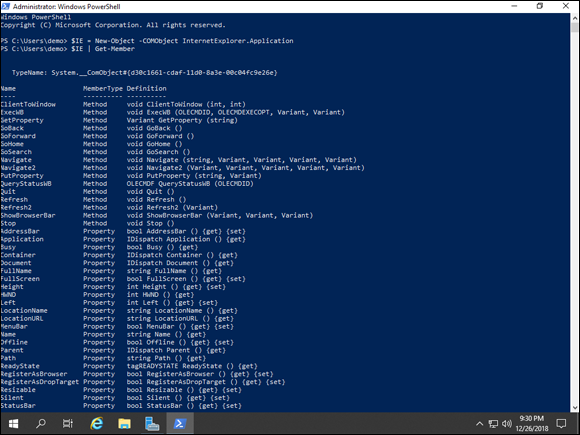
FIGURE 3-2: Checking the properties of COM objects is similar to checking the properties of cmdlets, using Get-Member.
Combining multiple cmdlets
Using one cmdlet at a time is not an efficient use of your time, and let's face it, every system administrator wants to be able to save some time.
You’ve learned about the pipeline and about variables. All these things will enable you to be a PowerShell ninja, one idea at a time.
For instance, you could write this line of code in this manner:
$cmd = Get-Command
$cmd | Get-Member
Or you could simply combine the two from the beginning like this:
Get-Command | Get Member
Combining multiple cmdlets instead of running them one at a time, and storing their values into variables, works much better and far more efficiently. In Chapter 4 of this minibook, I show you how to take this to the next level and save your commands into a file that you can write anytime. PowerShell scripts are absolutely wonderful. They’re huge time savers — and, if designed correctly, you can use them for years to automate processes and batch jobs.
Working from Another Location
You may need to work with data remotely from time to time without the requirement of logging in to the remote system to do that. There are several methods to accomplish this task. You may also want to be able to get information through the remote console.
To list the items in a share, similar to running the dir or ls commands:
Get-ChildItem \\servername\sharename
To check the health of your file shares:
Get-FileShare -FileServer (Get-StorageFileServer -FriendlyName "servername")
Working with Server Message Block (SMB), which is a file-sharing protocol for use over a network, is simple as well. Let's look at a few commands that will allow you to work with SMB shares on Windows file servers. These run locally so you will need to create a session with the system you want to run this against.
Get-SmbShare returns a list of all the SMB shares on the local system. This can be helpful when you need to go a step further and list the properties of a share. For example, say I want to see the properties of a share named MyData. I can type something like the following:
Get-SmbShare -Name "MyData" | Format-List -Property *
As you can see in Figure 3-3, you can get some valuable information on your share with that simple command. You can find out the physical path, whether the data is encrypted, whether shadow copies are turned on, and so on.
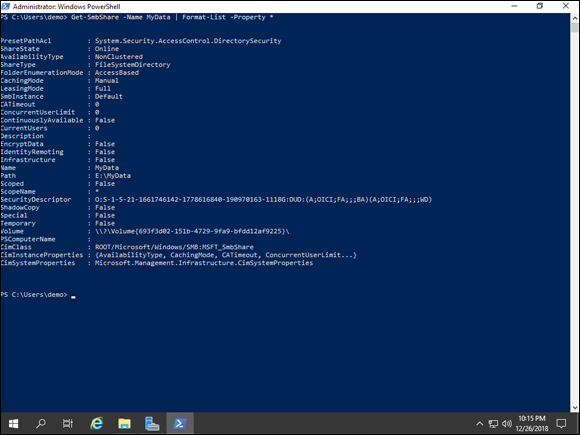
FIGURE 3-3: Get-SmbShare is a very powerful cmdlet that gives you the ability to collect a great deal of information.
Performing Simple Administrative Tasks with PowerShell Scripts
In this section, I show you some cool things that you can do with PowerShell scripts that might help you right now.
 Keep in mind that for some of these scripts you may need to install a module to get it to work properly. If you run the Active Directory scripts on your domain controller, you won't need to add the AD module. If you’re running from a system without Active Directory (like your desktop, for example), you need to import the Active Directory module with the command
 Import-Module ActiveDirectory. If you have the Remote Server Administration Tools (RSAT) installed on your desktop, the modules will be able to automatically load when needed.
Adding users in Active Directory
Adding users in Active Directory is a pretty common task. You can do this from the graphical user interface (GUI), but this method can be much faster. This example creates a user named George Smith, adds him to the Sales OU, prompts for the password (which is stored securely), enables the account, and ensures that the user will need to change his password after he has logged in.
New-ADUser -Name " George Smith" -GivenName "George" -Surname "Smith" -SamAccountName "gsmith" -UserPrincipalName "gsmith@sometestorg.com" -Path "OU=Sales,DC=sometestorg,DC=com" -AccountPassword(Read-Host -AsSecureString "Input Password") -Enabled $true -ChangePasswordAtLogon $true
As you can see in Figure 3-4, the user account is created and placed into the OU that I specified. The account is enabled and will be ready for the user on his first day.
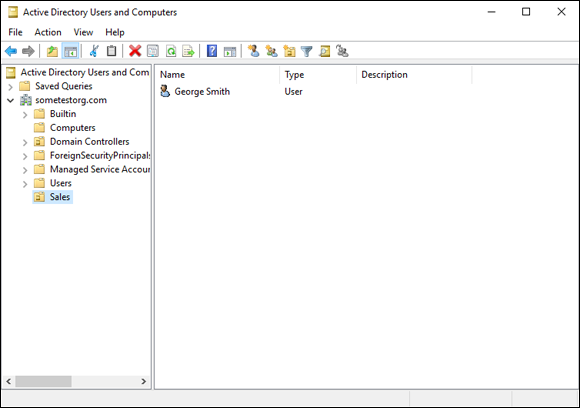
FIGURE 3-4: Creating a user in PowerShell is quick, and the user shows up almost instantaneously, as shown in the Active Directory Users and Computers window.
Creating a CSV file and populating it with data from Active Directory
Pulling data from Active Directory is an important skill for a system administrator to have. The following code queries Active Directory for Server operating systems. You can further define your filter to return specific versions of the server OS as well. Notice in Figure 3-5 that the information from onscreen appears in the CSV. There are no service packs out yet, so the OperatingSystemServicePack field is empty.
Get-ADComputer -Filter "OperatingSystem -like '*Server*'" -Properties OperatingSystem,OperatingSystemServicePack | Select Name,Op* | Export-CSV c:\PSTemp\ServerOSList.csv
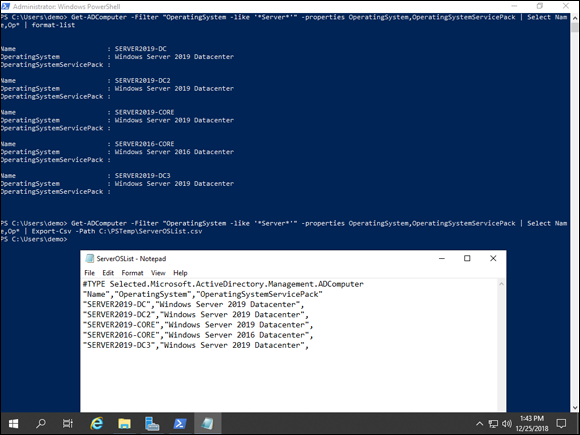
FIGURE 3-5: Running your query and having the information on the screen can be nice, but it’s even better when it’s in a file you can work with later.
Checking to see if a patch is installed
It never fails — when a big vulnerability is released and a patch is announced, your boss is almost always going to ask, “Is the patch installed?” If you work for a larger organization, you may have purchased a tool that can manage this for you. If you work for a smaller org, though, or if you want to spot-check the accuracy of your tools, PowerShell does give you a simple way to check to see if a patch is installed. You can use this with Invoke-Command, which is great if you want to check it against a list of all your systems, for example.
Get-Hotfix -Id "KBXXXXXX" -ComputerName <servername>
Replace the Xs with the numbers in the actual Knowledge Base (KB), and the servername with the remote server's hostname. If you’re running this command locally, you can omit the -ComputerName parameter altogether.
Checking running processes or services
Last but certainly not least are the administrative cmdlets to check for running processes and services.
Get-Process will return all the active processes by default. You can run it by itself, and you receive a table-formatted output with the active processes.
Get-Service is a little different in that it's totally normal to have services that are not running during the day. If you want to see only the running processes, you need to type a command similar to the following:
Get-Service | Where-Object {$_.Status -eq "Running"}
The $_.Status is a property of Get-Service. Using Where-Object in front of it will filter your output so that you only see running services.
What do you do if you want to check the services on multiple systems? You select multiple system names like this:
Get-Service -Name "WinRM" -ComputerName Server2019-DC, "Server2019-dc2", "Server2019-dc3" | Format-Table -Property MachineName, Status, Name, DisplayName -auto
This command will check for WinRM specifically on the three servers that I have included after the -ComputerName parameter.