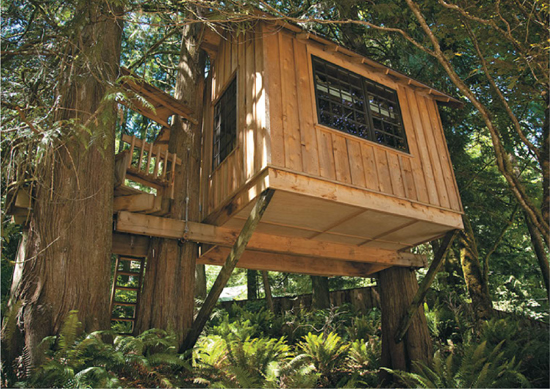
I find it fascinating that people are building mostly small retreats in the trees. They are places to unplug from everyday life and gain new perspective on the beauty of life and nature. Anywhere from 80 to 200 square feet of interior space seems to do the trick. Usually they range between 10 and 15 feet off the ground and have a conventional stairway for access. Features include a desk, basic electricity, a comfortable chair, a small outdoor deck—preferably covered—and a place to lie down and check for cracks in your eyelids.
When I first started building treehouses for others I imagined that I would be building home offices in the backyards of entrepreneurs and cutting-edge office workers. That has not been the case. The occasional art studio is as close to an office as we get—if you can make that association. Writing rooms, too, I suppose. Treehouses are surely creative spaces, as they should be. The big, over-the-top, fully equipped “live aboard” treehouses are also rare, but they are gaining momentum. More often than not we are building these as guesthouses on the plots of larger “ground based” homes. The fully independent, turnkey treehouse on its own land is rarest of all. But we hope to change that.
Trees are aching for treehouses. That is what I like to believe. And why not? When one starts to really look at trees in terms of housing possibilities, excellent candidates appear everywhere. It’s like turning on a light in a dark room. I tell people all the time to be careful when they begin to wander into the world of arboreal architecture. There is a strong chance that they will contract a happy ailment I call treehouse on the brain. Be warned.
Before getting too excited about what your treehouse will look like, you need to find your tree (or trees).
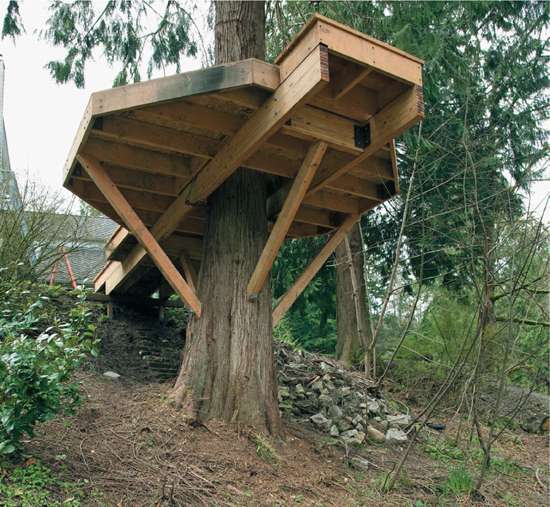
Treehouses can be built in either single-tree or multi-tree layouts. The tree(s) will determine what you can build. In general, spanning multiple trees with beams is easier than trying to build a significant structure in a single tree.
Regardless of what type of treehouse you build, it’s imperative that you start with strong and healthy trees. Bigger trees are usually better. Although you can safely put a TAB in a healthy tree as small as 10 inches in diameter, larger trees are ideal because they tend to move less in the lower reaches than smaller trees and have been put through their paces in terms of pest and fungus attacks and spells of drought. If you are planning a treehouse in a single tree, make sure the tree is at least 18 inches in diameter. If your treehouse uses multiple trees, try to select ones that are within 16 to 18 feet of each other. Naturally, larger spans require larger beams, and larger beams quickly become significantly more cumbersome to work with.
While treehouses can be built at almost any height, there are a few factors to consider that may make your project safer and more enjoyable to build. It is important to keep in mind that the higher up you go, the more the tree will move and the more difficult your treehouse will be to build. I recommend building within safe reach of a good ladder, so you can easily get yourself, your structure, and your materials in place. We are also big proponents of building scaffolding to ensure a safe and comfortable working environment in the air. A good rule of thumb is to aim for a height between 10 and 20 feet from the ground.
When choosing where to build, the site can be as important as the trees themselves. Ask yourself questions like “How will I get lumber and tools to the site?” “Will I get the view that I am looking for?” “How much sunlight does this site get?” “How will this treehouse affect my neighbors?” “How can I get power to the site?” and so on. I love the architecture adage that suggests you should resist the urge to build on the most beautiful part of the site, so as to preserve its beauty for your view. A complete understanding of the environment in which you plan to build will help ensure a successful project.
Once you think you know which trees you want to use for your treehouse, consider getting an arborist to verify the health of the trees. Arborists are very knowledgeable about how healthy and structurally sound the trees might be. Every tree is different, and some trees are more ideally suited for supporting treehouses than others, so please get your trees evaluated to ensure that they have no structural problems and can continue to support a treehouse for a long time.
I’d like to think that any tree is a good tree for building in, but the following lists offer a good starting point for selecting the best ones.
Apple, ash (be careful of blight in the midwestern United States), beech, cedar, chestnut, cypress, Douglas fir, elm, larch, London plane, all maples, monkeypod, almost all oaks, redwood, spruce, and sycamore
Avocado, basswood, bay, birch, catalpa, cherry, eucalyptus, gingko, hackberry, hemlock, hickory, hornbeam, ironwood, lime, locust, madrone, magnolia, mulberry, olive, Osage orange, persimmon, pine (watch for the beetle kill blight in the northern and western United States), poplar, sassafras, sweet gum, walnut, willow, and yew
Alder, aspen, box elder, cottonwood, holly, juniper, palm, and swamp oak
In order to begin to design a treehouse, you will need to make a drawing showing all of the tree trunks and major branches in the location of your treehouse, whether or not you will ultimately use them for support. We call this drawing a tree layout plan. This crucial drawing shows the diameters of the tree trunks and branches, and also the distances between them.
For a useful tree layout plan, you’ll need to take accurate measurements. The trees often do not sit on perfectly level ground, so be sure that your measurements are level in relation to each other and not with the ground. For complex tree layouts, you may want to use a string level or a water level to make sure your measurements are at the same height. For simpler tree layouts you should only need your eye.
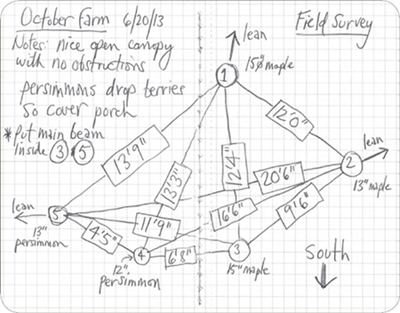
A simple way to begin is to make a rough sketch of the trees you plan to use before you begin the measurement process. Don’t worry about scale at this point—that will come in later. You can work in a notebook, first drawing and numbering the trees, and drawing a box for each measurement that you can fill in as you go (Fig. 1). Next, using lines centered on each tree, measure the distances “from bark to bark” between them, as well as the diameters of all the trees, and write them down in the sketch. If you are by yourself, bring string to tie around the trunks so you can hook the end of your tape measure to it when pulling measurements between trees. Also, you may want to mark the trees with surveyor’s tape so you don’t forget which ones you picked.
You should also record important details, like which direction south is (look for the sun and try to make a guess). Draw arrows indicating any leans to the trees if they are significant, and note any branch obstructions within the tree canopy that you might wish to keep; trees can handle a solid pruning if blocking branches need “modification.”
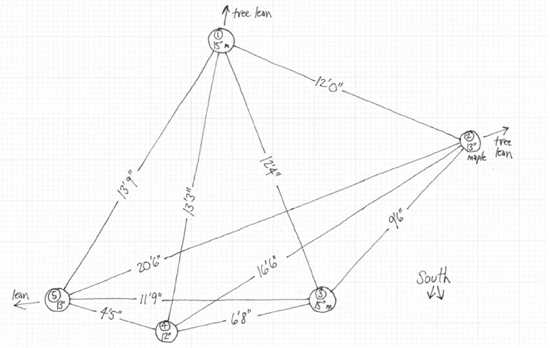
Using the sketch, you can create a scaled tree layout plan that accurately shows the tree sizes and the distances between the trunks and branches (Fig. 2). I recommend making this drawing on graph paper, for simplicity and clarity. A carefully created tree layout plan is essential for designing a treehouse from scratch (Fig. 3).
Now, before we start really getting into the nitty-gritty of planning a platform, we need to cover basic treehouse design logic and introduce the hardware you’ll use to build it.
Standing in a calm, quiet forest sometimes feels like being in a tremendous natural cathedral. The trees stand tall and straight, holding up the vaulted sky above. When the wind blows, there is a realization that the trees are not columns, but great big creatures that move on their own, swaying to their own rhythms. Trees are alive and dynamic. They are the foundations of treehouses, but they cannot be thought of as still, static columns. They must be allowed their movement. Trying to prevent this natural motion is harmful to the tree’s health and catastrophic for a treehouse’s structural integrity. Thus, the two dynamic forces that govern treehouse platform construction are tree growth and tree movement. We must design around these forces, focusing on providing sound structural support no matter which way the trees decide to move or grow. It is a challenge, but with careful planning and the right hardware, a treehouse can embrace the trees’ natural growth and rhythm, resting safely among them for decades to come.
Trees grow in two different directions: upward and outward. Upward tree growth only happens at the tops and tips of the trees. This means that your treehouse will stay at a constant height from the ground even as the trees grow taller. Increasing tree girth is the only growth factor we consider in design.
The TABs (treehouse attachment bolts) that you will use to anchor your platform are designed to allow for increases in tree girth. As the tree grows, it will envelop more and more of the TAB, eventually pushing the beam outward along the shaft, rather than pushing the entire piece of hardware out of the tree (Fig. 4). It should be noted, however, that sometimes trees will choose to envelop a beam rather than force the issue.
Over time, as the beams move because of tree growth, their positions with respect to other beams also changes. Therefore, just as beams cannot be rigidly connected to trees, the joists that sit on the beams and support the platform deck cannot be rigidly connected to all beams. Instead, when building a treehouse, it is necessary to attach joists to only one beam. The other end of the joists will simply sit on top of the other beams, allowing for a free range of motion. With proper blocking between joists and decking over the joists, you create a strong diaphragm that floats over the beams where the joists are not rigidly attached.
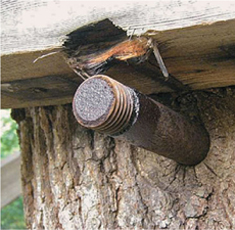
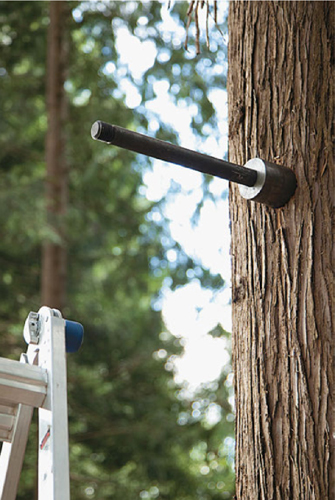
This TAB was installed in the year 2000. The oak tree quickly grew and sealed around the 3-inch diameter “boss.”
The picture also shows an imprint of the nut that attached to the end of the TAB, which we had to extend.

This is an example of how a tree “bolster blocks” around a beam, If the tree cannot move the beam, it will grow around it.
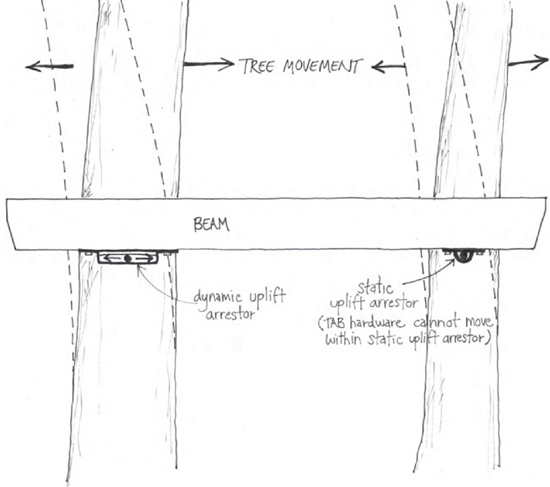
Trees sway at their own rates, to their own rhythms, regardless of how other trees are moving around them. When building a treehouse that involves more than one tree, it is important to allow for independent tree movement, rather than rigidly fixing trees together with beams or other structural components. You’ll use a piece of hardware called the dynamic uplift arrestor to safely connect a beam to more than one tree while still allowing for lateral tree movement.
The height at which the treehouse is built will also factor in to how much tree movement to account for. The higher in the tree you build, the more the tree will move in the wind, which is why we strongly suggest that you build your treehouse in the lower quarter of the tree. The maximum movement allowed by a large dynamic uplift arrestor is 14 inches, which is usually plenty of range. However, if your treehouse is especially vulnerable to wind, you can still make a treehouse work. TABs are great for hanging loads, too. If your tree movement is too great for a dynamic uplift arrestor, you may be able to use cable or chain to hang a load, thereby giving it maximum flexibility of movement (Fig. 5).
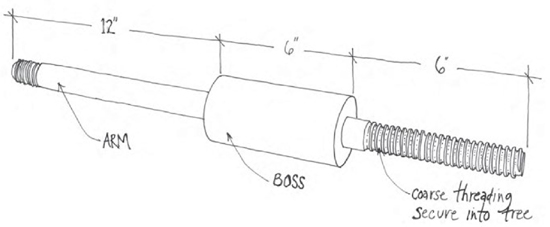
The TAB—the treehouse attachment bolt—is the most important piece of technology in treehouses today.
This groundbreaking—bark-breaking—device has a tangled history that began at the first annual World Treehouse Conference in Takilma, Oregon, in 1997. Suffice to say that the technology behind it is in the public domain and that no one holds—or ever can hold—a patent on its basic parts.
The very best way to successfully mount a treehouse in a living tree is with a simple and extremely strong steel bolt. Without the TAB, we could not safely accomplish so many things with our treehouses. A sturdy chunk of hardened steel, this heavy piece of hardware acts like an artificial tree limb. The main structural support members for the treehouse will rest on or hang from the TABs. A standard-size TAB can support between 6,000 and 10,000 pounds of force, depending on what type of tree is being used. Softer trees, such as pines and cedars, will support closer to 6,000 pounds, while harder trees, such as oaks and maples, will support closer to 10,000 pounds, but there are many other factors contributing to the TAB’s ultimate holding power.
The TAB is made from two separate pieces of steel (Fig. 6). The first is a length of 1¼-inch-diameter round stock 4140 steel, and the second is a length of 3-inch-diameter round stock mild steel that is press-fitted onto the narrower piece. Each TAB is custom fabricated in a machine shop and, when complete, is composed of four main sections, which can be seen in Fig. 6. The coarsely threaded end will secure the TAB within the heartwood of a tree. The boss, the thicker piece of 3-inch-diameter steel, provides the majority of the TAB’s sheer strength and allows for greater distribution of the load. The arm extends outward from the boss and acts as a limb to support the beams or other structural members. At the end of the arm is a short threaded section designed to accommodate the K-nut, which will be discussed later.
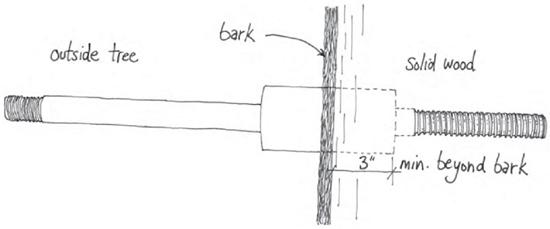
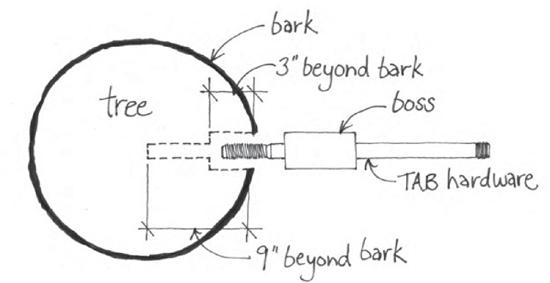
When properly installed, the coarsely threaded end and half of the boss penetrate the tree (Fig. 7). It is important to note that half of the boss will go beyond the bark and into the solid, healthy wood. Bark is not strong and has no structural value. The standard TAB is designated as 6 by 12 inches. This measurement refers first to the length of the boss (6 inches is standard), and then to the length of arm—the end sticking out of the tree (12 inches is standard). There are variations in both of these lengths and in the diameters of bosses and arms themselves, depending on the use.
The TAB works effectively because it not only supports large loads, but also allows free growth of the tree. The tree reacts to a TAB by growing what is called reaction wood around the perimeter of the boss. This seals off any possibility of airborne fungus and disease infiltrating the tree. Nutrients continue to flow both up and down the important cambium layer of the tree, just below the bark, and the tree continues to grow in its normal fashion. As the tree envelops it, the TAB becomes stronger. Cutting off the flow of nutrients by girdling or somehow belting a tree will eventually kill it. An adjustable belt, which I have seen employed on occasion, is ill-advised, in my opinion. I worry that the adjustment will not happen as the tree grows greater in girth, and the tree will suffer and die.
This is a standard 6-by-12-inch TAB installed properly. Note that the 6-inch boss is halfway into the wood of the tree.
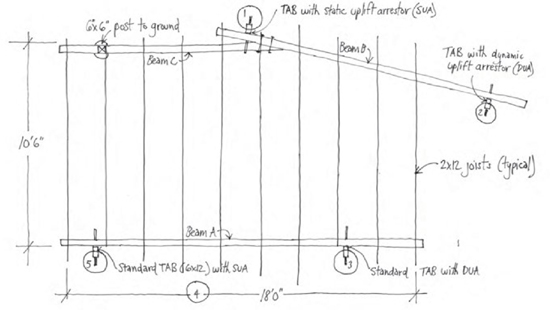
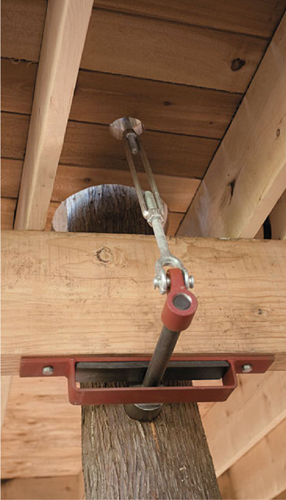
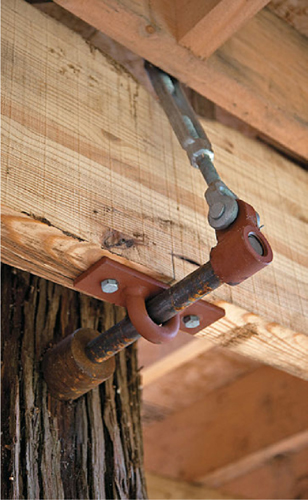
The beams that support the treehouse platform normally rest on the arm of the TAB. The uplift arrestor is a piece of hardware attached to the bottom of a beam, preventing the beam from lifting up or pulling away from the TAB, while still allowing the beam to move laterally along the length of the TAB’s arm over time. TABs and uplift arrestors work together to provide a strong and dynamic support system that allows for tree growth and movement without sacrificing the integrity of the structure or harming the trees. We have created two types of uplift arrestors that serve slightly different purposes: the dynamic uplift arrestor and the static uplift arrestor.
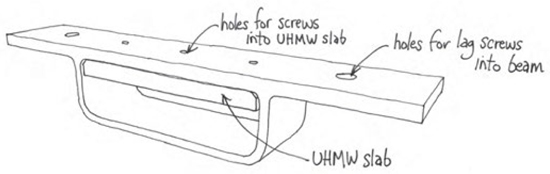
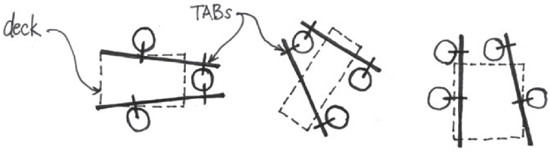
The dynamic uplift arrestor (Fig. 8) allows lateral movement along the length of the TAB’s arm while preventing vertical movement of the beam, and its slot design also allows tree movement perpendicular to the TAB (Fig. 10). In other words, if a tree supporting a beam begins to sway in the wind, the beam will remain relatively stationary, as the TAB simply moves back and forth within the slot of the dynamic uplift arrestor. The beam can easily slide over the TAB thanks to a piece of UHMW (ultrahigh-molecular-weight polyethylene, a high-density, low-friction material) secured within the slot. This allows smooth and fluid movement of the TAB arm within the arrestor.
The dynamic end of a beam installation.
The static end of a beam installation.
The static uplift arrestor (Fig. 9) is also used to secure a beam to a TAB, although it restricts any movement of the beam perpendicular to the TAB (Fig. 10). These static arrestors are commonly used in single-tree structures. They can also be used at one end of a beam spanning two trees, where the other end is secured with a dynamic uplift arrestor—Upper Pond Treehouse platform (p.24) is an example of this arrangement, which protects the platform from the lateral forces of tree movement.
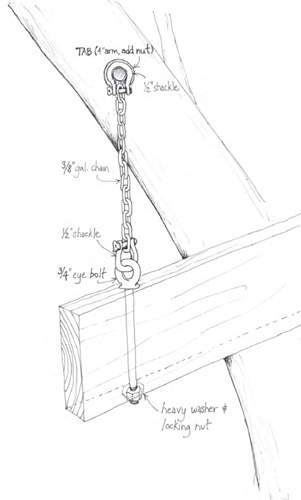
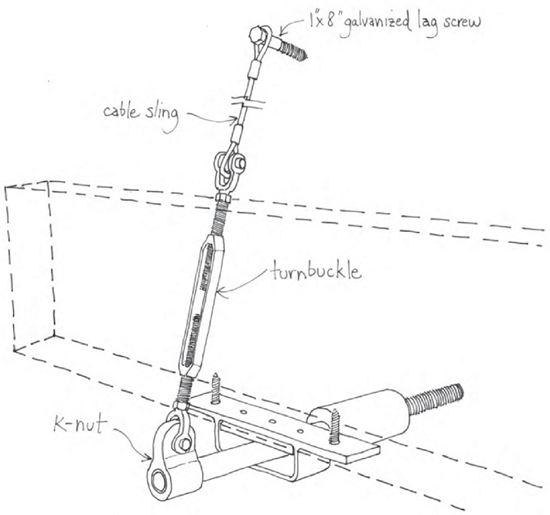
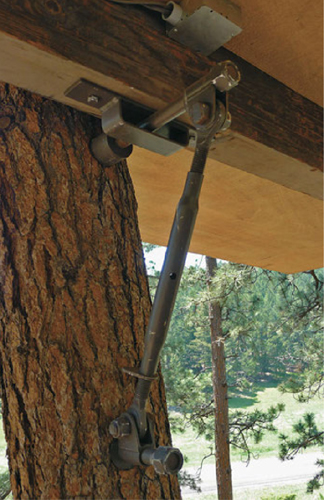
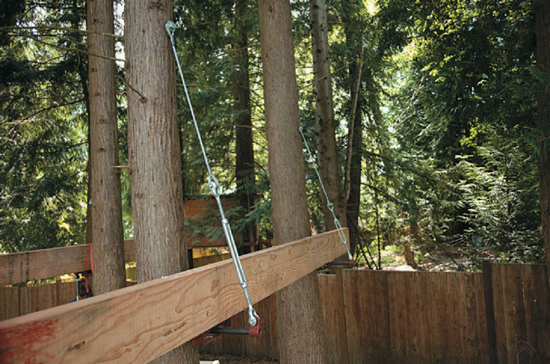
As a tree grows, it may choose to push your beams outward along the arm of the TAB. We add extra strength and structural life span to the TAB by supporting the end of it with a cable suspension assembly called the dynamic triangle. To support the exposed end, a K-nut is threaded onto the end of the TAB after the beams have been properly installed using uplift arrestors. A turnbuckle is then connected to the K-nut and a 2- to 4-foot-long cable sling is fastened to the other end of the turnbuckle. The unconnected end of the cable sling is fastened to the tree with a 1-by-8-inch lag bolt. The turnbuckle is tightened by hand to remove the slack, and the dynamic triangle is complete (Fig. 11). This whole assembly works together as one unit to ensure that the beam’s perch has maximum structural integrity for as long as possible; it is part of a standard connection system.
There are occasions when going below the TAB for additional support, rather than above it, works more effectively—we call this the reverse dynamic triangle. When dealing with heavy loads, we like to use an adaptation of a top-link connector, which is a device that farmers use to keep their tractor plows driving down into the earth. It works like a turnbuckle, only it separates loads rather than pulling them together.
A reverse dynamic triangle. The vertical member is a common top link found in tractor supply stores that keeps heavy loads separated.
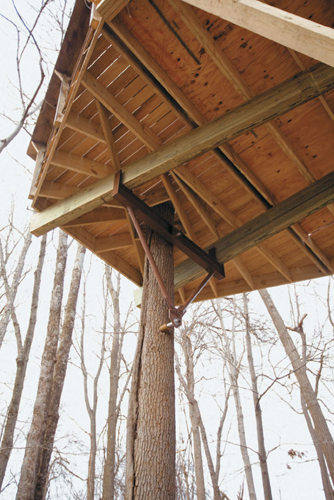
Two knee braces support the cantilevered edge of the Upper Pond treehouse at Treehouse Point.
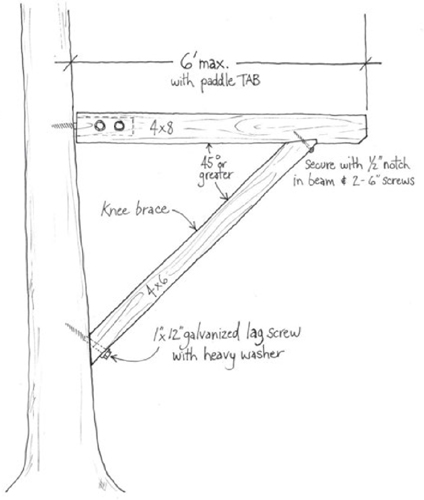
In the treehouse business, we spend a lot of time trying to maximize platform size in limited-tree configurations. In many cases, you will find that you need some extra structural support at the end of a beam, or some platform space where you do not have a beam to rest it on. In these cases, we can use a wooden knee brace that extends down at an angle from the edge of a platform to the lower part of a tree to accomplish what we need (Fig. 12). The geometry and pressure of the connection provide the strength necessary to hold the weight of a beam or floor away from the trunk of a support tree without posting down to the ground. With the correct hardware and careful installation, this can be an excellent way to increase the size of a treehouse platform when you are limited by a lack of other trees to tie to. Sure, a post to the ground can accomplish the same thing, and there are plenty of situations where a post, or ground-mounted strut, as our engineer, Charley Greenwood, likes to call it, is in order. But from a purist’s point of view, a knee brace is neater.
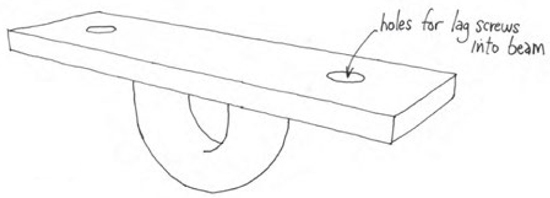
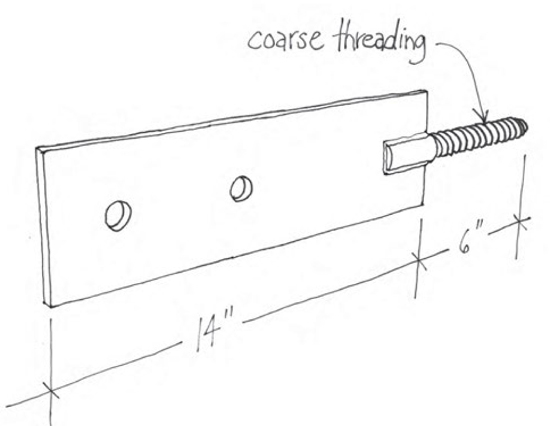
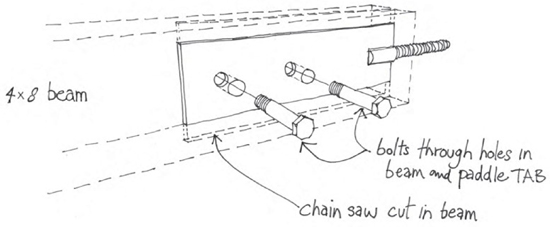
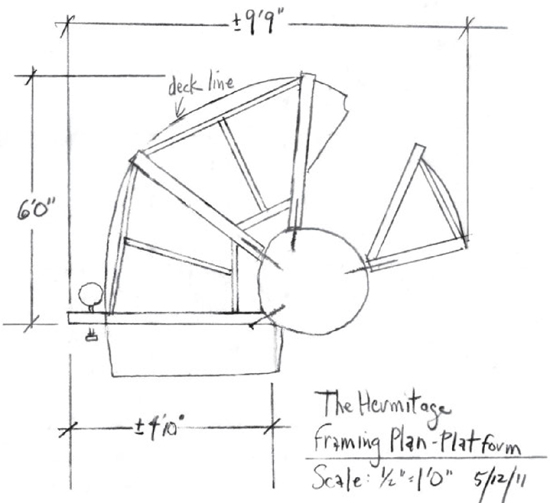
The paddle TAB is designed for the installation of smaller treehouse structures and components. It consists of two sections: the paddle, a flange that supports a structural element, and welded to it, a threaded rod that is screwed into the tree (Fig. 13). A major difference between this design and the standard TAB is the lack of a boss, which is the piece of the standard TAB capable of resisting large sheer forces. By not having a boss, the paddle TAB is easier to install in a tree, but it also holds significantly less weight. Once the paddle TAB is secured in the tree, a notched beam can be fitted onto the paddle section and bolted in place (Fig. 14). This hardware is used almost exclusively in conjunction with a knee brace assembly (Fig. 12)—an example is the Hermitage platform design (this page). By using multiple paddle TABs and knee braces around a tree (typically, five), an efficient platform can be constructed. As a rule of thumb, however, paddle TABs should not be used with beams that are longer than 6 feet, or ones that are bearing unusually large loads—like a hot tub, for instance.
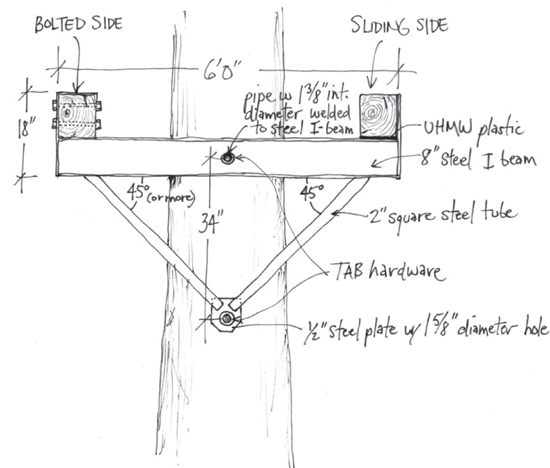
The yoke is not, strictly speaking, a piece of hardware. It is usually prefabricated in wood, steel, or a combination of the two and used as a substructure to support beams. Yokes are often used in two- and three-tree treehouses when beams resting on TABs would not provide a wide enough structural base. Regardless of its composition, a yoke is an angle of 45 degrees or greater that is connected to a tree with two vertically mounted TABs (Fig. 15).
The two yokes supporting each end of their two beams are bolted statically to their trees, but they can be easily incorporated into a dynamic structural plan: The anchor tree yoke holds both beams statically, bolted through the upright steel flanges at both ends of the yoke. The other yoke allows both beams to slide, guided by twin upright steel flanges (unbolted) and plastic skid plates, as the trees move. The platform plan for the Bonbibi treehouse at Treehouse Point (this page) uses this arrangement.

It is imperative that the TABs be installed precisely so the prefabricated steel yoke fits over them.
Now that you understand the principles of treehouse design logic and have become familiar with treehouse hardware, you can start putting pencil to paper to design your treehouse platform. Allow the trees to guide the process. Look to the trees and listen to your own design intuition.
It’s time to start getting excited about how the treehouse will look. This is one of my favorite parts in creating a treehouse, and I strongly urge anyone embarking on this path to take the time to enjoy and plan carefully. A successful project is born of a good plan, and a good plan is based on a sound platform. Every treehouse consists of two major elements: the platform and the shell. The platform is the structural foundation, and it consists of all the structural components—hardware, beams, joists, and decking surface—that will eventually support the shell. Just as the foundation is the most important part of your house, the platform is the most important part of your treehouse. The shell is everything above the decking: walls, windows, doors, and roof. Designing the platform must happen first, since this is what determines the size and shape of everything to follow.
A substantial platform in a single tree is best accomplished with a Roman cross platform.
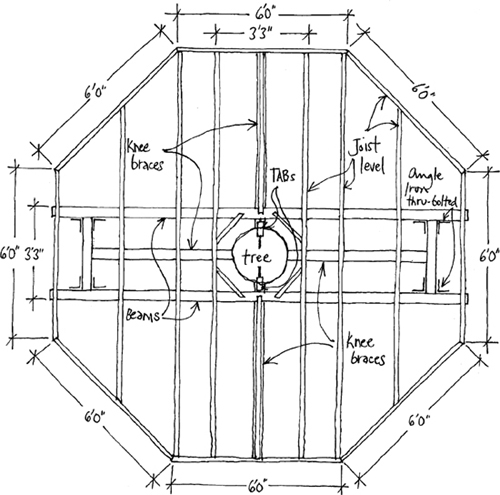
If you plan on building a single-tree treehouse, there are only two types of platforms I recommend: the Roman cross (Fig. 16), where two main beams sandwich a single tree and a floor joist layer sits on top of the beams, for larger platforms with a radius 6 to 8 feet off the bark of the tree and no more, and paddle TAB platforms (Fig. 17) for smaller platforms 6 feet or less off the bark of the tree.
When spanning multiple trees, there are endless beam-and-joist combinations that can be used to create the platform on which your treehouse will sit. Using the accurately scaled tree layout diagram created earlier, you can begin playing with configurations of beams spanning the trees. See Fig. 18 for a few different examples of how beams can be positioned for different tree layouts.
Designing a platform starts with placing the beams, and the sizes of the beams will depend on the distance they will have to span and the weight they will have to carry. The beams will support the joists, and the joists must be strong enough to span the distance between the beams and support the treehouse. Our standard deck is made with 2-by-12-inch nominally cut Douglas fir or yellow pine joists sitting on top of large fir beams or engineered glue-laminated wooden beams (which can range anywhere from 3½ by 12 inches to 6 by 19 inches, or even larger), but I suggest that you consult the published sawn lumber and engineered wood span tables (available on several trustworthy websites, including the American Wood Council’s at www.awc.org) to determine a safe size for your structural members. You can also have your structure checked by a licensed structural engineer, although he or she will probably freak out about connecting to a living tree! Maybe just tell him to imagine there is a post there instead of a tree … and then assure him that his name will never come up again in association with your harebrained scheme.
After planning the placements of the beams, joists, and platform deck, you can move on to your treehouse shell. I always start the outline or floor plan of a design by drawing possible walls 9 inches off the bark of all trees. This gets the process moving and keeps things from getting bogged down or overwhelming. With a little imagination, it can take almost any form. Have fun—the possibilities are endless. For important and helpful tips on some specific design elements, consult the rules of thumb below.
While all building projects present specific challenges, here are a few guidelines to keep in mind when planning and building your treehouse.
![]() Keep 3 inches (or more, if possible) between the beams and the bark of a tree.
Keep 3 inches (or more, if possible) between the beams and the bark of a tree.
![]() Keep joists 6 to 9 inches away from the bark of a tree (depending on how soon you want to get out the reciprocating saw and do a “remodel”).
Keep joists 6 to 9 inches away from the bark of a tree (depending on how soon you want to get out the reciprocating saw and do a “remodel”).
![]() Keep walls and roofs 9 inches away from the tree, if possible.
Keep walls and roofs 9 inches away from the tree, if possible.
![]() Trim decking 1½ inches back from the bark of the tree, then be ready to trim it back with a jigsaw every six or eight years, depending on how quickly your tree grows.
Trim decking 1½ inches back from the bark of the tree, then be ready to trim it back with a jigsaw every six or eight years, depending on how quickly your tree grows.
![]() Keep trunks and branches from penetrating the envelope of the building if you want to control the environment inside your treehouse.
Keep trunks and branches from penetrating the envelope of the building if you want to control the environment inside your treehouse.
Patrick Willse is on the adjustable end of a water level, one of the most important tools of a treehouse builder. A water level is an extremely accurate way of finding level in relation to a single point between two trees. Plus it can even see around the backs of trees when needed!
With the design complete, it is time to head up into the trees and start building your dream treehouse. The first step will be installing the hardware that will support the beams. Using the specialized hardware described in this book requires thorough preparation and careful installation. If the hardware is installed incorrectly, it cannot be corrected easily. The most important thing to do is to sink the boss of the TAB the full desired depth into the wood of the tree. The bark of the tree has zero structural value and therefore does not count for anything.
To begin, we need to mark exactly where our TABs go. When creating a tree layout plan, the trees are measured at the approximate height where the treehouse structure will sit, but this is not where the TABs will go. The TAB is typically installed below the floor level at a distance equal to the depth of the decking, joists, and main beam combined. Now that it is time for installation, we need to be more precise. In order to ensure that our structure sits level across our trees, we recommend that you employ a tool called a water level (Fig. 19). This is old technology, as old as Egypt, but it is the best method to guarantee the beams will lie level over the TABs. The water level is a useful tool because it can show level when you are far away from your first point, or when your line of sight is interrupted by a tree. The water levels sold as kits have an electronic sensor to allow you to take measurements on your own, but if you have any helpers on your project, just fill the clear plastic tube with water—making sure to get rid of any air bubbles—and you can get started.
The following example will demonstrate how to easily mark the locations where the TABs will be installed in the trees. For this example we will pretend we are placing a beam between a cedar tree and a maple tree 12 feet apart from each other on uneven ground.
A screw is placed in the maple 7 feet above the ground—the height where the TAB is expected to be installed. Try to insert your screws at approximately the same spot on the tree where you will be drilling. Using the first screw as a point of reference, use the water level to find the height on the cedar tree that is perfectly level with the screw in the maple tree.
Place a screw in the cedar tree at the height that is level with the screw in the maple tree. If your beam will be held in place with a static uplift arrestor on one end and a dynamic uplift arrestor on the other, you must take into account an extra ½ inch for the UHMW piece attached to the dynamic uplift arrestor, which would raise the end of the beam out of level by half an inch. If you’re using two dynamic uplift arrestors, the step is not necessary, as the UHMW pieces will raise the beam ends by the same amount.
In this example, we will assume a dynamic uplift arrestor is being used only on the end of the beam attached to the cedar. To account for the height difference, a new screw is placed in the cedar tree exactly half an inch below the screw you already placed. We will drill at the level of the second (lower) screw, so back the first (upper) screw out of the tree.
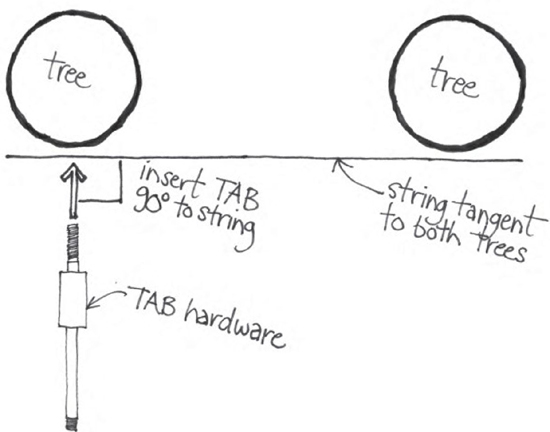
Finding the optimal locations and angles to drill into the trees is a simple matter of understanding how the beam will be positioned. Stretching a string between the trees at the level of the two screws, in the same orientation as the beam you want to install, will show how the beam is oriented in space. The best drilling spot is where the line touches the bark, creating a tangent (Fig. 20). From there, you will try to drill toward the exact center of the tree trunk. Ideally, a TAB should be installed so that it is aimed directly at the center of the tree (Fig. 21).
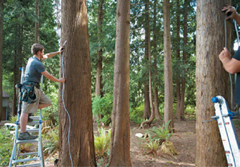
Now that you have taken care to measure the TAB locations and orientations correctly, drilling holes for the TABs is a straightforward process. Be sure you are comfortably and securely standing on a ladder and/or in a harness before starting. It may also be necessary to place a lanyard around the tree and yourself so that there is something to push against when the drilling gets tough—and it always does. The type of drill necessary for the following steps produces a large amount of torque, and poor footing can be very dangerous.
Remember to take your time. The process of drilling takes several steps, all of which have to be executed with care to ensure a properly drilled hole, which is crucial for the TAB to function properly. The way these holes are created will determine the structural integrity of your treehouse, so be sure to spend time making them as exact as possible.
Tip: Rather than drilling all the holes in all the trees first, then inserting the TABs, it’s a good idea to drill each hole just before the TAB is inserted. Often, if a drilled hole is left open for more than a few minutes, the moisture from the tree will cause the wood around the hole to swell, and it will be extremely difficult to insert the TAB into the tree.
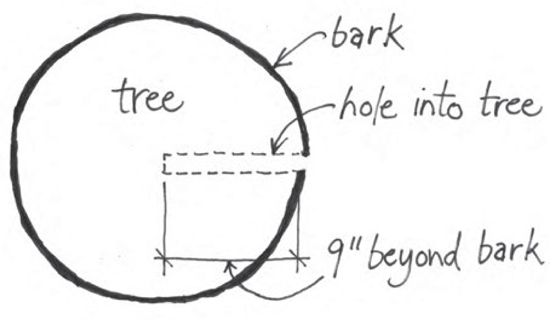
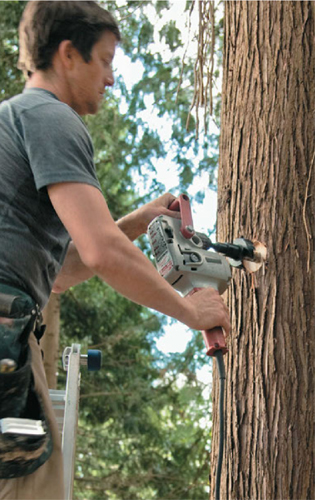
Drill the primary hole into the tree using a 1-by-18-inch auger bit while observing the proper orientation you determined in Step 2 (Fig. 22). The 1-inch diameter of the hole is the minor diameter of the 1¼-inch coarse thread and is critical in allowing the thread to bite into the tree. It is also important while you are drilling to keep the drill as level as possible, so periodically place a 9-inch torpedo level directly on the auger bit to be sure the hole is being drilled levelly. For standard 6-by-12-inch TABs, the entire threaded section and half of the boss will penetrate the wood, so the primary hole should be drilled 9 inches beyond the bark. It’s important to drill to a precise depth. If the hole is not deep enough, the TAB will not be inserted as far as necessary into the tree, and if it’s too deep you’ll have an empty space behind the TAB, which isn’t good either.
Tip: Before drilling, mark the auger bit at the proper depth by wrapping tape around it, then compensate for the bark once its depth has been determined.
Be sure to sink the boss the required depth into the wood of the tree. This is critical to maintaining the integrity of the treehouse structure. Stay with it and make it happen!
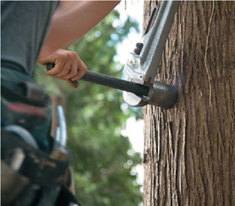
Patrick drills the 3-inch hole using a modified Forstner bit. Be sure to drill the full 3 inches into the wood, not including the bark.
Before a standard TAB can be inserted, you must remove an additional 3-inch-diameter section from the tree to accommodate the boss of the TAB (Fig. 23). Doing this precisely requires a modified 3-inch Forstner bit, commonly used in the plumbing trades to run pipe through wood framing. For the bits we offer through Nelson Treehouse and Supply, we remove the supplied self-feed point and replace it with a custom dummy that fits into the first 1-inch hole. A small tooth on the edge of the dummy cuts the important shoulder where the coarse threads end and the diameter of the round stock jumps back up to 1¼ inches before the boss. This seems trivial, but the engineers assure us that the full inch of 1¼-inch shaft behind the boss, before the thread begins, effectively eliminates a weak point in the TAB’s design. We stick the end of this bit into the center of the previously drilled hole and widen the first 3 inches of it (meaning you will only use this bit to drill into the tree 3 inches beyond the bark), which will make room for the boss.
Remove all the sawdust and wood chips from drilling that may be left inside the hole. We do this by blowing air into the hole through a straw or a short section of the water level’s tubing, so we can be sure to get all of the drilling debris out from the back of the hole. This is important, because the TAB will be a very tight fit, and there is no room for wood shavings. It’s a good idea to double-check the measurements after drilling to ensure their accuracy and make any necessary adjustments before inserting the TAB.
Insert the TAB into the hole and begin screwing it in by hand. Once the boss starts to enter, you will need to switch to a 24-inch pipe wrench. It’s a good idea to make a mark on the boss halfway down the length of it, so you can see how far you need to insert it. You should also be able to feel when the boss hits the back of its hole, so if you are in doubt about how far to insert the TAB, just keep turning it until it becomes impossible to go any farther.
Tip: If the TAB is being stubborn before it has bottomed out in its hole and is hard for a single person to turn, try adding some leverage. A 3-foot metal pipe slipped over the handle of the pipe wrench can aid the solo installer. If you have an assistant, a rope can be tied to the end of the wrench handle, and the assistant can tug on the rope from the ground as you turn the wrench. Be sure your ground person has a hard hat on!
Once all the TABs have been installed, the beams can be hoisted into place. To do this, first place the beams directly on the TABs, up against the boss, with no uplift arrestors underneath. Position the beam so the edge closest to the tree is up against the boss. Once the beams are correctly positioned, slide the uplift arrestors onto the TABs, lifting the beams slightly in the process, and place the hardware evenly underneath the beam. Once in place, predrill holes in the beams using a ³⅜-inch bit, and then secure the hardware in place with ½-by-4-inch galvanized lag bolts.
A skill set that comes in handy when lifting heavy beams into position is rope-and-cable rigging. It is a highly specialized and potentially dangerous trade that will not be delved into in this book. Certified arborists can be hired to assist in this sometimes critical aspect of building a substantial structure aloft. There are also excellent sources of information on the Internet or in books, particularly those by Brion Toss at www.briontoss.com. A good block and tackle, properly set, can be easily mastered and save your back in a big way!
The dynamic triangle provides even more strength to the beam-to-tree connection by supporting the end of the TAB, and we use it as often as possible. It simply increases the support strength of the TAB, which is always a good idea.
Turn the TAB into the tree using a large pipe wrench, a 24-inch at a minimum. You will know when the TAB is in place.
Rigging for treehouse building is a complex and important process. Be sure to do your research before attempting any heavy lifts.
The 4-by-12-inch Douglas fir beam is captured by the hardware, though still allowing tree movement, and ready to receive the floor joist layer.
The K-nut is the first piece we need to assemble the dynamic triangle. Screw the K-nut onto the exposed threaded end of the TAB. The top of the K-nut (where the turnbuckle will attach) must be pointing upward, which often means it may not be tightened all the way onto the TAB. This is expected. Just be sure that it is tightened as much as possible and is still in the proper orientation.
To assemble the rest of the dynamic triangle, adjust the turnbuckle so it is extended to roughly three quarters of its maximum length, then attach one jaw of the turnbuckle to the K-nut and the other jaw to the cable sling. The cable sling is ³⅜-inch aircraft cable with swaged eye ends. Now pull the free end of the sling toward the tree (above the TAB) until it is taut. Mark the spot where the eye of the sling touches the tree.
On the spot you have marked, drill a hole into the tree using a ¾-inch-diameter auger bit (the minor diameter of a 1-inch lag bolt). This hole should be drilled straight into the tree, perpendicular to the outstretched sling and aimed directly toward the center of the tree. Be sure to only drill deep enough to accommodate the 1-by-8-inch galvanized lag bolt, leaving about 2 inches outside of the bark (less, if the bark is particularly thick).
Place the 1-inch lag bolt through the eye of the sling, then screw it into the hole until the eye of the sling is against the tree. Lastly, tighten the turnbuckle until it is hand-tight.
Before going any further, it is time for a safety meeting.
Seriously.
Initially, this means clearing the base of the tree of fallen branches and debris, placing safety lines high in the trees, and setting some basic ground rules. No work site is ever 100 percent safe, but there are several things you can do to minimize the risk of injury to everyone on and around the site.
Make it absolutely clear to everyone on the site that walking under the tree is forbidden during construction. I recommend requiring hard hats for everyone near the perimeter of the tree. If there are kids around, under no circumstances should they be allowed close to the building area while work is going on. Between the dangerous tools and possible falling objects, it’s just too risky. If you want to include them, find off-site tasks to keep them busy and contributing. It might be simply sinking star-drive screws into a log and then removing them until they get the hang of it. It’s never too early to start training new treehouse builders.
Whenever anyone is in the tree on an open platform, they’ve got to be attached properly to a safety line with a climbing harness. This is the most important rule and it must be strongly enforced. Basic information on how to do this is coming up.
Before we set any lines in the tree, we like to take a moment and let the trees know that we come in peace. That probably sounds a little crazy, but it makes us feel good, and hopefully the trees too. We usually say a few words, ask permission, promise to be careful and treat the trees with respect. They are our hosts, after all, and we would like nothing more than to live in harmony with them. Finally, we bury a clove of garlic at the base of each tree to ward off disease and evil spirits, and then we let it rip!
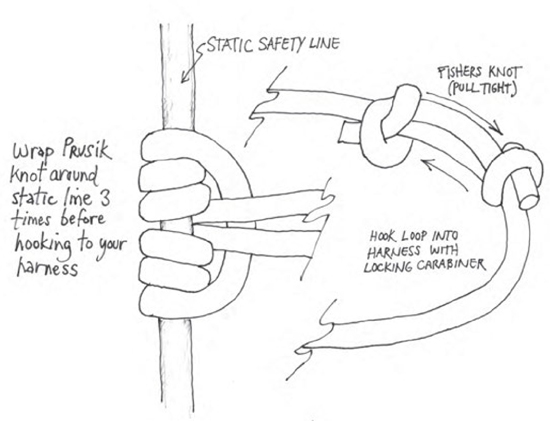
Setting a safety line is the first order of business as you move into the trees. It is the most important element of a safe building site, so if you don’t already have the gear, invest in a quality rope and climbing harness right away. Gear shopping is always a pleasure, so why not throw in a good rock-climbing helmet while you are at it, and a few carabiners as well? It is easy to get carried away with all the fancy climbing gear that is available today, but we can keep it simple, too. Depending on the size of the building crew and the configuration of the trees, you may need multiple safety lines. The way to attach to them is with a simple Prusik knot made from a length of ½-inch climbing rope (Fig. 24).
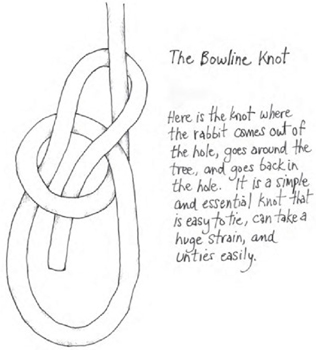
Setting the static safety line to begin with can be a little tricky. We often use a Big Shot slingshot, which can be ordered online, to shoot a 12-ounce weighted bag with a light nylon throw line attached high into the tree canopy. It takes a few attempts, typically, and you want to be sure to aim for a sturdy crotch or major branch. Once you make it, pull the heavier climbing rope up and over, then anchor the end to the trunk of a sturdy neighboring tree. A classic bowline knot will come in handy for this anchoring knot (Fig. 25). Call in an arborist if you are the least bit uncomfortable in setting these first lines. From this point on, anyone on the platform during construction is required to tie off to a safety line with a Prusik knot hooked independently to their rock-climbing harness with a locking carabiner.
With a sturdy platform installed and ready to go, it is time to shift your thinking to the shell of the treehouse. As this area of the building could be the sole subject of a different book, I will not go too deeply into it, except to offer the following tips.
Wood-frame construction is the only way to go. It is light, strong, and flexible. Books and information on “stick-frame construction” abound, so if you are not familiar with how to frame the shell of a building, put this research project on your priority list. Framing a treehouse can be simple or infinitely complex—you decide. Either way, framing is fun and enormously satisfying, as it can happen quickly and give the project positive momentum.
Frame your treehouse using the latest battery-powered screwdrivers and a big box of 3-inch “star drive” self-tapping screws. No need for nail guns, air compressors, or air hoses. If you make a mistake, simply back the screw out and fix it!
Take advantage of your platform. If you have a nice flat surface up in the tree with room to lay out and frame your walls, go for it. This will save you the struggle of lifting wall sections up from below.
Your building plan should have an access plan. There are many ways to enter a treehouse, but the most common way is by stairs. Ladders, bridges, and elevators can be awfully fun, but a good set of stairs is hard to beat. Don’t let them psych you out! They may seem complicated, but a simple set is actually quite easy to build. I recommend breaking a typical run of 10 to 15 feet of elevation gain into two sections. The first stair section will be ridged to the ground and rise to an ample landing perhaps two-thirds of the way up to the treehouse floor level. The second stair section will need to be flexible and move, as the trees move the platform in the wind. I secure the top of this stair section to the platform in a meaningful way. Overdo it, in other words. Then use some of the same UHMW plastic that is used as a friction plate in the dynamic uplift arrestor on the surface of the landing where the base of the second stair section lands. This is an important decoupling that will ensure the safety and longevity of your stairway into the trees.
A question I am often asked is how long a treehouse can last. The answer is that a treehouse can last as long as the trees themselves. Good design and construction techniques combined with normal home maintenance will ensure a long life for any treehouse. Technically, that means if you build in a bristlecone pine, and maybe fund a foundation to maintain your creation, your treehouse could last for 6,000 years!
Good planning is essential for a successful treehouse project. It starts with a detailed building plan and covers the sometimes unpleasant business of dealing with your local building authority. Turning a blind eye to these people can land you in some serious hot water.
Each of us has our own reasons for doing things the way we do, and I am not one to judge. At Treehouse Point, a commercial endeavor, I began by building first and filing for permits later, which was the only way I thought possible. Perhaps I was right, but it exacted a price that is difficult to quantify. Permitting after the fact was paid for in blood, sweat, and tears. Many tears. And money. The money part arrives early in the process and lasts throughout.
The price of going about planning piecemeal is high as well. It is paid up front and continuously along the way. The difficulty for me was in knowing what a long-term plan might look like in a venture as malleable as Treehouse Point. In King County, Washington, once it was discovered that I was building a treehouse within the 165-foot buffer to the salmon-bearing Raging River, the order came to tear my treehouse down or they would do it for me. And encumber the property with a lien to pay for the task.
Strong words via certified mail.
It’s the kind of thing that can lead to poor health.
A lasting lesson for me is that the authorities in charge of keeping us all safe from ourselves never go away. They are open to considering new ideas, but treehouse builders need to work hard to receive their blessings. There are parts of our great country where we have done away with building inspectors, but in my corner of the world, they rule. My advice: Plan accordingly.
If the answer to any of the following questions is “yes,” you should speak to your local building authorities before you start to build your treehouse.
1. Are you planning to use the treehouse for commercial purposes?
2. Will the treehouse in any way be a nuisance to your neighbors? Obstructing views, invading privacy, creating noise issues?
3. Will the treehouse be in violation of any neighborhood covenants, deeds, or restrictions?
4. Is the structure going to be within any front yard, side yard, or rear yard building setbacks?
5. Will it be within any so-called “critical area” setbacks and buffers from steep slopes, wildlife corridors, or riparian boundaries (lakes, rivers, oceans)?
6. Is there anything in the local building code that addresses “tree-supported structures”?
7. Is there a building height limit? Often it is 30 to 35 feet from average ground level to the top of the roof.
And even if everything appears to be a go, my strong recommendation would be then to go speak with any neighbors who would be even remotely affected. Let them know your plan. It could save unnecessary headaches in the long run and improve neighbor relations immediately. By the way, it makes no difference for building permits if the building will have plumbing or electricity. Those are both separate permits, typically. I do recommend that those permits be obtained even if you choose not to get a permit for the treehouse itself.
Here is a step-by-step guide to what it takes to get a treehouse through a typical building permit process:
1. Show the precise location of the treehouse on a plot plan of your property. You may need to involve a surveyor if the local tax assessor’s maps are inadequate. Be sure to indicate all the applicable setbacks on the plot plan, and know that if the treehouse is placed within the setbacks, then a new level of planning and unpredictability will kick into effect: the “variance” process.
2. Draw the treehouse plan to scale in detail, including platform layout with beam and joist sizes, a floor plan, at least two elevation drawings, and a section—this is a look through the structure as if it were cut in half, detailing wall, floor, and roof thicknesses. These are the structural bones of the project.
3. Prepare a detailed plan of the connections to the tree(s) and the ground, if applicable. Most likely a registered structural engineer will need to sign off on the connections. Go to the website www.treehouseengineering.com for inspiration here. Hopefully a local engineer will get the picture well enough to sign off on the information provided; otherwise you may need to get in line for Charley Greenwood himself. Charley has been the treehouse industry’s go-to guy for twenty years. He is brilliant and busy. Another contact is Nabil Taha in Klamath Falls, Oregon (licensed in most states), or Ben Brungraber in Massachusetts. Or better yet, maybe you are an engineer yourself!
4. The process of applying for a building permit varies, so call ahead and see what they say. Then be ready to start writing checks.
There you have it.
I’m sorry.