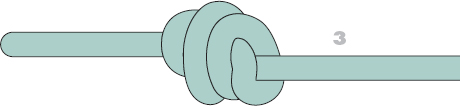
Stoppers, whippings, and splices
A stopper knot (of which the overhand is the most basic) is generally made to stop rope from passing through a hole and, incidentally, to prevent it from unraveling; a whipping offers another way to prevent fraying. A splice is a permanent means of joining two pieces of rope (the short splice), binding the end (back splice), or making a loop (eye splice).


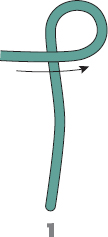
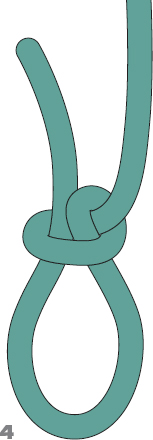
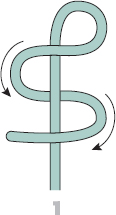
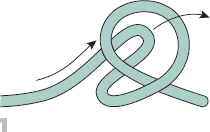
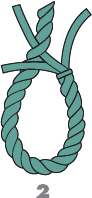
The overhand is a very simple stopper knot that has hundreds of applications. It forms the basis for many other knots in this book. Once it is under strain, it is comparatively difficult to untie.
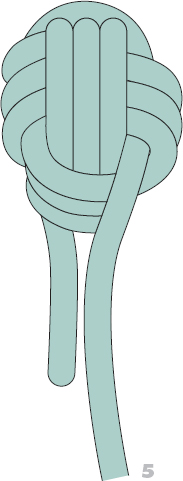
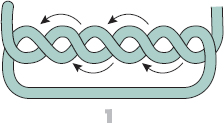
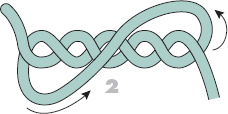
Take the end of the line in your hand and form a loop (1). Then pass the end beneath and through the loop (2). Pull on both ends of the line to tighten the knot (3, 4).


Use this quick and simple knot as a temporary stopper in the end of thread, twine, string, or cord. It is merely an overhand knot in which the working end has not been completely pulled through.
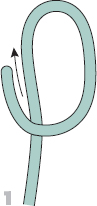
Create a loop with the working end beneath the standing part (1). Then make a bight in the end and tuck it down through the loop just formed (2) to serve as a quick-release drawloop (3). This is one of the few knots that may be tightened simply by pulling the two knot parts in opposite directions, in this case the standing part and the anchored leg of the drawloop (4).


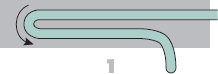
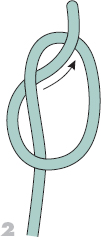
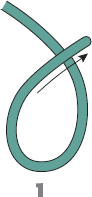
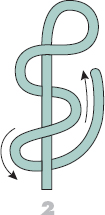
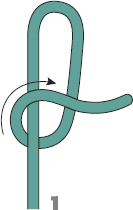
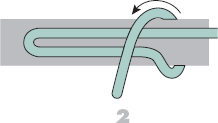
This is a useful stopper knot and forms the basis for many other knots in this book. It differs from the overhand in that the ends emerge from the knot parallel to each other, rather than at angles. This is desirable when you need a compact knot that will not catch or tangle with obstructions.
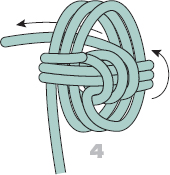
Begin with a clockwise loop of rope, with the working end passing over the standing part (1). Bring the end around the back of the standing part from right to left (2). Then feed the end through the loop you have just made, from top to bottom (3). Pull on the ends to tighten the knot (4).
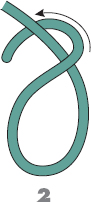


This stopper knot is slightly bulkier than a simple overhand or thumb knot; and, although it will not block a bigger hole, the quick-release drawloop makes it easier to undo.
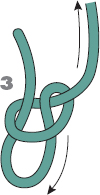
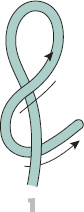
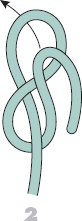
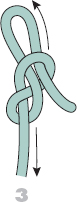
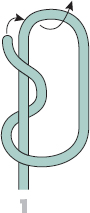
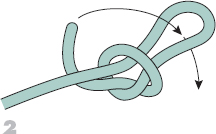
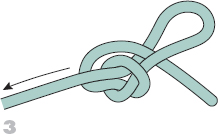
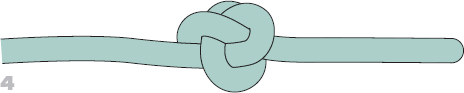
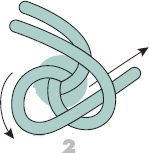
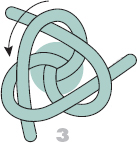
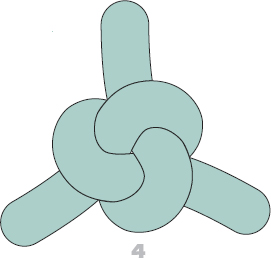
Outline an ampersand [&] with the working end, going first over and then under its own standing part; alternatively, impart a twist to achieve the same shape (1). Then tuck a bight through the upper loop from front to back (2, 3). Pull on both ends and on the loop to tighten the knot (4).
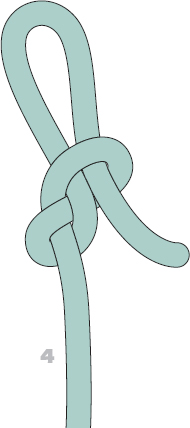


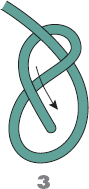
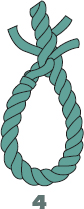
This is a bulky stopper knot, which is used for making a rope fast through a hole only slightly larger than its diameter.
Begin with a bight, then wrap the working end around the standing part in one complete turn (1). Then make a half turn and bring the working end back up to the top of the knot (2). Take the working end through the end of the bight from front to back (3). Pull on both parts to tighten (4).
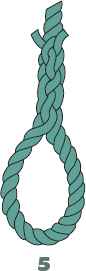
This is a beefier knot than the regular overhand (see page 292), and is used when more bulk is needed at the end of a line.
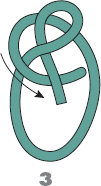
Start with a loop in the end of the line, and pass the working end through the loop once, then pass the end through a second time (1). Pull the working and standing ends apart to tighten the knot (2, 3).


Any kind of heaving line—whether a “messenger” sent ahead to haul a heavier rope into position, or a rescue lifeline—will fly better and further through the air with this knot on the leading end. It works best with a weighted core inserted (anything from a metal nut to an old golf ball), which will hold the numerous turns neatly in place and add momentum to its flight.
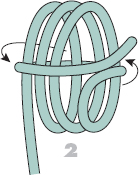
Wrap three vertical coils (1), and then enclose them within three horizontal ones (2, 3), taking care to hold everything in its place. Then change direction again and pass the working end a further three times (once more in a vertical plane, but at right-angles to the original turns) in a series of locking tucks (4). Insert whatever has been chosen as the heavy core. To tighten the knot, start at one end of the knot and—strand by strand, circuit by circuit—systematically pull unwanted slack, a bit at a time, through the knot until it emerges at the other end (5). Lastly, seize (or knot) the loose end to the standing part of the line.

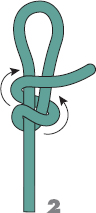
A cluster of these knots can sometimes be seen adorning the waist ties of nuns and monks, as a reminder that the wearer is bound to his or her vows of poverty, chastity (or celibacy), and obedience. Barrel-shaped knots of this sort also form the basis of other strong and secure knots, although, depending on the material in which they are tied, they may prove hard to untie again. Nevertheless, this is a useful knotting technique to master.
Tie a simple overhand knot (see page 292), then tuck the working end two, three, or more extra times (1). Pull both ends gently in opposite directions, allowing the knot to twist and wrap around itself (2). Work it snug and tight (3).
When a seaman needed to cast a line to a nearby dock or vessel, he would tie a knot to add weight to the end of the line to make its flight easier. One such knot is the heaving line knot.
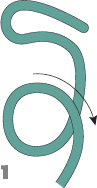
Start with a large bight of rope and plenty of excess in the working end. Make a loop around the bight near half its length (1). Continue wrapping the working end around the bight (2) to make the knot as large as you like. Feed the working end through the top of the bight (3). Pull the standing part to draw the bight down onto the working end (4).


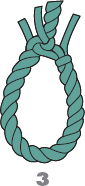
Clifford W. Ashley, author of the enormous compilation of knots and ropework, The Ashley Book of Knots, invented this stopper, which he said gave more bulk with less rope than other stopper knots. It can be used to stop a rope from going through a hole or eye up to twice the rope’s diameter.
Start with a loop, with the working end emerging from the back of the loop. Pull a bight from the standing part through the loop from back to front (1). Feed the remaining working end through the bight (2). Pull on standing end (3) to tighten the knot (4).
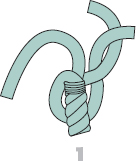
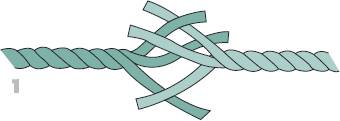
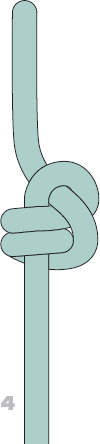
A crown knot forms the basis of a back splice (see pages 312–313) in hawser laid rope—that is, three-strand rope; it is also an indispensable technique for ornamental knotting. You can insert a quick crown knot in the end of a cut rope to prevent it from fraying, if whipping twine is not available.
Viewing the rope’s end head-on, and assuming that it has the usual right-handed lay, the three strands will appear to rotate counterclockwise (1). Working in this direction, bend one strand over its neighbor, and that second strand over the third one (2). Finally, tuck the third strand down through the first one (3). To tighten a crown knot, tug evenly on each strand in turn (4).
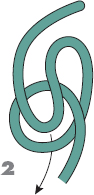
This ingenious version of what is generally a multistrand lanyard knot—but tied here in a single length of cord—is better known as a knife lanyard knot. Use it to create the retaining loop for a lucky charm, a referee’s whistle, an official’s stopwatch—or even a knife.
Locate the middle of a piece of cord and make a loop with the working end underneath (1). Pass the other end around it counterclockwise, then under in three places (2, 3). Make a locking tuck over-under-over (4). Still working counterclockwise, take each end in turn around the outside of the nearest standing part and tuck both up through the center of the knot (5). Gently tighten by pulling up on the two ends, while coaxing the entwined knot parts down around the two legs of the remaining loop (6).

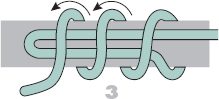
Rope is not cheap. So it is good practice to tape or tie it (using a constrictor knot, see page 153) on either side of where it is to be cut, to prevent needless fraying and unraveling. This first-aid measure can then be replaced with this traditional whipping.
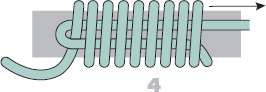
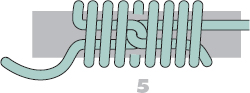
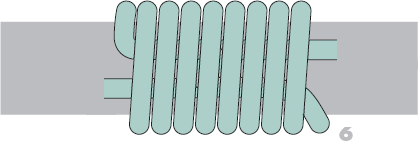
Lay a narrow bight of whipping twine along the rope (1) and with one end begin to bind a series of wrapping turns (2), traveling toward the rope’s end so as to trap the bight in place (3). (For clarity, these turns are shown apart, but they should actually be made firmly alongside one another.) Continue until the whipping is at least as long as the rope is thick, then tuck the working end through the tip of the bight, but leave the final wrapping turn slack (4). Pull steadily but firmly on the unused end of the whipping twine, dragging the working end under and into the wrapping turns; stop when it appears to be halfway (5). Cut off both ends close to the completed whipping (6).

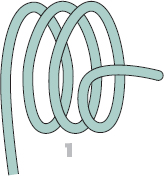
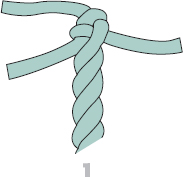
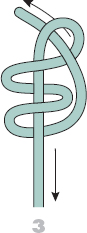
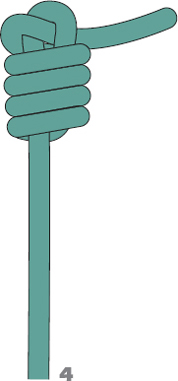
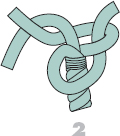
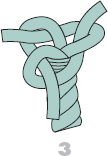
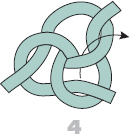
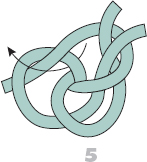
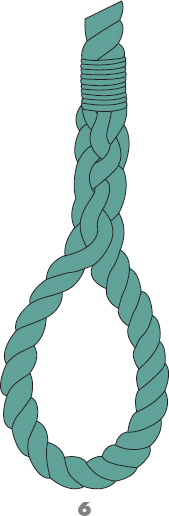
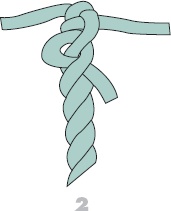
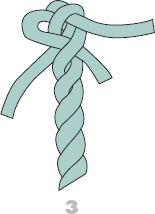
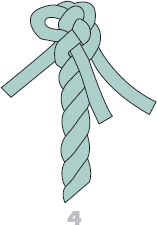
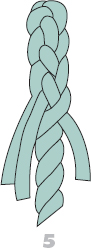
This classic stopper knot is far from being the only knot named after a person, but it may have been the first, its namesake believed to have been a mid-eighteenth-century master rigger who lived and worked aboard an old hulk moored on the River Wear at Sunderland in northeast England. Tie it in three-strand (hawser-laid) rope. Sailors have their own sleight-of-hand way of forming this tricky knot, but the more methodical method shown here has a better chance of success in fingers unfamiliar with it.
First tie a wall knot, tucking each of the three strands in turn under and up through the next strand around, working counterclockwise (1, 2, 3). Continuing counterclockwise, take each strand around and tuck it up through the next available space (4, 5, 6). Ensure that the trefoil knot layout that results is symmetrical (7), then lift the three strands up and shape the knot into its final, chunky, spiraling form (8). Tighten, a bit at a time, taking care to ensure that the tension on every strand is the same. The ends may either be whipped or taped together for neatness, although this knot is secure enough without that finishing touch.
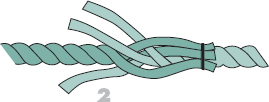
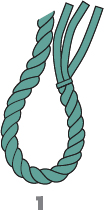
This time-honored technique makes a fixed eye of any predetermined size in a three-strand (hawser-laid) rope. Splices are generally stronger than knots in cordage of vegetable-fiber origin (hemp, coir, sisal, etc.) and are preferred for that reason; but in the phenomenally strong synthetic ropes (polyamide, polyester, polypropylene, and others) this may no longer be a critical factor.
Temporarily tie or tape the end of each strand to prevent fraying, then unlay them a short distance, taping the rope at that point to stop further unraveling (1). Keeping the three working ends in order, tuck the middle one beneath a convenient strand in the rope (2). Take the end nearest the rope, pass it over the strand just used, and tuck it beneath the next strand (3). The next step is crucial: lead the end so far unused around to the back of the rope and bend it around to tuck—in the same direction as the previous couple of ends—beneath the only strand unoccupied at that point in the rope (4). Pull this initial trio of tucks snug up against the body of the rope. Continue, tucking all three strands over one, under one, a second time; and tighten by pulling each in turn down (away from the eye), then up (toward the eye). Repeat the process once or twice more (5). It is then usual to roll the splice underfoot before whipping or taping the cut ends to the body of the rope (6).
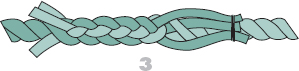
Use this splice instead of a whipping to prevent the three strands of a hawser-laid rope from unraveling, while at the same time creating a good-looking section of six-strand round plait.
Begin with a crown knot (see page 303) and pull each strand in turn to tighten it (1). Then select a strand (any one will do) and tuck it, in the opposite direction to the lay of the rope, over the nearest strand and under the next one (2). Repeat this process with another strand, and again with the remaining one (3, 4). Tug each strand in turn downward (away from the crown knot), and then lever it upward (toward the crown), to tighten what has been done so far. Continue, tucking all three strands over one, under one a second time; then tighten as before. Repeat the process at least once or twice more (5). It is then customary to roll the completed splice underfoot before whipping or taping the cut ends to the body of the rope (6).

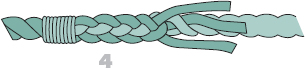
First, learn the back splice (see pages 312–313), and then tying the short splice will be easier. Use it to join two similar three-strand (hawser-laid) ropes’ ends together, in a way that is both neater and stronger than most knots.
Unlay a short section at the end of each rope, applying a constrictor knot (see page 153) or adhesive tape (not shown) to prevent further unraveling. Tape the end of each strand if necessary to prevent them from fraying. Then “marry” the six strands, bringing them together and interlacing them (1). Apply a temporary seizing such as a constrictor knot to keep three strands of one rope against the body of the other rope (2). Tuck each of the free strands in turn over one strand and under the next, then tighten all three, as for the back splice. Repeat the process twice more (3). Loosen the unused three strands (4) and tuck them the same number of times in the opposite direction. Roll them underfoot, and finally tape or whip both sets of ends (5).