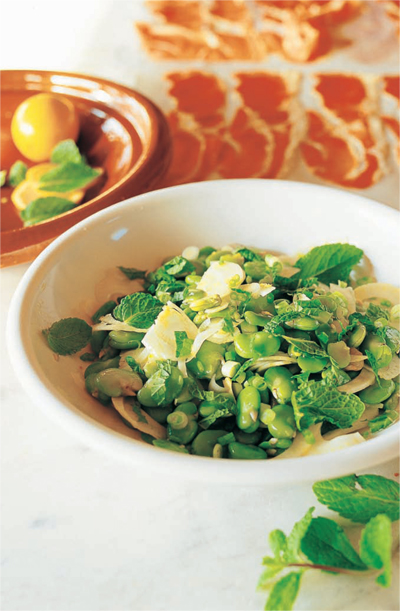
Fava Bean Salad with Mountain Ham and Mint
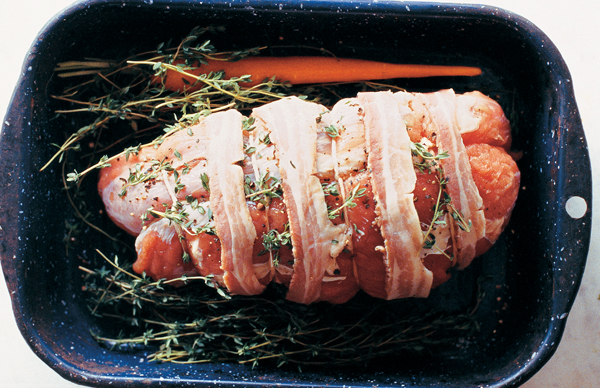
Roasted Veal with Morel Mushrooms and Saffron Carrots
Chicory Salad with Lemon and Anchovy
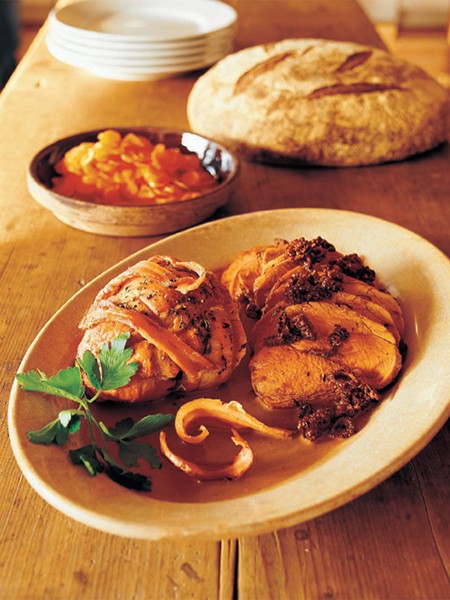
Shoulder of Spring Lamb with Flageolet Beans and Olive Relish
Wild Salmon with Vietnamese Cucumbers
Five-Spice Duck with Buttered Turnips and Fried Ginger
favas and other harbingers
Fava Bean Salad with Mountain Ham and Mint
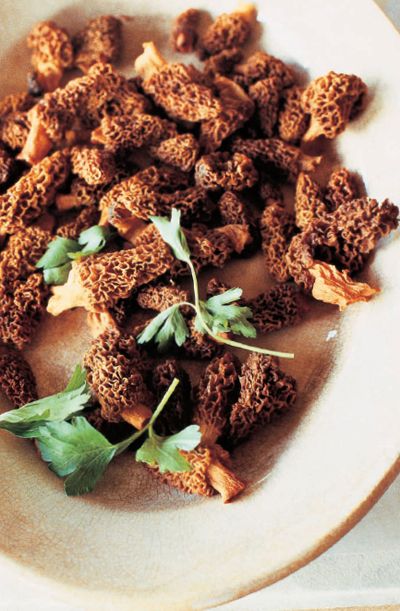
Roasted Veal with Morel Mushrooms and Saffron Carrots
So strange, isn’t it, the power of food memories. A simple salad of fava beans is always magical and exciting to me. I first encountered it in Spain, in a well-known Catalan restaurant not far from the Dalí Museum. I had barely taken my seat when a torrential rainstorm put out the power in the entire village of Figueres. Sitting in the blacked-out restaurant seemed appropriately Dalíesque. My day had already been slightly surreal. I’d traveled to Figueres in a ghostly empty third-class train with dusty red-velvet seats and tattered lace curtains. There were no other passengers, nor did I see a conductor. I wondered if there was even a driver. I spent the day among Dalí’s giant eyeballs, bizarre dioramas, and weird self-portraits. Now the artist seemed to be orchestrating my dinner with thunder and lightning—his kind of drama. The waiters calmly went about lighting lanterns and candles, and the place became eerily, wonderfully quiet, without the hum of generators or any equipment. When it was set before me by candlelight, that simple bean salad—a combination of favas, mint, good olive oil, and excellent Spanish ham—symbolized the whole experience. It still does.
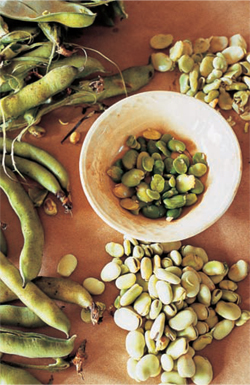
If fava beans are in the market, you know it’s spring, or spring somewhere nearby. Their giant green pods look like something strange and juicy, perhaps from another planet. In fact, they are the original Mediterranean bean. Early favas are small and tender; they get starchier as the season progresses. Favas are more than a little fussy to peel, but peel you must to appreciate them fully. Fresh fava beans are so good, though, they are worth the effort.
I usually try to enlist help and I always wish I had a houseful of kids or a couple of resident grandmothers … peeling favas makes a nice multigenerational chore. For this salad, the fava beans are removed from the pods, cooked briefly, peeled, and combined with thinly sliced raw fennel (or you could use raw artichokes or asparagus).
Shuck the fava beans from their pods. To remove their skins, blanch the beans in boiling water for 10 seconds, then cool in a large basin of ice water. Pop out the beans, piercing the gray-green skin with your thumbnail to free the bright green, barely cooked bean. Cover the favas with a damp towel.
Trim and wash the fennel.
When you are ready to make the salad, slice the fennel into thin shreds (a mandoline works well for this) and put them in a bowl. Add the fava beans, scallions, and a good sprinkling of sea salt. Drizzle generously with fruity olive oil to coat. Coarsely chop the mint leaves and add them, then squeeze the juice of half the lemon over the salad. Toss well with your hands, then taste and correct with salt, oil, and/or lemon juice.
Pile the salad onto a large platter, add a few grinds of black pepper, and surround with thin slices of mountain ham, such as jamón serrano or prosciutto. Or julienne or tear the ham into strips and scatter over the salad. Garnish with a few arugula leaves if you like, and serve immediately.
serves 8–10
{VARIATION} FAVA BEAN MASH ON TOAST
If the favas you find are larger and starchier, make a savory fava bean spread. Just buy a few pounds, and stew the peeled beans in ¼ cup olive oil with a little chopped garlic, a few whole cumin seeds, salt, and pepper. Add a glass of water and simmer for about 10 minutes, until soupy. Mash the beans with a wooden spoon, then spread on garlic toast (see page 182).
Olive oil was never a fancy ingredient in the Mediterranean. Still isn’t. You just used what you had, and there were olive trees aplenty on those sunny hillsides. And it wasn’t the only oil: grapeseed, rapeseed, poppy seed, cottonseed, and other nut oils like walnut or hazelnut were used frequently too, there and in other regions. So it’s pretty astounding to see today’s fetishizing of olive oil—marketing high-priced boutique oils to a foodie crowd.
Olive oil is a delicious, healthy oil to cook with. It’s the logical, natural oil to use when cooking Mediterranean food, and almost any midpriced oil produces good results. There are certainly some exquisite oils that do make a difference to food, such as a peppery Tuscan oil, or a sweet, round French oil from Provence—especially when you’re not cooking with it. Use these oils as a final drizzle on a dish or for dressing the simplest green salad. But you don’t need a $30 bottle to make good food.
The supermarket, unfortunately, is not usually the best place to buy olive oil, because even if it’s labeled extra virgin, it may have been on the shelves too long, or it may not be a good brand to begin with. Health food stores quite often sell decent olive oils in bulk that come from Spain, Turkey, or Greece, even California. For everyday cooking, these can be pleasantly fruity and flavorful.
Provençal housewives have a trick I like for stretching their olive oil: they mix it half-and-half with vegetable oil and keep it in a wine bottle by the side of the stove. They use that mix for everyday sautéing and frying. In this economizing gesture, the flavor of the olive oil still comes through.
Having said all that, you still have to look for extra virgin oil, because the term means the oil has not been heated or processed in any fashion. So-called pure olive oil is a misnomer; it is made after the first pressing of olives, from the dregs, which are heated, then centrifuged and blended with additives. Don’t buy it.
Factory-style veal—the result of a giant dairy industry gone amok, with cast-off male calves subjected to inhumane treatment—has animal rights people up in arms, and rightly so. Happily, wholesome, natural milk-fed veal is being raised again, and its flavor is excellent. If you can’t find good veal, use a pork loin roast (from a politically correct nonfactory pig farm).
Wild morel mushrooms are another delicacy, abundant in the spring woods and fun to hunt, but they’re are also relatively easy to find at good produce markets, for a price. Their flavor is deeper than that of other wild mushrooms. (In a pinch, dried morels, which rehydrate well, are an acceptably good substitute, or use a combination of fresh button mushrooms and dried morels.) Morels need to be cooked longer than other mushrooms to bring out their flavor and create a rich-tasting sauce. In other seasons, you can use chanterelles or porcini.
Season the roast well with salt and pepper. Insert the garlic slices in the loose flesh on the underside of the roast. Drizzle a little olive oil over the meat. Roughly chop the rosemary and thyme sprigs and press them all over the meat. Wrap the pancetta strips around the roast and place in a roasting pan. Refrigerate for a couple of hours, or overnight.
Bring the meat to room temperature, and preheat the oven to 400°F. Roast the veal for 45 minutes to an hour, until the internal temperature is 130°F. Let the meat rest on a platter, loosely covered, for at least 15 minutes before carving.
While the meat is cooking, prepare the sauce. Over high heat, reduce the dark chicken stock by half to yield one cup. Set aside. Swish the mushrooms quickly in a large bowl of warm water—morels can be sandy—then lift them out to a colander. Blot the mushrooms with a towel, and trim and discard the tough stems. Coarsely chop the morels or, if they are small, cut them in half.
Melt the butter in a saucepan. Slowly sauté the shallots in the butter, stirring occasionally, until lightly browned. Turn up the heat and add the mushrooms, salt, and pepper. Stew the mushrooms with the shallots for a minute or two, then add the reduced stock. Simmer gently for 10 to 15 minutes.
When the roast is out of the oven and resting, pour off the fat from the roasting pan. Add a little water or white wine and scrape up the roasty bits from the bottom of the pan. Add these pan juices to the sauce, then stir in the crème fraîche and simmer the sauce for 10 minutes more.
Slice the meat, arrange it on a platter, and spoon over the mushroom sauce. Serve the saffron carrots separately.
serves 8–10
To make an unctuous dark sauce to serve with a roast, begin with a dark stock. It takes a little time to make, but it’s wonderful to have on hand in the freezer.
Preheat the oven to 400°F. Split the chicken in half. Place it, unseasoned, in a shallow roasting pan and scatter the vegetables over and around it. Roast uncovered for an hour or so, starting at 400°F, then, after about 15 minutes, lower the heat to 350°F, turning the chicken over now and then. The idea is to get everything as darkly browned and caramelized as possible without burning it. The chicken, of course, will be quite overcooked.
Put the contents of the roasting pan in a stockpot and cover with the water. Add the thyme branch and bay leaf half. Bring to a boil, skimming off the froth, then reduce to a simmer.
Meanwhile, deglaze the roasting pan with a little hot water, scraping it with a wooden spoon; take care to dissolve all the brown bits in the pan. Add the tomato paste and stir it into the juices. Pour the dissolved juices into the stockpot.
Simmer the stock for 2 hours, or until reduced by half. Strain, refrigerate, and then degrease. The stock will have jelled slightly, and it should be a rich brown. It can be refrigerated for several days or frozen for future use.
For a simple dark sauce reduction, boil 2 cups of the half-reduced stock until 1 cup remains. Just 1 cup of this second reduction will be so rich it will make enough sauce for 8 servings.
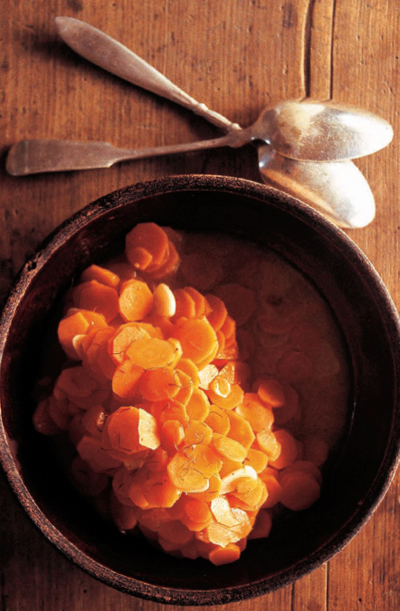
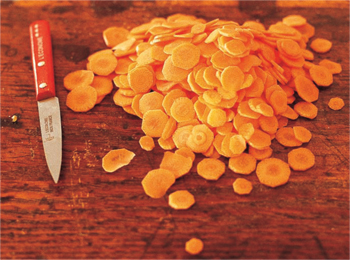
It’s amazing how a little saffron and garlic can transform ordinary carrots into something sublime.
Peel 3 pounds carrots and slice into thin coins. Cook in 2 tablespoons butter with a little crumbled saffron and a couple chopped garlic cloves. Season well with salt and pepper and a scant teaspoon of freshly grated lemon zest. Add a cup of water and simmer, covered, for 5 minutes, or until the carrots are tender.
{CARROTS, ANOTHER WAY} MASHED POTATOES WITH CARROTS AND SAFFRON
Boil 2 pounds potatoes and 2 pounds carrots in salted water until tender. Drain and add a little crumbled saffron, butter, and grated lemon zest. Mash the potatoes and carrots and thin with a little milk or Crème Fraîche (page 41).
I’m not much for rich, gooey cakes, but this one is neither. A small slice is especially good with a little fresh fruit and a spoonful of Barely Whipped Cream (page 69). It’s nice, too, frosted with a layer of coffee-flavored whipped cream, or used as a base for tiramisu. The cake keeps well and can be made a day or two ahead.
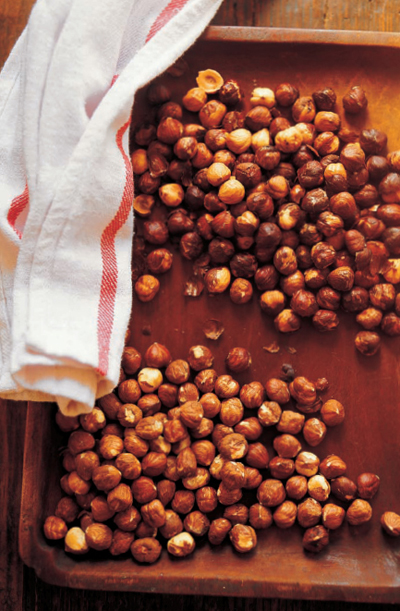
Preheat the oven to 400°F. Line a 10-inch springform pan with a round of parchment paper (or butter and flour the pan) and set aside. Roast the hazelnuts on a baking sheet for 10 minutes, or until the skins blister and the nuts are lightly toasted. Put the roasted nuts in a dry dish towel and rub them together to remove the blistered skins. When the hazelnuts are cool, coarsely chop in a food processor or with a nut grinder.
In a mixing bowl, beat the egg yolks with the sugar until creamy. Add the lemon zest, lemon juice, flour, salt, and chopped nuts and mix well. Whip the egg whites until stiff. Stir one-third of the whites into the batter to lighten it, then gently fold in the rest of the whites.
Scrape the batter into the cake pan and bake for 15 minutes at 350°F. Turn the oven down to 325°F and bake until a skewer inserted into the center of the cake comes out clean, about 25 to 30 minutes more. Let the cake cool completely on a rack before unmolding.
how to cook a rabbit
Rabbits are hideously misunderstood in this country, except by a few of us quiet loyalists who persist in our devotion. Every chef I know has a story about trying to put rabbit on the menu—not a good idea for the Easter crowd—and a few brave chefs do prevail. In Europe, rabbits are common in markets and on menus, but it seems Americans would still rather pet them than eat them. Yet rabbits were once popular fare in this country. And farm-raised rabbit is the very model of a perfect meat: mild and sweet, tender and quite lean, high in protein. Rabbits’ all-vegetable diet makes them a very healthy thing to eat.
On the other hand, rabbit recipes abound. And fresh rabbit is rather easily found—it’s encouraging that a Google search for “farm-raised rabbit” yields ever more sources—though it may mean ordering ahead from a good Italian butcher, or finding a Latino meat market. Some supermarkets stock rabbit “fryers.” It is worth investigating the rabbit underground in your area.
The old joke, in this case, is true: just about anything you can do with a chicken, you can do with a rabbit. Once you are a rabbit fan, you’ll choose the part you like best. The belly flap is very good, as are the forelegs, saddle, neck, even the head. The hind legs are fine if they’re roasted perfectly, but better if braised a little longer. Rabbit liver is delicious sautéed rareish, seasoned with nothing more than salt, pepper, and olive oil. Slice it, still warm, and serve on toast as an hors d’oeuvre with drinks, or as a treat for the cook. Rabbit kidneys, likewise, are succulent and mild, not at all strong tasting. At our table, we fight over the kidneys. Rabbit makes a tasty broth too. As cooks and diners become more adventurous, let’s hope for a rabbit revival, and maybe even a rabbit in every pot.
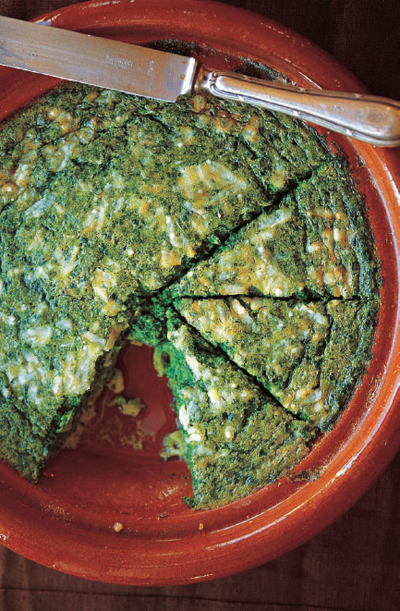
This cake—a cross between a custard and a frittata—tastes best at room temperature, so it’s best made several hours ahead of time. It’s great on a picnic, or as part of a cold lunch. It can be made with other greens, such as chard, mustard or turnip greens, or nettles. Made with spinach, the cake is a brilliant green, its flavor deeply satisfying.
Cut the spinach into 1-inch-wide ribbons, discarding any tough stems. Swish the greens in a large basin of cold water, then lift them out to a colander. Repeat the process 2 more times, with fresh water each time. It is tempting but unwise to stop after 2 washings. After the third washing, you shouldn’t see any sand or grit in the water.
Trim the leeks and peel off the tough outer layer. Cut the leeks into small dice. Fill a bowl with warm tap water and add the leeks. Agitate the leeks with your hand. Let the dirt and sand settle in the bowl, then scoop the leeks from the water. Repeat the process 2 more times.
Melt the butter in a deep, heavy-bottomed pan over medium heat. Add the leeks, season with salt and pepper, and sauté, stirring occasionally, until they are tender but still green, about 5 minutes.
Turn up the heat and scrape a little nutmeg over the leeks. Now add the drained spinach in layers, sprinkling each layer with a little salt. Cover tightly, and let the spinach steam rapidly over the leeks, removing the lid to stir once or twice. (The water clinging to the spinach will provide enough moisture for steaming.) When the spinach is just barely wilted, 2 minutes or less, turn out the contents of the pot onto a platter and let cool. Be sure to save any cooking juices that have accumulated.
Preheat the oven to 400°F. When the spinach-leek mixture is cool, taste for seasoning and adjust—it should be highly seasoned. In a blender or food processor, puree the cooked vegetables with the milk and eggs in batches, adding a little more salt, pepper, and a pinch of cayenne. Add any remaining cooking juices to one of the batches and whiz again.
Pour the soupy green batter into a buttered baking dish or a 9- or 10-inch deep-dish pie pan. Grate a scant 2 tablespoons Parmigiano over the top, and bake uncovered for 45 minutes, or until a knife inserted in the center comes out clean. Cool to room temperature. Cut into wedges and serve with the herb salad.
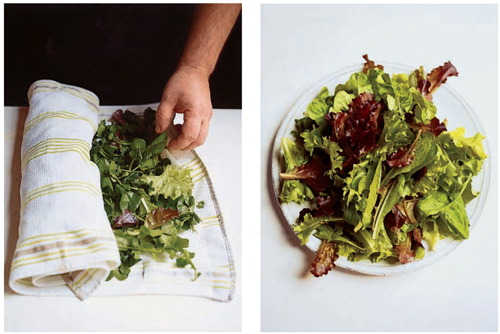
A salad of tiny lettuces and sweet herbs is a surprising and delicate thing. It must be dressed at the very last moment, with a very light hand. Use many different kinds of leaves; avoid anything too spicy or strong. Let the flavor of the herbs dominate. Belgian endive adds crunch and volume; so do mild watercress leaves and thinly sliced radish or young fennel. Garnish the plates with Soft-Center Hard-Cooked Eggs (page 154), if you like.
Wash and gently dry the arugula and lettuce leaves. Trim the endive, if using; discard the outer leaves, and slice crosswise about 1 inch thick. Combine with the washed greens and wrap in a clean towel and refrigerate until ready to serve.
Pluck the herb leaves from their stems, tearing larger leaves into rough ribbons. You will need roughly 2 cups of a mixture of sweet herbs, plus a few chopped celery leaves.
Prepare a vinaigrette: Macerate the shallot with the lemon juice and a little salt. Then whisk in the olive oil. Add a little freshly ground pepper.
Put the arugula, lettuce, and herb leaves in a low wide bowl. Sprinkle very lightly with salt and toss gently. Rewhisk the dressing and spoon half of it over the salad, then toss again to coat very lightly. The idea is that the salad will be barely dressed, but sprightly. Adjust with a little more vinaigrette, lemon juice, or a drop of oil. Toss, taste, and serve. (A spoonful of vinaigrette over the spinach cake tastes good too.)
If you have a garden, there’s nothing more satisfying than picking salad just before dinner: you can’t find a fresher salad—the greens taste alive. For those of us without gardens, our goal is to approximate the garden salad, relying on the efforts of good greengrocers and farm stands.
With greens, it’s buyer beware. You may be tempted by premixed salad, in bags or bins, but how fresh can these greens really be? It is better to buy individual lettuces, large or small, and mix your own. Try for a variety of flavors and textures, but make it mostly lettuces. I generally find beet greens, mustard greens, and the like too strong, but many commercial growers market these “sturdier” salad mixes, probably because they have a longer shelf life. They are sometimes called “spring mix,” but to me these leaves are better softened in a stir-fry. Likewise, the spicy “mesclun mix” in the States has nothing do with the French original, which in France usually means young lettuce shoots of different varieties mixed with a bit of arugula and chervil. All the seeds are sown together, then cut with scissors as they reach the proper size.
For me, a classic mixed green salad needs a combination of tender red and green oak-leaf lettuces, curly or Belgian endive, a little mild arugula or watercress, some small romaine leaves, butter or Bibb lettuce, and perhaps some flat-leaf parsley leaves pulled from the stem.
When buying lettuce, size is not as important as freshness. The lettuce should look sassy and tantalizing, the stem ends freshly cut. You must always refuse wilted or droopy heads; I find they can bring on a kind of cook’s melancholia or in some cases, severe depression. Pursue perky, frisky greens—they’re a cheap thrill.
To wash lettuces, fill a large basin with cold water. Pluck off any tough outer leaves, then separate the inner leaves and plunge them into the water. Inspect arugula or watercress for tough stems and trim them. Swish the lettuces with your hands and gently agitate to allow sand and soil to sink to the bottom of the basin. Try not to keep the greens in water for more than 5 minutes, or they’ll get waterlogged. Lift the greens from the basin to a colander. Give the colander a shake and let the lettuces drain. To dry the greens, lay them on kitchen towels, stacked in layers, then roll up into a loose log and refrigerate.
An old-fashioned drying trick is the pillowcase method, where drained salad greens are stuffed into a pillowcase, shaken and fluffed gently, then rolled up. The French are fond of the human centrifuge technique, where wet lettuces are put in a wire basket, carried outdoors, held at arm’s length, and spun rapidly, like a pitcher winding up for a fastball. If you like those little drawstring salad spinners that seem to be de rigueur in the modern kitchen, I won’t hold it against you, but I have become disenchanted with them. Why? Because that puts just one more unnecessary device between you and those tender greens. Under no circumstance do I recommend the spin cycle of the washing machine.
In any case, the ultimate goal is a salad bowl of greens that have not been overhandled or abused, dry enough so that the dressing is not diluted by water. Don’t rely on the salt in the salad dressing to salt the greens. In cooking, every vegetable needs salt to draw out the juices and flavor; in the salad bowl, adding a bit of salt does the same thing for greens.
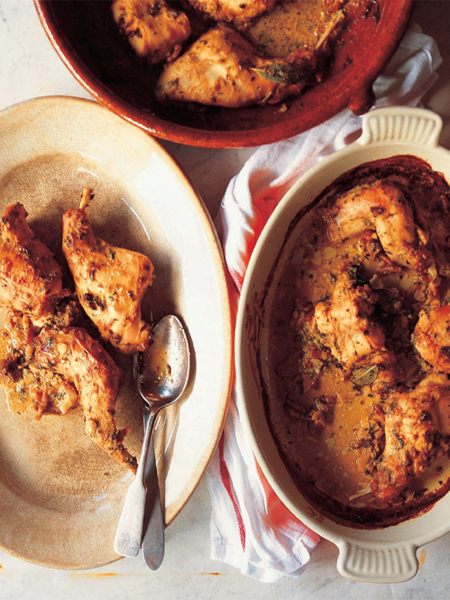
Rabbit in mustard sauce is an old French dish, and there are as many versions as there are housewives. Baking it gives the rabbit a nice roasty flavor and golden color, with just a little sauce. One rabbit will feed 4 people in the context of a three-course meal, but it’s no problem to do a third rabbit for larger portions, or more servings, or to have some to eat cold for lunch.
For some reason, the French mustard exported to the United States is not as pungent as the same brands bought there. So stock up on mustard when you’re in France, or add a little dry mustard powder to punch up Dijon mustard here.
Ask your butcher to cut the rabbit into 6 pieces (or do it yourself with a small cleaver) as follows: Cut the saddle into 2 pieces. Divide the hind legs. Cut the fore-section in half through the backbone, leaving the forelegs attached to the ribs.
Season the rabbit pieces generously with salt and freshly ground pepper and put them in a large bowl. Add the mustard, mustard seeds, crème fraîche, garlic, bacon, and bay leaves. Strip the leaves from the thyme and sage branches, chop them roughly (you’ll want about 2 tablespoons of each), and add to the bowl. With your hands, smear the ingredients all over the rabbit pieces to coat evenly. Cover and let the flavors meld for an hour or two, or overnight, in the fridge.
Bring the rabbit to room temperature, and preheat the oven to 400°F. Place the rabbit pieces, along with every drop of their juicy seasoning, in two shallow, oval earthenware baking dishes just large enough to hold them.
Bake on the middle oven shelf for about 1 hour, turning the pieces as they brown. (You may remove the saddle pieces a little earlier, though, if they seem done, to keep them from overcooking. Then return at the last minute to heat through.) The rabbit should be nicely browned and the juices quite reduced. If it seems to be browning too rapidly, lay a piece of foil on top, then uncover for the last 10 minutes of cooking. If the sauce seems too reduced, splash a little white wine or chicken broth into the bottom of the baking dish, and cook for a few minutes longer.
Bring the serving vessel to the table and serve each person according to their preference: foreleg, saddle, or hindquarter. Spoon a little sauce over each serving. Accompany with the roasted parsnips.
serves 8
I have tried many commercial crème fraîche products, and some are fine, but when you make it yourself, it’s cheaper and tastes better. It’s easy, and you can control the quality of the ingredients. Homemade crème fraîche will not curdle when added to a sauce—not true of some commercial crème fraîche. It can be whipped like heavy cream for fruit desserts, sweetened or not. A big spoonful will enrich vegetable soups or cold salads like Celery Root Rémoulade (page 273).
Heat 2 cups organic heavy cream, not ultrapasteurized, to just under a boil. Cool to room temperature. Stir in ¼ cup plain yogurt or buttermilk. Transfer to a glass, ceramic, or stainless steel bowl and cover with a clean towel. Leave at room temperature for about 12 hours, until slightly thickened. For a tarter flavor, let it stand for 24 hours. Cover well and store, refrigerated, for up to 2 weeks.
RABBIT BRAISED WITH HERBS AND OLIVE OIL
Here is an easy and delicious way to cook a rabbit for a casual, bone-nibbling dinner that approximates the best pan-roasted Italian style rabbit. (In fact, it can be prepared on the stovetop with good results, but this oven version is easier.)
Chop the rabbit into 10 pieces of equal size with a cleaver, cutting right through the bones. Season the pieces well with salt and pepper, then drizzle with ½ cup olive oil and some chopped rosemary, thyme, and sage.
Place the rabbit in a shallow earthenware casserole and roast, uncovered, in a fast oven (400°F) for an hour or so, turning the pieces occasionally so they brown evenly. When the rabbit is well browned and tender, add some chopped garlic, a handful of unpitted olives, black or green, some lemon zest, and a fistful of chopped parsley. Stir and return to the oven for 5 minutes.
Serve with new potatoes, lemon wedges, and a green salad.
RABBIT ROASTED LIKE A GREEK GOAT
Split the rabbit lengthwise, and season with salt and a mixture of ground coriander seeds, allspice, bay, clove, black pepper, fennel seeds, and cinnamon. Put the halved rabbit in a baking dish, and add 3 chopped ripe tomatoes, a chopped onion, garlic, some thyme, marjoram, and rosemary, ½ cup olive oil, and ½ cup dry white wine.
Bake uncovered at 350°F for an hour and a half, more or less, turning the rabbit over in the juices occasionally. Serve with roasted potatoes and cucumbers dressed with yogurt and mint.
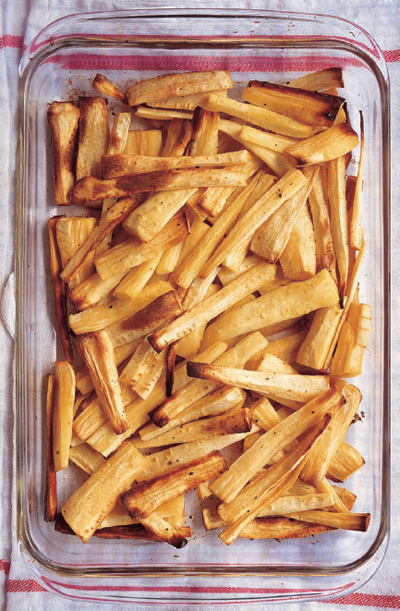
Parsnips have become an heirloom oddity, remembered only by an older generation. I first tasted parsnips cooked for me by a real salt-of-the-earth sixty-something big-boned American farmwife. Beryl Loobie—she was a dead ringer for Marjorie Maine, and had all that pioneer bullheadedness, but she didn’t sing—was a natural cook who favored cotton housedresses, bib aprons, and lace-up boots.
I was often a guest at her table when, as a young vagabond wandering through the then-quite-hippie Pacific Northwest, my greatest ambition was to be a goatherd. Beryl and her husband, Art, raised prizewinning goats and a few other critters on a tiny rural homestead, of a kind you don’t see much anymore. A few outbuildings, a small garden, the goat pens, and a two-room cottage were the extent of their possessions. To me it seemed idyllic.
That day, Beryl yanked those parsnips from the vegetable patch on the way back from chores, then washed, peeled, and roasted them in a cast-iron pan. “You might as well stay for dinner,” she told me. “I’ve got some chicken backs.” Then she went on to produce a frugal but delicious meal of gravy from scratch, instant mashed potatoes, homemade white bread, homemade pickles, and homemade pie. She managed this despite the inconvenience of a broken arm (the result of wrestling hay bales in the goat barn). Of the roasted chicken backs, crisp and well seasoned, barely meaty, she said, “I just wanted you to think you were having chicken.” When I praised the parsnips, she said, “Well, it’s just parsnips.” But they were so crisp, brown, tender, and sweet, I thought they were the best thing I’d ever eaten.
Beryl raised three boys, sometimes with the help of a harness to keep them from straying (“Never hurt ’em any!”), and somehow found time to teach a cake-decorating class at a nearby church. To see her, you’d never guess she had a soft side. But for everyone’s birthday, she would set out her bright-colored Crisco-based frostings and fashion a cake adorned with sugary miniature daffodils, jonquils, and roses. She was especially good with daffodils.
This old-fashioned, nearly forgotten root vegetable is lovely roasted and slightly caramelized. Parsnips look like pale carrots, but their flavor is a heady cross between butternut squash and chestnuts.
Preheat the oven to 375°F. Peel the parsnips and quarter them lengthwise. With a paring knife, remove the central core (in my experience, even small parsnips have a hard core). If the parsnips are smallish, just trim the ends; if larger, cut them into 3-inch lengths.
Season well with salt and pepper and toss with the olive oil, then install the parsnips in an earthenware dish or roasting pan. Bake for 45 minutes or so, until they are fork-tender and lightly browned. They can be cooked in advance and reheated.
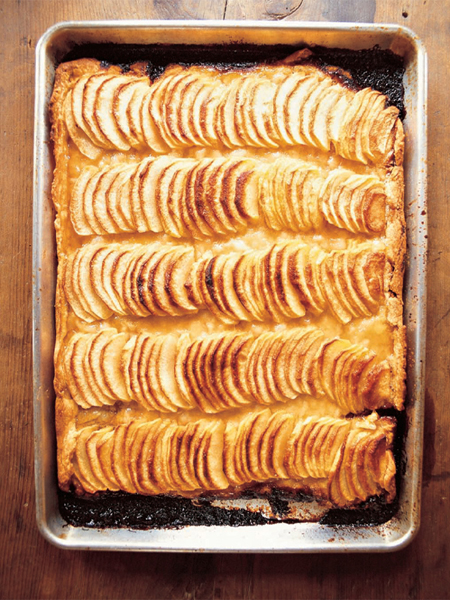
This is the plainest—and best—apple tart. It is good at room temperature, better if slightly warm. If possible, bake the tart during dinner, then let it cool a bit before serving.
My friend Ernestine, raised in rural Idaho, had a recipe for what she called Mormon pie dough. She used it for fruit pies and for a memorable sauerkraut and pork sausage pie. The original recipe begins, “First stir up an egg …,” and it calls for using all lard. For desserts, I prefer to use all butter; for a savory pie, I use lard. Either way, the pastry has wonderful flakiness and is easy to handle.
Put the flour, butter, and salt in a bowl. With your fingers, work the butter into the flour until it looks mealy, with some large flecks of butter remaining. Pour the egg–ice water mixture into the bowl and quickly knead the dough for only a minute or two, until it comes together. It will be soft, a little sticky, and, though gathered together, a little rough looking.
Sprinkle the dough with a little flour and pat into a rectangle about 1 inch thick. Wrap and refrigerate for at least an hour, or overnight.
Divide the pastry in half (there will be enough for 2 tarts; you can freeze one half for later). Roll out the pastry to a rectangle, approximately 11 by 16 inches, using a 15½-by-10½-inch baking sheet as a template.
Transfer the dough to the baking sheet and let it relax, then trim the edges to fit the pan with a little going slightly up the sides. Cover with plastic wrap and refrigerate.
Peel the apples and cut into quarters. Remove the cores and use to make a glaze as follows: Combine the 1 cup sugar and 1 cup water with the cores. Stir at first to dissolve sugar, then simmer to a thick syrup. Strain and reserve. (Or use honey or good apricot jam, thinned, for a glaze.) Slice the apples as thin as possible. Arrange the apple slices over the pastry in 5 rows, overlapping them like cards in solitaire. At this point the tart can be covered with plastic wrap and refrigerated for up to 8 hours. (It’s okay if the apples darken.)
Preheat the oven to 375°F. Sprinkle the sugar generously over the apples and bake until they are beautifully browned and the pastry is crisp, about 45 minutes. Cool on a rack.
Just before serving, reheat the glaze. Slide the tart from the pan onto a cutting board. Paint the apples with the warmed glaze. Slice into small rectangles to serve.
a cold spring
Chicory Salad with Lemon and Anchovy
We called it stormy Monday—a cold March day on the tail end of a New York winter. A group of friends had planned a night on the town, but given the nasty weather—the forecast was for more severe storms—we decided it would clearly be more fun to stay in. Eating well would be our revenge once again.
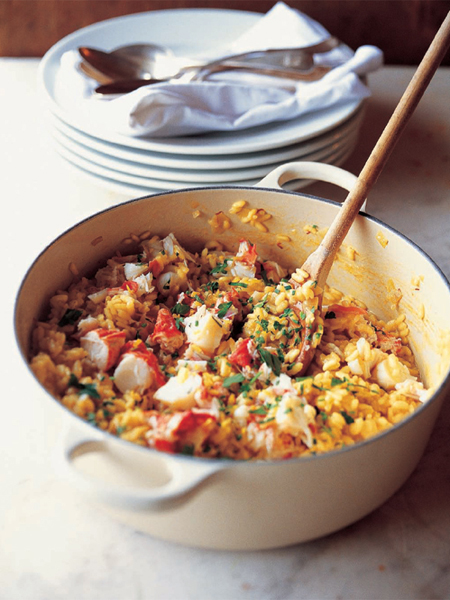
The plan was to get a fire going in the fireplace at my sister’s, chill a lot of Champagne, and take our time cooking dinner. We had no menu in mind, preferring to head for the market and employ the “take a look, see what shines” approach. The Union Square Greenmarket had lots of Italian chicories: radicchio, Treviso, speckled escarole, pale blanched curly endive, rose-hued Belgian endive, and dandelion (not a true chicory, but similarly bitter-sweet). A sparkling salad took shape before our eyes. Unmoved by the butcher shop (meat did not raise our spirits that day), we pressed on to the fish store, where we discovered fat oysters glistening with promise, somehow enhancing the wetness of the weather. The group was still growing, so panfrying fish wouldn’t work. We needed something elastic, like a stew or a roast. When I got to the lobster tank it was suddenly clear: lobster risotto.
Comforting and elegant, simple and fancy at the same time. And you just can’t get a good risotto in a restaurant. You have to wait for risotto; risotto doesn’t wait for you. Perfect. Since we didn’t yet know how many people were coming for dinner, I’d get a final count and, if necessary, add little more rice to the pot. I secretly hoped there would be leftovers so I could make risotto fritters the next day for lunch.
Get someone to teach you how to open an oyster. It’s really not difficult, and it really is all in the wrist. My trick is to keep a few oyster knives around and give a demonstration: soon everyone wants to open oysters.
I like oysters just plain, or maybe with a wedge of lemon. Forget about sauces like mignonette or “cocktail” sauce. All oysters really need is a glass of Champagne or Sancerre.
Ask a good fishmonger to get you a box of five dozen oysters for the day you’ll serve them. Keep them cold in an ice chest or even outside, if it’s not freezing. Wash the oysters briefly under cold running water to remove mud and bits of shell. Put them in a basket or pile them up on crushed ice.
Set up a little oyster station on a kitchen counter near the sink, with a small cutting board, a few kitchen towels, some oyster knives, and a receptacle for the shells. Enlist an assistant or two.
Open 12 oysters at a time, discarding the top shells, and making sure to sever the oysters from the bottom shells. Line a small platter with evergreens, fresh seaweed, or rock salt to keep the oysters from tipping over and spilling their liquor. Pass the platter for immediate stand-up slurping.
A chicory salad is a gorgeous mixture of colors—deep reds, pinks, and pale green-yellows. Here its agreeable bittersweet flavor is mellowed by a lemony vinaigrette, spiked with a good touch of anchovy.
This salad would make a great first course for another meal with the addition of Soft-Center Hard-Cooked Eggs (page 154), garlic toast (see page 182), and Parmigiano shavings. The dressing works well with romaine-type lettuces too, and with boiled leeks and potatoes.
Rinse the anchovy fillets in a bowl of warm water, then soak in the milk for 15 minutes to mellow (see page 172). Remove the anchovies from the milk and blot on paper towels.
Mash the garlic with the anchovies in a mortar. Add a little salt to help create a paste. Add a little finely chopped lemon zest, the juice of half the lemon, and a splash of champagne vinegar. Stir in the mustard, and, gradually, the olive oil, until you have a thickish vinaigrette. Check the seasoning, and correct with lemon juice, salt, and/or freshly ground black pepper. The vinaigrette should be zesty but not too acid.
In a large wide salad bowl, toss the chicories with a little salt. Dress the leaves lightly at first, tossing well with your hands to coat well. Taste a leaf and add a little more dressing as necessary. The salad tastes best about 5 minutes after it’s dressed.
It may seem counterintuitive, but risotto’s particular nature—it requires constant surveillance—makes it perfect for a big dinner.
In a heavy-bottomed pot (enameled cast iron works well), sauté the onions in the butter, adding a little salt, until they are translucent, 5 minutes or so. Increase the heat and add the olive oil, rice, saffron, bay leaf, garlic, and a little more salt. Stir until the rice is sizzling and aromatic. Add 2 cups broth and bring to a boil (from this point, it will take 15 to 20 minutes to cook the rice).
Set the fire to keep the liquid at a brisk simmer. This is critical. If the flame is too low, the rice will become soggy; if is too high, the liquid will simply evaporate instead of being absorbed by the rice. You’ll need to keep adjusting the heat to keep the risotto simmering correctly. Stirring occasionally, allow the broth to reduce almost completely, until little sinkholes appear on the surface. Add another cup of broth and repeat. Adjust the seasoning with each addition of liquid. Add a final cup of broth and repeat. A little more salt, or more broth, may be required. When the rice is done, it should be just al dente and a bit soupy.
Just before serving, add the cooked lobster meat and season it with salt and pepper. Sprinkle the herbs and lemon zest over the lobster, then gently mix with a wooden spoon—avoid smashing the rice. Add a little more warm broth, so the risotto is easily spoonable. Serve the risotto in warmed shallow soup plates, and pass a bowl of the spicy lobster mayonnaise, so each person can add a small spoonful.
serves 8–10
Bring 2 gallons heavily salted water to a rolling boil. Add 5 live 1-pound lobsters and boil for 12 minutes. Remove and let cool. Remove the meat from the lobsters, reserving the shells. Eat the knuckles for a cook’s treat. Coarsely chop the tail and claw meat (this should yield about 3½ cups meat) and keep at cool room temperature.
Put the lobster shells in a small stockpot. Add a few cloves of garlic and chopped carrot, leek, and onion. Cover with 4 quarts water and simmer for 20 to 30 minutes. Strain the broth. Reserve 6 cups for the risotto.
Boil down the remaining broth to make a dark concentrated lobster reduction, if you wish, or freeze the rest for another day.
A dab of spicy mayonnaise is the sauce for the risotto. I believe it’s important to make your own mayonnaise. It is not hard to do, and no matter how many cookbooks or food magazines recommend mayonnaise from a jar as a good substitute, I strongly, vehemently disagree.
Whisk 2 egg yolks in a bowl. Slowly stir in olive oil, a spoonful at a time, until an emulsion forms. As the sauce thickens, continue whisking and adding oil in a slow, steady stream.
When the mayonnaise is quite thick (you’ll have used about a cup of oil at this point), thin with a teaspoon of reduced lobster broth or water. Season with salt, pepper, and a good pinch of ground red pepper, such as piment d’Espelette or hot paprika. Whisk in another ½ cup olive oil. Thin again, and adjust the seasoning. Add a few drops of lemon juice or red wine vinegar, and a little more reduction or water. The finished mayonnaise should be the texture of softly whipped cream.
{VARIATION} PLAIN HOMEMADE MAYONNAISE
Replace lobster reduction with a few drops of lemon juice. Omit the red pepper. Use half olive and half peanut oil for a milder-tasting mayonnaise.
{FROM LEFTOVERS} RISOTTO CAKES
If you have risotto left, form it into small cakes, patting them with your hands as if making oval hamburgers.
Dip the cakes in flour seasoned with salt and pepper, then dip in beaten egg. Coat the cakes in bread crumbs and fry them in an inch of olive oil until golden, about 4 minutes per side. Serve with a dab of the Spicy Lobster Mayonnaise and a green salad.
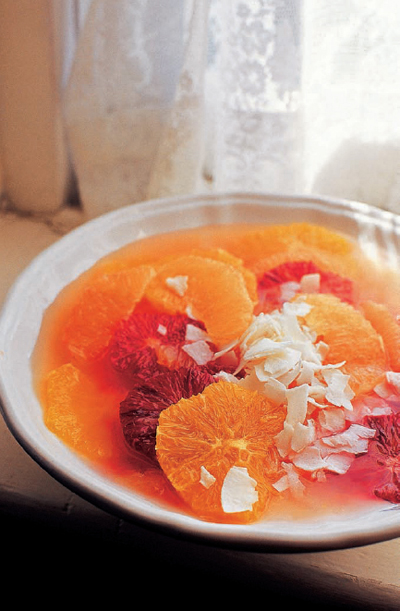
My mother’s cousin Jeannie was raised in the South, and she was probably responsible for making ambrosia a “company” dessert in our family, always served in cut-glass goblets. When I ask friends if they know about ambrosia, they say, “You mean the one with the miniature marshmallows?” “No,” I reply, “the one with the canned pineapple and shredded coconut.”
With a sharp serrated knife, cut off the top and bottom of the grapefruits, navel oranges, and blood oranges, then peel, making sure to remove the white pith. Working over a bowl, section the grapefruits into wedges, cutting between the membranes. Before discarding the grapefruit carcasses, squeeze them over the wedges—they will yield a cup or two of juice. Slice the navel oranges and blood oranges crosswise into ¼-inch disks and add them to the bowl. I add the crushed pineapple mostly for nostalgia’s sake. If you wish, use chunks of sweet fresh pineapple.
Slice the kumquats into the thinnest rounds possible, then mix them gently with the other citrus, to avoid breaking the fruit. Taste the juice, adding sugar only if it seems too tart. Transfer the compote to a serving bowl, cover, and refrigerate for up to several hours.
Just before serving, sprinkle the coconut over. Sweetened flaked coconut is traditional, but it’s nice to use unsweetened too.
supper of the lamb
Shoulder of Spring Lamb with Flageolet Beans and Olive Relish
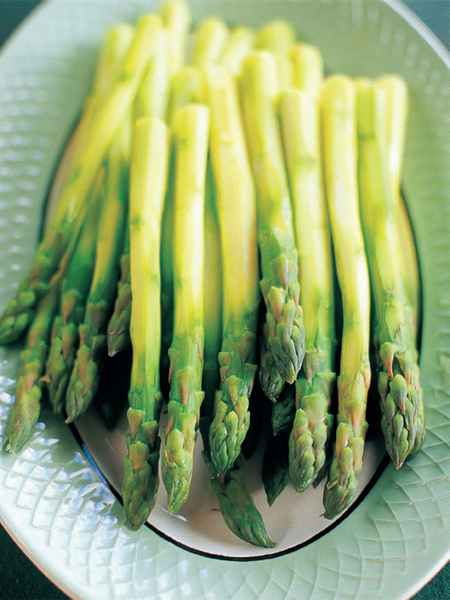
Ask any cook who has worked with me—they’ll tell you I’m a fanatic about asparagus. I’ve driven kitchen apprentices half crazy making them go through entire cases to choose only the most perfect spears. I adore asparagus, but it must be freshly picked or I’m not interested. I wouldn’t even think about eating asparagus shipped from Chile or Peru in November. I scoff at the early asparagus that arrives around Valentine’s Day. I’ll just wait for the real thing, thank you. It means spring has arrived, and it’s worth the wait.
When asparagus time does roll around, everyone in the market has it. But all asparagus is not equal. Asparagus must be ultrafresh; it really does not keep. Older asparagus tastes grassy and dull; newly harvested asparagus is sweet and toothsome. Oddly, asparagus continues to grow after it’s picked. The stalks keep pushing upward, attempting to fulfill their natural inclination: going to seed. As the asparagus grows, the meaty sweetness vanishes, the spears get stringy looking, and the tops open up. Don’t buy those.
Look for stalks that are firm, shiny, and unblemished, with tightly closed tips. Check the bottoms to make sure they’re freshly cut. And you need to snap the tough ends off. And while you may have heard that those ends are good in soup, I can assure you that it is not a good idea. They’re far too woody.
Okay. About peeling. I peel the stalks only if they’re fat. It’s a texture thing. The skin on fat asparagus spears doesn’t ever soften. Peel them so that you’re biting into the sweet flesh instead of tough skin.
Break off the tough ends of the asparagus spears and discard. If the spears are quite thick, peel them with a sharp vegetable peeler. Fill two large pots with 4 quarts water each, salt the water heavily, and bring to a rolling boil.
While the water comes to a boil, make the vinaigrette: In a small bowl, macerate the shallots in 2 tablespoons red wine vinegar with a little salt for a few minutes. Then whisk in the olive oil and a little freshly ground pepper. Taste and reseason the vinaigrette, adding a little more vinegar and salt if necessary—but don’t make it too tart.
Just before you’re ready to eat, put the asparagus spears in the boiling water and let them simmer briskly for 3 to 8 minutes, depending on their size. Remove them when they are firmly al dente and still bright green (the best way to check is to retrieve one spear and taste it). Lift the asparagus spears from the water with a large strainer—a wide Asian bamboo-handled wire spider works well—and let them drain on a clean kitchen towel for a couple of minutes. As they sit, they will continue to cook a little bit.
Pile the spears onto a platter. Sprinkle lightly with salt and freshly ground pepper. Whisk the vinaigrette and spoon it over the asparagus.
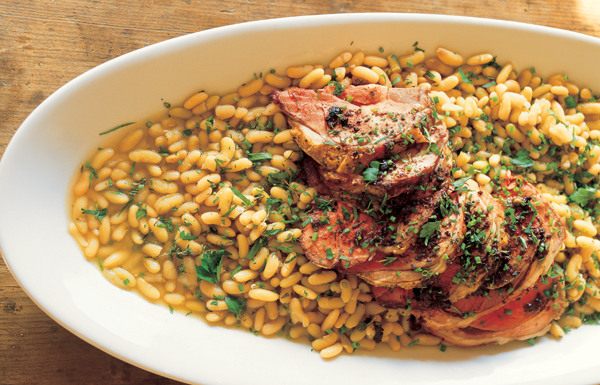
True spring lamb is not easily found here, as most American lamb (sourced from New Zealand) is raised to a larger size. But some good butchers carry or can order it, and a few excellent American farms now specialize in young pastured lamb. Otherwise, ask your butcher for the smallest lamb shoulder roasts possible. Tender young spring lamb is best cooked almost medium, with a crisp roasty exterior. I’m crazy about pale green flageolet beans, a classic lamb accompaniment. Their wonderful nutty flavor pairs well, too, with olive oil and thyme.
Pick over the flageolet beans and rinse them well. Set them to boil in a large heavy pot with enough cold water to cover by 3 inches. Add the onion, bay leaf, unpeeled garlic, and a large thyme sprig. When the water boils, turn the flame to low and let the beans simmer gently until quite tender, about 1 hour if they are from a recent crop, longer if not.
Once the beans are done, stir a good spoonful of salt into the cooking liquid, and let the beans cool in their broth. The beans can be cooked early in the day, or even a day ahead and refrigerated.
Preheat the oven to 375°F. Season the lamb roasts with salt and pepper. Insert the slices of garlic in the loose flesh on the underside of the roasts. Lay a few rosemary and thyme sprigs in the bottom of a roasting pan. Set the lamb on top.
Drizzle a little olive oil over the lamb. Pour the white wine into the pan.
Roast the lamb for 45 minutes to an hour, or until the exterior is nicely browned and the internal temperature reads 130°F. Remove the lamb to a platter, cover loosely, and let it rest.
Scrape up the juices from the bottom of the roasting pan with a wooden spoon, taking care to dissolve the caramelized brown bits clinging here and there. Pour the pan juices through a fine-meshed strainer into a small saucepan. Skim off any surface fat, and reheat the pan juices just before serving.
Drain the flageolets, reserving their liquid, and put them in a shallow pan. Season them with salt and pepper, a little chopped thyme, and a good splash of fruity olive oil. Add a cup of the bean broth and reheat the beans gently.
Chop the parsley and slice the lamb.
Pour the flageolets onto a warmed platter and arrange the lamb slices over the beans. Spoon some of the warm pan juices over the lamb. Scatter the parsley over everything and serve. Pass the olive relish, thinned with pan juices if you like.
serves 8–10
A wonderful condiment to have on hand, perfect with the roast lamb, this relish can also enhance grilled fish or roast chicken, or liven up a sandwich or a pizza. Well covered, it will keep for a week in the refrigerator.
Put the olives, capers, garlic, lemon zest, lemon juice, thyme, anchovies, if using, and ½ cup olive oil in a blender or food processor and grind to a paste. Make the texture of the relish to your preference—rough or smooth. Pulsing the ingredients makes it rough; for a smoother texture, let the machine run for a few minutes. (For a more rustic version, hand-chop the ingredients.)
Scrape the olive relish into a small bowl. Taste and adjust the seasoning, adding pepper—or a little cayenne or red pepper flakes—as desired and salt if necessary. Thin with a little more olive oil to loosen the paste. Makes about 2 cups relish.
Rum baba is one of those desserts people either love or hate. If you grew up with syrup-soaked cakes, you’ll adore it. If not, probably not. French restaurants make a big production of their babas au rhum, hauling a cart of exotic vintage rums over to the table and letting the diner choose the rum to be poured over the baba.
In Italy, you can find a rum-soaked cake in any bar, to accompany a strong espresso for a late-morning pick-me-up. The Italians and the French are still arguing about who taught what to whom when.
You can make a big baba, but I like small individual ones. A little whipped cream is good alongside, or vanilla or cardamom-flavored ice cream. Babas are also good with fresh orange sections, strawberries, or sliced mango.
The babas and the syrup can be made a day ahead, then assembled for serving. To restore the fresh-baked taste, crisp the babas in a medium oven for 15 minutes, then cool before soaking them in the rum syrup.
Dissolve the yeast in the warm water in a small bowl. Stir in the sugar and leave the mixture at room temperature for 5 to 10 minutes, until it becomes active and bubbly.
Beat the eggs with the salt in a small bowl, then add the yeast mixture. In a large mixing bowl (or in the bowl of a standing mixer), combine the flour and butter. Mash the butter (with your hands or the paddle attachment) into the flour until it is well absorbed. Add the egg mixture and mix well with a wooden spoon (or the machine) for about 5 minutes, until the dough comes together (at this stage, the dough is too soft to mix by hand).
When you have a nice soft but somewhat sticky dough, cover the bowl and put it in a warm sunny room or its makeshift equivalent for an hour or so, until risen to nearly double in size. Push down the dough, cover with plastic wrap, and refrigerate for several hours or overnight.
Turn the dough out onto a floured surface and knead lightly to form a soft smooth log. Cut the log into 12 pieces of equal size, then roll each piece into a little ball. Put the little balls into buttered baba molds, muffin tins, or small ramekins. Place them on a baking sheet, cover lightly with plastic wrap, and put them in a warm spot for 30 to 40 minutes, until they puff to twice their size.
Preheat the oven to 400°F. Bake the babas for 15 minutes, or until they firm up and their tops are brown. Invert the babas onto the baking sheet (their bottoms will be pale) and return them to the oven to brown and crisp for another 5 minutes. Cool the babas on a rack.
Two hours before serving, put the babas in a deep baking dish, top side down. Pour the syrup over the babas, and let them soak for 5 minutes. Turn them bottom side down and let them soak again. Now put the babas in a deep serving platter, reserving the syrup, cover, and refrigerate until serving time.
To serve, garnish the babas with some of the orange peel, lemon zest, cardamom, and kumquat from the syrup. Pour a few tablespoons of syrup over each baba, and pass the remaining syrup, the rum bottle, and the bowl of whipped cream. Eat the babas with soupspoons.
I prefer dark rum for this syrup. The syrup can be made a few hours in advance, or up to a day ahead.
In a saucepan, stir together all ingredients except the rum until the sugar dissolves. Bring to a boil, then lower the heat and simmer for 10 minutes. Add the rum, and cool to room temperature.
Put a cup of organic—not ultrapasturized—cream in a bowl. Add a tablespoon of sugar. Beat with a wire whisk or an old-fashioned egg beater (a handheld mixer can turn the cream too stiff very fast) until the cream has a light, billowy consistency; if you beat the cream until it just falls from a spoon, it’ll taste lighter and feel more voluptuous. Stop beating before peaks form. I like to pass the bowl around so friends can take a turn.
salmon on my mind
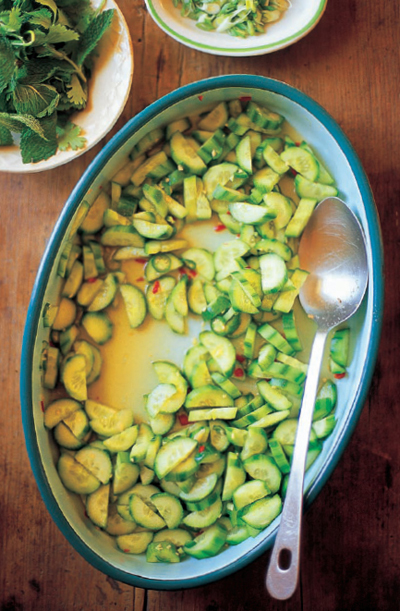
Wild Salmon with Vietnamese Cucumbers
In the kitchen at Chez Panisse, even though we have always served one set menu nightly, designed for seasonality and balance—and now even an alternative vegetarian menu—we still get an amazing number of requests for changes. We always accommodate requests based on allergies or dietary requirements, but increasingly the requests we’re hearing are rooted in a fear of food.
Our servings of meat are restrained, just a few slices. We always leave the fat on the duck breast and the fat on the pork—it tastes good, and you need some fat in your diet. Yet more and more diners are leaving the fat on the plate. It’s kind of astonishing, because the style of food at Chez Panisse emulates the best of home cooking: light-handed, vegetable-heavy. We use hardly any butter or cream, and desserts are usually based on fruit. If it’s a splurge, it’s a healthy splurge.
For me, balanced eating means a lot of vegetables with a little meat, not a lot of meat with few vegetables. But it doesn’t preclude fats or oil or butter or saucisson or even foie gras, in judicious quantities. My idea of balanced eating goes beyond the balanced meal to the balanced week, the balanced year.
Still, as the seasons change, you anticipate a shift in the kind of cooking you’ll be doing. After the heavier, browner food of winter—the wild mushrooms, the red wine braises—spring’s arrival means a different kind of craving. You want green. Not just for its tonic effect, but also for the bright, fresh flavors you’ve been missing. Light soups, tangy herbs, sweet peas. And fish. For me, spring fish means wild salmon. Its arrival is a joy, its flavor a welcome astonishment.
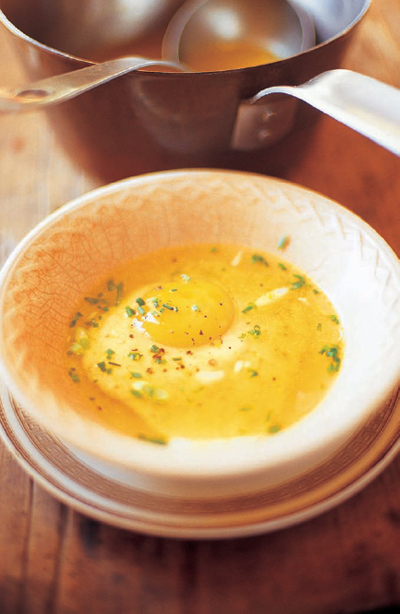
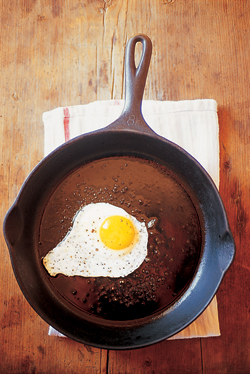
A runny egg in a bowl of garlicky chicken broth is a pleasurable way to begin a meal. The quality and freshness of the egg matters most. Poached eggs are good, but for this soup I like to fry the eggs for more flavor. Green garlic shoots come to market in early spring. Like tiny leeks or green onions, they need their outer layer removed, and then they can be slivered, chopped, or pounded to add to a dish. The perfume of green garlic shows best with minimal cooking.
Fry the eggs sunny-side up in a little olive oil, seasoning them well with salt and pepper and leaving them rather runny. The eggs can be fried up to an hour ahead and held on a baking sheet at room temperature.
In a large pot, bring the chicken stock to a simmer. Add the garlic and simmer for 5 minutes. Add the ginger and cook for a few minutes more. Taste and add salt as needed.
Just before serving, add the spinach or bok choy to the hot soup. It will just take a minute to wilt.
For each serving, put a fried egg in a warmed shallow soup plate. Ladle over the hot broth and sprinkle with the scallions. Serve the soup immediately.
It is so easy to boil up a little chicken stock, and the result is always so much better than what you can buy. Beware the canned or cubed—they never taste real. And I am bewildered by those shelf-stable stocks that come in boxes (some labeled organic!). Their flavor, color, and consistency seem odd.
For a quick chicken stock, start with 4 pounds meaty chicken wings in 4 quarts water. Add a finely slivered leek, a chopped onion and carrot, a thyme branch, and a few peppercorns. Simmer for 40 minutes, then strain and skim. This makes a light, tasty chicken stock you can use immediately.
{OTHER EGG SOUPS}
PROVENÇAL EGG SOUP
Omit the ginger. Simmer a few sage leaves in the broth with the garlic. Float the fried eggs on rounds of toasted baguette.
MEXICAN EGG SOUP
Omit the ginger. Garnish with sliced serrano chiles, a handful of cilantro leaves, fried tortilla strips, and a generous squeeze of lime.
Wild salmon is the healthiest and most sustainable salmon, and it’s also the best tasting by far. Farmed salmon are as bland and flavorless as factory chicken. They’re fed a dubious diet and require antibiotics to control the disease that inevitably results from their crowded, polluting pens. When they escape, farmed fish endanger native species. Need any more reasons to go wild? “Fish gotta swim” for both flavor and health.
To accompany the salmon and cucumbers, serve plain steamed jasmine rice and sweet potatoes roasted in the skin.
Bring the salmon to room temperature, and preheat the oven to 350°F. Put the fish on a baking sheet, and season with salt and pepper. Drizzle a little olive oil over the salmon and rub it into the flesh.
Bake for 20 to 25 minutes, just until juices appear on the surface. When probed with a fork at the thickest part, the salmon should be moist—cooked through, but barely. Transfer the fish to a warmed platter, and let it rest at least 5 minutes before serving.
Before bringing the fish to the table, embellish the platter with mint, cilantro, and basil sprigs, and surround the salmon with lime wedges. At the table, break the salmon into rough portions. Pass the cucumbers to be spooned over the fish.
This easy salad is more like a relish and can be made according to your own taste: very spicy, which is how I like it, or quite restrained. Its virtue is that it can refresh almost any dish. Look for palm sugar in Asian or Indian markets, or substitute Mexican piloncillo or raw brown sugar.
Peel the cucumbers, cut them lengthwise in half, and remove the seeds with a spoon if they are large. Slice the cucumbers into thickish half-moons and put them in a large bowl. Season with salt and pepper, sprinkle lightly with fish sauce, then add the ginger and a couple of tablespoons of palm sugar. Toss well, and let the cucumbers sit for 5 minutes or so.
Add a good spoonful of finely chopped serrano or jalapeño chiles (seeds removed, if desired, to lessen spiciness) or finely slivered Thai chiles. Squeeze over the juice of 2 limes and toss again, then cover and refrigerate till serving.
Just before serving add a fistful of roughly chopped mint and basil leaves. Taste and adjust the seasoning with lime juice as well as salt and pepper. Garnish with thinly sliced scallions or paper-thin slices of sweet onion.
serves 8–10
{VARIATION} HERBED CUCUMBERS
This salad is not spicy but it is refreshing. Peel the cucumbers, thickly slice them, and season with salt, pepper, and lemon juice. Chill them in a serving bowl for at least 20 minutes.
Just before serving, finely mince a mixture of the following herbs: parsley, chervil, dill, basil, tarragon, mint, and chives. Scatter over the cucumbers, toss briefly, and serve immediately.
Strawberries are botanically related to roses, and they taste wonderful together. Try to find locally grown organic strawberries. It is better to wait for good strawberries to come into season than to give in to mass-produced, chemically fertilized, and pesticide-laden fruit (nonorganic strawberries are the most heavily dosed fruit). Rose syrup, too, can be artificially tricked up. Look for a brand made with only roses and sugar. Serve with Barely Whipped Cream (page 69), if you like.
Rinse the berries briefly with cold water and lay them on a kitchen towel. Discard any imperfect fruit (or make jam with it).
With a paring knife or huller, remove the leaves and cores, taking care to leave the natural berry shape. Cut larger berries into wedges or slices. Cover and keep at room temperature until ready to serve.
Just before serving, put the strawberries in a mixing bowl, sprinkle lightly with sugar, and splash with a little kirsch. Add 2 teaspoons rose syrup and toss gently until all is glistening. Put the berries in a beautiful bowl and take them to the table.
duck for dinner
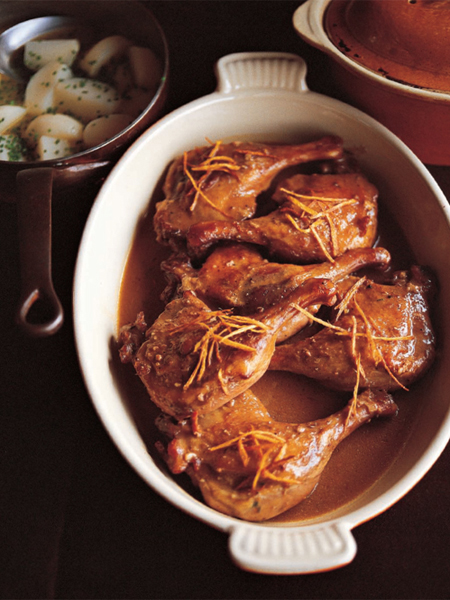
Five-Spice Duck with Buttered Turnips and Fried Ginger
You are probably not surprised to learn that I am not a fan of fusion. They can keep their wasabi aïoli, thank you very much. But though my training and inclination usually push me in a European—or at least a Mediterranean—direction, there’s a dim sum–eating, noodle-soup–slurping part of me too.
In both cities where I live—San Francisco and Paris—robust Asian communities have seductive markets offering such enticing ingredients it’s impossible for a curious cook to remain stubbornly, foolishly Western. I’ve found ways to enhance much of my cooking with the subtle use of ginger and sesame. I think Chinese five-spice powder is a genius seasoning. Its classic combination of pepper, star anise, clove, fennel seed, and cinnamon can perfectly perfume duck, pork, or any other meat.
Recently I was at the market, prowling for dinner as usual. I thought I wanted to make a spring duck stew, had nearly decided on a ducky variation of a spring lamb navarin, and had just bought some duck legs, when I noticed little bunches of sweet young turnips with their bright green tops smiling up at me.
Duck with turnips is a traditional combination in classic French cooking. Nothing wrong with that.
But suddenly the notion of duck and turnips turned Asian on me. I am a great fan of Chinese-style roast duck, and also of those heavenly griddled turnip cakes served in dim sum parlors. So I changed gears, went with the new idea, and bought some fresh ginger. The result was a French-style braise with Chinese flavors. It might sound like fusion or new-wave cooking to you, but the result is extremely subtle, and it doesn’t overpower a good bottle of red wine.
Make this only when you can find perfectly fresh shelled crab at your fish store.
Pick over the crabmeat for any bits of shell and put it in a bowl. Refrigerate until just before serving.
Sliver the scallions, both the white and pale green parts. Pick the leaves from the parsley. If the leaves are small and tender, leave them whole; otherwise, sliver them. Separate and trim the leaves of the endive. Zest a teaspoon or so of the lemon.
To assemble the salad, squeeze half the juice of the lemon over the crabmeat. Add the lemon zest, scallions, and parsley and season lightly with salt and pepper. Drizzle with the sesame oil and toss very gently. Taste and adjust the seasoning with more lemon juice if necessary.
Pile the crab salad into a platter. Surround with the endive leaves. Serve immediately.
Five-spice powder is available in most Asian groceries, but it’s easy to make your own (see below).
Trim the duck legs (save the trimmings to make rendered duck fat; see Note page 274). Season the duck generously with salt and pepper, sprinkle with the five-spice powder, and massage the seasoning into the meat. Refrigerate the seasoned duck legs overnight, or at least for several hours.
Preheat the oven to 400°F. Heat a dry cast-iron frying pan over medium heat, and slowly brown the duck legs (in batches or use 2 pans), skin side down. As the duck legs cook, they will give off a fair amount of fat. When the skin is nicely browned, after 10 minutes or so, remove the legs and set aside. Pour off all but ½ inch of the fat.
Add the onions to the pan and cook until golden, then add the ginger, garlic, and some salt and pepper. Cook 2 minutes more, then drain the onions in a colander, reserving the perfumed fat for another purpose (such as for frying potatoes). It will keep for 2 months in the fridge.
Put the onions in a shallow earthenware casserole. Lay the duck legs skin side up over the onions in a single layer. Put the casserole, uncovered, in the oven and let the legs roast for 10 to 15 minutes. Meanwhile, heat the chicken stock.
Add the stock to the casserole and continue cooking until the stock comes to a full simmer. Then reduce the heat to 375°F, cover, and cook for about an hour, until the duck legs are tender when probed with a paring knife.
Uncover the baking dish and keep in the oven to let the duck legs crisp for about 5 minutes. Remove the duck legs to a deep serving platter and cover loosely to keep warm.
Pour the cooking liquid into a saucepan and let stand briefly, then degrease. Taste and adjust the seasoning if necessary. Bring to a simmer. Mix the cornstarch with the cold water, add to the sauce, and simmer for 2 minutes to thicken slightly.
Pour the sauce over the duck legs. Sprinkle with the fried ginger, and serve with the buttered turnips.
serves 12
Grind 1 tablespoon each Sichuan pepper (or black peppercorns), star anise, crushed cinnamon stick, cloves, and fennel seeds in a spice grinder. Store in a glass jar.
Crisp lightly fried ginger makes a lovely garnish for meat dishes or vegetables.
Peel the ginger—using the “spoon trick” (see Note)—and cut it into thin slices. A mandoline is helpful but not necessary. Cut the ginger slices crosswise into slivers. They should look like flimsy matchsticks.
Heat the peanut oil to 400°F in a small deep pot. Carefully fry the ginger a handful at a time until the slivers are barely golden, about 2 minutes. Drain on paper towels. Sprinkle the ginger lightly with salt. Leave at room temperature until needed, up to several hours.
Try this trick—scrape an inverted teaspoon lightly over fresh ginger. The thin skin comes right off, as if by magic.
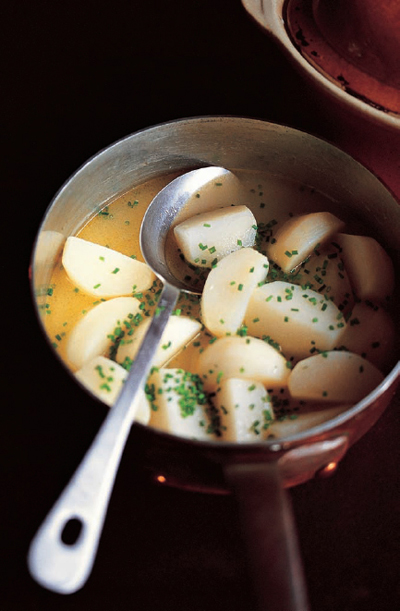
If you have larger turnips, peel them and cut into wedges, and cook them a little longer. Instead of turnip greens, you can use 1 pound tender mustard greens or spinach to finish the dish.
Cut the greens from the turnips. Wash the greens in a basin of cold water, lift out, and set aside. Cut the turnips into halves or quarters so they are all roughly the same size. Rinse and drain.
Melt the butter in a large heavy-bottomed pot. Add the turnips and season with salt and pepper. Let the turnips simmer over medium heat for a minute or so without browning, then add a glass of water and put on the lid. Cook for 4 to 5 minutes, until turnips are just tender. Add the greens and cook for 2 minutes more.
Growing up, we’d usually have a dish of applesauce next to our dinner plates, or sometimes rhubarb stewed with sugar. But that’s not the rhubarb I crave. I want my rhubarb roasted, preserving the intensity of its flavor. Kumquats are a spirited turn on the traditional orange companion.
Serve the rhubarb with plenty of sauce and a dab of Crème Fraîche (page 41) or a scoop of vanilla ice cream, or layer it with Barely Whipped Cream (page 69) to make a fool or a trifle. The compote is also good with plain whole-milk yogurt.
Preheat the oven to 350°F. Trim and destring the rhubarb, then cut into 4-inch batons. Put the rhubarb and kumquats in a bowl and mix well with the sugar. Transfer the mixture to a shallow baking dish. Bake for about 45 minutes, until the rhubarb is soft and suspended in a beautiful rose-hued sauce. Cool to room temperature.