There are three main reasons you should always prewash fabric before you use it in a quilt. The first is that different fabrics shrink at different rates. Even if you don’t plan to ever wash your quilt, at some point, decades from now, that quilt may need to be washed. Prewashing and preshrinking your fabric now could save a lot of heartbreak down the road.
The second reason is that manufacturers use finishing agents on fabrics to make them easier to roll and package. In addition, fabrics may spend months in a shop picking up dust. For the sake of your lungs and whatever unknown issues there may be with those finishing agents, you want to get that fabric clean before you start working with it.
The third reason is to rid the fabric of excess dye that may run when washed. In the time that we’ve been working on this book, we have had three different people ask us for advice on how to remove stains left by dyes running. In all three cases, the quilters hadn’t planned to wash their quilts or thought that they had prewashed all the fabrics but hadn’t. In one instance, a quilter simply sprayed part of her quilt with water to remove the line from a water-soluble marker. The spray wicked through the fabric to another part of the quilt, and that was enough to cause one fabric to run.
Sometimes one washing isn’t enough, so we religiously add Shout brand Color Catchers when we wash finished quilts. Color Catchers are single-use sheets that act as dye magnets, trapping fugitive dye in the wash. In doing so, they also help keep the lights from getting dingy when excess dye gets in the wash water.
If you’re a new quilter, buy or borrow a good rotary cutter, a clear acrylic ruler, and a cutting mat marked in ¼″ increments. Practice cutting with the rotary cutter and ruler on scraps of fabric before you cut into expensive fabric. Some people find it helpful to attach anti-slip rubber feet to the underside of their ruler, while others like their rulers to be able to slide.
Although manufacturers often claim that rotary cutting blades can cut through eight layers of fabric at once, we would advise you not to try to cut more than four layers of fabric at once. We’ve found that fabric slips around just enough when stacked that high to throw your pieces off by as much as ⅛″. That may not seem like much, but when it comes time to match points, you’ll see that the piecing becomes a struggle.
Make sure you always cut with your rotary cutter perpendicular to the cutting mat and flush against the ruler. If you hold it at even a slight angle, it is much more likely to veer away from the ruler and result in a miscut.
Please, please, please be sure to close the blade guard as soon as the rotary cutter leaves your hand. We’ve heard so many stories of hospital room visits and missing tips of fingers from quilters who meant to close the blade guard and went to answer the phone only to have someone end up in the emergency room. Rotary cutters are so sharp that you need to take extra care to close them every time you put them down, especially if there are pets or small children in the home.
The patterns for some of the quilts in this book call for making templates. Although you can use cardstock or scrap cardboard for this, we prefer transparent template plastic because we find it helpful to see the fabric through the template. Fine-point Sharpie markers are great for marking the right side of templates so you don’t mistakenly flip them over and cut your pieces backward.
When you’re getting ready to place your templates on the fabric for cutting, make a loop of tape with the sticky side out. Place one or more sticky loops on the underside of your template to prevent it from slipping while you cut. A rotary cutter works fine with many templates, such as the large circles in Big Dots (page 100). However, we suggest that you use scissors for complex, nongeometric shapes, such as the birds in Birds on a Wire (page 114).
When we first started making quilts, we pinned every pair of pieces we sewed. As we gained experience, however, we learned to determine when we need to pin and when we don’t. The critical time to pin is when you are trying to align seams or match points. We press open our seams to achieve a flat look, but doing so has the added benefit of making point alignment easier. We pin pieces together through the seams.
We have seen and heard of many quilters who see no problem with sewing straight over pins. However, in several instances of sewing long, pinned strips together, we’ve inadvertently sewn into a pin and broken the sewing machine needle. Once, a piece of a broken needle flew up into Bill’s face—he was grateful to be wearing glasses. Now we always remove the pins right before they reach the needle.
Align points before sewing by pinning through seams ¼″ from edge.
Most quilters piece by machine, because it’s faster and more durable. The stitch length with machine stitching is shorter than that found in most hand piecing. We have met quilters over the years, however, who love the portability of hand piecing. One retired woman described how she and her husband made long trips around the United States in their RV. The husband would drive, while the wife sat in the passenger’s seat with a pile of pieces in a basket and pieced away.
In quilting, small errors have a way of multiplying, leading to bigger problems. It all begins with cutting: If you don’t cut carefully, you will struggle getting points to match up. If your points don’t match up, your rows are unlikely to match up.
Start by cutting carefully. If you notice that pieces that are supposed to be the same aren’t, go back and measure them. If necessary, trim or recut them so they are all the same. This extra step will save you so much frustration down the road.
If you’re piecing by machine and your top and bottom pieces aren’t lining up, try using a walking foot. Although a walking foot is often recommended just for quilting, we have found that it helps move the two pieces of fabric evenly, while a standard presser foot sometimes moves the bottom piece of fabric at an ever-so-slightly different speed than the top fabric. This can cause the fabrics to fall out of alignment.
If you have a lot of pieces that don’t align and you don’t want to rip them all out, find the worst of the bunch and trim them down. Sometimes that will be enough to fix the problem.
Even if your rows aren’t aligning easily, don’t allow the points to shift too much. If each point is off by only  ″, you could still find the last block in the row off by a full ¼″ or more when you allow the seam alignments to creep. Pin each intersection carefully, and don’t remove the pin until you are less than 1″ away from sewing it.

Pin as you join rows so pieces don’t creep out of alignment.

Take time to pin through seams for precise alignment.
If you plan to piece by hand, mark seam allowances on your pieces before you get started. A sharp pencil will do the trick, because it will not bleed nor will it be visible in the finished quilt. You may prefer to piece with a thimble on the middle finger of your sewing hand. Aim for approximately eight stitches per inch. Use a rocking stitch to pick up little bits of both pieces of fabric—simply rock the needle back and forth before pulling the thread through the fabric. Some quilters knot the ends of their hand stitching, but we have found that back-tacking in place is usually faster.
Piecing using rocking stitch
To make pressing go faster, finger-press the seams to one side as you place the finished pieces in a pile. We always press our seams open because we piece by machine; for any pieces sewn by hand, be sure to press to the side any seams. Pieces sewn by hand typically have a longer stitch length than pieces sewn by machine. A longer stitch length increases the risk of fiber migrating from the batting through the gaps in the stitches, so pressing those seams to the side is advisable for hand sewers.
Whenever possible, we strategize how to piece as efficiently as possible when piecing by machine. A third-generation sewing machine repair technician told us once that 90 percent of all thread-jamming problems happen in the first six stitches of a new seam, when the thread ends are short. Chain piecing allows you to feed the pieces under the presser foot one after another.
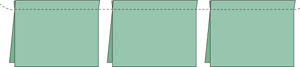
Chain piecing
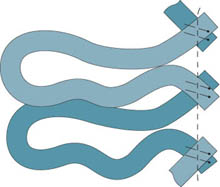
You can also leapfrog your pieces or blocks by working on two or more pieces at one time, cutting the threads between the pieces after they come out from the presser foot.
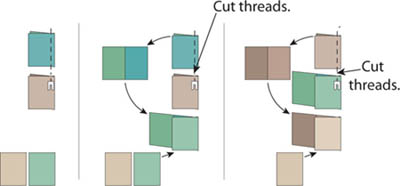
Three-step leapfrog method used to assemble two sets of pieces—one blue/green and one brown/tan.
In addition to avoiding those beginning-of-the-seam jamming issues, chain piecing avoids wasting thread every time you start and stop. Thus, it pays to chain piece your pieces to save time, avoid jamming problems, and reduce waste.
Chain piecing is useful not just for individual pieces but also for any size blocks or rows. If you mark your blocks carefully, you will be able to get them back in order when they are completed (page 131). Then you’ll find that you can work on dozens of blocks at the same time.
We love to piece improvisationally. In addition to using up scraps, this technique is relaxing, especially for those who tire of constantly measuring things and ripping out seams when points don’t align. Although improvisational piecing is the focus of Improv (page 92), it is also a fun option for making a pieced backing. We used different improvisational piecing techniques for Fashion District (page 46) and Double Dutch (page 70). What these different techniques share is piecing that uses up scraps and has a relaxed, playful quality.
Our general approach to improvisational piecing is to figure out the average size of the pieces being used. In Improv (page 92), we went pretty small, with most pieces somewhere between a postage stamp and a business card in size. If you’re using large scraps or strips, trim them into roughly the size you have in mind. Then place the smallest pieces along the strip, keeping in mind that you will cut them apart after you attach them to the strip. Once you have cut apart the individual pieces and pressed them, use the rotary cutter and ruler to trim them into a straight line the size of the piece you plan to sew next. Press the seams, and keep combining strips and scraps until the piece is big enough. Trim down the sides, and combine with sashing, as shown in Improv (page 92), or with other improvisationally pieced blocks.
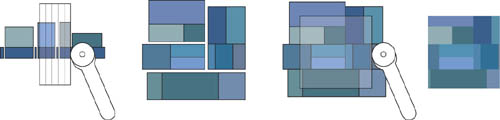
Combine scraps to make improvised blocks.
Consider throwing a few small glimpses of unexpected color in your improvised pieces. The gold fabrics in Improv look like small windows of color and really transform that quilt.
Birds on a Wire (page 114) combines hand and machine sewing. The wires upon which the birds sit were pieced by machine, because that was the quickest method and it produced straight lines. The birds themselves were hand appliquéd. Hand appliqué is well suited for complex shapes such as the birds. It also allows us to achieve fine details, such as the beaks and wing tips.
Bill appliquéd the birds by turning under the raw edges with the tip of the needle as he sewed; some find a damp toothpick helpful when coaxing the raw edges under. Pin or baste the piece into place, and use the smallest stitch you can manage consistently so the stitching blends into the edge of the piece. There may be instances when you’ll want the stitching to show; in that case, a contrasting thread and larger stitches may be appropriate. Appliqué is usually done without a hoop because it’s helpful to be able to manipulate the fabric as you sew.
Some people find shorter needles easier to work with, while others think of them as cumbersome. As you begin sewing, experiment with different lengths of needles to see which works best for you.

Detail of hand-appliquéd bird
The method you choose for machine appliqué depends on the design intention of the appliqué. Some art quilters use several layers of contrasting satin stitching to highlight the shape of the appliquéd piece. Others use a blanket stitch to give the appliqué a folk art quality. On Big Dots (page 100), we used a small zigzag, because any sewing machine can handle this stitch and it disappears into the edge of the appliquéd piece. We did try appliquéing with a straight stitch right next to the edge of the circles, but we didn’t like the way the edge curled up and away from the field of the quilt.
Circles are particularly easy to appliqué. To prepare the pieces for machine appliqué, cut circles of freezer paper that are the finished size of the pieces. Place the shiny side of the freezer paper against the wrong side of the fabric, and center the circles (which have been cut ¾″ larger in diameter than the finished size). Iron the circles to the freezer paper. Using the longest stitch you can manage on your machine, baste a line between the raw edge and the edge of the freezer paper. Gather the ends of the threads, and pull the bobbin thread until the raw edges are gathered neatly against the freezer paper’s edge. Press down the raw edges, and set aside to cool while you work on the others. After the freezer paper has cooled, remove it, and press the circles flat. For machine appliqué, make sure your pieces are as flat as possible. Most of the time, a good steam iron will get them sufficiently flat. If not, you might want to use some spray starch so the pieces won’t move around on the background fabric.
If you want to machine appliqué shapes other than circles, draw the finished shape on freezer paper, and cut it out with scissors. Press the shape on the freezer paper, with the shiny side against the wrong side of the fabric. Then add a ¼″ seam allowance to the shape on the fabric, and cut it out. Some quilters use a glue-stick to tack the underside of the raw edges to the finished shape. We tend to use the tip of the iron to press the seam allowance over before we remove the freezer paper.
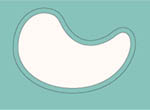
Creating kidney-shaped appliqué with freezer paper form.
If you are making a quilt that requires thoughtful layout, mark your quilt pieces after you lay them out so you can take them to the sewing machine and reposition them correctly after sewing. We number the order of blocks in rows and the order of rows. We have adopted the habit of numbering in the upper left corner of each block, so we don’t accidentally flip it upside down and put block #6 where block #9 should go.
Although disappearing and water-soluble marking pens are available, we usually mark pieces with plain white school chalk. It is inexpensive, and it washes out easily. For white blocks, we use blue chalk, which we pre-test to make sure it will wash out. Presoak the finished quilt in the washer to loosen any remaining chalk. Always check that all of the chalk has come out in the wash before you put the quilt in the dryer. If it didn’t come out in the first wash, let it soak longer or use an old toothbrush and water to loosen the chalk before you wash the quilt again.
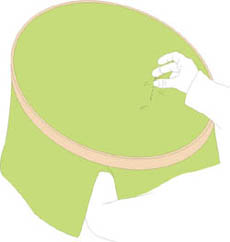
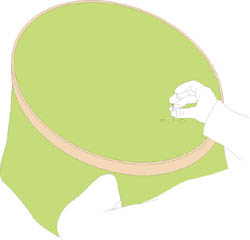
Although school chalk works well for numbering pieces for sewing, marking quilts for quilting generally requires a finer line. For a quilt that will be hand quilted and handled a lot, marking everything in advance may not be the best option. For Small Change (page 108), we marked the doughnut shapes each time we moved the hoop. We kept a small pouch with a chalk pencil, the plastic template, the thimbles, thread, small scissors, and a pencil sharpener with the quilt and hoop.
If you are machine quilting, you may choose to mark as you go or all at the beginning. For Big Dots (page 100), we marked guide circles between the appliquéd circles so the spirals would fit together nicely. For most of the other quilts in the book, we freehand quilted with a longarm machine, which means they did not require marking.
Once you have finished piecing your quilt top, press it, and lay it on a flat surface. We keep the floors of our studio clean so we can work on the floor, which is easiest when you have a big quilt.
Examine the quilt. Are the edges straight? Measure the quilt on both diagonals to ensure that the quilt is square (the diagonals should measure exactly the same). If it isn’t, trim it down so it is square. Whether you are quilting by hand, on a home machine, or on a longarm machine, make sure that the batting and backing are about 2″ longer on each side than the quilt top. Invariably the top will shift a bit during the quilting, and it’s far more preferable to trim down the back than it is to trim the front. If you plan to have your quilt quilted by someone else, be sure to ask ahead how you should prepare the quilt top and backing.
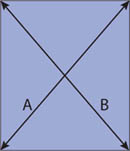
If A = B, then your quilt is square.
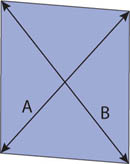
If A ≠ B, then your quilt is not square.
To ensure that the quilt top, batting, and backing all remain aligned, you need to temporarily connect all the layers with some form of basting. The sewing industry has an unbelievable array of gizmos to sell to you, each claiming to be the best and easiest method.
We’ve had students who love spray adhesive, which keeps all the layers together. We used it when repairing a neighbor’s baby quilt several years ago and can still remember its strong chemical smell. The odor came out in the wash, but if you are sensitive to odors or just want to avoid such chemicals, you might want to try another method. The smell was tolerable for an hour of machine quilting, but it would be miserable to hand quilt for months something with such a strong chemical odor.
The critical thing is that you find the method that works best for you. Some quilters baste with hundreds of safety pins or plastic fasteners shot through the quilt layers with a little gun. Our bias is not to have a bunch of gizmos cluttering up the studio, so even before we had a longarm (which we now use to baste quilts for hand quilting), we preferred to do our basting on the floor with a needle and thread. We only baste on hardwood floors. Having once tried to baste on carpet, we discovered that we were constantly picking up carpet strands and, in effect, sewing the quilt to the carpet! If you only have carpeted floors, try sliding a cutting mat underneath the quilt as you baste.
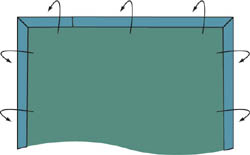
Once you determine how you want to baste, lay out the quilt backing wrong side up. Then place the batting on top of it, ensuring that the batting aligns nicely with the backing. Then center the quilt top in the middle, checking that you have a couple inches of backing and batting protruding on all sides and that the quilt top is squarely centered.
Regardless of the method you use, start in the center, and baste the layers every 3″ or so with a stitch, safety pin, or other fastener. If you’re using a needle and thread, make long stitches vertically and then horizontally. Rather than knotting the thread at the beginning and pulling a long thread through the first stitch, we find the center point of a long thread and place it to one the side of the quilt. We baste across, pulling only half the thread through the quilt. After basting all the way across the quilt, we remove the needle, go back to the long tail of the thread, and baste in the other direction.
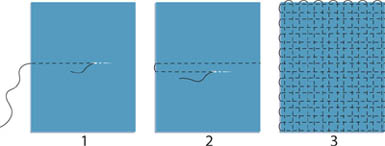
Basting with threads twice as long as the quilt width or length reduces tangling.
Some students have told us that the colored threads they used for basting, especially older ones they thought they’d use up, actually rubbed off, staining their light quilts. We generally baste with white thread. It’s easy to see on most quilts, and there’s no chance of bleeding.
There seems to be a chasm in the quilting world when it comes to quilting. Some hand quilters believe that hand quilting is inherently better than machine quilting. Machine quilting advocates sometimes look down on hand quilting as being old-fashioned. We believe that hand quilting and machine quilting offer different possibilities and can be equally modern.
Machine quilting is most efficiently done with continuous-line, free-motion quilting patterns. In most cases, the density of the quilting should be consistent across the entire quilt. Although many, many quilters opt for stitching in the ditch, a term that describes quilting in the seam where two fabrics are joined, this method of quilting rarely adds anything to the quilt. It also often looks messy when it invariably strays from the ditch. If you’re new to machine quilting and are not ready to tackle any free-motion patterns, you can always quilt in parallel lines. For more on this technique, see page 135.
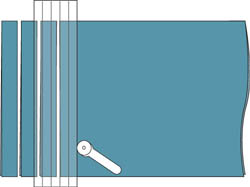
If you are quilting on a home sewing machine, keep the areas of the quilt not being quilted rolled up so you can maneuver the quilt through the sewing machine and so you can keep the backing flat. If the backing is not taut, you may inadvertently sew tucks into it—keeping the quilt rolled will help.
To keep the quilt rolled, you can use several safety pins to fasten it along the sides, or you can buy metal clips that go around the roll and that resemble those clips used by cyclists to keep their pant legs out of the bicycle chain.
If you plan to stipple, you’ll need a machine that allows you to drop your feed dogs. Check your manual to see if this is an option with your machine. Dropping the feed dogs lets you do free-motion quilting. You should use a free-motion foot or a darning foot for your machine as well. If you’ve never done stippling before, practice on a sandwich made with a top and bottom of quilting scraps and a small piece of batting.
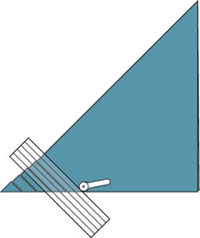
Machine quilting straight lines on a home machine is much easier done with a walking foot. The walking foot keeps the layers moving together under the presser foot. If you plan to do straight-line quilting, you needn’t adjust your machine’s feed dogs. To make sure your lines are straight, use masking tape strips on the quilt as guides. By aligning the edge of the presser foot with the edge of the masking tape, you’ll get perfectly straight lines without having to mark the quilt. If you use masking tape that is 1″ wide and quilt on either side of the tape, you’ll end up with quilted lines that are 1″ apart. Be sure to measure from the edges of the quilt to make sure that the masking tape is parallel to the edge of the quilt and to the other lines as you go. It is very important to use new masking tape and to remove it from the quilt within 24 hours. Old tape or tape that is left on the quilt too long may leave unwanted residue.
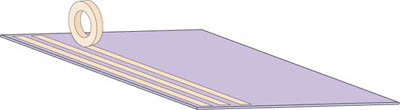
Sew along masking tape edge for accurate straight-line quilting.
There are no two ways about it: Hand quilting is very time consuming. There are, however, wonderful aspects to hand quilting that compensate for the patience it requires. While machine quilting can be a bit awkward on a home machine, hand quilting in a hoop can be comfortable and portable. We quilt most of our quilts on a longarm quilting machine. Longarm quilting may be fast, but because it’s loud and requires concentration, it’s a solitary endeavor. Hand quilting, on the other hand, can be done while visiting with friends or while watching TV or a movie.
Although quilters often associate hand quilting with traditional patterns, we included Small Change (page 108) in this book because we wanted to show an example of how hand quilting can be made modern.
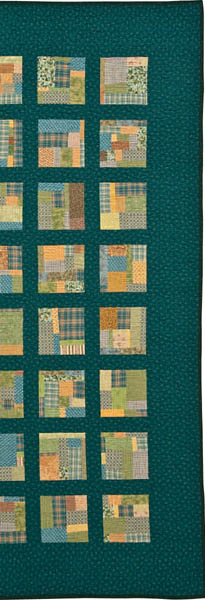
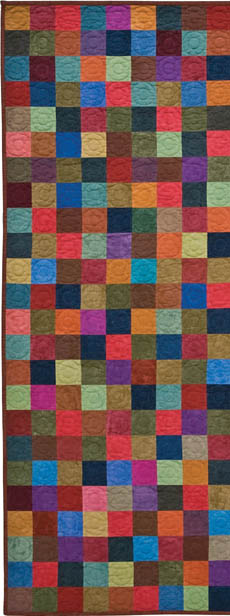
If you’re new to hand quilting, consider a quilting pattern that has a density that corresponds to the batting’s requirements. Many manufacturers of batting that is appropriate for hand quilting require that lines of stitching be no more than 1½″–2″ apart to maintain the integrity of the batting. While that might be fine for a pillow or baby quilt, it will add up to a lot of stitching for a bed quilt. We love the doughnut-in-a-square quilting pattern that we developed for Small Change, because it highlights the colors of the squares and creates a wonderful shadow pattern on the quilt. It also gives you a sense of progress as you count the number of squares you’ve quilted.
Here are some other modern hand quilting patterns that would work well.
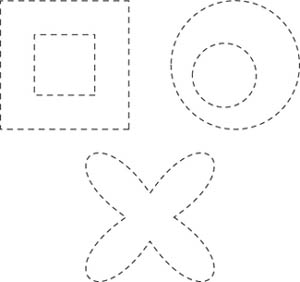
Modern hand quilting patterns
If you are going to quilt in a hoop, consider a design that allows you to quilt as much as possible in one area before moving the hoop to another area of the quilt. In Small Change, we were able to quilt every small square in the hoop before moving it. A long linear pattern that necessitated constantly moving the hoop would have been cumbersome. Smaller increments, such as the doughnuts in the squares, also meant that we could mark the quilt as we advanced the hoop. For more on quilt marking, see page 131.
For hand quilting, we use Peacemaker size 12 between quilters’ needles and Mettler hand quilting thread. Although this thread does not come in very many colors, it is ideal for hand quilting. You may also need a thimble or two. Finding a thimble that works for you may take some time. Weeks quilts with two different thimbles at a time, which is unusual. She uses a cheap flexible rubber thimble on her right middle finger on the underside of the quilt and a rigid plastic thimble on her left middle finger on top of the quilt. While the rubber thimble is more comfortable, the rigid thimble has dimples in it that help push the needle through thicker sections with seam allowances. Many people generally quilt with just one thimble on the middle finger of the hand on the underside of the quilt.
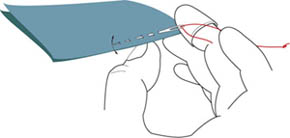
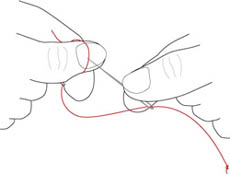
Once you have your quilt in the hoop, thread the needle. Pull tautly across your thumbnail the end of the thread closest to the needle. Use the needle to split the fibers of the thread that are tight against your thumbnail about 1½″ from the end of the thread. Pull the long end of the thread until the needle is firmly caught in the fibers of the split thread. Trim the tail an inch or so from the eye of the needle. Securing the end in this way will prevent you from accidentally pulling the thread through the needle with every stitch.
It is easier to split thread ply when holding thread taut against your thumbnail.
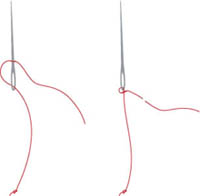
Slide split ply over eye of needle, then trim close.
Most quilters bury the starting knot. The easiest way to do this is to find the starting point, and push the needle through the top of the quilt so the knot is on the front of the quilt. Give a gentle tug to slip the knot down through the quilt top and into the batting underneath the quilt’s surface.
Bury knot when starting.
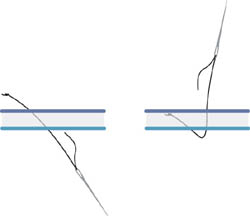
Numerous books and online videos on hand quilting show various versions of the rocking stitch, which is the most popular stitch used for hand quilting. To begin the rocking stitch, poke through the top and bottom of the quilt, and then rock back and forth between the top and bottom of the quilt to catch fabric on each side. Wear a thimble on the middle finger of your quilting hand to guide the needle up and down through the layers, aiming for about eight stitches to the inch. The rocking stitch is best for straight-line patterns or patterns with gentle curves. Although it is faster than other quilting stitches, it does require some strength in your hands and can be difficult to do with loftier battings.
Rock needle to quilt.
For Small Change (page 108), we did not use the rocking stitch because the tight curves of the quilting pattern and the loftier wool batting made it more challenging. Instead, we quilted using a two-handed method we call “the big stitch.” The big stitch uses the same needle and thread as the rocking stitch and is easier to master than the rocking stitch, even if it does take longer. We like the big stitch, because it’s not as tiring to our hands and it spreads the work between both hands. In Small Change, we averaged four stitches to the inch, which is still tight enough to withstand repeated machine washings.
Pushing needle down using “big stitch”
Weeks quilts with her left hand on top and the right hand underneath, because she’s left-handed. Bill quilts with his right hand on top, because he’s right-handed. In either case, we typically poke directly down through the top and pass the needle to the other hand, then push it back up again before pulling the thread taut. You may want to do one stitch at a time to practice passing the needle back and forth between hands. Aim for the gap on the top between stitches to be similar in length to the length of the stitch.
When your stitches reach where you started, slip your needle between the quilt layers, and poke up to the new starting point you’ve chalked. When you are running out of thread, bury the end of the thread in the batting by pushing your needle between the quilt top and the batting. Sometimes you can bring the needle up in the ditch of a seam and bury it again to make sure that the thread doesn’t come back up to the surface.
Unless you plan to do the pillowcase binding we describe in Birds on a Wire (page 114), you will need to make a binding for your quilt. Most quilters use a binding technique that combines machine sewing with hand sewing. We used this technique for Small Change (page 108), because we didn’t want a machine-bound edge to distract from the delicacy of the hand stitching. For the other quilts in this book, we used our one-step binding technique, which is totally done by machine. This one-step technique takes some practice to master, but the reward is being able to bind a queen-size quilt in less than an hour.
We’ll lead you through both the traditional double-fold, hand-and-machine method and our one-step method. The preparation for both is similar.
When preparing the strips to make the binding, some quilters advocate cutting the strips on the bias. If you want a smooth look to your binding and you don’t object to the large amount of fabric that is wasted in cutting bias strips, then this is a good method.
All of the bound quilts in this book were finished with binding cut with the grain (straight across from selvage to selvage). On-grain binding crinkles more when washed and dried, which we find in keeping with our richly textured quilts. We only use bias binding if we’re binding a quilt with curved edges—then it is essential.
Fold fabric diagonally for bias-cut strips.
Fold fabric in half, with selvages together, for on-grain strips.
For both the traditional method and our one-step method, begin by calculating how many strips you’ll need to cut and how much fabric will be required.
To calculate the number of strips, first find the perimeter of the quilt by adding together the length of all four sides. For example for a 60″ × 40″ quilt, the perimeter is 200″ (60″ + 60″ + 40″ + 40″). Next add 12″ for seam allowances; in the example, you’ll have a total measurement of 212″.
The number of strips needed is calculated by dividing this total measurement by the width of your binding fabric, which in most cases is 40″. Here, 212″ divided by 40″ equals 5.3, which you round up to make 6 strips.
To calculate the amount of fabric needed, you must decide which binding method you prefer. The traditional binding method requires 3″-wide strips, while the one-step method requires 2″-wide strips. You also need to decide whether you will cut the strips with the grain (selvage to selvage) or on the bias.
If you are cutting on-grain, multiply the number of strips needed by the strip width. In the example above, if you were making a traditional binding, you’d need 6 strips 3″ wide, or 18″ of fabric. When buying fabric, purchase extra (say, ¾ yard) to allow for shrinkage and warping during washing and because the cut might not have been perfectly straight at the quilt shop.
If you are cutting your strips on the bias, expect to get a bit more than 350 linear inches of 3″-wide binding or 600 linear inches of 2″-wide binding from a square yard of fabric.
If your binding strips will be made from solid-colored fabrics, determine a front and back side so you won’t get confused as you piece the strips together, which would result in seams on two sides. The easiest way to do this is to mark the fabric before you cut the strips. While the fabric is on the cutting table, chalk a rough line about ½″ away from each of the selvages. After the pieces are cut, remember to match chalk edges to chalk edges when making the continuous binding strip.
Mark solids along selvages to indicate fabric’s front side.
This is the initial process for making both the traditional and the one-step binding.
1. Calculate the number of strips (page 139). For the traditional method, cut 3″ strips. For the one-step method, cut 2″ strips.
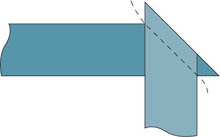
2. Pin the front sides of 2 binding strips together at right angles, and sew across them diagonally.

Join strips.
3. Using chain piecing, continue sewing all the strips together until they form one long strip.
Chain piece binding to form long strip.
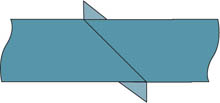
4. Cut the thread between the ends, then trim the strips ¼″ from the seams.
Trim.
5. Press open all seams to distribute the bulk of the seam allowance along the binding and to reduce bulging.
Press seams open.
The most common method of binding is a two-step approach that attaches by machine the binding to the front of the quilt. The binding is then flipped over to the back and finished with hand stitching. Begin by making a continuous binding strip the necessary length for your quilt (pages 139–140).
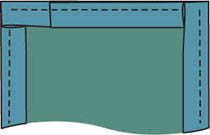
1. With the wrong side up, fold over one end of the continuous binding strip ¾″, and press flat.
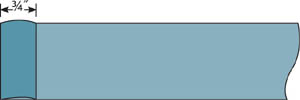
Fold over end.
2. Fold the continuous binding strip in half lengthwise, with the right sides of the fabric facing out. Press, making sure to align the raw edges.

Fold lengthwise.
3. With the front of the quilt facing you and starting about 6″ from a corner, align the raw edges of the binding with the edge of the quilt. Leaving the first few inches of the binding unsewn, stitch parallel and a scant ½″ from the edge, stopping with a backstitch ½″ from the corner.
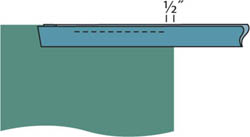
Sew binding to quilt.
4. Fold up the binding.
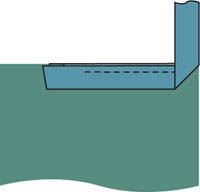
Fold up binding.
5. Fold the binding back down, and continue stitching, starting ½″ from the corner with a backstitch. Repeat the folding sequence at each corner.
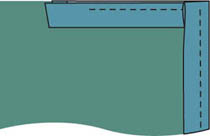
Fold back down, and sew.
6. When you return to the beginning, trim, leaving a ¾″ overlap. Tuck the end into the fold, and finish sewing.
Tuck in and sew.
7. Fold the binding to the back, and miter the corners. Using a double strand of thread and a blind stitch, cover the machine stitching by hand stitching the binding to the backing. Miter the corners, and secure with small stitches if desired.
Fold binding to back.
The one-step binding method requires only one pass with the sewing machine to attach the binding to the quilt. This method requires a 1″ bias tape maker to prepare the binding. We highly recommend the Clover brand 25mm (1″) tool.
Unlike the traditional method, which uses 3″ binding strips, the one-step method uses 2″ strips. Begin by making a continuous binding strip the necessary length for your quilt (page 139). Remember that although the tool is called a bias tape maker, you can use continuous binding strips cut with the grain or on the bias.
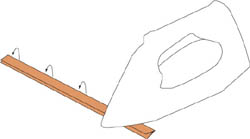
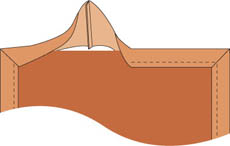
1. Trim one end of the continuous binding strip to a point to make it easy to feed through the 1″ bias tape maker. Pull the angled end through the tool, pressing the folds as you pull the binding strip through. Take your time to ensure that the raw edges of the binding align in the center of the strip and are consistent in width. As you encounter seams in the binding strip, press them open to ease them through the tool.
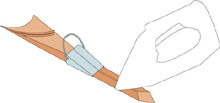
Press as you pull strip through tool.
2. Trim off the pointed end.
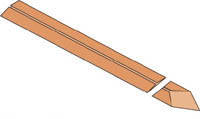
Trim off point.
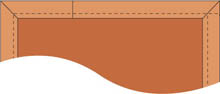
3. Press the binding in half lengthwise, carefully aligning the folded edges to produce a strip that is consistently ½″ wide. Using low steam will set the folds.
Fold and press lengthwise.
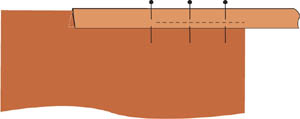
1. With the front of the quilt facing up and starting about 6″ from a corner, slip the raw edge of the quilt snugly into the slightly opened binding; pin. If you have ironed the binding carefully and fit it snuggly on the quilt, the width of the binding should be the same on both the front and back of the quilt.
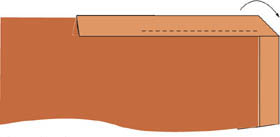
2. Leaving the first few inches of binding unsewn, stitch ⅛″ from the inner edge of the binding. Use your left hand to guide the quilt under the presser foot and your right hand to keep the binding snug against the quilt, sewing all the way to the quilt’s edge. Lift the presser foot, and cut the thread.
Fit binding on quilt and sew.
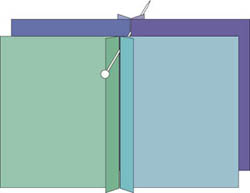
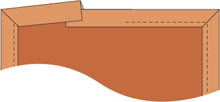
3. While holding the quilt in your left hand, place your right thumb inside the binding strip, and fold it open, creasing the binding at a 45° angle on the front and back.
Open binding.
4. Fold the binding to the front, making crisp miters on the front and back. Slip the raw edge of the quilt snugly into the slightly opened binding. You may find that with practice you can keep the binding snug enough without pinning. However, if you feel the binding slipping away from the quilt at all, pin as you go. Continue sewing down the next side of the quilt, backtacking the miter to reinforce it before you continue sewing.

Fold and sew.
5. Continue sewing until you come to the last corner. Then miter the last corner, and trim the binding so it overlaps ½″ with the beginning edge of the binding.
Trim, leaving ½″ overlap.
6. Sew the 2 ends of the binding together, using a ¼″ seam.
Sew ends.
7. Miter the last corner, and continue sewing the binding until you reach the starting point. Overlap the stitching and backstitch for added strength.
Finish sewing.
8. Check the entire binding on both sides of the quilt to make sure it is well attached. There are three common problems that you can quickly overcome with practice: The first occurs when instead of sliding the quilt into the binding, you open the binding, place the back of the quilt flat down on it, and then wrap the binding around to the front. This may cause the binding to be wider on the back than on the front and can lead to the second problem. This second problem occurs when your stitching misses the binding on the back because the binding was not evenly wrapped around the quilt. The third common mishap results from not fitting the quilt snuggly into the binding at the start. If your binding pulls away from the quilt as you stitch, it may cause the binding to separate from the quilt in spots.
The label is an important part of any quilt. Not only does it provide a place for you to include your name, it also dates the quilt for future generations.
There are numerous options for making a label. Some quilters embroider their labels by either hand or machine and include their name, the title of the quilt, and the date. Others use photo-transfer fabric and inkjet printers to create personalized labels.
For quilts that we make for clients, we use a computer printer to print labels that include care instructions. We then sign and date the labels by hand, using a permanent Sakura fabric marker. Some clients commission quilts to be given as gifts and want to write a message on the label themselves. In this case, we make a larger label with extra room and enclose a Sakura pen in a zippered plastic bag with the quilt so they can write their own message.
We’ve seen some beautiful labels that include poems or photos transferred onto the label using computers and others that are beautifully lettered by hand. In most cases, it’s better to hand sew the label to the quilt after it has been quilted, so that the label doesn’t get quilted in the process. Be sure to press under the raw edges of the label before sewing so it doesn’t ravel with use or washing. Then use a blind stitch to sew the label to the quilt.
Over the years, we have heard many opinions about how to care for quilts. Many quilters carefully hand wash their work and are astonished that we launder our quilts in a washer and dryer. Conservation-minded quilters advise you to fold up your quilts and place them in archival boxes with acid-free tissue.
Our approach to quilts is that they’re meant to be used. We wash and dry our quilts to remove any leftover chalk. Washing and drying also develops a lovely, crinkly texture when the cotton batting shrinks slightly. We don’t store any of our quilts archivally, but we do take some precautions. We never store quilts in direct sunlight. We also roll them or fold them differently each time we put them away—in thirds one time, in fifths another. This keeps fold marks from setting in prematurely. We don’t store quilts for long periods in plastic, which can trap moisture. Instead, if we are storing them for a while, we wrap them in muslin or place them somewhere that they can breathe.
If you’re making a functional quilt that you plan to wash regularly, we recommend washing it in a tablespoon of Ivory Ultra dishwashing soap, unless you have easy access to equine shampoo, such as Orvus. These two liquids have been shown to reduce fading in quilting cottons. Although we dry our quilts in a dryer, you can air dry quilts. When doing so, place the quilt over two parallel clotheslines to spread out the weight and reduce stress on the wet fibers, which are more delicate than dry ones. Some quilters dry quilts in their backyards on a bed of towels. Drying flat is always preferable but may be hard to manage if you have pets or small children running around.
What really matters is that before you make your quilt, you figure out how you’re going to use it. If you plan to use a quilt on a bed, make sure that the fabrics have been prewashed to prevent dyes from running, and make sure that you’ve quilted densely enough for the quilt to withstand repeated washings.
For more on caring for your quilt, see Resources (page 157).