The xclipboard client does exactly what you might think: it allows you to save multiple text selections (Section 5.13) and copy them to other windows. Text you copy from an xterm window can be made the CLIPBOARD selection (and thus automatically appear in the xclipboard window). To set this up, you first need to customize xterm using resources.[7]
For text you copy from an xterm to be pasted automatically into xclipboard, the text must be made the CLIPBOARD selection. You set this up to happen by specifying a few translations (Section 6.4) for xterm.[8] Here are the translations I use to coordinate xterm with xclipboard:
*VT100.Translations: #override\
Button1 <Btn3Down>: select-end(primary,CUT_BUFFER0,CLIPBOARD)\n\
!Shift <Btn2Up>: insert-selection(CLIPBOARD)\n\
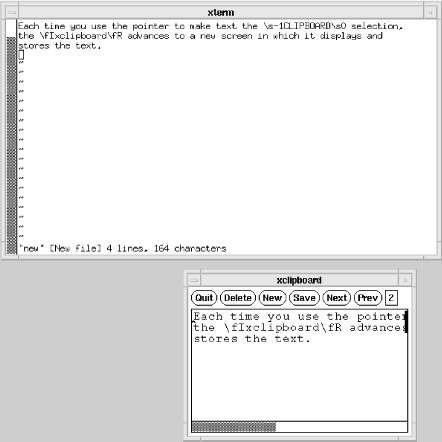
~Shift ~Ctrl ~Meta <Btn2Up>: insert-selection(primary,CUT_BUFFER0)To let you store multiple text selections, the seemingly tiny xclipboard actually provides multiple screens, each of which can be thought of as a separate buffer. Each time you use the pointer to make text the CLIPBOARD selection, the xclipboard advances to a new screen in which it displays and stores the text. If you make a long selection, it might take up more than one screen, but the clipboard still considers it a single buffer. When you make a selection that extends beyond the bounds of the xclipboard window (either horizontally, vertically, or both), scrollbars (Section 5.11) will be activated in the window to allow you to view the entire selection.
To the right of the command buttons is a tiny box that displays a number
corresponding to the selection currently in the xclipboard window. Once you have saved multiple selections, you
can click on the client's Next and Prev command buttons to move forward and backward
among these screens of text.
If you've coordinated xterm with xclipboard using the guidelines outlined earlier,
you paste the CLIPBOARD selection in an xterm
window by holding down the Shift key and clicking the second pointer button.
When you paste the CLIPBOARD selection, you get the selection that's currently
being displayed in the xclipboard window.
Here's where the client really comes in handy. Suppose you send four selections
to xclipboard and you want to paste #2. Just
go back to selection #2 using the Prev
command button; when you use the pointer command to paste the CLIPBOARD
selection, selection #2 is pasted. In Figure
5-4, we've pasted selection #2 into a new file. (Notice that the text
is too wide for the xclipboard window and
that a horizontal scrollbar has been provided so we can view the entire
selection.)
A selection remains available in xclipboard
until you Quit the program or use the
Delete button to erase the current
buffer.
Use the Save command button to save the
text in the current buffer to a file. A dialog will ask you to Accept or Cancel the save to a file with the default name
clipboard. You can change the filename using
Text widget commands [these are listed in the xedit(1) manpage — JP]. If
you want to save multiple selections, you'll need to change the filename each
time, or you'll overwrite the previous save.
You can edit text you send to the xclipboard using Text widget commands. When you edit a screenful of text, the xclipboard continues to store the edited version until you delete it or exit the program.
—VQ and SJC
[7] Since there can be only one CLIPBOARD selection at a time, you can only run one xclipboard per display.
[8] If you're using a terminal emulator other than xterm, the program should also allow this
sort of customization. See the client manpage for the actions (the
equivalents of select-end and
insert-selection) to include in
the translation table.