RUFFLE DUFFLE
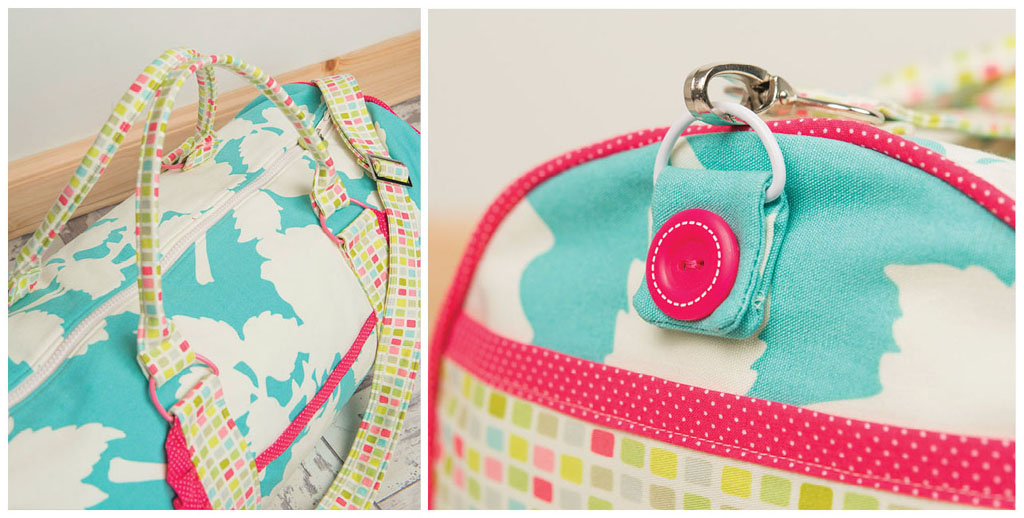
Ruffle Duffle is the perfect overnight or sports bag; highly practical while at the same time being completely cute and girlie. It would make an ideal gift for any special women in your life, from the sporty teen to the jet-setting businesswoman. Or why not make one for a boy? Simply leave out the ruffle and choose some of his favourite masculine prints.
SKILL RATING: 

You will need
- 90cm (351⁄2in) blue home décor weight print fabric for main bag
- 61cm (24in) lining fabric
- 90cm (351⁄2in) multi-square home décor weight print fabric for handles and end pockets
- 22.5cm (9in) pink micro-spot print fabric for ruffle and binding
- An extra fat quarter (18 × 22in) of pink micro-spot print fabric to make piping and bias tape or 2m (21⁄4yd) of pre-made bias tape
- 1m (40in) lightweight fusible fleece
- 2m (21⁄4yd) white cord to make piping
- Two matching 2.5cm (1in) buttons
- 61cm (24in) white chunky open-end zip
- Four large 5cm (2in) and two medium 3.3cm (11⁄4in) D-Rings
- Three large 4cm (11⁄2in) swivel hooks
- Large 4cm (11⁄2in) slide adjuster
- Decorative zip pull (optional)
Finished size: 54 × 25cm (211⁄2 × 10in) excluding handles

Cutting
- Trace all of the Ruffle Duffle templates (see Pattern Pullout Sheet) onto tracing paper or template plastic, transferring all the markings and cutting them out around the traced lines.
- From the main blue home décor weight print fabric, cut one large 58.5 × 77.5cm (23 × 301⁄2in) panel for the main outer bag, two 25 × 48cm (10 × 19in) pieces for the centre pockets, and four 4.5 × 9.5cm (13⁄4 × 3in) pieces for the shoulder strap ring holders. Trace the bag end template twice onto fabric, and cut out along the traced lines.
- From the lining fabric, cut one large 58.5 × 77.5cm (23 × 301⁄2in) panel for the main lining bag. Trace the bag end template twice onto fabric and cut out along the traced lines.
- From the multi-square home décor weight print fabric, trace the end pocket template four times and cut out along the traced lines. Cut four 70 × 6.5cm (271⁄2 × 21⁄2in) strips for the ring holder strips, four 58.5 × 5cm (23 × 2in) strips for the main handles and four 76 × 5cm (30 × 2in) strips for the long adjustable shoulder strap.
- From the pink micro-spot print fabric, cut two strips measuring 7.5cm (3in) × the full fabric width for the ruffles and four strips measuring 5 × 25cm (2 × 10in) for the pocket bindings.
- From the lightweight fusible fleece, cut one large panel measuring 58.5 × 77.5cm (23 × 301⁄2in) for the main outer bag. Trace the bag end template twice and cut out along the traced lines. Now cut two 70 × 6.5cm (271⁄2 × 21⁄2in) strips for the ring holder strips, two 58.5 × 5cm (23 × 2in) strips for the main handles and two 75.5 × 5cm (293⁄4 × 2in) strips for the long adjustable shoulder straps.
Preparation
- Interface the main bag panel, half of the handle strips and the main bag end pieces with the matching fusible fleece pieces. The shoulder strap interfacing is slightly shorter on one end than the fabric – this is intentional.
- Create two 1m (40in) lengths of piping with the pink fabric bias strips and white cord (see Creating Piping). From the remainder of the fat quarter of pink micro-spot fabric make two 91.5cm (36in) lengths of 2.5cm (1in) bias tape.
Construction
5mm (1⁄4in) seam allowance included.
- Take the interfaced main bag panel, lining panel and chunky zip. Undo and separate the two sides of the zip. Create a sandwich of three layers by placing the main bag panel right side up, then one side of the zip centered right side down on top of one 58.5cm (23in) edge, and finally the lining panel right side down so that all the raw edges meet. Pin or tack (baste) evenly in place (see Useful Stitches). Using the zipper foot on your machine, sew the zip in place along the 58.5cm (23in) edge.
- Repeat to make the three layers, this time with the remaining zip side on the opposite 58.5cm (23in) edge of the main bag and lining panel. Ensure that the zip ends are facing in the same direction and the zip is equally centred so the two sides will join evenly later. Sew in place with the zipper foot. Turn the main bag and lining layers right side out. Neatly press the zip seams and then topstitch the bag panel along both zip seams (see Useful Stitches).
Any zip may be used for this project, as long as it is an open-end zip. If you want to make construction and zip sewing easier choose a lighter-weight plastic zip.
- Take the two centre side pocket pieces measuring 25 × 48cm (10 × 19in) and place them on top of each other, right sides out. Machine tack them together along all four edges.
- Fold one of the 5 × 25cm (2 × 10in) pink binding strips in half along the length, right side out, and press. Now fold the long raw edges into the fold and press again. Use this strip to bind one 25cm (10in) edge of the pocket panel (see Topstitch Binding). Repeat to bind the other end of the pocket panel and then set aside.
- Fold one of the 7.5cm (3in) pink spot ruffle strips in half, right sides out, all the way along the length. Press well. Securing the end of a double length of strong thread, sew small/medium running stitches by hand all the way along the raw edge of the folded strip. Pull and gather the running stitches evenly along the edge, until the length of the ruffle strip measures approximately 61cm (24in). Tie off the thread and then machine sew the raw edge to secure the ruffles.
- Lay one of the 70 × 6.5cm (271⁄2 × 21⁄2in) interfaced ring holder strips right side up on your work surface. Place the ruffle, right sides together, along one side edge of the fabric strip. The raw edge of the ruffle should lie against the raw edge of the fabric and the ruffle should taper away from the strip 5cm (2in) from either end, as shown. Machine tack the ruffle into place and trim the excess ends.
- Take one of the non-interfaced ring holder strips and place it right sides together with the strip with the ruffle. Pin securely and then sew together along all four edges, leaving a 7.5cm (3in) gap in the centre of the long edge without the ruffle. Snip the corners, turn right side out and press well. Repeat Steps 5–7 to create another ring holder strip.
- Place the main bag panel right side up on your work surface. Place the bound centre pocket panel right side up on top of the main bag panel, ensuring that it is completely central. Tack (baste) the raw side edges evenly in place and machine sew across the centre of the pocket panel to create two pockets.
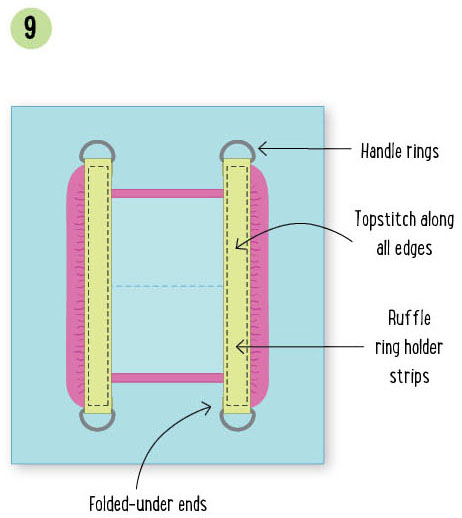
- Now take one of the ruffle ring holder strips. Thread both ends of the strip through a 5cm (2in) D ring, fold the ends under by approximately 2.5cm (1in) and pin in place. Lay the ruffle strip with rings right side up on top of the main bag panel, so that it covers the raw tacked side of the pocket panel. Tack evenly and then topstitch in place along all edges. The short ends of your topstitching need to capture the folded-under ends, enclosing the D-rings. Repeat with the remaining ruffle strip.
- Place two multi-print end pocket pieces on top of each other, right sides out. Machine tack together along all edges. Repeat with the remaining two end pocket pieces.
- Fold one of the 25cm (10in) pink binding strips in half along its length, right side out, and press. Now fold the long raw edges into the fold and press again. Use this strip to bind the top straight edge of one of your end pockets (see Topstitch Binding). Repeat to bind the second end pocket.
- Place two of the 4.5 × 9.5cm (13⁄4 × 33⁄4in) shoulder strap ring pieces on top of each other, right sides together. Sew together along all four edges, leaving a 2.5cm (1in) gap along one long edge for turning. Snip the corners, turn and press. Thread this through one of the medium D-rings and pin the ends evenly in place.
- Place one of the interfaced main bag end pieces and one of the lining bag end pieces evenly on top of each other, right sides out. Position one of the end pockets on top of this so that the curved edges meet. Machine tack the raw pocket edges in place, approximately 3mm (1⁄8in) from the raw edges. Tack the remaining section of the bag end edges together in the same way.
- Position the D-ring loop approximately 0.5–1.5cm (1⁄8–1⁄2in) above the centre of the pocket. Machine sew this in place through all of the layers, and then sew a decorative pink button over the stitching.
- Place one of the lengths of piping with right sides together around the complete edge of one of the bag ends. The raw edge of the piping should lie against the raw edge of the fabric, and the piping ends should taper away from the bag where they meet at the centre bottom, as shown. Machine tack in place and trim the ends. Repeat with the other bag end piece.
When sewing piped sections in place, you will find it easier if you use a zipper foot. This will ensure you set - your stitching as close as possible to the cord in your piping - and give a neater piped end.
- Take the main bag and connect both sides of the open-end zip. Zip the bag shut and then turn the bag inside out. Take one of the bag ends and ease it into place, right sides together, at the zip joining mechanism end of the main bag. Ensure that the centre top of the bag end meets the zip on the main bag. Tack neatly and evenly into place. Once you are happy with the fit, sew the bag side into place. When you reach the zip section, be very careful not to break your needle, but ensure that the needle takes its stitches between the teeth of the zip. Go over the stitching twice if you need to, and trim away any excess zip.
- Before moving on to the following step, turn your bag end side right side out and check that the piping is nice and neat. If the stitching needs to get closer to the piping, simply sew around the bag end again, increasing the seam allowance a little.
- Take the length of bias tape created in Step 2 of Preparation and bind the raw lining seam at the bag end. This will neaten the bag lining and keep the seams strong. To do this, simply fold the bias tape in half, right sides out, and then fit the tape over the seam allowance so that the raw edge of the seam sits inside the bias fold. Pin or tack (baste) securely, then topstitch in place. When you get to the end, simply cut the end of the bias tape, fold it under slightly and continue to topstitch the neat folded end in place, slightly overlapping the starting point.
- Open the zip halfway and repeat Steps 16–18 with the remaining bag end. This time, make sure you meet both zip sides together evenly when tacking and sewing the top section.
- Place one interfaced and one non-interfaced handle strip on top of each other, right sides together. Sew together along all four edges, leaving a 5–7.5cm (2–3in) gap in one long edge for turning. Snip the corners, turn right side out (see Turning Handles) and press well. Topstitch the handle along all four edges. Fold the handle onto itself all the way along the length and then topstitch the handle in this folded position, starting and ending 9cm (31⁄2in) from both short ends. Topstitch this together by stitching over the previous topstitching. Insert the ends into both of the D-rings at one side of the bag. Fold the ends under to enclose the rings by approximately 2.5cm (1in) and then topstitch the ends in place. Repeat to create the second handle.
- Sew the two interfaced shoulder strap pieces together at the short ends where the interfacing did not reach all the way (the 5mm (1⁄4in) seam allowance should have no interfacing). Press the seam open. Sew the two remaining non-interfaced strap pieces together along one short end. Press the seam open.
- Place the two strap pieces on top of each other, right sides together, and sew together along all four edges, leaving a 7.5–10cm (3–4in) gap along one long edge for turning. Snip the corners, turn and press (see Turning Handles). Topstitch the strap along all edges. Attach one end of the strap to your slide adjuster (see Adjustable Straps), and then attach the two swivel hooks. Now attach the adjustable strap to the D-rings at the bag ends.
Use fbric protector on your duffle bag before use to keep it looking fresh and lovely throughout regular use.