back-pocket baking
Chocolate Chunk Oatmeal Cookies with Pecans and Cherries
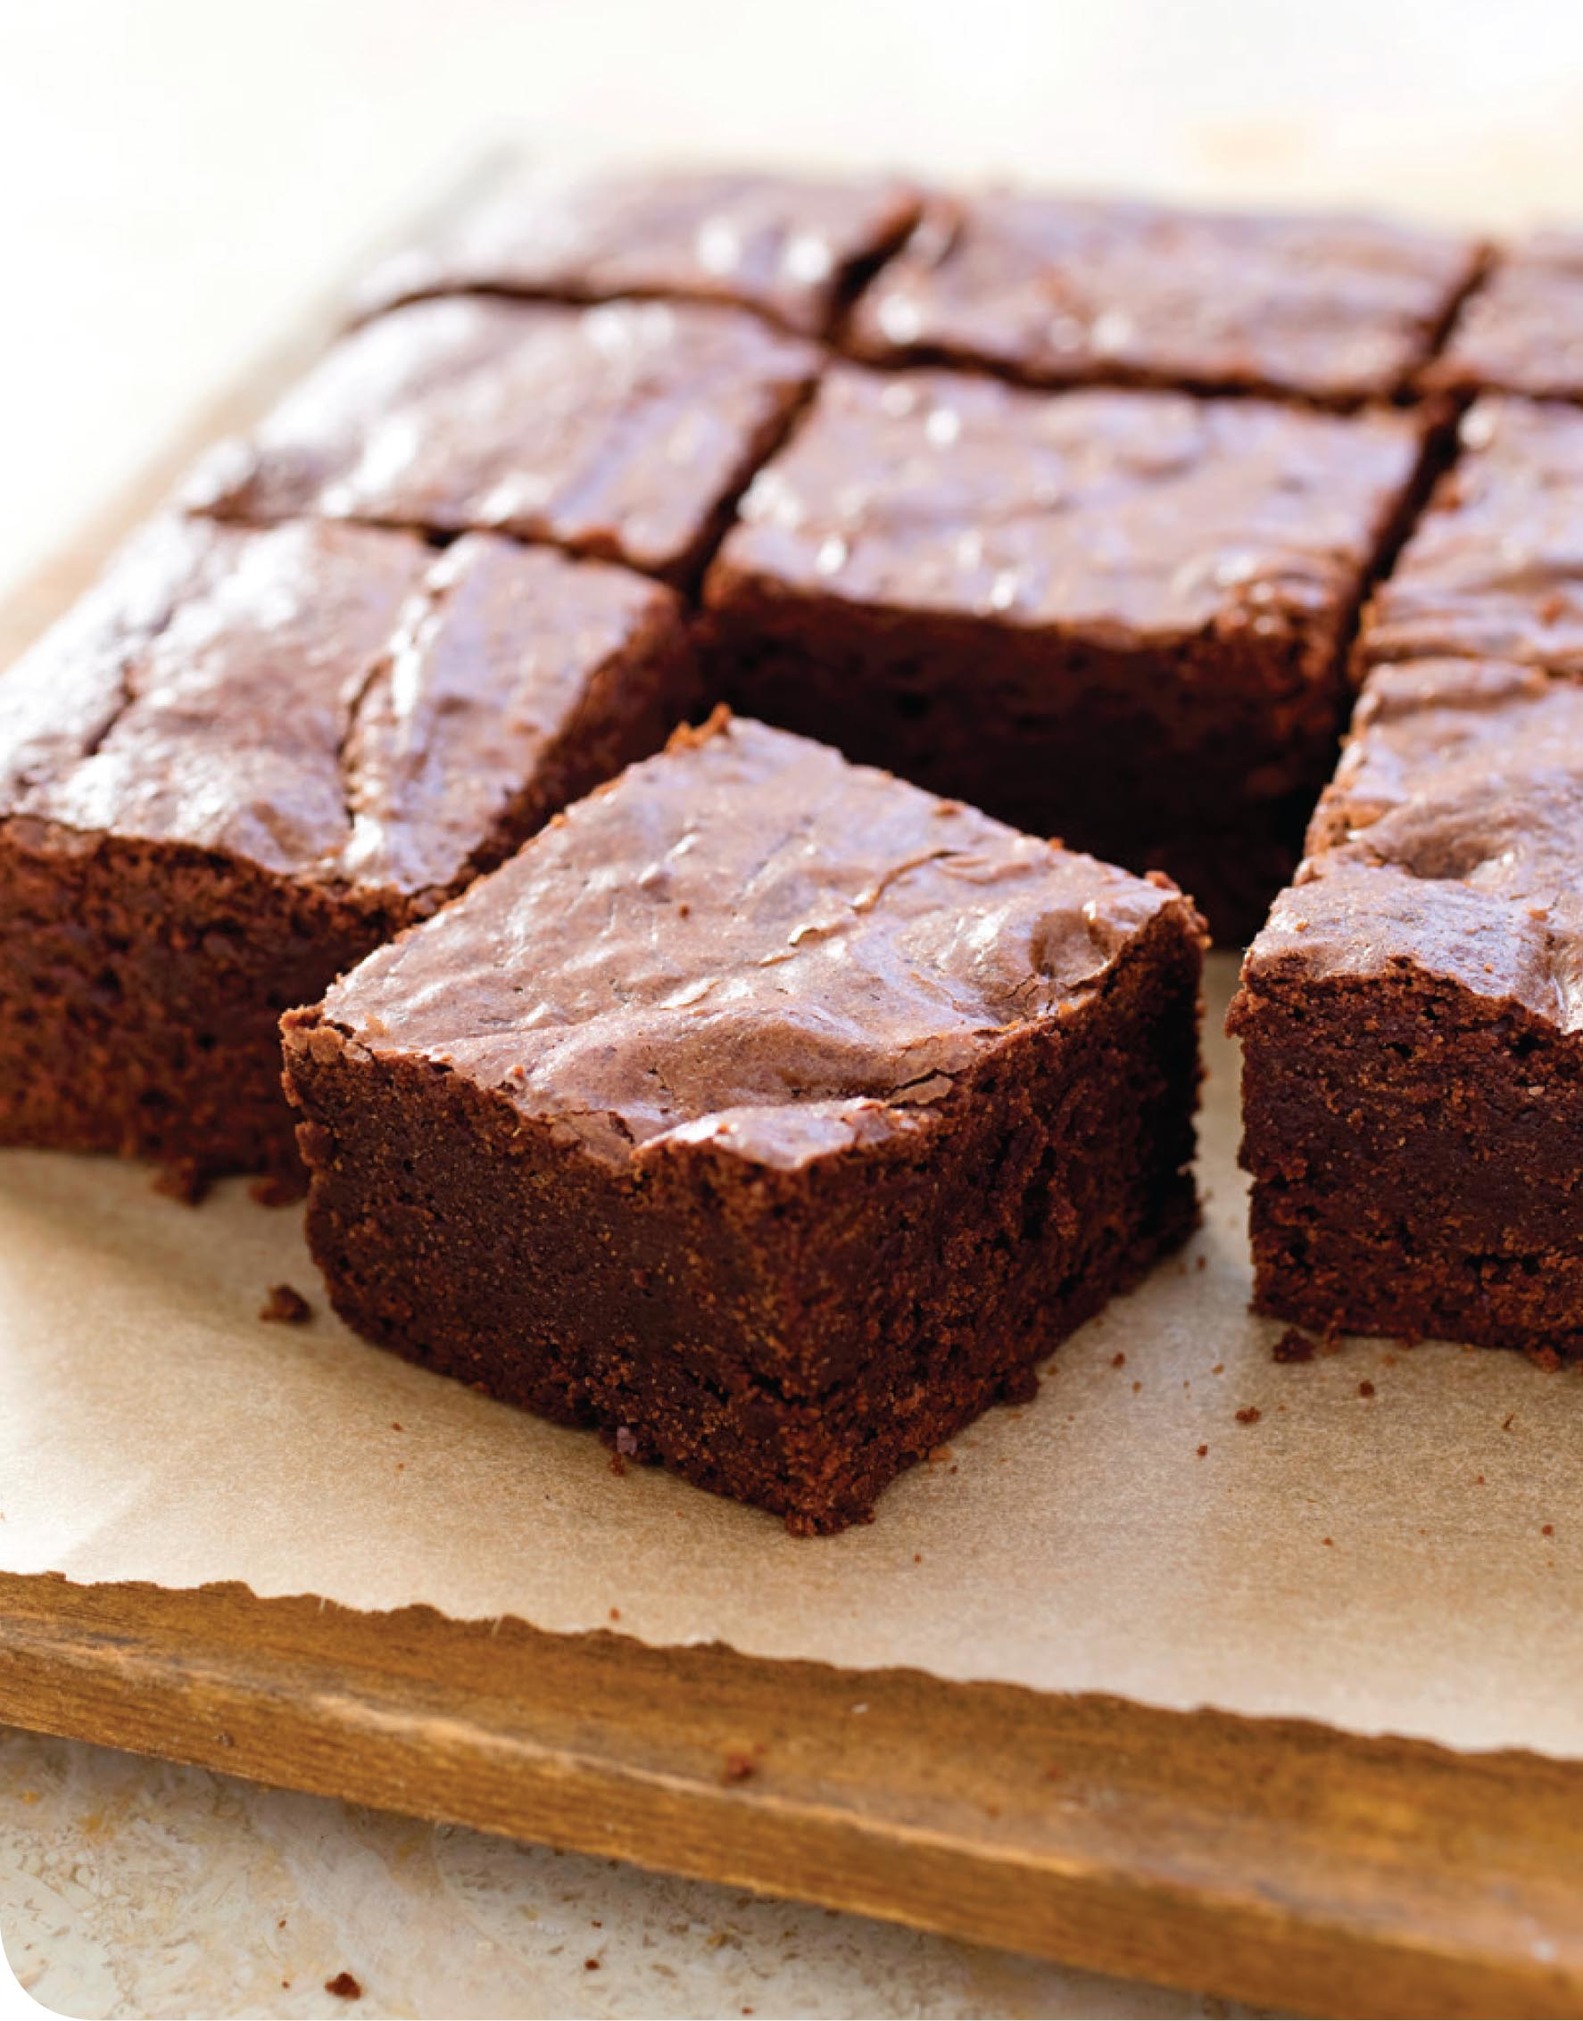
Fudgy Triple-Chocolate Espresso Brownies
Molten Mocha Microwave Mug Cakes
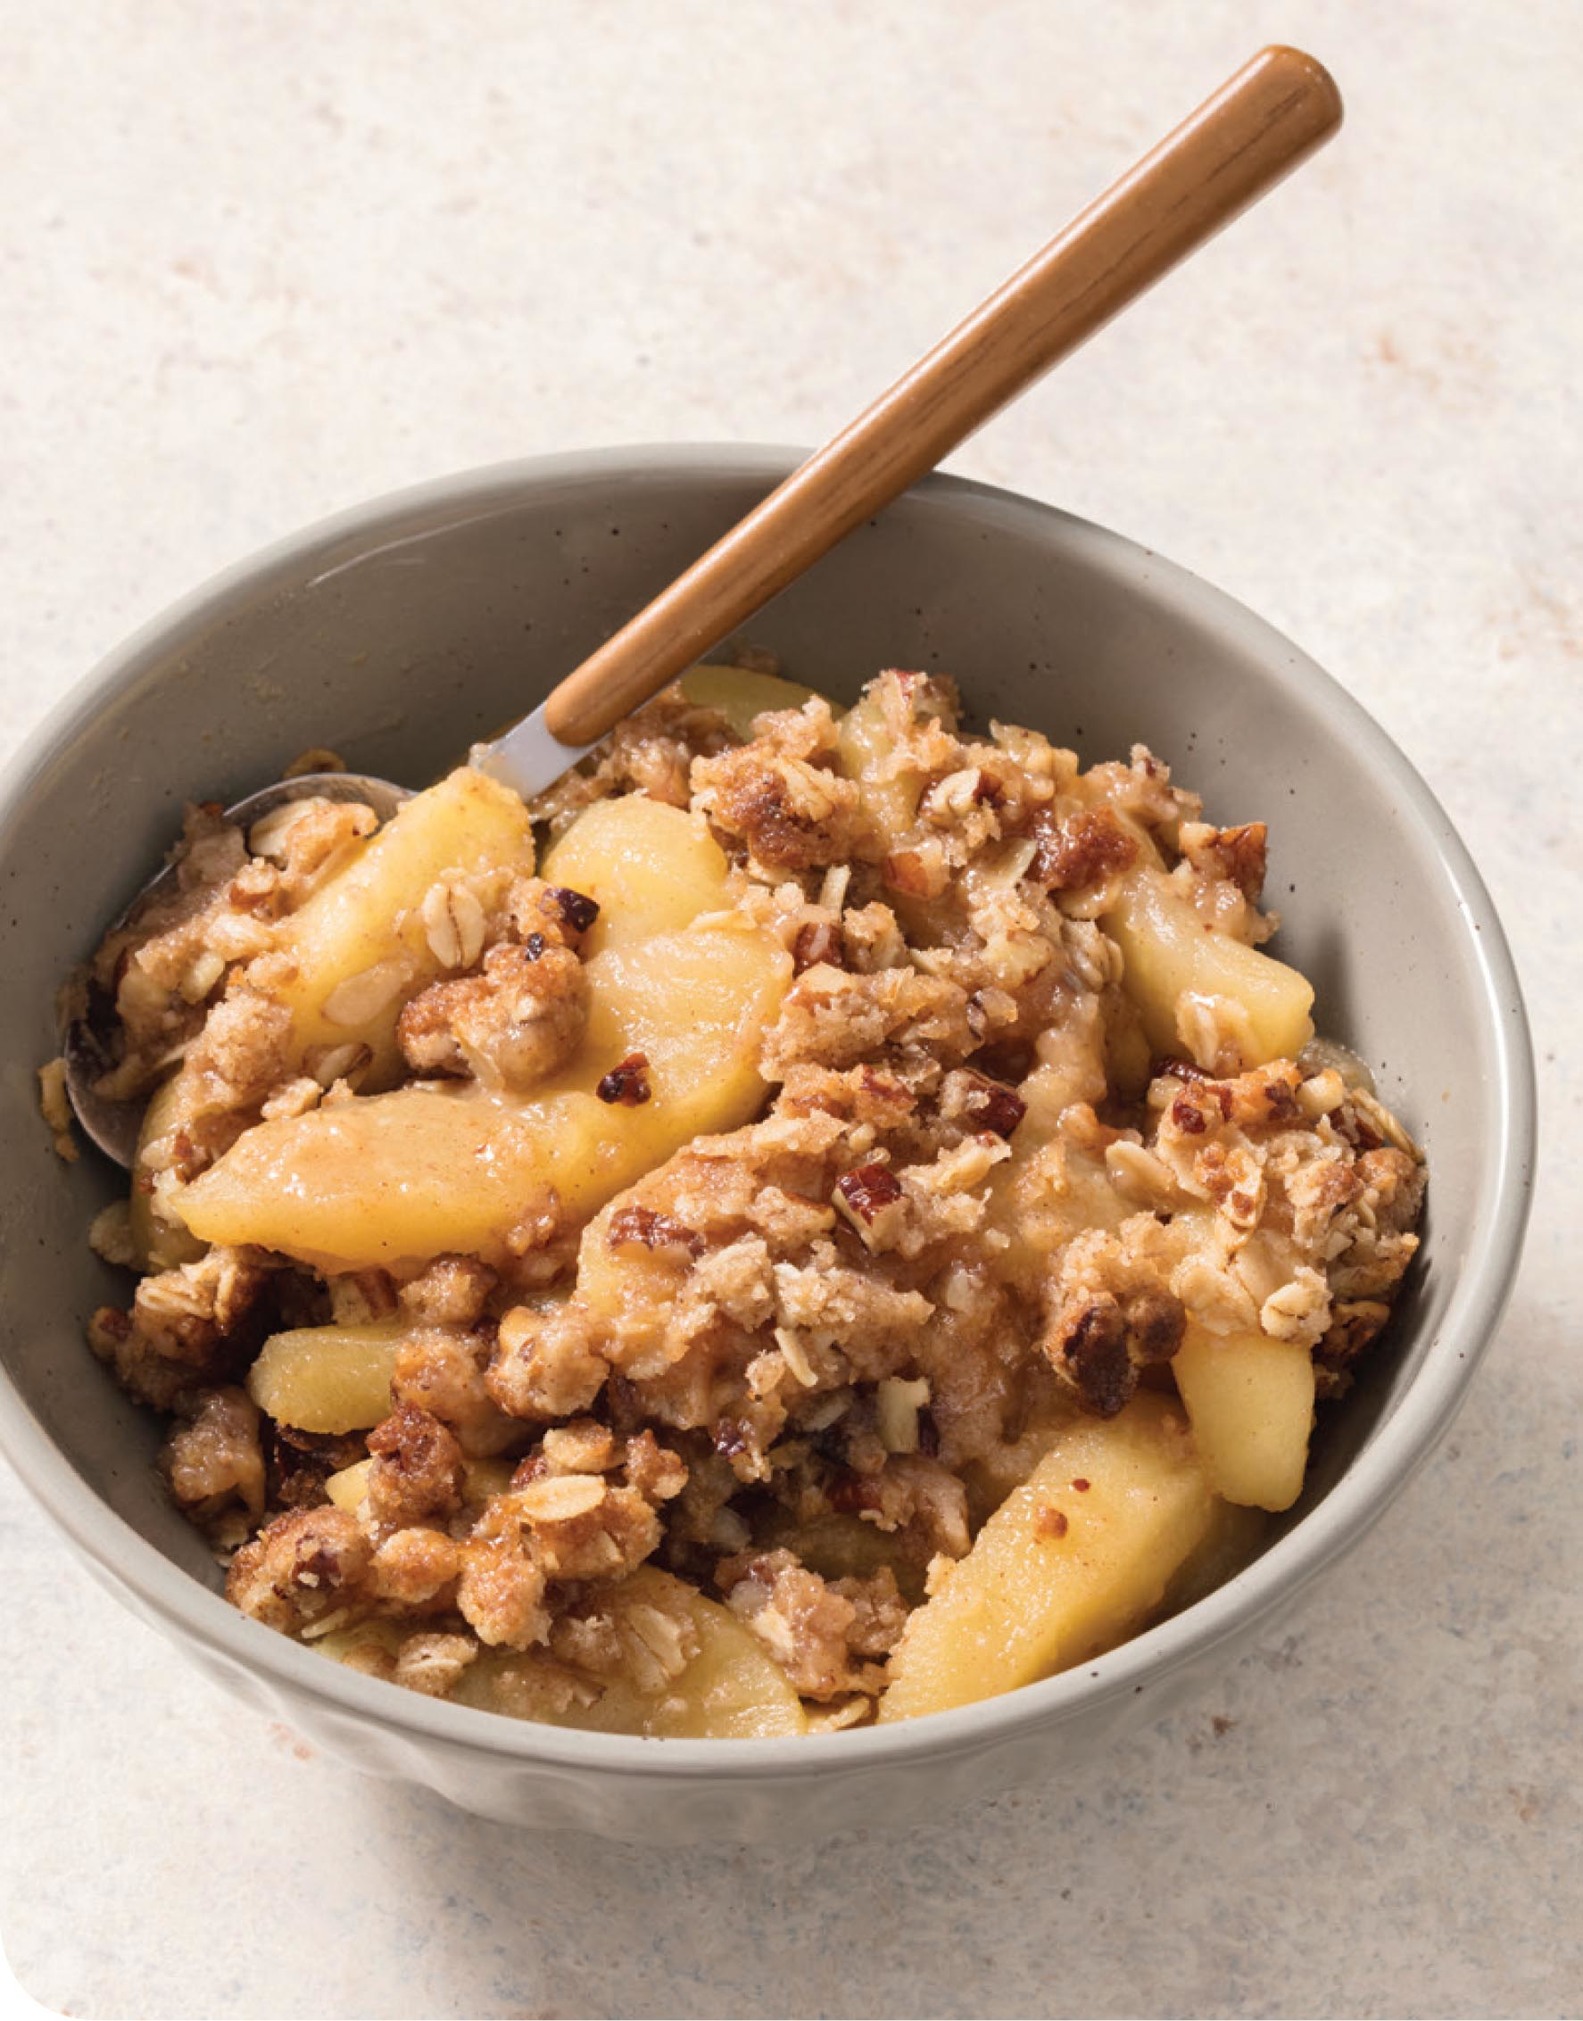
Skillet Apple Crisp with Raspberries and Almonds
Skillet Apple Crisp with Vanilla, Cardamom, and Pistachios
Buttery Yellow Layer Cake with Foolproof Chocolate Frosting
Cheddar and Pimento Drop Biscuits
Mustard and Dill Drop Biscuits
Rosemary and Olive Drop Biscuits
Spicy Southern-Style Cornbread
Brown Irish Soda Bread with Currants and Caraway
Whole-Wheat American Sandwich Bread
Makes 24 cookies; Total Time 1 hour (plus cooling time)
why this recipe works
This dead-easy sugar cookie has bold notes of butterscotch and toffee. Who could resist? We can’t, which is why this has become one of our favorite cookies for everyday baking. Turning up the volume on a plain sugar cookie was as easy as swapping out granulated sugar for brown (for its deep toffee notes) and browning the butter, which gave it a nutty flavor and aroma. Adding a full tablespoon of vanilla underscored the caramel notes, which we balanced with a dash of salt. For the signature crystalline sugar-cookie coating, we stuck with brown sugar but added a little white sugar to prevent clumping. Resist the temptation to bake both sheets at once, and pull the cookies from the oven when slightly soft; a light touch should produce a slight indentation in the cookie’s surface. Use fresh, moist brown sugar for cookies with the best texture.
14 tablespoons unsalted butter
2 cups plus 2 tablespoons (10½ ounces) all-purpose flour
½ teaspoon baking soda
¼ teaspoon baking powder
1¾ cups packed (12¼ ounces) dark brown sugar, plus
¼ cup for rolling
½ teaspoon salt
1 large egg plus 1 large yolk
1 tablespoon vanilla extract
¼ cup (1¾ ounces) granulated sugar
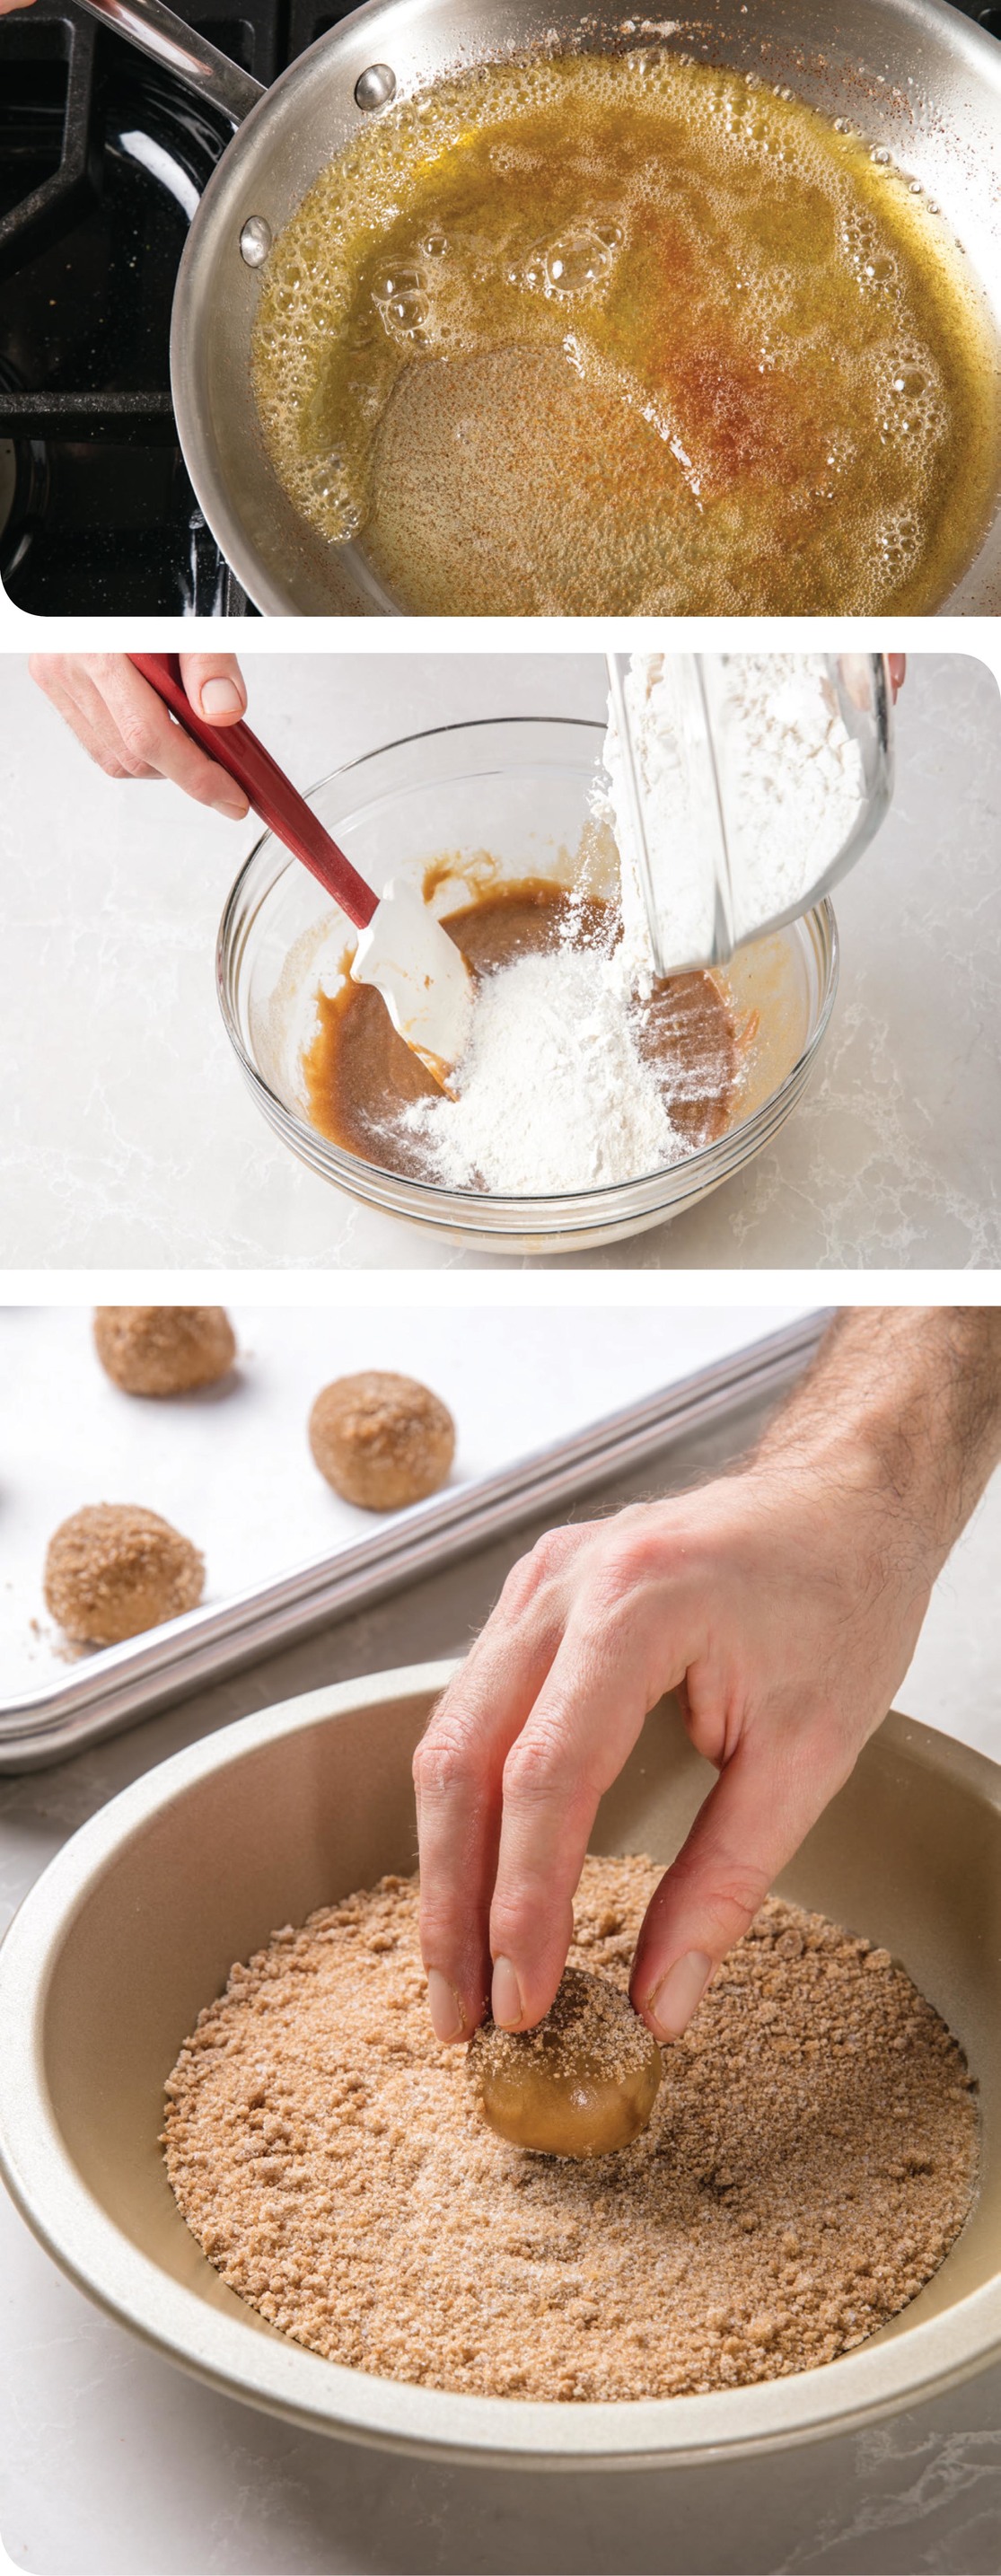
1. Melt 10 tablespoons butter in 10-inch skillet over medium-high heat. Continue to cook, swirling skillet constantly, until butter is dark golden brown and has nutty aroma, 1 to 3 minutes. Transfer browned butter to large bowl and stir in remaining 4 tablespoons butter until melted; let cool for 15 minutes.
2. Meanwhile, adjust oven rack to middle position and heat oven to 350 degrees. Line 2 rimmed baking sheets with parchment paper. Whisk flour, baking soda, and baking powder together in bowl.
3. Whisk 1¾ cups brown sugar and salt into cooled browned butter until smooth and no lumps remain, about 30 seconds. Whisk in egg and yolk and vanilla until incorporated, another 30 seconds. Using rubber spatula, stir in flour mixture until just combined, about 1 minute.
4. Combine remaining ¼ cup brown sugar and granulated sugar in shallow dish. Working with 2 tablespoons dough at a time, roll into balls, then roll in sugar to coat; space dough balls 2 inches apart on prepared sheets. (Dough balls can be frozen for up to 1 month; bake frozen dough balls on 1 baking sheet set inside second sheet in 325-degree oven for 20 to 25 minutes.)
5. Bake cookies, 1 sheet at a time, until edges have begun to set but centers are still soft, puffy, and cracked (cookies will look raw between cracks and seem underdone), 12 to 14 minutes, rotating sheet halfway through baking. Let cookies cool on sheet for 5 minutes, then transfer to wire rack. Let cookies cool completely before serving.
think like a cook
6 STEPS TO PERFECTLY BAKED COOKIES
Cookies may be more forgiving than some other baked goods, but small changes can still have big effects on the results, from too-tightly arranged cookies that fuse in the oven to cookies that brown unevenly. For an end-to-end sheet of well-baked cookies, follow these pointers.
1. Use the Right Pan
We use sturdy rimmed baking sheets. Rimless “cookie sheets” will work, but cookies may finish several minutes early because hot air flows more quickly over the dough. Flimsy sheets of either type will result in overbaked cookies. For our recommendation, see this page. Don’t forget to line your sheet with parchment, which minimizes sticking.
2. Use the Right Oven Rack
The middle of the oven is always a safe bet; the closer to the bottom of the oven, the browner the bottoms of your cookies will be relative to the tops. We nearly always bake individual sheets on the middle rack. When baking two sheets, we use the upper-middle and lower-middle racks.
3. Allow Adequate Space Between Cookies
Proper spacing ensures cookies don’t spread into each other during baking.
4. Rotate Your Pans
Even the best ovens have hot and cold spots, so rotating the sheet halfway through baking is essential (so the cookies that were in front are now in the back). If baking two trays of cookies at once, swap the positions when you rotate to avoid the cookies on the upper rack browning faster around the edges.
5. Check for Doneness at the Time Range’s Low End
You can always bake a cookie longer, but there’s no going back once it’s overbaked.
6. Cool Pans Between Batches
A hot pan will start the dough cooking too early, so run the pans under cold water, dry them off, and line with fresh parchment before reusing.
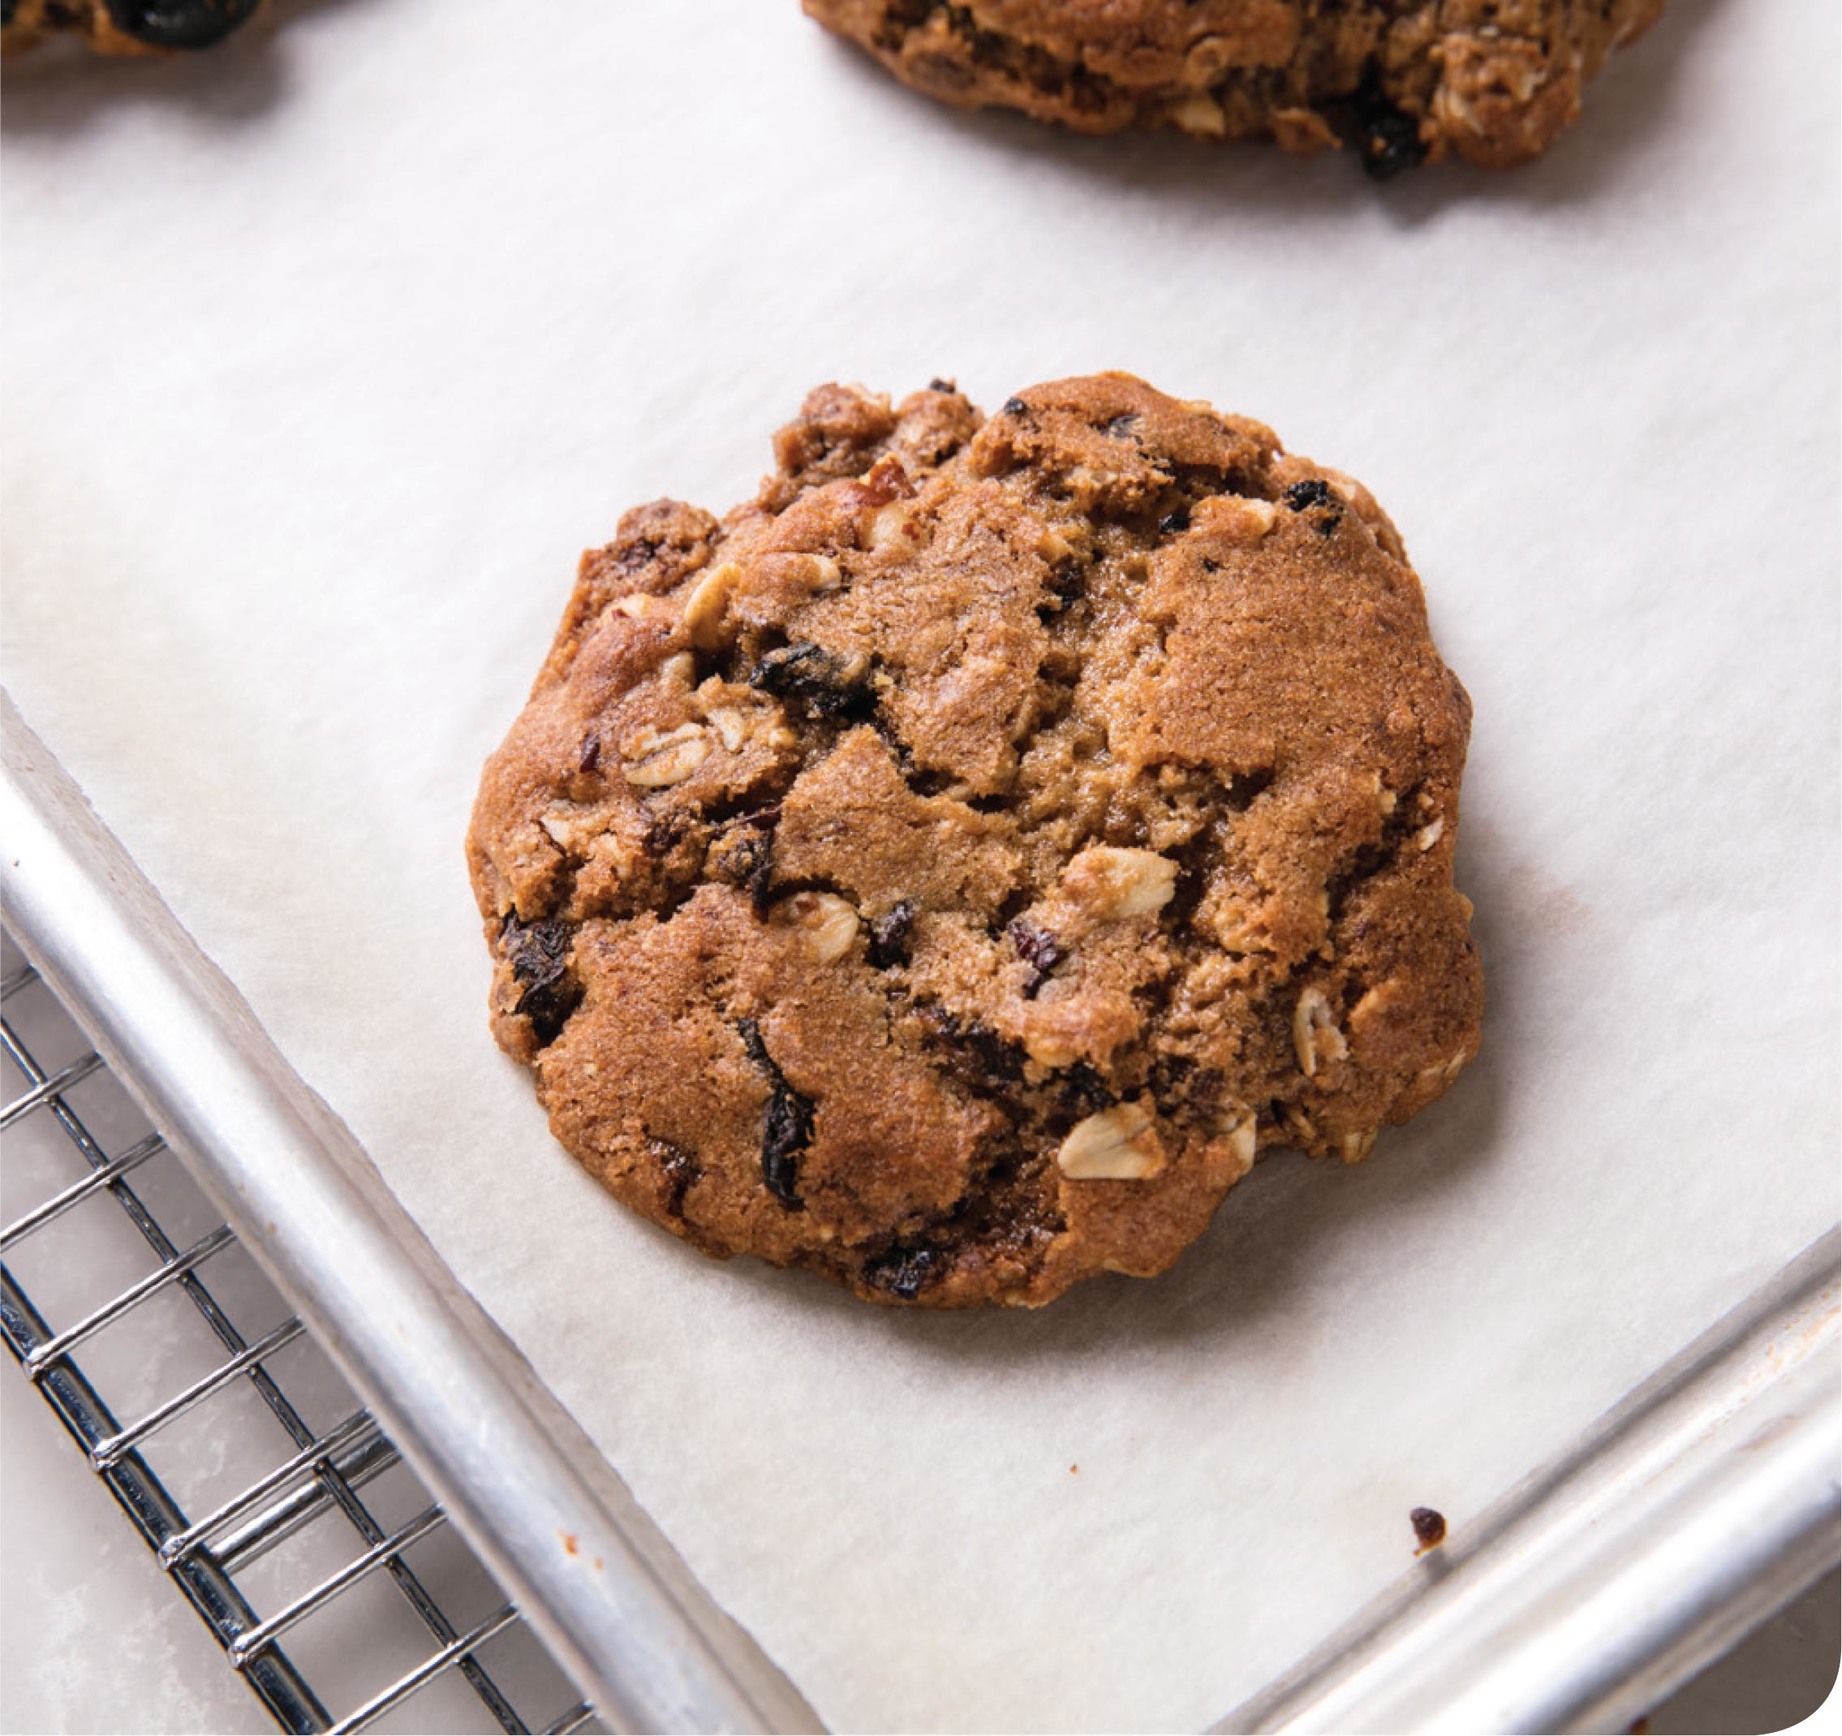
Chocolate Chunk Oatmeal Cookies with Pecans and Cherries
Makes 16 cookies; Total Time 1 hour (plus cooling time)
why this recipe works
Bake these cookies and you don’t have to choose between oatmeal and chocolate chip. We incorporated appealing chunks of bittersweet chocolate into an oatmeal dough, balancing them with toasted pecans and tart dried cherries. If you associate oatmeal cookies with being dry and cakey, these will change your mind: They are superlatively chewy. Using all dark brown sugar brought deep molasses flavor and a chewy texture. Making big cookies and baking them until slightly underdone further ensured chewiness. You can substitute walnuts or skinned hazelnuts for the pecans and dried cranberries for the cherries. Regular old-fashioned oats work best in this recipe.
1¼ cups (6¼ ounces) all-purpose flour
¾ teaspoon baking powder
½ teaspoon baking soda
½ teaspoon salt
1¼ cups (3¾ ounces) old-fashioned rolled oats
1 cup pecans, toasted (see this page) and chopped
1 cup dried sour cherries, chopped coarse
4 ounces bittersweet chocolate, chopped into chunks about size of chocolate chips
12 tablespoons unsalted butter, softened
1½ cups packed (10½ ounces) dark brown sugar
1 large egg
1 teaspoon vanilla extract
1. Adjust oven racks to upper-middle and lower-middle positions and heat oven to 350 degrees. Line 2 rimmed baking sheets with parchment paper. Whisk flour, baking powder, baking soda, and salt together in bowl. Stir oats, pecans, cherries, and chocolate together in second bowl.
2. Using electric mixer on medium speed, beat butter and sugar in large bowl until no sugar lumps remain, about 1 minute, scraping down bowl as needed. Reduce speed to medium-low, add egg and vanilla, and beat until fully incorporated, about 30 seconds, scraping down bowl as needed. Reduce speed to low, add flour mixture, and mix until just combined, about 30 seconds. Gradually add oat mixture until just incorporated. Give dough final stir by hand to ensure that no flour pockets remain and ingredients are evenly distributed.
3. Working with ¼ cup dough at a time, roll into balls and space them 2½ inches apart on prepared sheets. Using bottom of greased dry measuring cup, press each ball to 1-inch thickness.
4. Bake cookies until medium brown and edges have begun to set but centers are still soft (cookies will look raw between cracks and seem underdone), 20 to 22 minutes, switching and rotating sheets halfway through baking. Let cookies cool on sheets for 5 minutes, then transfer to wire rack. Let cookies cool completely before serving.

think like a cook
CHEWY VS. CAKEY: A DEBATE FOR THE AGES
Cookie texture is polarizing. Some prefer cookies that are chewy, with crisp edges and a yielding center. The milk dunkers like things crispy. Others enjoy a cookie that is cake-like, with a more open, tender crumb. We think there is a place for all kinds in the cookie jar, but it helps to know the science behind the textures.
A big determining factor is aeration from beating softened butter with sugar; this builds structure for a cookie with a more cakey texture. For chewier cookies, we’ll add vegetable oil or use melted butter (see Brown Sugar Cookies), which doesn’t aerate as well and interacts more freely with flour to develop gluten, increasing chew. Brown sugar also creates chewiness. The molasses in it is hygroscopic: It holds onto moisture during and even after baking. Of course, leaveners play a role. Baking powder provides lift that can make cookies more cakey. Baking soda, by contrast, weakens a cookie’s structure since it acts before the dough can set, helping it to spread out and even collapse a bit—ideal for a chewy cookie. Other chewy influencers include egg yolks, while using additional eggs or liquid creates structure and steam that increases cakiness. You can imagine the amount of testing required to explore all the variables for a perfectly textured cookie!
Makes 36 brownies; Total Time 1 hour (plus cooling time)
why this recipe works
We all know the feeling; it’s getting late and you remember that you’re supposed to bring a treat to work or school the next day. In these desperate moments, boxed brownie mix looks pretty good. But while convenient, mixes leave much to be desired in terms of flavor and texture. For decadent, fudgy brownies that take only a little more effort than a mix, we used three forms of chocolate: unsweetened chocolate for intensity, cocoa powder for complexity, and bittersweet or semisweet chocolate for moisture and well-rounded flavor. Melting the butter was key to getting fudgy texture, as was limiting the flour to just a cup. Granulated sugar gave the brownies a delicate, shiny, crackly crust. You can use 5 ounces of bittersweet or semisweet chocolate chips in place of the bar chocolate. If you use a glass baking dish, let the brownies cool for 10 minutes and then remove them from the dish. (The superior heat retention of glass can lead to overbaking.)
5 ounces bittersweet or semisweet chocolate, chopped
2 ounces unsweetened chocolate, chopped
8 tablespoons unsalted butter, cut into 4 pieces
3 tablespoons unsweetened cocoa powder 1¼ cups (8¾ ounces) sugar
3 large eggs
2 teaspoons vanilla extract
½ teaspoon salt
1 cup (5 ounces) all-purpose flour
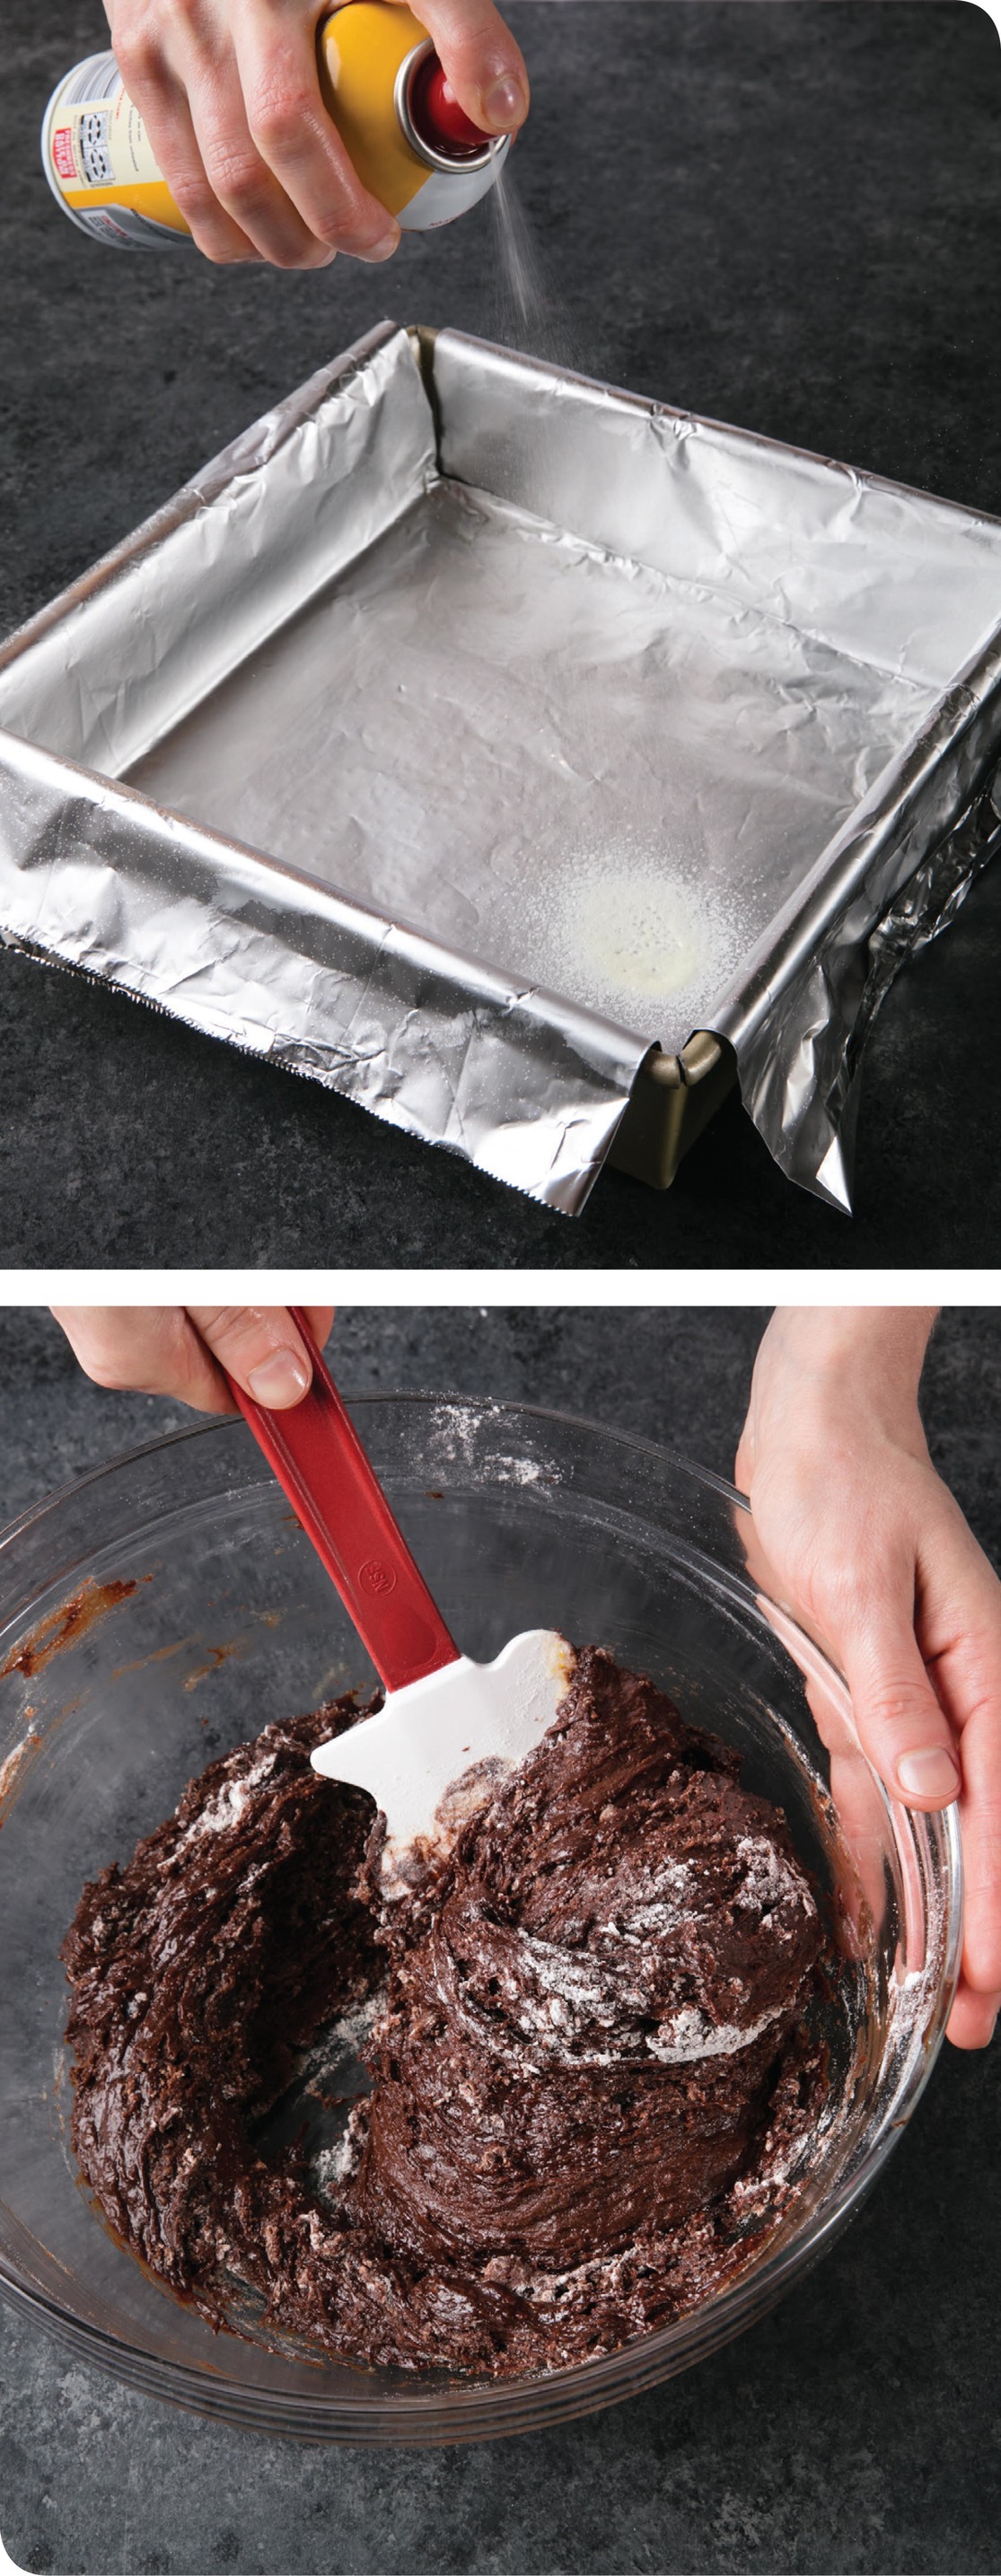
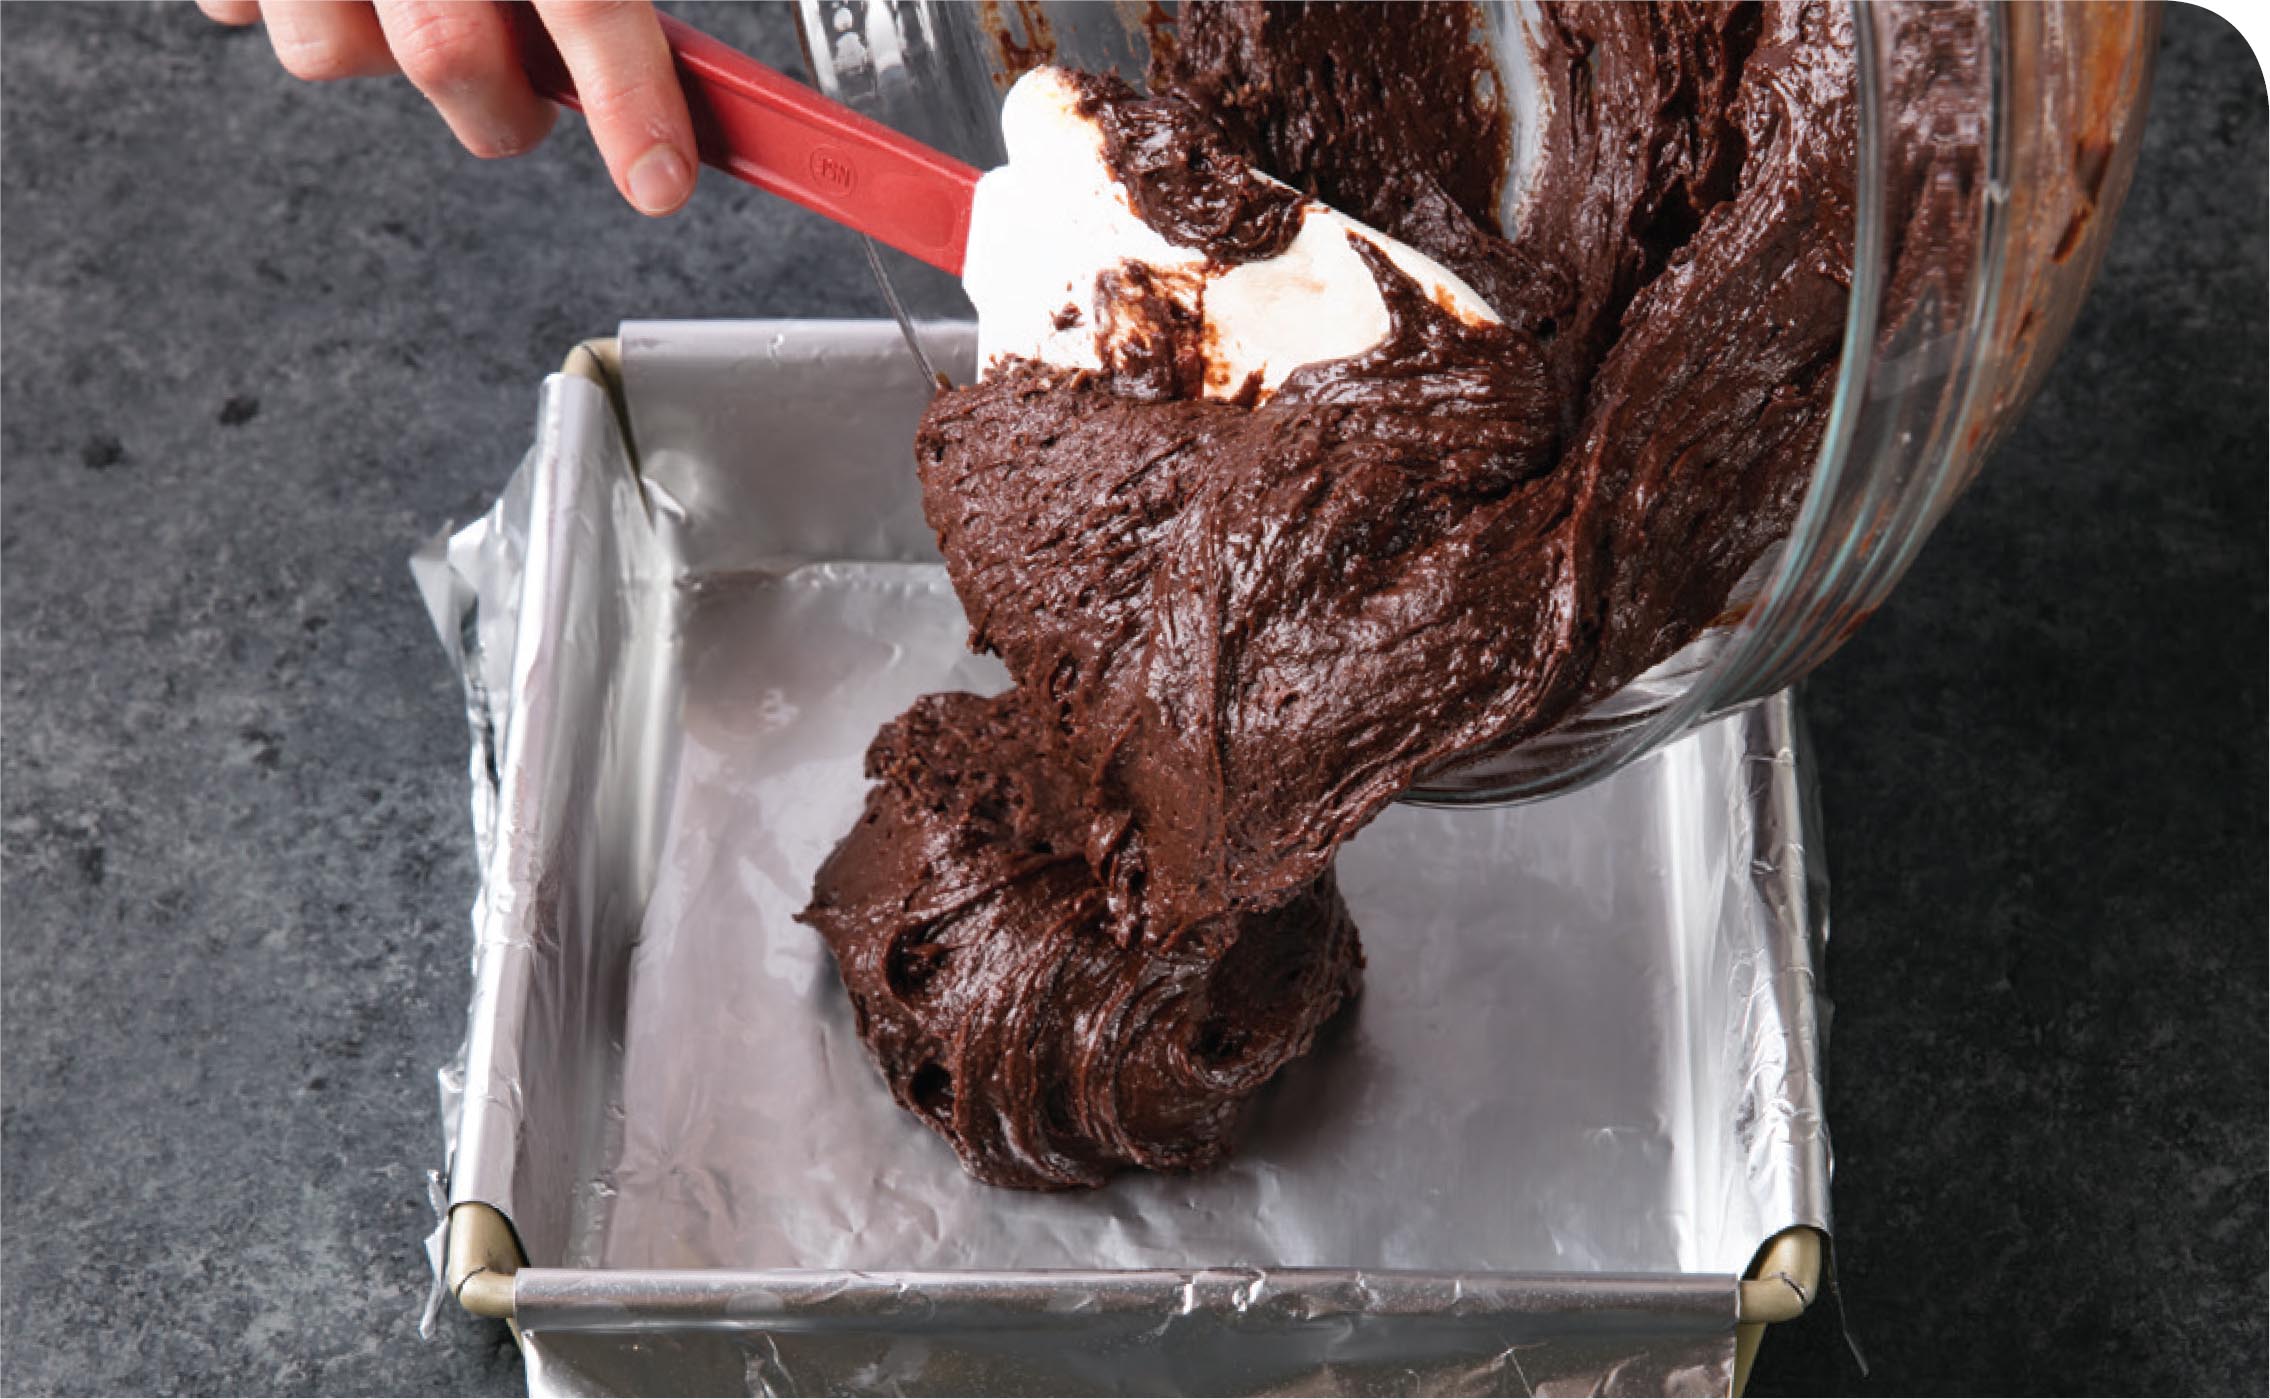
1. Adjust oven rack to middle position and heat oven to 350 degrees. Make foil sling for 8-inch square baking pan by folding 2 long sheets of aluminum foil so each is 8 inches wide. Lay sheets of foil in pan perpendicular to each other, with extra foil hanging over edges. Push foil into corners and up sides of pan, smoothing foil flush to pan. Grease foil.
2. Microwave bittersweet and unsweetened chocolates in bowl at 50 percent power for 2 minutes. Stir in butter and continue to microwave, stirring often, until melted. Whisk in cocoa and let mixture cool slightly.
3. Whisk sugar, eggs, vanilla, and salt in large bowl until combined. Whisk chocolate mixture into sugar mixture until smooth. Using rubber spatula, stir in flour until no dry streaks remain. Transfer batter to prepared pan and smooth top. Bake until toothpick inserted in center comes out with few moist crumbs attached, 35 to 40 minutes, rotating pan halfway through baking.
4. Let brownies cool completely in pan on wire rack, about 2 hours. Using foil overhang, remove brownies from pan. (Uncut brownies can be refrigerated for up to 3 days.) Cut into 36 squares before serving.
variation
Fudgy Triple-Chocolate Espresso Brownies
Whisk in 1½ tablespoons instant espresso powder or instant coffee powder along with cocoa in step 2.
think like a cook
THE DEEPEST CHOCOLATE FLAVOR
If you like baking with chocolate (and who doesn’t?), you’ll start to notice that different recipes call for different kinds of chocolate—unsweetened, bittersweet, cocoa, and so on. Some, like our Fudgy Brownies, use several. While that sounds wonderfully decadent, it raises the question of why go to the fuss. And which kind of chocolate brings the most intense flavor?
Based on taste, you might be tempted to think bittersweet. In fact, the amount of flavor a chocolate variety can provide depends on the amount of cocoa solids it contains. That’s why nearly all brownie recipes calling for bar chocolate include unsweetened chocolate, which contains just cocoa butter and chocolate solids. Many brownie recipes also use bittersweet chocolate; it contains more fat and sugar, so while it contributes less chocolate flavor it can help deliver a moist texture.
But when we want to pack a brownie with the most chocolate punch, we turn to cocoa powder: Ounce for ounce, cocoa powder has more cocoa solids—and thus more chocolate flavor—than any other type of chocolate. In order to equal the amount of chocolate solids in 1 ounce of cocoa powder, we had to use 1.63 ounces of unsweetened bar chocolate or 3.8 ounces of bittersweet chocolate.
The takeaway: While we never use just cocoa powder in our brownies (with all the starch and none of the fat of cocoa butter, it can make dry brownies), adding some can give brownies a big chocolate boost without weighing them down.
Molten Mocha Microwave Mug Cakes
Makes 2; Total Time 10 minutes
why this recipe works
The craving for fudgy cake and warm chocolate can strike at any moment. Why wait? This recipe produces two molten chocolate cakes (with a boost of espresso) in the microwave in 10 minutes. And it’s good, unlike many mug cake recipes, which can be rubbery, chalky, or even explode over the brim. To avoid overflow, we incorporated cocoa powder: It has less fat than chocolate, so produces less steam. For a tender crumb, we microwaved the cakes gently at 50 percent power. Dropping pieces of bittersweet chocolate into each cake gave them a molten center. We developed this recipe in a full-size, 1200-watt microwave. If you’re using a compact microwave with 800 watts or fewer, increase the cooking time to 90 seconds for each interval. Set to 50 percent power at each stage of cooking. Use mugs that hold at least 12 ounces.
4 tablespoons unsalted butter
1 ounce bittersweet chocolate, chopped, plus 1 ounce broken into 4 equal pieces
¼ cup (1¾ ounces) sugar
2 large eggs
2 tablespoons unsweetened cocoa powder 1 tablespoon instant espresso powder 1 teaspoon vanilla extract
¼ teaspoon salt
¼ cup (1¼ ounces) all-purpose flour
½ teaspoon baking powder
1. Microwave butter and chopped chocolate in large bowl at 50 percent power, stirring often, until melted, about 1 minute. Whisk sugar, eggs, cocoa, espresso powder, vanilla, and salt into chocolate mixture until smooth. In separate bowl, combine flour and baking powder. Whisk flour mixture into chocolate mixture until combined. Divide batter evenly between 2 (12-ounce) coffee mugs.
2. Place mugs on opposite sides of microwave turntable. Microwave at 50 percent power for 45 seconds. Stir batter and microwave at 50 percent power for 45 seconds (batter will rise to just below rim of mug).
3. Press 2 chocolate pieces into center of each cake until chocolate is flush with top of cake. Microwave at 50 percent power for 30 seconds to 1 minute (chocolate pieces should be melted and cake should be slightly wet around edges of mug and somewhat drier toward center). Let cakes sit for 2 minutes before serving.


think like a cook
BEST SUPPORTING INGREDIENT: ESPRESSO POWDER
There’s your average joe, and then there’s freshly brewed espresso. The same gulf separates regular instant coffee from instant espresso; its more concentrated flavor adds dimension and depth in convenient form. When you use enough of it, the fine-textured powder can give a big shot of flavor to baked goods, as it does here. But we also use smaller amounts in all kinds of chocolate recipes where we don’t want a coffee flavor to stand out. Why? Instant espresso powder can sharpen and amplify the flavor of the chocolate from behind the scenes, making it taste deeper, richer, fruitier, and more complex without delivering discernible coffee notes. Some flavor scientists believe that when foods complement each other well, it’s because they contain related flavor compounds. Coffee and chocolate are prime examples. They share some of the same flavor compounds (pyrazines) because they are both made from fermented beans.
Makes 12 bars; Total Time 45 minutes (plus cooling time)
why this recipe works
Have you ever met anyone who didn’t love a lemon bar? The sunny, sweet-tart treats can brighten any day, and the lemon flavor in these bars shines right through. The secret was not relying solely on lemon juice, since the more juice you use, the more flavor-dulling eggs and starch are needed to thicken and stabilize the wobbly top layer. So in addition to using a full ⅔ cup of lemon juice, we added 2 teaspoons of lemon zest (straining it out before cooking). But we wanted more tartness, too, without adding more juice, which would require increasing the thickeners. Here we turned to a pantry staple: cream of tartar. Typically used when whipping egg whites, the white powder tastes plenty sour, and 2 teaspoons of it brought our lemon bars’ flavor into sharp focus. Precooking the lemon filling on the stove ensured it wouldn’t curdle or brown in the oven. Do not substitute bottled lemon juice for fresh here.
CRUST
1 cup (5 ounces) all-purpose flour
¼ cup (1¾ ounces) granulated sugar
½ teaspoon salt
8 tablespoons unsalted butter, melted
FILLING
1 cup (7 ounces) granulated sugar
2 tablespoons all-purpose flour
2 teaspoons cream of tartar
¼ teaspoon salt
3 large eggs plus 3 large yolks
2 teaspoons grated lemon zest plus
⅔ cup juice (4 lemons)
4 tablespoons unsalted butter, cut into 8 pieces Confectioners’ sugar (optional)
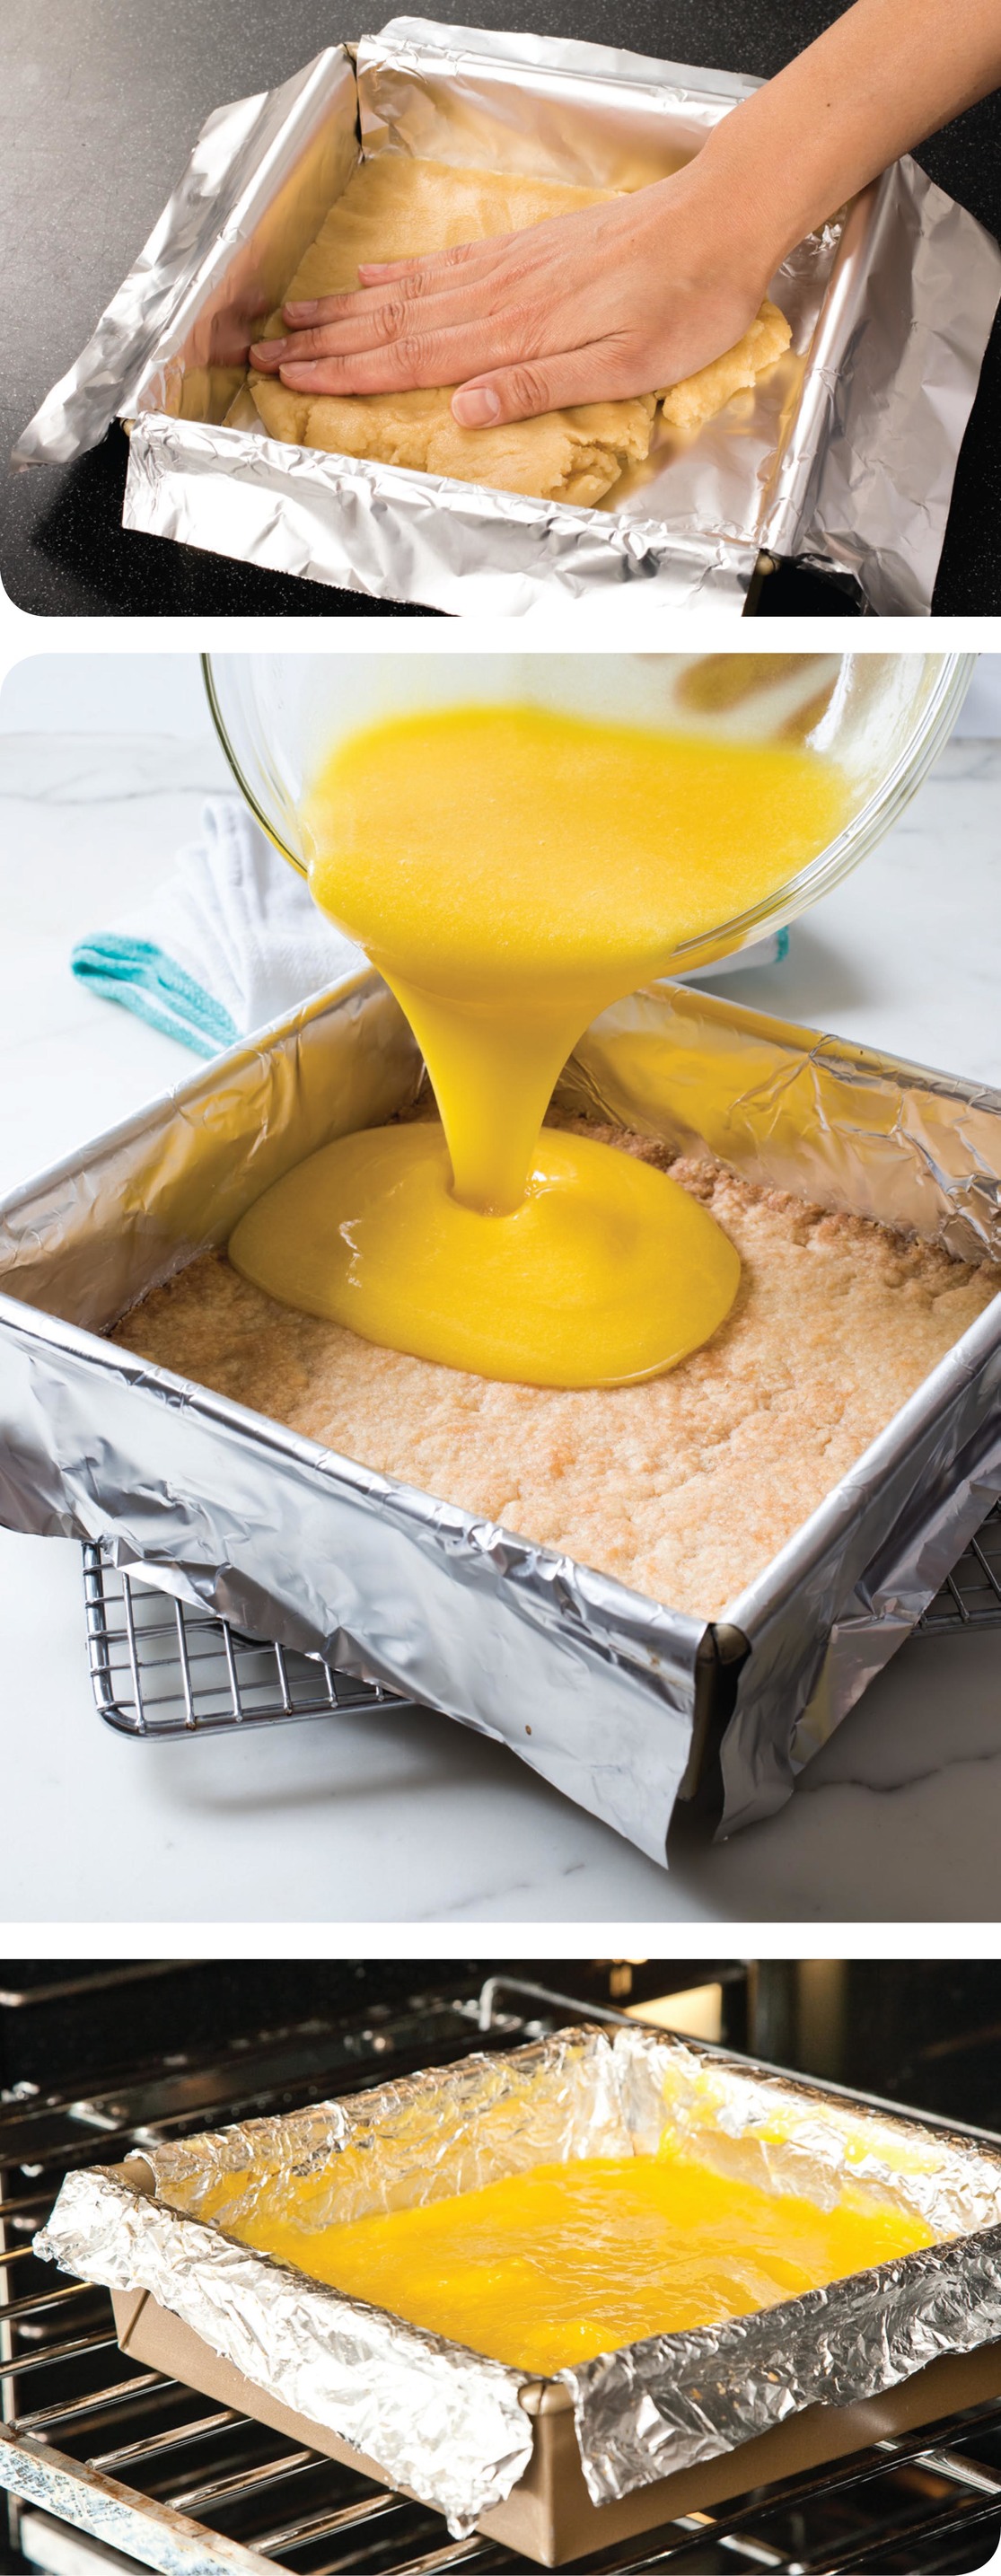
1. FOR THE CRUST Adjust oven rack to middle position and heat oven to 350 degrees. Make foil sling for 8-inch square baking pan by folding 2 long sheets of foil so each is 8 inches wide. Lay sheets of foil in pan perpendicular to each other, with extra foil hanging over edges of pan. Push foil into corners and up sides of pan, smoothing foil flush to pan.
2. Whisk flour, sugar, and salt together in bowl. Add melted butter and stir until combined. Transfer to prepared pan and press into even layer over entire bottom of pan (do not wash bowl). Bake crust until dark golden brown, 19 to 24 minutes, rotating pan halfway through baking.
3. FOR THE FILLING While crust bakes, whisk granulated sugar, flour, cream of tartar, and salt together in now-empty bowl. Whisk in eggs and yolks until no streaks of egg remain. Whisk in lemon zest and juice. Transfer to saucepan and cook over medium-low heat, stirring constantly, until mixture thickens and registers 160 degrees, 5 to 8 minutes. Off heat, stir in butter until melted. Strain through fine-mesh strainer set over bowl.
4. Pour filling over hot crust and tilt pan to spread evenly. Bake until filling is set and barely jiggles when pan is shaken, 8 to 12 minutes. (Filling around perimeter of pan may be slightly raised.) Let bars cool completely in pan on wire rack, at least 1½ hours. Using foil overhang, lift bars out of pan and transfer to cutting board. Cut into bars, wiping knife clean between cuts as necessary. Before serving, dust bars with confectioners’ sugar, if using.

think like a cook
LEMON FLAVOR THAT LINGERS
In considering how to make our lemon bars more lemony, we took a step back and considered how flavor in lemon juice (and all foods) works: When you take a bite of food, you encounter taste with your tongue and aroma through a channel in the back of your mouth that leads directly to your nose. In fact, our brains register the five tastes (sweet, sour, salty, bitter, and umami) on the tongue, but potentially register a trillion aromas through the pathway in the back of the mouth that leads to the nasal passages. The dominant taste chemical in lemon juice, citric acid, is nonvolatile and registers only on the tongue. But lemon juice also contains a small amount of volatile compounds that give it subtle fruity-floral flavors as well. With that in mind, we looked to lemon zest, which is full of the aromatic oils limonene, pinene, citral, neral, geranial, and linalool and would enhance the experience of lemon flavor in the nose. For a tangy boost from a nonliquid ingredient that would register on the tongue, we flirted with the idea of adding pure citric acid powder until we realized we had a sour-tasting powder in our pantry already: cream of tartar, aka tartaric acid.
Serves 6 to 8; Total Time 1 hour 25 minutes
why this recipe works
Warm spices, toasty oats, and not-too-sweet apples are a combination made in autumnal heaven. We love the unfussiness of this fall dessert (it also makes a respectable breakfast), but wanted a method that guaranteed tender apples: no rock-hard slices or mushy sauce. We first switched from a baking dish to a skillet. This way we could start the apples over direct heat for better caramelization and stir them for more even results. To improve the flavor, we added apple cider to the filling. We then sprinkled on our topping and finished the crisp in the oven. If your skillet is not ovensafe, prepare the recipe through step 3 and then transfer the filling to a 13 by 9-inch baking dish; top as directed and bake for 5 minutes longer than the times given in the recipe. You can substitute Honeycrisp or Braeburn apples for the Golden Delicious; do not use Granny Smith. While old-fashioned rolled oats are preferable, you may substitute quick oats; do not use instant oats. Serve with vanilla ice cream.
TOPPING
¾ cup (3¾ ounces) all-purpose flour
¾ cup pecans, chopped fine
¾ cup (2¼ ounces) old-fashioned rolled oats
½ cup packed (3½ ounces) light brown sugar
¼ cup (1¾ ounces) granulated sugar
½ teaspoon ground cinnamon
½ teaspoon salt
8 tablespoons unsalted butter, melted
FILLING
3 pounds Golden Delicious apples, peeled, cored, halved, and cut into ½-inch wedges
¼ cup (1¾ ounces) granulated sugar
¼ teaspoon ground cinnamon
1 cup apple cider
2 teaspoons lemon juice
2 tablespoons unsalted butter
1. FOR THE TOPPING Adjust oven rack to middle position and heat oven to 450 degrees. Line rimmed baking sheet with aluminum foil. Combine flour, pecans, oats, brown sugar, granulated sugar, cinnamon, and salt in bowl. Stir in melted butter until mixture is thoroughly moistened and crumbly.
2. FOR THE FILLING Toss apples, sugar, and cinnamon together in large bowl. Bring cider to simmer in 12-inch ovensafe skillet over medium heat and cook until reduced to ½ cup, about 5 minutes. Transfer reduced cider to liquid measuring cup and stir in lemon juice.
3. Melt butter in now-empty skillet over medium heat. Add apple mixture and cook, stirring frequently, until apples begin to soften and become translucent, 12 to 14 minutes. (Do not fully cook apples.) Off heat, gently stir in cider mixture until apples are coated.
4. Sprinkle topping evenly over fruit, breaking up any large chunks. Place skillet on prepared baking sheet and bake until fruit is tender and topping is deep golden brown, 15 to 20 minutes, rotating baking sheet halfway through baking. Transfer to wire rack and let cool for 15 minutes. Serve warm.
variations
Skillet Apple Crisp with Raspberries and Almonds
Substitute slivered almonds for pecans. Add ⅛ teaspoon almond extract to reduced cider with lemon juice. Stir 1 cup raspberries into apple mixture with reduced cider.
Skillet Apple Crisp with Vanilla, Cardamom, and Pistachios
Substitute ½ cup shelled pistachios and ¼ cup walnuts for pecans. Substitute ½ teaspoon ground cardamom for cinnamon in filling and add seeds from 1 vanilla bean to apple, sugar, and cardamom mixture.


think like a cook
HOW DO YOU LIKE THEM APPLES?
The fact that an apple tastes great eaten raw does not mean that it will taste good in a recipe. Choosing the right apple varieties for different cooked applications is key. Apart from flavor differences, you also have to think about texture: Some apples turn mushy in the oven while others hold their shape. In general, more tart apples—Cortland, Empire, Granny Smith—hold their shape. Meanwhile, Golden Delicious, Braeburn, and Jonagold varieties are all sweeter and will break down when cooked or baked. (There are exceptions: McIntosh apples are tart, but they also fall apart and become very watery when you bake them.) We often use a mix of sweet and tart apples in a recipe for balanced flavor and texture. In our Skillet Apple Crisp, where the apples are precooked before a very short baking time, we prefer Golden Delicious for their mellow, honeyed flavor. Our precooking technique allows that to shine through without the apples becoming too mushy during baking.
Serves 8 to 10; Total Time 1 hour 20 minutes (plus cooling time)
why this recipes works
In much of America, cobblers have a biscuit topping. But in Texas Hill Country, it’s a wholly different dessert: Melt lots of butter in a baking dish, add a simple batter and some sugar, then scatter on fruit. The fruit sinks during baking and forms juicy pockets underneath a craggy top. But versions we tried were thin and a little bland. We scaled it up and shifted most of the butter into our batter to enrich it while avoiding a greasy base. Swapping out Texas peaches for blueberries transported the cobbler to New England in summer. A potato masher broke them up, producing a more cohesive filling. Finally, a hit of lemon sugar, both sprinkled on top and mixed with the berries, brightened the cobbler and gave it a crisp top. Keep a close eye on the butter as it melts in the oven so that it doesn’t scorch. Place the hot baking dish with butter on a wire rack after removing it from the oven. Avoid untreated aluminum pans here. Serve with vanilla ice cream.
4 tablespoons unsalted butter, cut into 4 pieces, plus 8 tablespoons melted and cooled
1½ cups (10½ ounces) sugar
1½ teaspoons grated lemon zest
15 ounces (3 cups) blueberries (thawed if frozen)
1½ cups (7½ ounces) all-purpose flour
2½ teaspoons baking powder
¾ teaspoon salt
1½ cups milk
1. Adjust oven rack to upper-middle position and heat oven to 350 degrees. Place 4 tablespoons cut-up butter in 13 by 9-inch baking dish and transfer to oven. Heat until butter is melted, 8 to 10 minutes.
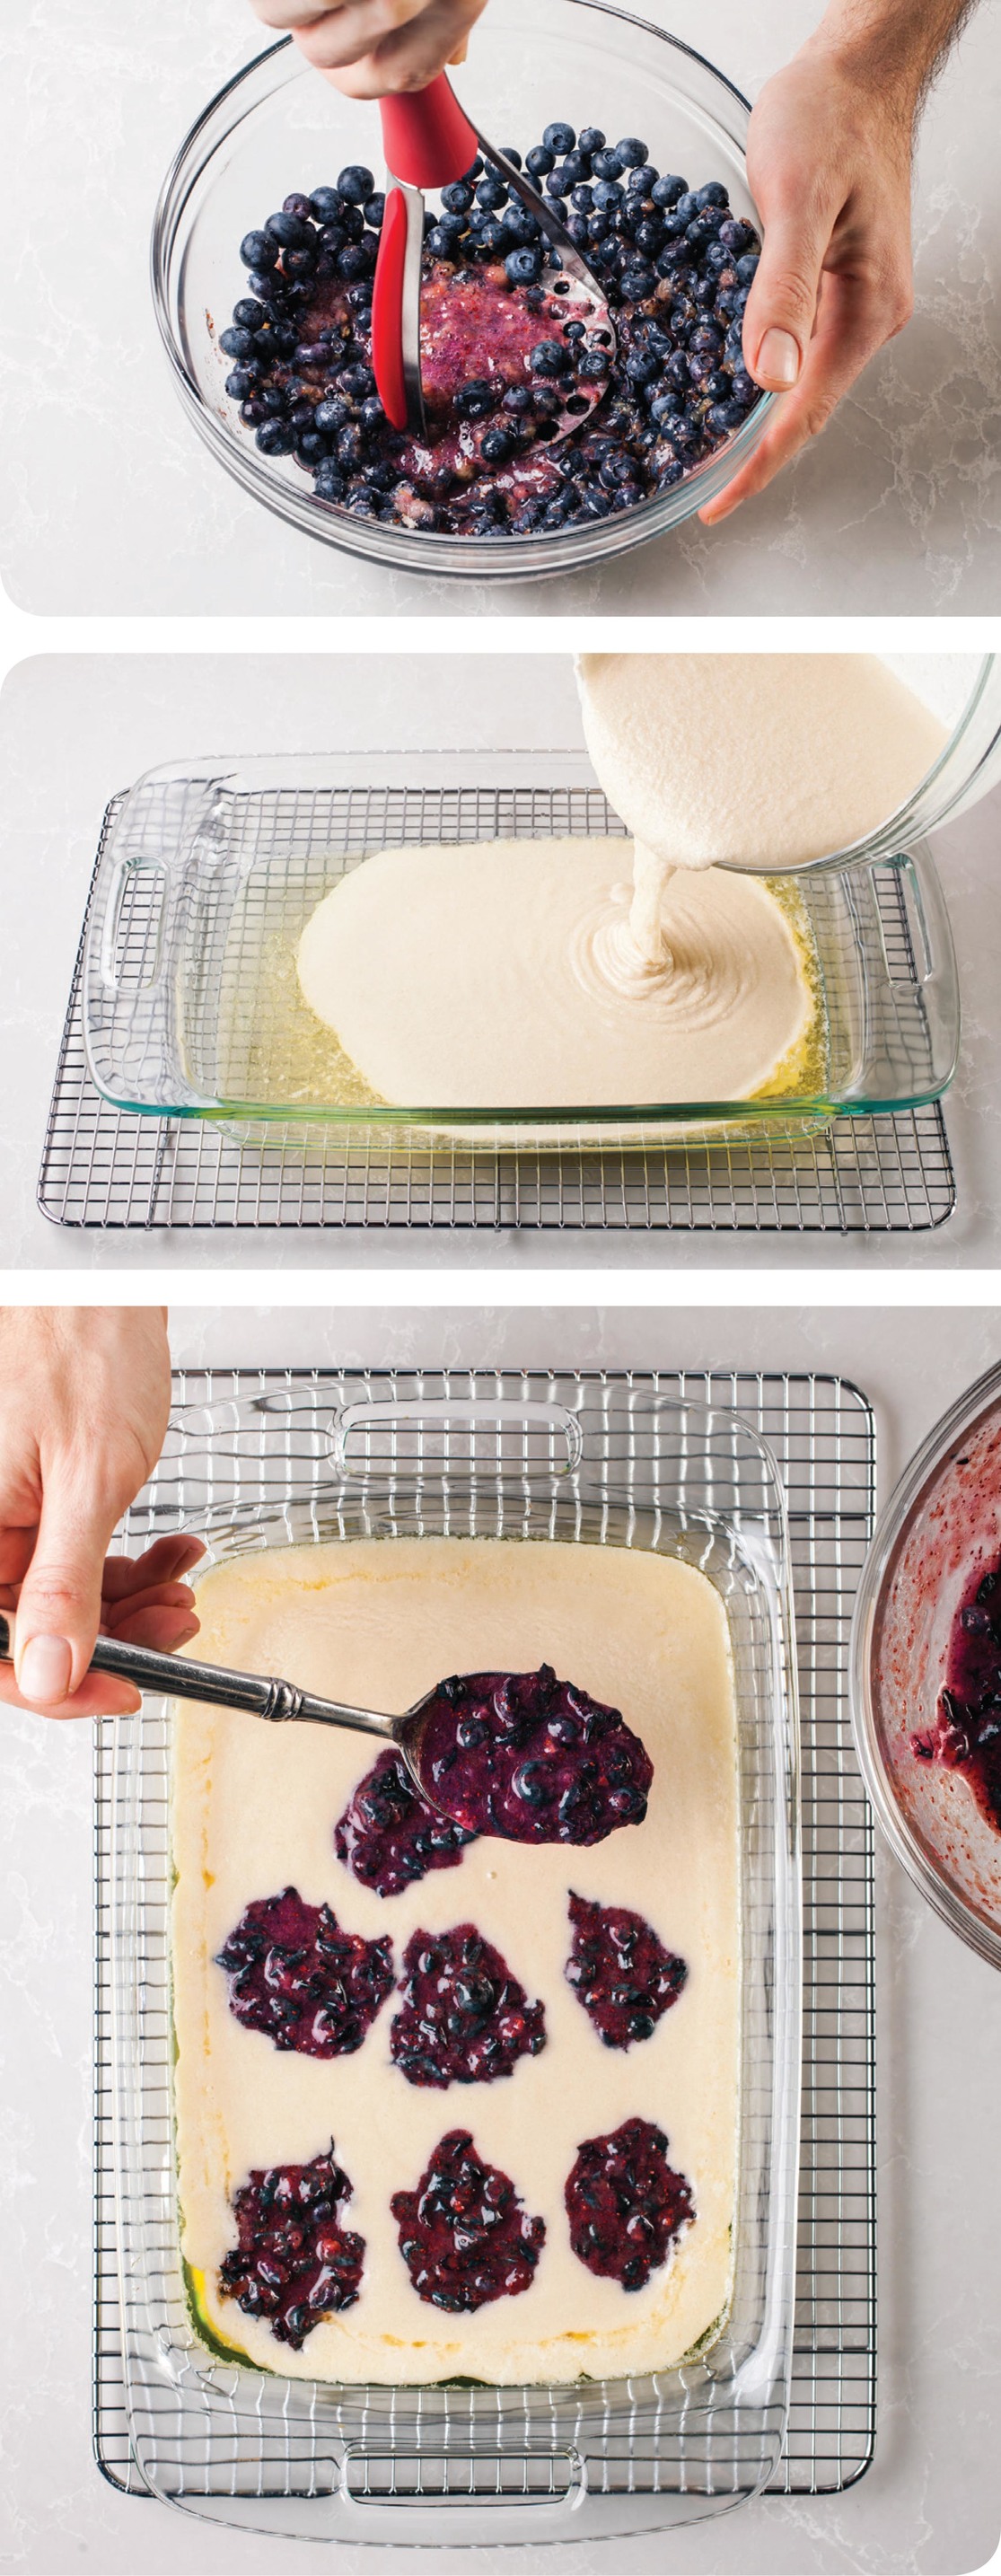
2. Meanwhile, pulse ¼ cup sugar and lemon zest in food processor until combined, about 5 pulses; set aside. Using potato masher, mash blueberries and 1 tablespoon lemon sugar together in bowl until berries are coarsely mashed.
3. Combine flour, remaining 1¼ cups sugar, baking powder, and salt in large bowl. Whisk in milk and 8 tablespoons melted butter until smooth. Remove baking dish from oven, transfer to wire rack, and pour batter into prepared dish.
4. Dollop mashed blueberry mixture evenly over batter and sprinkle with remaining lemon sugar. Bake cobbler until golden brown and edges are crisp, 45 to 50 minutes, rotating dish halfway through baking. Let cobbler cool on wire rack for 30 minutes. Serve warm.

think like a cook
COBBLER, BUCKLE, OR SLUMP?
Rustic fruit dessert terminology is a sticky matter: One region’s cobbler is another’s buckle. Here is a short list of our favorites and the names we use for them.
Betty (Also Known As Brown Betty)
Sweetened fruit, usually apples, rhubarb, or bananas, layered with bread crumbs and butter and baked.
Buckle
Cake batter poured over fruit, often berries, and baked. Some resemble a streusel-topped coffee cake.
Cobbler
The most controversial moniker; it’s often fruit topped with biscuit dough and baked to resemble cobblestones, but can also be a rectangular pie or like a buckle. And then there’s Texas-style cobbler.
Crisp and Crumble
Fruit, often apples or peaches, baked under a crunchy, streusel-like topping, which often contains oats.
Grunt and Slump
Fruit cooked underneath dollops of dumpling dough on the stovetop. Dumplings “grunt” under heat.
Pandowdy
Fruit baked under pie dough or sliced stale bread; topping is pressed into fruit while it cooks.
Sonker
Syrupy cooked fruit baked under a pancake-like batter.
Serves 6; Total Time 2 hours 30 minutes (plus cooling time)
why this recipe works
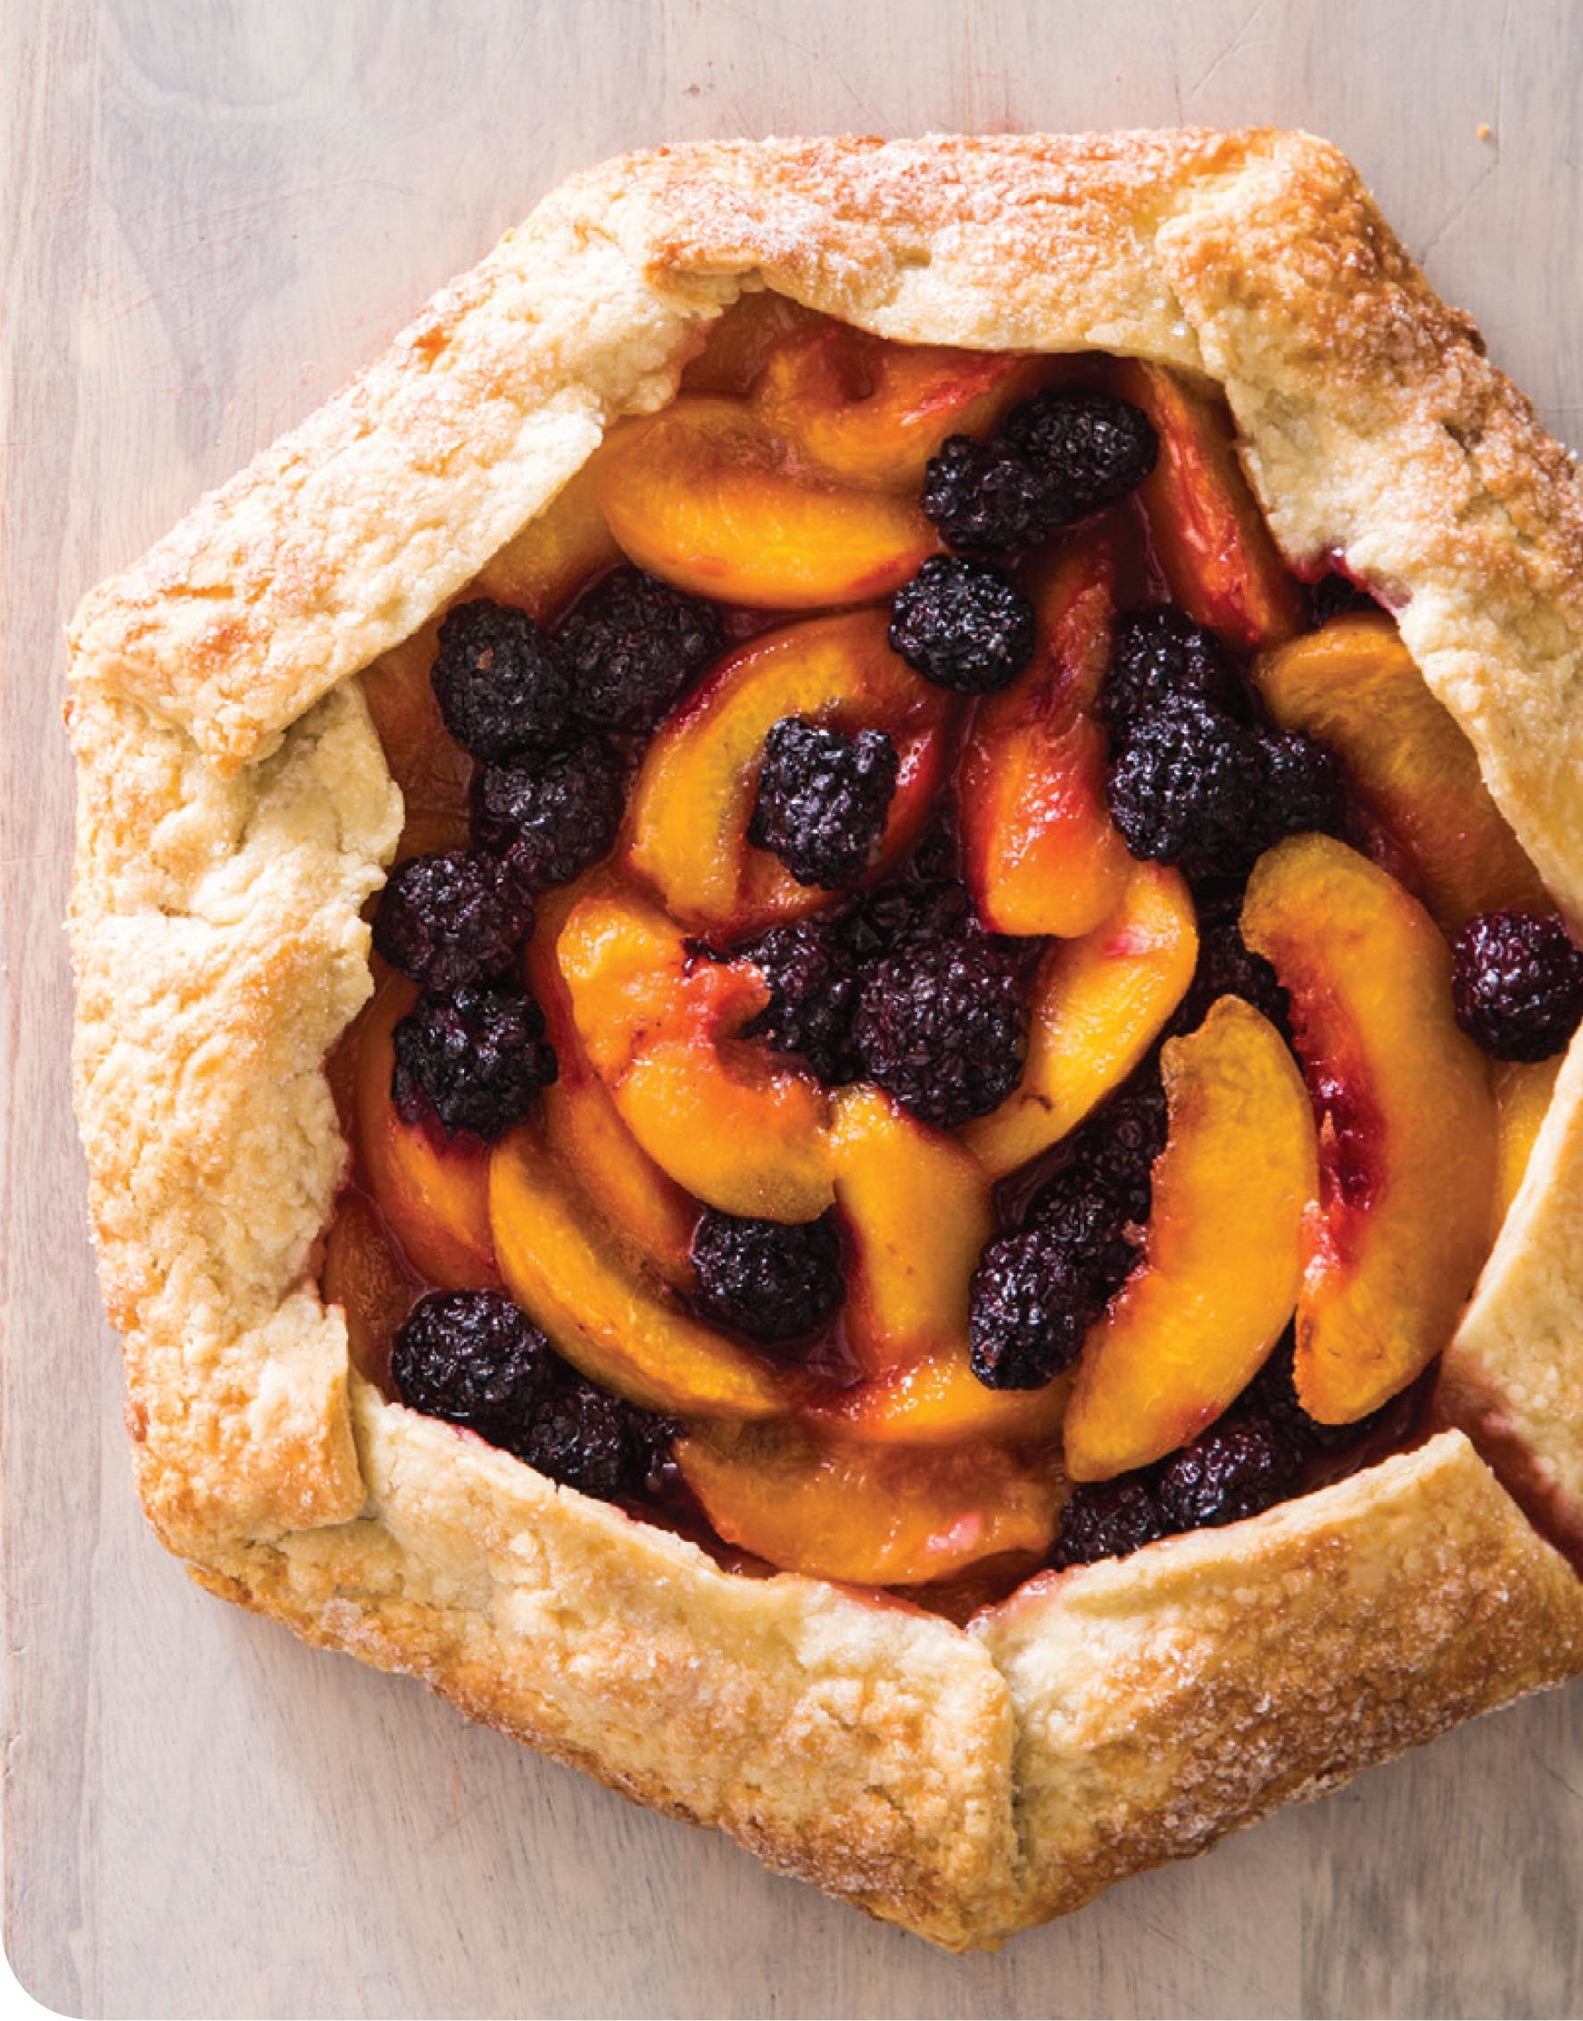
A free-form tart offers the irresistible elements of fruit pie—crisp, flaky crust and a just-sweet-enough filling—with far less effort. To make a free-form tart, a single crust is folded around a fruit filling, leaving the center exposed. Don’t aim for perfection: The tart’s rustic nature is part of its appeal. A mix of peaches and blackberries offers a nice contrast in flavors and textures and requires little preparation. Taste your fruit before adding any sugar; use less sugar if the fruit is very sweet, more if it is tart. Do not add the sugar to the fruit until you are ready to fill and form the tart. Serve with vanilla ice cream or with All-Purpose Whipped Cream.
1½ cups (7½ ounces) all-purpose flour
½ teaspoon salt
10 tablespoons unsalted butter, cut into ½-inch pieces and chilled
6–7 tablespoons ice water, plus 1 tablespoon water
1 pound peaches, halved, pitted, and cut into ½-inch-thick wedges
5 ounces (1 cup) blackberries
6 tablespoons sugar
1. Process flour and salt in food processor until combined, about 3 seconds. Scatter butter over top and pulse until mixture resembles coarse crumbs, about 10 pulses. Transfer to bowl. Sprinkle 6 tablespoons ice water over mixture. Using rubber spatula, stir and press dough until it sticks together, adding up to 1 tablespoon more ice water if it will not come together.
2. Turn dough onto lightly floured counter, form into 4-inch disk, wrap tightly in plastic wrap, and refrigerate for 1 hour. (Wrapped dough can be refrigerated for up to 2 days or frozen for up to 1 month.)
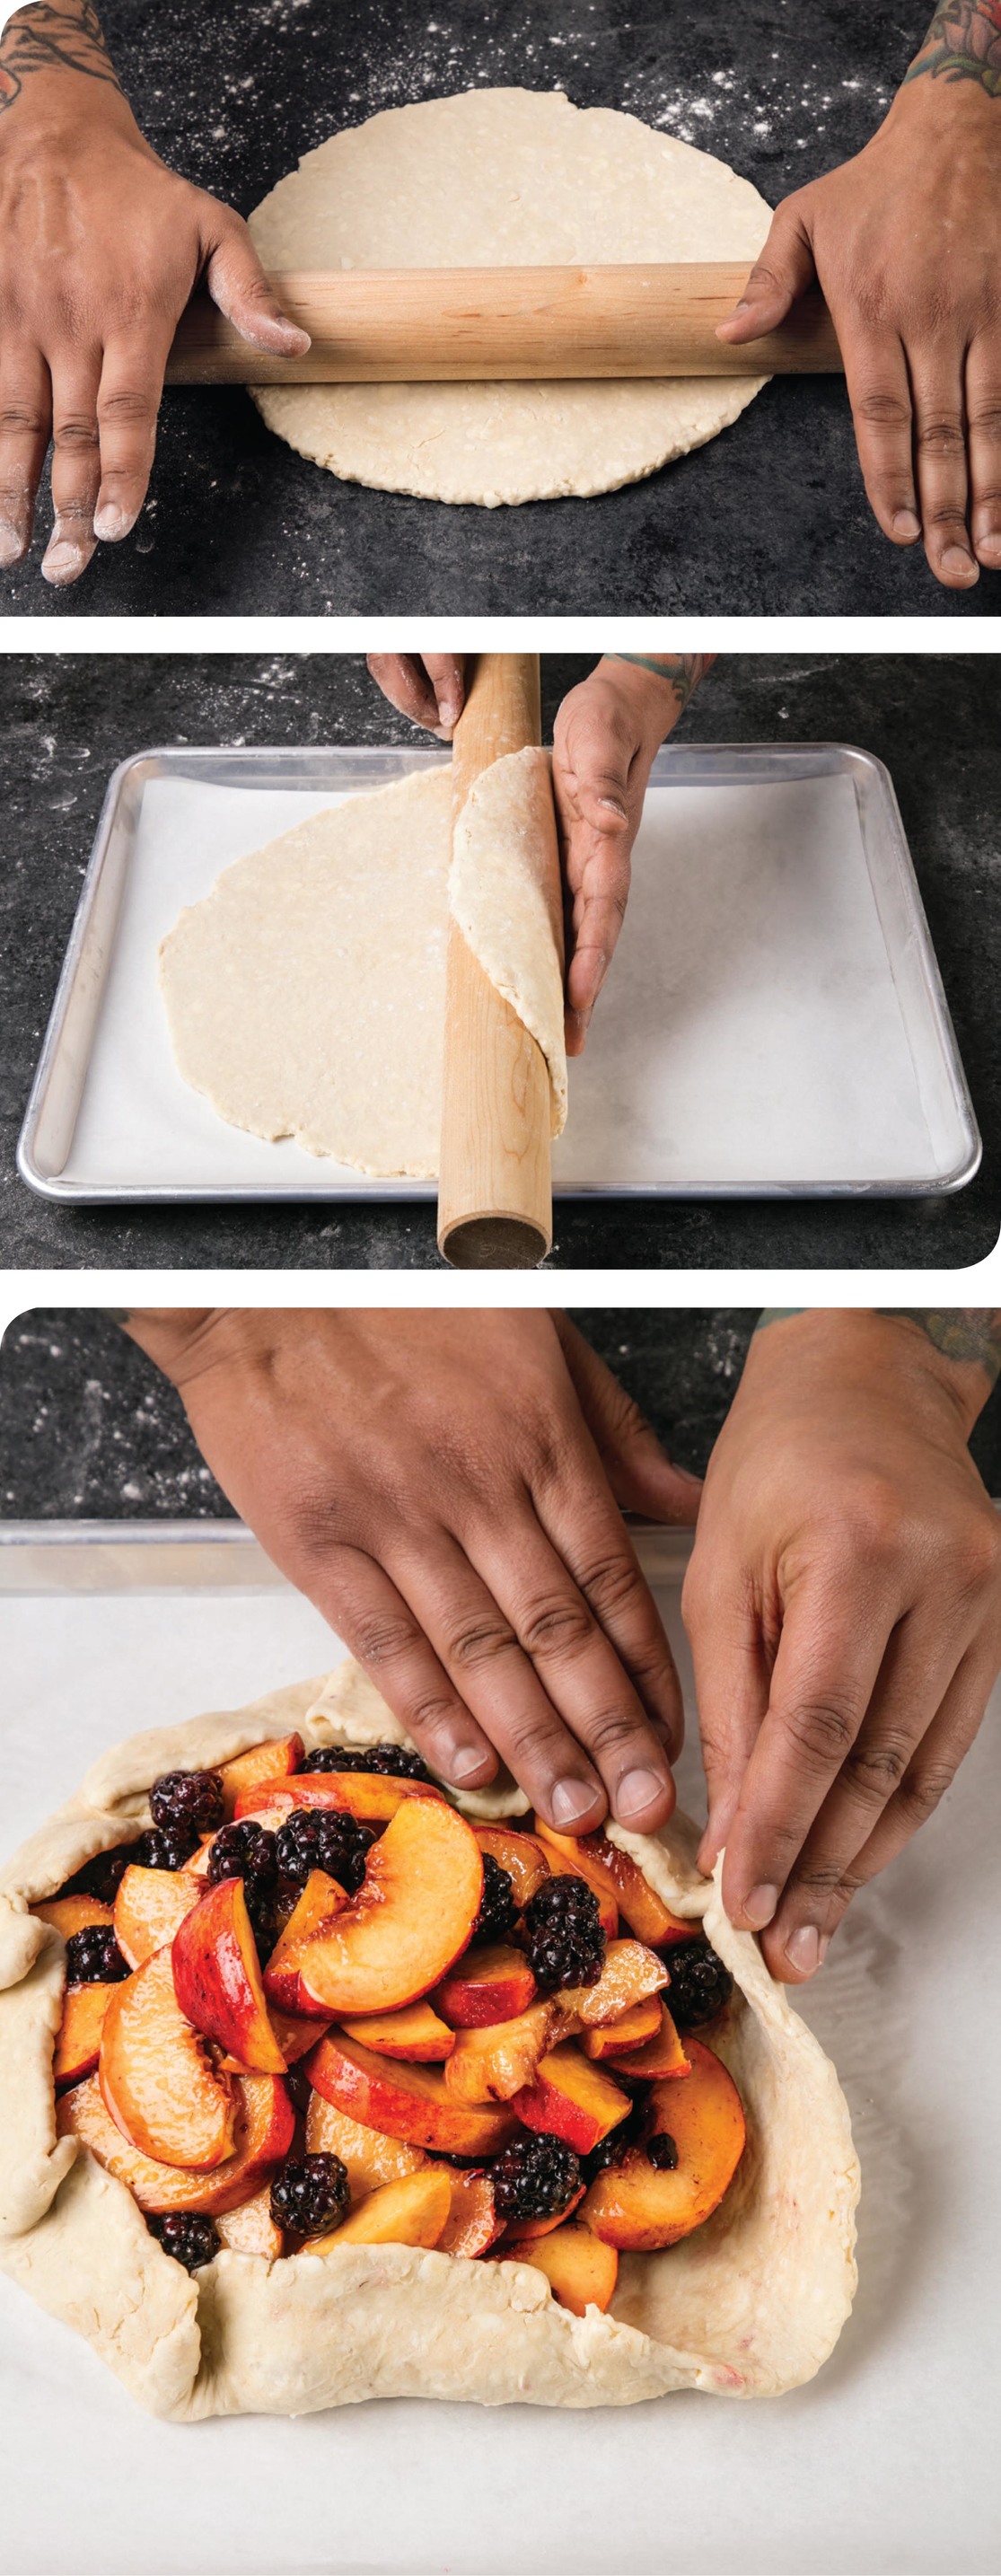
3. Adjust oven rack to lower-middle position and heat oven to 375 degrees. Line rimmed baking sheet with parchment paper. Let chilled dough sit on counter to soften slightly, about 10 minutes, before rolling. Roll dough into 12-inch circle on lightly floured counter, then transfer to prepared sheet.
4. Gently toss peaches, blackberries, and 5 tablespoons sugar together in bowl. Mound fruit in center of dough, leaving 2-inch border around edge. Carefully grasp 1 edge of dough and fold up 2 inches over fruit. Repeat around circumference of tart, overlapping dough every 2 inches; gently pinch pleated dough to secure, but do not press dough into fruit.
5. Brush dough with remaining 1 tablespoon water and sprinkle remaining 1 tablespoon sugar evenly over dough and fruit. Bake until crust is deep golden brown and fruit is bubbling, 45 to 50 minutes, rotating sheet halfway through baking. Transfer sheet to wire rack and let tart cool for 10 minutes. Using metal spatula, loosen tart from parchment and slide onto wire rack; let cool until warm, about 30 minutes. Cut into wedges and serve.

think like a cook
ON A ROLL
Watching an experienced baker roll out pie and tart doughs can appear magical, but don’t be frustrated if your attempts turn out more amorphous. This recipe is especially forgiving, and you can always use a knife to trim the result. Make sure the dough is in the shape of a flat disk before you roll it. Then follow these pointers.
Bring Your Dough to the Right Temperature
We often chill dough for about 1 hour and then let it sit for 10 minutes to ensure that the butter is just cold enough to work with. Overly cold dough will crack when rolled; warm dough can tear or stick to the counter. If dough softens too much when rolling, slide it onto a baking sheet and chill it for a bit.
Roll from the Center Outward and Rotate as You Go
This avoids overworking the same section of dough and helps maintain a nice, round shape. Use even, gentle pressure and give the dough a quarter turn after every few rolls.
Dust the Surface with Flour (Not Too Much)
A dusting of flour minimizes sticking without working too much flour into the dough. Sprinkle flour loosely from a foot above the surface for even coating. Toss additional flour underneath the dough as needed to keep it from sticking to the counter.
Roll Fragile Dough Between Floured Parchment
All-butter doughs are especially fragile. Using parchment is easier and helps keep the dough from breaking. Sturdier doughs can be rolled on the counter.
Serves 12; Total Time 1 hour 10 minutes (plus cooling time)
why this recipe works
Cake doesn’t have to be an elaborately frosted affair, or reserved for special occasions. This simple, lightly sweet Mediterranean cake is one of our favorite everyday cakes, perfect with tea, at breakfast, or anytime. Extra-virgin olive oil and yogurt contribute to a moist, delicate cake with a slightly coarse crumb and a subtly tangy, mildly fruity flavor profile. The simplicity of the cake allows the subtle aroma of the olive oil to shine through. We tested a range of yogurts and found that plain whole-milk yogurt yielded the best results; cakes made with Greek yogurt were too thick and dense, while cakes made with low-fat yogurts were dry and crumbly. An easy-to-make lemon glaze (with a touch of tangy yogurt) added an elegant finishing touch. For the best flavor, be sure to use high-quality extra-virgin olive oil.
CAKE
3 cups (15 ounces) all-purpose flour
1 tablespoon baking powder
1 teaspoon salt
1¼ cups (8¾ ounces) granulated sugar
4 large eggs
1¼ cups extra-virgin olive oil
1 cup plain whole-milk yogurt
LEMON GLAZE
2–3 tablespoons lemon juice
1 tablespoon plain whole-milk yogurt
2 cups (8 ounces) confectioners’ sugar
1. FOR THE CAKE Adjust oven rack to lower-middle position and heat oven to 350 degrees. Grease 12-cup nonstick Bundt pan using baking spray with flour. Whisk flour, baking powder, and salt together in bowl. In separate large bowl, whisk sugar and eggs together until sugar is mostly dissolved and mixture is pale and frothy, about 1 minute. Whisk in oil and yogurt until combined. Using rubber spatula, stir in flour mixture until combined and no dry flour remains.
2. Pour batter into prepared pan, smooth top, and gently tap pan on counter to settle batter. Bake until cake is golden brown and wooden skewer inserted into center comes out clean, 40 to 45 minutes, rotating pan halfway through baking.
3. FOR THE GLAZE Whisk 2 tablespoons lemon juice, yogurt, and confectioners’ sugar together in bowl until smooth, adding more lemon juice gradually as needed until glaze is thick but still pourable (mixture should leave faint trail across bottom of mixing bowl when drizzled from whisk).
4. Let cake cool in pan for 10 minutes, then gently turn cake out onto wire rack. Drizzle half of glaze over warm cake and let cool for 1 hour. Drizzle remaining glaze over cake and let cool completely, about 2 hours. Serve.

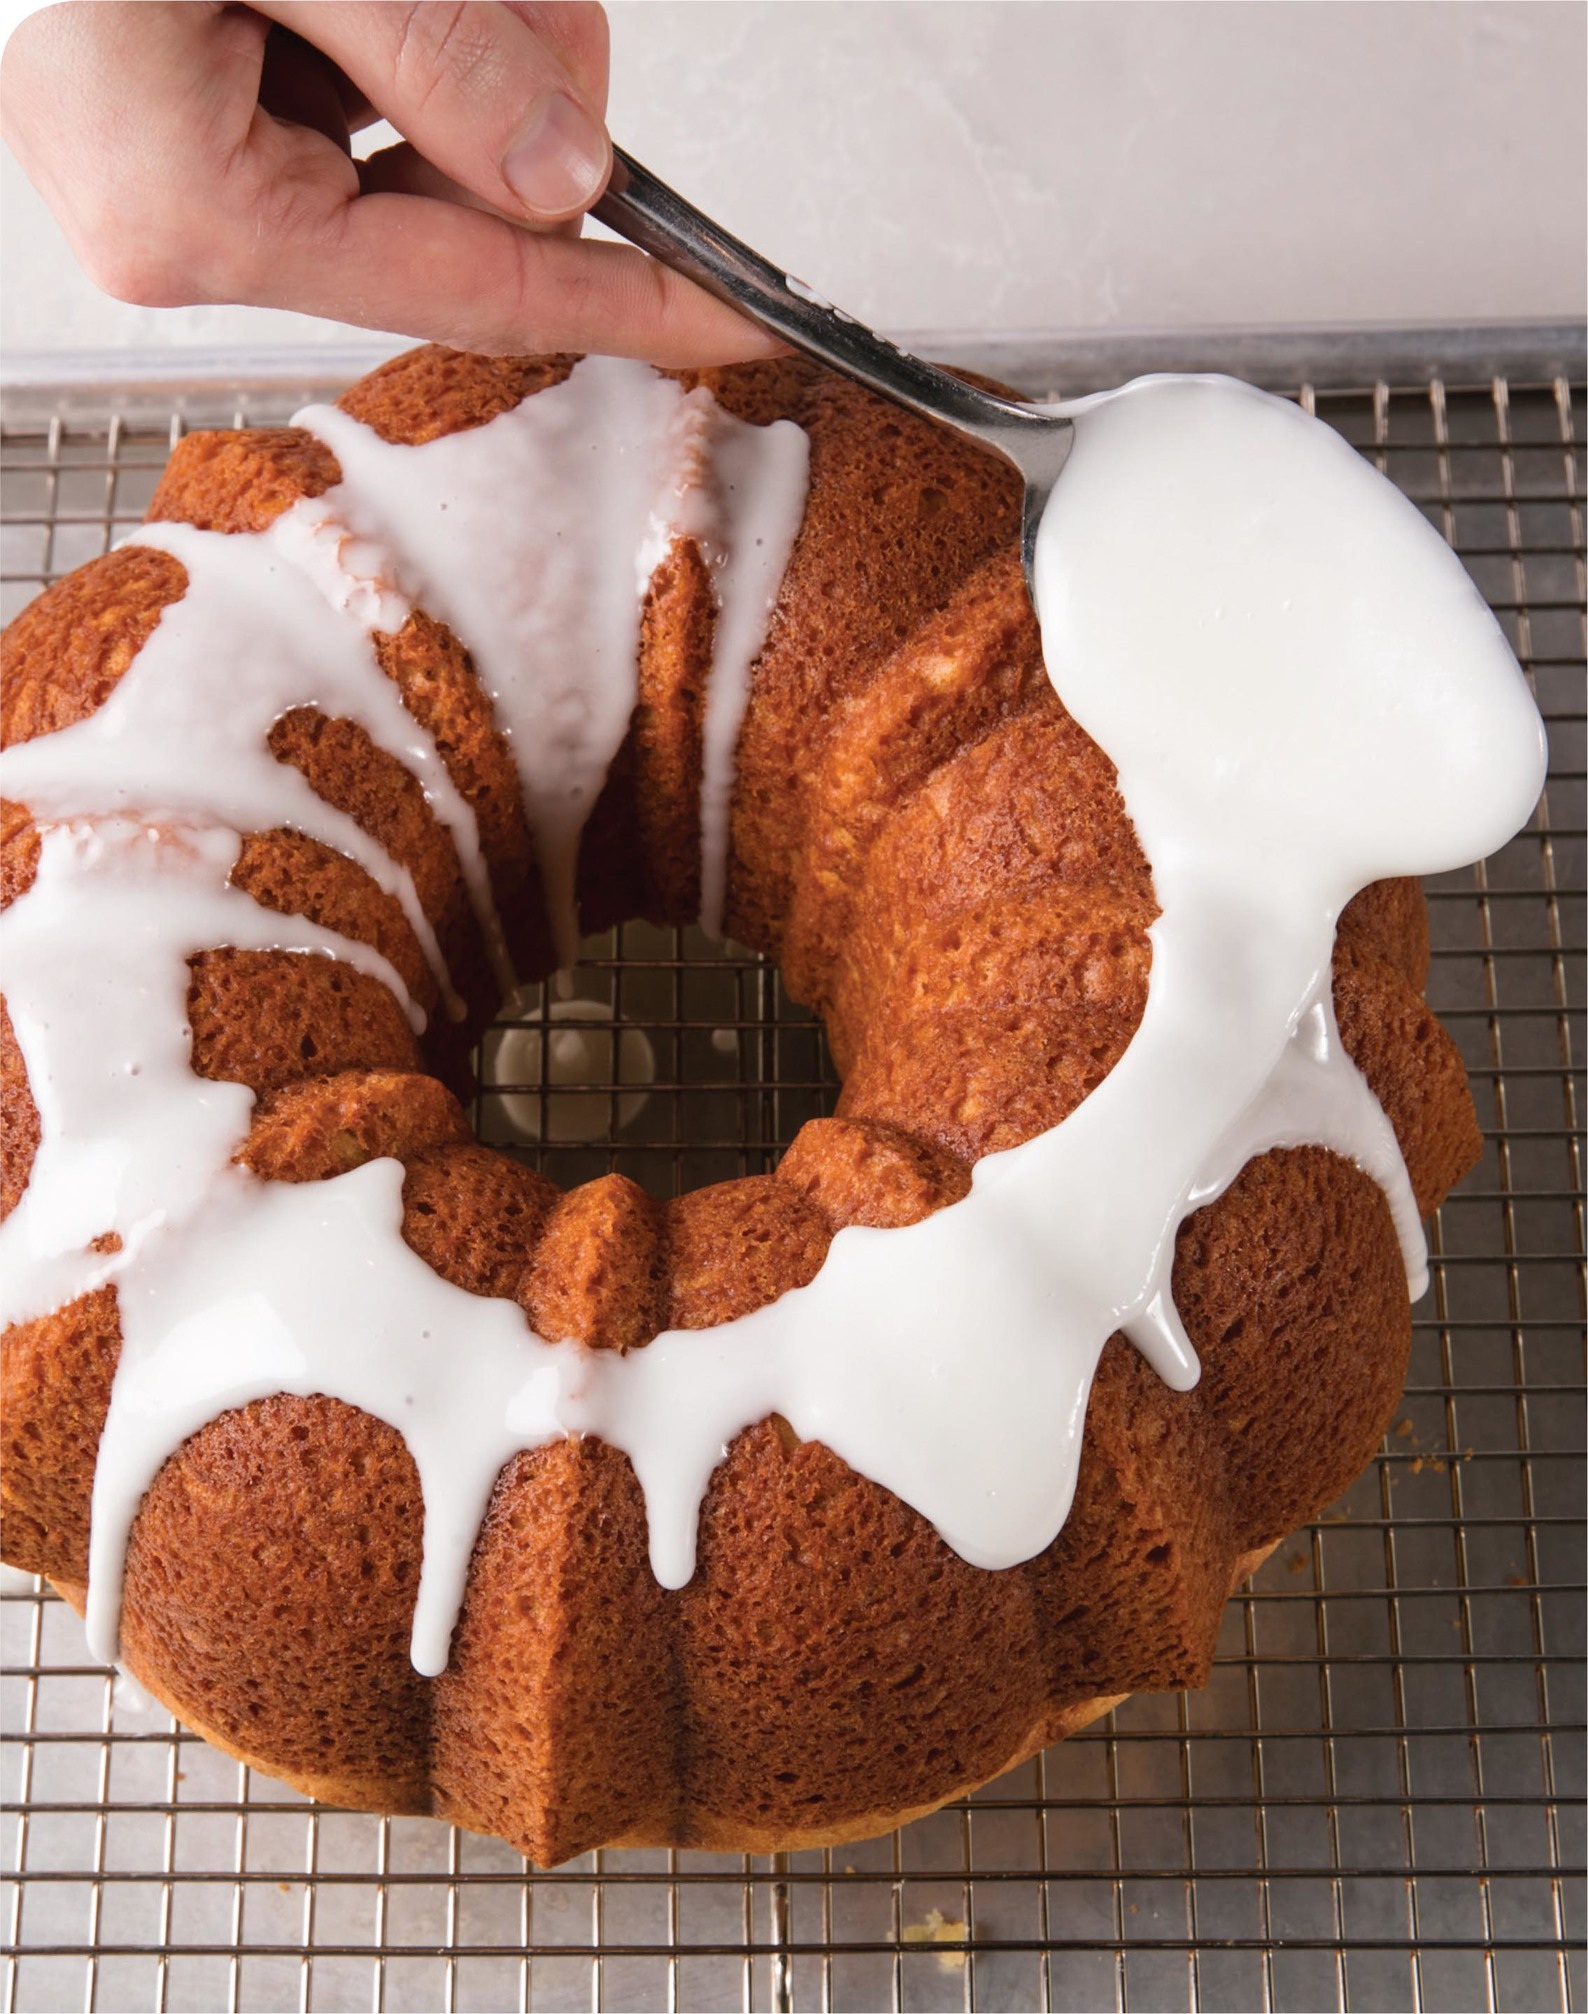
think like a cook
A Bundt pan produces an attractive cake—if you can get it out in one piece. Properly preparing a pan at the start ensures a clean release.
We often line pans with parchment paper to facilitate removal but that’s not possible with Bundt pans. Instead, a generous spray of baking spray with flour does the job for properly baked cakes (underbaked cakes will stick).
For layer cakes, cut out a parchment circle using the cake pan as a guide. Grease the bottom and sides of the pan with vegetable oil spray or butter. Fit the parchment into the pan, grease the parchment, and then sprinkle with flour. Shake and rotate the pan to coat it evenly and tap out the excess.
For loaf cakes or if you’re serving the cake right out of the pan, you can simply grease and flour the pan.
Serves 8 to 10; Total Time 2 hours (plus cooling time)
why this recipe works
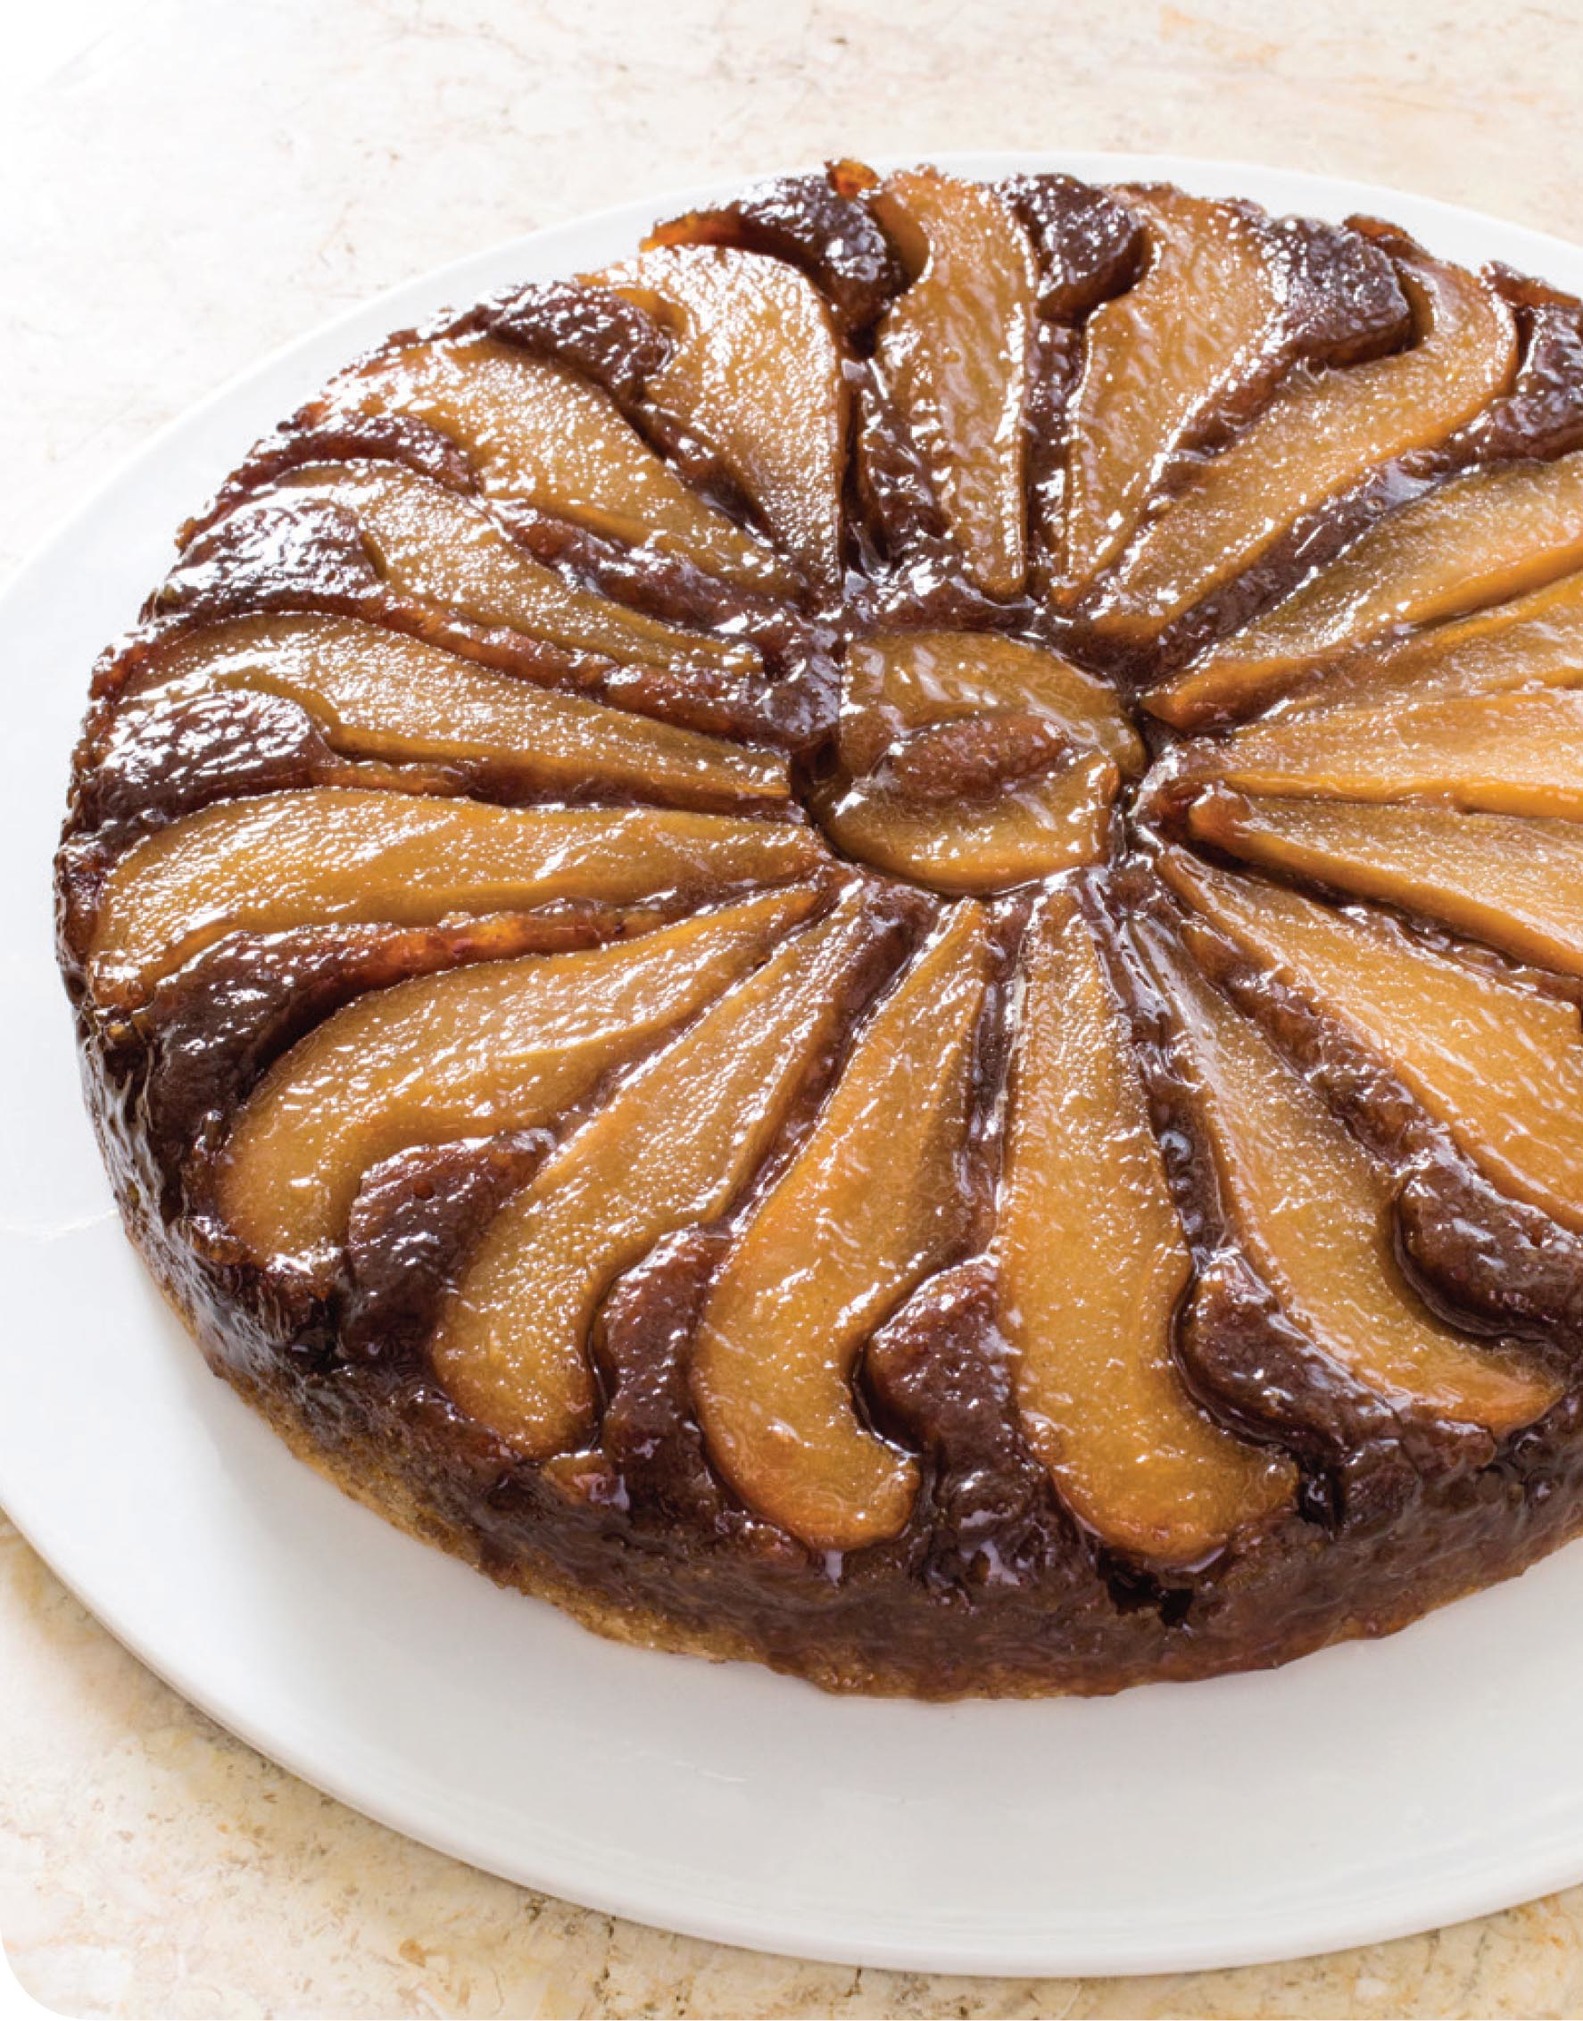
The star of an upside-down cake is the rich caramel that forms as the fruit cooks on the bottom of the pan, which becomes an irresistible topping when the cake is inverted. This version features fresh pears and a rich walnut cake—but it’s surprisingly easy to make. Slicing the pears into wedges meant we didn’t have to precook them. To simplify the batter, we used the food processor two ways: first grinding the walnuts with the dry ingredients, then whipping the eggs and sugar, which gave the cake structure without making it dense. Letting the baked cake sit for just 15 minutes before unmolding allowed the fruit top to set while preventing the bottom from turning soggy. We recommend baking this cake in a light-colored cake pan with sides that are at least 2 inches tall. If using a dark-colored pan, start checking for doneness at 1 hour; note that the cake may dome in the center and the topping may be too sticky. Serve with vanilla ice cream or All-Purpose Whipped Cream.
TOPPING
4 tablespoons unsalted butter, melted
½ cup packed (3½ ounces) dark brown sugar
2 teaspoons cornstarch
⅛ teaspoon salt
3 ripe but firm Bosc pears (8 ounces each)
CAKE
1 cup walnuts, toasted (see this page)
½ cup (2½ ounces) all-purpose flour
½ teaspoon salt
¼ teaspoon baking powder
⅛ teaspoon baking soda
3 large eggs
1 cup (7 ounces) granulated sugar
4 tablespoons unsalted butter, melted
¼ cup vegetable oil
1. FOR THE TOPPING Adjust oven rack to middle position and heat oven to 300 degrees. Grease 9-inch round cake pan and line bottom with parchment paper. Pour melted butter over bottom of pan and swirl to evenly coat. Combine sugar, cornstarch, and salt in small bowl and sprinkle evenly over melted butter.
2. Peel, halve, and core pears. Set aside 1 pear half and reserve for other use. Cut remaining 5 pear halves into 4 wedges each. Arrange pears in circular pattern around cake pan with tapered ends pointing inward. Arrange two smallest pear wedges in center.
3. FOR THE CAKE Place walnuts, flour, salt, baking powder, and baking soda in food processor and pulse until walnuts are finely ground, 8 to 10 pulses. Transfer walnut mixture to bowl.
4. Process eggs and sugar in now-empty processor until very pale yellow, about 2 minutes. With processor running, add melted butter and oil in steady stream until incorporated. Add walnut mixture and pulse to combine, 4 to 5 pulses. Pour batter evenly over pears (some pear may show through; cake will bake up over fruit).
5. Bake until center of cake is set and bounces back when gently pressed and toothpick inserted in center comes out clean, 1 hour 10 minutes to 1 hour 15 minutes, rotating pan after 40 minutes. Let cake cool in pan on wire rack for 15 minutes. Carefully run paring knife or offset spatula around sides of pan. Set wire rack on top of pan; flip cake onto rack and set rack in rimmed baking sheet. Discard parchment and let cake cool completely, about 2 hours. Transfer to serving plate and serve.
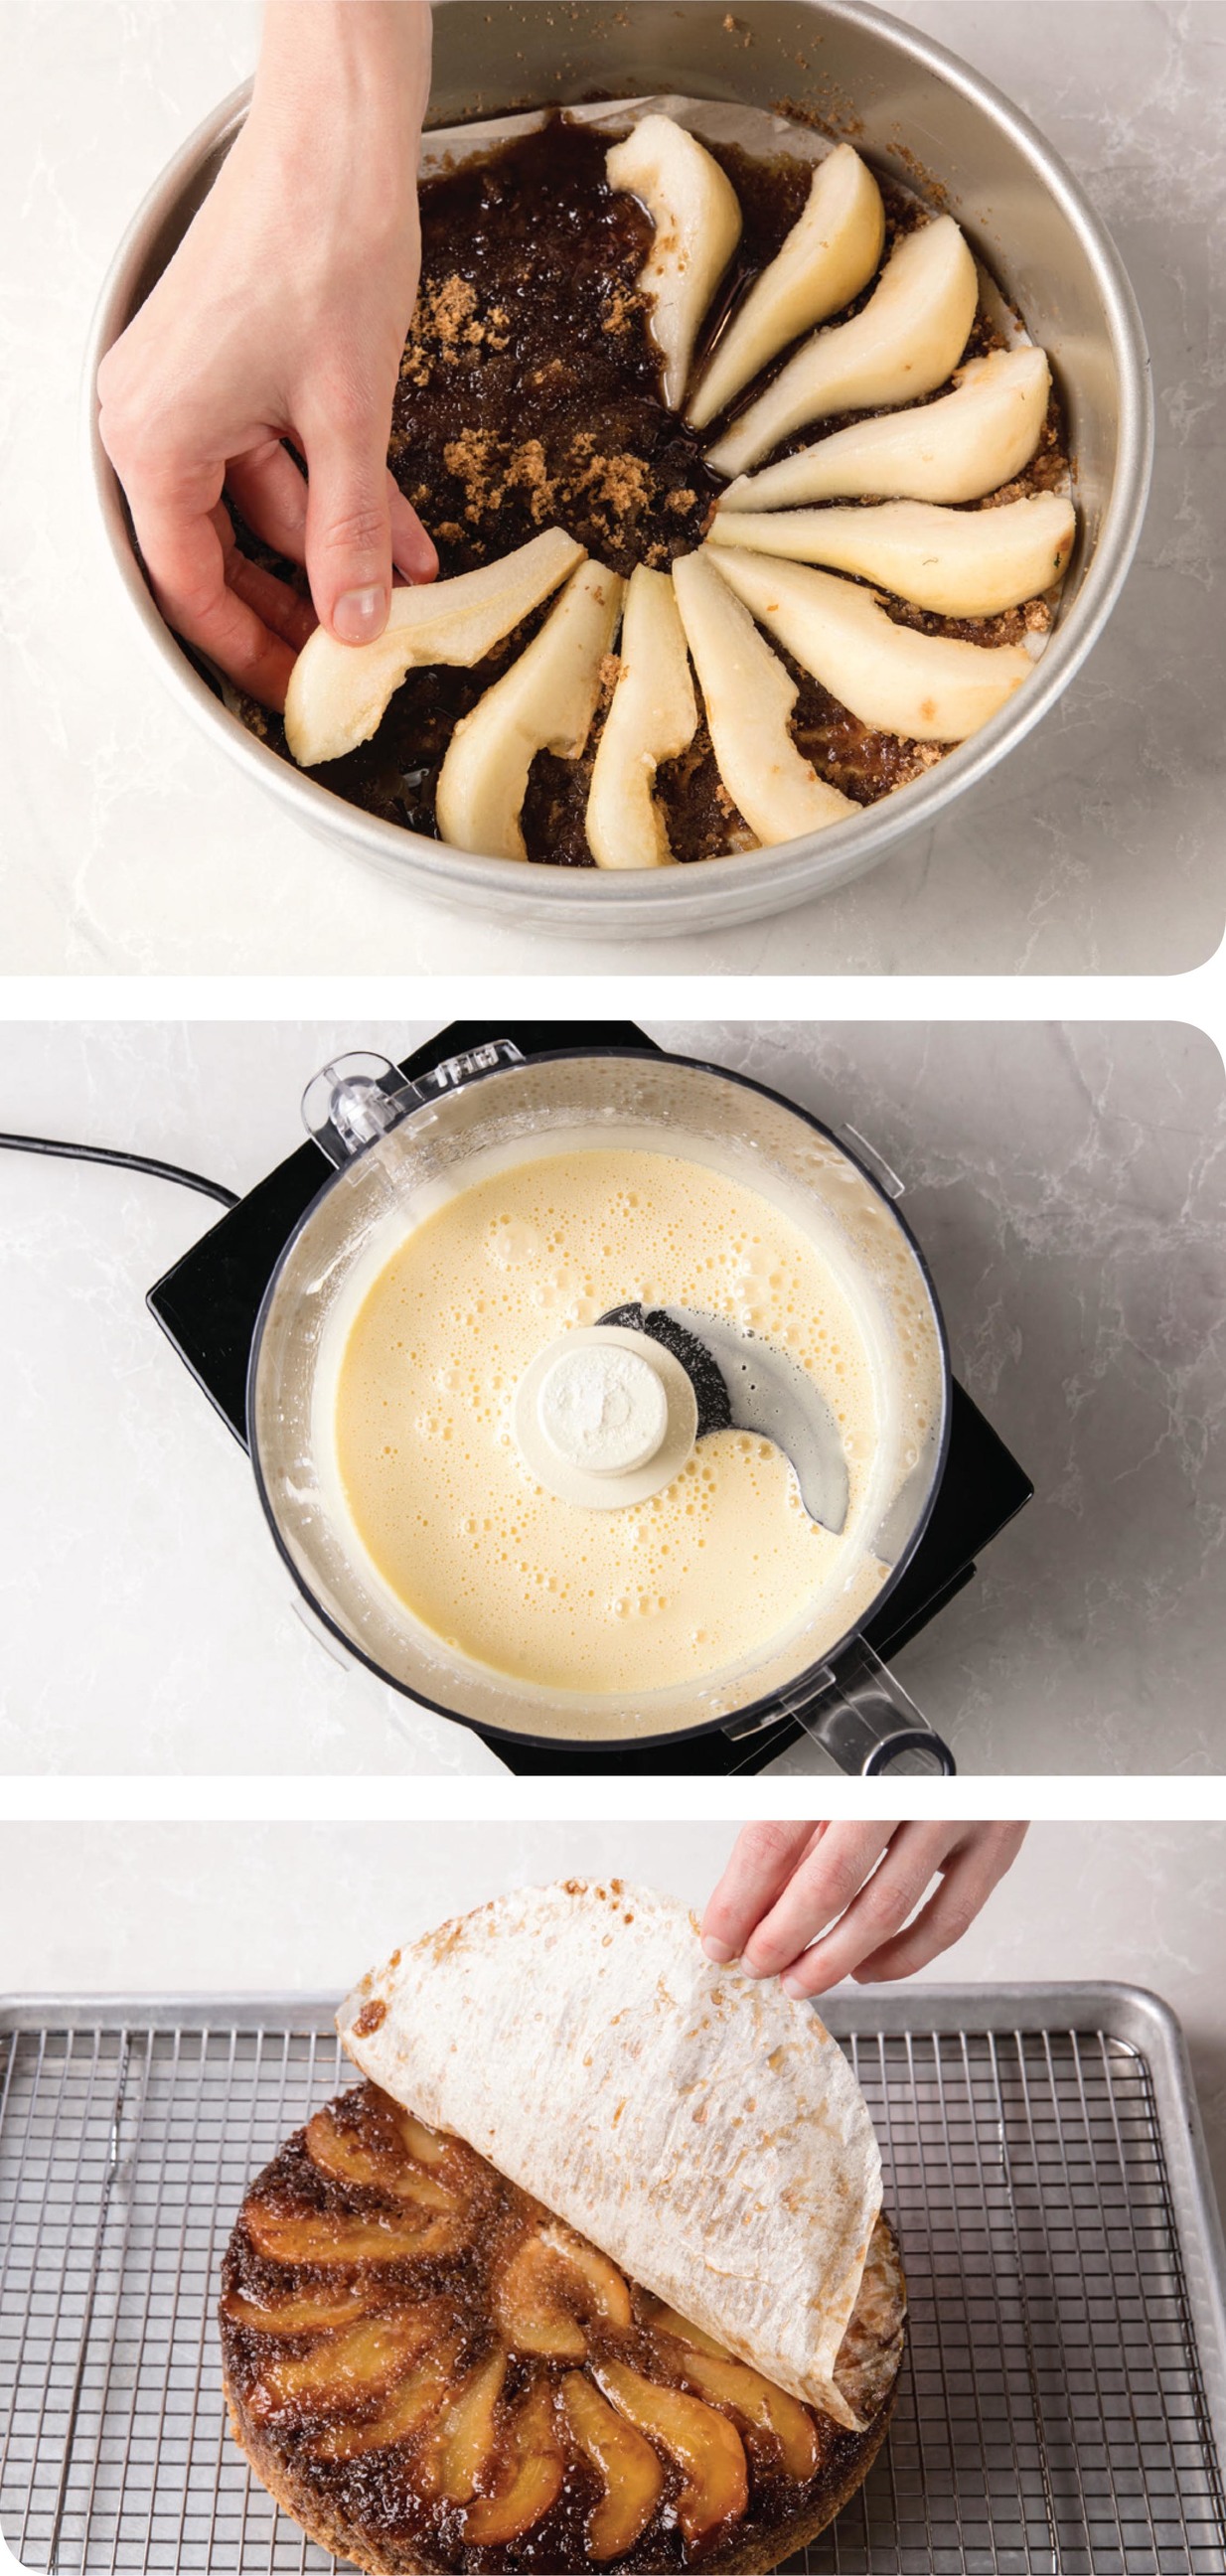
think like a cook
PICK THE RIGHT PEAR
While we love their sweet, floral flavor, pears have long been a distant second to apples from a baking standpoint, perhaps because there’s a lack of good information about them. Recipes often don’t name a variety, simply suggesting pears be “ripe but firm,” but what exactly does that mean?
Bosc pears are ideal for baking and poaching, especially when a visual presentation matters, as with our upside-down cake. That’s not only because of their elongated necks but also because, unlike other varieties, they develop sweetness before they fully soften, so can be used when firmer. This means there is a wider window in which they will taste sweet but hold their shape. Bartletts are also good baking pears, but can turn mushy more quickly; save them for pies and crisps. Anjou pears are very juicy and too soft for baking.
Check the Neck
Pears ripen from the inside out, so the fruit’s narrowest point—the neck—will be the earliest indication that the pear has started to ripen. For baking, you’re looking for the neck to give only slightly when pressed and feel a bit softer than a russet potato—that’s the meaning of “ripe but firm.” For eating, the pear should yield slightly more, like a ripe avocado, when pressed at the neck. Pears that are soft at the base are overripe.
Storage
Pears ripen best off the tree so may be underripe when purchased. Keep them at cool room temperature and let them ripen slowly. (In a pinch, speed up ripening by storing them in a paper bag.) Once pears are ripe, move them to the refrigerator.
Buttery Yellow Layer Cake with Foolproof Chocolate Frosting
Serves 8 to 10; Total Time 1 hour 30 minutes (plus cooling time)
why this recipe works
Everyone needs a really good classic yellow birthday cake recipe in their back pocket. This one is picture-perfect. It produces a sturdy yet velvety cake with rich flavor. For a truly tender cake, we used cake flour. We also employed the reverse-creaming method (see “Getting Even Layers”), which produced a light, flat-topped cake with a delicate crumb and just enough heft, ideal for layering and slathering with frosting. Bring all the ingredients to room temperature before beginning this recipe. Be sure to use cake pans with at least 2-inch-tall sides (see this page for our recommendation). Do not substitute all-purpose flour for cake flour in this recipe. We prefer to use a stand mixer for this recipe but a handheld mixer will also work.
½ cup whole milk, room temperature
4 large eggs, room temperature
2 teaspoons vanilla extract
1¾ cups (7 ounces) cake flour
1½ cups (10½ ounces) sugar
2 teaspoons baking powder
¾ teaspoon salt
16 tablespoons unsalted butter, cut into 16 pieces and softened
1 recipe Foolproof Chocolate Frosting
1. Adjust oven rack to middle position. Heat oven to 350 degrees. Grease two 9-inch round cake pans, line with parchment paper, grease parchment, and flour pans, tapping sides to remove excess flour. Whisk milk, eggs, and vanilla together in small bowl.
2. In large bowl, whisk flour, sugar, baking powder, and salt together. Using electric mixer on medium-low speed, beat butter into flour mixture, one piece at a time, about 30 seconds. Continue to beat mixture until it resembles moist crumbs, 1 to 3 minutes.
3. Beat in all but ½ cup of milk mixture, then increase mixer speed to medium and beat batter until smooth, light, and fluffy, 1 to 3 minutes. Reduce mixer speed to low and slowly beat in remaining ½ cup milk until batter looks slightly curdled, about 15 seconds.
4. Give batter final stir with rubber spatula to make sure it is thoroughly combined. Scrape batter into prepared pans, dividing batter as evenly as possible; smooth tops and gently tap pans on counter to release air bubbles. Bake until toothpick inserted into center comes out with few moist crumbs attached, 20 to 25 minutes, rotating pans halfway through.
5. Let cakes cool in pans on wire rack for 10 minutes. One at a time, set wire rack on cake pan and flip cake out onto rack. Discard parchment. Flip cake right-side up on second rack. Let cool completely, 2 hours.
6. Frost cake following instructions on this page. Use 1½ cups frosting to fill the cake and remainder for top and sides. (Assembled cake can be refrigerated for up to 24 hours. Bring to room temperature before serving.)
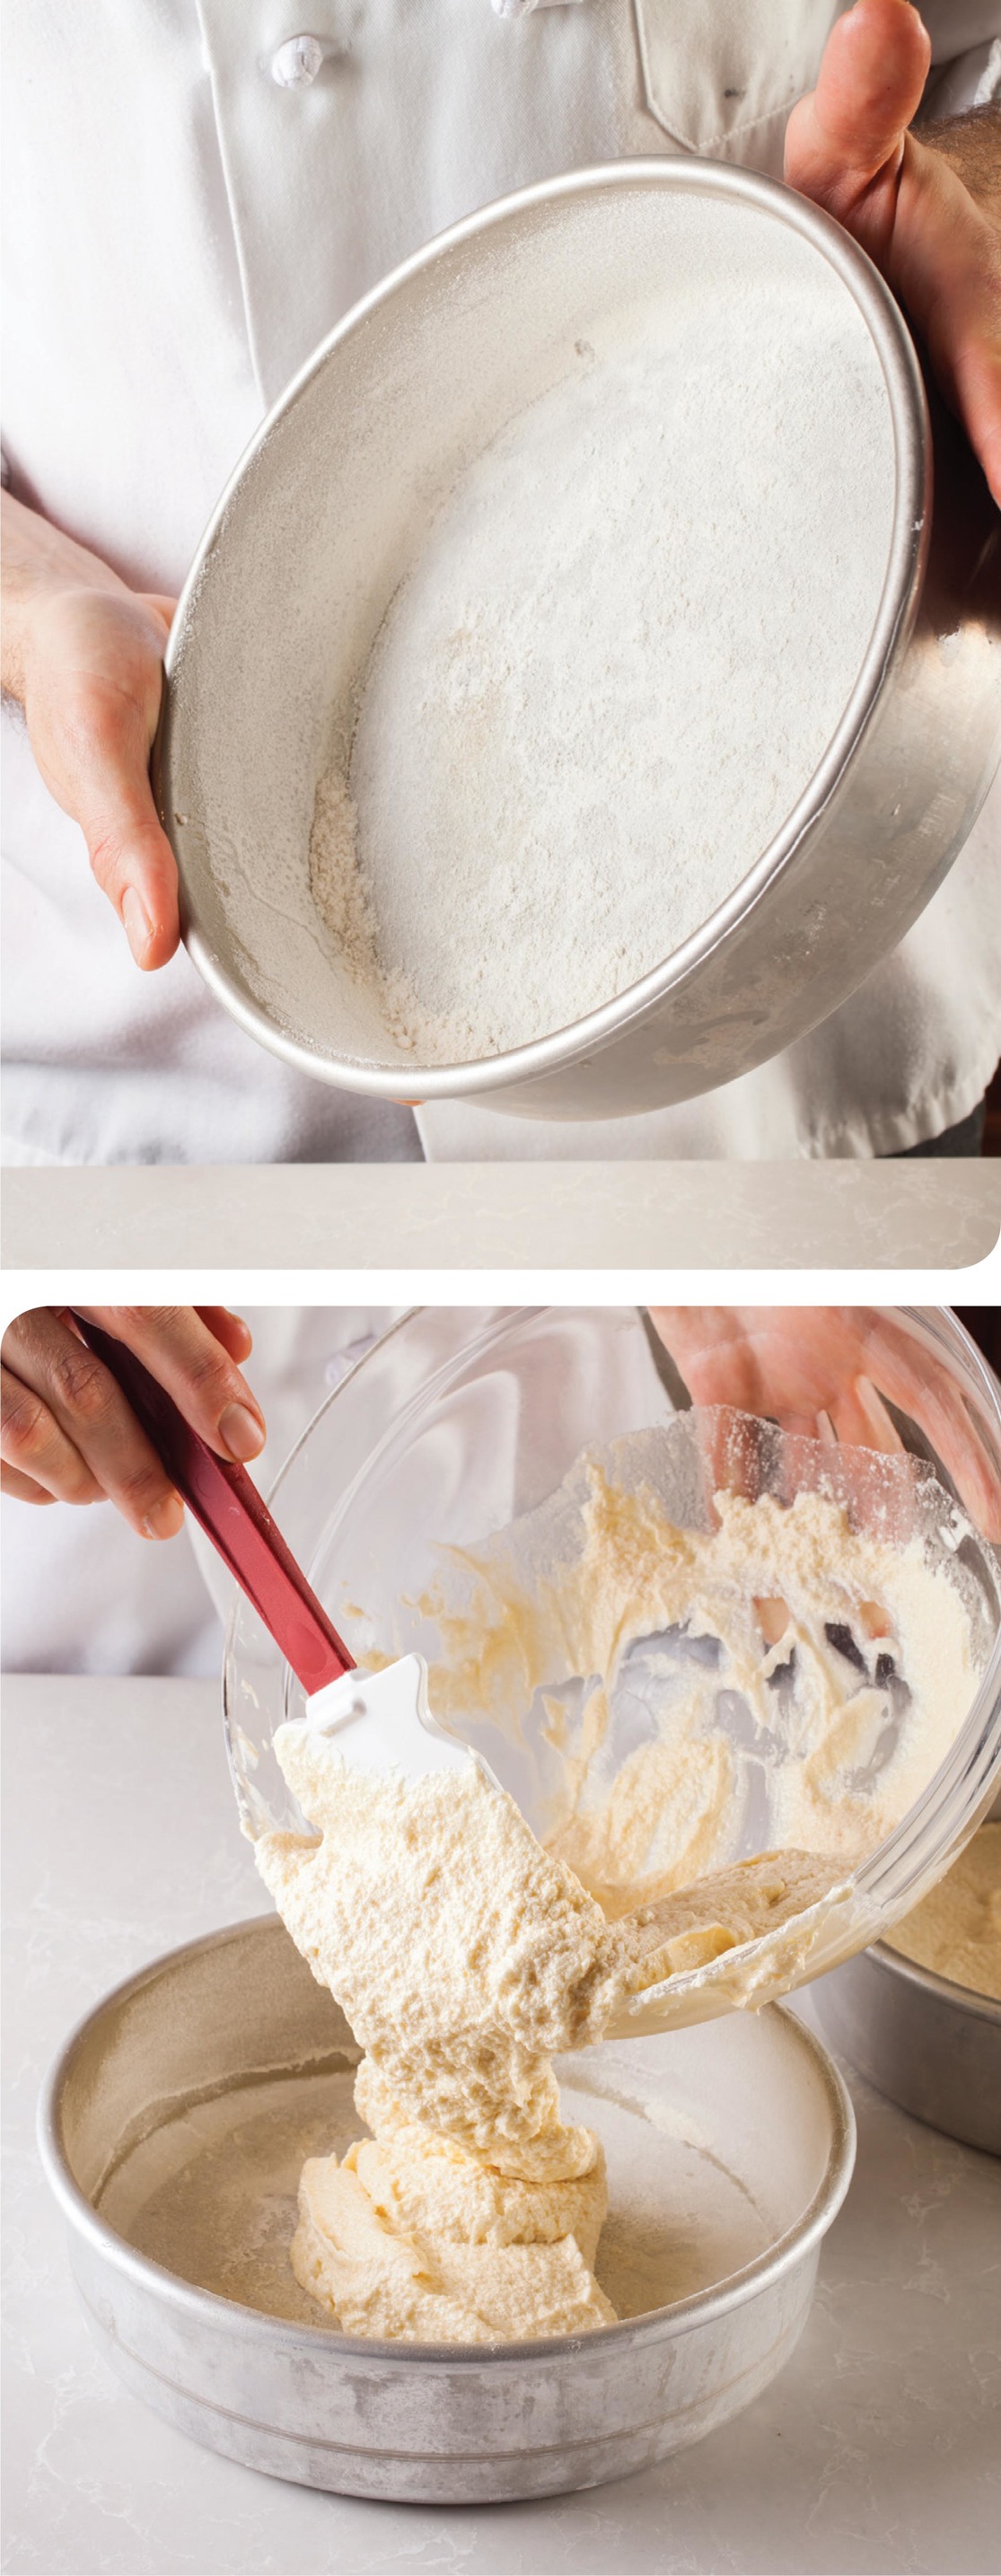

think like a cook
Ever wonder how bakeries achieve such even-looking layer cakes? It starts with level cake layers. This is often achieved by sawing off a cake’s domed top. But our recipe for buttery yellow cake avoids the domes in the first place. Doming is the result of creaming butter and sugar, which beats air into the batter. The step may be common in the world of baking, but we don’t follow it all that much for layer cakes. Instead, when we want a level cake that’s ready to be stacked and frosted, we turn to reverse creaming (the same method we use in our Make-Ahead Coffee Cake). Rather than beat butter with sugar, we mix it into the dry ingredients. Less air is incorporated this way, and the butter coats the flour particles, which minimizes gluten development for a cake with an ultrafine, downy crumb.
A second key to getting even cake layers is to divide the batter as evenly as possible between the pans. Then, you typically want to smooth the top of the batter with a rubber spatula for a level result; this is particularly important with thick batters. Finally, if a batter isn’t too delicate, tap it on the counter to further settle it or to release any air bubbles that could leave holes in the finished cake.
Makes about 1 cup
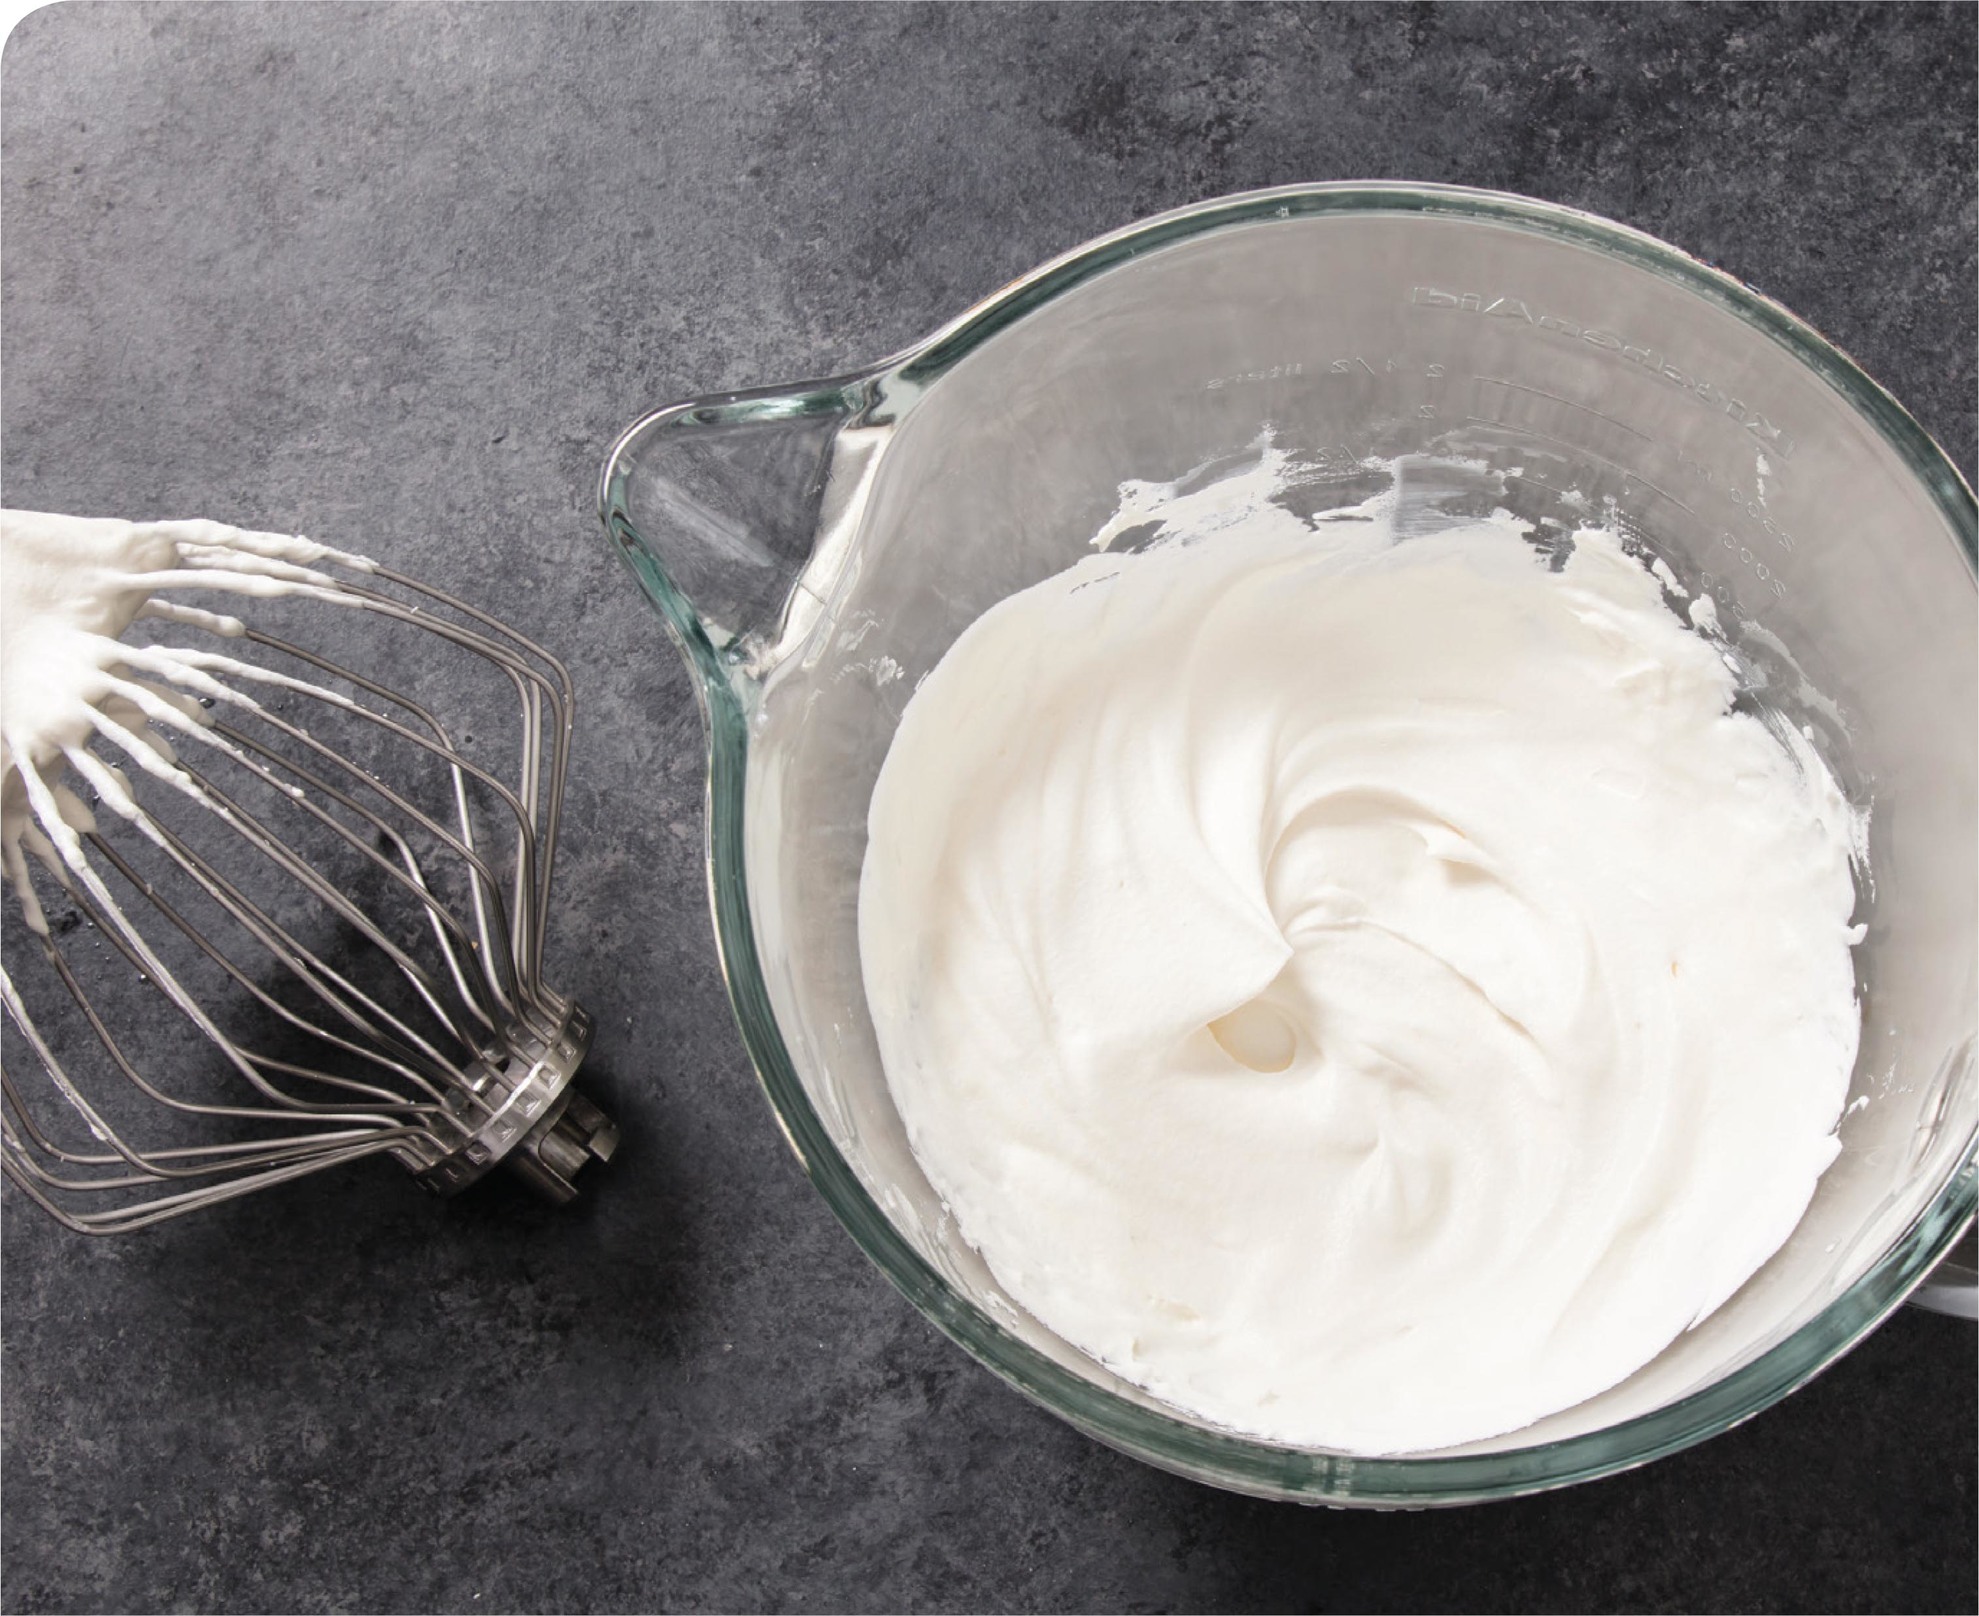
The lightly sweetened flavor and creamy texture of whipped cream make it the ideal partner to numerous desserts, but perfect whipped cream can be hard to achieve. The cream can go from watery to properly whipped to curdled and stiff in a matter of seconds. For more foolproof fluffy mounds, we begin whipping on medium-low, then increase the speed and continue just until the mixture is thick and billowy. If the cream becomes granular, you’ve beaten it too long. If you accidentally overwhip, add unwhipped cream to the overwhipped mixture 1 tablespoon at a time. Gently fold it in, adding more unwhipped cream until the desired consistency is reached. Look for regular heavy cream, which has a slightly higher fat content than “whipping cream.” The fat helps it stay whipped for longer without losing stability. We like pasteurized (not ultra-pasteurized) heavy cream with 40 percent fat and no added ingredients like emulsifiers or stabilizing agents.
½ cup heavy cream
2 teaspoons sugar
½ teaspoon vanilla extract
Pinch salt
Using handheld electric mixer or stand mixer fitted with whisk attachment, whip ingredients on medium-low speed until foamy, about 1 minute. Increase speed to high and whip until stiff peaks form, 1 to 3 minutes.
Makes 5 cups
A combination of melted chocolate and cocoa powder gives this frosting deep chocolate flavor, while confectioners’ sugar and corn syrup turns it smooth and glossy. Mixing the frosting in a food processor eliminates the risk of incorporating too much air. The result is a thick, fluffy chocolate frosting that spreads like a dream. This recipe may be made with milk, semisweet, or bittersweet chocolate. Cool the chocolate to between 85 and 100 degrees before adding it to the butter mixture.
20 tablespoons (2½ sticks) unsalted butter, softened
1 cup (4 ounces) confectioners’ sugar
¾ cup (2¼ ounces) Dutch-processed cocoa powder
Pinch salt
¾ cup light corn syrup
1 teaspoon vanilla extract
8 ounces chocolate, melted and cooled
In food processor, process butter, sugar, cocoa, and salt until smooth, about 30 seconds, scraping sides of bowl as needed. Add corn syrup and vanilla and process until just combined, 5 to 10 seconds. Scrape sides of bowl, then add chocolate and pulse until smooth and creamy, 10 to 15 seconds. (Frosting can be kept at room temperature for up to 3 hours before frosting cake, or refrigerated for up to 3 days. If refrigerated, let stand at room temperature for 1 hour before using.)
FROSTING A CAKE

1. KEEP THE CAKE PLATTER CLEAN Cover the edges of the platter with strips of parchment paper to ensure that extra frosting doesn’t end up on the platter. Place one layer on the platter.
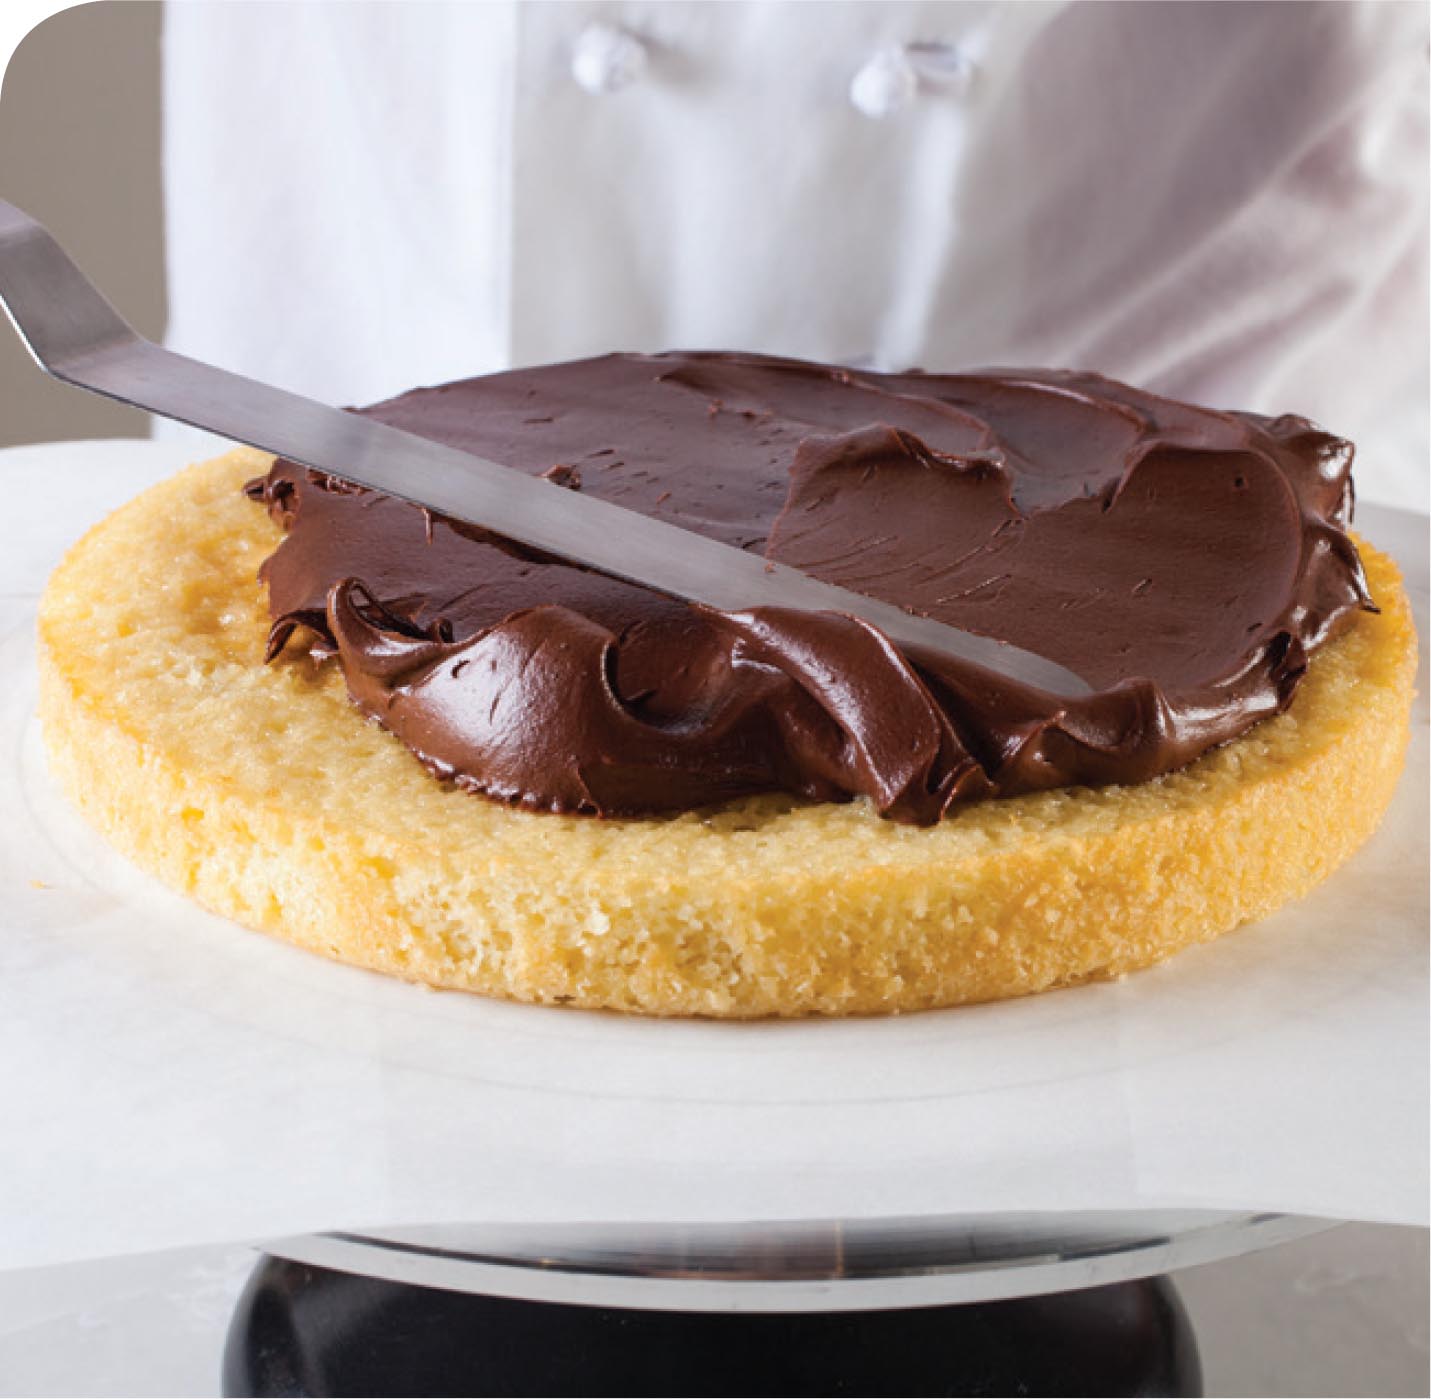
2. FROST THE FIRST LAYER Dollop a portion of frosting in the center of the cake layer. Using an offset spatula, spread the frosting in an even layer from the center right to the edge of the cake.
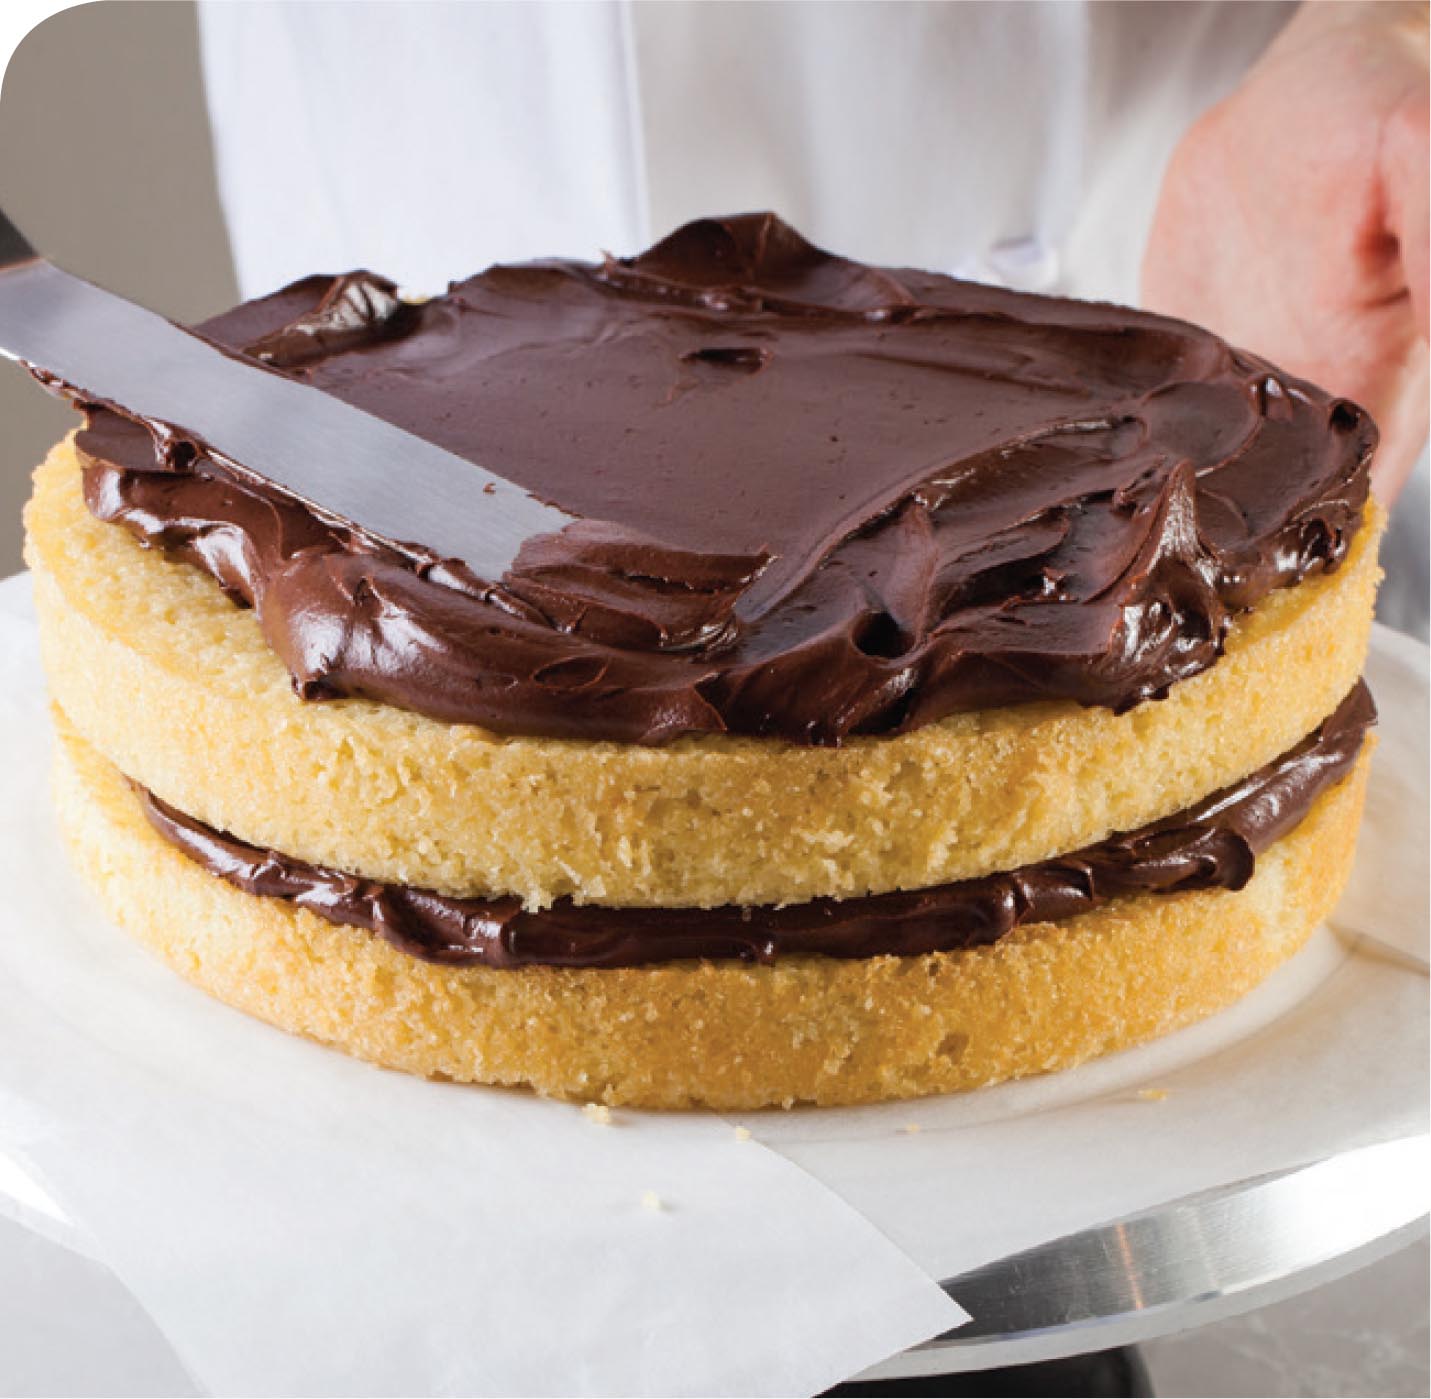
3. FROST THE SECOND LAYER Place the second layer on top, pressing gently and making sure it’s aligned with the first layer. Finish by dolloping more frosting in the center and spread evenly across the top layer, pushing it slightly over the edge of the cake.

4. GATHER UP FROSTING FOR THE SIDES A narrow, flexible offset spatula is ideal for spreading frosting on vertical surfaces. Mound a few tablespoons of frosting on the spatula’s tip and press it against the side of the cake to adhere.

5. FROST THE SIDES Gently smear the frosting onto the sides of the cake. Repeat until the sides are covered. Use gentle motions and don’t press too hard or you will wind up with crumbs in the frosting. Clean off the spatula as needed.
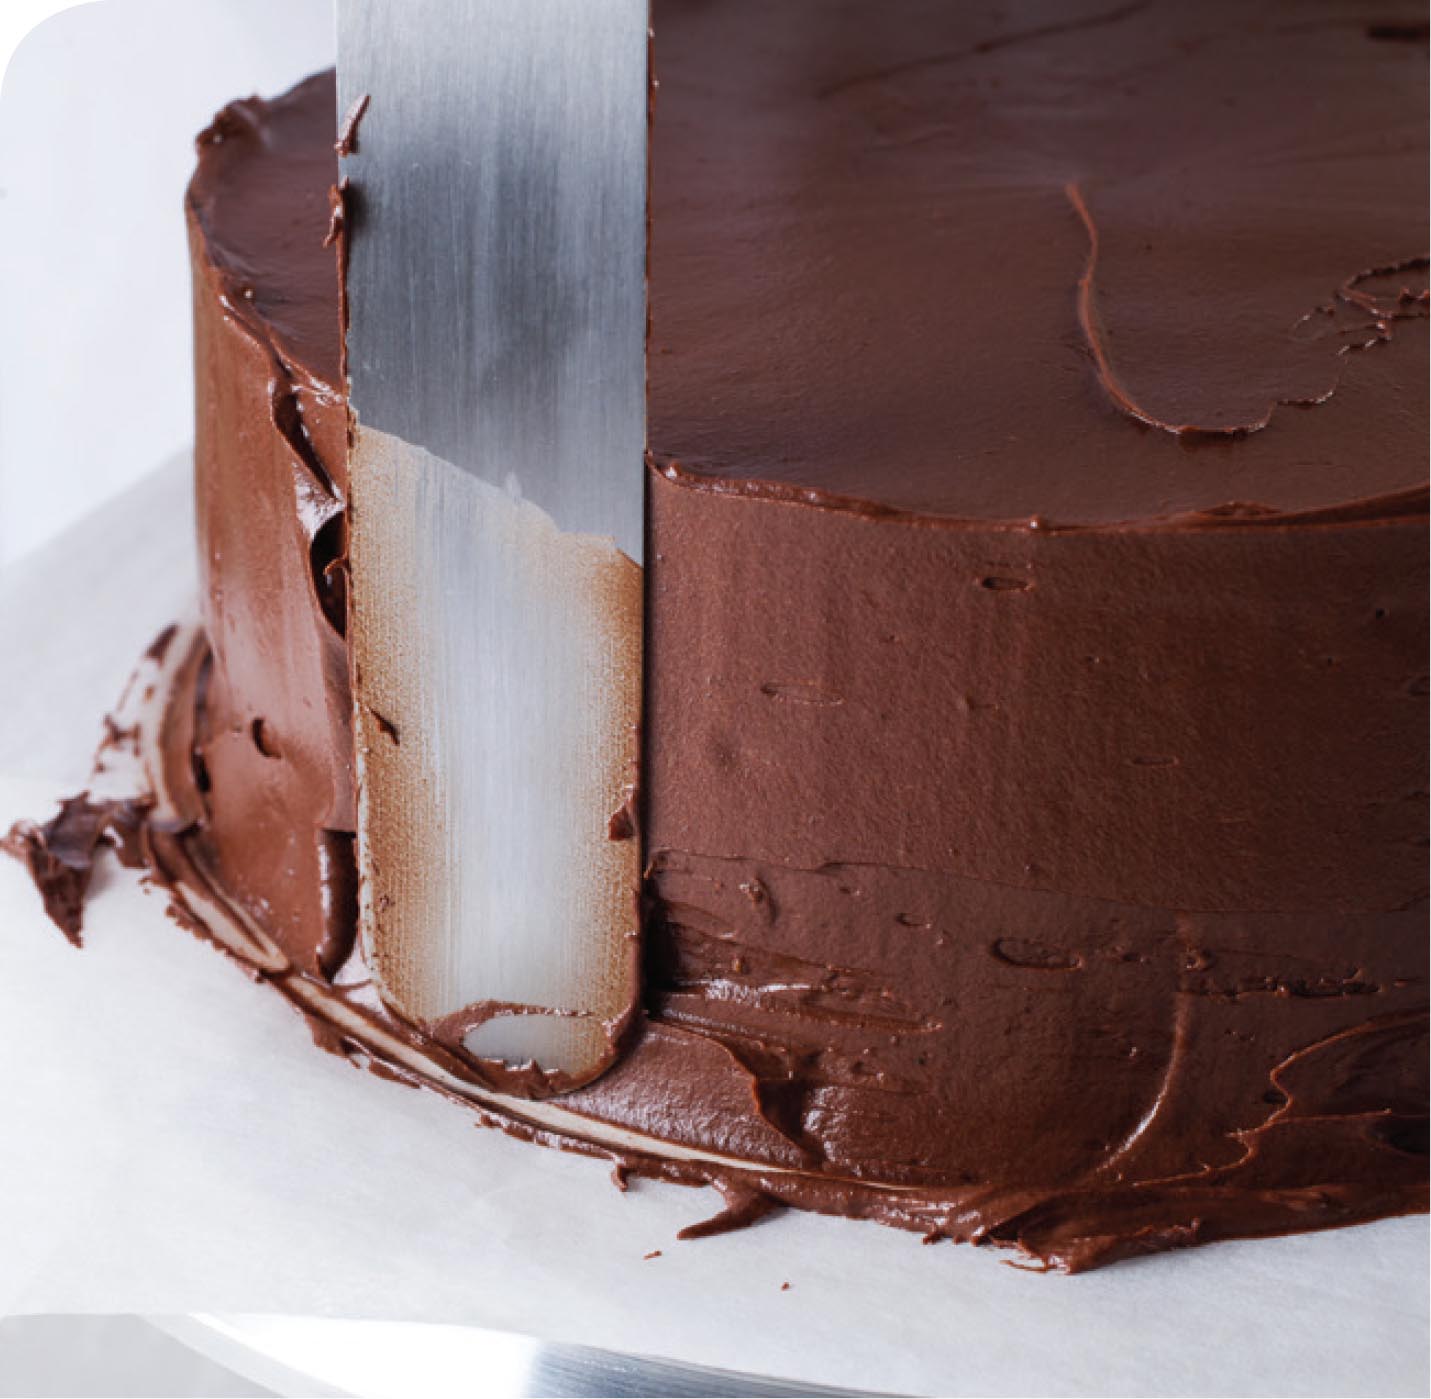
6. SMOOTH OUT THE ROUGH SPOTS Gently run the edge of the spatula around the sides to smooth out any bumps and tidy the area where the frosting from the top and sides merges. You can run the edge of the spatula over the top of the cake to give it a smooth look too. Remove the strips of parchment before serving.
Serves 12 to 16; Total Time 3 hours (plus cooling and chilling time)
why this recipe works
To many people, homemade cheesecake seems like too much work. Better to leave this to the pros. But after many rounds of experimentation, we have to disagree. Producing a perfect cheesecake is merely a matter of paying close attention to the temperature of the oven and the temperature of the cheesecake itself. Aside from that, the ingredient list is short and the method is easy. Our food processor took care of both the graham cracker crust and the filling. We relied on our oven thermometer to make sure that the oven temperature was correct and an instant-read thermometer to ensure the cheesecake’s temperature didn’t rise too high. With this level of precision, a water bath was unnecessary. Reduce the oven temperature as soon as the crust is finished baking and be sure it has dropped to 250 degrees before you begin baking the cheesecake. Make sure to thoroughly scrape the processor bowl as you make the filling to eliminate lumps.
CRUST
6 whole graham crackers, broken into pieces
⅓ cup (2⅓ ounces) sugar
½ cup (2½ ounces) all-purpose flour
¼ teaspoon salt
6 tablespoons unsalted butter, melted
CHEESECAKE
2 pounds cream cheese
1¼ cups (8¾ ounces) sugar
4 large eggs
¼ cup heavy cream
¼ cup sour cream
2 teaspoons vanilla extract
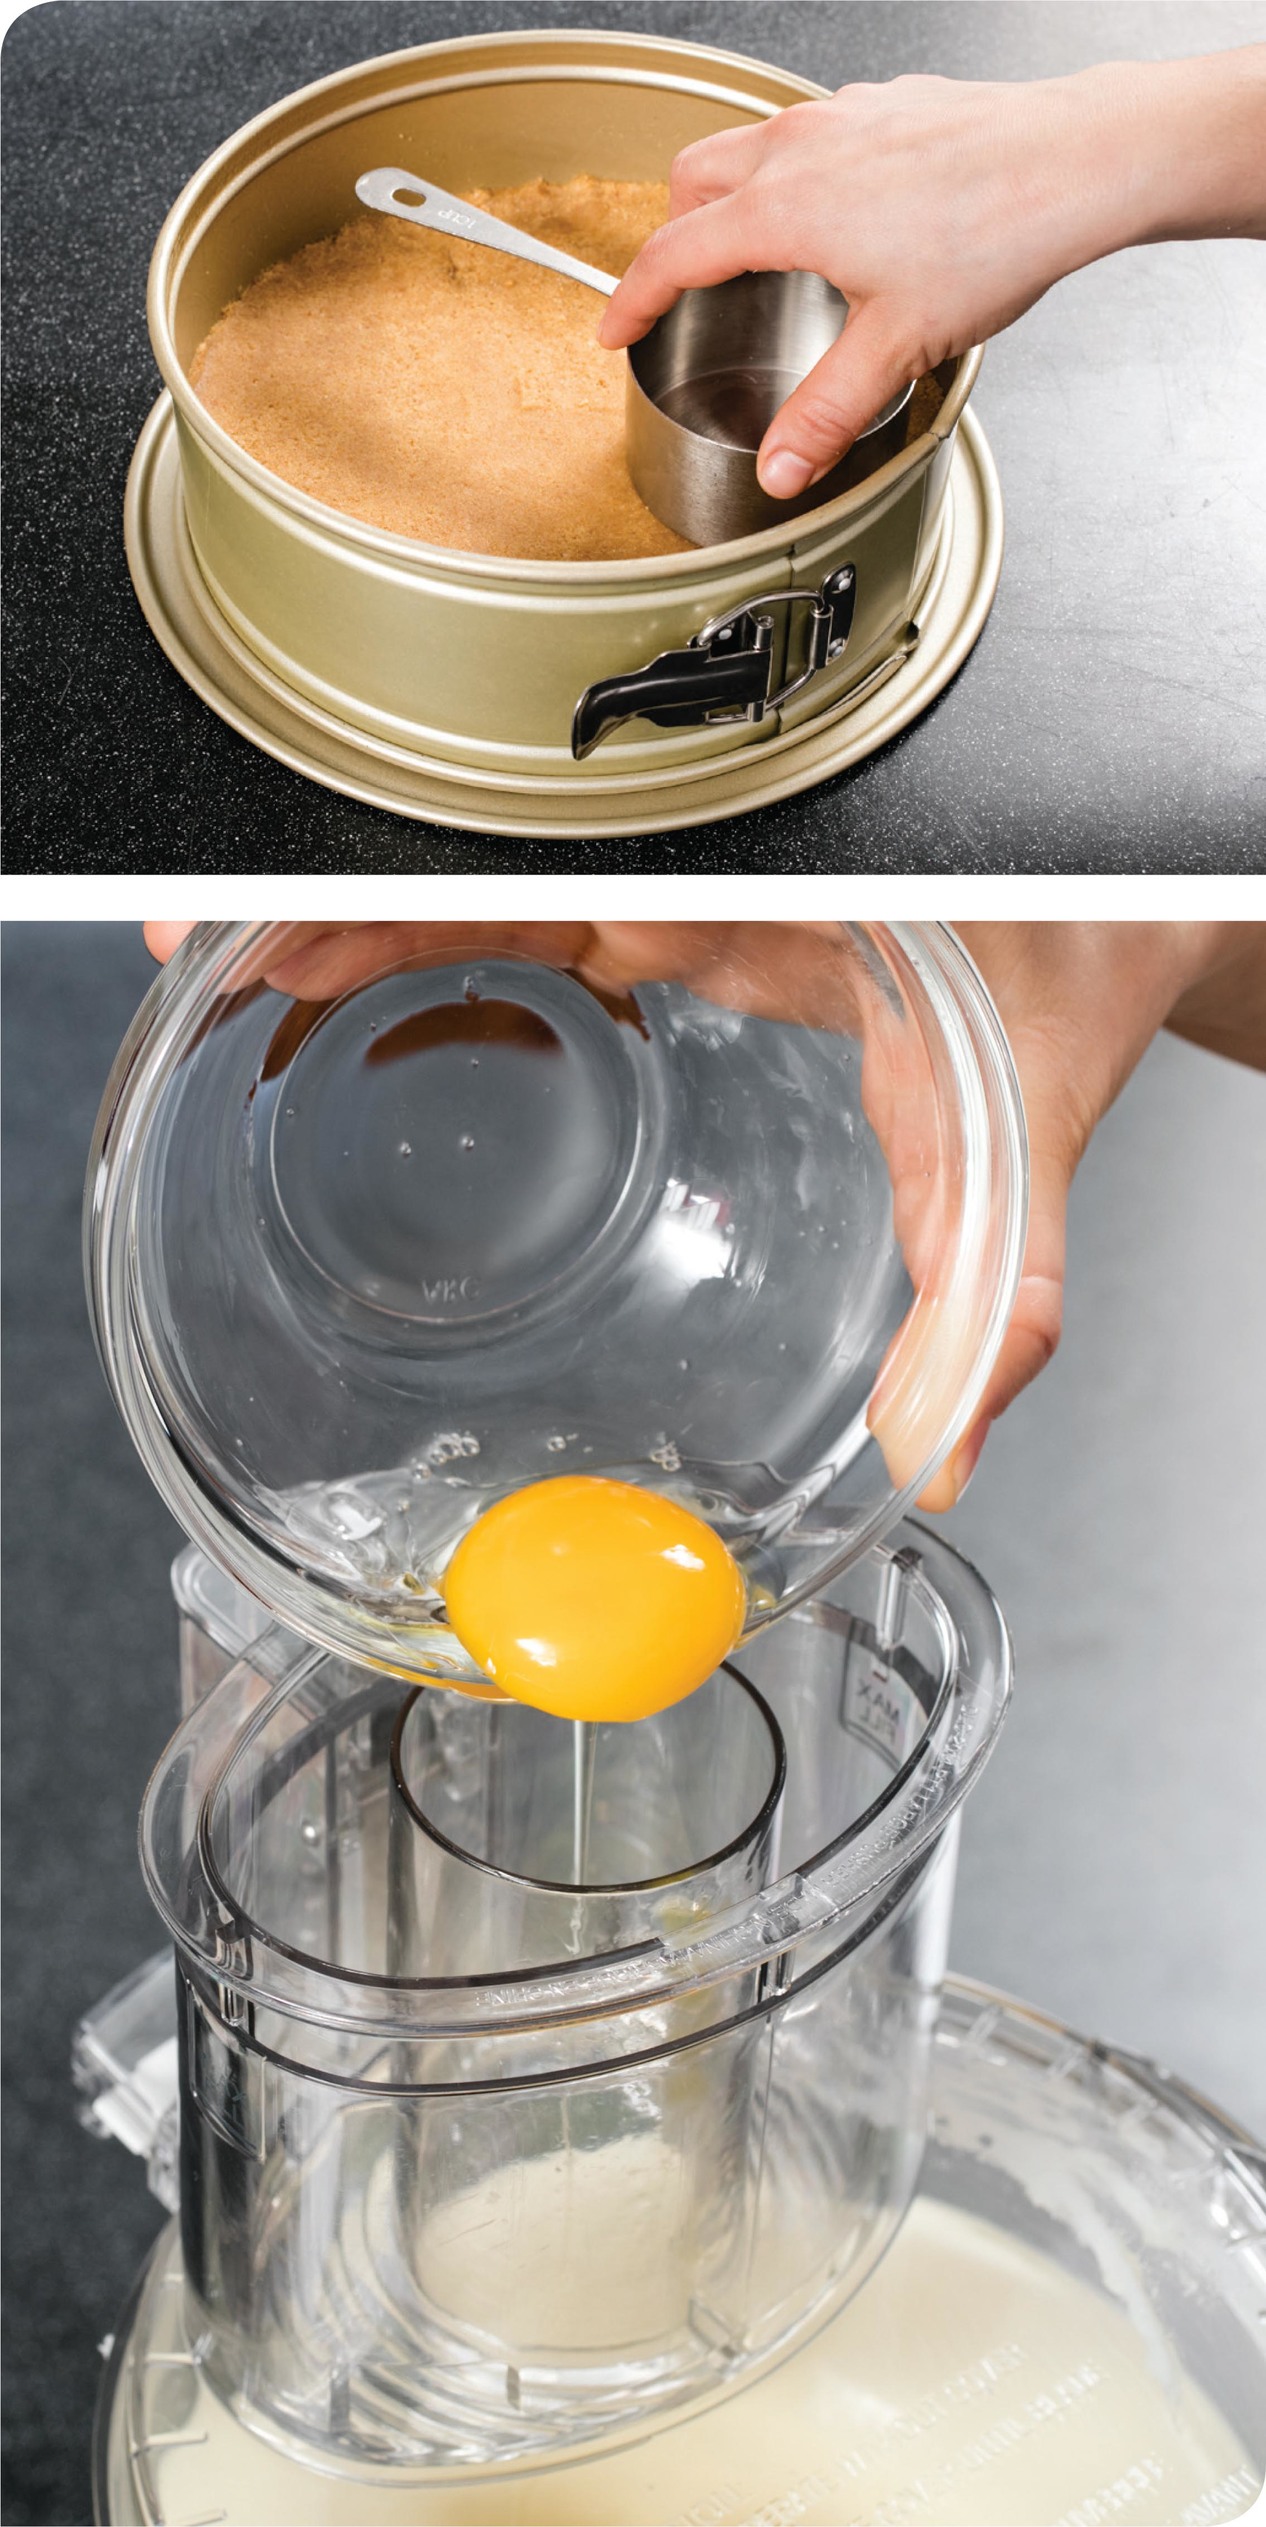
1. FOR THE CRUST Adjust oven rack to middle position and heat oven to 325 degrees. Spray 9-inch springform pan with vegetable oil spray. Process cracker pieces and sugar in food processor until finely ground, about 30 seconds. Add flour and salt and pulse to combine, about 2 pulses. Add melted butter and pulse until crumbs are evenly moistened, about 10 pulses.
2. Using your hands, press crumb mixture evenly into pan bottom. Using bottom of dry measuring cup, firmly pack crust into pan. Bake until fragrant and beginning to brown around edges, about 13 minutes. Let cool completely.
3. FOR THE CHEESECAKE Reduce oven temperature to 250 degrees. In clean, dry processor bowl, process cream cheese and sugar until smooth, about 3 minutes, scraping down bowl as needed. With processor running, add eggs, one at a time, until just incorporated, about 30 seconds total. Scrape down sides of bowl. Add heavy cream, sour cream, and vanilla and process to combine, about 30 seconds.
4. Pour cheesecake mixture onto cooled crust. Gently tap pan on counter to release air bubbles. Gently draw tines of fork across surface of cake to pop any bubbles that have risen to surface.
5. Once oven temperature has reached 250 degrees, bake cheesecake until edges are set, center jiggles slightly when shaken, and thermometer inserted into center registers 155 degrees, 1 hour 20 minutes to 1½ hours. Transfer pan to wire rack and let cool completely, about 2 hours. Refrigerate cheesecake, uncovered, until cold, about 6 hours. (Cake can be covered and refrigerated for up to 4 days.)
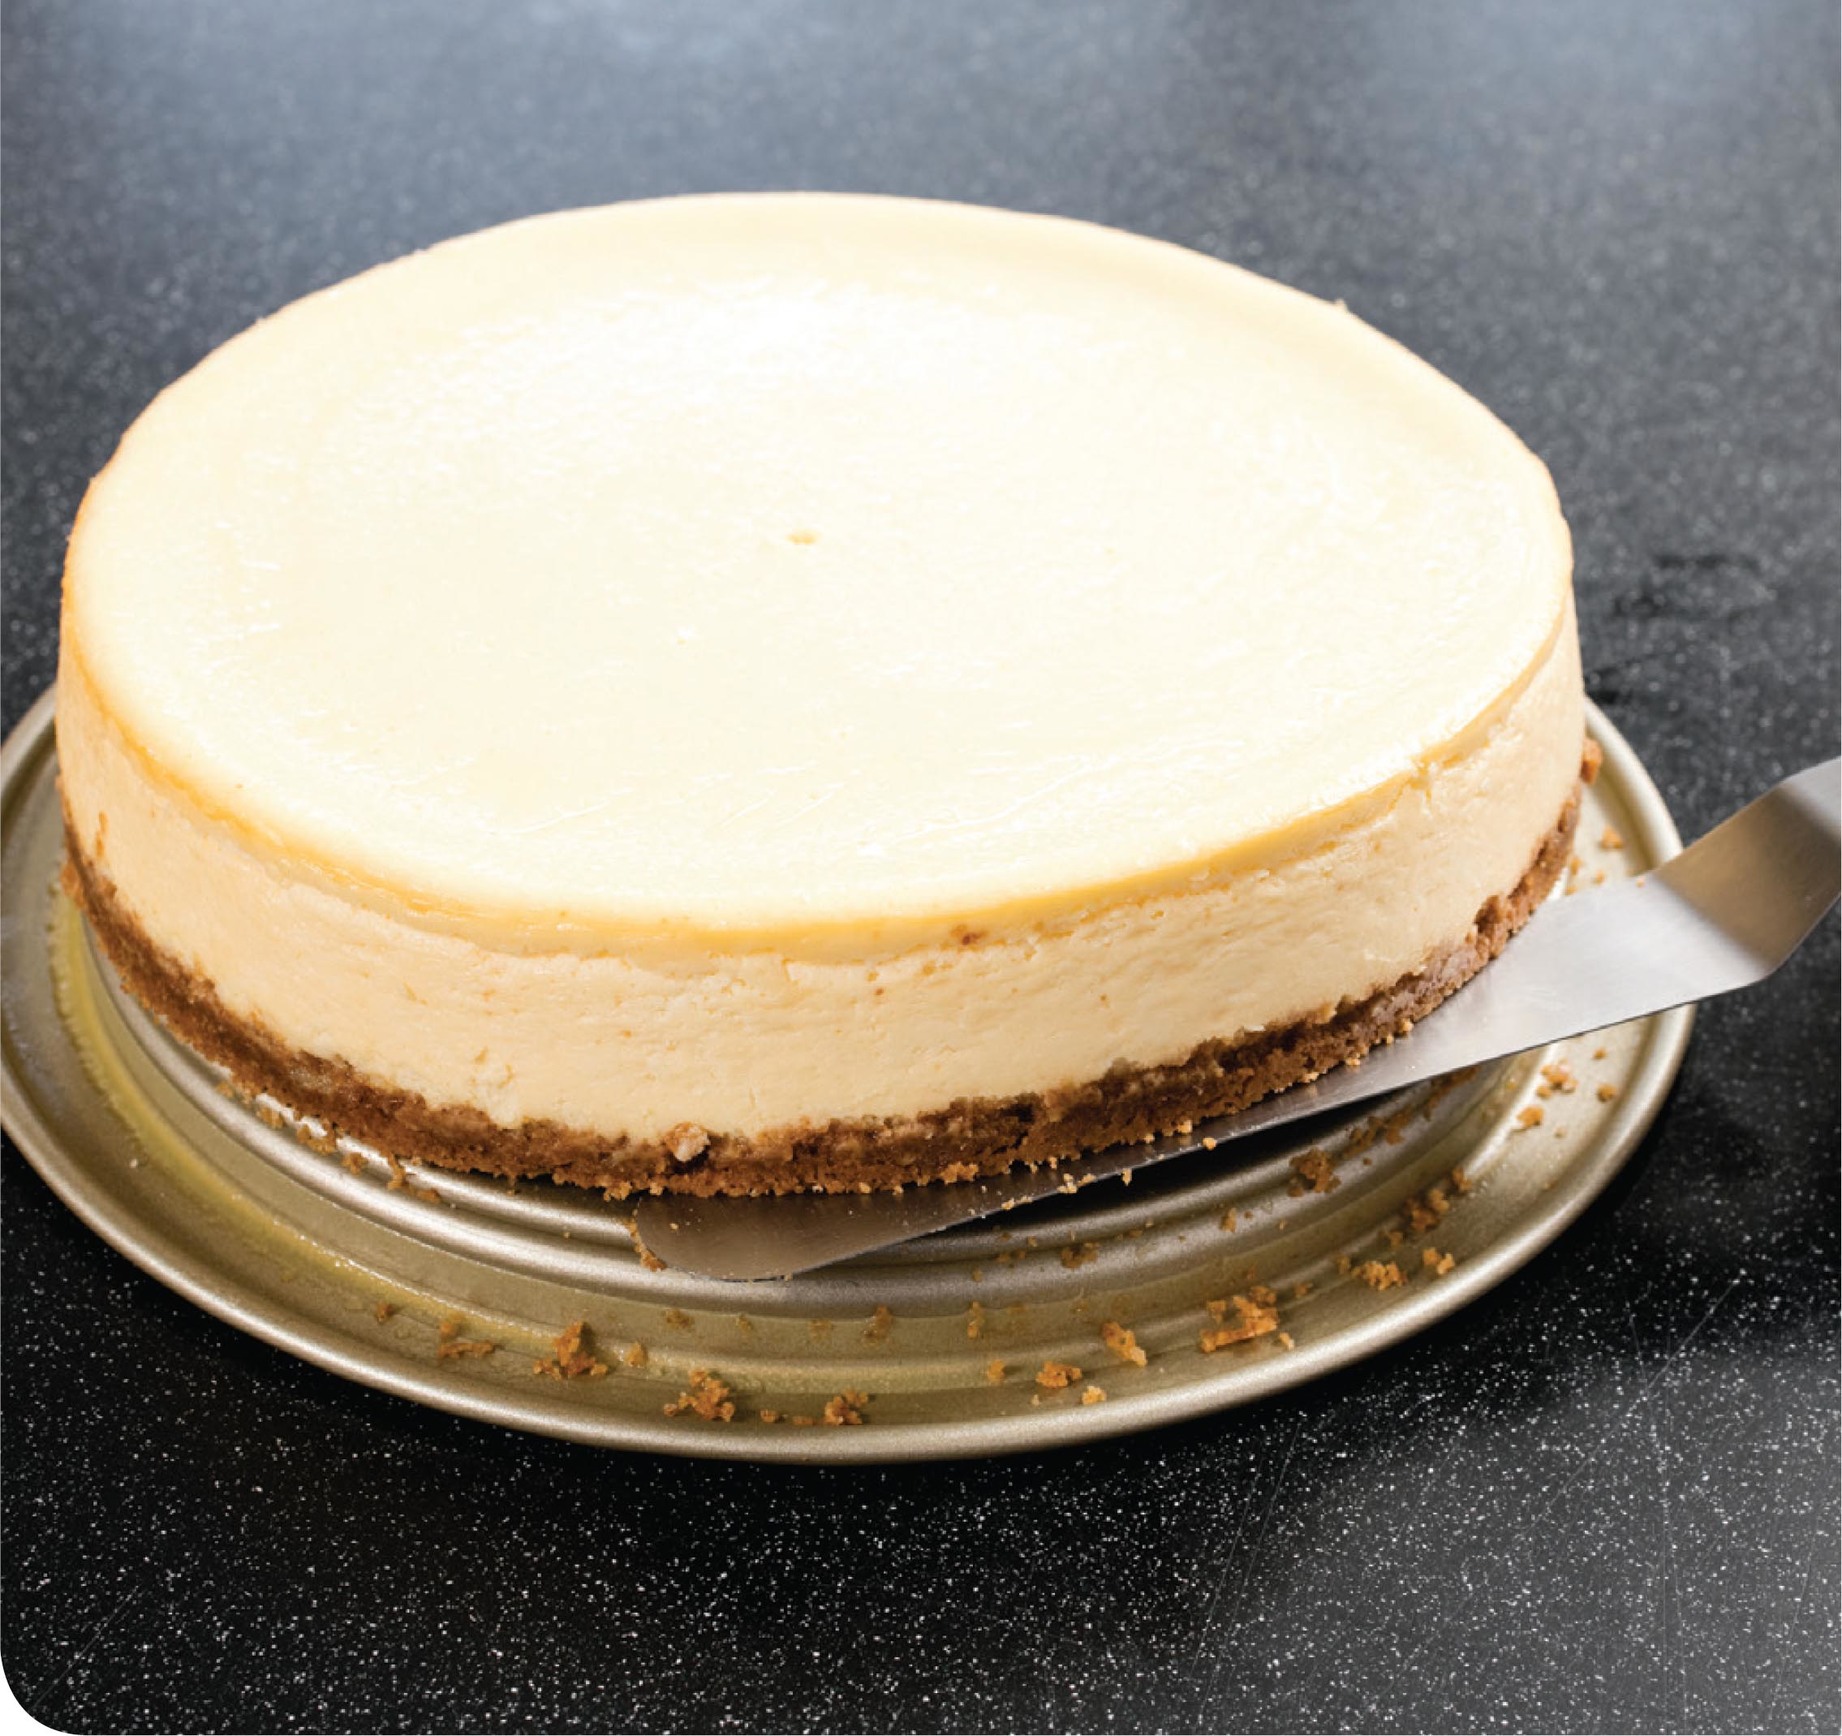
6. To unmold cheesecake, run tip of sharp paring knife between cake and side of pan and remove side. Slide thin metal spatula between crust and pan bottom to loosen, then slide cake onto serving platter. Let cheesecake stand at room temperature for 30 minutes. To serve, dip a sharp knife in very hot water and wipe dry before and after each cut.
think like a cook
DON’T TRUST YOUR OVEN
Ovens are inaccurate. Since all ovens cycle on and off to maintain temperature, even the best periodically deviate by a couple of degrees and some can be off by as much as 50 degrees unless they’re recalibrated regularly. An oven’s internal thermometer only gauges the temperature of the location where it’s installed, which is necessarily in an out-of-the-way spot. But ovens can be subject to hot spots or drafts. Only a good freestanding thermometer can tell you what’s going on right in the middle, where most food cooks. A good oven thermometer should be easy to read and easy to mount securely and safely out of the way in your oven. It should also be durable. Our favorite model, the CDN ProAccurate Oven Thermometer, costs less than $10 and can save you a lot of grief in the kitchen.
Serves 12; Total Time 1 hour 30 minutes (plus cooling and chilling)
why this recipe works
Dense and decadent, flourless chocolate cake is an ideal back-pocket dessert for dinner parties or whenever you want to impress. It looks sophisticated and tastes luxurious but requires very little work and can be stored in the fridge until you need it. We used the microwave to gently melt chocolate and butter, then whisked in all the other ingredients. To ensure a perfectly smooth, crack-free cake, we strained the batter into the pan, rested it, and then carefully popped any bubbles that rose to the surface. To avoid the trouble of baking the cake in a water bath, which helps prevent it from cooking too quickly and developing cracks, we found gentle heat by way of a low 275-degree oven. Plan ahead: This cake needs to chill for at least 6 hours, so we recommend making it a day ahead of time. Dollop with All-Purpose Whipped Cream before serving.
12 ounces bittersweet chocolate, broken into 1-inch pieces
16 tablespoons unsalted butter
6 large eggs
1 cup (7 ounces) sugar
½ cup water
1 tablespoon cornstarch
1 tablespoon vanilla extract
1 teaspoon instant espresso powder
½ teaspoon salt
1. Adjust oven rack to middle position and heat oven to 275 degrees. Spray 9-inch springform pan with vegetable oil spray. Microwave chocolate and butter in bowl at 50 percent power, stirring occasionally with rubber spatula, until melted, about 4 minutes. Let chocolate mixture cool for 5 minutes.
2. Whisk eggs, sugar, water, cornstarch, vanilla, espresso powder, and salt together in large bowl until thoroughly combined, about 30 seconds. Whisk in chocolate mixture until smooth and slightly thickened, about 45 seconds. Strain batter through fine-mesh strainer into prepared pan, pressing against strainer with rubber spatula or back of ladle to help batter pass through.
3. Gently tap pan on counter to release air bubbles; let sit on counter for 10 minutes to allow air bubbles to rise to top. Use tines of fork to gently pop any air bubbles that have risen to surface. Bake cake until edges are set and center jiggles slightly when cake is shaken gently, 45 to 50 minutes. Let cake cool for 5 minutes, then run paring knife between cake and sides of pan. Let cake cool in pan on wire rack until barely warm, about 30 minutes.
4. Cover cake tightly with plastic wrap, poke small hole in top, and refrigerate until cold and firmly set, at least 6 hours.
5. To unmold cake, remove sides of pan and slide thin metal spatula between cake bottom and pan bottom to loosen, then slide cake onto serving platter. Let cake stand at room temperature for 30 minutes. To serve, dip a sharp knife in very hot water and wipe dry before and after each cut.


think like a cook
In the life of any cake, there comes the final step—serving it. At this point, if it’s for a special occasion, guests will often exchange nervous glances. Who’s going to cut into it? Often, people will feign incompetence and suggest the cake’s baker do the honors. The expectation to produce clean, professional slices can feel great. This burden is not lightened by the number of cake cutting gadgets available, from wagon wheel–shaped contraptions that cut the entire thing in one go to scary-looking pieces of wire. Of course, the cake will be just as delicious if it smudges or topples, but don’t just reach for any old knife or server.
It may seem obvious, but you want a knife that will reach into the center of the cake so that you can make slices of the same depth all the way around. We use a chef’s knife. The next step is key: Dip the knife in very hot water and wipe it dry before the first and after each cut. Wiping the knife ensures that crumbs, frosting, and anything else won’t mar successive slices. Heating the knife causes it to very slightly melt what it’s cutting, preventing the surface from cracking and allowing for a clean separation of each piece. This is critical with our Flourless Chocolate Cake and Easiest-Ever Cheesecake, as the custardy centers are so soft.
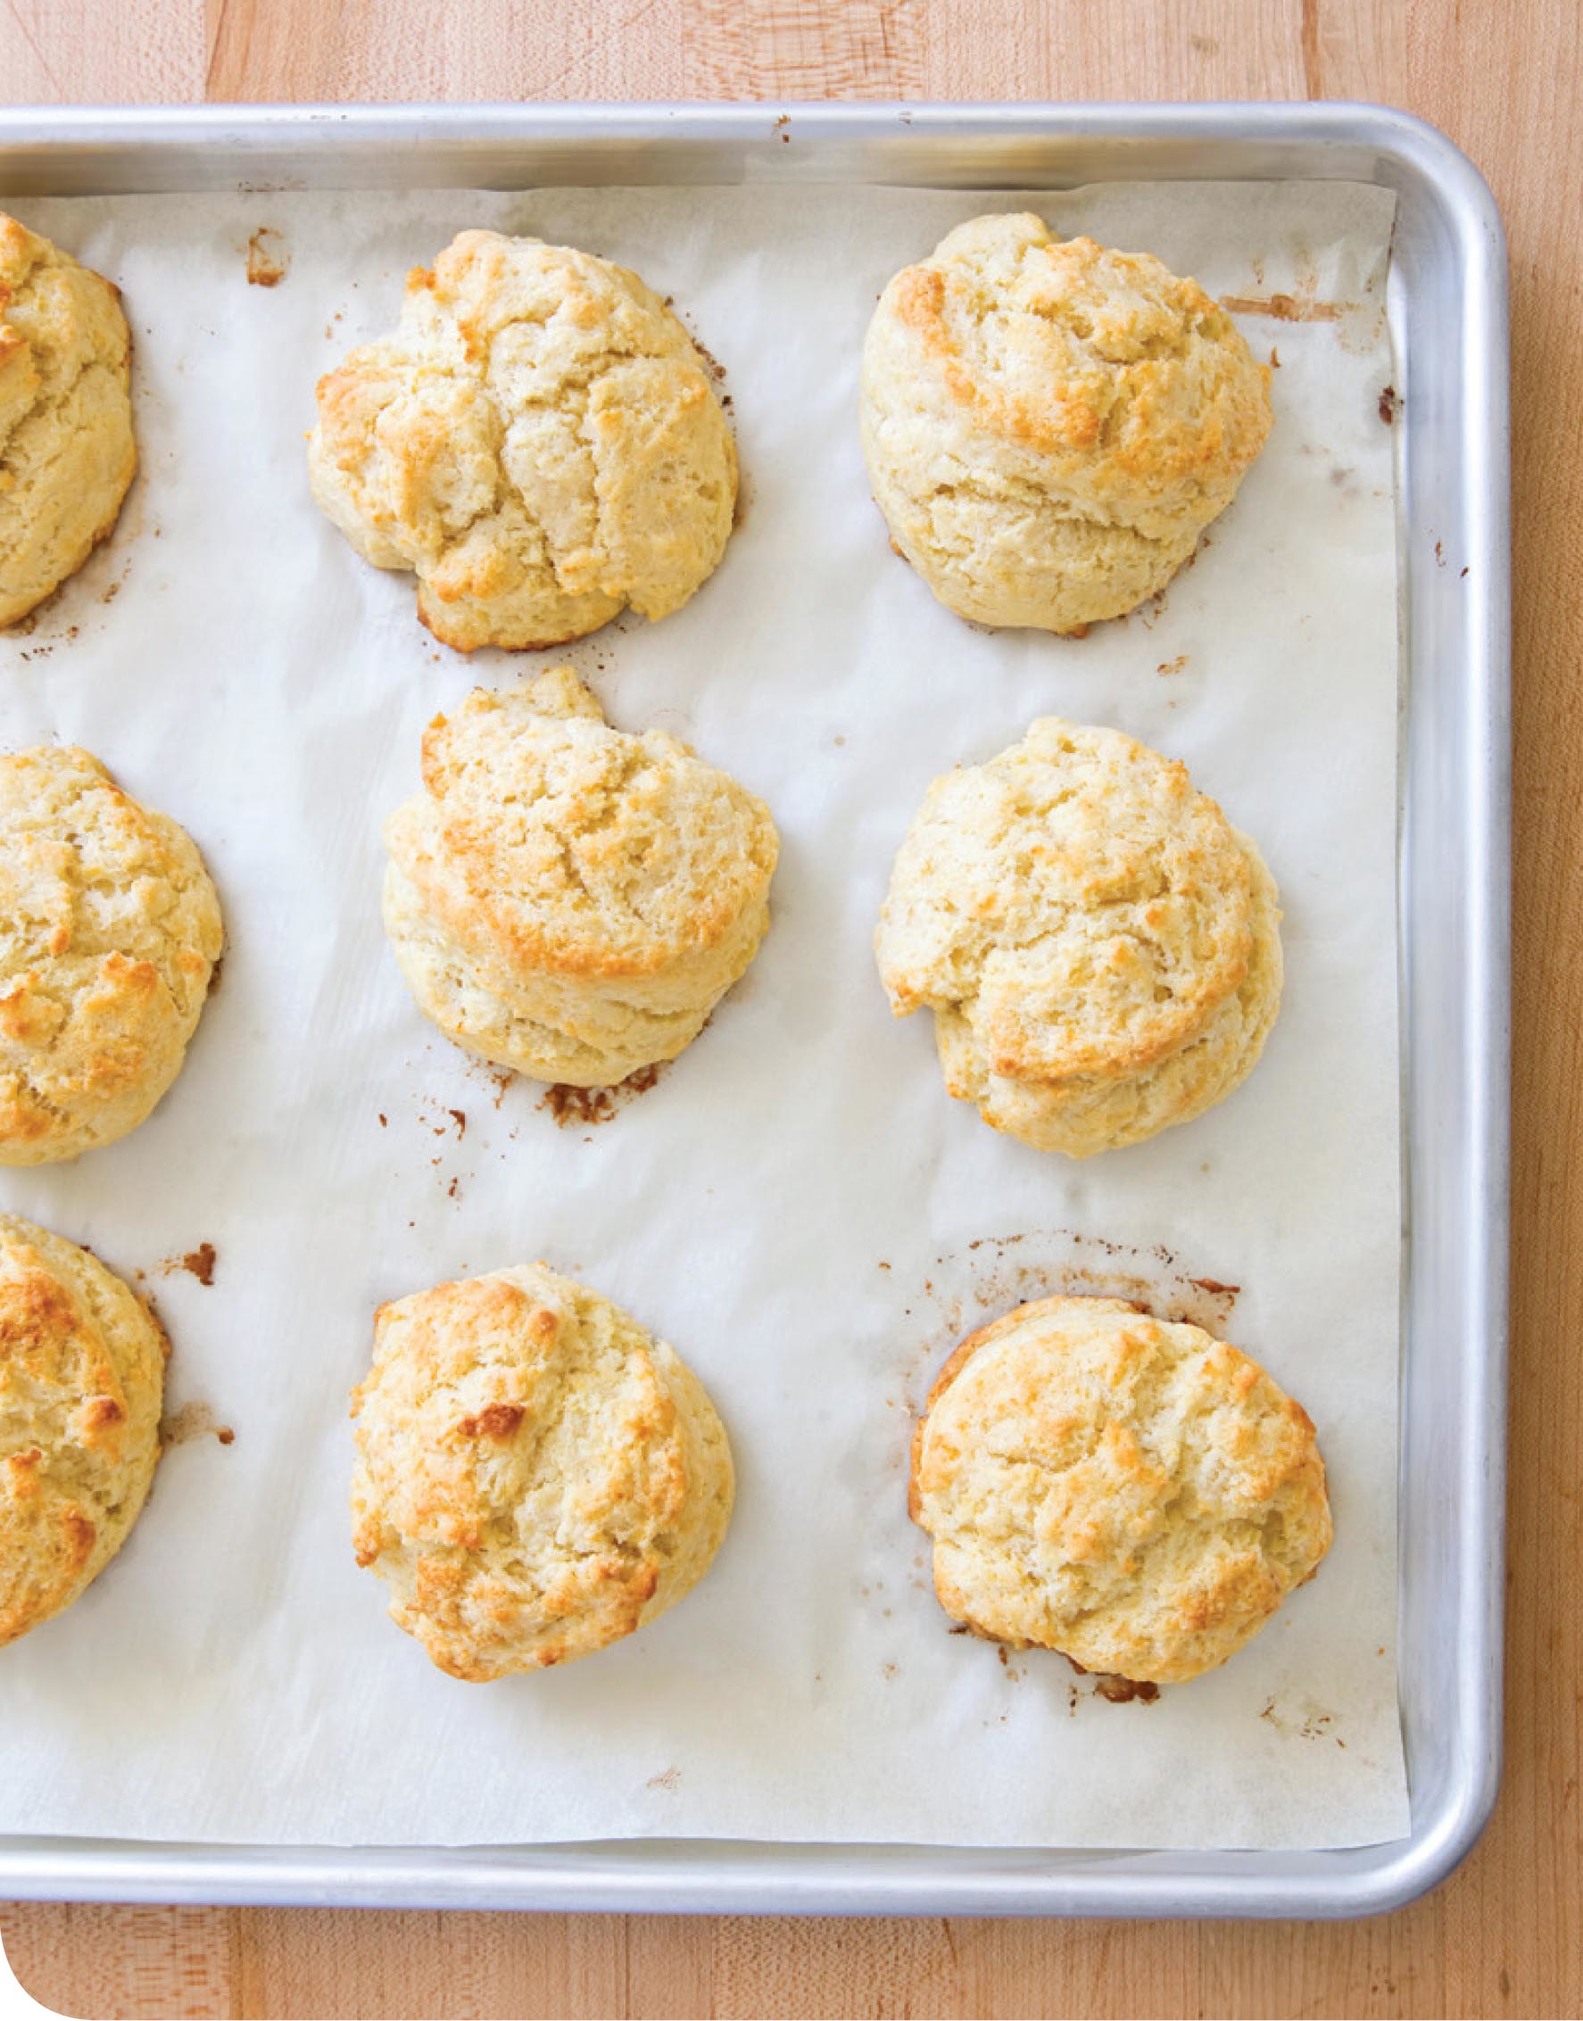
Makes 12 biscuits; Total Time 35 minutes
why this recipe works
Maybe you think baking a loaf of actual bread is beyond your abilities in the kitchen. First of all, that’s probably not true—see our foolproof recipes on this page and this page. But if you are intimidated, or even if you just need something to fill the bread basket within the next hour, a solid biscuit recipe is your best bet. Drop biscuits are easy. Unlike traditional biscuits, which need to be rolled and cut out with a biscuit cutter, drop biscuits are simply dropped onto the baking sheet. Still, to get flaky layers, the butter typically has to be cut into flour, which can be a hassle. This recipe gets around that: We devised a method of combining hot melted butter and cold buttermilk. When the butter hits the milk, it clumps into pieces just the right size. Voilà—light, fluffy, and easy stir-and-drop biscuits in plenty of time for dinner. To refresh day-old biscuits, heat them in a 300-degree oven for 10 minutes.
2 cups (10 ounces) all-purpose flour
2 teaspoons baking powder
½ teaspoon baking soda
1 teaspoon sugar
¾ teaspoon salt
1 cup buttermilk, chilled
8 tablespoons unsalted butter, melted, plus 2 tablespoons unsalted butter
1. Adjust oven rack to middle position and heat oven to 475 degrees. Line rimmed baking sheet with parchment paper. Whisk flour, baking powder, baking soda, sugar, and salt together in large bowl. Stir buttermilk and melted butter together in 2-cup liquid measuring cup until butter forms clumps.
2. Add buttermilk mixture to flour mixture and stir with rubber spatula until just incorporated. Using greased ¼-cup dry measuring cup, drop level scoops of batter 1½ inches apart on prepared sheet. Bake until tops are golden brown, rotating sheet halfway through baking, 12 to 14 minutes.
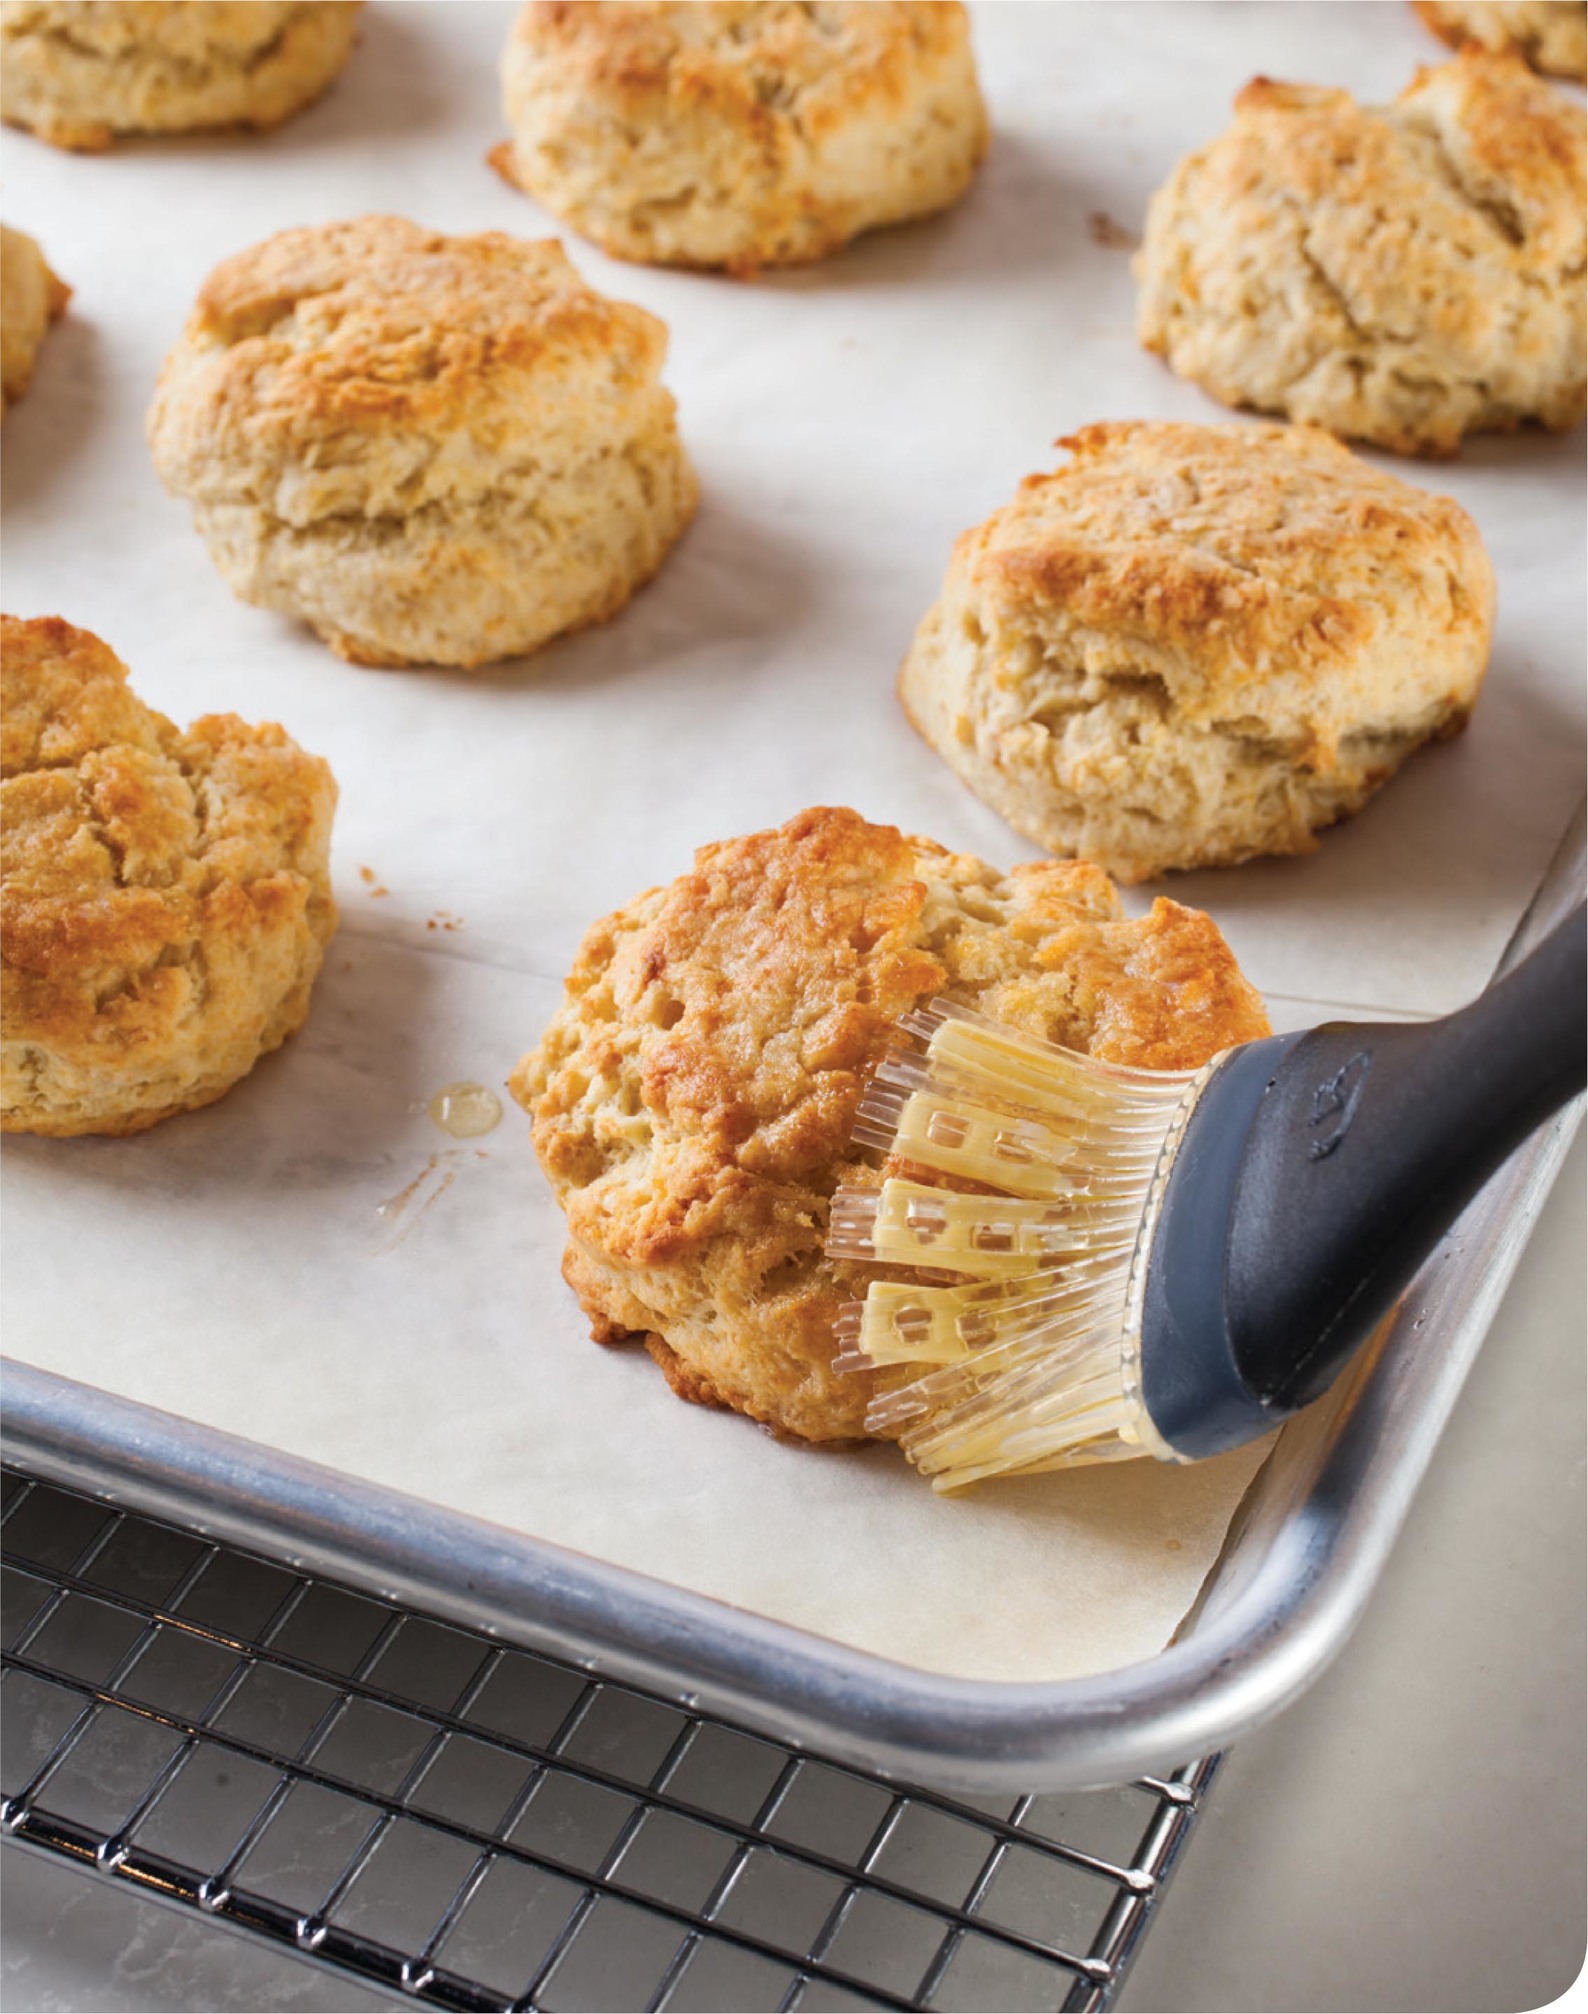
3. Melt remaining 2 tablespoons butter and brush on biscuit tops. Transfer biscuits to wire rack and let cool for 5 minutes before serving.
variations
Cheddar and Pimento Drop Biscuits
In step 1, add ¾ cup shredded extra-sharp cheddar cheese and ¼ cup finely chopped jarred pimentos to flour mixture.
In step 1, add 2 tablespoons chopped fresh basil, 2 tablespoons minced fresh parsley, and 2 teaspoons minced fresh oregano to flour mixture.
Mustard and Dill Drop Biscuits
In step 1, add 1 tablespoon minced fresh dill to flour mixture and 2 tablespoons whole-grain mustard to buttermilk mixture.
Rosemary and Olive Drop Biscuits
In step 1, add ¼ cup finely chopped pitted kalamata olives and 1½ teaspoons minced fresh rosemary to flour mixture.

think like a cook
DELICIOUS SCIENCE: LAYERS OF BUTTER MAKE FLAKY PASTRY
Butter is the key to many great biscuits and pie crusts because when it’s heated, the water in it turns into steam, which lifts the dough and creates a flaky texture. For the steam to have a significant effect, the butter must be evenly dispersed in layers throughout the dough. This way, when the butter layers melt, the steam helps separate the superthin layers of dough into striated flakes. The challenge is getting the butter evenly dispersed throughout the dough while leaving it in distinct layers. If the butter becomes fully incorporated (as when making a cake, for instance), the flakes won’t form. In traditional rolled biscuits, this is accomplished by incorporating tiny pea-size chunks of cold butter in the dough. In our drop biscuit recipe, the clumps of butter created when the hot butter mixes with cold buttermilk helps distribute the butter in pockets for results that are almost as light and fluffy as rolled biscuits, without any of the fussiness or extra steps.
Makes 1 loaf; Total Time 1 hour
why this recipe works
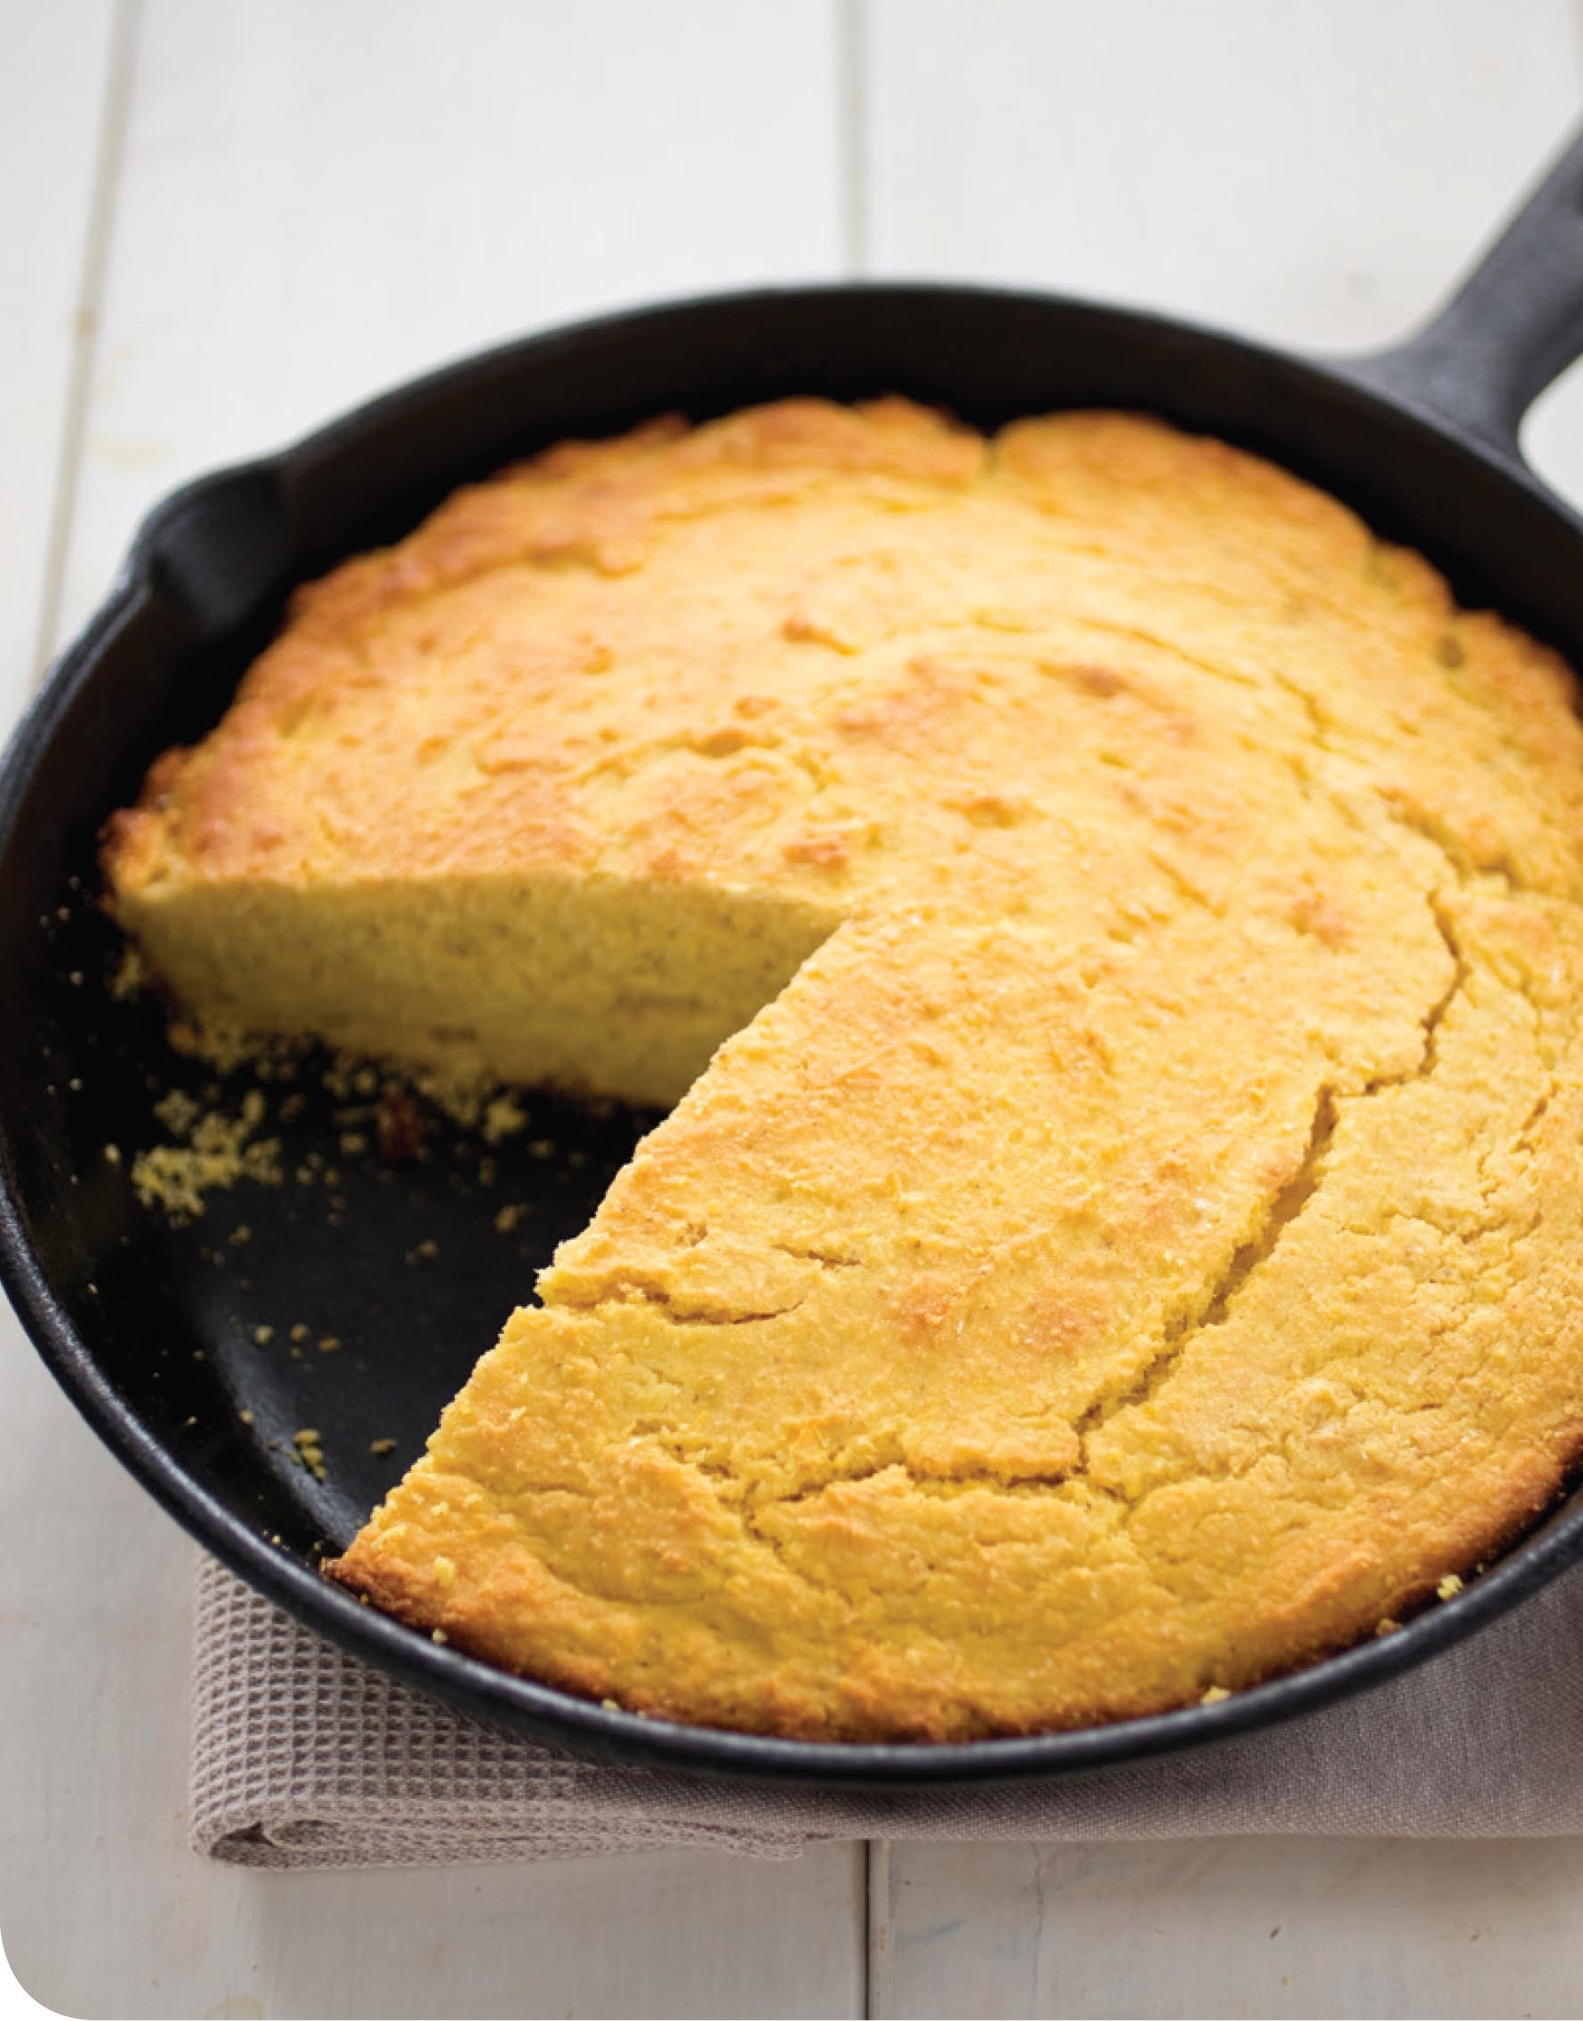
Of all the quick breads out there, cornbread is probably our favorite. And of all the ways to make cornbread, using a cast-iron skillet is definitely the best. The greased, preheated skillet gives the bread a seriously crunchy, golden crust. Using a combination of oil and butter to grease the skillet (as well as to enrich the batter) struck the perfect balance in the flavor and structure of the bread—the butter added richness, and the oil raised the smoke point so the butter wouldn’t burn. We also used the skillet to toast the cornmeal before adding it to the batter for superpotent corn flavor. We added a small amount of sugar to the mix in order to enhance the natural sweetness of the cornmeal. A cornmeal mush created by moistening the toasted cornmeal with sour cream and milk produced bread with a fine, moist crumb. You can use any type of fine- or medium-ground cornmeal here, but do not use coarse-ground.
2¼ cups (11¼ ounces) stone-ground cornmeal
1½ cups sour cream
½ cup whole milk
¼ cup vegetable oil
5 tablespoons unsalted butter
2 tablespoons sugar
1 teaspoon baking powder
1 teaspoon baking soda
¾ teaspoon salt
2 large eggs
1. Adjust oven rack to middle position and heat oven to 450 degrees. Toast cornmeal in 10-inch cast-iron skillet over medium heat, stirring frequently, until fragrant, about 3 minutes. Transfer cornmeal to large bowl, whisk in sour cream and milk, and set aside.
2. Wipe skillet clean with paper towels. Add oil to now-empty skillet, place skillet in oven, and heat until oil is shimmering, about 10 minutes. Using potholders, remove skillet from oven, carefully add butter, and gently swirl to incorporate. Being careful of hot skillet handle, pour all but 1 tablespoon oil-butter mixture into cornmeal mixture and whisk to incorporate. Whisk sugar, baking powder, baking soda, and salt into cornmeal mixture until combined, then whisk in eggs.
3. Quickly scrape batter into skillet with remaining fat and smooth top. Transfer skillet to oven and bake until top begins to crack and sides are golden brown, 12 to 15 minutes, rotating skillet halfway through baking.
4. Let bread cool in skillet for 15 minutes. Remove bread from skillet and transfer to wire rack. Serve warm or at room temperature.
variation
Spicy Southern-Style Cornbread
Whisk 2 minced jalapeño chiles and 2 teaspoons grated lime zest into cornmeal mixture with eggs in step 2.


There are a host of practical and culinary reasons why we love cast iron. One of its greatest advantages is that a cast-iron pan is possibly the only piece of kitchen gear you can buy that noticeably improves after years of heavy use. As you cook in it, a cast-iron pan gradually develops a natural, slick patina, called seasoning, which releases food easily. A well-seasoned cast-iron skillet can be just as nonstick as an aluminum or stainless-steel pan and will definitely outlast them.
Cast iron doesn’t heat very evenly because its thermal conductivity, or ability to transfer heat from one part of the metal to another, is very low. What cast iron does do well is hold onto heat: Once a cast-iron pan is hot, it will stay that way much more effectively than stainless steel. This makes cast iron the ideal material for high-heat applications, such as searing steak, and browning, in recipes like our cornbread.
Cast iron’s durability is legendary—many people are still cooking on cast-iron pans handed down through their family for generations. Cast iron is virtually indestructible and easily restored if mistreated. Cast iron’s ability to develop a nonstick coating also makes it incredibly versatile. This is a boon for minimalist cooks but also for gourmet cooks who appreciate the particular benefits cast iron offers for specific dishes and techniques.
Makes 1 loaf; Total Time 1 hour (plus cooling time)
why this recipe works
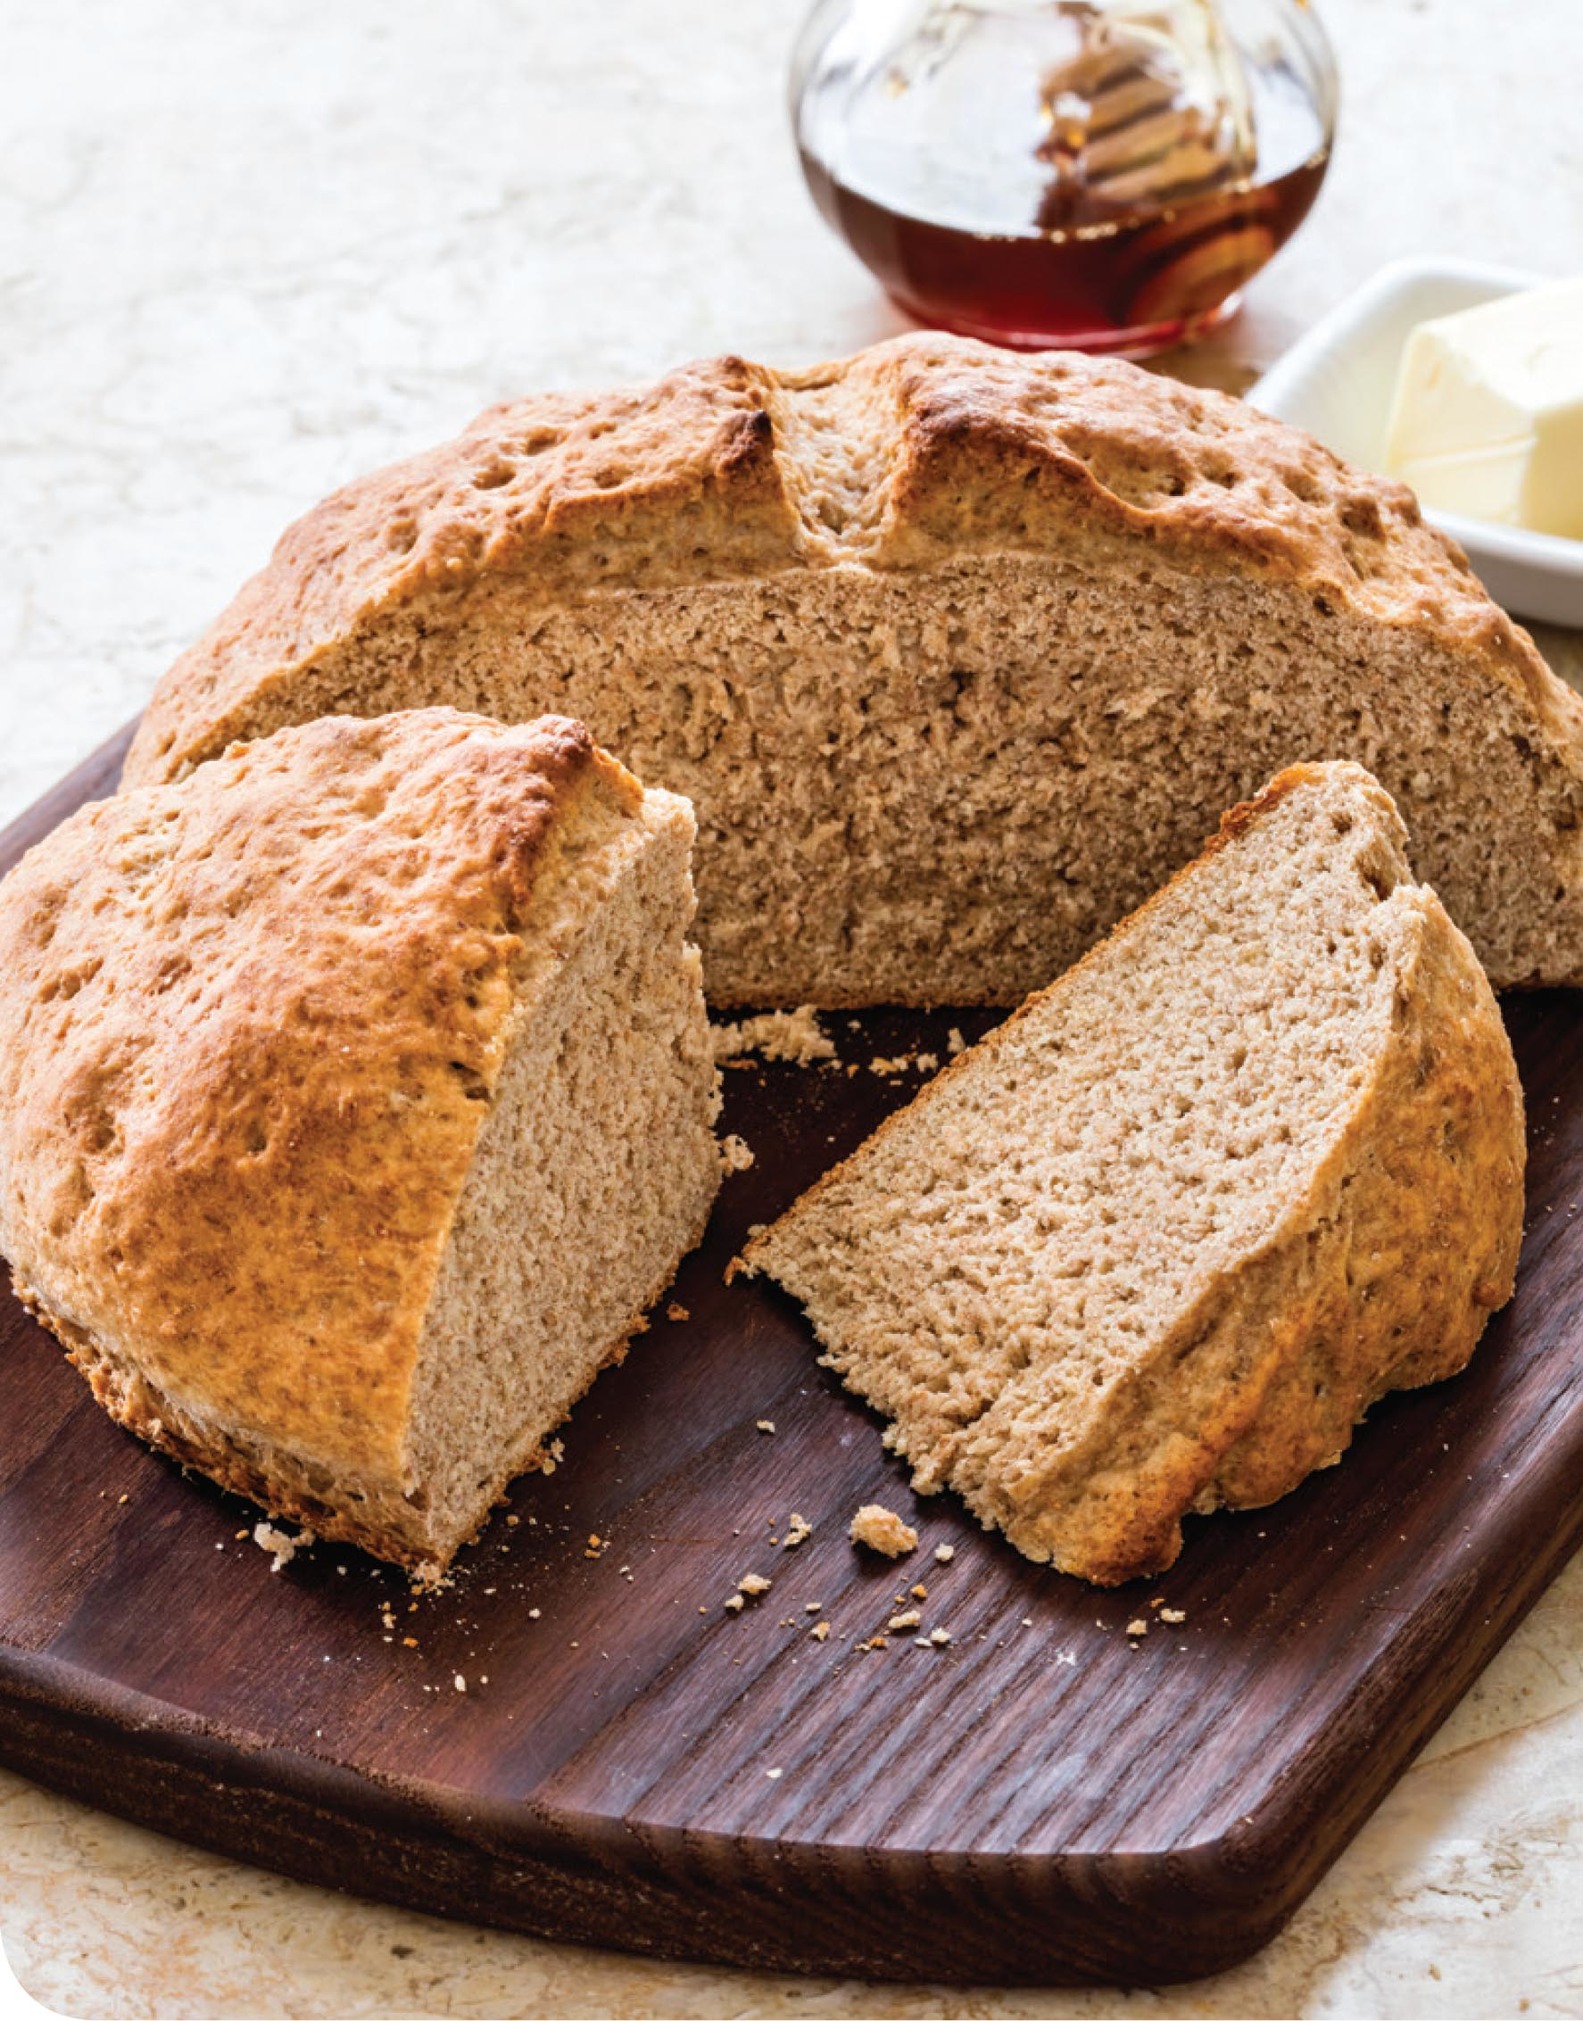
Probably the easiest whole-grain bread you’ll ever bake, brown Irish soda bread requires barely 15 minutes of work. Being a quick bread, it requires no yeast or long rise. But while most quick breads are rather sweet, this hearty bread has a robust, wheaty flavor with only slight sweetness, making it as suitable for the dinner table as it is at breakfast, slathered with butter and jam. In Ireland, coarse whole-meal flour is responsible for the bread’s deeply flavored crumb; we used easier-to-find whole-wheat flour along with toasted wheat germ to achieve a similar nutty flavor. Just a touch of sugar and a few tablespoons of butter added a hint of sweet richness. The dough required only a brief knead, and shaping it was a cinch—we simply patted it into a round. Finally, brushing melted butter on the hot loaf gave this authentic soda bread a rich crust.
2 cups (10 ounces) all-purpose flour
1½ cups (8¼ ounces) whole-wheat flour
½ cup (1½ ounces) toasted wheat germ
1½ teaspoons salt
1 teaspoon baking powder
1 teaspoon baking soda
1¾ cups buttermilk
3 tablespoons sugar
3 tablespoons unsalted butter, melted
1. Adjust oven rack to lower-middle position and heat oven to 400 degrees. Line rimmed baking sheet with parchment paper. Whisk all-purpose flour, whole-wheat flour, wheat germ, salt, baking powder, and baking soda together in large bowl. Whisk buttermilk, sugar, and 2 tablespoons melted butter in second bowl until sugar has dissolved.
2. Using rubber spatula, gently fold buttermilk mixture into flour mixture, scraping up dry flour from bottom of bowl, until dough starts to form and no dry flour remains. Transfer dough to lightly floured counter and knead by hand until cohesive mass forms, about 30 seconds. Pat dough into 7-inch round and transfer to prepared sheet.
3. Using sharp paring knife or single-edge razor blade, make two 5-inch-long, ¼-inch-deep slashes with swift, fluid motion along top of loaf to form cross. Bake loaf until golden brown and skewer inserted in center comes out clean, 45 to 50 minutes, rotating sheet halfway through baking.
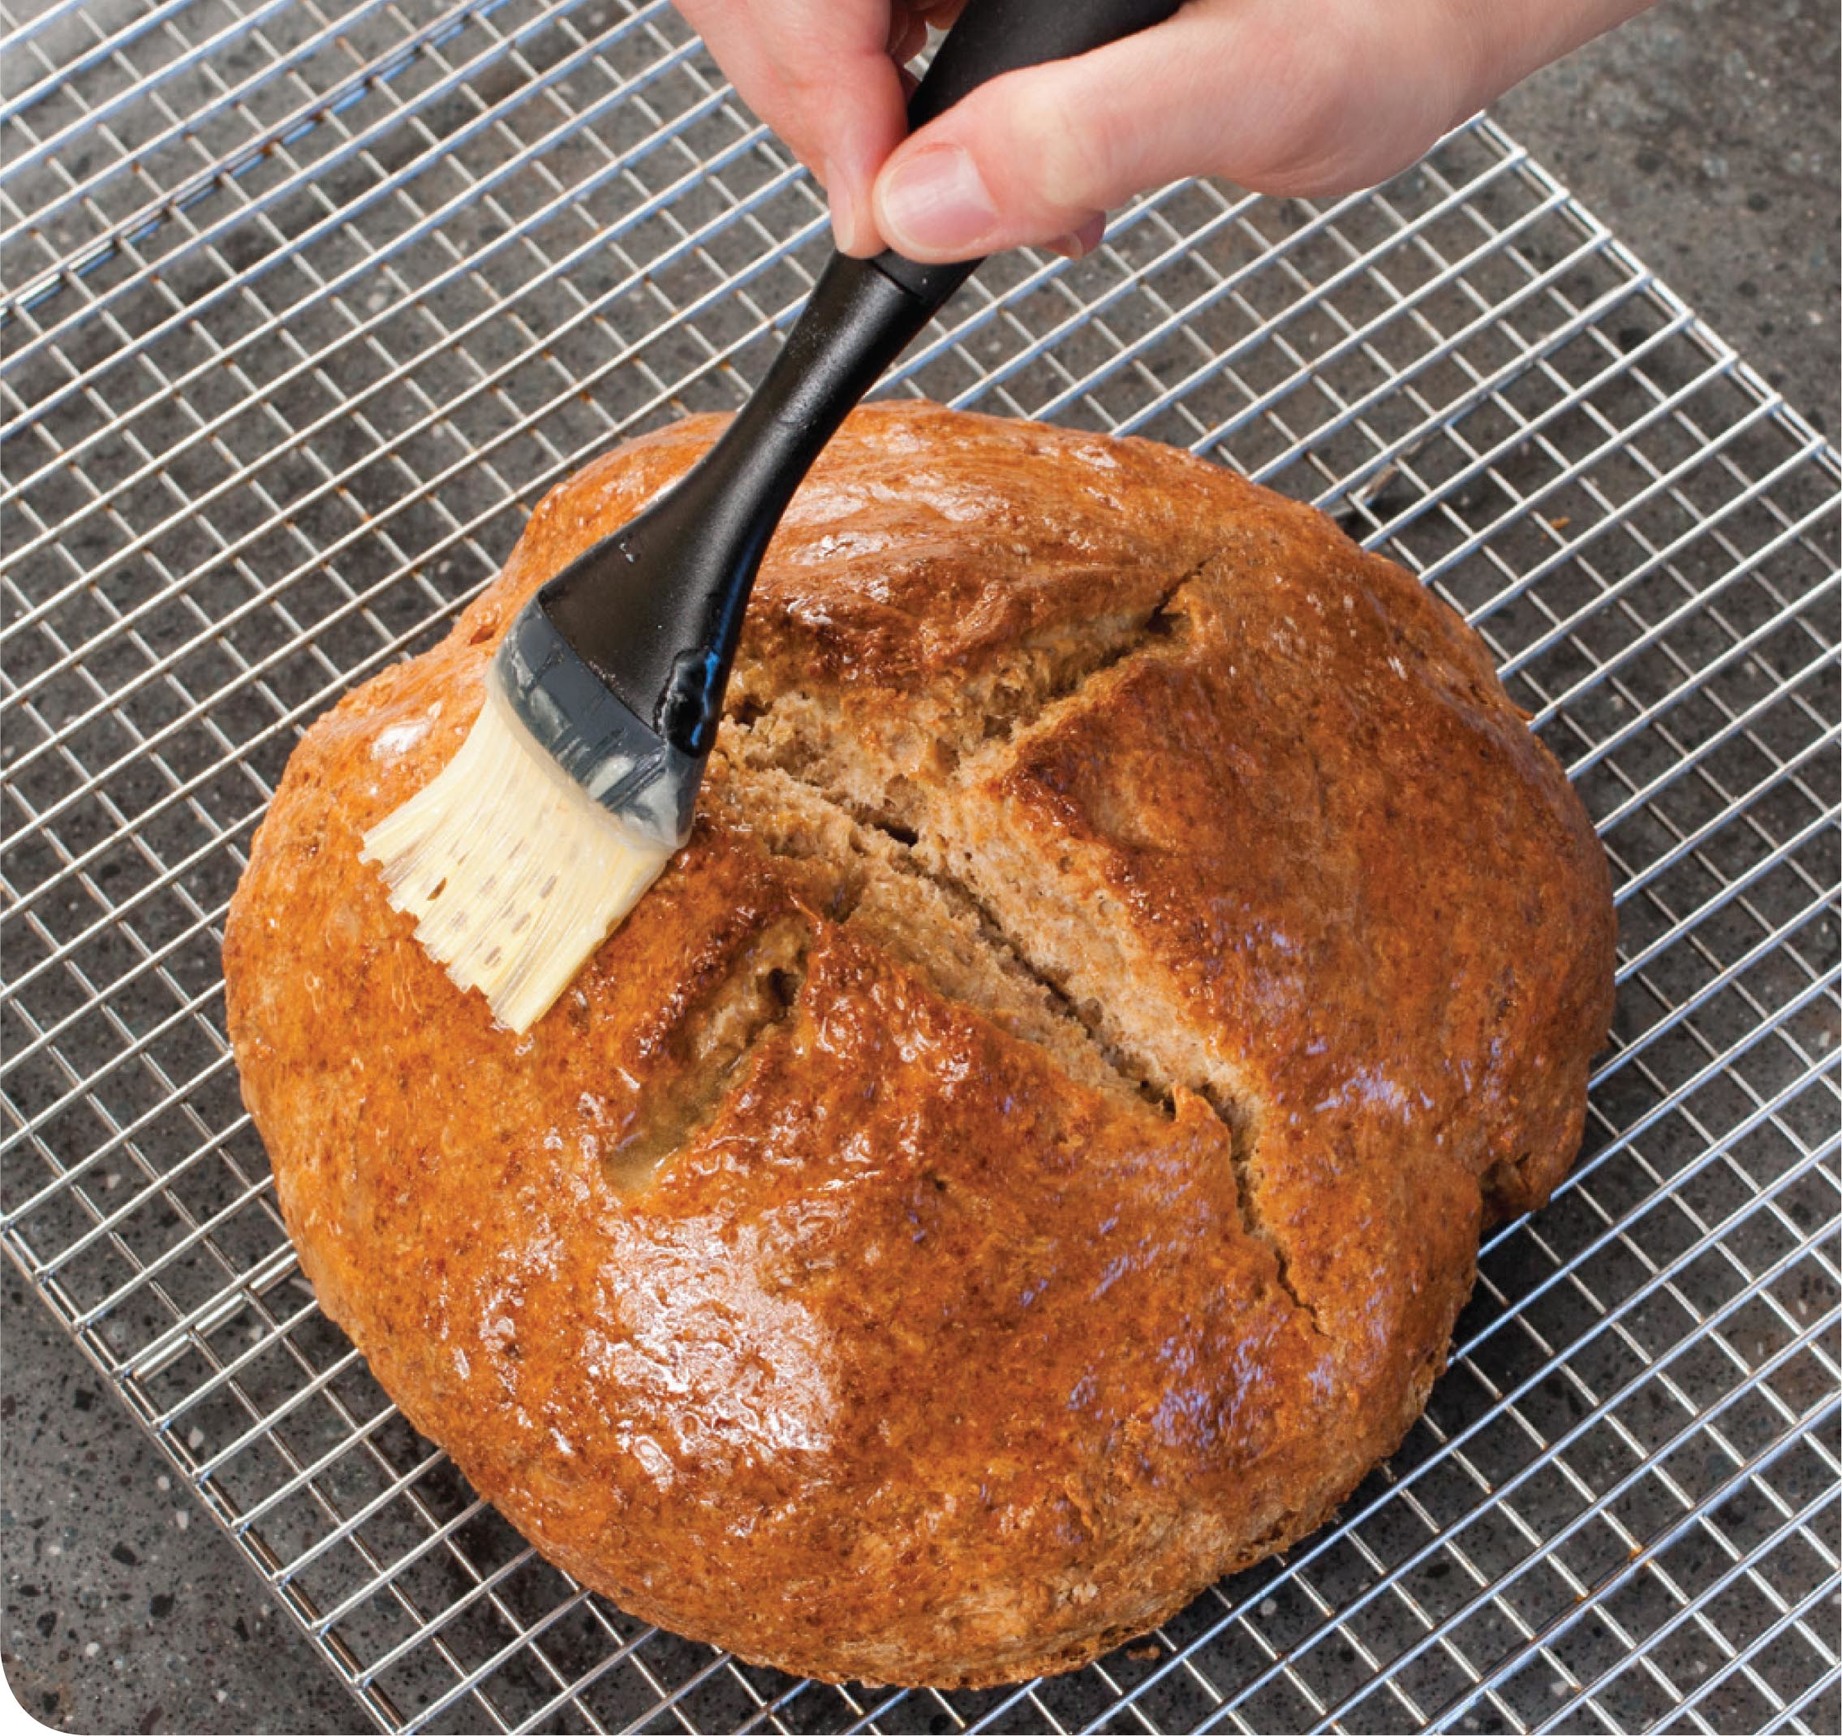
4. Transfer loaf to wire rack and brush with remaining 1 tablespoon melted butter. Let cool completely, about 3 hours, before serving.
variation
Brown Irish Soda Bread with Currants and Caraway
Add 1 cup dried currants and 1 tablespoon caraway seeds to dry ingredients in step 1.

think like a cook
SLICING INTO WARM BREAD: JUST SAY NO
The hard work is over, and your reward is a beautifully browned, lofty loaf of bread with an appetite-inducing aroma. But there is one more difficult step: resisting the urge to slice into the warm bread! The interior of a loaf needs to cool to room temperature from the 190 to 210 degrees it was when it emerged from the oven. During this time, the starches in the loaf continue to gelatinize, or absorb water and set into a solid mass; excess moisture evaporates; and the true flavor of the loaf comes to the fore. We’ve found that this takes about 3 hours for most large loaves. For perfect cooking, take your bread or rolls off their cooking surface or out of the pan and transfer them (after a brief wait, in some cases) to a wire rack so that air can circulate, preventing the escaping moisture from softening the crust. Once this wait period is complete, you can finally slice your homemade creation. The tool you use is of utmost importance. A chef’s knife may be sharp, but it will squash your loaf’s crumb as you press down on it. A serrated knife, in contrast, relies on a slicing motion in which the blade is dragged across the bread’s surface as it moves down through it, so it preserves the bread’s crust and interior holes.
Makes about 12 (6-inch) tortillas; Total Time 1 hour
why this recipe works
For most uses, supermarket bagged tortillas are fine, especially if you buy the freshest you can find. But if you have a little extra time, tortillas aren’t actually that hard to make. Fresh corn tortillas have a lightly sweet flavor and a soft, springy texture unmatched by store-bought. Our recipe features a short ingredient list, a very forgiving dough, and no need for a tortilla press. We tested a few variables, including whether to add salt (yes) and how long to rest the dough before pressing (5 minutes so the masa is fully hydrated). Vegetable oil, although nontraditional, made the dough soft, pliable, and easy to work with. Pressing the dough between a cut-open zipper-lock bag prevented sticking, and a pie plate pressed out even rounds. Using a clear pie plate makes it easy to see the tortilla. Distribute your weight evenly over the dough when pressing. You can find masa harina in the supermarket’s international aisle or near the flour.
2 cups (8 ounces) masa harina
2 teaspoons vegetable oil
¼ teaspoon salt
1¼ cups warm water, plus extra as needed
1. Cut sides of sandwich-size zipper-lock bag but leave bottom seam intact so that bag unfolds completely. Place open bag on counter and line large plate with 2 damp dish towels.
2. Mix masa, 1 teaspoon oil, and salt together in medium bowl. Using rubber spatula, stir in warm water to form soft dough. Using your hands, knead dough in bowl, adding extra warm water, 1 tablespoon at a time, until dough is soft and tacky but not sticky (texture is like Play-Doh). Cover dough and set aside for 5 minutes.
3. Meanwhile, heat remaining 1 teaspoon oil in 8-inch nonstick skillet over medium-high heat until shimmering. Using paper towel, wipe out skillet, leaving thin film of oil on bottom. Pinch off 1-ounce piece of dough (about 2 tablespoons) and roll into smooth 1¼-inch ball. Cover remaining dough with damp paper towel. Place ball in center of open bag and fold other side of bag over ball. Using clear pie plate, press down on plastic to flatten ball into 5-inch disk, rotating plastic during pressing to ensure even thickness. Working quickly, gently peel plastic away from tortilla.
4. Carefully place tortilla in skillet and cook, without moving it, until tortilla moves freely when pan is shaken, about 30 seconds. Flip tortilla and cook until edges curl and bottom surface is spotty brown, about 1 minute. Flip tortilla again and continue to cook until bottom surface is spotty brown and puffs up in center, 30 to 60 seconds. Place toasted tortilla between the 2 damp dish towels. Repeat shaping and cooking with remaining dough. (Cooled tortillas can be transferred to zipper-lock bag and refrigerated for up to 5 days. Reheat before serving.)


think like a cook
Whether you are making your own tortillas or buying them, for many dishes you probably want to warm the tortillas before serving. Warming tortillas not only makes them more pliable but can also add flavorful toasty char, depending on the method. Here are three methods we like. Whichever method you use, once the tortillas are warm, wrap them in foil or clean dish towels to keep them warm until serving.
If you have a gas stove, turn one burner to medium and use tongs to place the tortillas one at a time directly over the flame of the burner until lightly charred, about 30 seconds per side.
If playing with an open flame makes you nervous or you don’t have a gas stove, you can use a dry nonstick skillet over medium-high heat; toast the tortillas one at a time until softened and spotty brown, 20 to 30 seconds per side.
If you’d rather avoid the stove altogether, you can also use the microwave. Wrap up to 6 tortillas in a damp, clean dish towel and microwave until warm, 30 to 45 seconds.
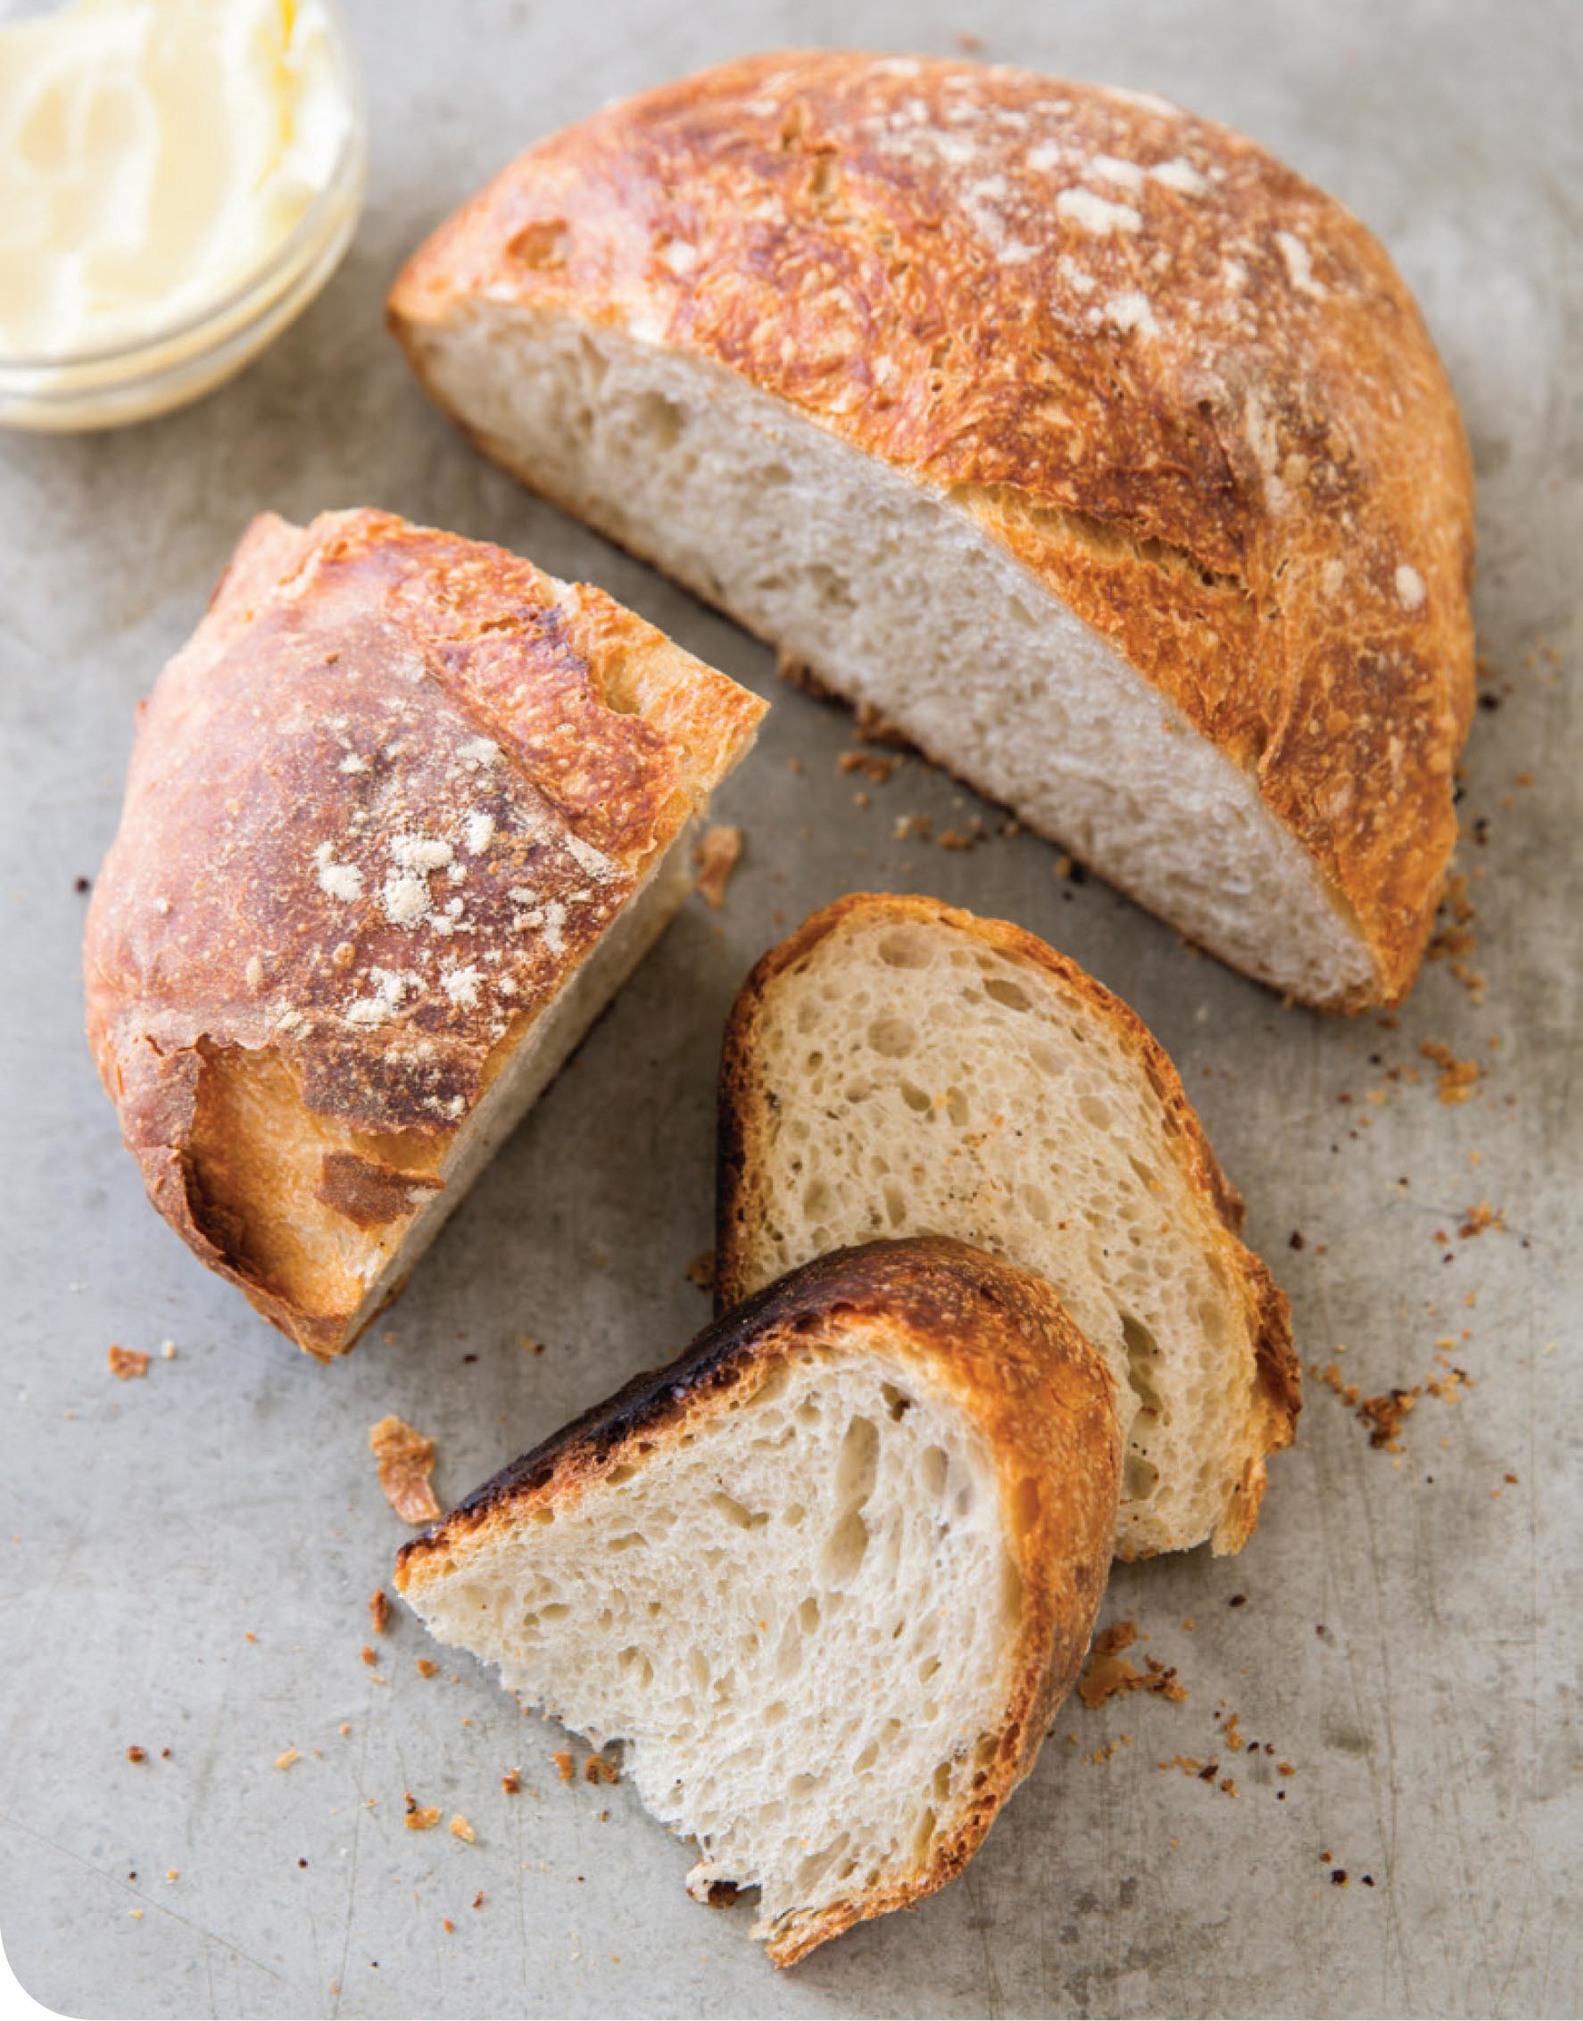
Makes 1 loaf; Total Time 11 hours (plus cooling time)
why this recipe works
Artisan-style loaves—with a thick, crisp crust that breaks open to a chewy, open interior—take professional skills, right? Wrong. Not only is it possible to make a rustic loaf for your table, it’s easy with the no-knead method. This technique replaces the kneading (which develops gluten to give bread structure) with a long (but hands-off) resting period, or autolyse. During autolyse, enzymes break up proteins so the dough requires only a brief turn to develop its gluten. The dough is then baked in a covered Dutch oven; the humid environment gives the loaf a dramatic open crumb and a crust. But the breads we tasted needed more structure and flavor. So we added vinegar for tang and beer for yeastiness; just a minute of kneading strengthened up the dough. Use a mild-flavored lager, such as Budweiser (nonalcoholic lager also works). In step 5, start the 30-minute timer as soon as you put the bread in the cold oven. Do not wait until the oven has preheated or the bread will burn.
3 cups (15 ounces) all-purpose flour
1½ teaspoons salt
¼ teaspoon instant or rapid-rise yeast
¾ cup water, room temperature
½ cup mild lager, room temperature
1 tablespoon distilled white vinegar
1. Whisk flour, salt, and yeast together in large bowl. Whisk water, beer, and vinegar together in 4-cup liquid measuring cup. Using rubber spatula, gently fold water mixture into flour mixture, scraping up dry flour from bottom of bowl, until dough starts to form and no dry flour remains. Cover bowl tightly with plastic wrap and let sit at room temperature for at least 8 hours or up to 18 hours.
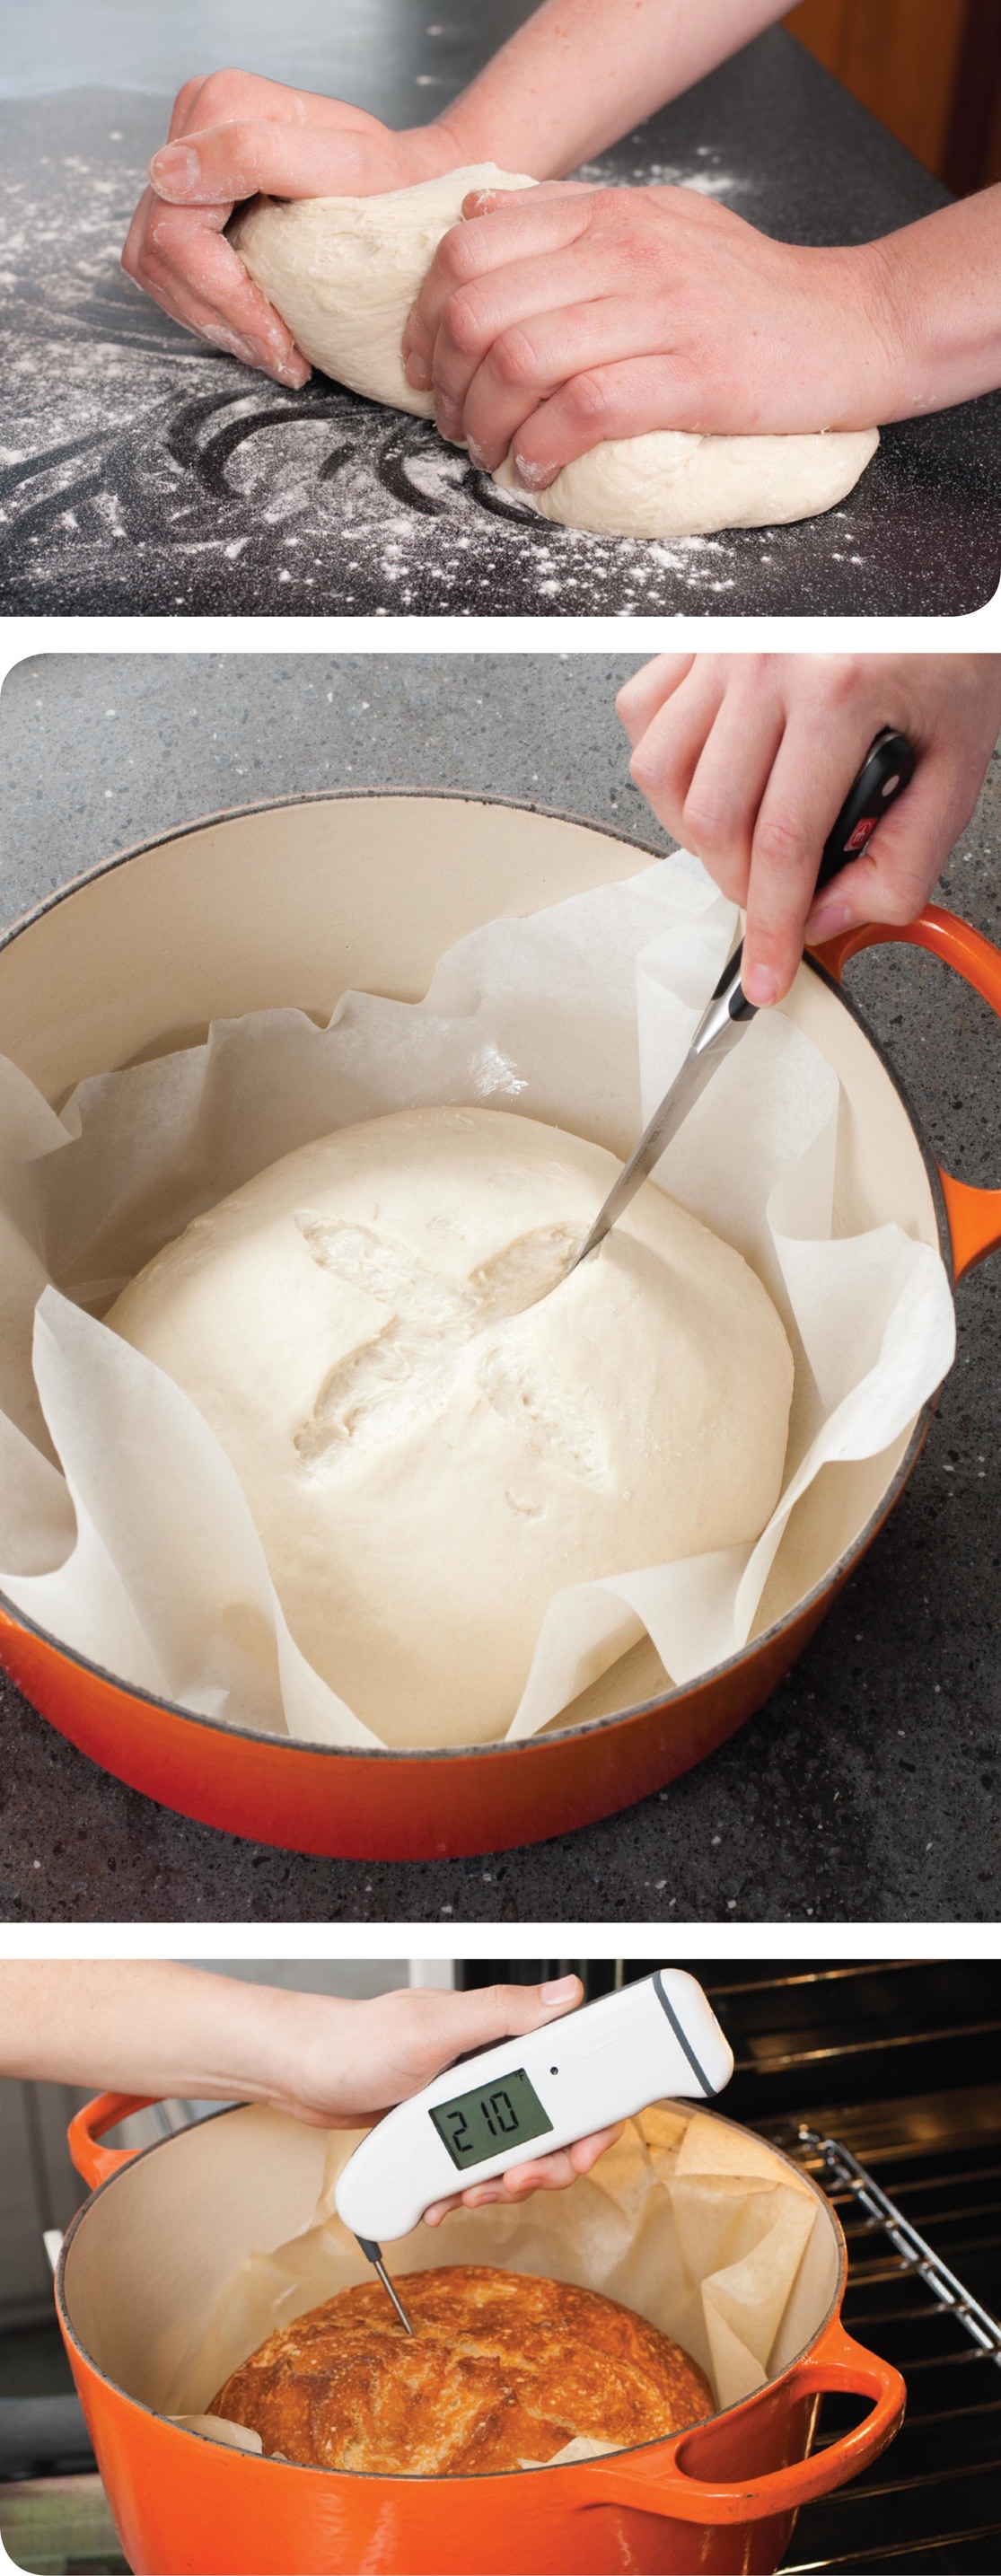
2. Lay 18 by 12-inch sheet of parchment paper on counter and lightly spray with vegetable oil spray. Transfer dough to lightly floured counter and knead by hand until smooth and elastic, about 1 minute.
3. Shape dough into ball by pulling edges into middle, then transfer seam side down to center of prepared parchment.
4. Using parchment as sling, gently lower loaf into Dutch oven (let any excess parchment hang over pot edge). Cover tightly with plastic and let rise until loaf has doubled in size and dough springs back minimally when poked gently with your knuckle, 1½ to 2 hours.
5. Adjust oven rack to middle position. Using sharp paring knife or single-edge razor blade, make two 5-inch-long, ½-inch-deep slashes with swift, fluid motion along top of loaf to form cross. Cover pot and place in oven. Turn oven to 425 degrees and bake loaf for 30 minutes while oven heats.
6. Remove lid and continue to bake until loaf is deep golden brown and thermometer inserted into bread registers 205 to 210 degrees, 25 to 30 minutes. Using parchment sling, remove loaf from pot and transfer to wire rack; discard parchment. Let cool completely, about 3 hours, before serving. (Bread is best eaten the day it is baked, but can be wrapped in aluminum foil and stored in a cool, dry place for up to 2 days.)
think like a cook
Gluten is the protein developed in bread making that gives bread its chew. This elastic protein is formed when two partial proteins present in wheat flour, glutenin and gliadin, come into contact with water during mixing, in a process called hydration, and then bond. Glutenin provides dough with strength; gliadin provides stretch. Hydrating the proteins allows them to unwind and become flexible. Then, through mixing, they begin to link up with one another to form long, elastic chains of gluten. Finally, typically through prolonged kneading, the proteins align and continue to cross-link until the chains combine to form a gluten network. Here’s an easy way to look at it: Imagine these proteins as bundled-up balls of yarn that need to be unwound and tied together into one longer piece that’s then sewn into a wider sheet. In their balled-up state they can’t be tied together; first you have to untangle and straighten them. Liquid does the untangling, mixing ties the proteins together, and kneading sews them into a sheet.
In this recipe, however, gluten develops through a long rest called autolyse: With an extremely wet dough such as this one, enzymes naturally present in the dough are able to act like scissors, cutting the balled-up proteins into pieces that are easily straightened with just a minute of kneading, or even no kneading with enough time and a sufficiently hydrated dough. We found just a minute of kneading and slightly less hydration than a totally hands-off bread would require reaped substantial improvements: a loaf with superior structure and an 8-hour minimum resting time instead of 12.
How does gluten work? A strong gluten network provides dough with structure to expand. Starch granules in the flour swell when hydrated, while yeast creates gas bubbles; both of these stretch the gluten network, and it traps the air—much like a balloon—so that the bread develops an airy crumb. Different types of baked goods benefit from more or less gluten formation—a rustic bread or pizza dough needs a lot of gluten for structure and chew, while a cake or quick bread needs much less in order to maintain its tender texture.
Makes 1 loaf; Total Time 4 hours (plus cooling time)
why this recipe works
Tall and domed, with a fine crumb and a light brown crust, this bread is a far cry from bouncy plastic-wrapped supermarket loaves. And it’s simple to make with the food processor, which handles most of the kneading. Sandwich loaves take the form of their pan, obviously, but they still need to be shaped. Rolling the dough into a tight cylinder enforced the gluten structure and prevented the loaf from being misshapen. To preserve air from the first rise, we worked the dough gently. We lightly floured our hands as well as the counter to keep the dough from sticking. Placing the loaf in the pan seam side down ensured that it didn’t split open as it rose. The test kitchen’s preferred loaf pan measures 8½ by 4½ inches; if you use a 9 by 5-inch loaf pan, increase the shaped rising time by 20 to 30 minutes and, when baking, start checking for doneness 10 minutes earlier than advised. Be sure to use chilled milk and ice water in the dough to prevent the food processor from overheating.
2 tablespoons unsalted butter, melted
2 tablespoons honey
¾ cup whole milk, chilled
⅓ cup ice water
2½ cups (13¾ ounces) bread flour
2 teaspoons instant or rapid-rise yeast
1½ teaspoons salt
1. Whisk melted butter and honey together in 4-cup liquid measuring cup until honey has dissolved. Whisk in milk and ice water until combined.
2. Pulse flour, yeast, and salt in food processor until combined, about 5 pulses. With processor running, add milk mixture and process until dough forms rough, elastic ball that begins to clear sides of bowl, 30 seconds to 1 minute.
3. Transfer dough to lightly floured counter. Using your lightly floured hands, knead dough to form smooth, round ball, about 30 seconds. Place dough seam side down in lightly greased large bowl or container, cover tightly with plastic wrap, and let rise until doubled in size, 1½ to 2 hours.
4. Grease 8½ by 4½-inch loaf pan. Press down gently on dough to deflate. Turn dough out onto lightly floured counter (side of dough that was against bowl should now be facing up). Press and stretch dough into 8 by 6-inch rectangle, with long side parallel to counter edge.
5. Roll dough away from you into firm cylinder, keeping roll taut by tucking it under itself as you go. Pinch seam closed and place loaf seam side down in prepared pan, pressing dough gently into corners. Cover loosely with greased plastic and let rise until loaf reaches 1 inch above lip of pan and dough springs back minimally when poked gently with your knuckle, 1 to 1½ hours.
6. Adjust oven rack to lower-middle position and heat oven to 350 degrees. Mist loaf with water and bake until deep golden brown and thermometer inserted into loaf registers 205 to 210 degrees, 35 to 40 minutes, rotating pan halfway through baking. Let loaf cool in pan for 15 minutes. Remove loaf from pan and let cool completely on wire rack, about 3 hours, before serving.
variation
Whole-Wheat American Sandwich Bread
Increase honey to 3 tablespoons. Reduce bread flour to 1½ cups (8¼ ounces) and add 1 cup (5½ ounces) whole-wheat flour and 3 tablespoons toasted wheat germ in step 2.
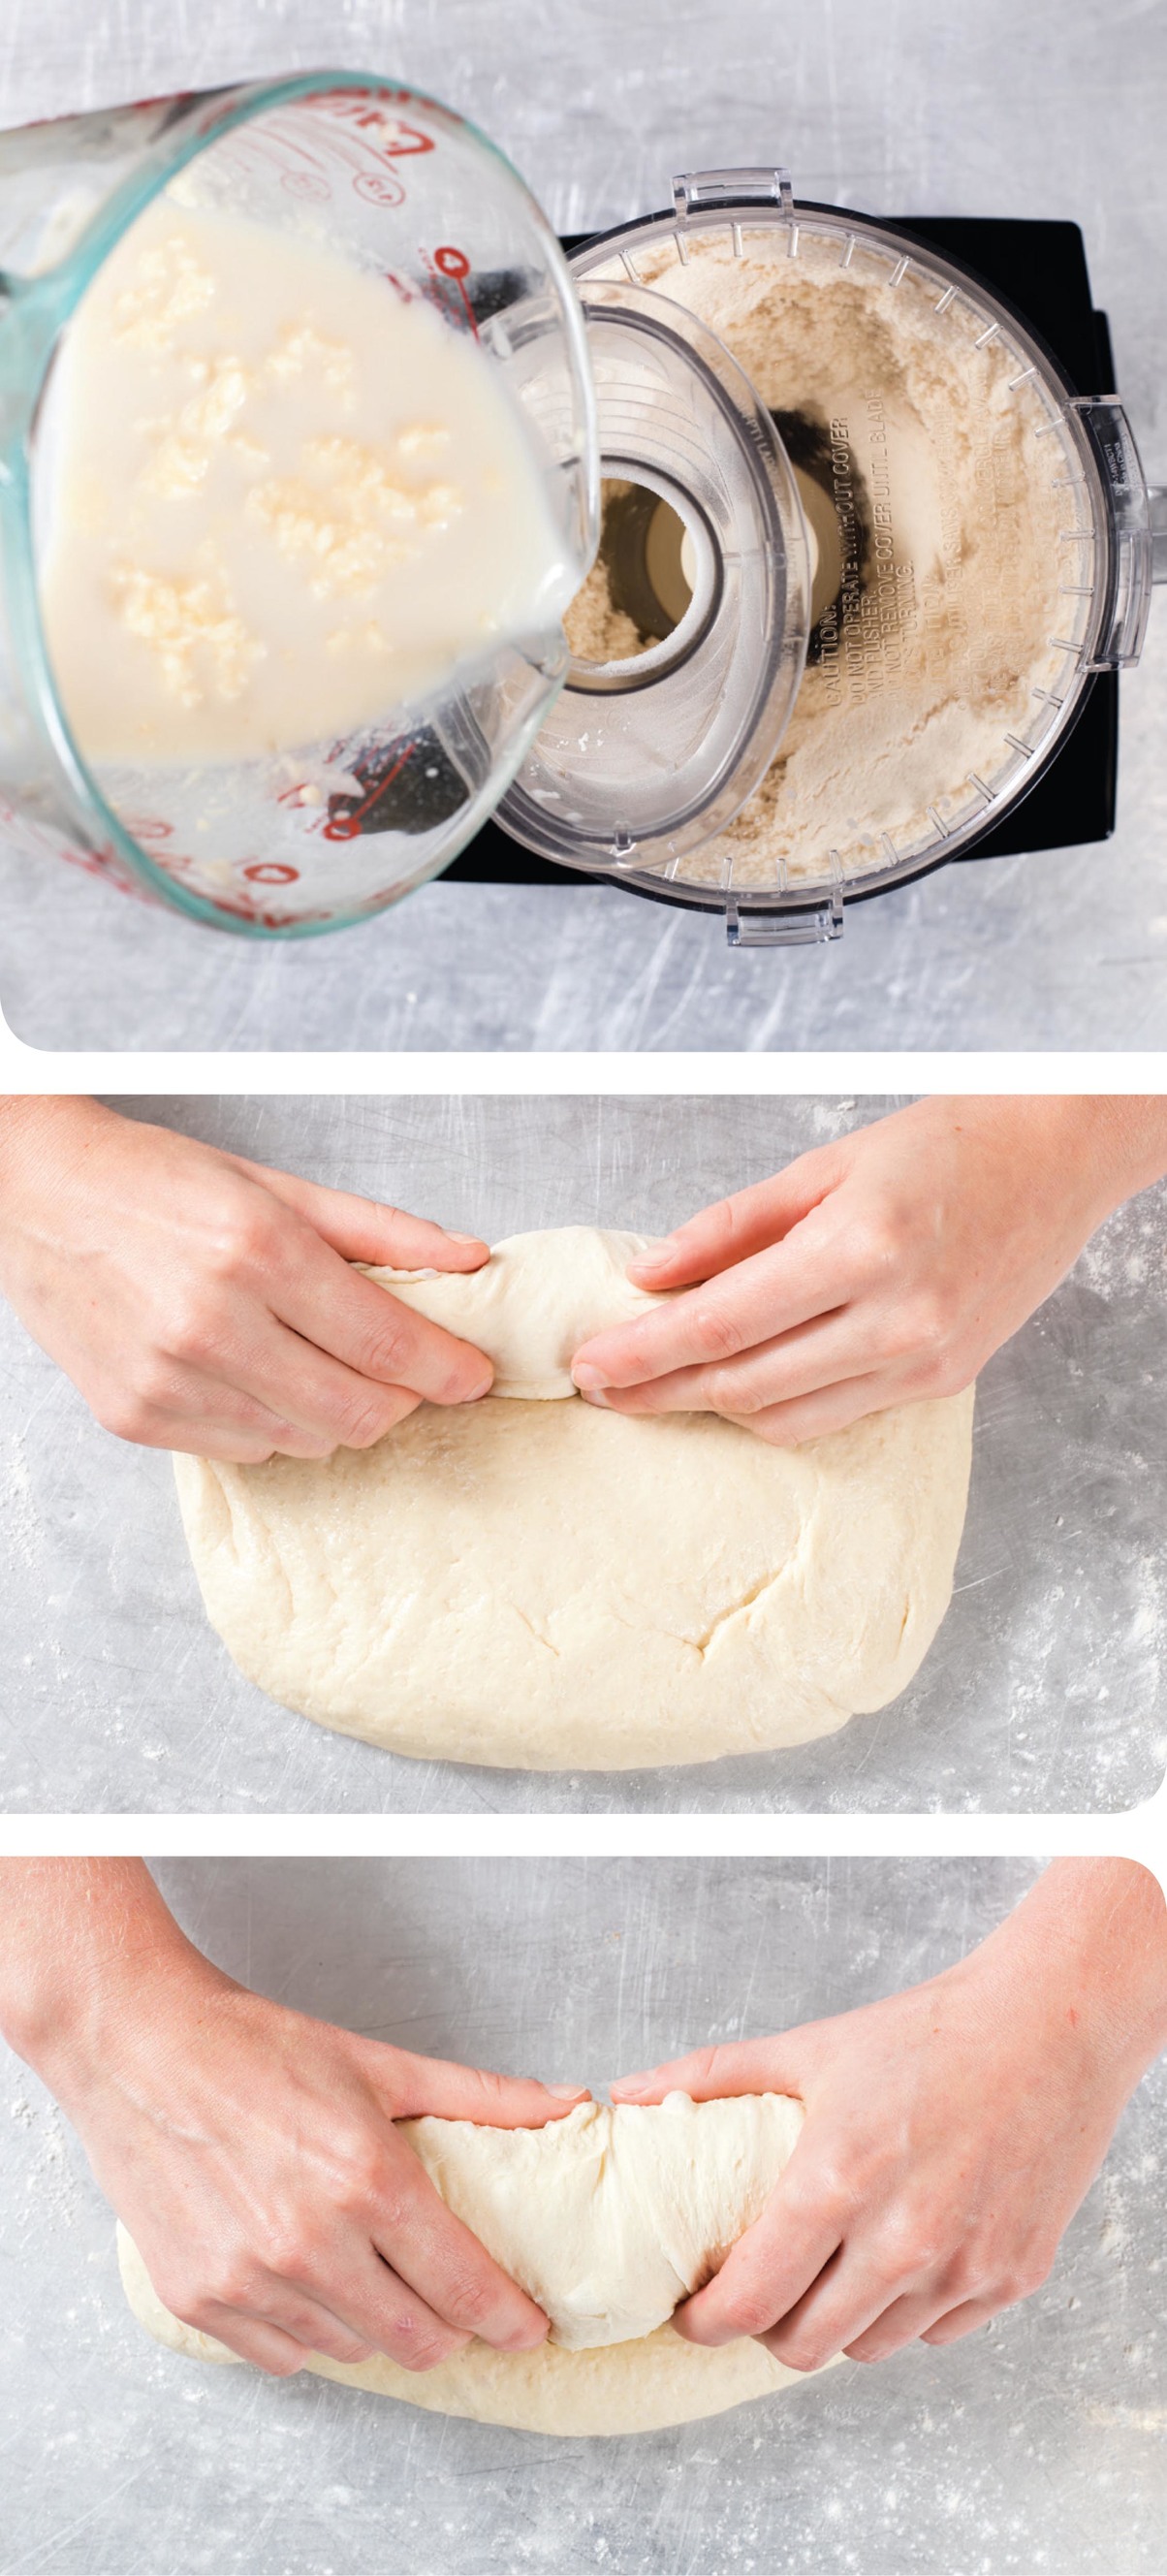

think like a cook
IF YOU WANT TO KNEAD BY HAND
We prefer to mix and knead most bread doughs with either a stand mixer or food processor depending on the dough, because these methods are almost effortless and produce great bread. But you can still make most breads by hand, the exception being doughs that are simply too wet or enriched for hand kneading.
Whisk the liquid ingredients together in a medium bowl and whisk the dry ingredients together in a large bowl. Using a rubber spatula, stir the liquid mixture into the dry mixture until the dough comes together and looks shaggy. Turn the dough onto a clean counter. To knead, start each stroke by gently pressing the dough down and away from you with the heel of your hand. Lift the edge of the dough that’s farthest away and fold the dough in half toward you. Repeat pressing and folding until the dough is smooth and elastic and forms a ball, 15 to 25 minutes, adding flour as needed to prevent the dough from sticking to the counter.


