SRIRACHA-CAULIFLOWER MAC ’N’ CHEEZE
Y’know, I was going to write this recipe using pasta, but then I got to thinkin’ about how I made this book for people who love veggies. So I swapped cauliflower for the pasta, and it turned out great! For those who simply want pasta and will kill anyone who gets in their way, feel free to use 8 ounces of elbow macaroni, cooked until al dente, in place of the cauliflower. MAKES 4 TO 6 SERVINGS
2 tablespoons coconut oil or extra-virgin olive oil
1 cup panko bread crumbs
¾ cup raw whole cashews, soaked in water for 2 hours
¼ cup raw sunflower seed kernels
¾ cup nutritional yeast flakes
1½ teaspoons kosher salt
1 teaspoon dry mustard
½ teaspoon freshly ground black pepper
½ teaspoon ground nutmeg
2 tablespoons coconut oil or extra-virgin olive oil
½ small sweet onion, diced
¼ cup all-purpose flour
2 cups unsweetened nondairy milk
3 tablespoons cornstarch
¼ cup Sriracha
1 large head cauliflower, cut into small florets
Chopped fresh flat-leaf parsley, for garnish
To make the topping, melt the coconut oil in a large saucepan over medium heat. Gently stir in the panko, then turn off the heat and let the bread crumbs absorb the oil.
Preheat the oven to 400°F. Lightly spritz a 2-quart casserole dish with nonstick cooking spray.
To make the sauce, drain the cashews and pulse them in a food processor with the sunflower seeds until finely ground. Add the nutritional yeast, salt, mustard, pepper, and nutmeg and pulse until well combined.
Heat the coconut oil in a large saucepan over medium heat. Add the onion and sauté until softened, 5 to 7 minutes. Whisk in the flour. Cook for 2 to 3 minutes, stirring constantly to avoid lumps. In a small cup or bowl, whisk together ½ cup of the nondairy milk and the cornstarch. Add to the pan, stirring constantly. Cook, still stirring constantly, until the mixture has thickened, then whisk in the remaining
1½ cups nondairy milk. Stir in the cashew mixture and Sriracha. Bring to a simmer, then immediately lower the heat and cook, stirring occasionally, until thickened and creamy, about 5 minutes. Season with salt and pepper to taste. Remove from the heat and cover to keep warm.
To assemble the dish, put ½ inch of water in a saucepan and bring to a simmer over medium heat. Add the cauliflower and season lightly with salt and pepper. Cover and cook until just tender, 4 to 6 minutes. Drain well, then pat dry with a clean kitchen towel or paper towels. Transfer to the prepared casserole dish. Pour the sauce over the cauliflower and top with the panko.
Bake for 15 to 20 minutes, until the topping is golden brown and the sauce is bubbling. Remove from the oven and let sit for 5 minutes so the molten cheeze lava can cool just a touch. Portion, plate, and serve garnished with parsley.
 To make a classic cheese sauce, heat 2 tablespoons butter or oil in a large saucepan. Add ½ sweet onion, diced, and sauté until softened, then stir in ¼ cup flour as directed. Whisk in ½ cup whole milk. Once the milk has thickened slightly, stir in another 1½ cups whole milk, then 1 cup heavy cream, 1 teaspoon kosher salt, ½ teaspoon freshly ground black pepper, and ½ teaspoon ground nutmeg. Simmer gently for 5 minutes, stirring occasionally. Stir in ¼ cup Sriracha. While whisking continuously, add 1½ cups grated Cheddar cheese, one handful at a time. Once the cheese has melted, add the cooked cauliflower and stir gently until evenly coated. Transfer to the prepared casserole dish. Top with ⅓ cup grated Parmigiano-Reggiano cheese and another ¼ cup grated Cheddar cheese. Spread the panko (cooked in butter rather than oil if you like) evenly over the top and bake as directed.
 For the topping, substitute 2 cups of rice squares cereal (such as Rice Chex) for the panko. Put the cereal in a large ziplock bag and gently roll over it with a rolling pin until the cereal is coarsely crushed into bits, resembling panko in texture. For the cheeze sauce, simply substitute gluten-free flour for the all-purpose flour.
CURRIED KALE AND SQUASH RISOTTO
Risotto, the king of rice dishes so often feared by home cooks, is actually pretty darn easy to make if you bake it. Screw that “stir constantly” crap; I’ve got things to do! If you can muster up the wherewithal to stir this version once every fifteen minutes for forty-five minutes—yes, a whopping three times—congrats in advance on becoming the newest member of the risotto cognoscenti. MAKES 4 TO 6 SERVINGS
2 tablespoons extra-virgin olive oil
½ red onion, diced
3 cloves garlic, minced
1 cup Arborio rice
¼ cup Sriracha
½ cup dry white wine or malty amber ale (see sidebar)
3 to 4 cups vegetable stock, kept hot
1 small butternut squash, seeded and cubed
1 bunch kale, stemmed and coarsely chopped
½ medium red onion, halved lengthwise and sliced
1 clove garlic, minced
2 tablespoons extra-virgin olive oil
1½ tablespoons curry powder Salt and freshly ground black pepper
½ cup nutritional yeast flakes
Salt and freshly ground black pepper
Toasted pine nuts, for garnish (optional)
Preheat the oven to 350°F.
To prepare the rice, heat the oil in an ovenproof pot or Dutch oven over medium heat. Add the onion and sauté until softened, 5 to 7 minutes. Add the garlic and sauté just until fragrant, about 30 seconds. Stir in the rice and continue stirring until every grain is coated with oil and the rice has a nutty aroma, about 5 minutes. Add the Sriracha and stir until the rice is evenly coated. Pour in the white wine to deglaze the pan, using a wooden spoon to scrape up all the stubborn, tasty brown bits. Cook until the wine has almost entirely evaporated, 2 to 3 minutes. Add 1½ cups of the hot stock and bring to a boil. Cover and transfer to the oven and bake for 15 minutes.
To make the topping, combine the butternut squash, kale, onion, garlic, oil, and curry powder in a large bowl and toss until well combined. Season generously with salt
and pepper. Spread the mixture in an even layer in a large roasting pan or on a rimmed baking sheet.
Carefully remove the risotto from the oven and give it a healthy stir, then stir in another ½ cup hot stock. Cover and return to the oven. Put the squash mixture in the oven, too.
Bake for 15 minutes, then remove the risotto from the oven once again. (Leave the veggies in to continue roasting.) Give the risotto a healthy stir, then stir in another ½ cup of hot stock. Cover and return to the oven.
Bake for 15 minutes. Remove both vessels from the oven. The veggies should be fork-tender, and the rice should be creamy, with no trace of chalkiness. If the rice is still too firm or dry in the center of each grain, add another ½ cup of hot stock. Stir, cover, and return to the oven for 15 minutes. (Keep the squash covered so it stays hot.) Once the texture is right, stir in another ½ cup of hot stock and the nutritional yeast. Season the risotto and the squash mixture with salt and pepper to taste.
Serve on individual plates, creating a small divot in each mound of risotto. Fill the divot with the squash mixture, garnish with pine nuts, and serve immediately.
Feel free to substitute 2 tablespoons melted butter and ¼ cup grated Parmigiano-Reggiano cheese for the nutritional yeast flakes.
My good comrade, Anya, requested a recipe such as this risotto for the book. And I wouldn’t be doing it any justice if I didn’t include an option to use beer, which adds an awesome layer of flavor, in place of the traditional white wine. Anya’s husband, Mike (who’s a pretty wicked cook!), loves to make his “beersotto” with Chimay Grande Réserve. While this Belgian Trappist ale is fairly readily available, feel free to substitute any amber to dark brown malt-forward ale or porter. Avoid hoppy beers and big, thick stouts. (If gluten is an issue, be sure to choose a gluten-free beer.)
SRIRACHA SWEET POTATO SHEPHERD’S PIE
I didn’t really appreciate shepherd’s pie before trying the tempeh shepherd’s pie at Stone Brewing World Bistro & Gardens, which I ate a lot of during recipe testing for my second book. This rendition definitely draws some influence from Stone, but I’ve added Sriracha (duh) and used sweet potatoes for the topping, with some chipotles thrown in to provide a smoky heat that puts it all over the top. MAKES 6 TO 8 SERVINGS
2 pounds sweet potatoes, peeled and quartered
½ cup vegetable stock
2 tablespoons extra-virgin olive oil or coconut oil
2 chipotle chiles in adobo sauce, minced
Salt and freshly ground black pepper
1 (8-ounce) package tempeh, crumbled
¼ cup Sriracha
3 tablespoons Bragg Liquid Aminos or low-sodium soy sauce
1 tablespoon garlic powder
2 teaspoons ground cumin
3 tablespoons extra-virgin olive oil
1 small red onion, diced
2 carrots, diced
2 stalks celery, diced
1 small zucchini, diced
½ cup frozen or fresh peas
3 cloves garlic, minced
3 tablespoons tomato paste
½ cup vegetable stock Salt and freshly ground black pepper
Chopped fresh flat-leaf parsley, for garnish
To make the topping, put the sweet potatoes in a saucepan, add water to cover, and season with a generous amount of salt. Bring to a boil over high heat, then immediately lower the heat, cover, and simmer until the potatoes are fork-tender, 15 to 20 minutes. Drain well. Add the garlic, stock, oil, and chipotles and use a potato masher to puree the mixture and combine well. Add more stock or oil for a thinner consistency if desired. Season with salt and pepper to taste.
Preheat the oven to 350°F.
To make the filling, mix the tempeh, Sriracha, liquid aminos, garlic powder, and
cumin in a bowl. Heat 2 tablespoons of the oil in a large cast-iron or nonstick skillet over medium heat. Add the onion, carrots, and celery and sauté for 3 minutes. Add the zucchini and sauté until all the veggies are softened, 3 to 4 minutes. Add the peas and garlic and sauté just until the garlic is fragrant, about 30 seconds. Move the vegetables toward the outer edge of the pan, creating a well in the center. Pour the remaining tablespoon of oil into the well and let it heat slightly. Add the tempeh mixture to the well and stir to coat with the oil. Add tomato paste and mix everything together. Cook for 1 minute, stirring constantly. Pour in the stock to deglaze the pan, using a wooden spoon to scrape up all the stubborn, tasty brown bits. Cook, stirring occasionally, until most of the moisture has evaporated, about 3 minutes. Season with salt and pepper to taste.
To assemble the dish, transfer the filling to a 9 by 13-inch baking pan and spread it in an even layer. Top with sweet potato mixture, spreading it evenly as well. Cover with aluminum foil and bake for 20 minutes. Serve immediately, garnished with parsley.
Feel free to sub cream or milk for the veggie stock in the sweet potatoes.
You can assemble the shepherd’s pie up to 2 days before serving. Cover with aluminum foil and refrigerate. When you’re ready to cook it, bake, covered, at 350°F until heated through, 35 to 40 minutes.
To roast garlic, preheat the oven to 350°F. Cut the top ¼ inch off of a head of garlic, leaving the head intact but exposing the individual cloves of garlic. Place the garlic cut side up on a large sheet of aluminum foil, drizzle 1 tablespoon olive oil over the top, and season with a sprinkling of salt and pepper. Gather the foil up around the garlic, folding or twisting the top to seal. Bake for 1 hour, then let cool to room temperature. Squeeze the flesh out from the bottom up by hand, or use a fork to pull it out.
Maple-Sriracha Roasted Brussels Sprouts with Cranberry Wild Rice
MAPLE-SRIRACHA ROASTED BRUSSELS SPROUTS WITH CRANBERRY WILD RICE
While I wish I could take all the credit for the unique blend of flavors here, the inspiration for the brussels sprouts came from a restaurant in NYC called the Vanderbilt. I was going to rework their recipe as a side dish, but after taking my first bite of this new version, I realized that serving the brussels sprouts atop my favorite wild rice dish would create a stunning entrée. MAKES 4 TO 6 SERVINGS
2 tablespoons extra-virgin olive oil
1 small red onion, diced
3 cloves garlic, minced
2 bay leaves
1½ cups wild rice
3½ cups vegetable stock
½ cup unsweetened dried cranberries
¼ cup chopped raw walnuts or pecans
2 tablespoons minced fresh rosemary
Salt and freshly ground black pepper
½ cup Grade B maple syrup or raw agave nectar
3 tablespoons extra-virgin olive oil
3 tablespoons Sriracha
1½ tablespoons Bragg Liquid Aminos or low-sodium soy sauce
Juice of 1 lime
1 pound brussels sprouts, trimmed and halved lengthwise
Chopped fresh flat-leaf parsley, for garnish (optional)
To make the rice, heat the oil in a large Dutch oven or pot over medium-high heat. Add the onion and sauté until softened, 5 to 7 minutes. Add the garlic and bay leaves and sauté just until the garlic is fragrant, about 30 seconds. Add the rice and stir until evenly coated. Continue to cook, stirring occasionally, until the rice is slightly toasted and has a nutty aroma, about 3 minutes. Pour in 1 cup of the stock to deglaze the pan, using a wooden spoon to scrape up all the stubborn, tasty brown bits. Add the remaining 2½ cups of stock and the cranberries. Bring to a boil, then immediately lower the heat, cover, and simmer until the rice is tender and some of the grains have popped, 50 to 60 minutes. Uncover and fluff with a fork. Simmer for 5 minutes, stirring occasionally. Remove from the heat and drain off any excess liquid.
While the rice is cooking, prepare the brussels sprouts. Preheat the oven to 375°F. In a large bowl, combine the maple syrup, oil, Sriracha, liquid aminos, and lime juice and whisk until well blended. Add the brussels sprouts and toss until evenly coated. Using a slotted spoon, transfer the brussels sprouts to a nonstick or parchment-lined rimmed baking sheet or a large cast-iron skillet and spread them in a single layer. Reserve any liquid left in the bowl. Bake the brussels sprouts for about 25 minutes, until tender and browned.
To finish the rice and serve, add the walnuts to the rice without stirring. Cover and let stand for 5 minutes. Add the rosemary and fluff with a fork to combine. Season with salt and pepper to taste. Serve the brussels sprouts over the rice, garnished with a healthy drizzle of the reserved maple-Sriracha dressing and a sprinkling of parsley.
You can use honey in place of the maple syrup if you wish. Raw orange blossom honey would be especially nice.
BRAISED EGGPLANT TAGINE WITH SRIRACHA HARISSA AND MINT-COCONUT CREMA
A tagine is a traditional Northern African stew, typically cooked in an earthenware vessel called, well, a tagine. These vessels have a flat, round base and a cone- or dome-shaped lid, which promotes condensation of steam, helping retain moisture in the finished dish. If you’ve got a tagine, great! If not, a Dutch oven or casserole will work just fine. Make sure to use harissa paste, not powder, or make your own
harissa.
MAKES 4 TO 6 SERVINGS
1 (14-ounce) can coconut milk (not the low-fat or light variety)
Juice of 1 to 2 limes
2 tablespoons chopped fresh mint
1 tablespoon white or yellow miso (optional)
½ teaspoon kosher salt
¼ cup Sriracha
2 tablespoons extra-virgin olive oil
1 large red onion, halved lengthwise and sliced
1 green bell pepper, diced
1 large eggplant, diced large
3 cloves garlic, minced
2½ cups vegetable stock
¼ cup raisins
1 cup brown lentils, soaked in water for 2 hours
1 lemon
Salt and freshly ground black pepper
Chopped fresh flat-leaf parsley, for garnish
To make the crema, refrigerate the can of coconut milk for at least 4 hours. Open the can and scoop out all the creamy goodness that’s solidified in there into a bowl, leaving any liquid behind in the can. Add the juice of 1 lime, mint, miso, and salt. Mix until smooth, with the consistency of sour cream. Taste and season with more salt or lime juice, if desired. Transfer to an airtight container and refrigerate until serving time.
To make the
harissa sauce, mix the Sriracha and harissa paste in a small bowl. Cover and set aside.
To make the tagine, heat the oil in a large tagine or Dutch oven over medium heat. Add the onion, bell pepper, and eggplant and sauté until the onions are softened, about 7 minutes. Add the garlic and
ras el hanout and sauté until the seasoning is slightly toasted, about 1 minute. Pour in
1 cup of the stock to deglaze the pan, using a wooden spoon to scrape up all the stubborn, tasty brown bits. Stir in the remaining 1½ cups of stock and the raisins. Drain the lentils and stir them in. Bring to a boil, then immediately lower the heat, cover, and simmer until lentils and eggplant are tender, 25 to 30 minutes. Mince the zest of half a lemon, then juice the entire lemon. Stir the zest and lemon juice into the tagine. Season with salt and pepper to taste. Garnish with parsley and serve family-style, with the crema and harissa sauce in bowls alongside.
For the crema, feel free to substitute ¾ cup plain whole-milk yogurt (not low-fat or nonfat) for the coconut, cashews, lime juice, miso, and salt. Simply stir the chopped mint into the yogurt.
In addition to making sure the miso and vegetable stock are gluten-free, as usual, check the harissa label. Some brands include ingredients that contain gluten. If you can’t find a gluten-free variety, make your own using the recipe below.
Ras el hanout is a traditional Moroccan spice blend. Its name loosely translates to “head (or top) of the shop,” indicating that its ingredients include some of the finest spices a given vendor offers. It adds an interesting touch when substituted for cumin in recipes, such as
Sriracha-Cucumber Hummus and
Five-Alarm Black Bean Soup with Cilantro-Coconut Crema. Look for it at Middle Eastern markets or online, or make your own blend. Here are some guidelines, but please feel free to improvise, as the mixture is different in every household according to taste and can contain anywhere from a handful of different ingredients to upward of fifty. For a basic
ras el hanout, combine 2 teaspoons each of: ground cinnamon, coriander, ginger, black pepper, and turmeric, plus 1 teaspoon each of: ground nutmeg, allspice, and cayenne pepper.
HARISSA
6 large dried chiles
2 roasted red bell peppers
Juice of 1 lemon
2 cloves of garlic
2 teaspoons cumin
½ teaspoon ground cayenne pepper
½ teaspoon coriander
¼ cup extra-virgin olive oil Salt and freshly ground black pepper
Soak the chiles in ½ cup boiling water until they are fully reconstituted, about 15 minutes. Carefully remove them from the soaking liquid. Trim the top from the chiles and discard along with the seeds.
Place the chiles into the bowl of a food processor or high-powered blender, along with the bell peppers, lemon juice, garlic, cumin, cayenne, and coriander. Blend until a coarse paste forms. With the processor running, slowly drizzle in the olive oil through the feed tube. Season with salt and pepper, to taste. Store refrigerated in an airtight container, and use within 1 month for best flavor.
SPICY CALIFORNIA ROLLS
Since the basis of a California roll is already
mock crab (usually made from a much cheaper fish called pollock), I have no misgivings about making mock mock crab using garbanzo beans. Mixing in nori brings a briny flavor from the sea, while Old Bay Seasoning adds depth and character that will make you oh-so-happy. Y’know … as opposed to crabby.
MAKES 4 TO 6 SERVINGS
2 cups sushi rice or short-grain white rice
2 cups water
2 tablespoons rice vinegar (not the seasoned variety)
2 tablespoons sugar
2 teaspoons fine sea salt
1 sheet nori
1¾ cup cooked garbanzo beans, or 1 (15-ounce) can, drained
¼ cup Sriracha
1 carrot, grated and then minced
1 clove garlic, minced
½ teaspoon Old Bay Seasoning or seasoned salt
Salt and freshly ground black pepper
2 large, ripe Hass avocados
Juice of ½ lemon
8 sheets nori
¼ to ½ cup
toasted black sesame seeds
1 large English cucumber, peeled and julienned
1 large carrot, julienned
Pickled ginger, for serving Wasabi, for serving
Soy sauce, for serving
To prepare the rice, put the rice in a large bowl and cover with cool water. Swirl around, drain, and repeat until the water runs clear. Combine the rice and water in a small saucepan set over medium-high heat. Bring to a boil, then immediately lower the heat as low as possible. Cover and simmer for 15 minutes. Remove from the heat and let stand, covered, for 10 minutes. (For best results, use a rice cooker to cook the rice).
In a small bowl, combine the vinegar, sugar, and salt and stir until the salt and sugar have dissolved. Transfer the rice to a nonmetallic bowl (wooden if available). Drizzle in the vinegar mixture while stirring with a wooden spoon until the rice is evenly
coated. Let cool to room temperature—
don’t refrigerate.
To make the mock crab, break up the nori. Process it in a spice grinder or mortar and pestle to create a fine powder. (Alternatively, mince it as finely as possible with a knife.) Transfer to a small bowl.
In the bowl of a food processor, combine the garbanzo beans, Sriracha, vegan mayonnaise, carrot, garlic, and Old Bay Seasoning and pulse until the mixture comes together and has a coarse texture, with plenty of medium-size chunky pieces. Transfer to a bowl and stir in ½ teaspoon of the powdered nori. Season with salt, pepper, and more powdered nori to taste. Cover and let sit at room temperature while the rest of the assembly ingredients come together. (This can be made up to 2 days in advance and kept in the refrigerator. Remove from the fridge 30 minutes before use.)
To assemble the nori rolls, peel, pit, and slice the avocados. Sprinkle the lemon juice over the avocado slices to help prevent browning. Cover a bamboo sushi mat with plastic wrap. Place one sheet of nori on a work surface with the shiny side facing down. Lightly dampen your fingers and use them to spread about ½ cup of the rice in a thin, even layer over the entire surface of the nori. Sprinkle ½ to 1 tablespoon of the black sesame seeds over the rice. Place the plastic-wrapped rolling mat on top of the rice, then carefully flip the assembly so that the mat is on the bottom and the nori is on top. On the end closest to you, spread about one-eighth of the mock crab in a thin line across the nori. Place about one-eighth of the avocado, cucumber, and carrot in thin lines alongside the mock crab.
Use the sushi mat to roll the rice-covered nori around the fillings, beginning at the end closest to you, keeping the filling in place with your fingers. With each turn, use the mat to shape and tighten the roll. Set the finished roll aside and cover with a small piece of plastic wrap, which will keep it moist and aid in slicing the roll later. Repeat to make 7 more rolls. Dip a sharp chef’s knife in water, then cut each roll in half. Make two more cuts out on each side to yield a total of 6 pieces per roll. Discard the plastic wrap. Serve immediately, with the pickled ginger, wasabi, and soy sauce alongside.
CAJUN QUINOA CAKES WITH LEMON-DILL-SRIRACHA RÉMOULADE
I want to believe that I’m quinoa’s biggest cheerleader, but it seems every time I talk to someone about it—which is more often than I care to admit—the response is almost always “OMG! I friggin’ love quinoa!” After you taste these quinoa cakes, I’m willing to venture that you’ll soon be on the hunt for other awesome quinoa recipes. That is, if you aren’t already … MAKES 4 TO 6 SERVINGS
1 cup quinoa
2 cups vegetable stock or water
1 lemon
¼ cup Sriracha
3 tablespoons chopped fresh dill 1 large clove garlic, minced
Salt and freshly ground black pepper
1 tablespoon ground flaxseeds
3 tablespoons water
¼ cup whole wheat or all-purpose flour
½ red onion, diced
2 stalks celery, diced
½ green bell pepper, diced
3 cloves garlic, minced
Salt and freshly ground black pepper
2 tablespoons extra-virgin olive oil
Chopped fresh dill, for garnish
In a small saucepan, combine the quinoa and stock. Bring to a boil over medium heat, then immediately lower the heat, cover, and simmer until the liquid is absorbed, about 15 minutes. Transfer to a bowl, fluff with a fork, and let cool to room temperature.
Meanwhile, prepare the rémoulade. Mince the zest of half the lemon, then juice the lemon. In a small bowl, mix the vegan mayonnaise, Sriracha, dill, garlic, and lemon juice and zest. Season with salt and pepper to taste. Cover and set aside. (This can be made up to 2 days in advance and kept in the refrigerator.)
In a small bowl, mix the flaxseeds and water and let sit for several minutes, until a gel forms. Add to the quinoa, along with the flour, onion, celery, bell pepper, and garlic. Season generously with salt and pepper and mix well. The mixture should be moist
enough to stick together and slightly tacky. Adjust with water or flour to achieve the proper consistency. Form into 8 to 12 patties about ½ inch thick. (The patties can be made 1 day in advance and kept in the refrigerator.)
Preheat the oven to 200°F. Put a wire rack atop a baking sheet or line a baking sheet with foil. Put the baking sheet in the oven.
Heat the oil in a large cast-iron or nonstick skillet over medium heat. Add the patties and cook until browned on the bottom, about 4 minutes. Gently flip and cook until the other side is browned, 4 to 5 minutes. Transfer to the wire rack in the oven to keep warm. Once all of the quinoa cakes are cooked, serve immediately, garnishing each with a generous dollop of rémoulade and a sprinkling of dill.
For the quinoa cakes, feel free to substitute 1 large beaten egg for the flax and water mixture.
If you want to make a larger batch of these, or if you’re just trying to cut down on frying, you can also bake these bad boys! Simply arrange them in a single layer on a lightly greased baking sheet and bake at 400°F until golden brown and heated through, about 25 minutes total, gently flipping once about halfway through.
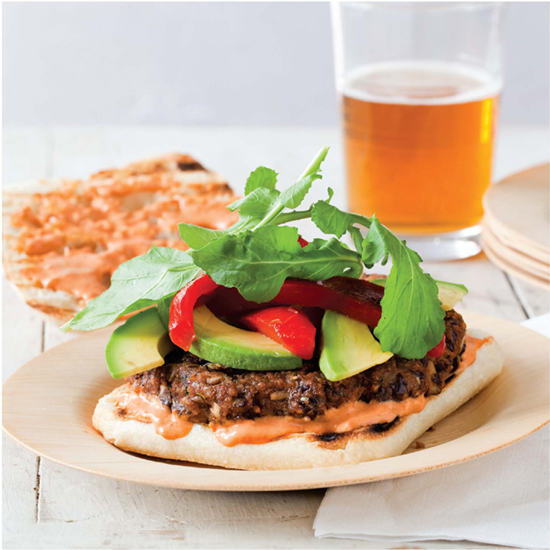
Ultimate Sriracha Veggie Burger
ULTIMATE SRIRACHA VEGGIE BURGER
Remove any preconceived notions you may have about veggie burgers. This is not some frostbitten hockey puck of a patty that’s been sitting in your grocer’s freezer section for an eternity. Nay! This is a delicious handmade treasure, bursting with moisture and flavor thanks to the mixture of black beans and fresh mushrooms. Topped with arugula, roasted red bell pepper, avocado, and aioli seasoned with cumin and Sriracha, all I can say is … you’re welcome in advance! MAKES 4 SERVINGS
2 tablespoons Sriracha
2 teaspoons ground cumin
1 clove garlic, minced
1¾ cups cooked black beans, or 1 (15-ounce) can, rinsed and drained
1 tablespoon ground flaxseeds
3 tablespoons water
3 tablespoons extra-virgin olive oil
1 cup diced red onion
8 ounces cremini or button mushrooms, thinly sliced
2 tablespoons minced fresh cilantro
2 cloves garlic, peeled
¼ cup Sriracha
1 tablespoon Bragg Liquid Aminos or low-sodium soy sauce
2 teaspoons freshly ground black pepper
1 to 1½ cups fresh bread crumbs
4 sesame seed buns or ciabatta rolls
Arugula leaves, for serving
1 roasted red bell pepper, cut into long strips
1 ripe Hass avocado, pitted and sliced just before serving
To make the aioli, combine the vegan mayonnaise, Sriracha, cumin, and garlic in a small bowl and stir until well combined. Cover and refrigerate until ready to use.
To make the patties, spread the rinsed and drained beans in a single layer on a clean kitchen towel or paper towels. Cover with an additional towel or more paper towels and pat dry.
In a small bowl, mix the flaxseeds and water and let sit for several minutes, until a gel forms.
Heat the oil in a large cast-iron or nonstick skillet over medium-high heat. Add the
onion and sauté until softened, 5 to 7 minutes. Add the mushrooms and sauté until they have given off their moisture and begin to brown, 5 to 7 minutes. Remove from the heat and let cool slightly.
Transfer to a food processor and add the beans, flaxseed gel, cilantro, garlic, Sriracha, liquid aminos, pepper, and 1 cup of bread crumbs. Pulse just until combined, with some chunky bean bits still intact. Form the mixture into 4 patties and let sit while you preheat the grill. If the patties aren’t firm enough to hold their shape, incorporate additional bread crumbs by hand, then form into patties again.
Lightly oil a grill or grill pan and preheat to medium-high heat. Using a metal spatula, gently transfer the patties onto the grill. Cook until well browned on both sides, about 10 minutes total, gently flipping once about halfway through. Lightly toast buns in the last minute or two of cooking if desired.
To assemble the burger, spread the aioli on the top and bottom of each bun. Load each up with a patty, a small handful of arugula, and one-fourth of the red bell pepper and avocado. Serve immediately.
Substitute almond flour for bread crumbs. Use gluten-free hamburger buns, or wrap your topped burgers in large leaves of iceberg, Boston, or Bibb lettuce.
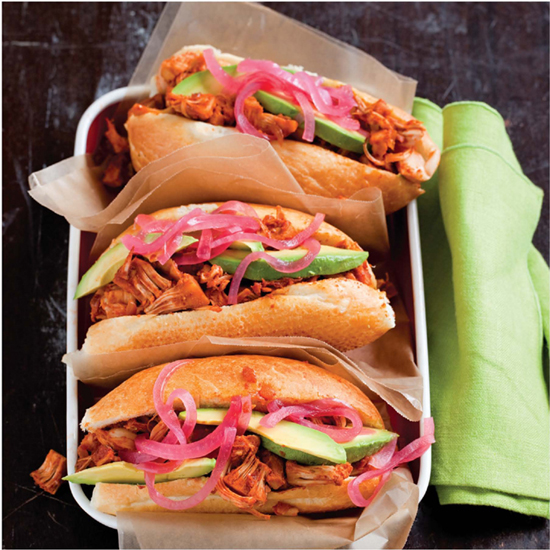
Jackfruit “Pulled Pork” Sammiches with Pickled Red Onion
JACKFRUIT “PULLED PORK” SAMMICHES WITH PICKLED RED ONION
I first enjoyed fresh jackfruit (which is one helluva treat) at my friend Phi’s house. Sadly, canned jackfruit packed in syrup pales in comparison. And then there’s canned young jackfruit packed in brine, a product that doesn’t sound anywhere near as tasty. When shredded, however, it makes an excellent stand-in for pulled pork, right down to the texture. I discovered this novel substitution at the delightful vegan SoCal food truck Seabirds, and I’ve been hooked ever since. It might take a little searching, but you should be able to find canned young jackfruit in brine at Asian markets or online. MAKES 4 TO 6 SERVINGS
1 large red onion, halved lengthwise and thinly sliced
1 cup apple cider vinegar
3 tablespoons sugar
2 teaspoons fine sea salt
6 whole black peppercorns (optional)
3 tablespoons extra-virgin olive oil
1 small red onion, diced
4 cloves garlic, minced
1 tablespoon smoked paprika
1 tablespoon ground cumin
1 teaspoon dry mustard
3 tablespoons tomato paste
¼ to ½ cup Sriracha
¼ cup water
3 tablespoons light brown sugar
2 (20-ounce) cans jackfruit packed in brine
Salt and freshly ground black pepper
Hamburger buns or rolls, for serving
Sliced ripe Hass avocado, for serving
To make the pickled onion, put the onion in a large saucepan and add water to cover. Bring to a boil over high heat. Boil for 1 minute, then drain well. Transfer to a small bowl or a glass jar. In the same saucepan, combine the vinegar, sugar, salt, and peppercorns. Bring to a boil over high heat, then immediately remove from the heat. Pour over the onion. Let cool to room temperature, then cover and refrigerate for at least 1 hour before serving. Stored in the refrigerator, it will keep for 1 month.
To make the “pulled pork,” preheat the oven to 350°F.
Heat the oil in a large cast-iron or nonstick skillet over medium heat. Add the onion and sauté until softened, 5 to 7 minutes. Add the garlic and sauté just until fragrant, about 30 seconds. Add paprika, cumin, and mustard and sauté until the spices are toasted, about 3 minutes. Add the tomato paste and cook, stirring constantly, for 1 minute. Stir in ¼ cup Sriracha, the water, and the brown sugar. Bring to a simmer, then lower the heat, cover, and simmer for 5 minutes. Uncover and cook, stirring occasionally, until the mixture has the consistency of barbecue sauce, about 4 minutes. Remove from the heat. Taste and add more Sriracha if desired.
Drain the jackfruit and rinse under cool running water to reduce the saltiness. Transfer to a large bowl and use two forks to pull the jackfruit into shreds. Add the Sriracha mixture and toss until the jackfruit is evenly coated. Transfer to a nonstick or parchment-lined rimmed baking sheet. Bake for about 20 minutes, until the jackfruit firms up and the sauce dries slightly, adhering to the jackfruit. Season with salt and pepper to taste.
To assemble the sandwiches, divide the “pulled pork” among the buns. Top with avocado slices and pickled onion. Serve immediately.
Substitute gluten-free hamburger buns, or wrap the “pulled pork” in gluten-free tortillas or large leaves of iceberg, Boston, or Bibb lettuce.
If you’re crazy and want yet another spicy topping, slap some
Sriracha Broccoli Slaw on top of this beast for a truly invigorating (and extra-delicious) experience.
SAM’S JAMAICAN JERK GARBANZO SLIDERS WITH MANGO-CUCUMBER RELISH
My good friend Samantha Loveira is no stranger to making delicious plant-based food, something I learned shortly after starting to work with her at Stone Brewing Co. When I dropped a clue that I was working on a follow-up Sriracha cookbook for veggie lovers, she was quick to offer help with recipe testing. I asked if she’d be interested in developing a recipe of her own to contribute; she jumped at the chance, and this is the delightful result. MAKES 4 TO 6 SERVINGS
1 large mango, julienned
½ Persian cucumber, or ¼ English cucumber, julienned
¼ small red onion, thinly sliced
1 tablespoon minced fresh mint
Juice of 1 lime
1 tablespoon extra-virgin olive oil
Salt and freshly ground black pepper
¼ cup Sriracha
2 tablespoons Bragg Liquid Aminos or low-sodium soy sauce
Juice of 1 lime
4 green onions, white and green parts, coarsely chopped
2 cloves garlic, peeled
1 tablespoon light brown sugar
1 tablespoon minced fresh thyme, or 1½ teaspoons dried
2 teaspoons ground allspice
1 teaspoon grated fresh ginger or ground ginger
½ teaspoon ground nutmeg
¼ teaspoon ground cinnamon
Salt and freshly ground black pepper
1 tablespoon ground flaxseeds
3 tablespoons water
1¾ cups cooked garbanzo beans, or 1 (15-ounce) can, drained
½ cup panko bread crumbs
½ red onion, minced
½ red bell pepper, minced
1 small carrot, grated
1 clove garlic, minced
Salt and freshly ground black pepper
2 tablespoons extra-virgin olive oil
12 slider buns, or 4 hamburger buns
Fresh cilantro leaves, for serving
To make the relish, put the mango, cucumber, onion, mint, lime juice, and oil in a bowl and toss until well combined. Season with salt and pepper to taste. Cover and refrigerate for at least 30 minutes. (This can be made up to 3 days in advance.)
To make the sauce, combine the Sriracha, liquid aminos, lime juice, green onions, garlic, brown sugar, thyme, allspice, ginger, nutmeg, and cinnamon in a food processor. Process until a smooth, thick sauce forms. If it’s too thick, add a bit of water. Set aside half of the sauce to include in the patties. Mix the other half with vegan mayonnaise and season with salt and pepper to taste. Cover and refrigerate until needed. (This can be made up to 3 days in advance.)
To make the patties, mix the flaxseeds and water in a small bowl and let sit for several minutes, until a gel forms.
In a medium bowl, crush the garbanzo beans with a potato masher or fork until they have a coarse texture, with plenty of medium-size chunky pieces. Add the flaxseed gel, panko, onion, bell pepper, carrot, garlic, and the reserved jerk sauce (the half without mayo). Mix well, then season with salt and pepper to taste. Divide the mixture into 12 equal portions, roll them into balls, and then flatten slightly into disks about 1 inch thick. (If you prefer full-size patties or can’t find slider buns, make 4 regular-size patties.)
Remove the relish from the fridge to take some of the chill off. Heat the oil in a large cast-iron or nonstick skillet over medium heat. Add the patties and cook until nicely browned on both sides, 8 to 10 minutes total, gently flipping once about halfway through.
To assemble the sliders, spread the jerk sauce (the half with mayo) on the top and bottom of each bun. Load each bun with a patty, some of the relish, and a few cilantro leaves. Serve immediately, with any leftover relish offered on the side.
Substitute almond flour for the bread crumbs. Gluten-free slider buns may be a little difficult to come by. Feel free to make your own, or just make 4 regular-size patties and use gluten-free hamburger buns. Another alternative is to wrap the patties and condiments in large leaves of iceberg, Boston, or Bibb lettuce.
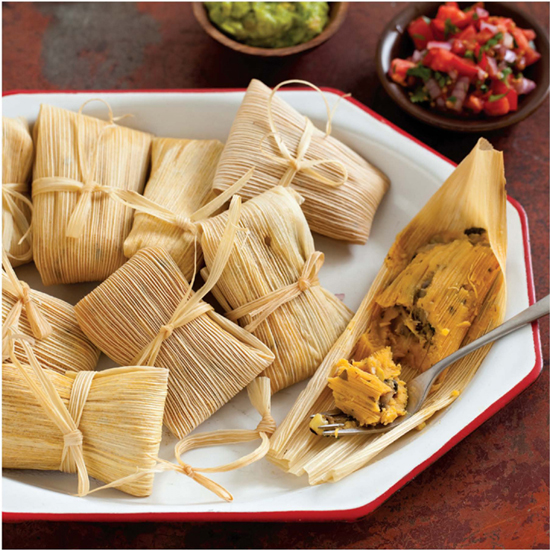
Dios Mio Tamales
DIOS MIO TAMALES
When I made the switch to a plant-based diet, I thought tamales were out of my life forever, since they’re traditionally made with lard. But I had a vegan tamale at Tamara’s Tamales on the Westside of Los Angeles that rocked my world and sent me to my kitchen to create my own version.
Dios mio means “my god”
en español, as in “oh my god,” which you’ll undoubtedly be exclaiming when you taste these, partially because of the awesome flavor combo, and partially because of the heat that sneaks up after a few bites. For a fantastic meal, serve the tamales with Spanish rice, black beans, guacamole, and salsa—preferably pico de gallo or salsa verde. For extra zing, serve them with
Sriracha-Mango Guacamole.
MAKES 6 TO 8 SERVINGS
4 cups masa harina
2 teaspoons baking powder
1 teaspoon fine sea salt
¼ cup minced fresh cilantro
4 cups vegetable stock
½ cup Sriracha
¼ cup extra-virgin olive oil
2 tablespoons extra-virgin olive oil
1 red onion, diced
8 ounces cremini or button mushrooms, thinly sliced
1 green bell pepper, diced
1 small zucchini, diced
3 cloves garlic, minced
2 tablespoons ground cumin
Kernels from 2 ears fresh sweet corn,
roasted1 bunch spinach, stemmed, or 1 (10-ounce) package frozen spinach, thawed and drained
Salt and freshly ground black pepper
2 (6-ounce) packages corn husks, soaked in warm water for at least 1 hour
To make the dough, combine the masa harina, baking powder, and salt in a large bowl (or the bowl of a stand mixer fitted with the paddle attachment) and mix well. Add the roasted garlic, cilantro, stock, Sriracha, and oil and whip with a handheld electric mixer or stand mixer until soft and fluffy, 3 to 5 minutes. Cover and set aside.
To make the filling, heat the oil in a large Dutch oven or pot over medium-high heat. Add the onion, mushrooms, bell pepper, and zucchini and sauté until softened, 5 to 7 minutes. Add the garlic, cumin, and corn and sauté just until the garlic is fragrant, about 30 seconds. Add the spinach and sauté until completely wilted and its moisture has evaporated, about 5 minutes. Season with salt and pepper to taste. Let cool to room temperature.
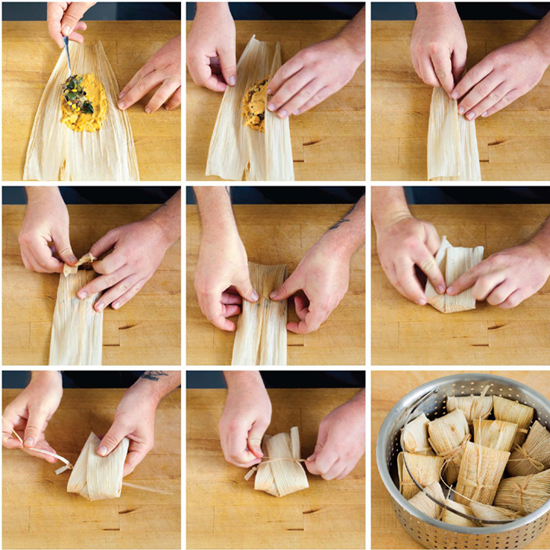
To assemble and steam the tamales, remove the corn husks from their soaking water. Lay a large corn husk or two overlapping small husks on a work surface. Spread 2 tablespoons of dough down the center, leaving a ½-inch border on each side and a 3-inch border on the top and bottom. Top with a generous tablespoonful of the filling, followed by another tablespoon of the masa. Fold up the sides of the husk and pull the top and bottom in to fully encase the filling. Seal the tamale using by tying either kitchen twine or strips of corn husk around it. This needn’t be excessively tight, as the tamales will expand during cooking.
Loosely pack the tamales in a large steamer basket and steam them until they expand and feel firm to the touch, about 1 hour, checking the water level periodically and adding more if needed. Serve immediately.
To roast corn on the cob, remove the husks and set the corn over a direct flame (on a preheated grill or over a gas burner). Cook until the kernels begin to blacken, turning every few minutes until evenly roasted. Enjoy smeared with a little
Sriracha Aioli and sprinkled with a pinch of nutritional yeast flakes, or cut the kernels from the cob to use in recipes.
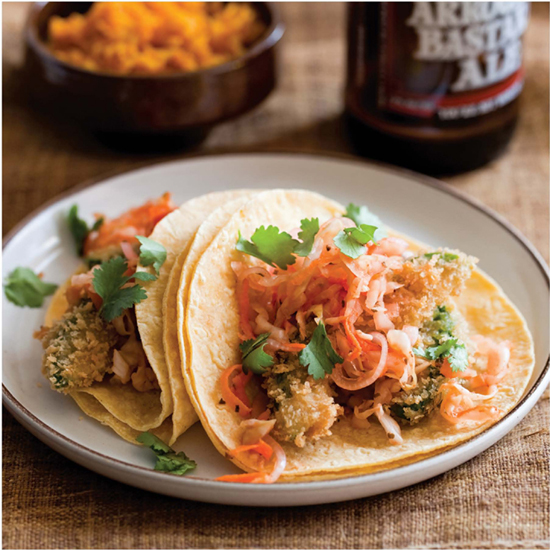
Beer-Battered Fried Avocado Tacos with Sriracha Curtido
BEER-BATTERED FRIED AVOCADO TACOS WITH SRIRACHA CURTIDO
This recipe melds together a few of my favorite things: beer, avocado, Sriracha, and curtido, an incredibly tangy slaw hailing from El Salvador—spiked with Sriracha in this version. Many thanks to my friend chef Alex Carballo at Stone Brewing World Bistro & Gardens in San Diego for introducing me to beer-battered fried avocado tacos, a fantastic culinary treat. To round out the meal, serve with Spanish-style rice and black beans. MAKES 4 SERVINGS
½ head green cabbage, shredded (about 4 cups)
1 small red onion, halved lengthwise and thinly sliced
1 large carrot, grated
½ cup water
½ cup apple cider vinegar
¼ cup Sriracha
2 teaspoons dried Mexican oregano
2 teaspoons sugar
2 teaspoons fine sea salt
2 cups strong amber ale (such as Arrogant Bastard Ale or Lagunitas Brown Shugga’)
2 cups all-purpose flour
2 tablespoons garlic powder
2 teaspoons baking powder
2 teaspoons fine sea salt
1 teaspoon freshly ground black pepper
2 cups panko bread crumbs
2 large, ripe Hass avocados
Extra-virgin olive oil or vegetable oil, for frying
8 or 16 small corn tortillas, warmed
Fresh cilantro leaves, for garnish
To make the curtido, boil about 4 cups of water. Put the cabbage, onion, and carrot in a large mixing bowl and toss to combine. Pour in the boiling water and let stand for 5 minutes. Drain well. In a small saucepan, combine the ½ cup water, vinegar, Sriracha, oregano, sugar, and salt. Bring to a boil over high heat. Remove from the heat and stir to ensure that the sugar and salt have dissolved. Pour over the drained cabbage
mixture and toss to combine. Let cool to room temperature, then cover and refrigerate until ready to use. (This can be made up to 1 week in advance and gets better after it’s been sitting for a day or two.)
To make the fried avocados, put the ale, flour, garlic powder, baking powder, salt, and pepper in a bowl and whisk to combine. Prepare a deep fryer by filling it with oil to the manufacturer’s suggested fill level. (Alternatively, use a wide, deep cast-iron or other heavy pan with oil to a depth of 2 to 3 inches, but no more than halfway up the side of the pan.) Heat the oil to 375°F. Spread the panko in a shallow baking dish. Cut the avocados in half, remove the pit, and scoop out the flesh, keeping it intact. Slice each half into four pieces. Dunk the slices into the ale mixture, shake off any excess, and then roll each piece in the panko. Carefully lower into the oil and fry until deep golden brown and crispy, 3 to 5 minutes. Remove with a slotted spoon and immediately season lightly with salt and pepper.
Now assemble the tacos. I like to stack 2 tortillas per taco, but you’re welcome to use only 1 if that’s your preference. Either way, top with 2 hot avocado slices. Using tongs, lift a big mound of the curtido from its pickling bath, give it a quick shake to ditch some of the liquid, and pile it atop the avocado. Garnish with cilantro and serve immediately.
A little Cotija cheese crumbled on top would be delicious.
If you’re able to source a gluten-free amber or golden beer that you enjoy, by all means, use it! Alternatively, you can use gluten-free vegetable stock. For the panko, substitute 2 cups of rice squares cereal (such as Rice Chex). Put the cereal in a large ziplock bag and gently roll over it with a rolling pin until the cereal is coarsely crushed, with pieces resembling panko in texture.
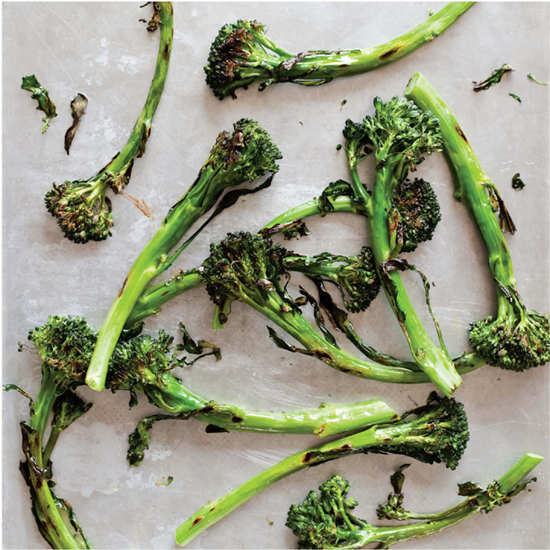
PENNE PUTTANESCA WITH CHARRED BROCCOLINI
Charred broccolini is one of the greatest things on earth. There’s a spot in San Diego called Tiger!Tiger! Tavern that makes it in a wood-fired oven, and I could probably eat about ten pounds of it in a sitting if I put my mind to it. Behold my attempt to recreate that same glory using a broiler. I decided to combine it with one of my favorite pasta preparations, and the pairing is awesome! MAKES 4 TO 6 SERVINGS
4 tablespoons extra-virgin olive oil
1 small red onion, halved lengthwise and sliced
1 carrot, grated
4 cloves garlic, minced
2 bay leaves
2 tablespoons tomato paste
2 (28-ounce) cans whole tomatoes, undrained
¼ cup Sriracha
1 cup pitted kalamata olives
1 tablespoon nonpareil capers (optional)
Salt and freshly ground black pepper
1 pound penne pasta
1 pound broccolini
Juice of ½ lemon
Chopped fresh flat-leaf parsley, for garnish
Heat 2 tablespoons of the oil in a large cast-iron skillet or Dutch oven over medium heat. Add the onion and sauté until softened, 5 to 7 minutes. Stir in the carrot, three-quarters of the garlic, and bay leaves and sauté just until the garlic is fragrant, about 30 seconds. Add the tomato paste and cook, stirring constantly, for 1 minute. Crush the tomatoes with your hands and add them (with their liquid) to the skillet. Stir in the Sriracha, olives, and capers. Bring to a boil, then immediately lower the heat and simmer, stirring occasionally, for 45 minutes. Discard the bay leaves. Season with salt and pepper to taste.
About 20 minutes before the sauce is ready, bring a large pot of salted water to a
boil over high heat. Preheat a grill, grill pan, or broiler to high heat. Put the broccolini in a bowl, drizzle with remaining 2 tablespoons of oil, add the remaining garlic, and toss until evenly coated. Season with salt and pepper.
Stir the penne into the boiling water, lower the heat to medium, and cook until just tender. Meanwhile, spread the broccolini in a single layer on the grill or a broiler pan. Cook until tender and lightly charred, about 7 minutes total, gently flipping once about halfway through. Remove from the heat and sprinkle with the lemon juice.
Drain the pasta well. Return it to the pot, add the sauce, and toss gently until well mixed. Serve immediately, garnished with parsley and topped with the broccolini.
Use gluten-free pasta in place of traditional pasta, or substitute steamed or roasted cauliflower florets for the pasta.