While the previous chapters in this book provide you with inspiration, this final chapter provides you with practical instruction and advice on how to master an extensive variety of different binding techniques. Some are more in-depth than others, and some require more materials and tools, but all are accessible and give both beginners and more advanced bookmakers the chance to create a series of unique and individual books.
These illustrated step-by-step tutorials take you though a range of techniques from the fairly simple accordion to the more complex carousel fold, the basic pamphlet stitch to the more advanced French link and Coptic stitches, as well as instruction on how to case-bind a book. This final chapter also explores different techniques for decorating papers, as well as suggestions for how to accomplish a range of eye-catching cover treatments, including Suminagashi paper marbling, frottage, and natural plant dyeing techniques.

Paper Good art papers are often made from cotton or linen rags. Try a variety and see what you like that fits your budget. Beware of high-acid papers, like newsprint and children’s construction paper—they are too brittle for bookbinding. Many different weights of paper are available, and papers are sized for different processes.
Decorative paper is great for endsheets or covering book boards. At good art stores a variety of decorative papers are available, including marbled, textured, colored, or Japanese papers. Some wrapping papers are high quality, but beware of brittle papers that might tear as you fold them. You can also make your own decorative paper, such as paste paper, marbled paper, or frottage paper.
Kozo paper Often incorrectly referred to as rice paper, Kozo paper, from Japan, Thailand, and Korea, is strong, thin paper with long fibers. It is good for backing cloth and mending, as well as for book pages.
Yasutomo’s sHosho Sumi sketch paper This is one paper that you could use for Suminagashi paper marbling.
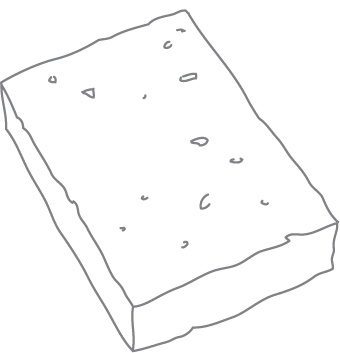
Book board Book board, or binder’s board, is available from speciality bookbinding suppliers (see the Resources section).
Book cloth Book cloth is sized and/or backed cloth, which you can glue without the adhesive seeping through. You can buy it through art and craft suppliers or you can make your own.
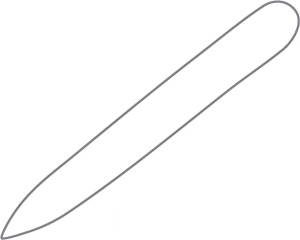
Bone folder A basic, but essential tool for bookmaking, a bone folder is good for folding, burnishing, even tearing paper. It’s sort of like a letter opener made of real bone, although plastic ones are also available. Silicone folders are generally more expensive, but they do not mark the paper so are worth investing in if you really get into bookbinding.
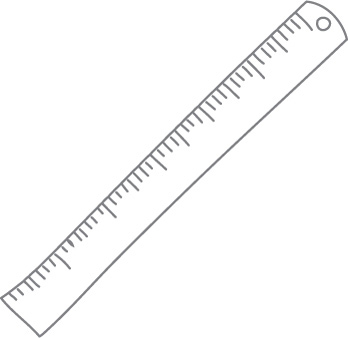
Steel ruler Steel rulers do not warp and are good for cutting straight lines with a scalpel. A cork back provides grip and keeps the ruler from sliding and damaging your paper.
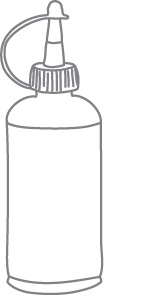
PVA glue Although odorless, PVA is toxic and in OSHA settings workers wear gloves and masks to work with it. So always use with care—don’t leave it open next to a mug of tea. It dries very fast and is not reversible. Some PVAs are heat-set, some dry flexible, and some, like Jade PVA, dry stiff and are better for boxes. Wash your brushes very well with cold water after working with PVA.
Glue brush Brushes made for use with glue can be found at speciality bookbinding suppliers. Natural bristles are best for working with paste. Cheaper utility brushes work well for PVA.
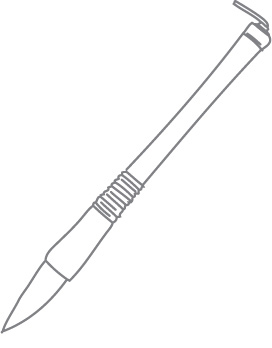
Pencil Assorted pencils are always useful—keep them sharp for precise measurements.
Scissors Use good, sharp scissors; you may want to get a few different sizes.
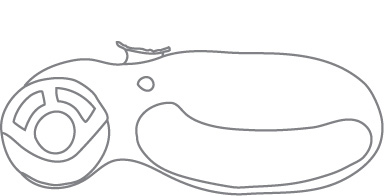
Rotary cutter Rotary cutters are used by quilters, or people cutting long strips of paper for weaving, but you may find a rotary cutter useful for cutting down large sheets into the size you need for book pages.
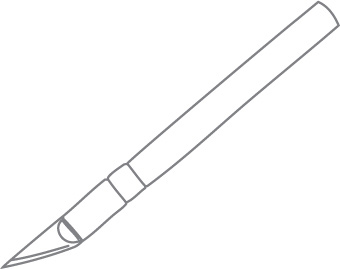
Scalpel Sharp blades (plus a good cutting mat) are the secret to accurate cutting. Cork-backed steel rulers and cutting mats help make cutting with a scalpel, such as an X-Acto knife, easier. Surgical scalpels stay sharp for longer and are less likely to lose their tips. Olfa knife blades can be snapped off, which some people find easier than changing blades.
Cutting mat Self-healing cutting mats are useful when using knives. You can flatten a warped cutting mat in a photo-mounting press.
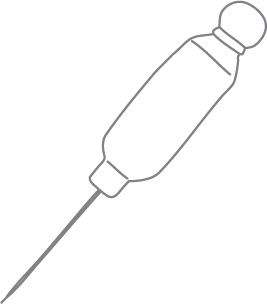
Binder’s awl A binder’s awl is a needle on a wood handle, used for punching holes in paper and boards. Etcher’s needles and potter’s needles can work too. Beware of the attractive awls with wooden egg handles—they can sometimes bend and break.
Different awls make different size holes—you may want to get an assortment. Awls come in student grade and professional grade at bookbinding suppliers. You may also find them at hardware stores, but beware of very thick points.
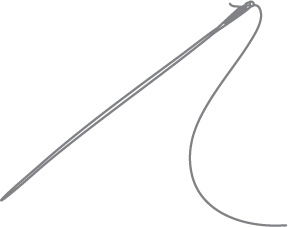
Bookbinding needle Use good, strong needles, as linen thread can cause weaker needles to break. Some binders prefer to use dull tapestry needles and punch their holes with an awl. Always make sure that the eye of your needle is big enough for your thread. Curved needles can be helpful for Coptic binding.
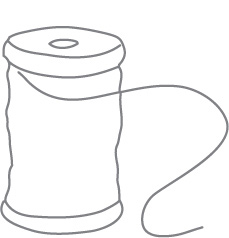
Linen thread A strong linen thread works best for sewing books. You can dye them or buy thread in different colors. They are also available in different thicknesses. Wax your thread with beeswax to help prevent tangles.
Double-sided tape Photo-safe archival double-sided tape can work well for some bindings. Look out for adhesive roll too in bookbinding speciality stores or from photography suppliers.
Baking pan When you are just starting out, or working with children, baking pans can be used for paper treatments such as dyeing and marbling, but photo trays may be worth the investment if you use this technique regularly.
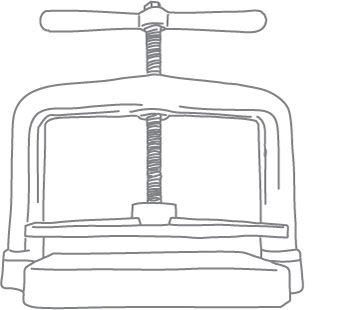
Book press A book press is a heavy cast iron tool that uses pressure to compress books while they are drying to help prevent warping. They are available from speciality bookbinding suppliers.
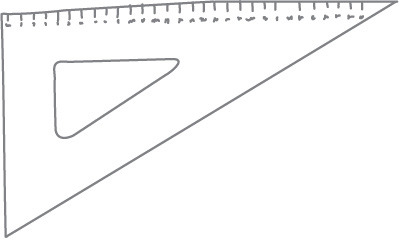
Drafting triangle A drafting triangle is useful for making sure your paper and boards are square, with right angles. The clear triangles with grids (and a metal edge for cutting) work best for accuracy.
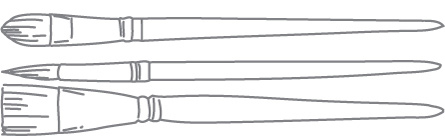
Brushes Paste brushes can be found in specialty bookbinding stores. Cheap utility brushes can work for use with PVA. Trim them down to 1" (2.5cm) with scissors for the best results. Calligraphy brushes can be found from most art and craft suppliers.
Sponge A clean new cellulose or natural sponge is handy for dampening paper, such as when making paste paper. A sponge or foam rubber can also be glued between cloth and board to create pillow books.
Clamp (clip) A clamp is useful for keeping your pages together, such as when binding with stab stitch. You can also clamp boards to tables to create right angles. If you are cutting book board by hand, it’s best to clamp it with a cutting mat onto a work table.
Newspaper You can protect your work table with newspapers or buy clean newsprint so that you do not have to worry about ink offsetting onto your work.
Fabric scraps Fabric scraps or any spare pieces of cloth, such as cut-up old clothing, can be used to sew new book covers.
Sumi-E liquid ink This Japanese ink is available from art stores and used to create decorative paper as in the Suminagashi marbling technique. Suminagashi marbling kits often contain several colors of floating ink.

Dispersant (such as Photo-Flo) A chemical for use in the paper marbling process.
Calligraphy brushes Calligraphy brushes have a fine tip and are available in art stores and from calligraphy suppliers.
Wheat paste Wheat paste, for making paste paper, is available from bookbinding suppliers or you can make your own from unbleached flour and water (1:6 ratio). It can also be made from cornstarch (1:12 ratio).
Stamps Assorted rubber stamps are available in many art and stationery stores, and you can even have them custom made.
Ink pad For use with rubber stamps, ink pads come in a variety of colors, including some metalics.
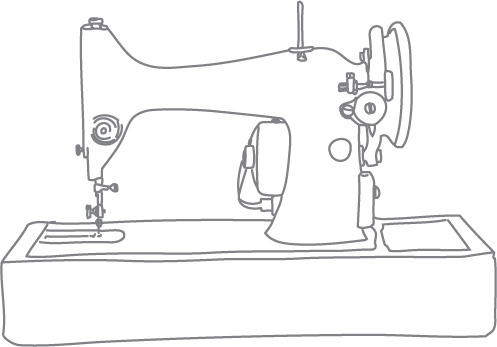
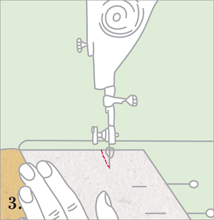
Sewing machine People do not usually stitch books with sewing machines, but they can work for perforating papers and for making cloth book covers.
Alum (aluminum sulfate or potassium aluminum sulfate) Powder used for naturally plant-dyeing paper to aid in pigment retention.
Dye plants Dye plants can include chamomile, coreopsis, blackberry, dahlia, eucalyptus, and golden marguerite.
Gloves Always protect your hands with rubber gloves when treating paper or working with chemicals. Invest in heavy-duty ones or buy disposable gloves.
Rubbing crayons Rubbing crayons, also used for brass rubbings, may be found at hardware stores, or you can carefully melt odds and ends of children’s crayons and mold them in muffin tins for use with frottage.
Squeegee This is a wide, wooden-handled rubber blade used to smooth fabric or remove water. It can also be used for silkscreen printing.
Brayer An ink roller, usually rubber.


Esther K Smith
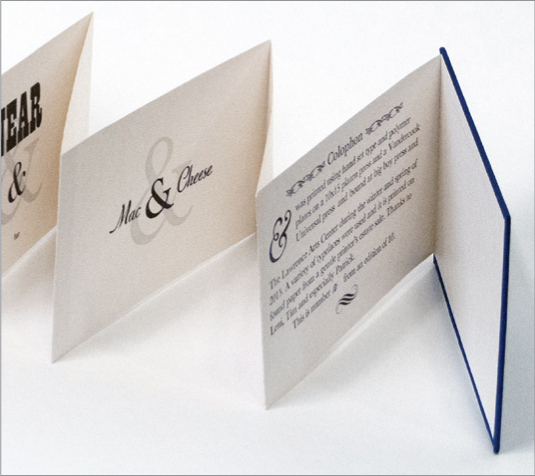
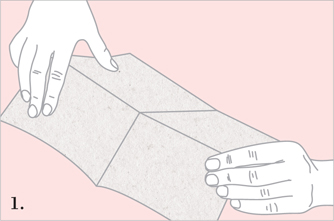
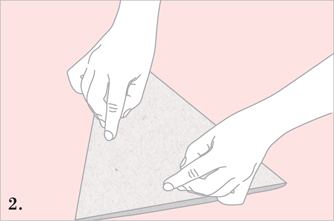
The instant book is sometimes also called an origami book or an eight-page booklet. This six-page, three-spread book, with front and back covers, comes from a single sheet of paper with just a few quick folds and a cut. You can make one with cloth using an iron as your bone folder.
• Paper measuring 8½" × 11" (21.5 × 28cm)
• A bone folder
• A pair of scissors or a knife
• A cutting mat (for knife)

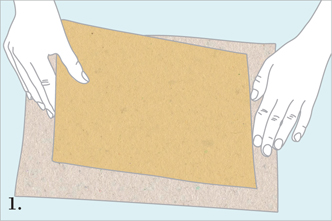
1. Fold the paper in half lengthwise, and burnish with the bone folder.
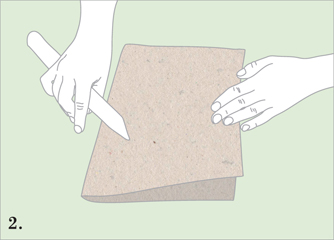
2. Fold the paper in half again, in the other direction, and smooth with the bone folder.
3. Fold the paper in half again, in that same direction, and smooth with the bone folder.
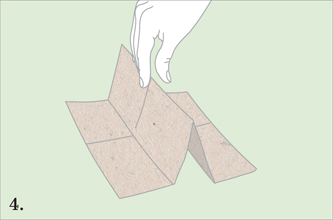
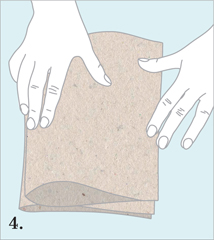
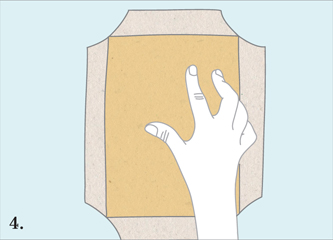
4. Open the folded paper, and reverse the folds so that it looks like a W.

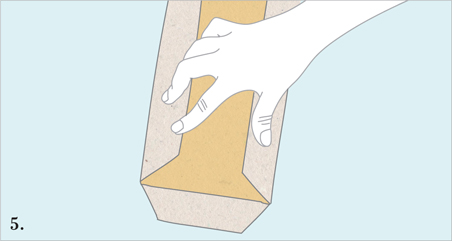
5. Tear or cut the center fold from the peak to the valley of the W.
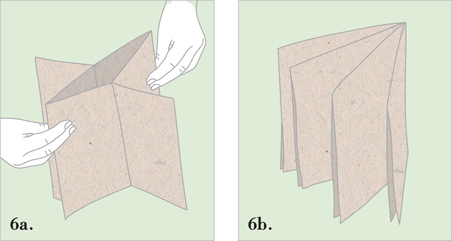
6. Bring the sides down together as shown to form the textblock.

Neil J. Salkind
Making an accordion or concertina book is a great place to start bookbinding. It can be as simple or as advanced as you like and requires minimal tools and materials.
• 2 sheets of paper measuring 8¼" × 22" (21 × 56cm)
• 1 sheet of paper for hinge measuring 8" × 2" (20 × 5cm)
• 2 pieces of book board measuring 8½" × 5¾" (21.5 × 14.5cm)
• Paper-backed book cloth (cut to 2 sheets 1" [2.5cm] larger than book board all round)
• A bone folder
• A steel ruler
• A pair of scissors
• PVA glue
• A glue brush
1. Dilute a small amount of PVA glue with water and apply to the center of the paper side of your book cloth. Place the book board in the center of the book cloth and press down. Use the bone folder to smooth out any imperfections on the board.

2. Trim all four corners of the book cloth along the diagonal using the book board as a guide.

3. Apply glue to each edge and fold over and press onto the back of the board. Use the bone folder to smooth and secure. Repeat on all four sides. Tap each corner with the flat of the bone folder to soften the point. Repeat steps 1–3 for the second cover.
4. Fold one of the sheets of paper in half, then fold one edge back in toward the initial fold. Smooth each fold with the bone folder. The top half of the paper now has two pages; each will be a quarter the width of the total sheet. Flip the sheet over and repeat. Repeat for the second sheet. You will now have two four-page accordions.
5. To connect the accordion units create a 2" (5cm) “hinge” using paper. Glue the units to the hinge. You will now have one eight-page accordion.
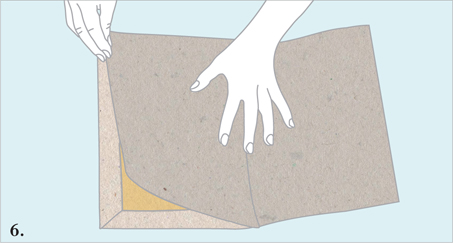
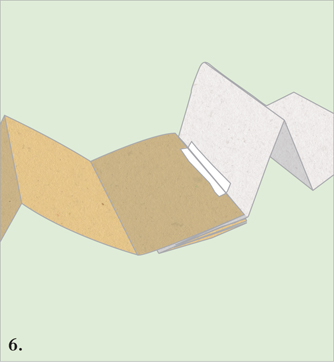
6. Dilute a small amount of PVA glue with water and carefully glue the first page of the accordion book block to the center of the back of the hardcover and press down. Use the bone folder to smooth out any imperfections. Repeat for the last page and the second hardcover.

Kyle Holland
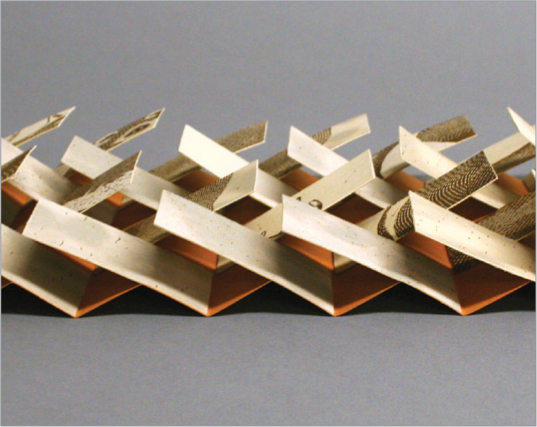
Bookbinder Hedi Kyle invented this delightful and accessible bookform in the 1970s. Many artists have used it since for books incorporating photos, texts, and even abstract paintings.
• 165gsm paper measuring 8½" × 14" (21.5 × 35.5cm)
• 2 sheets of cover stock measuring 8½" × 6" (21.5 × 15cm), or covered boards
• 9 paper flags, 2" × 4" (5 × 10cm) approx. of 250gsm paper or a light card that folds well)
• A bone folder
• Glue

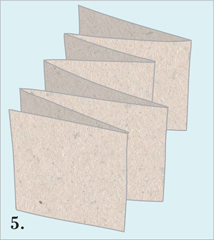
1. Fold the 8½" × 14" (21.5 × 35.5cm) paper horizontally into eighths, making a narrow accordion or concertina, so it has eight folds. Smooth with the bone folder.
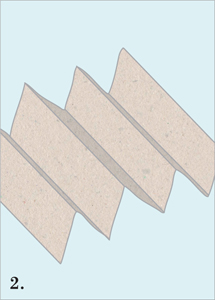
2. Turn the paper so that it looks like two Ws.
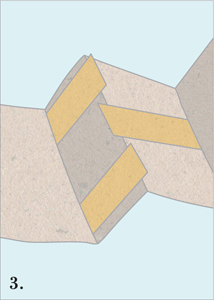
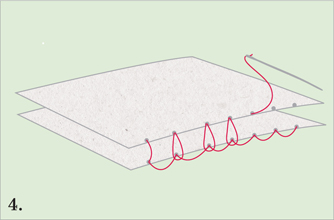
3. Glue three “flags” to your first mountain fold, alternating sides. Leave a little space between each flag.

4. Repeat step 3 for the other mountain folds. Line up the flags on each mountain fold so that they match the first one.
5. Glue the outer folds to the book covers.
6. Rest the book under a weight as the glue sets.
The flags can all go in one direction instead of interweaving with each other. They can be any shape, or even a variety of shapes, as long as they do not interfere with each other as the accordion opens.


WNYBAC members; image by Adam Sauerwein Photography
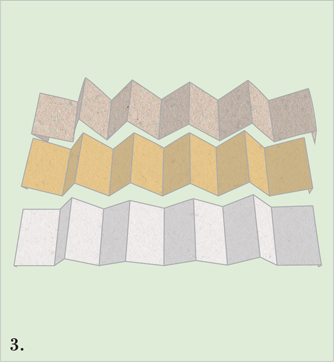
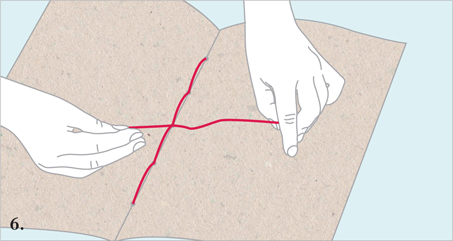
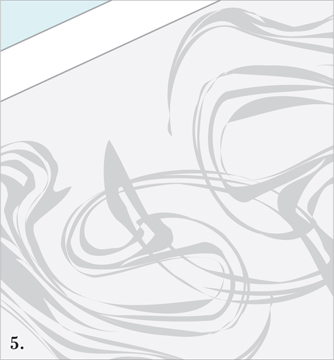
The folded book structure known as the snake or dragon book is deceptively simple to master and has a relatively short production time.
• 5 sheets of paper measuring 5" × 5" (12.5 × 12.5cm)
• Card measuring 2¾" × 2¾" (7 × 7cm)
• Decorative papers of your choice
• PVA glue
1. Take the first piece of paper and fold it in half. Then open it up, rotate 90 degrees, and fold it in half again.
2. Flip the paper over, so it forms a peak on the table in front of you, and take one corner of the paper and bring it to the opposite corner, forming a triangle fold.

3. Hold the paper, opening of the triangle facing up, with your thumbs pressed up against the center of the square. Push up on the center of the paper. You should feel a pop.
4. The paper should be split up into four sections by the folds you’ve made. Two of the sections are flat and smooth, while the other two have folds down the center of them. Take the sections that have folds and bring them together so the smooth sections end up on the outside. This completes the fold. Repeat steps 1–4 on each of the four sheets of paper.
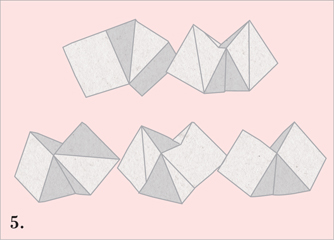
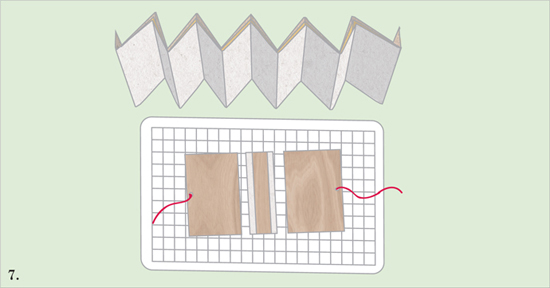
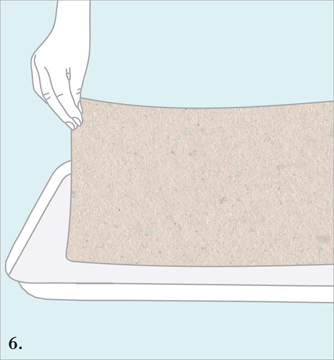
5. Once all sheets of paper have been folded, the pages are fitted and adhered together with glue. To do this you must first arrange the pages alternating opening-side up and opening-side down.

6. The pages will slide into one another and are now ready to be glued in place.
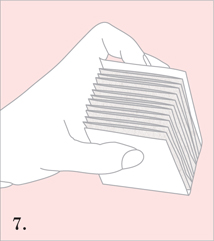
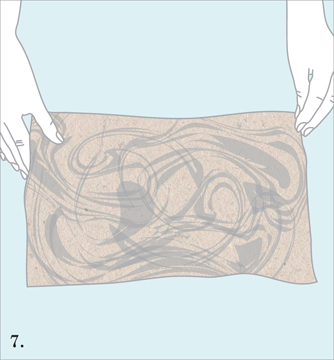
7. When you have glued all of the pages together they will fold up compact into a square. You can now adhere the covered boards to each end to create covers and complete the book.
If you’re pre-printing on the pages, experiment with which way you will need to fold the pages in order for them to be readable and consistent. Keep in mind that a portion of each page will be covered by the following page where they’re glued.


Cassandra Fernandez
The carousel binding is a more complex accordion, allowing a book to be viewed like a traditional book or circularly.
• Paper measuring 22½" × 35" (57 × 89cm)
• Lightweight wood or cardboard 1/12" (2mm) thick for cover
• A metal ruler
• Acid-free glue
• An X-Acto knife or scalpel
• A bone folder
• Acid-free double-sided tape
• A cutting mat
• Strings to close the book
• Parchment paper for hinges
• Colored paper
1. Cut three strips of paper measuring 4" × 28½" (10 × 72cm); 4" × 31½" (10 × 80cm); and 4" × 34½" (10 × 87.5cm).
2. With a pencil, mark the first strip ½" (13mm) in (as a margin) and then every 2¾" (7cm, or ten marks), and then ½" (13mm) again for a margin. In the second strip, mark a ½" (13mm) margin, then every 3" (7.5cm, or ten marks), and then ½" (13mm) for a margin. In the third strip, mark a 1" (2.5cm) margin, and then every 3¼" (8.5cm, or ten marks), and then a 1" (2.5cm) margin. Then, use the bone folder to mark straight lines where the paper will fold. Do this on each strip of paper.
3. Print a desired image on the first strip, let dry, and then fold the paper along the marks to create your first accordion strip. Fold the second and third strips.
4. Make hinges by adhering double-sided tape to parchment paper. Cut eight strips measuring 2" × ½" (5cm × 13mm) length × width. Fold in half along the width.
5–6. Each accordion has four folds out and five folds in (not counting the margins). Adhere each “half” of a hinge on the center back edge of each fold out of the first strip. Then adhere the second strip “spooning” with the first strip with the other half of the hinge. The two strips of paper are glued with the help of the hinges now. Do the same with the second and third strip of paper and the four hinges left to create an accordion with three strips of paper.
7. For the cover, cut two pieces of wood or cardboard measuring 3½" × 4⅛" (9 × 10.5cm). Measure on the inside face of the each cover where the half is and cut a perpendicular line of about ½" (13mm) long and as wide as the string to be used to close the book. Make a little carving with an X-Acto knife to embed the string inside the cover. Glue the string inside that carving and let it dry. Do the same on both covers.
8. Make a spine also with wood or cardboard measuring ⅝" × 4⅛" (1.5cm × 10.5cm) and cut a piece of paper measuring 3" × 4⅛" (7.5 × 10.5cm). This paper will work as an outside hinge to hold together the spine and the covers. Center the spine in the paper and glue it. Leave ¼" (6mm) margin on each side of the spine and glue the two covers into the paper. Make sure the strings in the covers are facing in.
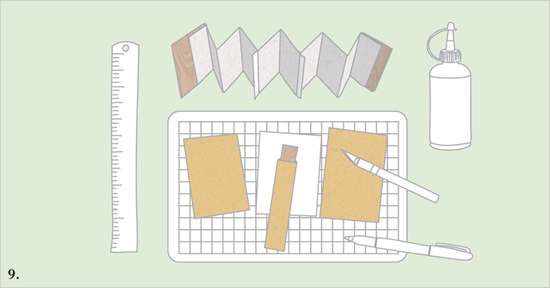
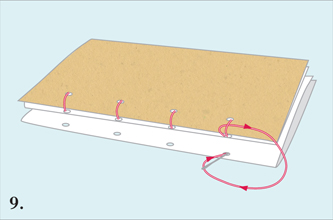
9. To cover the inside of the covers and spine, cut three pieces of paper of any color of your choice, or simply white, with the same measurement for each piece. Glue the paper into the wood or cardboard and let dry.
10. Back to the accordions: The margins on the ends of the first strip should be glued to the margins of the second strip. Then the margins of the third strip are used to adhere the whole book to the covers.
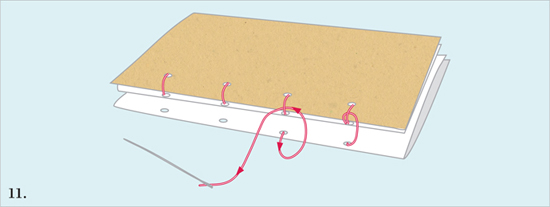
11. For the book to be held in place while opening as a carousel it needs two internal paper hinges measuring about 3 × ¾" (7.5 × 2cm). The hinges should be folded in half with ⅙" (4mm) of spine.
12. Center the book inside the covers and glue the left margin to the front cover. Then glue the internal paper hinges from step 11. Glue half of one of the paper hinges to the inside outer edge of the front cover; the other half is glued to the inside of the second fold of the book. Keep closing the book and glue one half of the second paper hinge on the internal fourth fold of the book, and the other half of the hinge to the inside outer edge of the back cover. Finally, glue the left margin to the back cover.
13. Close the book and keep under weights for a few hours.
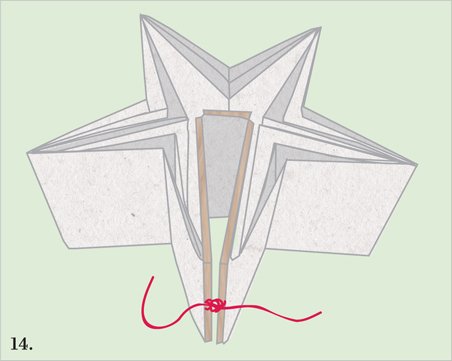
14. The book is now finished. It can be opened by tightening the strings.
Making a mock-up book before starting on your final one is always a good idea so you can make a note of any corrections along the way.


Leah Buckareff
This secret message fold is another variation of the accordion that forms a compact book.
• Paper measuring 8½" × 11" (21.5 × 28cm)
• A glue stick
• Scissors
• A bone folder
• Cover paper
1. Write and illustrate a message on one side of a piece of paper—8½" × 11" (21.5 × 28cm) will work perfectly—and, if you like, cover the reverse side with a pattern or illustration.
2. Fold the paper in half at least three times, but keep going until you have the desired size of actual book page. The smaller you fold down the paper, the more pages the book will have.
3. Once you’ve got the desired page size, unfold your paper so that the non-message side is facing up. Starting just below the top-right page/fold, cut the paper along the folds in a spiral all the way to the middle. Be careful not to cut the final page off!
4. Gather the pages together in an accordion style.
5. To make the cover, measure the length and width of the pages, then the “spine,” which is how thick the little stack of pages is. Then, on your cover paper, draw a rectangle that is equal to the following measurements: height = the height of the pages and width = the width of the pages × 2 + the spine width. Cut this out.
6. Place the cover paper in front of you with the inside facing up. Make a little mark using the folder on the top and bottom of the cover where the spine will start and end. Do this by measuring the width of the pages from the left and right edge. Score the paper where the edges of the spine will be and fold the covers in.

7. Using a glue stick (regular white glue is too wet), apply a little paste to the non-message side of the first page and paste it down onto the back cover. Gather the pages inside the covers and you have a book!
Using a bone folder ensures you achieve clear, crisp, and sharp creases as the pages are folded and then refolded.


Molly Lewis and Michelle Johnson; image by Matt Fuhr
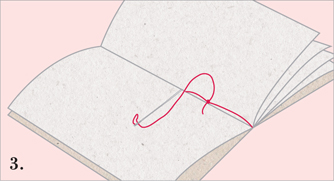
The simplest method of binding a single signature codex is with a pamphlet stitch. There are three basic variations of the pamphlet stitch: the three-hole, the four-hole, and the five-hole. This tutorial is for the five-hole stitch.
• 5 sheets of plain paper measuring 8½" × 11" (21.5 × 28cm)
• 1 sheet of decorative cover paper measuring 8½" × 11" (21.5 × 28cm)
• A bone folder
• A steel ruler
• A pencil
• A binder’s awl
• A pair of scissors
• A bookbinding needle (2⅜" [6cm] × 19 gauge, blunt tip)
• French linen thread
1. Using the bone folder, fold each of the sheets of paper in half to create five folios. Then fold the cover in half too.

2. Nestle the sheets together to create a signature and sit them inside the cover. Then using the ruler and pencil mark five sewing stations as follows: station 3 is exactly in the center of the spine. Stations 2 and 4 are equidistant from the center (1" [2.5cm] from station 3). Stations 1 and 5 are equidistant from stations 2 and 4 (1" [2.5cm] from stations 2 and 4, respectively).
3. Using the awl, pierce the sewing stations.
4. Thread the needle but do not tie a knot in the end. Prepare to follow the sewing guide.
5. Begin inside at station 3. Pull the needle through station 3. Pull all but 2" (5cm) of the thread to the outside. Go through station 4 to the inside. Then go through station 5 to the outside. Go through station 4 to the inside. Go through station 2 to the outside. Go through station 1 to the inside. Go through station 2 to the outside. Go though station 3 to the inside.
6. To secure the stitches, tie a square knot around the long stitch, which crosses over station 3, and cut the excess thread.
In this technique, the cover and signature are sewn at once. Be sure to lay the signature and cover together properly so the outside edges are level with one another before you pierce the sewing stations.

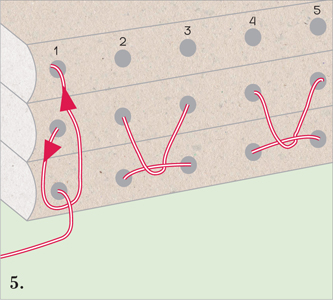
Rima Bueno
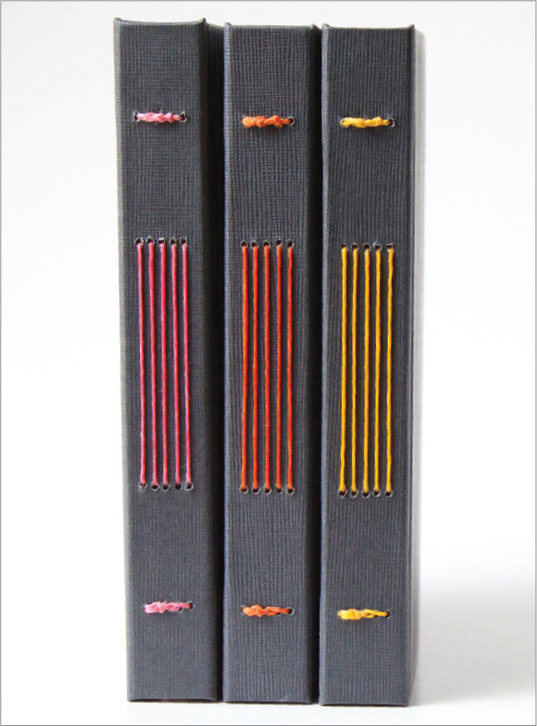
Although it may look complicated long stitch is a relatively simple stitch to master. It allows books to lay flat when open and adds a decorative touch to the spine.
• 9 sheets of any paper (can be the same, mixed, patterned)
• Cover paper
• A cutting mat
• A ruler
• An X-Acto knife (or scissors)
• A pencil or pen
• An awl
• A needle
• Thread
1. For this tutorial we will be using three-sheet signatures so you will need to fold each of the nine sheets of paper in half and then nestle them together in groups of three. Carefully cut the signatures so that each of them measures 4¼" × 5¼" (11 × 13.5cm). Mark and pierce the signatures. The height of the signature needs to be divided into five sections. You can either choose to have equal-sized sections or, in the case of this tutorial, make the top and the bottom sections bigger (or smaller). The three middle sections here measure 1" (2.5cm) each, and the top and bottom sections are 1⅛" (3cm) each. Once marked, pierce with an awl.
2. The height of the cover should equal the height of the signatures, in this case 5¼" (13.5cm). The width of the cover will equal the width of the signatures, in this case 4¼" (11cm), times two, plus the depth of the signatures when grouped together (the spine width). To measure the depth, slightly squeeze the signatures together. Cut the cover paper accordingly. You can add about ⅛" (3mm) to the height and width—this way your block will be sitting deeper inside the cover. Finally you will need to fold your cover and then make horizontal slits on the spine. Use one of the signatures as a guide to mark the back of the spine. Make horizontal slits in line with the awl piercings on the signatures. Be careful not to cross the hinge-folds.
3. Begin with the first signature. Pass the thread through the first station (from inside) and through the first slit in the cover leaving a tail inside the signature. You will use it to tighten the stitches. Wrap the thread around the end of the block and cover, near the hinge-fold. Bring the thread in and tie two knots. You can then pass the thread into the second station and through the cover.
4. Next pass from outside into the cover and the third station, and then from inside out through the fourth station and the cover, before finally wrapping the thread around the end of the booklet and cover.

5. Add in the second signature and pass the thread through the fourth station of the booklet, but not the cover. Wrap the thread around the end of the block, through the cover slit and into the last (fourth) station.
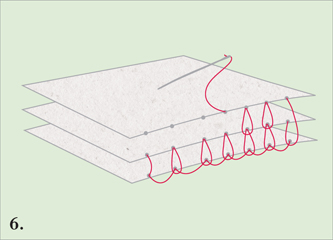
6. Next pass the thread from inside into the third station and cover slit, and then from outside into the second cover slit and station. Then pass the thread from inside out through the first station and cover slit. Wrap the thread around the end of the booklet.

7. Add in the third signature and insert the needle into the first station of the signature. Do not go through the cover. Similarly to the first and second signatures, pass the thread in and out; into the second station and slit from inside, from outside into the third slit and the third station, then into the forth station and slit, and then around the end of the block. Once the thread is inside, tighten all the stitches, tie the thread, and you are done!
 TIP
TIP
With each stitch ensure you pull the thread through entirely so that each stitch is firm and secure, but be careful not to pull too tight.


Eileen Pandolfo
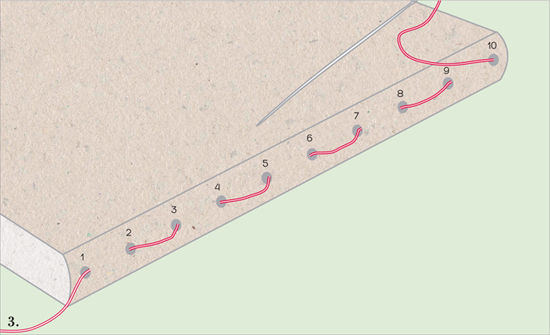
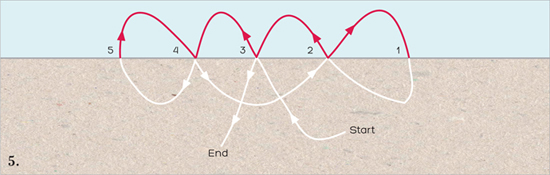
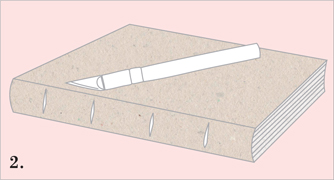
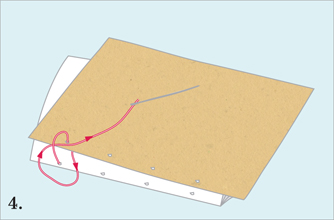
There are four basic variations of Japanese stab binding: Kikko Toji (tortoise shell binding), Asa-No-Ha Toji (hemp leaf binding), Koki Toji (noble binding), and Yotsume Toji (four eye binding). This is for Yotsume Toji, the most common.
• 5 sheets of plain paper measuring 5" × 7" (12.5 × 18cm)
• 2 sheets of decorative cover paper measuring 5" × 7" (12.5 × 18cm)
• A steel ruler
• A pencil
• A binder’s awl
• A clamp
• A pair of scissors
• A bookbinding needle (2⅜" [6cm] × 19 gauge, blunt tip)
• French linen thread

1. On the reverse of the cover use a ruler and pencil to mark four sewing stations. The stations should be at least ⅛" (3mm) from the spine edge, and station 1 should be at least ½" (13mm) up from the tail, with station 4 at least ½" (13mm) from the head. Stations 2 and 3 should be equally spaced between them.
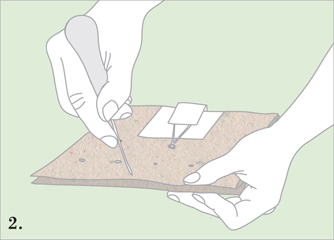
2. Assemble the covers and pages of the book and use a clamp to secure them in place (with the cover still in reverse). Then use the binder’s awl to pierce the sewing stations.

3. Turn the cover over so the right side is facing out, thread the needle, tie a knot in the end, and begin binding at station 2 (entering from the back). Pull the thread through until it is snug. Prepare to follow the guide.

4. Wrap the needle around the spine and thread it back through station 2. Then go in to station 1 (entering from the front), wrap the needle around the spine, and go back through station 1.
5. Wrap the needle around the head to the front cover and go through station 1 (from the front). Go through station 2 (from the back), go through station 3 (from the front), and go through station 4 (from the back). Wrap around the spine and go back through station 4.
6. Wrap around the tail to the front cover, and go through station 4 (from the front). Go through station 3 (from the back), wrap around the spine, and go back through station 3 (from the back). Go through station 2 and tie a square knot.
As the block of this book is created with a simple stack of pages (as opposed to a number of signatures) you can always use different weights, textures, and colors of paper for the pages. Just make sure they are cut to the same size.


Gina Nagi
The Coptic stitch is a beautiful stitch that will add a decorative element to the spine of a book. It will also allow the book to lie flat when open.
• 15 sheets of any paper
• Cover paper (plain or decorative)
• Cover board
• A cutting mat
• A ruler
• An X-Acto knife (or scissors)
• A pencil or pen
• A binder’s awl
• A needle
• Thread
• PVA glue
1. For this book we will be using five three-sheet signatures, so you will need to fold each of the 15 sheets of paper in half and then nestle them together in groups of three. You can make this book any size you like but for the purpose of this tutorial cut your signatures so that each of them measures 4¼" × 5½" (11 × 14cm). Then mark and pierce the signatures. This book will have four stitch columns spaced equally along the spine. This is optional; there doesn’t have to be four, and they don’t have to be spaced equally. You do however have to make sure that each signature is marked and pierced in a position that corresponds with the others, otherwise your notebook will be crooked.
2. Next you will need to prepare the cover boards. First cut two pieces of board to the size of the signatures. Then glue larger pieces of your choice of paper onto the front of these boards, cut the corners, and then wrap neatly to the back of the board. Again, using the awl, mark and pierce the boards carefully in line with the pierced signatures. For this tutorial we have left a ½" (13mm) distance from the board’s edge. This distance is arbitrary and you can decide to make it smaller or bigger.
3. Begin sewing with the first signature. Pass the thread through the first station, from the inside, leaving a tail inside the signature (you will use it to tighten and secure the stitches). Then pass the thread through the first station of the board, from the outside—the needle should come out between the board and the signature.
4. Before tightening, pass the needle through the loop. Insert the needle back into the first station of the first signature.
5. Tighten the stitch and knot together the tail and the thread.
6. Insert the needle into the second station of the first signature.

7. Pass the thread into the second station of the board from outside (the needle should come out between the board and the signature). Then pass the needle through the loop.
8. Continue in the same fashion until you reach the last hole of the board.
9. Take the second signature and, after looping the thread around the board and onto itself, insert it into the last station of the second signature.
10. Insert the needle, from inside, into the second to last station of the second signature.
11. On the outside pass the thread from right to left under the stitch connecting the first signature and the board.

12. Insert the needle back into the second to last station of the second signature. Repeat steps 10 and 11, passing from inside into the third station, then passing from right to left under existing stitch, and then back into the third station.
13. Continue until you get to the last station. After passing the thread from right to left under the stitch, take the third signature and insert thread into the first station of the third signature.
14. Pass the thread through inside, into the second station of the signature. On the outside, pass the thread from left to right under the stitch. Continue stitching the signatures together. You will be traveling from the first station to the last up-down on the odd numbered signatures, and down-up on the even ones. When traveling up-down, the thread is passed from left to right under the existing stitch. When traveling down-up the thread is passed from right to left under the existing stitch.

15. Now you are ready to attach the last signature and board. This is the trickiest part of the binding. After finishing the last stitch of (in this tutorial) the fourth signature, you will need to attach both the board and the fifth signature. Instead of going into the first station of the last signature, insert the needle, from outside, into the first station of the board. The needle should then come out between the board and the signature. Pass under the existing stitch, left to right, and insert the needle into the first station of the signature.
16. Pass the thread from the inside into the second station. Pass it under the stitch between the fourth and third signature, left to right, then loop around the board. Before inserting the needle back into the second station of the signature, pass it through the loop on the board.

17. Repeat step 16 until the last station is reached, passing the thread from inside into the third station. Pass it under the stitch, left to right, then loop it around the stitch on the board and back into the third station. And so on.

18. After the last stitch, the thread ends up inside the last signature. Loop the needle under the binding thread, tighten the knot, and cut the thread.
You might find it easier to use a curved tapestry needle instead of the regular straight one. Make sure that you tighten the thread while stitching.


Becca Hirsbrunner
French link stitch is an exposed spine sewing. It does not incorporate a cover, but once the signatures are sewn together, separate boards can be adhered to the first and last page.
• 9 signatures (27 sheets of paper)
• A cutting mat
• A ruler
• An X-Acto knife (or scissors)
• A pencil or pen
• An awl
• A needle
• Thread
1. Prepare the signatures. This bind looks best with an odd number of signatures. At least three are needed, from there you can add as many as you like. For this tutorial we will be using three-sheet signatures so you will need to fold each of your 27 sheets of paper in half and then nestle them together in groups of three. This bind works for any dimension/orientation. As a guide you could cut the signatures so that each of them measures 5" × 7" (12.5 × 18cm), 4" × 6" (10 × 15cm), or 8" × 10" (20.5 × 25.5cm).
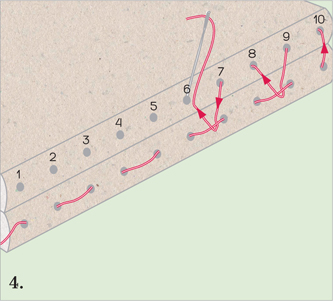
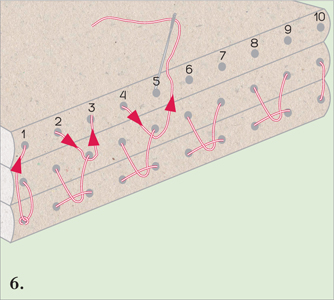
2. Measure, mark, and pierce the sewing stations on each signature with an awl. To do this, open up each signature and mark a beginning station, then four groups of two stations, then an end station. The stations should be at least ¼" (6mm) from the edge, and at least that far apart. Any closer and you will rip the holes open as you sew.
3. You are now ready to sew the first signature. Thread your needle, then enter at station 1, leaving a tail hanging outside of the signature. Exit 2, enter 3, exit 4, enter 5, exit 6, enter 7, exit 8, enter 9, and exit 10.
4. Attach the second signature. Enter station 10 of the second signature, exit 9, then thread needle under loop between stations 8 and 9 on signature one, needle pointed down. Enter 8, exit 7, then thread needle under loop between 6 and 7 on signature one, needle pointed down. Enter 6, exit 5, thread needle under loop between stations 4 and 5 on signature one, needle pointed down. Enter 4, exit 3, thread needle under the loop between stations 2 and 3 on signature one, needle pointed down. Enter 2, exit 1.
5. Before going any farther, you need to deal with the loose tail on signature one. Wrap thread from signature two, station 1, counterclockwise around tail from signature one, and enter station 1 on signature three. Remove needle from thread, and thread needle onto tail left from signature one, station 1. Enter station 1 and tie off tail inside. Place needle back on working thread.
6. Attach third signature. Exit 2, thread needle under right side of loop coming from station 3 on signature two (only the one side, not the whole × created between signature one and two), needle pointed down. Enter 3, exit 4, thread needle under right side of loop coming from station 5 on signature two, needle pointed down. Enter 5, exit 6, thread needle under right side of loop coming from station 7 on signature two, needle pointed down. Enter 7, exit 8, thread needle under right side of loop coming from station 9 on signature two, needle pointed down. Enter 9, exit 10, thread needle through loop between station 10 on signatures one and two, needle pointed to the left (clockwise).

7. Attach fourth signature. Enter station 10 on signature four. Exit 9, thread needle under left side of loop coming from station 8 on signature three, needle pointed down. Enter 8, exit 7. Thread needle under left side of loop coming from station 6 on signature three, needle pointed down. Enter 6, exit 5. Thread needle under left side of loop coming from station 4 on signature three, needle pointed down. Enter 4, exit 3, thread needle under left side of loop coming from station 2 on signature three, needle pointed down. Enter 2, exit 1. Thread needle through loop between station 1 on signatures two and three, needle pointed right (counterclockwise). Enter 1 of next signature. Repeat instructions for third and fourth signatures (steps 6 and 7) for remaining signatures, until you reach the last signature.
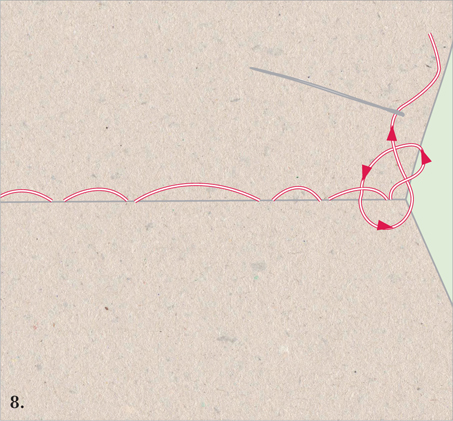
8. After exiting the last station (whether 1 or 10) in the final signature, thread the needle like normal (if station 1, counterclockwise, if station 10, clockwise) around the loop below, and enter through the same station. Tie off inside.
The amount of thread you need is at least one spine-length per signature (plus extra so you have enough to tie off each end). Always pull the thread tight in the direction you are sewing to avoid tearing the paper.

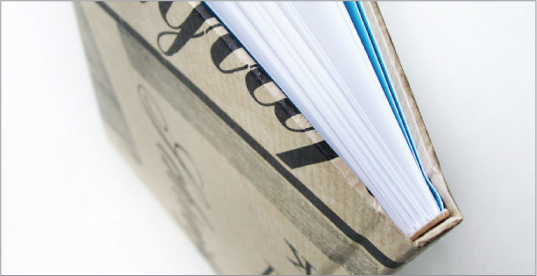
Jennifer Bates
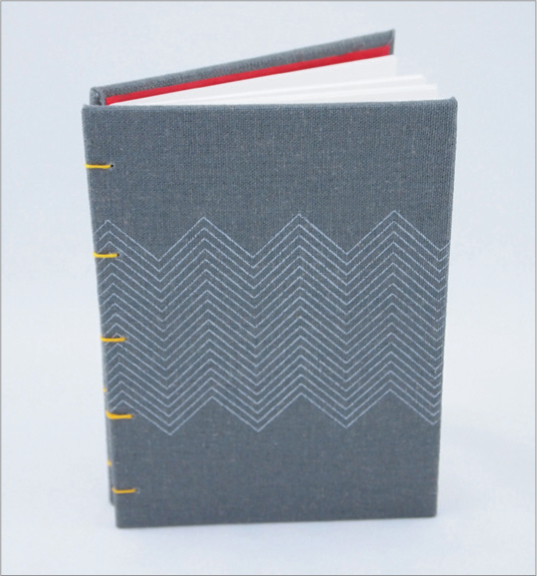
Case binding is a common type of hardcover binding for books. The pages are arranged in signatures and then glued together in a textblock. Then the textblock is glued to the cover.
• 40 sheets of paper measuring 8½" × 11" (21.5 × 28cm)
• 2 thick sheets of paper, approx 8½" × 11" (21.5 × 28cm)
• 1 sheet of paper 5" × 8" (12.5 × 20cm)
• Board for cover
• Book cloth
• A binder’s awl
• A needle and thread
• PVA glue
• A pencil
• A ruler
• A cutting mat
• A bone folder
• An X-Acto Knife (or scissors)
• A glue brush
• Weights
• Book press (optional)
• A drafting triangle
1. Fold each of the 40 sheets of paper in half then nestle them together in groups of four to make the signatures. With the first signature, take a ruler, start in the middle, and then mark 1" (2.5cm) holes (stations) on either side. You will have seven marks in total. Repeat for the other signatures, and then pierce the markings with the awl.
2. Take the first signature, sew into the first station on the left and weave through the next stations, in and out. When you reach the last station, weave back through to the first. Loop under the thread and tie a knot on the inside. Then return the needle and lightly pull the knot to the outside.
3. Take the next signature, sew from the outside through the first station on the left, back out through the second, then through the right loop below.
4. Take the needle up through the left loop and back into the second station on the second signature. Repeat this method (in steps 3 and 4) through the remaining stations of the second signature. You will be working left to right.
5. Take the third signature and sew through the first station on the right (you will now be working right to left) and out through the second station.
6. This time you are going to take the thread in between the bottom two signatures, loop around the first stitch that joins them, and then take the needle back through the first station on the third signature.
7. Repeat this method for the remaining stations on this signature, and for the remaining signatures, always looping around the previous stitch below. If you get to a point where you run out of thread, tie if off with a knot on the inside, lightly pull the knot to the outside, and cut off the excess thread. Thread the needle again, sew into the same station (from the outside), and continue on binding.
8. On the last station, loop under the thread on the inside of the last signature, tie and knot, and lightly pull to the outside of the book, then cut off the excess thread.
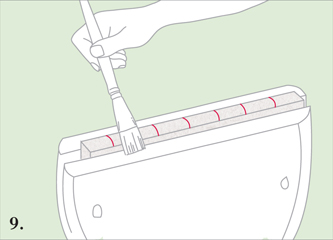
9. Using a book press, place the textblock inside, and make sure the signatures are stacked evenly. Apply two coats of PVA glue to spine and leave to dry.

10. Attach the endpapers. To do this fold the two thick sheets of paper in half, apply a ¼" (6mm) line of glue along the edge of the front side of the textblock, and then apply one end page. Repeat on the other side, and then place it back in the book press to dry.
11. Once dry remove from the press. Take the sheet of 5" × 8" (12.5 × 20.5cm) paper and place it around the spine of the book, using the bone folder to score the folds.
12. Apply glue to the spine and apply the paper. Glue the sides, smoothing with the bone folder. Place textblock in press to dry.
13. Next create a smooth edge to the pages of the book using a blade and a ruler. Slowly cut around ¼" (6mm) off. Cut slowly and evenly through all the pages. You can use sandpaper or a nail file to smooth off any rough or uneven parts.
14. You are now ready to case-bind the textblock. Start by measuring the board. Measure the width of the textblock, now subtract ¼" (6mm) from the width, then add ⅛" (3mm).
15. For the height measure the textblock and ⅛" (3mm) to the top and bottom, so ¼" (6mm) in total.
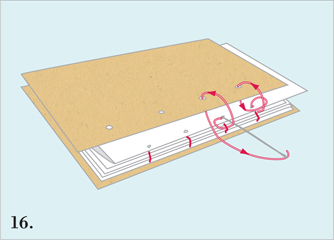
16. Mark the measurements out on the board twice (to get the front and back cover) and then place the spine of the book onto the board, trace down the sides of the spine to get the width, but draw the height in line with the marked front and back covers. Then cut out all the pieces.
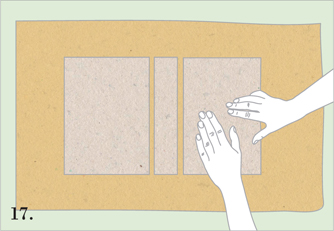
17. Take the book cloth (or paper) and lie it face down in front of you. Paste PVA glue on each of the three pieces of board and place onto the book cloth (or paper) one at a time, using the bone folder to smooth out any air bubbles. Leave a gap of ¼" (6mm) plus the thickness of the board between the front and back covers and the spine. Use a ruler or drafting triangle to ensure they are glued on straight. Add weights to the cover and allow to dry.
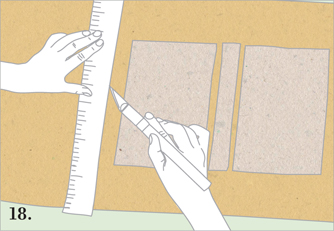
18. Once dry, cut the cover material off so there is at least 1" (2.5cm) around the sides of all the boards.
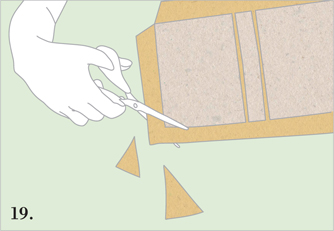
19. Then cut all the corners at an angle, leaving a small gap at the corner tips.

20. Glue down one flap at a time, pinching the gaps on the tips as you go, and smoothing with the bone folder.

21. Glue the endpapers to the inside cover. Position the textblock to where the end pages will have a ⅛" (3mm) border around it. Run the bone folder across to ensure it is glued down smoothly.
Be sure to use the bone folder to smooth out any creases or air bubbles on the front and back covers and the spine as you glue them to the book cloth or paper.


Ruth Bleakley
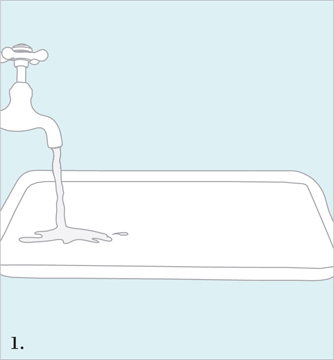
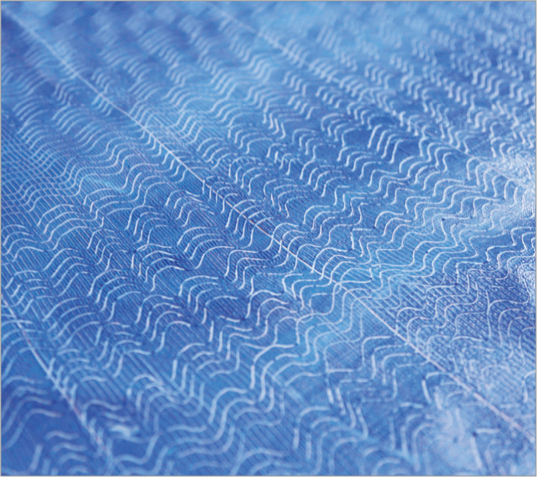
Suminagashi, or “floating ink,” originated in Japan and is one of the oldest known paper marbling methods. This technique creates beautiful patterns and textures on paper and is ideal for book covers or inside pages.
• Sumi-E liquid Ink
• Dispersant (such as Photo-Flo)
• Paper (such as Yasutomo’s Hosho Sumi Sketch Paper; 12" × 9" [30 × 23cm])
• 2 Sumi-E calligraphy brushes (that match in size)
• A baking pan, 13" × 9" (33 × 23cm) or similar tray to hold water
• 2 small containers for ink and water (small cups like the type used at restaurants to hold sauce work well)
• Strips of newspaper the width of your tray and about 2" (5cm) wide for skimming
1. Lay out newspapers on your workspace to protect the tabletop, and prepare the water bath. To prepare the water bath, fill the baking pan with about 2" (5cm) of room-temperature water and allow it to settle until it is still. The water temperature is not critical, but it should not be too hot or too cold.
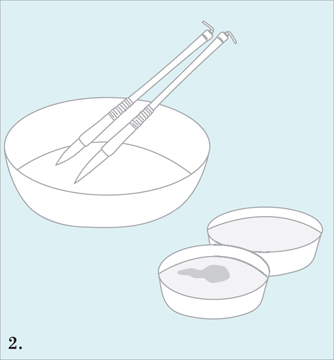
2. Prepare the brushes and ink. To prepare the brushes, soak them in water while you get your ink ready—this will soften up the fibers of the brushes. You will need to prepare two small dishes of ink, containing no more than a few teaspoons of liquid per dish. Carefully pour 2 teaspoons of black ink into one of your dishes. In the other dish, add 2 teaspoons of room-temperature water and 2 drops of dispersant—this makes the “clear ink” that will make spaces between the black rings. You may need to add more dispersant depending on the brand of ink and dispersant you’re using, but it’s good to start with less and add more if needed.
3. Prepare the surface of the water for marbling. Take the soaked Sumi-E brushes and carefully squeeze them out with your fingertips, reshaping the brushes into points, and lay them aside. Take a strip of newspaper, and, holding it from edge to edge on the baking pan of water, skim the surface of the water to pick up any dust that might have fallen on the surface. Think of it like taking a squeegee across a window. It’s important not to skip the skimming step, or your rings might not form correctly.

4. Holding one brush in your right hand, and the other in your left hand, dip one into the black ink, and the other into the “clear ink.” Carefully scrape off extra ink on the edge of the ink container. With your elbows on the table on either side of your tray, hold each brush straight up (one in your left hand, one in your right hand), with the tips pointing toward the water. Carefully lower the tip of the brush containing black ink to the surface of the water, just barely touching. Don’t plunge the tip too far below the surface of the water; it should just barely touch the surface. A ring of black ink will leak from the brush tip onto the water—if it’s very faint, don’t worry; they’ll start to show up better later. Take the black brush out of the water, and lower the tip of the brush with the clear ink down onto the surface of the water, right in the center of the black circle.
5. Continue dipping the brushes into the water bath, holding each brush in the water for 2–3 seconds, alternating them to form concentric rings. Be patient! The longer you touch the brush to the water, the thicker the rings will be. Move slowly. Gently push the rings around either by blowing on them (gently) or swirling them slowly with a toothpick. The key is slow and gentle motions, so as to preserve the separation of the two colors. If it seems like the black and white inks are not balanced—for example if it takes you 5 seconds to make a clear ring and 1 second to make a black ring of the same size—you can add dispersant to the slower color to make the speed of expansion the same.
6. Once you have made all your circles (I would recommend 50; 25 of each color) you are ready to “print” the design onto the paper. Holding the paper at opposite ends lengthwise, gently lower it directly onto the design in the water bath, laying it down carefully from one end to the other, like putting film on a microscope slide. Try to avoid air bubbles between the paper and the design. Work quickly and smoothly—the paper only needs to lie on the surface of the water for 2–3 seconds.
7. As soon as you see the design appear on the paper, pick up the paper by peeling it from one edge. If it looks a little runny give it a gentle rinse by sliding it under the surface of the water in the marbling tray before taking it out. Careful though, the wet paper is very fragile. Lay the wet sheet of paper down on a clean countertop or on newspaper, or hang it to dry by draping it over a clothes drying rack (don’t forget to put extra newspaper on the floor to catch the drips). When the paper is dry, it will be wrinkled, but to flatten it out simply iron the back side on low with no steam.
8. Print as many sheets as you like, skimming the surface of the water in the marbling tray between each print. Reload the brushes as necessary, but don’t saturate the brushes too much or the inks will fall to the bottom of the marbling tray instead of floating on top. If you have too much ink in your brush, carefully squeeze it out until no more drops of ink come out.
If the water in the marbling tray becomes murky, it is because you are dipping the brush too far under the surface of the water, or you have too much black and white ink in the brush. Start again with fresh water in the tray. If your paper tears, it is because it is too thin—try a thicker paper. If your rings expand too slowly, it may be because of dust on the water surface—make sure to skim it, and if that doesn’t work, try adding another drop of dispersant to the ink. If you get mixed black and white ink, empty out the ink, rinse the brushes, and start again. For more troubleshooting tips on the Suminagashi paper marbling technique see: www.ruthbleakley.com/blog/2013/11/suminagashi-marbling-tips.

Esther K Smith
A grown-up form of finger painting, traditional bookbinders have decorated endsheets and covers with this technique for centuries.
• Paper or cover stock
• For the wheat paste: water, unbleached flour, and 1 clove
• A substance for color (see step 2)
• A pan
• A brush or sponge
• Assorted items for texturing (such as combs, stamps, forks)
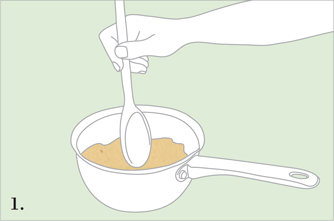
1. Make the paste by combining six parts cold water and one part unbleached flour in a pan. Cook and stir until it thickens and starts to bubble, then remove from heat and keep stirring until cool enough to touch. Add a clove as an insect repellent. You can use the paste right away or store it covered in a refrigerator for a few days.
2. Divide the paste into a few smaller containers and add color to each. You can do this using acrylic paint, tempera, powdered pigments, or even turmeric!
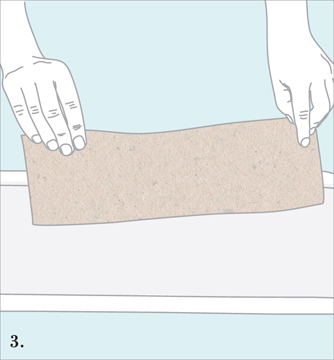
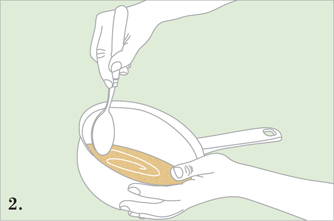
3. Dampen the paper on both sides with water, using a brush or sponge.
4. Apply a thin coat of color to the paper with the brush or sponge.

5. Comb or stamp the paper to make patterns.
6. Let the paper dry, and then put under a weight. Repeat steps 1–6 for covers and endpapers, and so on.
You can also make paste from cornstarch, cake flour, or rice flour, and color it with acrylic or tempera—any water-based pigment. You can even add metalic powders or glitter.

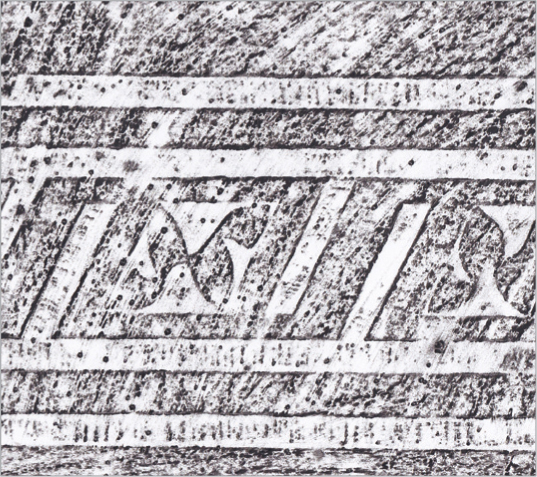
Esther K Smith
One of the earliest forms of printing, people used this approach to copy documents that were carved in stone in Ancient China. Max Ernst and the Surrealists named this rubbing technique “frottage.”
• Brass rubbing crayons, lumber crayons, or melt crayons
• A textured surface
• Thin, strong paper
• Weights or removable artist’s tape

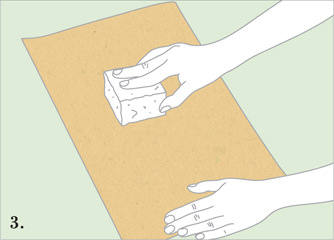
1. Find and clean a textured surface. This could be anything, from a textured chopping board to a manhole cover!
2. Tape down the paper, or weigh down the corners.
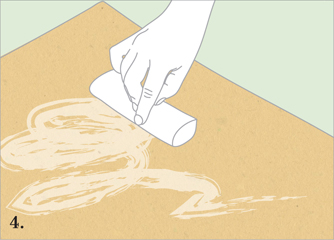
3. Rub over the paper with a crayon.

4. Use circular, diagonal strokes, and combine colors as desired.
5. You can move the paper to another texture to make more complex patterns.
6. Store the paper flat and use for covers, endpapers, and so on.
Instead of using found textures to create frottage patterns, you can make your own texture plates for rubbings.

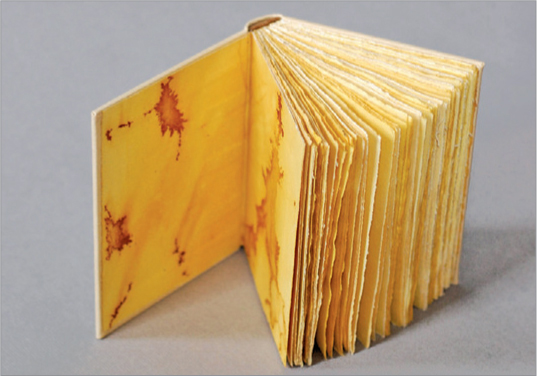
Natalie Stopka
Many plants and flowers contain natural dye colorants, notably those with the species name tinctoria following their genus name. Plants can be used fresh from the garden, or purchased pre-dried and pulverized from a dye supplier. Here are just some options: chamomile, coreopsis, blackberry, dahlia, eucalyptus, golden marguerite, marigold, tansy, yarrow, and the leaves of fruit plants.
• Paper (any paper with 50% or greater cotton or linen content, including watercolor and printmaking papers, size of your choice)
• Alum (aluminum sulfate or potassium aluminum sulfate)
• A pot of boiling water
• Dye plants
• Tray (marbling tray, enamel tray, or lipped baking pan large enough to hold the paper flat)
• Latex or dish gloves
• A strainer
• Optional: lemon juice or white vinegar, or ammonia (see tip)
1. Fill the tray with warm water, measuring as you go. Add 1½ teaspoons alum per quart of water, stirring to dissolve.
2. Next, wearing gloves, take the sheets of paper and submerge them in the water a few at a time. Be careful not to let air bubbles between them. Let them sit in the water for 20 minutes or until the water has cooled to room temperature. Once you have submerged all the pieces of paper, remove the paper and empty the tray, then rinse and dry the tray.

3. Fill a pot with the same quantity of water and bring to a boil, then pour into the empty tray. Wearing gloves, scatter a layer of petals, whole blossoms, leaves, or pulverized wood in the water, gently crushing fresh plants between your hands as you go. Cover this with a sheet of paper, pressing to submerge it.
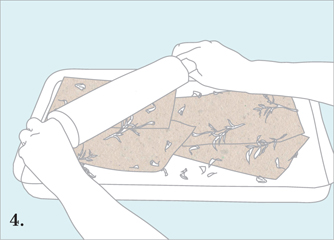
4. Continue layering plants and paper until the tray is full, ending with plants. For a stronger color run a rolling pin over the paper and plants. Allow the dye bath to cool, at least 1 hour or overnight.
5. Empty the tray, straining out plant matter. Fill the tray with clear water, and gently swish each sheet of paper through the water to remove any plant material (stubborn bits will easily come off when it is dry). Lay the paper out to dry. When still slightly damp, stack between waste sheets and blotters, and press to dry flat.

While the bath is hot, pour in diluted lemon juice or white vinegar to make the bath more acidic, or use diluted ammonia to make it more alkaline. Changing the pH will alter the dye’s color. It will also shorten the papers’ lifespan, but the results may be worth it.

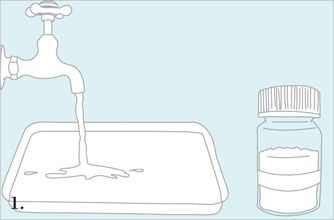
Trinh Mai
This is a great technique that lets you use fabrics of your choice to create unique book cloths.
• Fabric (cut 1" [2.5cm] larger than the project all around; cotton works best)
• Kozo paper (cut 1" [2.5cm] larger than the fabric all around)
• Wheat paste
• A plastic container
• A squeegee
• A window or glass pane
• A brush or brayer
• A spray bottle for water (or bowl of water and wide brush)
1. Make the wheat paste by mixing one cup of cake flour with a cup of cold water. Boil 4 cups of water and then add the flour mixture. Boil at a medium heat, stirring constantly until it becomes glossy and looks like thick gravy. Let it cool in a plastic container. Sieve the mixture if necessary to remove lumps.
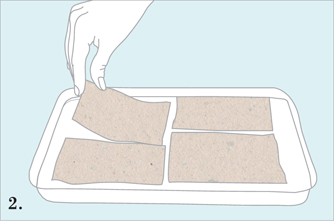
2. Wash and iron the fabric.
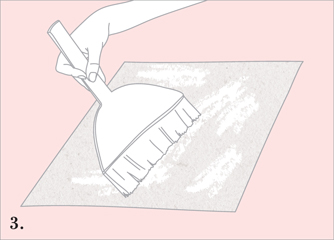
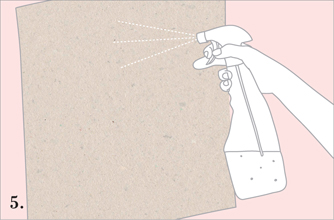
3. Spray water on the Kozo paper and brush it to relax the fibres.
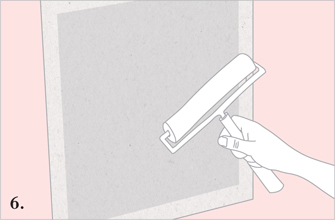
4. Spread the wheat paste straight onto the paper with a brush or a squeegee. Apply it evenly over the entire surface; not too much and not too little—it should be a thin, even layer.
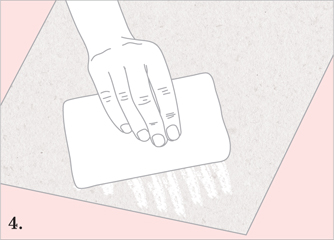
5. Place the fabric face down onto the glass pane, or if using a window, against the pane. Wet the fabric slightly with the spray bottle so that it sticks to the glass. You must work quickly before the fabric falls down if using a window pane.
6. Stick the paper onto the fabric. Use the brayer from the center to the outer edge to flatten out any air bubbles. The outer edges of the paper should stick to the glass.

7. Let it dry. Once dry, you can take a blade to cut along the edges of the fabric. The leftover paper strips can be removed from the glass with water and a cloth.

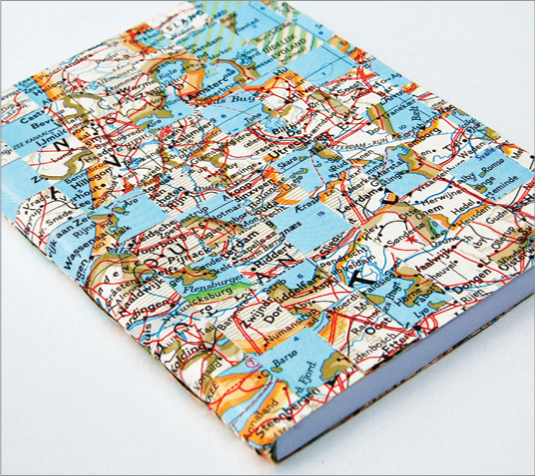
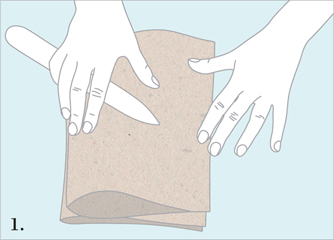
Emma Bonsall
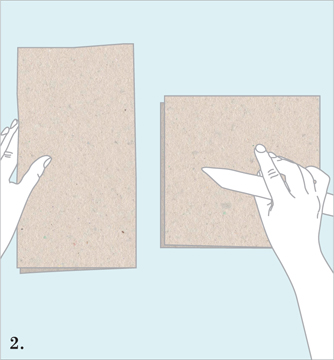
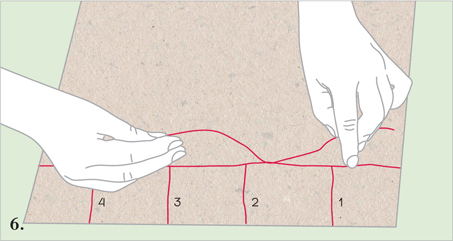
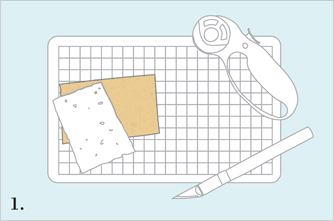
Woven covers are a great way to add character to a book cover. This tutorial uses old maps, but you could use any decorative or plain or colored paper that you have. If using maps, select one map that is mostly land and one that is mostly water so as to give a good mix of colors.
• A book ready to cover
• Large sheets of decorative or plain paper
• A cutting mat
• A steel ruler
• A rotary cutter (or scissors)
• PVA glue
• Double-sided tape

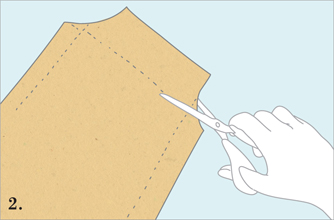
1. On the back of the maps, mark up strips that are ½" (13mm) wide and long enough to wrap around the book from top to bottom (vertical pieces) and front to back (horizontal pieces). Allow 1" (2.5cm) at either end. Keep the strips horizontal so that you can read the place names.
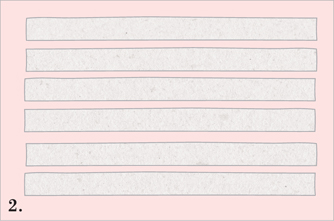
2. Lay out the horizontal pieces of the paper in a line and secure them to the surface you are working on, either using tape or by weighing them down.
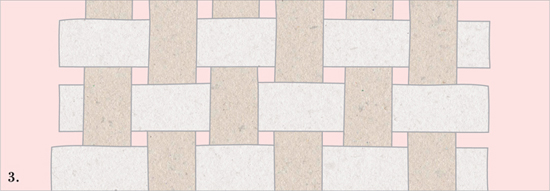
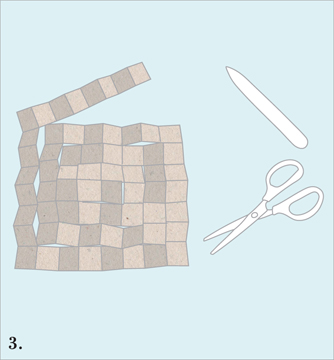
3. You can now begin to weave the vertical pieces through the horizontal pieces, starting on the left and working your way across.
4. When you’ve woven enough to cover the front and back of the book, add some tape to the bottom of the woven pieces, leaving enough of the tape to be able to fold over and seal the ends together. Repeat for the top and sides, then fold tape over to the back. You will now have a woven “fabric.”
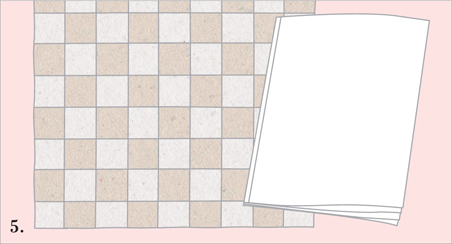
5. Layer double-sided tape on the book you are covering, including the spine, then lay the back of the book on the woven map fabric, wrapping it around the book and pressing down to make sure it sticks.
6. Trim around the edges and then glue to front cover.
It is a good idea to stack a pile of books onto the completed cover to ensure all pieces stick properly to the cover.


Mareth Cordell
A removable fabric cover only requires a few supplies and is a great way to use up fabric scraps.
• A journal, approx 5" × 8¼" (12.5 × 21cm)
• 3 fabric scraps (at least 2½" × 19" [6.5 × 48.5cm])
• Fabric shears or a rotary cutter
• Numeric stamps
• A permanent ink pad
• A pencil
• A sewing machine
• Thread
• Embellishments (optional)

1. Determine the order of the fabrics then cut them into strips as follows: top 4¼" × 19" (11 × 48.5cm), middle 2½" × 19" (6.5 × 48.5cm), and bottom 6" × 19" (15 × 48.5cm). For the middle fabric, this is where the numbers will be stamped, so pick something light and neutral.

2. Add letters or a Dewey Decimal code using stamps and an ink pad.
3. Place the right sides of the bottom and middle fabrics together and sew along the long side with a ½" (13mm) seam. Next place the right sides of the middle and top fabrics together and sew along the long side with a ½" (13mm) seam. The final piece should measure 10¾" × 19" (27.3 × 48.5cm).
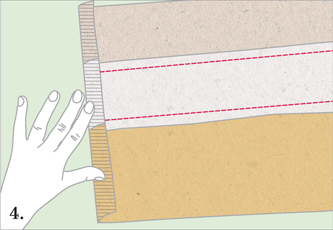
4. Fold in the edge of the short side of the fabric roughly ¼" (6mm), and press. Fold over another ¼" (6mm) and press again. Sew along the folded edge with a narrow top stitch. Repeat on both sides.

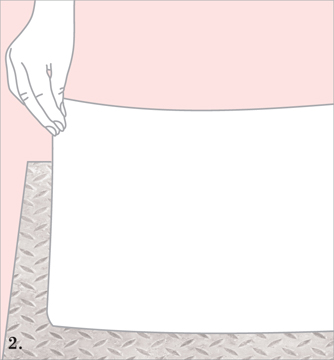
5. Place the journal on the fabric, right side up. Fold the short edges of the fabric over the cover of your journal. Draw lines on the folded over fabric to mark the top and bottom of the book’s edges. These lines are where you will need to sew in the next step.

6. Once you’ve marked the four sewing lines (top left, bottom left, top right, and bottom right), slide the journal out of the fabric. Press the edges to keep everything in place and sew the folded sides along the lines. Make a diagonal cut across each corner, making sure not to cut the stitching.
7. Turn your cover inside out, push the corners out, and press it. Add any embellishments. Insert the journal; the fit should be snug.
When sewing the fabrics together, check the placement of the middle fabric to ensure that the numbers will be facing the right way when the cover is completed.


The pillow book was created by Bassuet as a literal interpretation of a famous eleventh-century Japanese book, where the author, Sei Shõnagon, kept the pages hidden under her pillow.
• Book board
• Book cloth
• ½" (13mm) foam
• PVA and methyl celluose glue (50/50)
• A glue brush
• A cutting mat
• An Olfa knife or rotary cutter
• Scissors
• A bone folder
• A book press
1. Cut the book board using an Olfa knife or a rotary cutter, and the foam with a pair of scissors to the size of your textblock.
2. Cut the book cloth 1" (2.5cm) all around bigger than book board, using an Olfa knife or a rotary cutter, and cut the corners with a pair of scissors.

3. Glue the foam to the board. Spread glue on the book cloth with the glue brush and glue foam side down.
4. Press the board and foam firmly down while gluing the edges of the book cloth, long sides first. Use the bone folder to smooth the cloth.
5. Pinch the corners of the long sides, again pressing the board and foam down firmly, while gluing the short edges.
6. Leave under a book press.
 TIP
TIP TIP
TIP