The British countryside offers enormous scope for walks, ranging from a morning or afternoon stroll on a summer day to challenging long-distance paths that take a week or more in whatever conditions the weather provides. Walking on a warm summer’s day can be hot and thirsty work, in which a light lunch of a few sandwiches, plus some fruit and a bottle of water are enough. Crisp spring or autumn mornings, frosty winter days and unpredictable weather demand more and, although more challenging, they are often more fun and more rewarding; they provide better light and more interesting conditions for photographers, cooler walking (hot isn’t always good) and a greater sense of reward generally – especially when one sits down to eat.
Soup is welcome on cold, raw days. Take well-wrapped sandwiches with moist fillings. As well as the suggestions in this section, see Pressed Sandwiches, and maybe hard-boiled eggs, perhaps with a little Dukkah, wrapped in a twist of paper to eat with them. Fruit is always good. If you are taking oranges – which are very thirst-quenching – peel and divide them into segments before setting off to reduce mess and chores for cold fingers.
A selection of small high-energy snacks is important. Anyone who has wolfed down their sandwiches in the car park and then piled up a mountain, only stopping to recover from nausea shortly after the start, will say what a mistake this is. Save the soup and sandwiches for the top, and nibble some Granola Bar or Flapjack for short energy bursts (when walking one feels one has earned them). The idea of small treats at intervals is also an incentive for children. Some people arrange their walks around the locations of country pubs for liquid refreshment. By all means do so if you wish, but the ideas here are for the self-sufficient. Take bottled water, and hot drinks in flasks (don’t add milk beforehand, carry it separately), or consider if there is the possibility of taking a tiny camping stove and a kettle to brew a drink on the spot.
Serves 8
2 red peppers
1 teaspoon cumin seeds
30g butter
2 garlic cloves, chopped
2cm piece of fresh root ginger, peeled and grated
1 large onion, chopped
½ teaspoon turmeric
a pinch of chilli powder
200g red lentils
2 × 400g tins of tomatoes
a pinch of sugar, if needed
100ml single cream (optional)
salt
Here is a warming soup for a cold day’s hill walking. The recipe makes a large quantity of soup, but it can be frozen.
Preheat the grill. Put the red peppers on a baking tray and grill them until the skins are black. Remove from the heat and cover with a bowl. Leave until cool, then peel off the skins, halve and remove the cores and seeds, then chop the flesh roughly.
Meanwhile, put the cumin seeds in a dry frying pan and toast them over a low heat until they turn a slightly darker colour and smell toasted. Grind in a spice grinder or using a mortar and pestle.
Melt the butter in a large saucepan over a medium heat. Add the garlic and ginger, then stir-fry for 2 minutes. Add the onion and fry gently until it softens without browning. Then add the turmeric and chilli, stir well and leave to cook for 2 minutes.
Tip in the peppers, lentils and tomatoes, add 600ml water and a generous 1 teaspoon salt and bring to the boil. Simmer gently for 30 minutes or until the lentils are soft.
Leave to cool slightly, then use a stick blender to make a smooth, thick soup. Taste and adjust the seasoning, adding a pinch of sugar if it seems on the acid side.
Add the cream if you are eating this at home; otherwise, leave this out and put the soup in a pre-heated flask as part of a warming picnic lunch.
For walking, and especially hill walking, the best sandwiches have moist fillings between bread that doesn’t offer too much resistance. Soft white or wholemeal rolls are good alternatives to sliced bread. Very crusty bread is better avoided. Butter helps to make the bread easier to chew, but it is unnecessary, even futile, with the tomato and anchovy filling given below.
There is a catalogue of tried-and-tested favourite fillings: ham and mustard, cheese and pickle, hard-boiled egg sliced with salad or mashed into salad cream or mayonnaise, variations on tinned sardines or tuna. Everyone’s family has these in their repertoire, a legacy of the habits and routines of generations. Here are a few more unusual suggestions from the great back catalogue of early 20th-century British picnic ideas. Of course, they can be used on any other occasion as one’s fancy dictates – for afternoon tea, other picnics, and for travelling.
Makes 4 rounds of sandwiches (or 20 tiny afternoon tea sandwiches if used in the same manner as Cucumber Sandwiches)
150g full-fat soft cheese
6–8 dried dates, stoned and chopped
50–60g salted peanuts (not dry roasted), to taste, coarsely chopped
4 tablespoons single cream
½ teaspoon black peppercorns, coarsely crushed
8 slices of brown bread
softened butter, for spreading
This combination of peanuts, dates and cream cheese was originally suggested by Ambrose Heath in his book Good Sandwiches and Picnic Dishes (1948). Use with brown bread to make an interesting sandwich for long walks and journeys.
Put the soft cheese in a bowl and stir in the dates and peanuts. Add enough cream to make the mixture soft and spreadable.
Divide the mixture among 4 slices of buttered bread. Sprinkle a little of the black pepper over each portion. Top with the remaining bread, press together and cut in half diagonally. Wrap the sandwiches well for carrying.
Makes enough filling for 6 rolled sandwiches, or 8–10 sandwich rounds for small triangular sandwiches, or 12 bridge rolls
500g asparagus spears
a little olive oil
4–6 tablespoons mayonnaise, as needed
1 small freshly baked wholemeal loaf
softened butter, for spreading
6 cooked asparagus tips (optional)
salt
Fresh asparagus makes a delicious and delicately flavoured sandwich filling. It might seem a little effete for a day out in the hills, especially if made into rolled sandwiches, as described below, but it is actually a delicious alternative to more conventional walker’s fare. If the mood takes you, reserve 6 asparagus stalks before making the filling and roll one into the centre of each sandwich. This filling can also be spread between slices of brown bread and then trimmed into little triangles without crusts, or used in Bridge Rolls, each one topped with a little grated Parmesan or some sieved hard-boiled egg yolk for afternoon tea or less mobile picnics.
Preheat the oven to 170ºC. Snap off any hard or woody sections from the asparagus (use these to flavour vegetable stock). Put the olive oil in a small roasting tin and add all the asparagus spears and tips in a single layer. Add a pinch of salt, then roast for 15 minutes or until the asparagus is tender. Remove from the oven and leave to cool. Take out and reserve the 6 asparagus tips for rolling into the filling, if using.
Put the asparagus stalks and tips, and any liquid they have produced, into a food processor and blend into a coarse paste.
Transfer to a small bowl and stir in enough mayonnaise to make a pleasant texture. Taste and add a little more salt if needed. (You can use the filling at this stage to fill sandwiches or bridge rolls as normal.)
To make the rolled sandwiches, chill the loaf for 2 hours. Take a bread knife and dip it into a jug of boiling water, then dry it before using for cutting. Cut off the bottom crust of the loaf, then cut slices as thinly as possible working from the base of the loaf towards the top. Depending on the size of the loaf, it will be possible to cut about 6 slices before you reach the top crust when, however sharp the knife, the slices will begin to distort.
Spread each slice with a thin layer of butter and then trim off the crusts. Divide the asparagus filling among the slices and put an asparagus spear, if using, at the short end of each slice.
Carefully roll up the bread around the filling, trying not to allow cracks to form in the bread. Secure each roll with a cocktail stick. Chill until needed, then remove the cocktail sticks before either packing in a plastic box or arranging on a plate, depending on the occasion.
Makes enough to fill 4 individual bread rolls generously, cut in half for serving
1 large beef tomato or similar, about 250g 6 anchovy fillets in oil, drained and finely chopped
2 tablespoons full-fat crème fraîche
4 French rolls or other white bread rolls with a firm crust and fine crumb
This is a delicious and moist sandwich filling. Skinning the tomatoes is not absolutely essential, but the flavours mingle better without the skins. It’s important to remove all the pulp around the seeds as this will make the filling too watery if left behind. Extra thick double cream, clotted cream or crème fraîche can be used, but the slight acidity of crème fraîche blends best with tomato. This is a good filling for hollowed-out French rolls. It can also be used as an element in Pressed Sandwiches, perhaps with some mild softish cheese such as mozzarella.
Put the tomato in a heatproof bowl and pour boiling water over to cover, leave for 30 seconds, then drain and peel off the skin. Cut the tomato in half and discard the core, seeds and surrounding pulp. Cut the flesh into fine dice, put them in a sieve and leave to drain for 1 hour.
Stir the anchovy fillets into the drained tomato. Add the crème fraîche and stir again.
Cut the rolls across the top and pull out some of the crumb to make a hollow in each side, then spoon in the filling (don’t overdo it so that it oozes out). Squeeze the sides together, wrap tightly, and chill until needed.
Makes 9 scones
225g self-raising flour, plus extra for dusting
a pinch salt
60g cold butter, cut into pieces
100g mature Cheddar cheese, finely grated
130ml milk or water, as needed
3 tablespoons Pesto Genovese (see opposite)
1 medium egg, beaten
These don’t win prizes for an elegant shape – there is a bit of the free-form sculpture about them – but the flavour more than compensates, and they will be eaten rapidly. They are best when freshly baked but still good eaten cold. Take them on a picnic, eat with soup on a long, cold winter walk, or as a snack on a long journey. It you have a campfire or barbecue going, wrap them in foil and warm gently before eating.
Use a really good pesto – I’m fortunate in living near an Italian deli whose owner makes his own. If you can only buy industrially made versions, it’s worth making some (see opposite), for a really intense flavour.
Preheat the oven to 200ºC, and dust a baking tray with flour. Put the flour and salt in a bowl. Rub in the butter until the mixture resembles fine breadcrumbs, then mix in the Cheddar. Stir in enough milk to make a soft, slightly sticky dough.
Dust a work surface generously with flour and briefly work the dough. Cut into three equally sized pieces. Working quickly, gently roll or pat each piece out to give a rough square about 1cm thick. Try to make the pieces reasonably neat and of a similar size and shape.
Use the pesto to spread over two of the pieces of dough, and stack one on top of the other. Top with the third piece of dough. Press gently together and re-roll slightly to give a piece of just over 2cm thickness. Trim the edges a little if they are really untidy. Brush the top with beaten egg and then cut into 3 along the top edge and 3 along the side to make 9 pieces.
Quickly transfer each one to the baking sheet and bake for 15–20 minutes until well risen and golden. Cool on a wire rack.
Makes about 125g
50g fresh basil leaves
15g pine nuts
1 garlic clove
½ teaspoon salt
30g freshly grated Parmesan
40ml olive oil, plus extra if needed
salt
One among many types of herb and nut sauces, pesto is worth making at home simply for the wonderful aroma released by the basil and the intense flavour. As well as an ingredient for the savoury scones, above, it has many other uses – eat it with vegetables grilled on the barbecue, use it as a spread, or add it to Minestrone Soup. An interesting version of pesto can be made with wild garlic leaves, something that can be foraged on walks during springtime.
Put the basil in a food processor and add the pine nuts, garlic and salt. Process together, then add the Parmesan and process again.
Add the oil and process to make a thick, slightly runny paste. Taste, and add a little more salt if you like, or a little more oil to give a slightly runnier texture.
For 4–6
3 tablespoons sunflower oil or rapeseed oil, plus extra for greasing
120g gram flour (chickpea flour)
60g peas, shelled fresh or frozen
a pinch of sugar
1 tablespoon lemon juice
5–6 mint sprigs, leaves chopped
1 fresh green chilli, or to taste, deseeded and finely chopped
1 teaspoon cumin seeds
1 teaspoon coriander seeds
a pinch of fennel seeds
½ teaspoon black peppercorns
1 teaspoon salt
a pinch of ground turmeric
2 large garlic cloves
a thumb-sized piece of fresh root ginger, peeled and roughly chopped
1 small-medium onion, thinly sliced
To garnish and serve
a few fresh mint leaves
a few fresh coriander leaves
1 green chilli, deseeded
1 tablespoon desiccated coconut
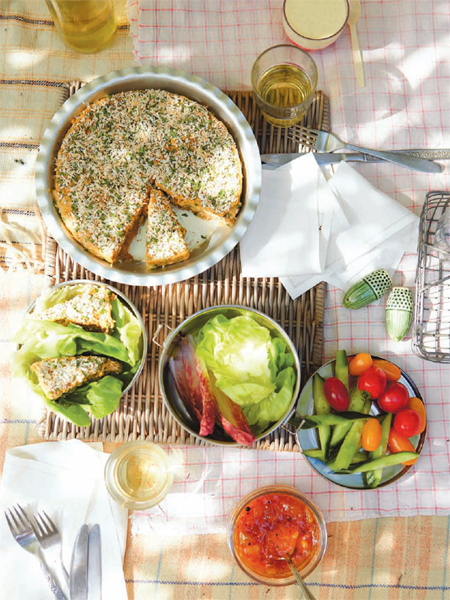
lettuce leaves, cucumber sticks, cherry tomatoes and mango chutney, to serve
This cake is vegan, gluten-free, nutritious, filling and very tasty.
Preheat the oven to 150ºC and grease a small cake tin. Spread the gram flour on a baking tray and toast in the oven for 30–40 minutes, stirring occasionally, until it turns a little darker and gives off a slightly nutty, toasted aroma. Keep an eye on it, as the flour burns easily. Transfer to a bowl and gradually stir in 350ml water to make a thick batter. Leave to rest.
Cook the peas in boiling water until tender. Drain, then mash them roughly and stir in the sugar and the lemon juice. Stir the mint leaves and chilli into the mixture, then leave to cool.
Put the cumin, coriander, fennel and black peppercorns in a dry frying pan over a low heat and dry toast, stirring until they turn a little darker and release a toasted aroma. Grind to a powder using a grinder or mortar and pestle. Add the salt and turmeric. Put the garlic and ginger in a blender or wet grinder with 2 tablespoons water and process to make a paste.
Heat the oil in a deep saucepan and add the onion. Cook gently for a few minutes until soft but not coloured. Stir in the garlic-and-ginger paste and cook for 2 minutes, stirring well, then add the spice mixture. Fry for 1 minute, and then stir in the chickpea flour batter. Keep stirring. It will thicken to a custard-like consistency. Cook gently, stirring constantly, until the mixture becomes quite sticky. It becomes quite heavy in the last stages and relatively difficult to stir, but keep going, otherwise it will be too soft as it doesn’t thicken any more when it cools. It will take 10–15 minutes to reach the correct thickness.
Drop spoonfuls of half the mixture into the oiled tin. Divide the pea and herb mixture over the top of the chickpea mixture, then top with the remainder of the chickpea mixture, pressing it down well. Use a fork to roughen the top.
Chop the mint, coriander and green chilli together. Toast the coconut lightly in a dry frying pan over a medium heat, then stir it into the herb mix and press lightly on top of the mixture in the tin. Chill overnight before cutting into wedges.
Put each slice onto a lettuce leaf before packing it for carriage in a suitable container. Take with you the cucumber cut into sticks, some cherry tomatoes and a small container of mango chutney to eat with it.
Makes 2 large pasties
150g lard plus extra for greasing
300g plain flour, plus extra for dusting
200g potato, peeled and chopped
100g turnip, chopped
60g onion, chopped
300g chuck or skirt steak, finely chopped
milk or 1 medium egg, beaten
salt and ground black pepper
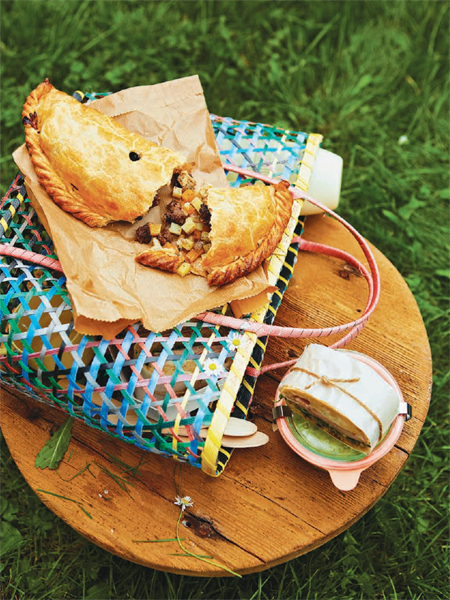
At its best, the pasty is a wonderful traditional portable food, but sadly it has now become an industrialised snack for the long-distance traveller. When it is homemade with care, however, it becomes a delicious treat for an outdoor feast.
Preheat the oven to 200ºC and lightly grease a baking tray. To make the pastry, put the flour and ½ teaspoon salt in a large bowl. Put the lard in the freezer for 20 minutes, then grate it into the flour. Using a fork, stir in 6–8 tablespoons cold water until the dough just begins to hold together. Bring the dough together into a ball and knead lightly for a few seconds. Wrap in clingfilm and chill for 30 minutes before using.
Put the vegetables into a large bowl and mix together well, and, in a separate container, season the meat well with salt and black pepper and stir.
Dust a work surface with flour and, working quickly, roll the pastry out to a little under 1cm thick, then cut two dinner-plate sized rounds.
Divide the vegetable mix between these, covering half of each circle. Likewise, divide the meat between the two, scattering it over the vegetables. Speed is essential – the pasties become difficult to handle if the pastry becomes warm at this stage.
Brush the edges of the pastry with water, fold each piece in half over the filling and crimp to seal the edges. Brush the pasties with milk or egg to glaze.
Bake for 25 minutes, then reduce the heat to 180ºC and cook for a further 35 minutes until golden. Cool on a wire rack.
Serves 4
500g fillet steak from the tail end
15g dried sliced porcini mushrooms (optional)
2 tablespoons olive oil
100g button mushrooms, sliced
1 part-baked ciabatta loaf
salt and ground black pepper
finger-food salad, to serve
For the herb marinade
4 tablespoons red wine
2 teaspoons balsamic vinegar
1 garlic clove, crushed
2 teaspoons finely chopped parsley
1 bay leaf, finely sliced
3–4 thyme sprigs, leaves only
3–4 marjoram sprigs, leaves only, chopped
2 tablespoons olive oil
Here is the ultimate sandwich, and one whose name suggests it must have been popular with parties of gentlemen out for a day on the grouse moor or deer stalking. The much simpler original for this recipe was given by Elizabeth David, who suggested it as a good idea for events such as moving house, another time when you might also need a picnic to hand. The fillet steak makes it an expensive choice, but it’s good, and a real treat to eat on a long walk where you have a lovely view to enjoy at the same time.
Put the marinade ingredients in a shallow bowl and mix well to combine. Add the steak, and rub the mixture into it well. Put in the fridge and leave it to marinate for at least 2 hours and preferably 24 hours, turning it from time to time.
Put the porcini, if using, in a small bowl and cover with 100ml warm water. Leave to soak for 30 minutes, then drain and reserve the soaking water. Preheat the oven to 230ºC.
Heat the oil in a frying pan or a small, shallow cast-iron dish over a medium heat. Add the button mushrooms and fry briskly, stirring from time to time, until they begin to brown slightly at the edges. Stir in the soaked porcini and their liquid.
If you have used a frying pan, transfer the mushroom mixture to an ovenproof dish. Lift the beef out of the marinade, rubbing off any debris, and lay it on top of the mushrooms. Season with pepper and a scant 1 teaspoon salt. Pour the marinade into the dish underneath the meat. Roast for 15–20 minutes until medium-rare or done to your liking.
Bake the ciabatta as instructed on the packet and leave to cool. Slice it in half lengthways and remove some of the crumb from each half to leave a hollow in which the steak will fit. When the meat comes out of the oven, lay it in one side of the bread and distribute the mushroom mixture over it. The cooking liquid should have reduced to a few tablespoonfuls (if it hasn’t, reduce it some more by fast boiling over the hob).
Check the seasoning and adjust if necessary. Pour the liquid over the meat and mushrooms. Put on the top half of the loaf, pressing it down firmly to enclose the filling.
Wrap firmly in foil, clingfilm or greaseproof paper. Put a small board on top and weight lightly with a couple of tins. Leave for 5 hours, or overnight, then unwrap and cut across the sandwich in slices at least 1cm thick.
Rewrap the sandwich to carry, and take finger-food salad, such as cherry tomatoes or radishes, and perhaps a hip flask of something warming to accompany the sandwich.
Makes 16
175g butter, plus extra for greasing
350g jumbo oats
a pinch of salt
175g soft light brown sugar
3 tablespoons golden syrup
100g dark chocolate (optional)
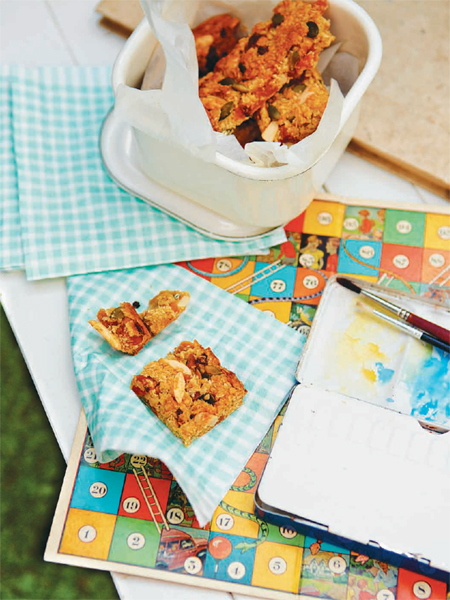
Everyone has their own idea of what constitutes a good flapjack – a classic walker’s or traveller’s snack. For me a flapjack should be relatively thick, small in proportion to depth, slightly chewy and taste distinctly of butter.
Preheat the oven to 180ºC and grease and line a 20 × 20 × 2cm square tin with non-stick baking parchment. Take half the oats and process them in a blender or food processor until they are reduced to a coarse powder. Tip them in a bowl. Add all the remaining oats and the salt, and mix well.
Heat the butter, sugar and syrup in a small saucepan over a low heat until the butter is melted and the sugar dissolved. Pour into the oats and stir well to combine.
Tip into the prepared tin and level the top carefully, using the back of a spoon to press it down well. Make the surface as even as possible, especially along the edges and in the corners.
Bake for 20 minutes or until golden brown and slightly puffy, but check periodically to make sure the mixture is browning evenly. It should be evenly golden, bubbling a little have a wonderful nutty, buttery smell.
Leave to cool a little in the tin, then and cut into 4 along each side. Cool completely in the tin.
If using the chocolate, melt it in a heatproof bowl over a pan of gently simmering water, making sure the base of the bowl doesn’t touch the water.
Pipe or drizzle the chocolate in lines back and forth across the pieces, or dip each one to coat half the top. Leave to set, and store in an airtight tin. These are best eaten within a day or two of baking.
Makes 12 bars
50g butter, plus extra for greasing
150g jumbo oats
100g marzipan
about ½ teaspoon salt
50g almonds, blanched and halved
30g pumpkin seeds
100g dried apricots, each one cut in 4–5 pieces
30g honey
These bars are another high-energy snack useful for long walks and camping trips. Making bars that stick together well is a challenge. I add (purchased) marzipan, which helps with this, but as formulae vary slightly from manufacturer to manufacturer, you may have to experiment a little with brands – I used Dr.Oetker’s in my latest version. Any leftover marzipan can be cut into blocks, wrapped in non-stick baking parchment and frozen.
Preheat the oven to 180ºC, and grease and line a 20 × 20 × 2cm square tin with non-stick baking parchment. Take half the oats and process them in a blender or food processor until they are reduced to a coarse powder. Tip them into a bowl.
Shave the marzipan into the thinnnest possible slices and rub it into the oats until it disappears. Add all the remaining oats, the salt, almonds, pumpkin seeds and dried apricots.
Put the butter and honey in a small saucepan and heat gently until the butter has melted. Pour into the oat mixture and stir well. Tip into the prepared tin and level the top carefully, using the back of a spoon to press it down well. Make the surface as even as possible, especially in the edges and corners.
Bake for 15 minutes or until golden brown and slightly puffy, but check after 10 minutes and turn the tin if the mixture is browning unevenly.
Leave to cool in the tin. While still slightly warm, cut into 2 along one edge and 6 along the other to make long, slender bars. Allow them to cool completely, and store any bars you haven’t eaten in an airtight tin.