CHAPTER 1
Getting Started with Your MacBook
Understanding the MacBook Models
MacBook is the family name for Apple’s laptop computers. As of this writing, the MacBook family includes the MacBook Pro, the MacBook Air, and the MacBook usually called simply “MacBook” but also known as “12-inch MacBook” to distinguish it from the MacBook Air and MacBook Pro.
Each MacBook has similar core features, such as the display for viewing information and the keyboard and trackpad for entering data and controlling the computer. Beyond that, the MacBook models differ in various ways, from design, size, and weight to screen size, memory and storage capacity, and processor type and speed.
Identify Your MacBook’s Main Features
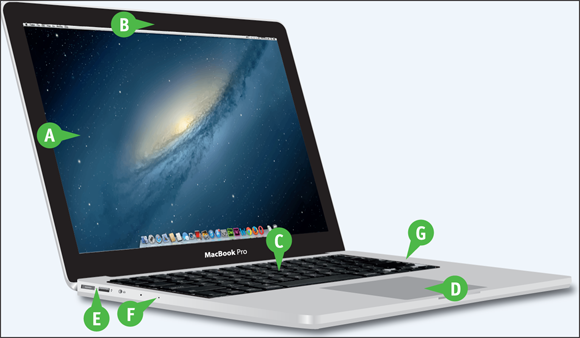
 Display
The MacBook’s display provides a sharp, bright, and colorful view into all that you do.
 Camera
The built-in camera enables you to videoconference, take photos, and more.
 Keyboard
Along with the standard letter and number keys, the keyboard provides function keys to control your MacBook. The keyboard has a backlight that illuminates automatically when you are using the MacBook in dim light, enabling you to see what you are doing.
 Trackpad
The trackpad enables you to manipulate objects on the screen using finger gestures. The entire trackpad is also the button that you click or double-click to give commands. On some MacBook models, you can also use a pressing movement called force-touch or 3D touch to access commands quickly.
 Ports
Ports
The ports connect your MacBook to other devices, such as external drives, external displays, iPods, and so on. Different MacBook models have different ports.
 Microphones
The microphones enable you to use your MacBook for audio and video calls without needing to connect a headset.
 Speakers
The speakers enable you to listen to music or other audio.
Meet Your MacBook’s Keyboard
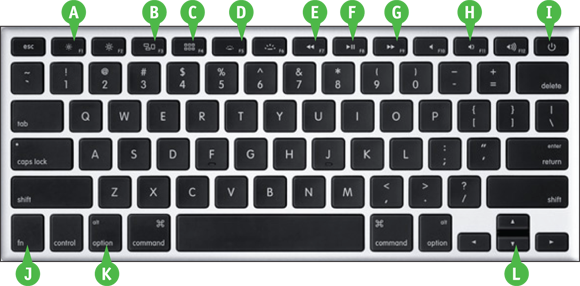
Brightness
Press  to decrease your screen’s brightness or
  to increase it.
Mission Control
Press  to open Mission Control so you can quickly move between working spaces.
Launchpad
Press  to open or close the Launchpad.
Keyboard Backlight Brightness
Press  to decrease the brightness of the keyboard backlighting, or press
  to increase it.
Previous/Rewind
Press  to move to the previous item or rewind in iTunes and other applications.
Play/Pause
Press  to play or pause iTunes and other applications.
Next/Fast Forward
Press  to move to the next item or fast-forward in iTunes and other applications.
 Volume
Press  to mute your MacBook,
  to turn the volume down, and
  to turn it up.
 Power Button
Press the Power button to turn on your MacBook; press and hold the Power button to force your MacBook to turn off.
 Alternate Function Key
Hold down the Alternate Function key while pressing a function key to perform the alternate task.
 Modifier Keys
Macs and OS X use four modifier keys that you press to enter capital letters or symbols or to invoke keyboard shortcuts. As usual, you press Shift ( ) to type capital letters or the symbols that appear on the upper part of the keys. You press Command (
 ), Option (
 ), and Control (
 ) to give keyboard shortcuts.
 Arrow Keys
Press the arrow keys to move around the screen.
Each MacBook model includes two or more ports that enable you to connect other devices to it. For example, a Thunderbolt port enable you to connect external displays or drives to your MacBook, whereas a standard USB port enables you to connect any of a wide range of USB devices.
The selection of ports varies by MacBook family and by MacBook model: the 15-inch MacBook Pro has more ports than the 13-inch MacBook Pro, and the 13-inch MacBook Air has more ports than the 11-inch MacBook Air. The ultra-slim 12-inch MacBook has only two ports: a headphone port for connecting audio output devices and a USB-C port, which combines connectivity with the capability to charge the battery.
Identifying the Ports on Your MacBook

MagSafe 2 Port
Connect the MacBook’s power adapter to this port. The MagSafe 2 connector attaches magnetically, providing a secure connection but detaching easily if force is applied — for example, if someone’s foot snags the power cord.
Thunderbolt 2 Port
Use this high-speed port to connect external displays and Thunderbolt external drives to your MacBook. The port conforms to the Thunderbolt 2 connectivity standard developed by Apple but is backward compatible with the Thunderbolt 1 standard, so you can connect any Thunderbolt 1 or Thunderbolt 2 device to this port.
Thunderbolt uses the same connector size as Mini DisplayPort, a standard for connecting displays to computers. The Thunderbolt port includes the Mini DisplayPort connections, so you can connect an external display via Thunderbolt.
You can link one Thunderbolt device to another, so you can run multiple devices off a single Thunderbolt port.
USB Ports
Use these ports to connect USB devices — such as an iPhone, an external drive, or a printer — to your MacBook. The ports support USB 1.1, 2, and 3 versions, enabling you to connect a wide range of devices.
You can connect USB devices directly to the USB ports. If you need to connect multiple devices, connect a USB hub to a USB port on the MacBook, and then connect the devices to the ports on the hub.
Analog/Digital Audio In/Out
This port looks like a standard analog headphone port, but it works for both analog and digital audio and combines audio output and audio input. For analog audio output, simply connect headphones or analog speakers. For digital audio output, use a TOSLINK cable to connect digital audio equipment, such as surround-sound speakers. For audio input, connect a microphone or other sound input device.

SDXC Card Slot
You can insert SDHC, SDXC, and other types of SD cards here so you can store files or transfer files to or from your MacBook.
SDHC is the abbreviation for Secure Digital High Capacity. The SDHC standard uses the FAT32 file system and supports memory cards up to 32 gigabytes, 32GB.
SDXC is the abbreviation for Secure Digital eXtended Capacity. This is a newer standard that uses a different file system, Extended File Allocation Table or exFAT file, and supports memory cards of up to 2 terabytes, 2TB, which is equivalent to 2048GB. As of this writing, 512GB is the highest-capacity SDXC card available.
The SDXC card slot accepts regular-size SD cards, which are 32mm × 24mm × 2.1mm. To use a miniSD card or a microSD card, get an adapter.
Standard-size SDXC cards protrude from the SDXC slot. This makes them easy to remove but even easier to damage if you leave them in the slot while transporting your MacBook. If you need to leave an SD card in the slot, get a microSD card and a low-profile adapter such as those made by Baseqi.
HDMI
You can connect an HDMI screen or TV to this port to display your MacBook’s output on another screen. You can set the external screen or TV either to mirror what is shown on your MacBook’s screen or to act as an extension of your MacBook’s screen. See the section “Add a Second Display” in Chapter 2 for details.

USB-C
You connect the MacBook’s charger or a standard USB-C cable to this port. The port combines quick charging, data transfer at USB 3’s high speeds, and video output. For video output, you need to use an adapter such as Apple’s USB-C Digital Apple TV Multiport Adapter, which provides an HDMI port, a regular USB port, and a USB-C charging port.
Set Up Your MacBook
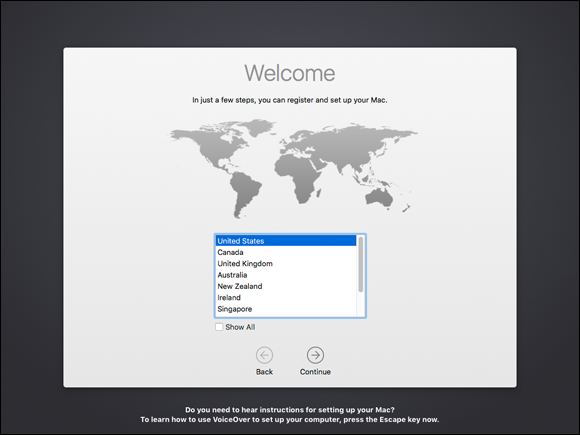
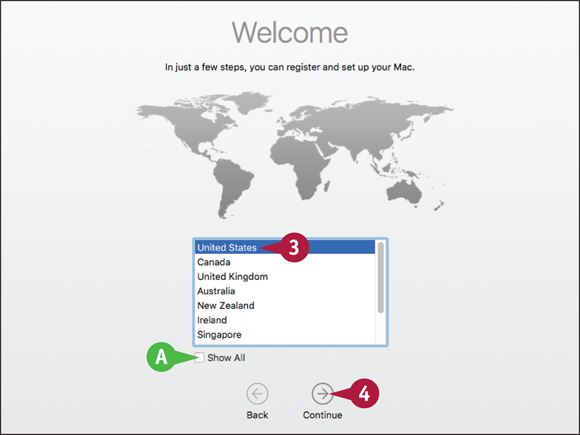
If you have just bought your MacBook, you need to set up OS X and create your user account before you can use it. Your user account is where you store your files and settings on the MacBook.
The first user account you create is an administrator account, which can create other accounts later for other users. You may also choose to create a personal account for yourself, leaving the administrator account strictly for administration.
When creating an account, you can use either your full name or a shortened version. You can edit the username that OS X suggests based on that name. You can choose whether to set a password hint to help yourself remember your password. You can also choose whether to use the iCloud Keychain feature, which enables you to store your passwords and credit-card details securely online. You can then use this information from any Mac, Windows PC, or iOS device with which you use the same Apple ID.
The Terms and Conditions screen appears.
 Click Agree (
 ).
).
A confirmation dialog opens.
 Click Agree in the dialog.
The dialog closes.
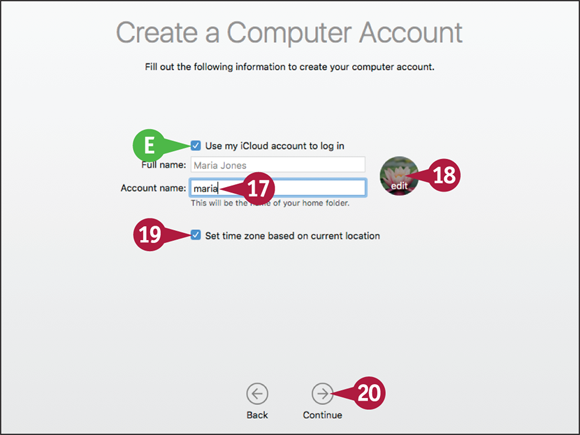
The Create a Computer Account screen appears.
Click Use my iCloud account to log in ( changes to
  ) if you do not want to log in via iCloud.
 Change the account name that OS X suggests as needed.
 Click the default picture and choose the picture you want. You can also use your MacBook’s camera to take a photo of yourself.
 Click Set time zone based on current location ( changes to ) to enable OS X to set the time and date automatically.
 Click Continue ().
The Allow iCloud to Use the Location of This Mac for Find My Mac? dialog opens.
 Click Allow or Not Now, as needed.
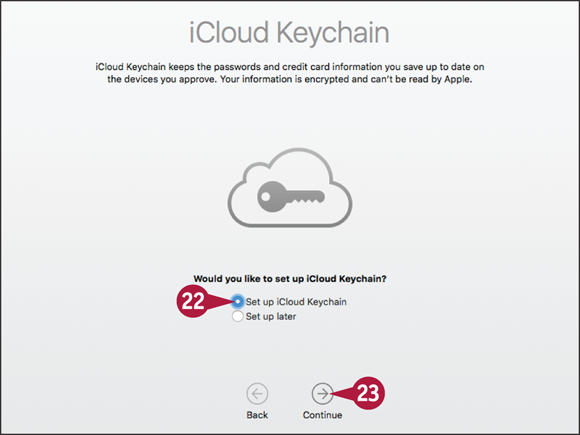
The first iCloud Keychain screen appears.
 Click Set up iCloud Keychain (
 changes to
  ) if you want to use iCloud Keychain.
 Click Continue ().
Note: If you clicked Set Up iCloud Keychain, type your iCloud security code and click Continue () on the second iCloud Keychain screen.
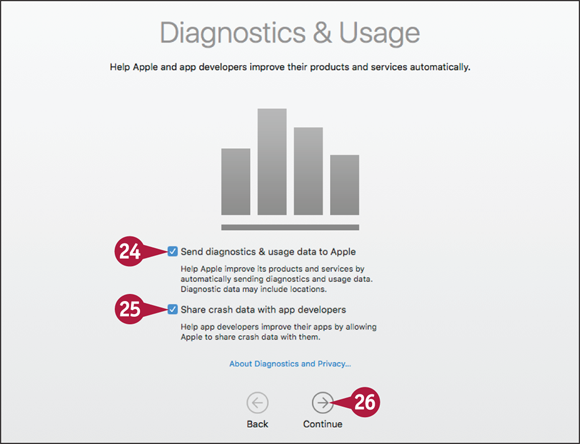
The Diagnostics & Usage screen appears.
 Click Send diagnostics & usage data to Apple ( changes to ) if you do not want to send this data.
 Click Share crash data with app developers ( changes to ) if you do not want to share data generated about apps that crash.
 Click Continue ().
The Setting Up Your Mac screen appears while OS X sets up your MacBook.
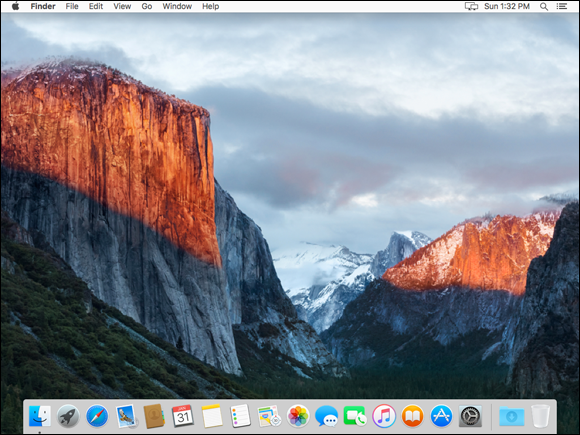
The OS X desktop appears, and you can start using your MacBook as explained in the rest of this book.
Start Your MacBook and Log In
When you are ready to start a computing session, start your MacBook and log in to OS X with the credentials for the user account you have set up or an administrator has created for you. After you start your MacBook, OS X loads and automatically displays the login screen by default or logs you in automatically. You can then select your username and type your password.
When you log in, OS X displays the desktop with your apps and settings.
Start Your MacBook and Log In
 Press the power button on your MacBook.
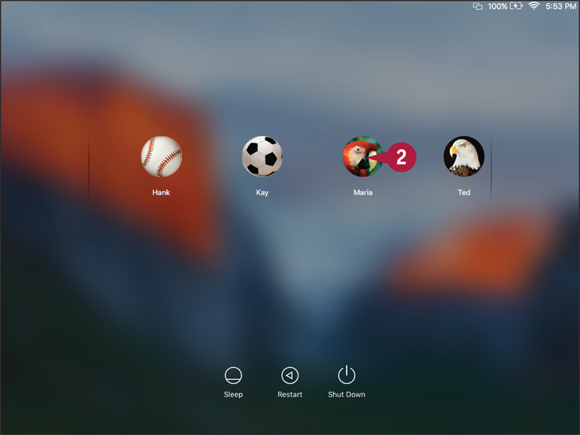
A screen showing the list of users appears.
Note: Your MacBook may not display the list of users and login window. Instead, it may simply log you in automatically or show a different login screen. Chapter 12 shows you how to change this behavior.
Note: You may need to swipe right with two fingers on the trackpad to display your username. Alternatively, start typing the username to display it.
 Click your username.
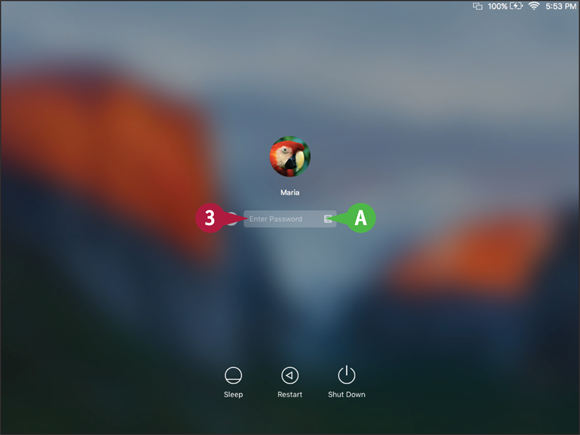
The login window appears.
 Type your password in the Enter Password box.
If you cannot remember your password, click Hint ( ).
).

If your account is set to use your iCloud password, OS X displays a message telling you so. If the account has a local password with a password hint, OS X displays the password hint below the Enter Password box.
 Type your password.
 Click Log In (
 ).
).
Note: Instead of clicking Log In (), you can press  .
.
The MacBook displays your desktop, the menu bar, and the Dock. You can now start using the MacBook.
Explore the OS X Desktop
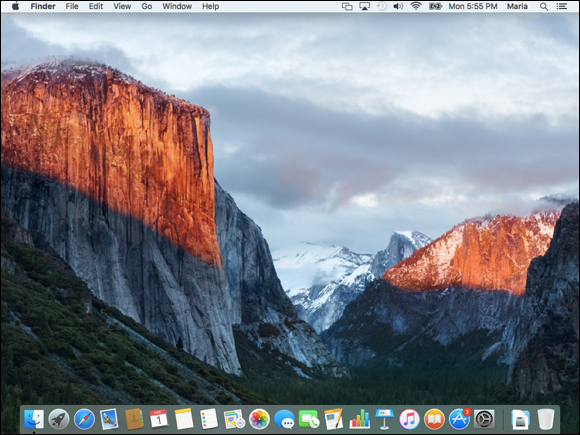
Your MacBook runs the OS X operating system, which is currently in version 10.11, a version called El Capitan. The Macintosh operating system has long been known for being very intuitive and is also pleasing to look at. It was the first major system interface to focus on graphical elements, such as icons. The OS X desktop is the overall window through which you view all that happens on your MacBook, such as looking at the contents of folders, working on documents, and surfing the Web.
OS X Desktop

Menu Bar
A menu bar usually appears at the top of the screen so that you can access the commands it contains. OS X hides the menu bar in certain situations. The menu bar shows the menus for the active application.
Drives
The MacBook stores its data, including the software it needs to work, on an internal drive. This drive is a solid-state device, or SSD, rather than an external drive with moving platters, but it is often referred to as an external drive. You can also connect external drives for extra storage.
SuperDrive
You can connect an external SuperDrive or other compatible optical drive to read from and write to CDs and DVDs.
Folders
Folders are containers that you use to organize files and other folders stored on your MacBook.
Files
Files include documents, applications, or other sources of data. There are various kinds of documents, such as text, graphics, songs, or movies.
Finder Windows
You view the contents of drives, folders, and other objects in Finder windows.
App and Document Windows
When you use apps, you use the windows that those apps display, for documents, web pages, games, and so on.
Finder Menu Bar and Menus
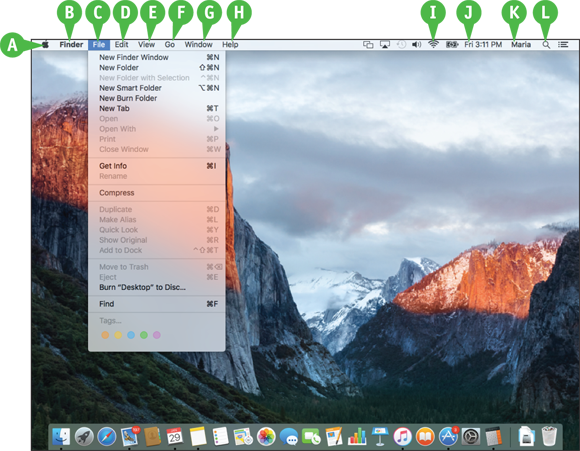
Apple Menu
This menu is always visible so that you can access special commands, such as Shut Down and Log Out.
Finder Menu
This menu enables you to control the Finder app itself. For example, you can display information about Finder or set preferences to control how it behaves.
File Menu
This menu contains commands you can use to work with files and Finder windows.
Edit Menu
This menu is not as useful in Finder as it is in other applications, but here you can undo what you have done or copy and paste information.
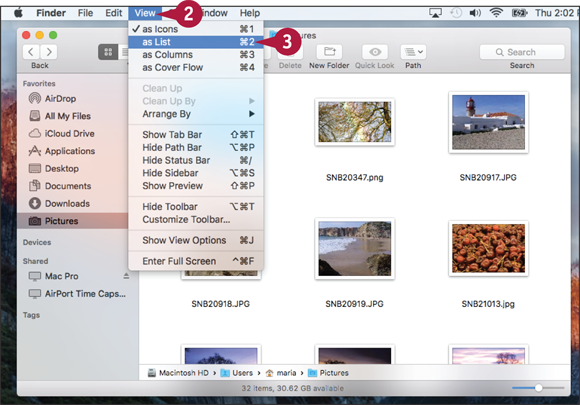
View Menu
This menu enables you to determine how you view the desktop; it is especially useful for choosing Finder window views.
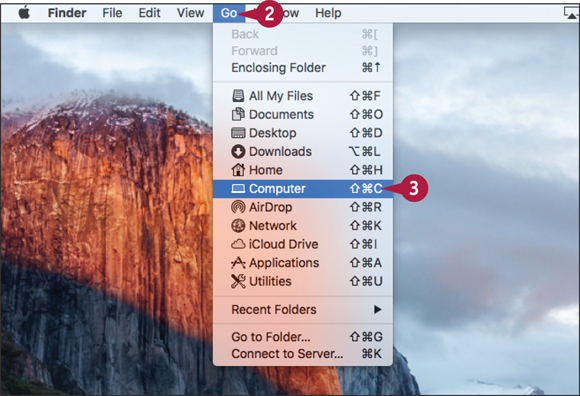
Go Menu
This menu takes you to various places, such as specific folders.
Window Menu
This menu enables you to work with open Finder windows.
Help Menu
This menu provides help with OS X or the other applications.
Configurable Menus
You can configure the menu bar to include specific menus, such as Screen Mirroring, Volume, Wi-Fi, Battery, and many more.
Clock
Here you see the current day and time.
Fast User Switching
This feature enables you to switch user accounts and open the Login window.
Spotlight Menu
This menu enables you to search for information on your MacBook.
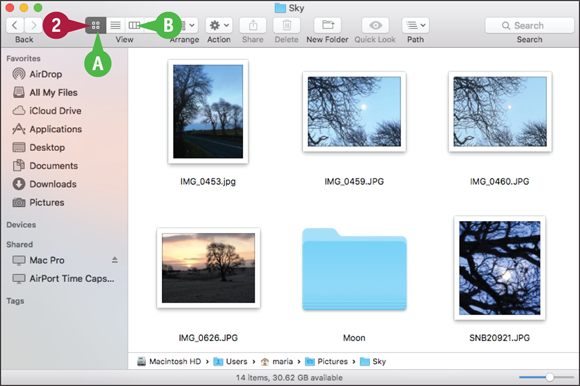
The Finder app controls the OS X desktop, and so you see its menu bar whenever you work with this application. When you view the contents of a folder, you do so through a Finder window. There are many ways to view the contents of a Finder window, such as Icon view and List view. The sidebar enables you to quickly navigate the file system and to open files and folders with a single click. The Dock on the desktop and the sidebar in Finder windows enable you to access items quickly and easily.
Finder Windows
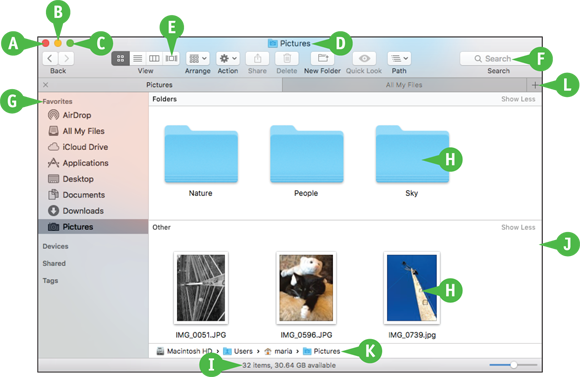
Close Button
Click to close a window.
Minimize Button
Click to shrink a window and move it onto the Dock.
Zoom Button
Click to expand a Finder window to the maximum size needed or possible; click it again to return to the previous size.
Window Title
The name of the location whose contents you see in the window.
Toolbar
Contains tools you use to work with files and folders.
Search Box
Enables you to find files, folders, and other information.
Sidebar
Enables you to quickly access devices, folders, files, and tags, as well as searches you have saved.
Files and Folders
Shows the contents of a location within a window; this example shows the Icon view.
Status Bar
Shows information about the current location, such as the amount of free space when you are viewing the MacBook’s drive.
Window Border
Drag a border or a corner to change the size of a window.
Path Bar
Shows the path to the location of the folder displayed in the window.
Tab Bar
Enables you to open multiple tabs containing different Finder locations within the same Finder window and quickly switch among them.
Dock and Sidebar
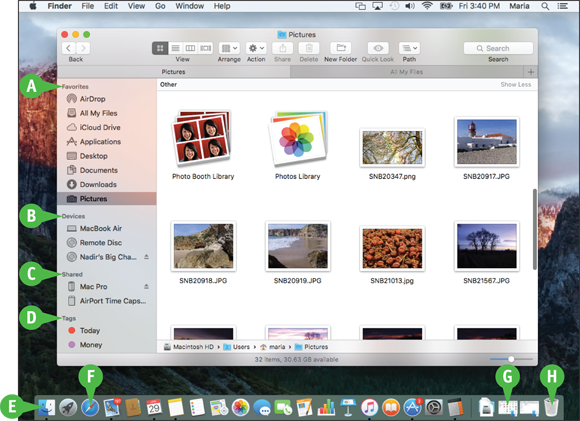
Favorites
Contains files, folders, searches, and other items that you can open by clicking them.
Devices
Contains your internal drive, any DVD or CD in an external optical drive, external drives, and other devices that your MacBook Pro can access.
Shared
Displays computers and other resources being shared on a network.
Tags
Shows the list of tags you can apply to files and folders to help you identify and sort them easily.
Dock
Shows apps, files, and folders you can access with a single click, along with apps currently running.
Apps
Icons on the left side of the Dock are for apps; each open app has a dark dot under its icon unless you turn off this preference.
Files, Folders, and Minimized Windows
Icons on the right side of the Dock are for files, folders, and minimized windows. The default Dock includes the Downloads folder for files you download from the Internet along with your Documents folder.
Trash/Eject
OS X puts items you delete in the Trash; to get rid of them, you empty the Trash. When you select an ejectable device, such as a DVD, the Trash icon changes to the Eject icon.
Point and Click with the Trackpad
To tell the MacBook what you want to do, slide your finger across the trackpad to move the on-screen pointer over the object with which you want to work. After you point to an object, you press the trackpad down to click, telling the computer what you want to do with the object. The number of times you click, and the manner in which you click, determine what happens to the object you point at.
Point and Click, Double-Click, or Secondary Click
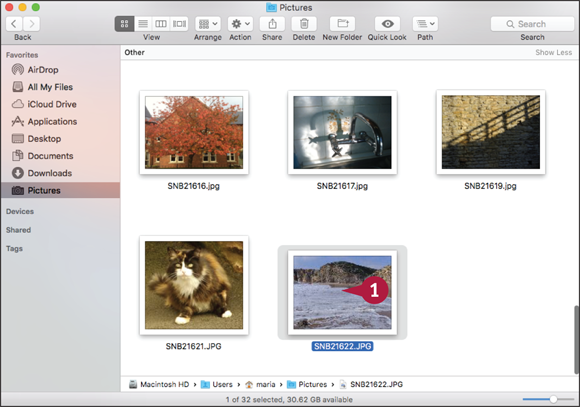
Point and Click
Slide your finger across the trackpad until the pointer points at the appropriate icon.
Press the trackpad once to click the trackpad. This is a single click.
The object becomes highlighted, indicating that it is now selected.
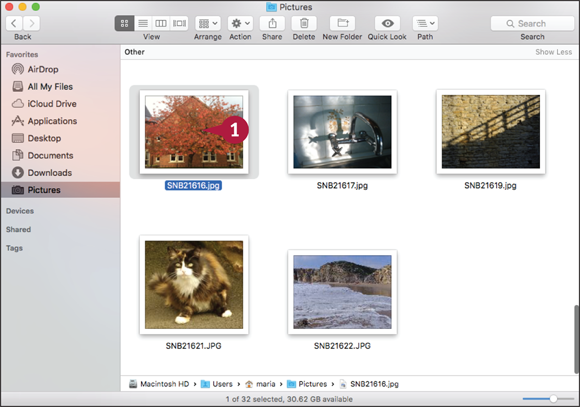
Double-Click
Slide your finger across the trackpad until the pointer points at the appropriate icon.
Click the trackpad twice.
Your selection opens.
Point, Click, and Drag
Slide your finger across the trackpad until the pointer points at the appropriate icon.
Press down the trackpad and hold it.
The object at which you were pointing becomes attached to the arrow and remains so until you release the trackpad.
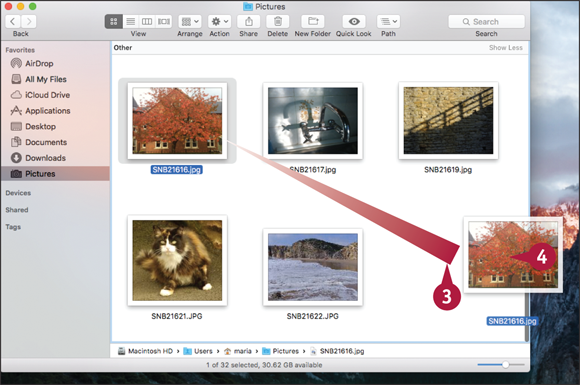
Drag your finger on the trackpad to move the object.
When you get to the object’s new position, release the trackpad.
Note: Dragging an item to a different external drive, flash drive, or disk volume copies it there. Changing its location on the same drive moves it instead.
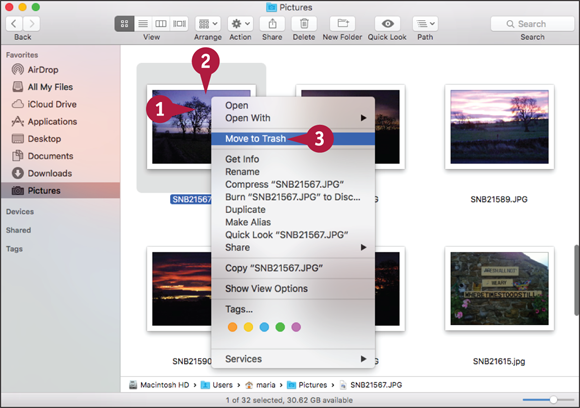
Secondary Click (Control + Click)
Point to an object on the desktop or even the desktop itself.
Note: To select more than one item at the same time, press and hold while you click each item you want to select.
Press + click the trackpad.
A contextual menu appears.
Point to the appropriate command on the menu and click the trackpad once to give the command.
Connect to a Wireless Network
If you have set up a wireless network, you can connect your MacBook to it. Wireless networks are convenient for both homes and businesses because they require no cables and are fast and easy to set up.
Your MacBook includes a wireless network feature that uses some of the wireless network standards called Wi-Fi. You can control wireless networks directly from the Wi-Fi menu at the right end of the menu bar. To connect to a Wi-Fi network, you need to know its name and password.
Connect to a Wireless Network
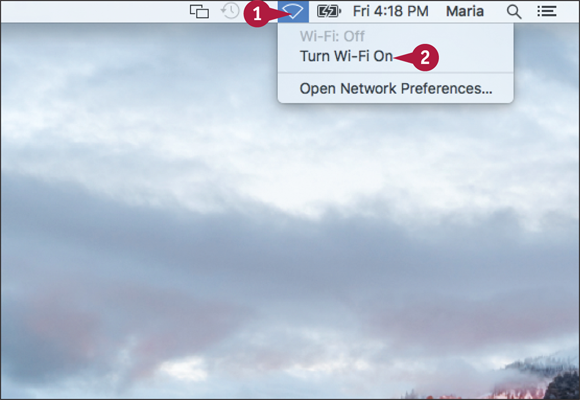
Note: If you connected your MacBook to a wireless network during setup, you do not need to set up the connection again.
Click Wi-Fi status ( ) on the menu bar.
Click Turn Wi-Fi On.
Note: If the list of wireless networks appears, go to step 4.
OS X turns Wi-Fi on.
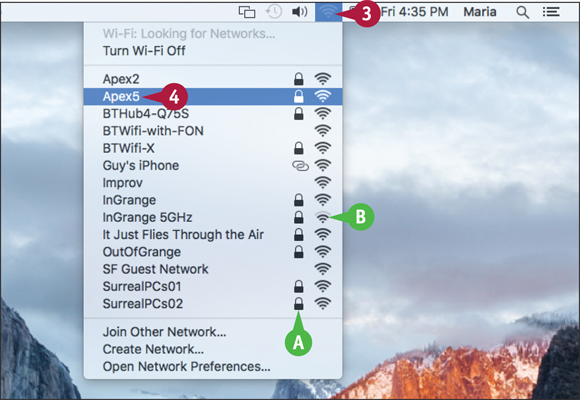
Click Wi-Fi status ( ) on the menu bar.
The menu opens and displays a list of the wireless networks your MacBook can detect.
A lock icon ( ) indicates that the network is secured with a password or other security mechanism.
The signal strength icon () indicates the relative strength of the network’s signal.
Click the network to which you want to connect your MacBook.
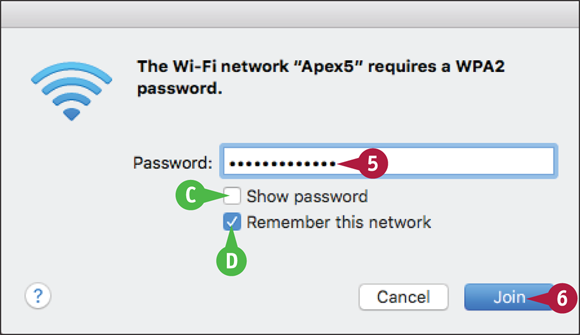
If the wireless network uses a password, your MacBook prompts you to enter it.
Type the password in the Password box.
If you want to see the characters of the password to help you type it, click Show password ( changes to ).
If you do not want your MacBook to remember this wireless network for future use, click Remember this network ( changes to ).
 Click Join.
Your MacBook connects to the wireless network, and you can start using network resources.
The number of arcs on the Wi-Fi status icon () indicates the strength of the connection, and ranges from one arc to four arcs.
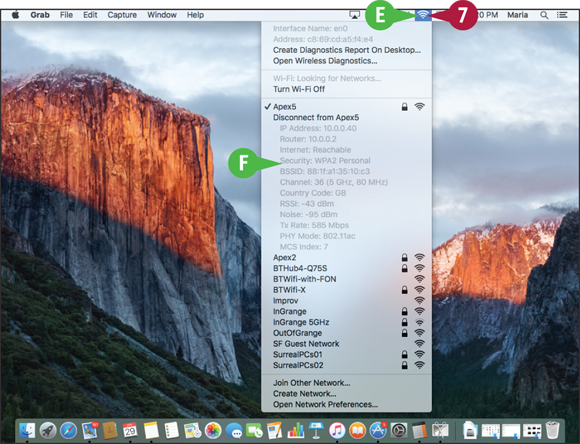
 To see more details about the wireless network, press and click the Wi-Fi status icon () on the menu bar.
The network’s details appear, including the physical mode, the wireless channel, and the security type.
Give Commands
The easiest ways to give commands in OS X are by using the menus and the toolbar. You can also give commands by pressing keyboard shortcuts.
The menu bar at the top of the window shows the Apple menu ( ) on the left followed by the menus for the active app. Any open window can have a toolbar, usually across its top but sometimes elsewhere in the window.
Give Commands
Give a Command from a Menu
On the Dock, click the app you want to activate — Finder ( ) in this example.
Note: You can also click the app’s window if you can see it.
On the menu bar, click the menu you want to open.
The menu opens.
Click the command you want to give.
The app performs the action associated with the command.
Choose Among Groups of Features on a Menu
On the Dock, click the app you want to activate — Finder () in this example.
On the menu bar, click the menu you want to open.
The app opens the menu.
Click the option you want to use.
The app activates the feature you selected.
Give a Command from a Toolbar
On the Dock, click the app you want to activate — Finder () in this example.
Click the button on the toolbar, or click a pop-up menu and then click the menu item for the command.
The app performs the action associated with the toolbar button or menu item.
Choose Among Groups of Features on a Toolbar
On the Dock, click the app you want to activate — Finder () in this example.
In the group of buttons, click the button you want to choose.
The app highlights the button you clicked to indicate that the feature is turned on.
The app removes highlighting from the button that was previously selected.
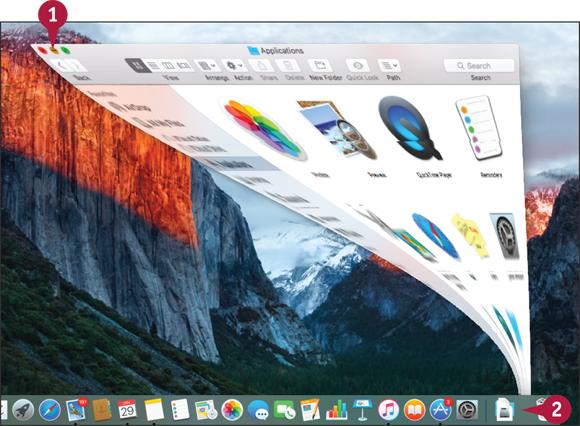
Open, Close, and Manage Windows
Most OS X apps use windows to display information so that you can see it and work with it. You can resize most windows to the size you need or expand a window so that it fills the screen. You can move windows and position them so that you can see those windows you require, minimize other windows to icons on the Dock, or hide an app’s windows from view.
Open, Close, and Manage Windows
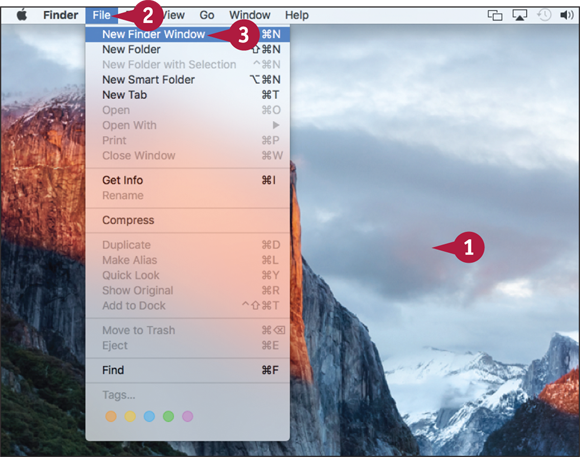
Open a Window
Click anywhere on the desktop.
OS X activates Finder and displays the menu bar for it.
Note: Clicking anywhere on the desktop activates Finder because the desktop is a special Finder window. You can also click Finder () on the Dock.
Click File.
The File menu opens.
Click New Finder Window.
A Finder window opens, showing your files in your default view.
Move, Resize, and Zoom a Window
Click the window’s title bar and drag the window to where you want it.
Click a border or corner of the window and drag until the window is the size and shape you want.
Click Zoom ( ).
).
The window zooms to full screen.
Move the pointer to the upper-left corner of the screen.
The OS X menu bar and the app’s title bar appear.
Click Zoom Back ( ).
).
The window zooms back to its previous size.
Minimize or Hide a Window
Click Minimize ( ).
).
OS X minimizes the window to an icon on the right side of the Dock.
Note: You can also minimize a window by pressing +  .
.
Click the icon for the minimized window.
OS X expands the window to its original size and position.
Note: Press and hold while minimizing or restoring a window to see the animation in slow motion.
Using Notifications
OS X’s Notification Center feature keeps you up to date with what is happening in your apps. Notification Center puts all your alerts, from incoming e-mail messages and instant messages to calendar requests and software updates, in a single place where you can easily access and manage them.
You open Notification Center by clicking the icon at the right end of the menu bar. Notification Center opens as a pane on the right side of the screen, and it contains sections you can expand or collapse as needed.
Using Notifications
View a Notification
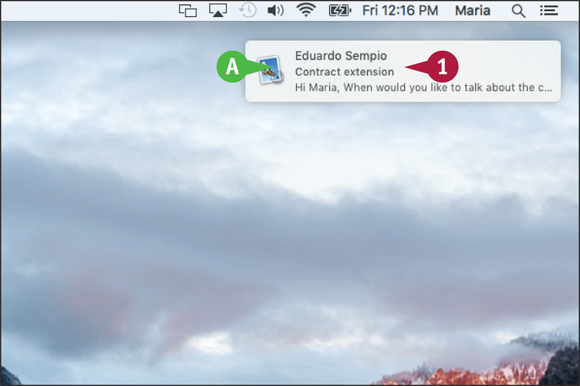
When you receive a notification, a notification banner appears in the upper-right corner of the screen for a few seconds.
Note: Notification Center can display either banners or alerts. A banner appears for a few seconds, and then disappears. An alert remains on screen until you dismiss it.
If you want to see the item that produced the notification, click the banner.
Display Notification Center When Your Desktop Is Visible
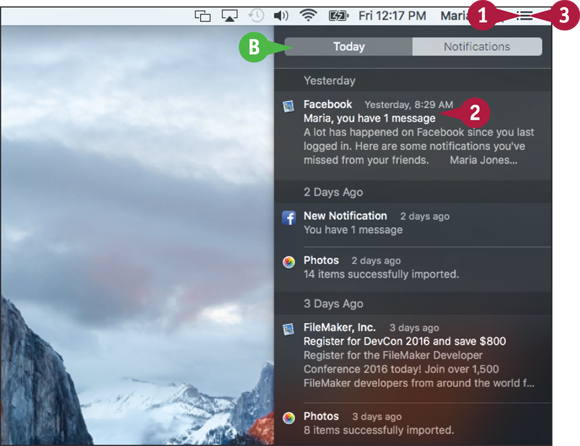
Click Notification Center ( ).
).
Notification Center opens.
Optionally, click a notification to display the related item in its app.
You can click Today to display the Today pane, which shows your calendar events, stock information, weather forecasts, and other data.
When you are ready to close Notification Center, click Notification Center ().
Choose What Types of Notifications to Display and Set Your Do Not Disturb Hours
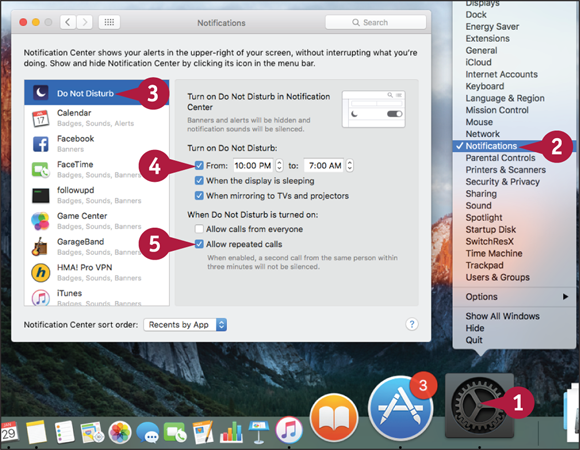
Press and click System Preferences ( ) on the Dock.
The contextual menu opens.
Click Notifications.
System Preferences opens and displays the Notifications pane.
Click Do Not Disturb.
The Do Not Disturb settings appear.
Click From ( changes to ) and then set the hours.
Choose which calls to accept during Do Not Disturb times.
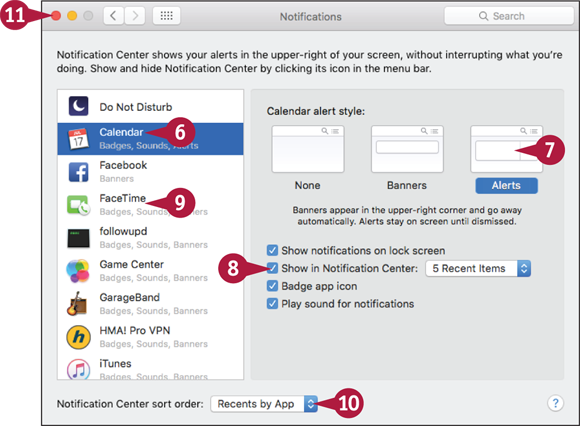
Click an app or feature.
The controls for the app or feature appear.
Click None, Banners, or Alerts to set the alert style.
 Choose other options for the app or feature.
 Repeat steps 6 to 8 for other apps and features.
 Click Notification Center sort order (
 ) and click Recents, Recents by App, or Manually by App, as needed.
 Click Close (
 ).
).
System Preferences closes.
Put Your MacBook to Sleep and Wake It Up
OS X enables you to put your MacBook to sleep easily and wake it up quickly. So when you are ready for a break but you do not want to end your computing session, put the MacBook to sleep instead of shutting it down.
Sleep keeps all your apps open and lets you start computing again quickly. When you wake your MacBook up, your apps and windows are where you left them, so you can swiftly resume what you were doing.
Put Your MacBook to Sleep and Wake It Up
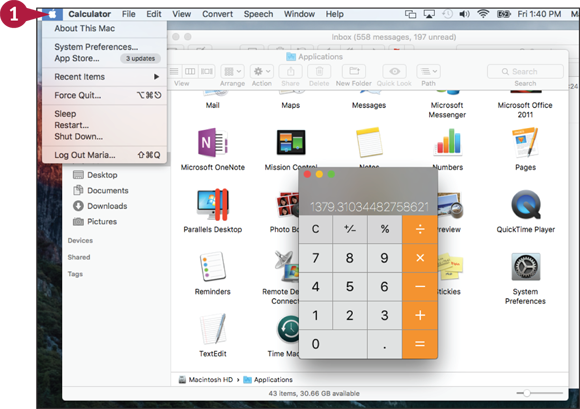
Put Your MacBook to Sleep
Click Apple ().
The Apple menu opens.
Note: You can also put your MacBook to sleep by closing its lid.
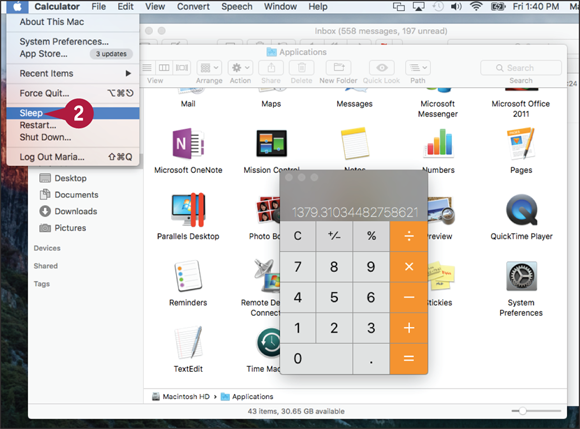
Click Sleep.
The MacBook turns its screen off and puts itself to sleep.
Note: You can also put your MacBook to sleep by pressing its power button for a moment.

Wake Your MacBook
Click the trackpad or press any key on the keyboard.
Note: If you put the MacBook to sleep by closing its lid, lift the lid instead.
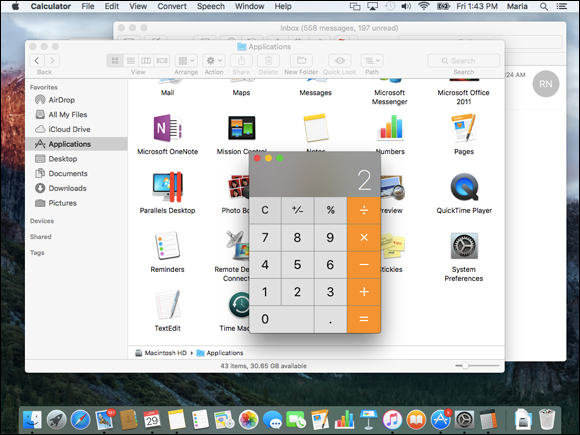
The MacBook wakes up and turns on the screen. All the apps and windows that you were using are open where you left them.
The MacBook reestablishes any network connections that it normally uses and performs regular tasks, such as checking for new e-mail.
Log Out, Shut Down, and Resume
When you have finished using your MacBook for now, end your computing session by logging out. From the login screen, you can log back in when you are ready to use your MacBook again. When you have finished using your MacBook and plan to leave it several days, shut it down.
Whether you log out or shut down your MacBook, you can choose whether to have OS X reopen your apps and documents when you log back on. This helpful feature can help you get back to work — or play — quickly and easily.
Log Out, Shut Down, and Resume
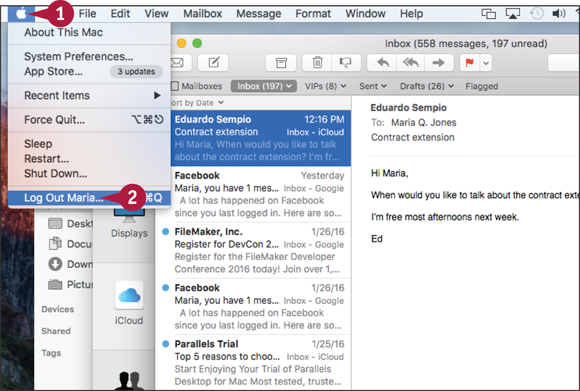
Log Out from Your MacBook
Click Apple ().
The Apple menu opens.
Click Log Out.
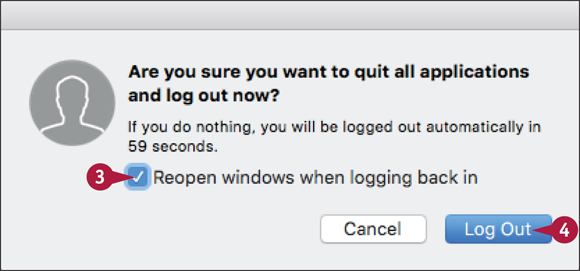
The MacBook shows a dialog asking if you want to log out.
Click Reopen windows when logging back in ( changes to ) if you want to resume your apps and documents.
Click Log Out.
Note: Instead of clicking Log Out, you can wait for 1 minute. After this, the MacBook closes your apps and logs you out automatically. To log out quickly, bypassing the dialog, click Apple (), press and hold , and then click Log Out.
The MacBook displays the window showing the list of users. You or another user can click your name to start logging in.
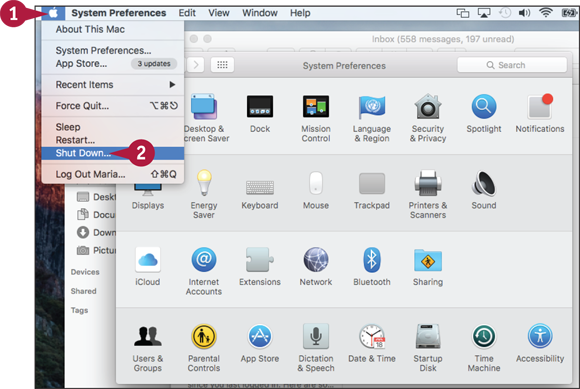
Shut Down Your MacBook
Click Apple ().
The Apple menu opens.
Click Shut Down.
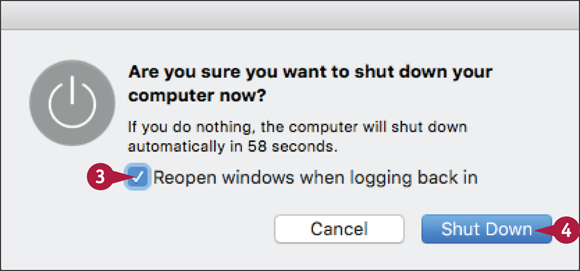
A dialog opens asking if you want to shut down.
Click Reopen windows when logging back in ( changes to ) if you want to resume your apps and documents.
Click Shut Down.
Note: Instead of clicking Shut Down, you can wait for 1 minute. After this, the MacBook shuts down automatically. To shut down quickly, bypassing the dialog, click Apple (), press and hold , and then click Shut Down.
The screen goes blank, and the MacBook switches itself off.
 ) at any stage in the setup process if you need to go back and change a choice you made.
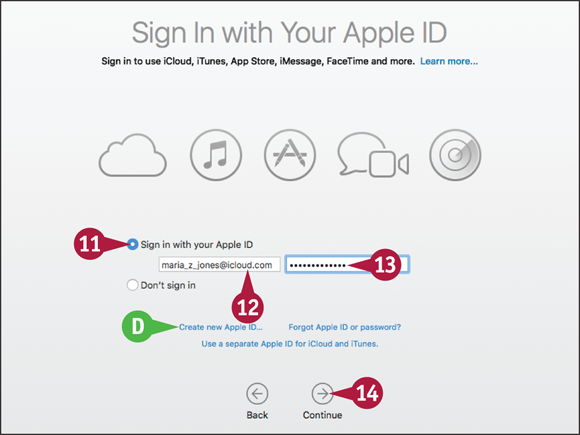
 Type your Apple ID.
 Type your password.
  Click Continue (
 ), Minimize (
 ), and Zoom (
 ).
). . To close all the windows of the app, press