Often I am asked to teach classes on charcuterie and, in almost every case, people want to make prosciutto or salami first. I get it; they are amazing products. But learning how to make dry-cured salami without prior meat-making experience is like learning how to ski on a black diamond run. So start with something that you can enjoy right away and that will allow you to enjoy the whole process: start with rilletes.
The beauty of slow-cooked meats is the ease; they cook at a low temperature, nice and even. In this chapter you’ll learn a key technique for slow-cooked meat: cooking with animal fat and preserving the meat under a lid of fat. This is one of the best ways to preserve meat and to make it unbelievably delicious. And all you will need for these recipes is a knife, an oven, and a pan.
The percentage charts are ingredient ratios by weight, with the meat serving as the baseline weight. They’re especially useful for scaling recipes, allowing you to get consistent recipe results no matter how much meat you have. For more information on how to use them, see this page.
COOKED IN FAT (CONFIT)
Confit is meat cooked in fat and often preserved under a cap of fat. For confit recipes in this chapter, you can try Pork Rillettes and Rillons, Duck Confit and Rillettes, and Coppa di Testa.
| *Meat | 100% |
| Salt | 2% |
| *Curing salt #1 | 0.2% |
| Spices | 3% |
| *Cooking fat | 23% |
SLOW ROASTED
Slow-roasted meats are exactly what they sound like. For a slow roasted recipe, try Capicola.
| *Meat | 100% |
| *Salt | 2.5% |
| Sugar | 1.3% |
| *Curing salt #1 | 0.2% |
| Rub | 1.5% |
| Spices | 0.3% |
* Ingredients marked with an asterisk need to be converted precisely.
Quality Tips
Master three key components of slow-cooking—(1) marinating, (2)cooking temperature, and (3) preserving—and you’ll be golden.
Marinating: At the shop, we call marinating “letting the cure set.” Grind the spices using a dedicated coffee grinder or a mortar and pestle as close as possible to the time you set your marinade. Use fresh onions, garlic, and herbs. And, to ensure the marinade or cure will reach the middle of the meat, wrap the meat in marinade with plastic wrap and let it sit for at least 2 days in the refrigerator before you cook it.
Cooking Temperature: This cooking method is called “low and slow” for a reason, so use a gentle hand. A nice, slow pace means the meat cooks evenly, the center simultaneous with the outside. In the charcuterie world, we chill out and enjoy a refreshing beverage while the meat cooks. I cook, smoke, and poach everything I make at temperatures lower than 300°F (148°C)—there’s no need, in any phase of my production, for a temperature that’s any higher. I hate to see meat boil or even simmer in my shop. It’s like watching kids get yelled at in a park—just awkward for everyone.
Preserving: The key to preserving confit and other slow preparations is keeping the meat sealed in fat. This keeps oxygen out and flavor in.


One of the beauties of making charcuterie is that you can use the whole animal—from the muscle to the trim to the fat—to create something delicious. In the case of rillettes and rillons, you use the animal’s own fat to tenderize and preserve the meat. Rillettes and rillons use the same cooking technique; however, for rillettes, the meat is chopped fine and ends up a bit like pâté, with a smooth texture, while for rillons, larger chunks of meat are tossed in sugar and crisped in a pan.
Rillettes are said to be the first “butter” in the world—smeared on stale bread to make it palatable. When I was a kid, my parents would heat up a small amount of rillettes, spread it on thick-cut country toast, and place a fried egg on top. They served it with a dandelion salad dressed in lemon and oil; this was the breakfast of champions in the Cairo household. Rillons, once you have crisped them up in a pan, are best enjoyed with a simple radish salad and some great bread.
If you are able to get lard that has been freshly rendered by your butcher, please do. It will give you the best porky flavor.
MAKES ONE 4 BY 12-INCH (10 BY 30 CM) TERRINE OR 2½ POUNDS (1.1 KG) OF RILLETTES OR RILLONS; SERVES 8 TO 10
6 whole cloves
2 teaspoons (10 g) ground coriander
½ teaspoon (2 g) ground white pepper
1 teaspoon (5 g) ground black pepper
2 tablespoons (30 g) fine sea salt
½ teaspoon (2 g) curing salt #1 (optional)
1½ tablespoons (17 g) chopped fresh ginger
2½ tablespoons (36 g) chopped garlic
1½ tablespoons (18 g) chopped fresh thyme
½ teaspoon (2 g) freshly grated nutmeg
Pinch of ground ginger
¾ teaspoon (2 g) ground cinnamon
¼ cup (60 ml) dry white wine
3 pounds (1.4 kg) boneless pork shoulder, cut into 1-inch (2.5 cm) cubes
11 ounces (312 g) good-quality lard
Olive oil (optional)
1 cup (220 g) sugar (if making rillons)
NOTES: CURING SALT #1 IS OPTIONAL IN THIS RECIPE. IT WILL AID IN COLOR AND PRESERVATION BUT IS BY NO MEANS NECESSARY. THIS IS A 3-DAY RECIPE WITH 2 HOURS OF HANDS-ON TIME.
1 Using a mortar and pestle, coarsely grind the cloves, coriander, and white and black peppers. In a large bowl, combine the ground spices with the sea salt, curing salt, fresh ginger, garlic, thyme, nutmeg, ground ginger, cinnamon, and wine and mix well with a fork.
2 Add the cubed pork to the bowl and, with clean hands, mix the pork and rub until the pork is well coated. Cover the bowl with plastic wrap and refrigerate for 3 days. By day 3, the meat should have a great smell of clean spice and garlic; it should have a slight pink color to it if you used the curing salt.
3 Remove the pork from the fridge and let it come to room temp-erature, about 30 minutes. Preheat the oven to 275°F (135°C).
4 Melt the lard in a small pot over low heat, warming it until it is completely translucent and begins to bubble. This should take no more than 5 minutes.
5 Transfer the pork to a Dutch oven and carefully pour the melted lard over it. Be sure that the meat is totally covered. If there is not enough lard, add a bit of olive oil so that the meat is totally covered. Cover the pot and cook in oven for about 3 hours, or until the pork is fork tender but not dry and “cottony.” Start checking for doneness after 2½ hours so as not to overcook the pork. Remove from the oven and allow the pork to rest in the fat for 1 hour.
6 Using a slotted spoon, transfer the pork from the fat to a bowl. Reserve all the fat and liquid and set aside to cool. Separate the fat from the cooking liquid as you would if you were skimming fat off of a stock: press the bowl of a ladle into the liquid until the lip breaks the surface and the fat flows into the ladle, being very careful not to stir together the fat and the liquid. Reserve the skimmed lard in a separate bowl and set aside at room temperature. You will be able to tell that you are into the cooking liquid when you see the darker color liquid on the bottom of the pot. At this point, choose whether you are making rillettes or rillons: If you’re making rillons continue with steps 7, 8, and 9. If you’re making rillettes, skip to step 10.
7 To finish the rillons, place the pork in a large bowl and, working very gently, sprinkle the sugar in a steady flow while stirring with a rubber spatula. You are trying to cover all sides of the rillons with sugar while keeping them as intact as possible.
8 Heat a large nonstick pan over medium heat. Pour a small amount of the reserved lard into the pan and fry the sugar-covered rillons in batches to prevent crowding, until nice and crispy on all sides, about 2 minutes. Wipe out the pan with a paper towel and add fresh lard before each batch. Serve the rillons hot from the pan.
9 To store any leftover rillons, fried or unfried, cover them completely with leftover lard, with all of the meat submerged in fat. Discard the cooking liquid. The rillons will keep, refrigerated, for up to 1 month.
10 To finish the rillettes, put the pork on a cutting board and chop coarsely. You are looking for an uneven texture. Transfer to a bowl.
11 To the chopped pork, add one-third of the reserved lard and a third of the cooking liquid stirring until well incorporated. Taste the pork; it should be well salted and very succulent. If not, add more salt to taste. Press down on the meat with a slotted spoon. Liquid should ooze a bit, and the meat should begin to bind. Place the meat in a 4 by 12-inch (10 by 30 cm) terrine mold or in a casserole, jar, or any other vessel you would like. Press down gently to slightly compact the meat. Refrigerate for 1 hour.
12 In a saucepan over medium heat, melt the remaining reserved lard until liquid. Remove the rillettes from the refrigerator and pour the melted lard over the rillettes until they are covered by at least ¼ inch (6 mm). Cover the terrine or other vessel (or not, it doesn’t really matter as you have your fatty protective layer) and refrigerate for up to 1 month. (You can eat the rillettes right away while still warm; however, the flavors will become much more incorporated and mellow if you let them rest for a day or two.) Remove from the refrigerator about 1½ hours before serving; the rillettes are best at room temperature.


Slow-cooking meat in its own fat is grand, but the truly great quality of this recipe has to be the flavor from the fresh garlic, ginger, and sweet spices—in other words, the rub.
I’ve created a choose-your-own-adventure below: one path will lead you to a warm duck confit, the other to succulent rillettes topped with crackled duck skin. There is no right way, only different moods. Confit for dinner, rillettes for lunch?
MAKES 6 SERVINGS OF CONFIT OR ONE 4 BY 12-INCH (10 BY 30 CM) TERRINE OF RILLETTES; SERVES 8 TO 10
2 teaspoons (9 g) finely chopped shallot
2 teaspoons (9 g) finely chopped garlic, plus 1 head garlic, root end chopped off
2½ teaspoons (11 g) finely chopped fresh ginger
Pinch of ground allspice
Pinch of ground cloves
Pinch of ground coriander
Pinch of ground black pepper
Pinch of chopped fresh thyme
Pinch of chopped fresh parsley
1½ tablespoons (22 g) fine sea salt
½ teaspoon (2 g) curing salt #1 (optional)
6 duck legs, about 3 pounds (1.4 kg) total
2 cups (450 g) duck fat
TO SERVE (OPTIONAL)
Chicories Salad (if serving confit)
Baguette slices (if making rillettes)
Cornichons (if making rillettes)
NOTES: CURING SALT #1 IS OPTIONAL IN THIS RECIPE. IT WILL AID IN COLOR AND PRESERVATION BUT IS BY NO MEANS NECESSARY. THIS IS A 3-DAY RECIPE WITH 5 HOURS OF HANDS-ON TIME.
1 To prepare the rub, grind the shallot, chopped garlic, ginger, allspice, cloves, coriander, black pepper, thyme, and parsley using a mortar and pestle or dedicated coffee grinder until the texture is like coarse ground pepper, about 3 minutes. Add the sea salt and curing salt and mix to combine well. Transfer to a large bowl.
2 Add the duck legs to the bowl and, using your hands, coat and rub the duck with the rub. Cover the bowl with a lid or plastic wrap and refrigerate for 2 days.
3 If possible, remove the legs from the fridge and let them come to room temperature, about 30 minutes. Preheat the oven to 300°F (148°C).
4 Remove the duck legs and set them aside on a dish to drain. Place the legs in a Dutch oven or casserole, skin side up. In a heavy pot over low heat, warm the duck fat until it melts and becomes almost translucent. This should take about 5 minutes. Very carefully pour the hot fat over the legs; they should be completely covered. Nestle the garlic head into the fat, making sure it is submerged as well.
5 Cover the pot and place in the oven. After 2 hours, check for doneness by poking one leg with a skewer. It should slide out of the meat with very little resistance. If it doesn’t, place the pot back in the oven and cook for another 15 minutes or so, until the skewer slides out easily. Remove from the oven, uncover, and allow to cool for 1 hour. If you are not going to proceed to confit or rillettes right away, place the pot, covered, in the refrigerator, where it can stay for up to 1 month.
6 Remove the pot from the refrigerator 1 hour before cooking to allow the fat to soften.
7 Place a nonstick pan over low heat. Using a slotted spoon, remove one of the legs from the fat and let the fat drain off for a second. Place the leg, skin side down, in the hot pan. Allow to sizzle, without moving, until the skin is golden, about 5 minutes, then flip and cook for 4 minutes on the other side. Remove to a paper towel–lined plate. Repeat with the remaining legs.
8 If you are serving the confit legs, place them on plates and serve with the chicories salad. You can use the leftover fat for roasting potatoes or vegetables.
9 If you are making rillettes, let the legs cool for 5 minutes after browning. Carefully remove the skin from the legs and reserve in the refrigerator to make the duck cracker. Pull the bones out of the legs; they should come out easily. Put the meat on a cutting board and give it a coarse chop with a sharp knife. You are looking for an uneven texture. Place the meat in a bowl and add about 1 cup (225 g) of the cooking fat from the confit; give the mixture a good stir and taste. It should be moist but not too greasy and have plenty of salt. Place the meat in a 4 by 12-inch (10 by 30 cm) terrine mold or in a casserole, jar, or any other vessel you would like. Press down gently to slightly compact the meat. Refrigerate for 1 hour.
10 In a saucepan over medium heat, melt the remaining cooking fat until liquid. Remove the rillettes from the refrigerator and pour the melted fat over them until they are covered by at least ¼ inch (6 mm). Cover the terrine or other vessel (or not, it doesn’t really matter since you have your fatty protective layer) and refrigerate for up to 1 month. (You can eat the rillettes right away while still warm; however, the flavors will become much more incorporated and mellow if you let them rest for a day or two.) Remove from the refrigerator about 1½ hours before serving; the rillettes are best at room temperature.
11 To make the duck cracker, remove the reserved duck skin from the refrigerator and let it come to room temperature, about 10 minutes. Carefully scrape excess fat from both sides of the skin and place the skin in a small heavy pot. Set over medium heat and render for about 5 minutes, until crisp like a delicate, gossamer piece of bacon. Take care not to burn the skin. (Alternatively, lay the skin pieces in a single layer on a parchment paper–lined baking sheet and render them in a 300°F (148°C) oven until crisp, about 10 minutes.) Drain on paper towels and allow to cool.
12 Serve the rillettes with baguette slices, cornichons, and the duck cracker.
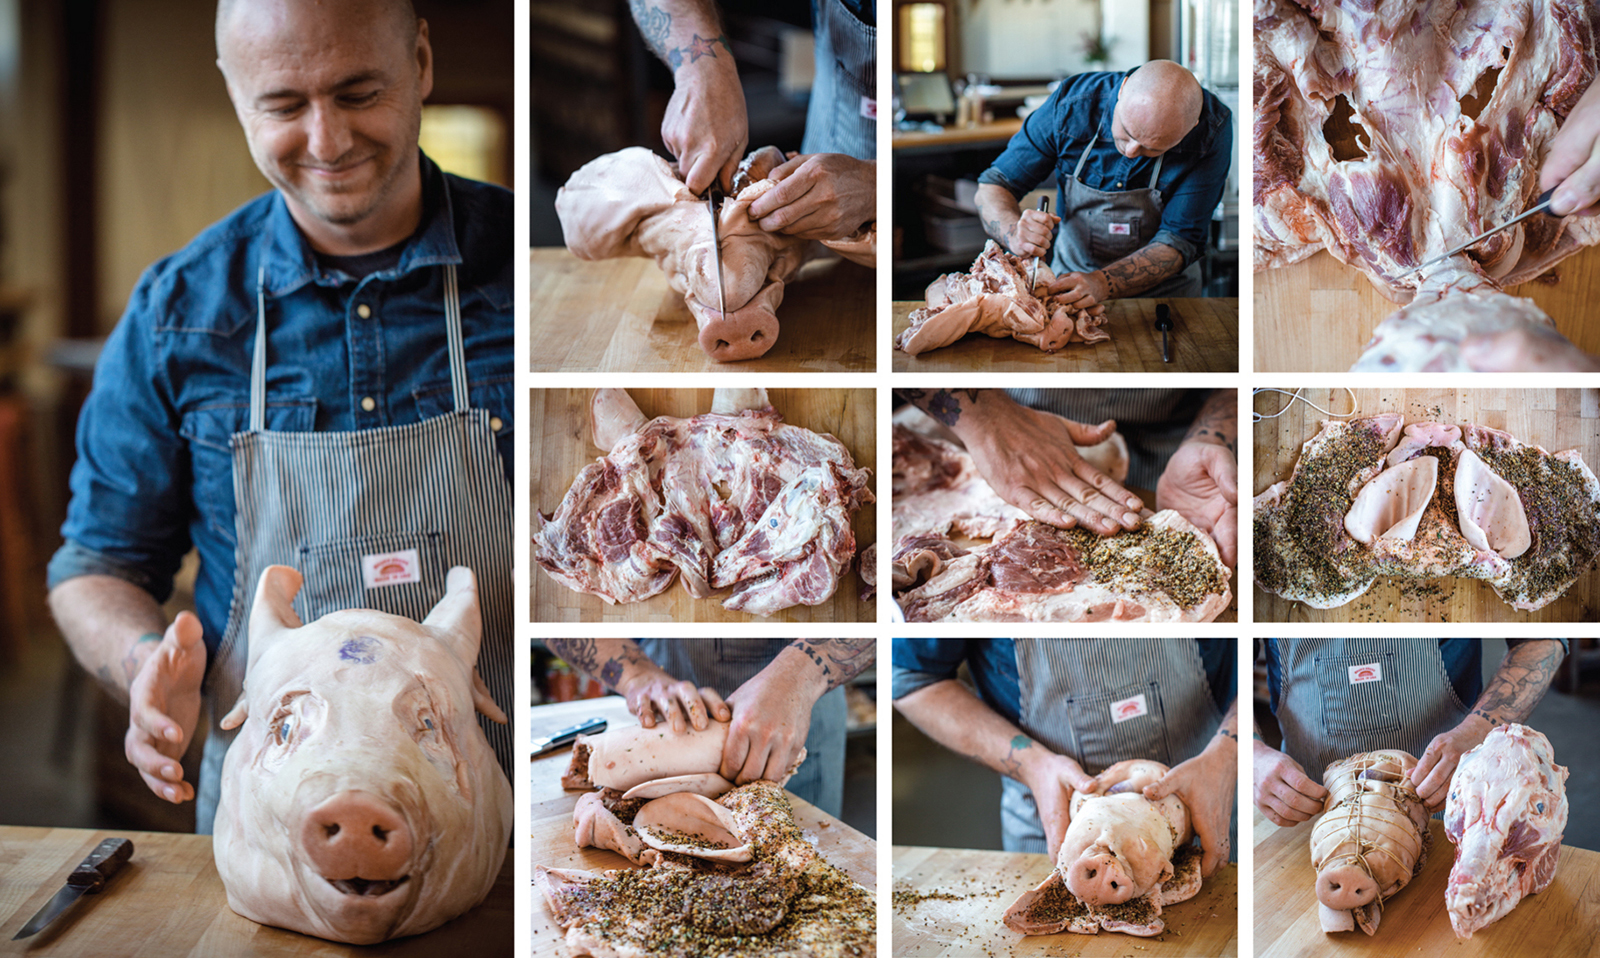

To those who think coppa di testa is too difficult for the home cook, I would say you’re half correct. Yes, you’re flipping a pig’s face inside out and rolling it into a tight sleeping bag in this recipe. But clearly this doesn’t deter quite a few of you, as the class I teach about making coppa di testa at the annual Feast Portland food festival is always the first to sell out, period. This preparation is the one that routinely brings the ooohs and aaahs. And it’s definitely doable, especially if you get your butcher to debone and clean the head for you and to give you the skull to use in the stock.
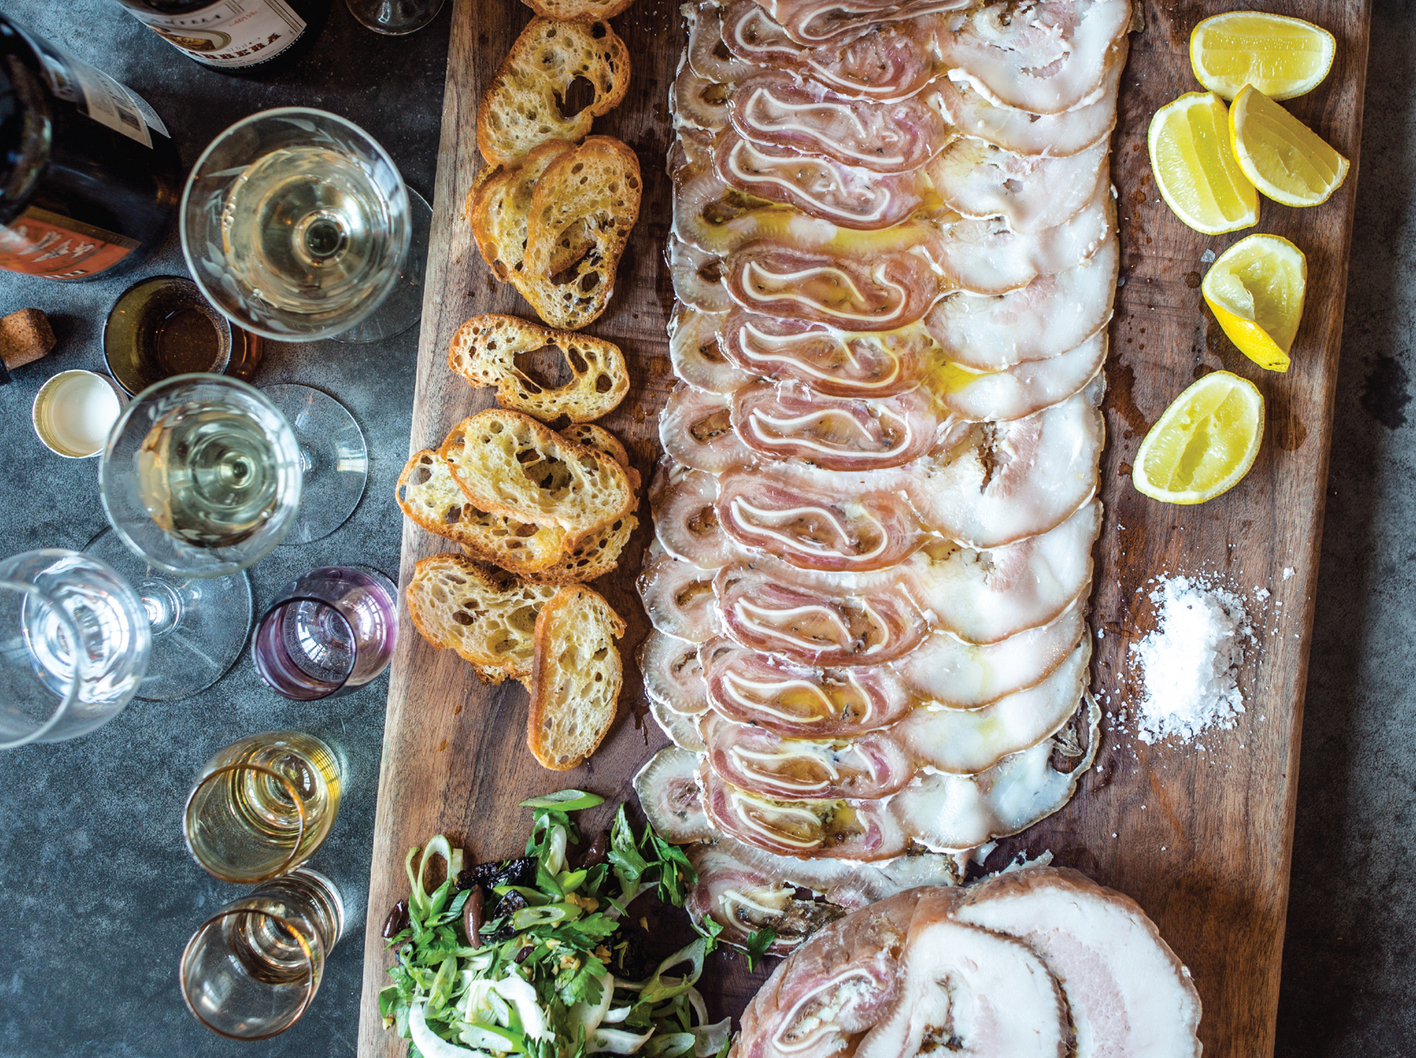
Our coppa is not a typical headcheese, which is to say, it’s not brined or bound with aspic in a terrine. In our method (inspired by similar coppa I’ve seen at the Austrian markets in the Alps), you slice the meat thinly so that a mixed texture of cartilage and jowl fat is on display (both aesthetically and in terms of flavor). I like to eat thin slices of coppa di testa on crostini with a drizzle of olive oil, some crunchy salt, and a squeeze of lemon. You could also serve this with a mix of fennel, mint, parsley, and lemon—or anything bright and acidic, really.
MAKES 20 SNACK-SIZE PORTIONS
1 pig’s head, 4 to 5 pounds (2 kg) when deboned
1 large carrot, peeled and cut into matchsticks
2 stalks celery, cut into matchsticks
1 onion, quartered
Fine sea salt
¾ teaspoon (3 g) black peppercorns
¾ teaspoon (3 g) coriander seeds
1 teaspoon (4 g) curing salt #1
¾ teaspoon (3 g) orange zest
½ teaspoon (2 g) chopped fresh rosemary
1 tablespoon (16 g) minced garlic
NOTE: THIS IS A 2-DAY RECIPE, WITH 5 HOURS OF HANDS-ON TIME.
1 If your butcher has deboned and cleaned your pig’s head, proceed to step 2. To debone the head, start with the head chin-up facing away from you. I use a stiff 6-inch deboning knife. Slice the chin, starting at the neck cutting up towards the chin and eventually through the lips, and work your way around the skull, trying not to make extra cuts through the skin as you get the skull detached from the skin and flesh (if you do cut through the skin, it’s not the end of the world—it just may be a bit more difficult to tie up). Work all the way around the head until the skull is fully removed from the skin. Then lay the face skin side down on the work surface and remove all of the glands in the jowl area (they should look like purplish rounds of fat), as well as any bits of bone you may have missed. (see photos, for reference). Place the deboned head in the fridge to chill while you get the stock started.
2 Place the pig’s skull in a stockpot that is large enough to hold it. Cover completely with water. Slowly bring the water to a simmer over low heat, skimming off and discarding any scum that may come to the surface. Add the carrot, celery, and onion and keep at a very low simmer for at least 4 hours, or up to 6 hours. Skim every 20 minutes or so. Place the whole pot in the refrigerator and allow to chill overnight.
3 Weigh the boneless and cleaned pig’s head and measure out, as precisely as possible, 2 teaspoons (8 g) of fine sea salt per pound (455 g) of weight. Using a mortar and pestle, grind the pepper corns and coriander seeds. Then add the fine sea salt, curing salt, orange zest, rosemary, and garlic, and mix well.
4 Sprinkle one third of the cure mixture into a casserole dish and place the pig’s face in the dish, meat side up (skin side down). Add the rest of the cure mixture to the face and massage really well, making sure to cover the entire face and get the cure into all the nooks and crannies.
5 Set out your twine so it is on hand once you start rolling the face. Pull the ears through the eye holes so that the ears are on the inside of the face. Place the face, meat side up, on the work surface with its snout pointing away from you and, starting at one side of the face, near the cheek, roll it up as tightly as you can, trying to keep the ear tucked inside the face.
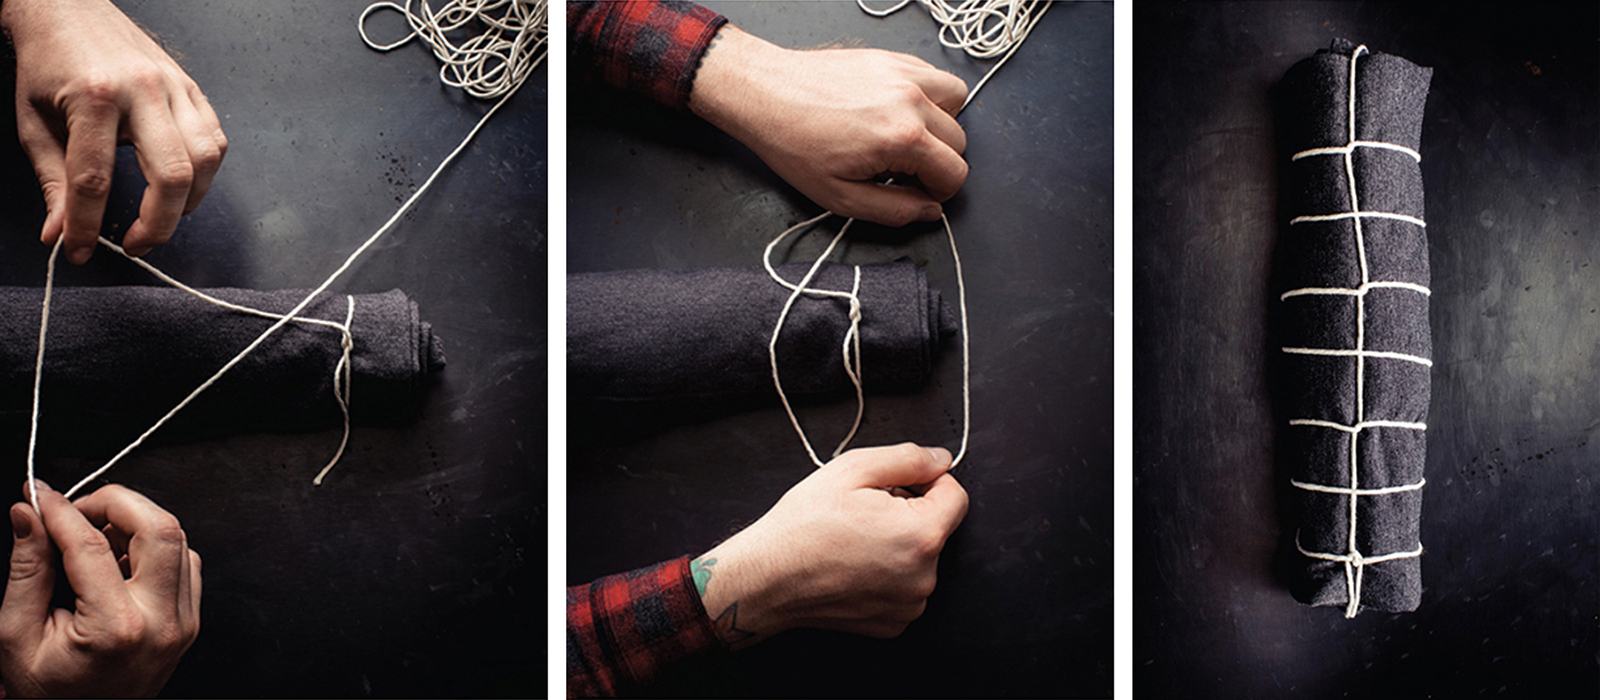
6 Hold onto the roll to keep it as tight as possible. Place the face on a work surface, with the snout facing away from you. To begin, tie the twine tightly around the face using one end of your twine, about 1 inch from the snout. Next, take the ball of twine and pull it toward you with your right hand. Place your right thumb on the twine to hold it in place once you have measure out 1 inch, then use your left hand to take the twine at a 90-degree angle to your left and wrap it underneath and around the face. Bring the twine back up, cross it over in between your right hand and the snout, and then pull it back toward you tight. Your twine should make a taut cross on the face. Take your right hand, pull the twine toward you again, and keep repeating the procedure at 1-inch intervals. When you are within 2 inches of the end of the face, securely tie off the twine (see photos, for reference). Place the rolled face back in the the casserole dish, cover with plastic wrap, and refrigerate for 24 hours.
7 Remove the casserole dish from the fridge and allow the pig’s face to come to room temperature, about 30 minutes. Preheat the oven to 250°F (121°C). Take the face out of the casserole and place it in a large pot with a tight-fitting lid. Your chosen vessel must be large enough to hold the rolled face fully submerged in stock.
8 Take the stock out of the refrigerator and slowly heat it on the stovetop until liquefied. Pour the warm stock through a fine-mesh strainer over the face until it is completely covered; you will need about 1½ gallons (5.7 liters). Cover the pot, put it in the oven, and forget about it for at least 3 hours. After 3 hours, check to see if the face is still submerged. If not, you need to add a bit more stock (or water if you’re out of stock). Cook for about 1 hour longer, then stab the meat with a wooden skewer: it’s done when you can pull out the skewer without any resistance.
9 Remove the pot from the oven and immediately place it—face, broth, and all—in the refrigerator. (You may have to remove one or two shelves in your fridge to accommodate it.) Refrigerate for 5 to 6 hours.
10 Remove the coppa from the stock and, using your hands, scrape the excess broth off of the face (it will be gelatinous when it’s cold). Keep the stock to serve on its own as a broth, or use it to cook beans or polenta.
11 Starting at the snout and working your way back, slice the coppa as thin as you possibly can—it’s best sliced as thinly as paper, either on a slicer or with a really sharp knife and a skilled hand. (You might take it to your butcher and have him slice it for you—say you’ll pay in coppa di testa and he will surely oblige.) Wrapped tightly in plastic wrap, the unsliced coppa di testa will keep in the fridge for up to 1 month.

Capicola to Italians, capocollo to Americans, capicolla to Canadians, “gabagoul” to Tony Soprano—whatever you call it, capicola is made from the neck of the pig, coppa, prized for its perfect ratio of 30 percent fat to 70 percent lean, making the meat moist and tender. At OP, it’s cured for 10 days, then coated in black pepper, fennel seed, coriander, and anise and slow-roasted to produce a tender ham. (We have also included two other options if you want to mix it up.) If you can roast beef, you can pull this off with no trouble at all.
Yes, but what to do with it? Well, one can’t make a proper Italian sub (or, I’d say, any proper lunchbox sandwich) without capicola. I use it in our OP Cured Meats Sandwich. You can also find it, tossed like mini Frisbees, on the Apizza Amore served at Apizza Scholls, our favorite Portland pizzeria.
MAKES ONE 2½-POUND (1.1-KG) CAPICOLA, ENOUGH FOR 4 GOOD-SIZE SANDWICHES OR 8 AVERAGE SANDWICHES
Choose one rub from the three listed below: Classic, Sweet, or Herb.
CURE
3 pounds (1.4 kg) pork coppa (see Notes)
2 tablespoons plus 1 teaspoon (35 g) fine sea salt
2 tablespoons (20 g) sugar
1 teaspoon (4 g) crushed red pepper flakes
1 teaspoon (4 g) curing salt #1
CLASSIC RUB
1 teaspoon (4 g) crushed red pepper flakes
2 teaspoons (10 g) black peppercorns
½ teaspoon (1.6 g) coriander seeds
½ teaspoon (1.6 g) fennel seeds
½ teaspoon (1.6 g) aniseed
SWEET RUB
1 teaspoon (4 g) coriander seeds
1 teaspoon (1 g) fennel seeds
1 teaspoon (5 g) black peppercorns
½ teaspoon (2 g) crushed red pepper flakes
HERB RUB
1 teaspoon (5 g) black peppercorns
1 teaspoon (4 g) chopped fresh thyme
1 teaspoon (4 g) chopped fresh rosemary
1 teaspoon (4.5 g) chopped garlic
NOTES: THIS IS A 10-DAY CURE WITH 4 HOURS OF HANDS-ON TIME. ASK A GOOD BUTCHER FOR THE COPPA, WHICH WILL NEED TO BE CUSTOM CUT FROM A WHOLE SHOULDER.
Special Equipment: You will need a size 16 ham net for this recipe. Ask your butcher for one or buy one online at SausageMaker.com.
1 To make the cure, grind the fine sea salt, sugar, red pepper, and curing salt using a mortar and pestle.
2 Place the pork in a large bowl and massage the cure into the pork, really coating it and working it into the cracks and crannies. Wrap tightly in plastic wrap (or put into a big zipper-top bag), place on a dish, and refrigerate for 5 days. Then flip it over so that the top side is down and refrigerate for another 5 days.
3 After 10 days of curing, remove the coppa from the refrigerator and unwrap it. Rinse under cold water until all particles of salt and spice have been removed. Allow it to dry while you prep your rub.
4 Prepare the rub of your choice by combining all the ingredients in a mortar and grinding with the pestle for about 2 minutes. You’re looking for a coarse texture, not too fine. Pour the rub into a large bowl and add the meat, turning to coat it well.
5 Preheat the oven to 250°F (121°C). Place a roasting pan filled halfway with water in the middle rack of the oven to create humidity. Put the meat into the ham net and tie the net closed on both ends. Place the meat in a roasting pan and cook for 1 hour on the top rack. Turn the meat over and cook for 1 hour longer. Check the internal temperature: you want it to reach 155°F (68°C). When the capicola done, it should be evenly roasted and smell so wildly good that you can’t wait to slice and dig in. But not yet! Instead, remove it from the oven, transfer to a plate, and refrigerate, uncovered, for 3 to 4 hours, until the capicola’s internal temp is below 39°F (4°C). Remove the capicola from the refrigerator, slice thinly, and serve, either solo or atop a sandwich or pizza. Wrapped tightly in plastic wrap, the unsliced capicola will keep for 3 weeks in the refrigerator.

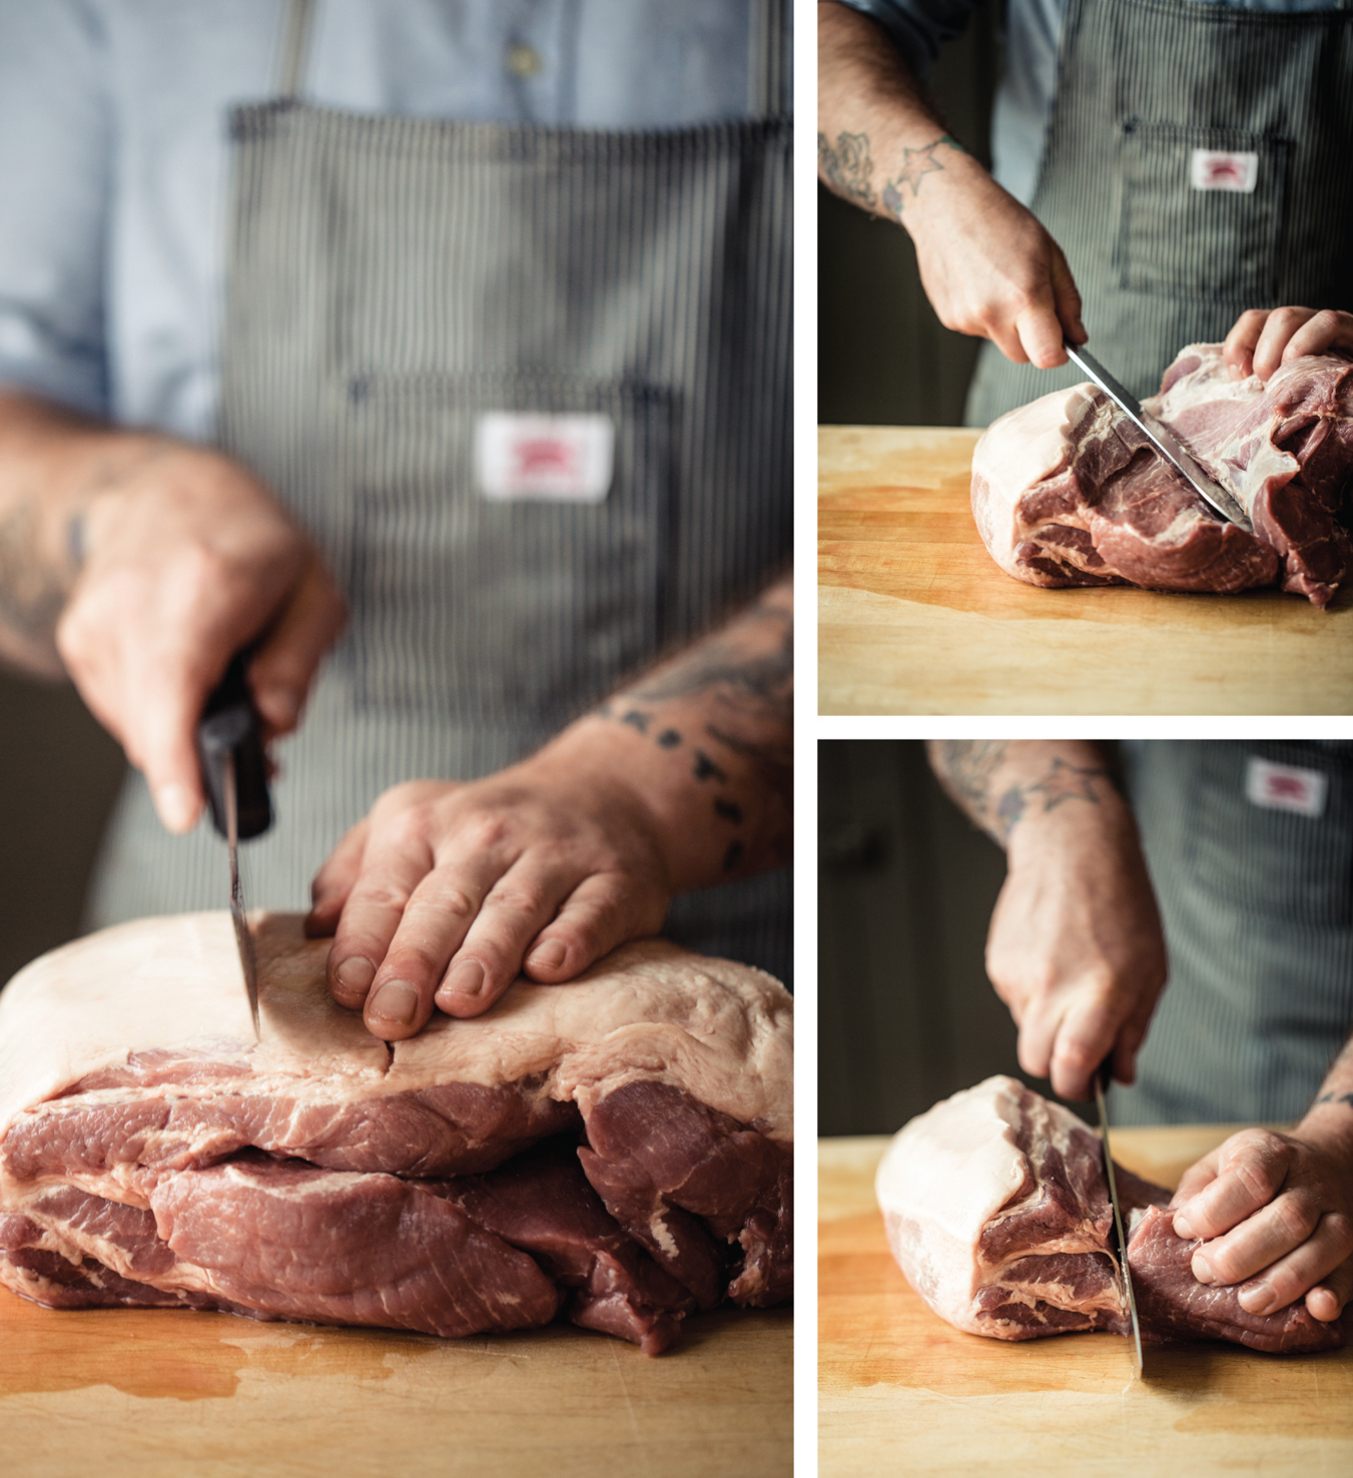
Harvesting a coppa for Capicola.

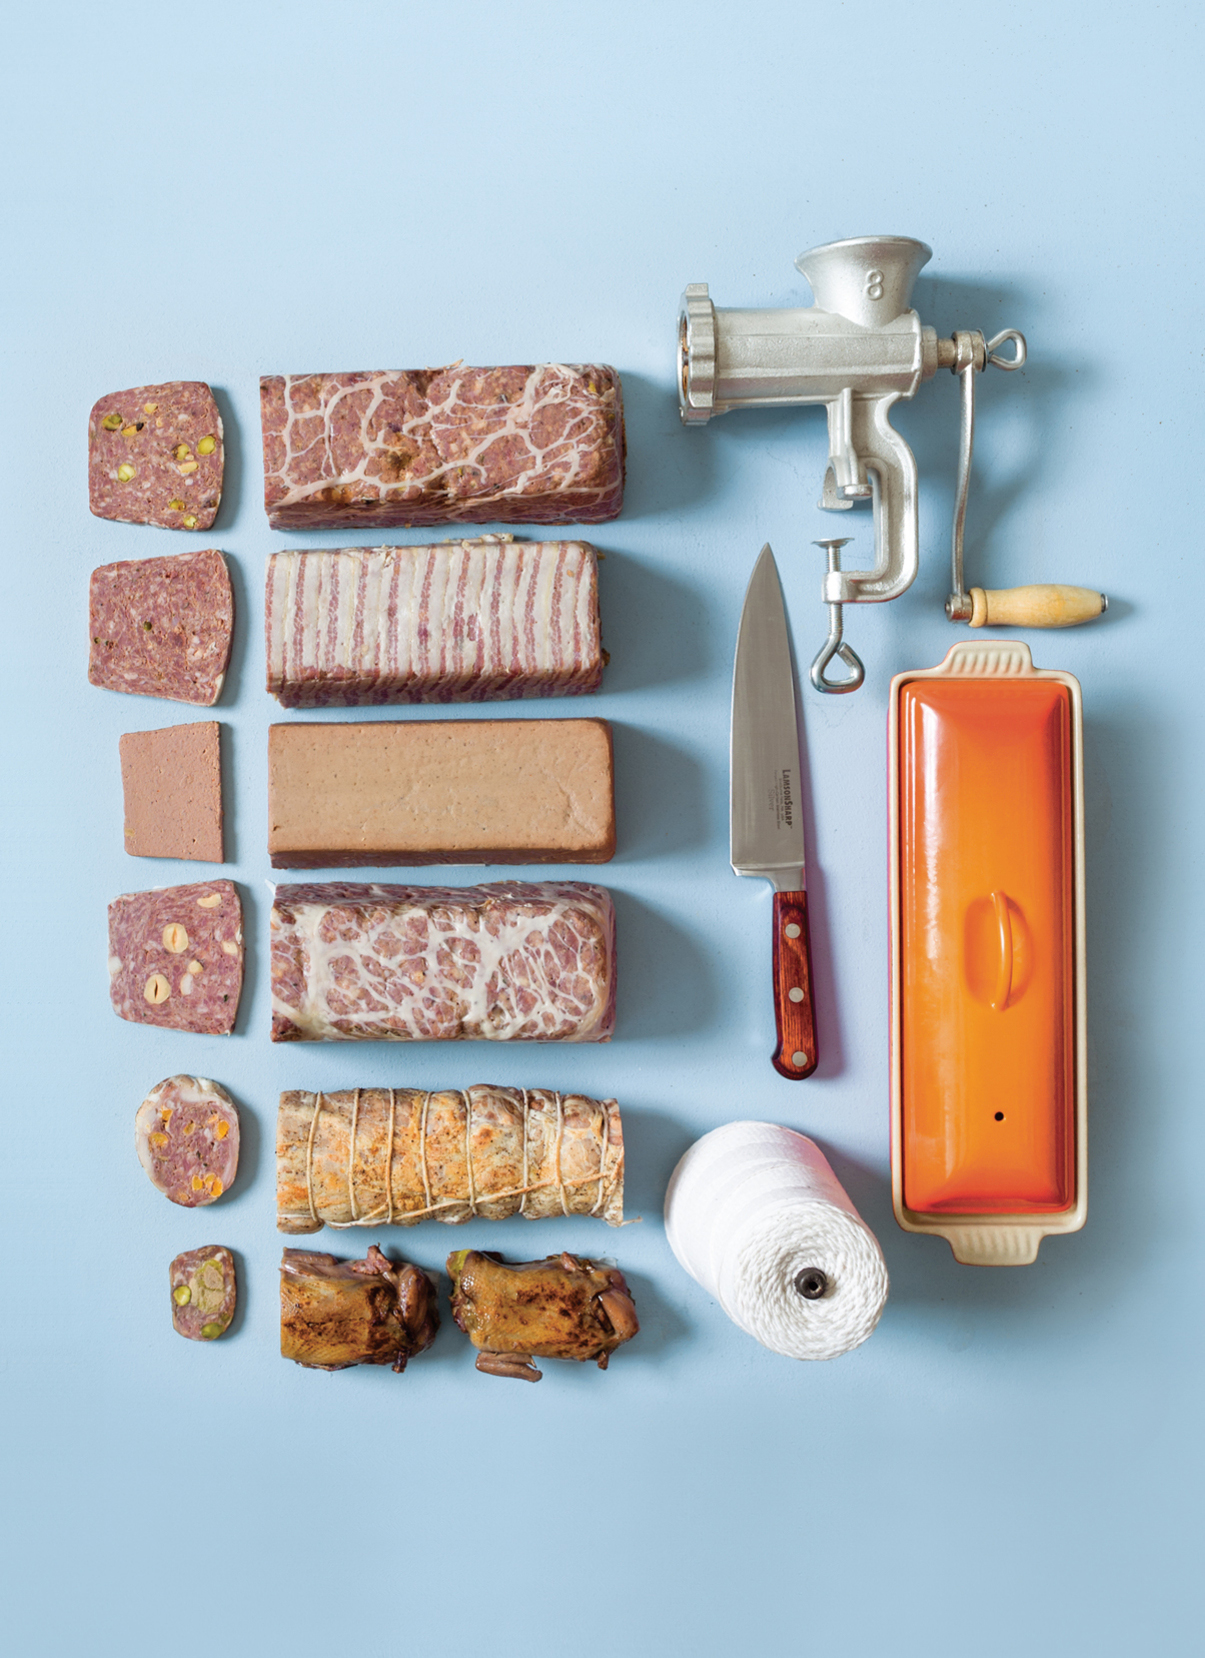
From top: Pork Pistachio Pâté, green peppercorn pâté, Pork Liver Mousse, honey hazelnut pâté, Rabbit Ballotine, Quail en Gelée.