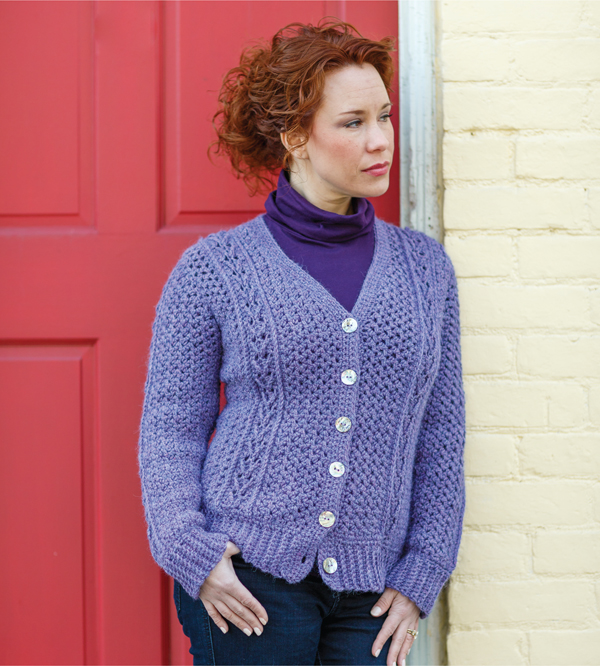
Don’t let this sweater fool you. It works up much faster than it looks using the Woven stitch and worsted weight yarn. I recommend this pattern to anyone who has never constructed a sweater before since it is less complicated and sews together simply. Just be sure to make a gauge swatch to determine the proper hook size. You want to be sure the sweater fits when you’re finished!

Intermediate
I/9 (5.5mm) crochet hook
Sweater: 8 (9, 10, 10) skeins of Worsted (no. 4) weight yarn (project shown uses Berroco Ultra Alpaca [215 yds/198m per 3.5 oz/100g] in color no. 6283 Lavender Mix)
Vest: 5 (6, 7, 7) skeins of Worsted (no. 4) weight yarn (project shown uses Berroco Ultra Alpaca [215 yds/198m per 3.5 oz/100g] in color no. 6285 Oceanic Mix)
Six 1" (2.5cm) Buttons
Needle
Matching thread
Instructions for these sizes are listed in order in parentheses S (M, L, XL). Be careful to read the correct numbers for the size you are making.
Finished Sizes:
Bust: 331⁄4 (371⁄4, 411⁄4, 451⁄4)" (84.5 [94.6, 104.8, 115]cm)
Length: 191⁄4 (201⁄4, 201⁄4, 211⁄2)" (48.9 [51.4, 51.4, 54.6]cm), excluding ribbing
5 Woven sts = 23⁄4" (7.6cm) and 6 rows = 2" (5.1cm) in Woven stitch pattern
Low Front Ridge (LFR), Low Back Ridge (LBR), Arrow, Woven

Tipperary Vest
Starting from center of right front.
Ch 71 (75, 75, 79).
Row 1 (WS): Sc in 2nd ch from hook and in each ch across. Turn, (70 [74, 74, 78] sc).
Rows 2 & 3 form the LFR pattern.
Row 2 (RS): Ch 1. Working in flps only, sl st in 2nd sc and in each sc across. Sl st in turning ch. Turn.
Row 3: Ch 1. Working in rem lps of last sc row, sc in each sc across. Turn.
Row 4 & 5 form the Arrow pattern.
Row 4: Ch 2 (counts as 1st dc). Dc in next st, *sk next 3 sc, tr in next st. Working behind tr just worked, dc in each of the 3 sts just skipped. Rep from * across row to last st. Dc in last st. Turn.
Row 5: Ch 2. *Sk next 3 dc, tr in next tr, working in front of tr just worked, dc in each of 3 skipped dc. Rep from * across to last st. Dc in last st. Turn.
Row 6: Ch 1. Sc in each st across. Turn.
Rows 7 & 8 form the LBR pattern.
Row 7: Ch 1. Working in blps only, sl st in 2nd sc and in each sc across. Sl st in turning ch. Turn.
Row 8: Ch 1. Working in rem lps of last sc row, sc in each sc across. Turn.
Row 1 (WS): Ch 2. Work Woven st in 2nd st, *sk next st, work 1 Woven st in next st. Rep from * across row. Turn, (35 [37, 37, 39] Woven sts).
Rows 2–3 (5, 7, 7): Ch 2. Woven st in the sp between the 1st and 2nd Woven sts. Woven st in the sp between each Woven st across, ending with a Woven st in the turning ch. Turn.
Row 4 (6, 8, 8): Ch 2. Work 27 (29, 29, 31) Woven sts across row, leaving the rem 8 Woven st sps unworked. Turn, (27 [29, 29, 31] Woven sts).
Row 5 (7, 9, 9): Ch 2. Work 1 dec as follows: yo, pull up 1 lp in 1st Woven st sp, pull up 1 lp in next Woven st sp, pull through 1 lp, yo, pull through all lps on hook to complete 1st half of st. Complete 2nd part of Woven st as usual. Woven st in rem sp across row and turning ch. Turn, (26 [28, 28, 30] Woven sts).
Row 6 (8, 10, 10): Ch 2. Work Woven sts across to last sp and turning ch. Work 1 dec over last sp and turning ch. Turn, (25 [27, 27, 29] Woven sts).
Rep Rows 5 (7, 9, 9) & 6 (8, 10, 10) once. Rep Row 5 (7, 9, 9) once more, (22 [24, 24, 26] Woven sts). Finish off.
Row 1 (RS): With RS facing, join yarn along the foundation ch with a sl st in the 1st st. Ch 2, Woven st in next st. [Sk next st, Woven st in next st] across. Turn, (35 [37, 37, 39] Woven sts).
Row 2 (WS): Ch 2. Woven st in the sp between the 1st and 2nd Woven sts. Woven st in the sp between each Woven st across, ending with a Woven st in turning ch. Turn.
Row 3 (Dec Row): Ch 1. Sl st in 1st Woven st sp, [ch 1, sl st in next Woven st sp] 1 (2, 3, 4) times, ch 1, work 1 dec over next 2 Woven st sps. Work Woven st across on rem sps and turning ch. Turn, (32 [33, 32, 33] Woven sts).
Row 4: Ch 2. Work Woven sts across row until you reach the last 3 sps (not counting turning ch). Work a Woven st dec over the next 2 sps. Turn, leaving 1 sp and the turning ch unworked (29 [30, 29, 30] Woven sts).
Row 5: Ch 1. Sl st in 1st Woven st sp, [ch 1, sl st in next Woven st sp] twice, ch 1, work 1 dec over next 2 Woven st sps. Work Woven st across on rem sps and turning ch. Turn, (25 [26, 25, 26] Woven sts).
Row 6: Ch 2. Work Woven sts across row until you reach the last 2 sps (not counting turning ch). Work 1 dec over these 2 sps. Turn, leaving turning ch unworked (23 [24, 23, 24] Woven sts).
Row 7: Ch 2. Work WS dec over 1st 2 sps, work in WS across row. Turn (22 [23, 22, 23] Woven sts).
Row 8: Ch 2. Woven st in the sp between the 1st and 2nd Woven sts. Woven st in the sp between each Woven st across, ending with a Woven st dec in last sp and turning ch. Turn, (21 [22, 21, 22] Woven sts).
Size S only, finish off.
Row 9: Ch 2. Woven st in the sp between the 1st and 2nd Woven sts. Woven st in the sp between each Woven st across, ending with a Woven st in turning ch. Turn.
Size M only, finish off.
Sizes L and XL, rep Row 9 – (–, one, four) more times. Finish off.
Work Rows 1–8 of Right Front Panel. Work the Right Front Armhole. (Note that WS rows are now RS rows and vice versa.) Finish off. With RS facing, connect yarn with a sl st in upper corner. Work Neckline same as Right Front Neckline. (Note that WS rows are now RS rows and vice versa.)
Follow instructions for Right Front Panel, Rows 1–8.
Woven Stitch Rows:
Row 1: Ch 2, Woven st in next st. [Sk next st, Woven st in next st] across. Turn, (35 [37, 37, 39] Woven sts).
Row 2: Ch 2. Woven st in the sp between the 1st and 2nd Woven sts. Woven st in the sp between each Woven st across, ending with a Woven st in turning ch. Turn.
Rep Row 2 an additional 20 (24, 28, 28) times.
Row 23 (27, 31, 31): Ch 1. Work 2 sc in each WS sp across row and in turning ch. Turn, (70 [74, 74, 78] sc).
Rep Right Front Panel Rows 1–8.
Right Arm Hole: Work as for Right Front Panel Arm Hole. Finish off.
Left Arm Hole: With RS facing, connect yarn with a sl st in the upper right corner on the foundation row. Work as for Left Front Panel Arm Hole. Finish off.
Ch 67 (71, 75, 83). This is the foundation ch for pattern in center of arm.
Row 1 (WS): Sc in 2nd ch from hook and in each ch across. Turn, (66 [70, 74, 82] sc).
Rows 2–8: Work Right Front Panel Rows 2–8.
Row 9: Ch 2. Work Woven st in 2nd st, *sk next st, work 1 Woven st in next st. Rep from * across row. Turn, (33 [35, 37, 41] Woven st).
Row 10 begins the decs on the sleeve cap end.
Row 10: Ch 2. Woven st in the sp between the 1st and 2nd Woven sts. Woven st in the sp between each Woven st across to last sp and turning ch, ending with a Woven st dec as follows: yo, pull up 1 lp in next Woven st sp, pull up 1 lp in turning ch, pull through 1 lp, yo, pull through all lps on hook to complete 1st half of st. Complete 2nd part of Woven st as usual. Turn, (32 [34, 36, 40] Woven st).
Row 11: Ch 2. Work 1 Woven st dec. Work Woven st over rem sps and turning ch. Turn (31 [33, 35, 39] Woven st).
Row 12: Ch 2. Woven st in the sp between the 1st and 2nd Woven st. Woven st in the sp between each Woven st across, ending with a Woven st in turning ch. Turn.
Rows 13 & 14: Rep Rows 11 & 12, (30 [32, 34, 38] Woven st).
Row 15: Rep Row 12 (11, 11, 11), (30 [31, 33, 37] Woven st).
Sizes M, L, and XL only: Rep Row 12. Then Rep Row 11, (– [30, 32, 36] Woven st).
Row 16 (18, 18, 18) begins the decs that taper the cuff end of the sleeve.
Row 16 (18, 18, 18): Ch 2. Work 1 WS dec over 1st 2 sts. Work Woven st over rem sts and turning ch. Turn, (29 [29, 31, 35] Woven st).
Row 17 (19, 19, 19): Ch 2. Work 1 Woven st dec over 1st 2 sts, Woven st across to last 4 sps and turning ch. Work 1 dec over next 2 sps. Leave rem sp and turning ch unworked. Turn, (24 [24, 26, 30] Woven st).
Row 18 (20, 20, 20): Ch 2. Work 1 Woven st dec over 1st 2 sts, work Woven st over rem sts and turning ch. Turn (23 [23, 25, 29] Woven st).
Row 19 (21, 21, 21): Rep Row 17 (19, 19, 19), (18 [18, 20, 24] Woven st).
Row 20 (22, 22, 22): Ch 2. Work 1 Woven st dec over 1st 2 sts. Work Woven st across to last sp and turning ch, end with a Woven st dec. Turn, (16 [16, 18, 22] Woven st).
Row 21 (23, 23, 23): Ch 2. Work 1 (1, 2, 2) Woven st dec. Work Woven st across to last 5 sps and turning ch. Work 1 dec over next 2 sps. Leave rem sps and turning ch unworked. Turn, (10 [10, 11, 15] Woven st).
Row 22 (24, 24, 24): Rep Row 20 (22, 22, 22), (8 [8, 9, 13] Woven st).
Row 23 (25, 25, 25): Ch 2. Work 1 (1, 2, 2) Woven st dec. Work Woven st across to last sp and turning ch, end with a Woven st dec. Turn, (6 [6, 6, 10] Woven st).
Sizes S, M and L only: Finish off.
Row – (–, –, 26): Ch 2. Woven st in the sp between the 1st and 2nd Woven sts. Woven st in the sp between each Woven st across, ending with a Woven st in turning ch. Finish off.
With RS facing, attach yarn with a sl st to work along the foundation ch. Rep Rows 9–26 to match other side of sleeve. Finish off.
Note: When sewing panels together, I prefer to use sewing needles and thread rather than using yarn and a yarn needle. This creates less bulky seams. Be sure to use thread color that matches your yarn color.
With RS facing, sew shoulder seams tog (for vest, sew shoulder and side seams only). Next, sew the sleeves in place using the center shoulder seam to center the sleeve. Sew the side and sleeve arm seams. Work bottom ribbing across the end of the sweater as well as on ends of the sleeves (9 sc for all ribbing).
With gauge hook, join yarn to bottom of sweater with a sl st. Sc evenly around edge. Turn. Ch 10.
Row 1: Sc in 2nd ch from hook and in each ch. Connect to edge by working a sl st in the next 2 sc. Turn, (9 sc).
Row 2: Ch 1, working in the blps only, 1 sc in each sc. Turn.
Row 3: Ch 1, working in the blps only, 1 sc in each sc. Turn.
Rep Rows 2 & 3 around edge. Finish off.
With gauge hook, join yarn to the bottom of the sleeve with a sl st. Sc evenly around edge. Join with a sl st. Ch 10.
Work ribbing as in ribbing for bottom and collar.
End by connecting the 1st row of the cuff to the last row with a row of sl sts, working toward the original foundation row. Finish off.
Row 1: Attach yarn with a sl st at bottom right of the sweater. Ch 1. Sc in end of next row and in each end sp across front opening of sweater, being careful to crochet evenly. Cont the row by crocheting around neck and down the left side to the other end of the sweater. Turn.
Row 2: Ch 1. Sc in each sc across. Turn.
Mark places for 6 evenly spaced buttonholes on the RS. (I set the 1st buttonhole 1" (2.5cm) from the bottom.)
Row 3 (buttonhole row): Ch 1. Sc in each sc across, being careful to [ch 2, sk 2 sts] at the locations of the place holders for buttonholes. Turn.
Row 4: Ch 1. Work sc in each sc, and 2 sc in each ch-2 sp across row. Turn.
Row 5: Rep Row 2. Finish off.
Row 1: With RS of vest facing, join with a sl st at underarm seam. Sc evenly around opening of arm. Join to 1st sc with a sl st.
Row 2: Sl st in each sc around. Finish off.
Sew buttons in place to correspond to the buttonholes.
Weave in ends.
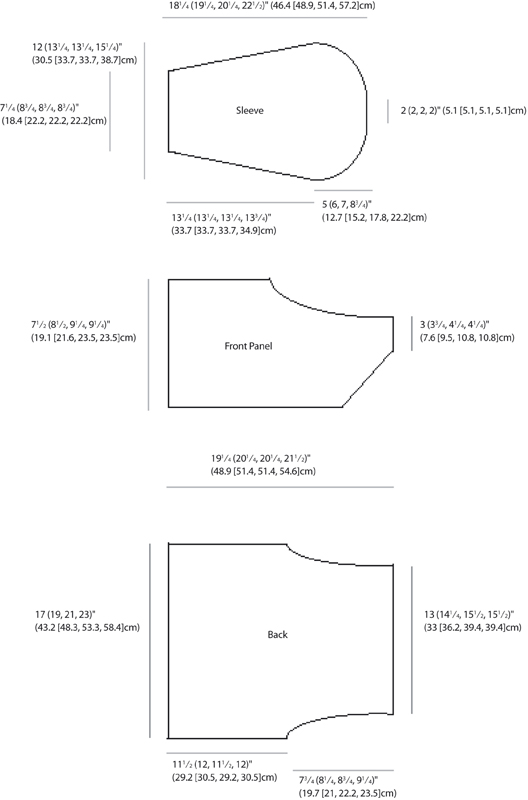
Tipperary Sweater & Vest Assembly Diagram