
Plasma cutting is a process that uses high heat created by an electric arc (plasma) and an air blast to cut through metal, leaving a very clean and easy-to-finish cut (Figure 10.1). As the electric arc travels through air, plasma is created, giving the tool its name. Where the oxygen-acetylene (oxy-acetylene) torch cutting method in Chapter 9 oxidized the material in order to cut it, the plasma cutter’s electric arc lets you cut many types of conductive metal, even nonferrous ones. Another key difference between the plasma cutter and the oxy-acetylene torch is that for most metals, compressed air can be used as the cutting force rather than compressed specialty gases. This means that you can set up a plasma cutter to run off an air compressor, a common tool in shops.

FIGURE 10.1 Plasma cutting in progress.
Plasma cutting does not require any preheating like oxy-acetylene cutting. Just like electric welding, the electric arc is capable of melting steel within milliseconds of when the trigger is pulled. This makes plasma cutting ideal for cutting thin materials such as sheet metal, in which excess heat causes warping. The heat-affected zone from plasma cutting is very small. Take a look at the left corner of the workpiece in Figure 10.2. The darker color that extends from the edge about  in is the heat-affected zone. In the same figure, the right side was cut using a torch, and the heat-affected zone extends ¼ in or more into the material.

FIGURE 10.2 Heat-affected zones, plasma left and oxy-acetylene right.
Completing the cutting process is the air blast. Pressurized air travels from the air compressor into the body of the plasma cutter, where the pressure is controlled by a built-in regulator. When you pull the trigger of the plasma gun (or torch), an electric arc is created between the work material and the plasma gun tip, and at the same time, the blast of air forces the plasma through the work material. As long as the tip is close enough to the work and the trigger is pulled, the cutting process will continue.
NOTE: When you pull the trigger on the gun at a distance where the electric arc is not completed, you still should see a plasma flame exit the tip of the torch. This is so because many plasma cutters are equipped with a high-frequency start that initiates the plasma flame within the gun. This is designed to help start the cutting process and illuminate the work area. If your machine does not show a plasma flame when you pull the trigger, it may be of the contact-start variety. Refer to the owner’s manual for more information.
There are a few downsides to owning a plasma cutter over an oxy-acetylene torch if you must decide which one to purchase. One of the downsides is the capacity to cut thicker materials. Whereas an oxy-acetylene torch can cut up to 6-in solid steel, most hobbyist or light industrial plasma cutters are not rated for over ½-in material. However, in my own work, I rarely need to cut plate that is over ¼ in thick, so a plasma cutter works fine. Another downside is cost. A light plasma cutter will run you over $800 new (plus the cost of a compressor), whereas a robust torch setup can be had for less than $600. Finally, the plasma cutter does only one thing—cut. In Chapter 9 you learned about the wide range of tasks a basic oxy-acetylene torch can accomplish. The two tools complement each other quite well, though, if you can afford both.
NOTE: Plasma cutters need a supply of dry air. Your air compressor should be outfitted with at least one air dryer that you check and empty regularly.
Figure 10.3 shows the parts of a plasma cutter.

FIGURE 10.3 Plasma cutter. (Photo courtesy of Miller Electric Mfg. Co.)
Figure 10.4 shows the parts of a plasma torch.

FIGURE 10.4 Plasma torch detail. (Photo courtesy of Miller Electric Mfg. Co.)
A few accessories can make your cuts more accurate and come standard with some plasma cutters. I am not going to review how to use these accessories, so if you have them, be sure to read the owner’s manual that came with them. These accessories include the following.
This tip must be paired with an extended electrode and allows the user to drag the tip of the plasma cutting torch along the surface of the material to be cut. The drag tip helps you to keep the proper standoff distance to make a precise cut. I prefer not to use this type of tip because it blocks my visibility around the cut line. A drag tip is shown in Figure 10.4.
Roller guides have wheels that attach near the end of the torch gun, helping to maintain proper standoff and making it easy to travel in a straight line. Roller guides provide better visibility than a drag tip. A roller guide from Miller is shown in Figure 10.5.

FIGURE 10.5 Roller guide. (Photo courtesy of Miller Electric Mfg. Co.)
The circle-cutting guide is similar to the roller guide (it may share some parts) and features an adjustable arm that turns the plasma cutting torch into a compass. This is very useful when a near-perfect circle is desired, but it isn’t needed for the projects in this book. Figure 10.6 shows a circle-cutting attachment from Miller.
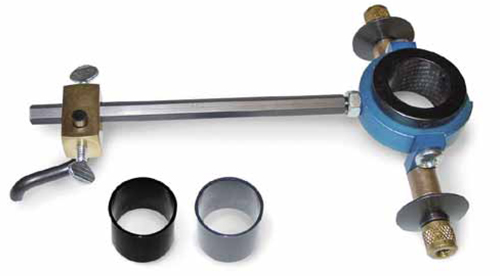
FIGURE 10.6 Circle-cutting guide. (Photo courtesy of Miller Electric Mfg. Co.)
• This device produces extreme heat of over 10,000°F. Do not handle recently cut material without gloves, and keep all skin covered at all times.
• This device produces ultraviolet (UV) light. Always wear goggles or a face mask of the proper shade (nos. 4 to 9).
• Plasma cutting produces a shower of sparks below (and sometimes above) the work material. Keep the floor below your cutting table free of flammable material.
• Plasma cutters require electricity between 110 and 660 V. Always use caution when plugging in and unplugging a plasma cutter. Never cut in wet conditions or near standing water.
• Always inspect the equipment before use, including the lead, electrical cord, and air hose. Replace damaged equipment if needed.
• Do not let recently cut material fall onto the gun lead because it will cause damage.
• Usually the end of the air hose that connects to the air compressor will allow air to escape freely when unplugged. Use caution when unplugging this end by turning your head away from the hose and firmly holding the hose end.
• Always wear shaded safety glasses, goggles, or a facemask (shade nos. 4 to 9).
• When cutting for extended periods, wear an N95 or N99 dust mask.
• Wear insulated welding gloves at all times.
• Wear heavy, nonflammable boots, uncuffed pants, and long sleeves.
• Wear clothing made of natural fibers (cotton or wool) or leather, never synthetics.
• A welding cap, bandana, or nonsynthetic hat will keep stray sparks from getting in your hair.
• Surround your work area with welding screens to minimize spark travel.
CAUTION: Plasma cutters are equipped with a safety mechanism for good reason: With a high-frequency start unit, the plasma flame at the end of the torch is very hot and dangerous. Never pull the trigger with the torch aimed at body parts or clothing.
Most plasma cutters require a constant amount of air pressure, which leaves the amperage as the one adjustment to make before you start cutting. The amperage required for a clean cut has a lot to do with the travel rate of the user, so, in theory, you could cut 22-gauge sheet metal and ¼-in plate all with the plasma cutter set to its lower amperage. However, you’d be traveling really slow through the ¼-in plate, and by turning up the amperage, you can travel faster. The only way to know how to set your amperage is to make a few test cuts and inspect them. You’ll make test cuts later in this chapter, but in general, a lower amperage setting will allow you to cut slower (good for thin sheet metal) and a higher amperage setting creates a lot more heat (good for thicker steel).
Figure 10.7 shows how cut speed relates to material thickness. To read the chart, find your material thickness on the bottom, move up until it intersects the mild-steel line, and on the left side at that intersection is the ideal cut rate given in inches per minute. Steadiness is an important factor in creating a clean cut. As you make a few cuts later in this chapter, you’ll see how every bit of user input shows in the profile of the cut material.

FIGURE 10.7 Plasma cutting chart. (Photo courtesy of Miller Electric Mfg. Co.)
A plasma cutting torch can be held and used at any angle, but for a straight cut, it should be held perpendicular to the surface. You do not need to angle the torch at the beginning of a cut or during the length of the cut, but at the end of the material if you slightly angle the torch toward the edge, you will help to completely cut through the material.
For making an angled cut, simply hold the torch at the desired angle. For example, to cut a chamfer, hold the torch at 45 degrees to the corner, and move the plasma flame along the top  in of your material to remove the corner. You can even vary the angle of your cut on the fly to make organic shapes and more.
The height from the plasma tip to the workpiece is known as standoff. This distance should be kept at  to
to  in at all times. If the nozzle touches the material, it will prematurely wear the tip out. Finding a steady position for your body during the length of the cut is critical.
1. Make sure that your workspace is clean of any flammable materials and that you are wearing all the required personal protective equipment (see earlier list).
2. If possible, use a perforated table designed for torch or plasma cutting. If no table is available, make sure that your cut line overhangs your worktable and is supported.
3. Parts to be cut should be on your cutting table and free of coatings or contaminants.
Compressed Air Check that your air compressor is on and is supplying the recommended pressure for your unit.
Body Position The best position for plasma cutting will be a position similar to the one you used for oxy-acetylene cutting. You should be braced against your table or work with your face near enough to the cut area to have good visibility. Make sure that your legs and boots are not directly below the path of the cut where sparks will fall.
1. Inspect your electrode, nozzle, and nozzle cap. Replace any worn parts before continuing. Figure 10.8 shows what a worn nozzle and electrode look like. The nozzle and electrode on the upper left should be replaced.
FIGURE 10.8 New and worn nozzle and electrodes.
2. Turn the plasma cutter on.
3. Check that the air pressure is consistent by releasing the trigger safety and pulling the trigger. Be sure to aim the gun away from your work, body, clothing, and other tools. If necessary, adjust the pressure at either the compressor or using the regulator on your machine or both.
4. Place the ground clamp as near as possible to your cut area.
5. If you already know what amperage to use, go ahead and set it now. If not, take the following steps to find out.
Finding the Correct Amperage for Plasma Cutting For this, you’re going to use a piece of 10-gauge mild steel.
1. Follow the preceding steps to prepare your machine and work area.
2. Turn the amperage of your welder all the way up, and make a perpendicular cut through the material at roughly the proper cut speed for your machine. Using Figure 10.7, my cut speed would be about 140 in/min, or a little over 2 in/s (your machine may be different depending on the output amperage).
3. When your cut is complete, inspect the side of the cut and bottom of the material, but watch out, it’s going to be hot, so be sure to wear gloves.
4. Look for a clean, straight cut edge with very little slag on the backside, like the lower cut in Figure 10.9. For thicker material, a subtle J shape in the side of your cut should appear that points in the direction opposite that of your travel.
FIGURE 10.9 Edge of a cut.
5. The second indicator of proper travel speed is slag. Figure 10.10 shows a medium to high amount of slag buildup on the back of a plasma cut. If too much slag forms, either increase your travel speed or turn up the amperage to find a comfortable setting.
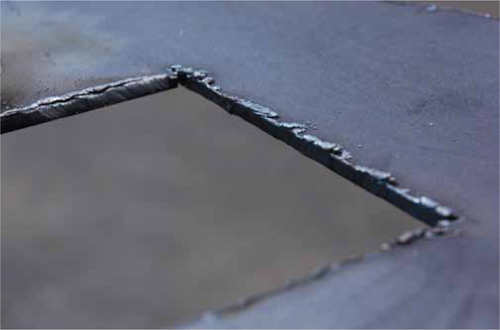
FIGURE 10.10 Slag.
Before proceeding, double-check that the grounding clamp is placed near the cut area, the machine on and set to the right amperage, and the regulator on the machine is set to the right pressure as laid out in the preceding instructions.
1. Find your preferred position, and hold the plasma torch near the starting corner of your cut, as shown in Figure 10.11.

FIGURE 10.11 Starting a cut.
2. Make sure that your standoff is about  to
to  in before you pull the trigger. When ready, release the safety mechanism on the trigger, and pull and hold the trigger.
3. Move steadily along the cut line at the proper speed while maintaining good standoff.
4. As you near the very last  in of your cut (the edge of the material), gently rotate the torch tip toward the end at about 10 degrees. That will help to undercut the last bit of material, making a complete cut.
5. Watch out for the falling material as the cut is completed.
6. Release the trigger, and rest the plasma torch on the table or back on the machine.
NOTE: The blast of air that continues after the trigger is released is normal. It helps to cool the tip and will turn off within 30 seconds. During this cooling cycle, the plasma cutting can be resumed if needed.
TIP: If at any time along the cut sparks are directed up from the material rather than through it, this means that the plasma cut did not go all the way through. If this happens, you can immediately go back over the area or return to it after the cut is complete.
After all your cuts are made, you will need to prepare the plasma cutter for its next use.
1. Gently coil the gun lead and grounding wire around the machine.
2. Turn the machine off. Most machines will go through a quick cooling cycle at this point.
3. Turn off the air compressor and/or disconnect the hose.
Following the steps in the preceding section will prepare you for making a straight cut. Two other useful tricks covered here in the practice area are plunge cutting and using a straight guide.
To create a hole in steel or start a cut line that’s not on an edge, you need to know how to plunge cut.
1. Follow the preceding instructions to set up your cut area and plasma cutter.
2. When you are ready to cut, hold the torch at 45 degrees from the surface at the proper standoff, as shown in Figure 10.12.
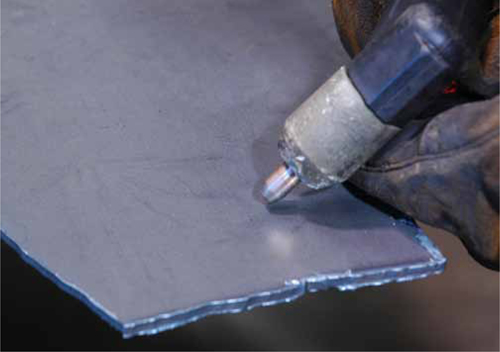
FIGURE 10.12 Preparing for a plunge cut.
CAUTION: Do not angle the torch toward yourself or anyone else for a plunge cut because the first second or two of this cut produces a shower of sparks above the material and in the direction of the angled torch.
3. Release the safety, and pull the trigger when you are ready.
4. Sparks should be created above the material, and once the sparks go below, you can angle the torch back to perpendicular.
5. If you just want to make a small hole, now you may release the trigger. However, from this point on, you also may move in any direction on the surface of the steel.
6. Figure 10.13 shows some facial features for a small jellyfish I made using plunge cuts.
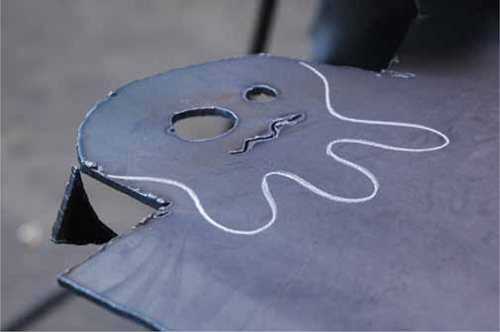
FIGURE 10.13 Plasma-cut jellyfish face.
7. When you are finished, shut down the torch using the method described earlier.
No fancy guides are needed to cut an extremely straight line using a plasma cutter, just a spare piece of straight steel and some clamps. For this practice, choose a length of steel against which you can rest the nozzle or nozzle cap of your torch, as in Figure 10.14. This is your guide. This piece needs to be thicker than ¼ in but not more than about an inch (enough to maintain proper standoff but not interfere with the cup).
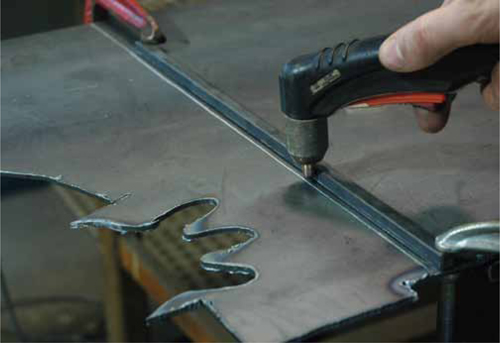
FIGURE 10.14 A  -in solid-stock guide.
1. Draw a straight line across the sheet metal using your guide.
2. Position the guide at a distance from your line equal to half the width of your nozzle cap or nozzle so that the center of the nozzle is directly on top of the cut line.
3. Clamp your guide to the workpiece in a way that does not interfere with the path of the plasma gun. You also can hold the guide stationary with magnets, but it could shift on you unexpectedly during the cut.
4. Cut your material, resting the plasma gun gently on your guide as you move along the cut line. Too much pressure on the guide and you’ll have a hard time keeping steady.
5. Figure 10.15 shows my progress along the cut line.

FIGURE 10.15 Moving along the guide.
6. Make sure to give your cutoff work a place to fall so that it doesn’t land on your toes or the plasma lead.
7. Shut down the plasma cutter, and store any hot material safely.