This may be the oddest project in this book, but I think it’s a really fun one for newcomers to see that the metal–inert gas (MIG) welder can be an art-making machine. For this project you’ll ignore most of what you’ve learned about welder settings and weld orientation and focus on starting and stopping the weld. All you need to create sculpture with the MIG welder is a starting surface. If you work slowly from there, you can build sculptural shapes using only welding wire. With a bit of patience, you can make some pretty impressive pieces with a really unique look. Figure 14.1 shows my MIG-welded igloo. With this project, you can make animals, structures, pots, plant forms, and more. Think of how the form you select would connect to the ground, and work up from there using layers. These small projects can make fun gifts and are a good way to get used to the low-lighting environment of MIG welding.

FIGURE 14.1 A hollow MIG-welded sculpture.
• Any scrap of steel larger than a quarter
• An angle grinder with a flap disk
• A MIG welder
• Personal protective equipment for MIG welding
1. Clean your scrap of steel using the flap disk to help promote a good arc.
2. Set your welder to the appropriate settings for your material—but turn the wire feed up slightly. By turning the wire speed up, you’ll add more filler than necessary with each weld, helping you to build something from nothing.
3. Create a series of tack welds, one on top of another, to build up a three-dimensional form.
4. Wait for each tack weld to cool off between welds to make the most of the filler material. If you welded a solid bead for this exercise, the heat would start to burn away the base material and filler before you could build a structure. Figure 14.2 shows progress on my igloo form.
NOTE: This series of small tack welds can be used to fill small gaps in various materials. If the ratio of filler metal to heat is in favor of the filler, you can add material quickly without burning away much of the base material.
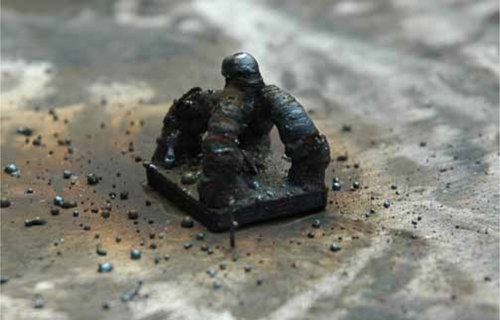
5. Figure 14.3 shows another structure made using just filler metal. Note the excess spatter around the piece. Remember that when MIG welding, and especially with excess filler, spatter will occur. Even though it’s sort of messy, the workpiece is in good shape. If you notice this much spatter under normal operation, you may want to try turning down the wire feed slightly.
TIP: If you ever have trouble starting the weld arc when you pull the MIG welder trigger, try cleaning the surface of your material with a wire brush, and double-check that your ground is getting a solid connection.
FIGURE 14.2 Progress.

FIGURE 14.3 Extra filler and spatter.