Chapter 6
MEMORY QUILTS: A WAY TO CELEBRATE LIVES
— By Linda Pool —
In this chapter, you will learn how to share family stories in a tangible way by transforming your memories into quilts that can be passed down generation after generation.
The much-loved tradition of using up instead of throwing out has been adopted in the craft-turned-art of quilting. This chapter helps you choose a theme and create your own memoir quilt from keepsakes and clothes. Plus, it gives practical advice on how to use images to incorporate bits of vintage documents and photos into your quilts. Friends and family benefit from these unique ways of storytelling.
Choosing Your Quilt Theme
If you sew or craft, quilting offers you a way to turn your art into memoir. Quilting is one of the most diverse and practical ways to capture the stories of your life or the life of a loved one. A quilt will be cherished for generations. Even after it’s no longer used for warmth and comfort, it might be hung on a rack or on a wall and the beauty and charm of its design will live on.
Of all the inspirations for memoir quilts, the challenge is to choose just one subject or idea, one person, or one family as the theme and focal point of your quilt. Ideas can come from many different places: a special memory, a family holiday, a friend’s wedding, or the loss of a loved one or a special pet. Regardless of where the ideas come from, memoir quilts can serve important purposes: healing, preserving family history, and memorializing loved ones. The possibilities are endless and someone is always excited to receive a quilt full of memories.
Memories Are a Good Starting Place
Memorable moments are good starting places for creating a quilt that tells a story. Happy memories and the joy of life shared with others lead us to want to create something tangible, something that we can put our hands on as a reminder of the special moments we have shared with family and friends. Sad memories, too, can be used in a memoir quilt to bring closure and comfort after an unexpected or traumatic event.
What kinds of moments might inspire a story quilt?
Celebrations are memorialized in scrapbooks all the time. How about making a quilt to tell the story of your family’s holiday celebrations or other special events, like vacations? You could include opera ticket stubs from Vienna, Austria; football tickets from the Orange Bowl; Mickey Mouse’s autograph; and other scraps that remind you of happy times spent with those you love. Combine these images with a few words describing the most memorable parts of these events, print them onto fabric, and sew them into your quilt.
A wedding quilt, a centuries-old tradition, could be the basis for a memoir quilt that tells the story of the happy couple’s first meeting, significant milestones, the best man’s toast at the wedding, and other meaningful moments in their lives.
Pets are another favorite quilt theme. Fun stories and pictures of the animals you have loved, or of one special pet, when transferred to fabric, could be stitched into a lovely little quilt.
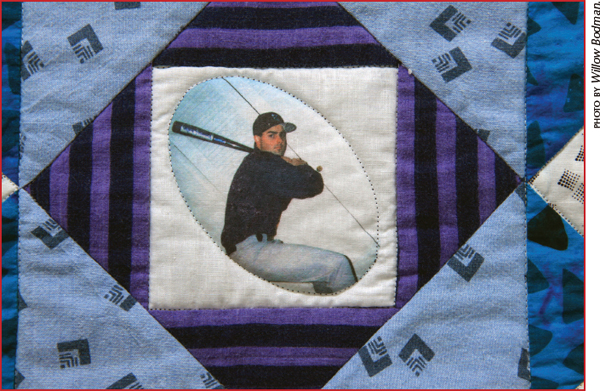
Hobbies are another starting place for remembered moments that tell a story. Imagine the joy you would bring to a boy who loves to play baseball if you made him a quilt that featured a photo of him wearing his uniform and holding his bat, standing tall and proud. Now imagine including a similar photo from each year that he played ball, showing his growth and his changing teams as he has matured. Add a few quotes or highlights of his biggest baseball moments. What a treasure for him!
A wedding memory, 19” × 20”. These images, photographed at a nephew’s outdoor wedding, give charming personal glimpses into the bride’s and groom’s personalities. Put into a quilt, these memories will bring to mind their very special day whenever they see the quilt hanging on their wall. Quilt by Linda Pool.
Chris’s college quilt, 72” × 90”. Pictures recalling my son Chris’s infancy, school days, hobbies, and even girlfriend at the time are included in this quilt. I made it for my son Chris to use on his college bed. The girlfriend later became his wife. Quilt by Linda Pool.
Chris’s baseball moment. This close-up of Chris’s college quilt captures one of his team memories from baseball.
Chris’s college quilt was made out of my son Chris’s cotton shirts that he had worn in his high school years. The photos in the center squares of the quilt included his baby picture; school, sports, and prom photos; and even his girlfriend, who is now his wife.
Travel and places lived make wonderful themes for a memoir quilt. My mother and father, for example, recently traveled to Pennsylvania to visit the places they lived after they married. They photographed each house they had lived in, places where I had lived since my birth. This is a great inspiration for a quilt. And people who are in the military or other occupations that require them to move around might have lived in so many places that, in their mind, they all run together and get mixed up. What happened here, or was it there? It might give a child some form of stability to see an image of each house or apartment that he or she lived in through the years. Each photo might jog a story of a person or event that happened while the family lived in that location.
Careers or hobbies are another rich source of inspiration for a memoir quilt. If you are an artist, for example, you could make a memoir quilt that tells the story of your artwork, using the actual images to create the design. Your growth as an artist might be visible from the changes in your images and subject matter.
I love to take pictures. As a sample for a class that I teach, I made a quilt of my floral photographs. These photographs were taken in tropical, desert, hot-house, home, and many other locations throughout my travels. A label can be included on the back of the quilt to identify the flower and where the picture was taken. This would tell future generations some special things about me. I love flowers and travel!
Quilts That Heal a Loss
Making a quilt can help you heal from traumatic events such as divorce or loss of a loved one.
Divorce. When I think of healing quilts, one of the first quilts that come to mind is a quilt made in May 1991, by Katharine Brainard, just after she found her husband with his twenty-three-year-old secretary, on his new boat, in a compromising position. She made the quilt to work through her anger, hurt, and disappointment in her unfaithful husband.
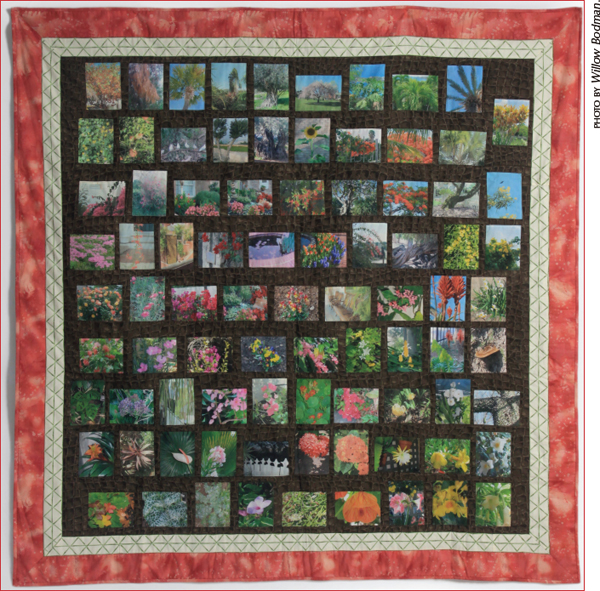
My travels in florals, 63” × 63”. Flowers draw my attention wherever I am, so I document my travels with the local vegetation. These photos were taken all over the world. Quilt by Linda Pool.
Katharine added words and phrases to the quilt by printing and writing them onto the fabric. For example, she used the words “road kill” and made tire track marks on the quilt by actually driving over the quilt fabric with the wheels of her car. This acted-out visual was dramatic enough to help work out some of her destructive feelings.
The quilt has been displayed for the public to see and has elicited different reactions. A husband and wife (therapists and contemporary art collectors) purchased the quilt because they liked its visual appeal, its humor, and “its value as a constructive expression of powerful feelings,” as Susan Baer of The Baltimore Sun said.
Katharine said she had an enormous sense of relief after she put the last stitch in the quilt. She said she had shared all her feelings about her husband and their divorce through the images on the quilt, and this gave her “closure.”
Loss of a child/sibling/parent/friend. The death of someone you love is always a very emotional time in your life. Making a quilt can help you work through the deep feelings you have about the loss of your loved one. Planning and making a quilt gives you time to think about the person you are missing and what he or she meant to you, and it gives your hands something to do while you are thinking. The quilt will be something tangible to hold and snuggle with, bringing you a little closer to that person.
When my brother Daniel passed away in a mountain-climbing accident in Colorado, I took his shirts back to Virginia and made a quilt for his son’s tenth birthday. Working with the fabrics, I could still smell my brother’s fragrance, and this made him a little more alive to me. Making a quilt from the deceased person’s clothing will not make the loss any less painful. However, making it for another person is such a positive act that it will help heal your heart.

Eric’s quilt, 56” × 87”. This quilt features my brother Daniel’s shirt pockets. After Daniel died in a mountain climbing accident, I made the quilt for his son Eric to bring his father “to life.” Quilt by Linda Pool.
When Eric recognized the fabrics in the quilt, i.e., his dad’s shirts worn so often around the house, the quilt became a precious, up-close reminder that his dad was so much a part of his life. The remembrance this invokes will keep memories alive in a more real way.
Imagine making a quilt with just the pockets of a pile of shirts. What treasures could be put into those pockets? For his son’s quilt, the only part I used of my brother Daniel’s shirts was the pockets. I later made quilts for my sister-in-law and two nieces with the leftover parts of the shirts.
My brother Daniel rode his bicycle from coast to coast of the United States in 1980, and he wrote a journal entry every day about his experiences along the way. He also wrote journal entries of each of his mountain climbs. His journals were, and still are, a treasure for the family he left behind.
Daniel wrote his thoughts on God and life and relationships and the wonder of his experiences with nature. Some of Daniel’s comments were perfect for lessons to help his children grow to be happy and emotionally healthy adults. I took some of his words, in his own hand-writing, and also typed them and transferred them onto fabric. I collected photos of Daniel and the family, specifically ones that showed Daniel with his arm around his son or his son sitting on his shoulders, and transferred them onto fabric. I stitched the pieces of fabric to ribbons and placed them in the pockets with the ribbon attached to the pocket edge. This way the words will never get lost and separated from the quilt.
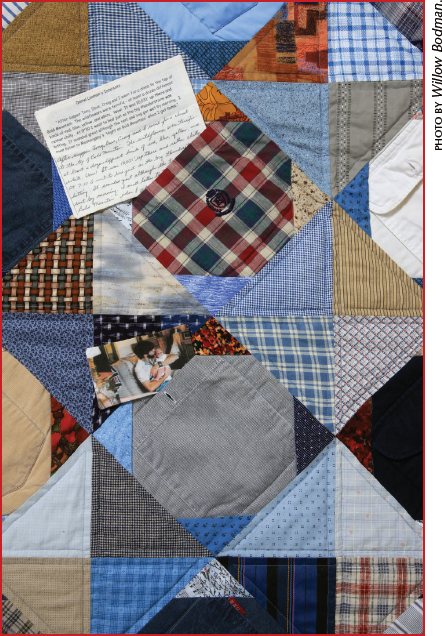
Pocket contents. Excerpts from Daniel’s outdoor adventure journal are stuffed into each pocket of the quilt to help Eric know who his father was. On one side of each fabric block is Daniel’s handwritten journal entry and on the other side is its typed version. I put pictures of Eric with his father in the pockets with buttons.
My sister-in-law told me one day that the whole family goes to the quilt to reach into the pockets and read Daniel’s words or see his picture, and that has helped them to heal from the hurt of his loss.

Christie’s quilt, 62” × 90”. I made two similar quilts for Daniel’s daughters with the leftover fabric from the shirts.
Quilts That Preserve Family History
You can also make quilts to preserve family history using photos, documents, correspondence, and other trinkets that trigger memories and, taken together, tell a large (or small) story. First, think of your theme, such as ancestors, and then select the artifacts that will make the quilt a wonderful heirloom. Your artifacts could include photographs, documents (such as a marriage license), correspondence, and/or trinkets or other physical objects that jog memory.
Old sepia-toned photos that have been passed down in the family for generations or just found in grandma’s attic can be shared and documented by making a family history quilt. It is a treasure to have a photo history of what your ancestors looked like to conjecture about where Grandma got her big nose, to notice how the men in the family tend to be tall like Great-Grandpa Henry, and to confirm once and for all who actually wore that old dress spotted in a trunk in the attic. Could that really be Aunt Alice wearing it in the photo where she is leaning on the fence watching someone feeding the chickens? What a treasure!
Documents and other important papers could be included in a family history quilt and will add so much more interest and information to the pictures you have used. Do you have a copy of an old marriage license or birth certificate from your ancestors? Maybe you have one of their old school report cards, or a baptism certificate. If you include the names of the people pictured in your quilt, the documents with the names on them will be self-explanatory.

Grandma’s report card, 20” × 26”. This is my maternal grandmother’s picture, taken when she would have been in the fourth grade. We found a treasure when we found her fourth-grade school report card. C. 1912/1913. Quilt by Linda Pool.
Correspondence, such as old love letters between your grandparents or a note of commendation sent to your grandfather when he was in the service, copied and included on the quilt, will be a treasured addition. And trinkets or other items that jog memory can help tell important family stories. My mother-in-law, for example, saved the “Do Not Disturb” sign sporting the logo of the Ritz, the hotel where she and my father-in-law stayed the first night of their honeymoon. The image of the sign is included in a quilt about her and my father-in-law, as it meant a lot to her and she mentioned it to me many times.

The Evans/Pool quilt, 27” × 26”. Copies of special keepsakes were combined with copies of photos to tell a more complete story of my in-laws. Quilt by Linda Pool.
Adding key words and phrases will create yet another, deeper dimension. If you are making a quilt about a person, you could include words to represent personality traits, such as honest, trustworthy, loving, kind, or giving. If your quilt is about a treasured memory, some of the words you could use might be “baked us cookies,” “pushed us on the swing,” “gave hugs and kisses,” “doctored skinned knees,” etc. Your mother or grandmother might have had a favorite saying that she repeated often and that would benefit future generations, such as: “If your dreams turn to dust, vacuum,” or “If you want to make friends, be a friend.”

Man’s suit and tie quilt, 13” × 19”. My best friend Barb made this little wall-hanging quilt and three others for family members after her father passed away. She made the quilt using her father’s best suit and some of his ties. Quilt by Barb Celio.
Friendship Quilts
Signature quilts or autograph quilts are another form of memoir quilt. They are also referred to as “friendship” quilts.
To make a friendship quilt, collect signatures of friends and family on fabric and stitch them into special themed quilts. Record your family names for posterity or make an autograph quilt as encouragement for a friend going through a rough time. Memorialize an event, group, or organization of people by collecting their signatures and stitching them into a signature quilt.

Friendship quilt, 28” × 46”. Seventy-one of my quilting friends pieced and signed these mini-quilt blocks. Barb Celio stitched them together and gave them to me after my year as president of our local quilt guild. What a joy to look at the names and remember friends who were a part of my life in the guild. Quilt by Linda Pool.
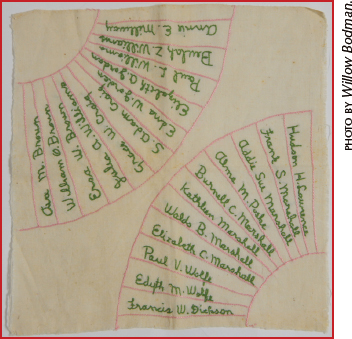
Antique signature block, 12” × 12”. Signatures can be collected and stitched into quilts for a memoir of groups of people. The signatures were embroidered onto this antique quilt block. For a faster way to get the same effect, prepare your fabric by stabilizing the back with freezer paper, grab a permanent ink pen, and collect the signatures.
Many quilts from the past boast a large sampling of family surnames as groups of people signed fabric and included these signatures into quilt blocks. These signatures not only represented the makers of the quilt blocks, but the participants in an organization, the members of a family, or even in some cases, the signatures of very important people such as the presidents of the United States, political leaders, actors, pastors, and many other groups and clubs. Historians and genealogists study these signature quilts to discern the history and community of certain regions of the country. These signature quilts tell many stories just by knowing who was involved in the creation of the quilt.
Quilts That Memorialize Loved Ones
Creating a quilt that memorializes loved ones not only helps you come to terms with their loss but also creates an heirloom every bit as important as the historical statues or modern websites commonly used for this purpose. And, it’s something to carry with you and keep you warm.
When my mother passed away, I collected a lot of her clothes that I thought would work for making quilts and made seven of them, one each for my father, my siblings, myself, Mom’s best friend, and a lady that my mother helped raise. The seven quilts all used the same design for the layout. I chose to work with squares. The square is simply one of the easiest and fastest shapes to piece together.
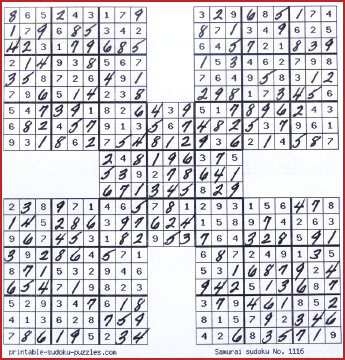
Sudoku drawing. A drawing like this was used for the layout of nine different fabrics for Mom’s Clothing Quilts on pages 116 and 117.
But now, what kind of interesting pattern could I use to lay out the fabrics so that the quilt would not just be random squares sewn together? Aha! I remembered the Sudoku puzzle that my daughter, Genelle, had finished when she was home for a visit. It had five blocks of 9 × 9 squares, wherein the five puzzles overlap into one larger puzzle. Numbers are placed in the squares so that no number is repeated in a square of nine or in the lines going vertically or horizontally. Genelle had completed the puzzle successfully, and I asked her for a copy of it. I decided that I would use her completed puzzle as the layout for nine different fabrics in each of the quilts I was making. My parents and siblings loved to play games, so using a game for the quilt’s fabric layout was appropriate.

Mom’s clothing quilt, 53½” × 68”. I made this quilt for my father from my mother’s “everyday” clothing. Three extra rows of squares at the left and right of the Sudoku layout lengthen the quilt. Quilt by Linda Pool.
Mom’s clothing quilt, 53½” × 68”. This quilt uses the same layout of squares as my father’s quilt but with different coloration. Quilt by Linda Pool.
This may sound like all the quilts looked alike; however, they were all made using different pieces of clothing, thus different colors and prints, so they were all unique. Some had an overall pink look and some blue. It was fun to lay out the pieces. I chose a number for each of the nine fabrics. As I held the finished Sudoku puzzle in one hand, I laid down the precut fabric squares in the same configuration as the numbers on the puzzle. Since I did not want the quilts to be square, I added three extra rows of blocks and strips of fabric to both ends to make the quilts rectangular.
Now the quilts not only have a very mixed-up layout of colors and prints, they also include a “hidden” puzzle for someone to study and decipher. What fun! A sort of game to keep you occupied while covered with the quilt. All this was created from patches of clothes that I recognized as having been worn by my mother. Seeing the fabrics brings back memories of things we did together while she wore that clothing. I spent about a month working on these seven quilts, and it helped so much to heal from the loss of her.
Choosing Your Fabrics
The best fabrics for a quilt are 100 percent cotton; however, cotton/polyester blends will work. Light-weight fabrics are best. If you want to make a quilt after someone passes away, and would like the quilt to be made from the person’s clothing, collect a pile of his or her clothes (both everyday and nice items) that are cotton or cotton blends and are not too thick in weave or texture. You will need solids as well as prints—and lots of color. If using men’s shirts, you will need about eight to ten shirts to make a twin-bed-sized quilt.
Jeans
Many quilts have been made from old blue jeans that have worn out or been discarded. Whenever you see a quilt made from jeans, you will see parts with pockets and parts with the golden decorative stitching used on the jeans. These quilts can be rather heavy but are warm and well loved, especially by teenagers. This type of quilt makes a great family room quilt to snuggle under while watching TV.
T-Shirts
What family does not have a pile of T-shirts saved because they have a logo from a beloved sports team, an organization they support, summer camp, a yearly reunion, swim team, a school, etc.? One way to keep and preserve this logo after the shirt is no longer worn is to make a quilt with it.

Don’s T-shirt quilt, 56½” × 66”. Some of my husband’s favorite hobbies and interests are memorialized in this T-shirt quilt. It was good to exchange a bag of old T-shirts for a quilt to keep us warm on a cold winter evening in front of the TV. Quilt by Linda Pool.
T-shirt fabric is knit and therefore stretchy. These stretchy fabrics need to be stabilized if used to make a quilt. Purchase an iron-on tricot stabilizer from the local fabric store and iron it to the back of the logo the size of the square or rectangle that you will be cutting from the shirt. It is best to iron on this stabilizer before cutting out the logo. If you purchase the stabilizer intended for knits, the fabric will still feel soft and pliable after it is applied, but will not stretch out of shape. Using this stabilizer will make all the difference in determining whether or not you like the finished quilt.
T-shirt quilts that have not been stabilized will have wrinkles, lumps, and bumps. Take the time to do this important step of stabilizing so that your T-shirt quilt can last a long time and tell the story of the person it was made for.
Conversation Prints
Many fabrics are printed with thematic prints and are called conversation prints. You can find fabrics with sports balls, sports players, makeup items, animals, hobbies, space objects, airplanes, tractors, furniture, baskets, travel, games, food, collectibles, money, old advertisements, cleaning products, movie stars, and just about anything and everything there is that has been printed on fabric. If you find a fabric store with a good supply of these conversation prints, you can include these picture fabrics to explain the hobbies, favorites, and personality of the person you are making the quilt for and about.
Conversation prints are especially interesting for children. They will find an endless supply of interesting things to look at when wrapped up in their quilt.

Conversation prints. Children love quilts using fabrics with images of some of their favorite things.
Grandma’s Scrap Bag
If your great-grandmother was a quilter, she most likely made her quilts from the family’s worn-out clothing or she saved the scraps from making new clothes. If you have inherited her scrap bag, you have a treasure trove of fabrics to use to make a memoir quilt. You may not know who wore which fabric; however, just having a collection of older fabrics is a good starting point for a lovely vintage quilt.
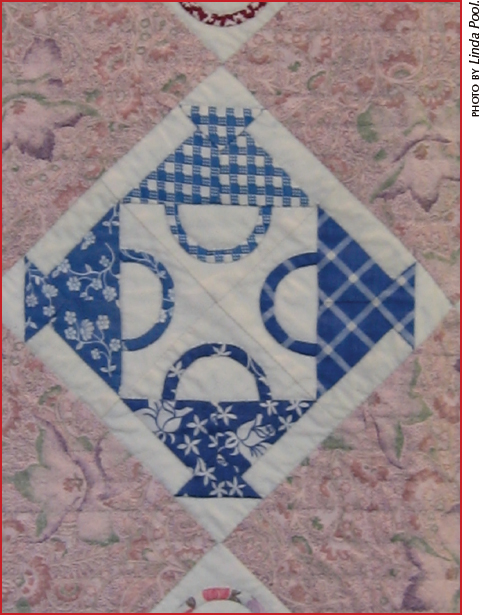
Vintage baskets quilt. My friend had fabrics from the 1920s through 1950s that her mother-in-law had collected. I used them to hand-piece and appliqué 210 different mini basket blocks and made this twin-sized quilt and two wall hangings that I presented to the collector’s granddaughters. Gayle Ropp hand-quilted the quilt with the author’s designs. Quilt by Linda Pool.

Vintage hearts quilt, 17” × 21”. These hearts were hand-appliquéd using the same collection of 1920s to 1950s fabrics, as shown in the vintage baskets quilt. Quilt by Linda Pool.
Incorporating Your Stories into the Quilt
Fabrics aren’t the only vintage items you can use in creating a memoir quilt. Well-chosen artifacts such as photos, letters, and important papers help you tell your stories and help you make a connection to the past. When I found an old marriage license that belonged to my great grandparents, it was a windfall! They actually touched the paper, cherished it, and kept it in a safe place. It is as though I touched their lives in a small way. This special document can still be kept in a safe place even as I use it to tell their story in a memoir quilt.

Paternal great-grandparents’ marriage license and photo, 1901. I shrank the image of my great-grandparents’ marriage license and printed it onto a Printed Treasures fabric sheet along with their photo. The technique is explained in the section “Printing Words and Pictures Directly onto Fabric.” I will cut the marriage license and picture apart to use in a quilt.
A Memoir Fabric “Scrap” Book
Try a new concept by making a scrapbook from fabric. Saving scraps and pieces of our family’s past is something that most mothers do. We save that cute little baby bonnet, the tiny pair of soft shoes, the bib with the baby’s name embroidered on it. You may have a snippet of hair from the baby’s first haircut you can put in a little pouch and include on a fabric scrapbook page. Your child may also have a box of saved trinkets. You can sew these treasures, photos copied on fabric, baubles, and all kinds of memorabilia onto the pages of a fabric book for an organized way of displaying these precious memories.
Use decorator fabric samples for the book’s pages, with clothing, lace, and doilies as the backdrop for displaying your treasures. Trim pages with handmade braids, gimp, twill, or ribbon, but don’t be too neat. Raw edges are the charm of a fabric scrapbook. Choose a theme for each page, such as father, mother, sister, brother, sports, hobbies, etc. Make mini fabric photo albums to display multiple pictures on a page. Use your imagination and display items in a creative way, such as baby dresses hanging on a clothes line and tucked into a makeshift pocket.

Genelle’s fabric scrap book 1, 22” × 13”. I made this fabric scrapbook for my daughter Genelle and gave it to her at her bridal shower. I included many items from her past, such as her first baby bonnet and a picture of her wearing the bonnet and matching dress. The roses on the page are made from baby socks. The following page has a picture of newborn Genelle under the front panel of one of my maternity dresses. Fabric scrap book by Linda Pool.
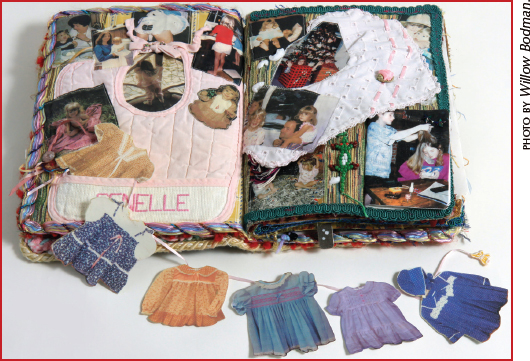
Genelle’s fabric scrap book 2, 22” × 13”. On the left page I strung images of Genelle’s baby dresses, stabilized with iron-on Pellon, and tucked them into the pocket of her embroidered bib. The opposite page represents moments she shared with her brother, Kevin. Under the eyelet bib from one of her dresses are three pictures of Kevin wearing Genelle’s dresses; she used her little brother as a living doll to dress up while playing. Fabric scrapbook by Linda Pool.
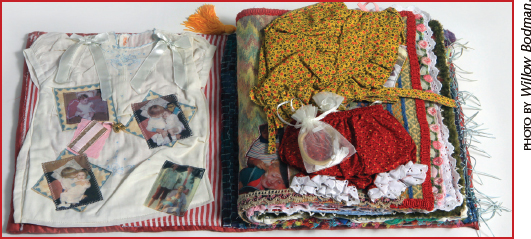
Stephanie’s fabric scrap book, 22” × 13”. This book belongs to my daughter, Stephanie. On the left page are her baby dress and pictures of her wearing it while held by her brother, Chris. On the right are her bonnet and a doll’s drawers used as the pocket for holding little cloth bags of snippets of her “spun-gold” baby hair. Fabric scrap book by Linda Pool.
Photo Quilt Layouts
Photos are wonderful additions to a memoir quilt. Let’s look at how you can use photos, fabric, and fabric panels to create interesting patterns.
Simple Photo Layouts
When you make a quilt using photos, the design for the quilt should be kept simple. The photos will be the main interest of the quilt, and you would not want to detract from the viewer’s appreciation of them by having an intricately pieced block. Words can be typed to fit the size of the spaces in your quilt block squares and then transferred onto fabric to stitch on the front or back of the quilt. These words will help to tell the story of your photos in the quilt.
Search for quilt block designs that have open squares in the middle of the block. This is a good location for a photo or words. Other quilt block designs have squares at each corner. This layout might work as well. These three blocks are all drawn using a nine-patch design. Each whole block is divided into 3 × 3 squares and then divided further for working with its distinct block design.

Simple quilt blocks. The center square and corner squares of these quilt blocks are good spots to place the pictures for a memoir quilt.

My family, 35” × 47”. I gathered some of my favorite pictures of my children and grandchildren, inkjet-printed them onto treated fabric for permanency, and included them in this colorful quilt. Quilt by Linda Pool.
Be sure the fabrics you add to surround the photo block don’t detract from the photo. Use colors that complement the colors in the photo and keep the fabric prints simple or low-contrast so as not to draw the eye away from the photos.
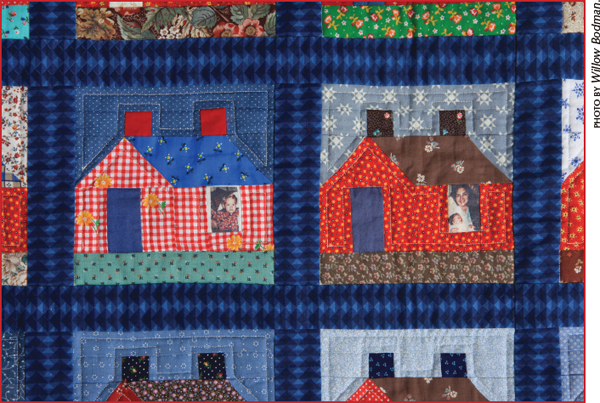
Chris’s house quilt. When making a house design quilt, stitch fabric pictures into windows and doors to give the impression that people live there. Here are pictures of my son Chris and of me holding him in my arms. Quilt by Linda Pool.
In a house quilt made for my son Chris, I added photo transfers in the windows and doors of the houses. The photos are an afterthought as they do not stand out with the bright colors of the houses and roofs. In this case, this is as it should be; the people look like they are inside the houses. That’s me holding Chris in the window.

Family tree, 26½” × 36”. It was fun to play with this tree-design fabric panel, to which I added ironed-on photos to make it a true “family tree.” Quilt by Linda Pool.
Photo Montage
You might even want to make a photo memory quilt that is not in the form of blocks but that has an overall layout of pictures. You may like the idea of appliquéing a tree to a light colored fabric and using the iron-on heat transfer technique to apply the photos directly to the background fabric as leaves on the tree.
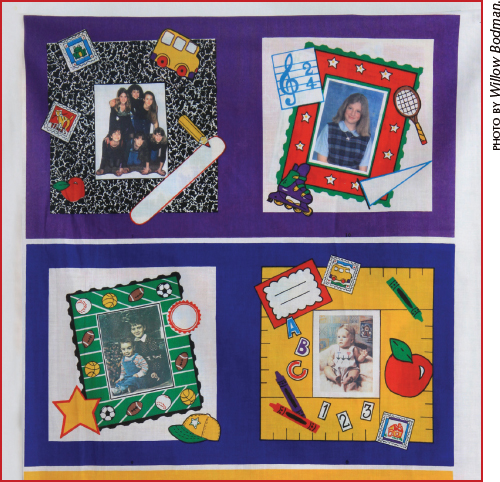
School days. I purchased these fabric panels to make a fabric book with ironed-on images. I changed my mind about making a book and will include these framed photos in a quilt instead.
Printed Fabric Panels
Sometimes you can find fabrics printed with panels of bordered empty spaces meant to be used as signature blocks for labeling your quilts. There might be a dozen or more different designs on a panel. You can transfer your photos directly into these bordered spaces.

Film strip quilt, 22” × 38”. I picked out multiple images of my daughter Stephanie and me in period costumes, printed them out using my computer’s CAMEDIA Master program (index size), and printed them onto heat transfer paper. Then I cut each to fit one of the filmstrip-frame spaces and ironed them onto the fabric. Quilt by Linda Pool.
When I found this fabric, which resembles the film used to make movies, I used the blank spaces for transferred images. The “filmstrip” contains photos of my daughter Stephanie, me, and some of our friends in period attire for historic reenactments.

Family heritage quilt, 50” × 64”. These ironed-on images were fit into the frames of this pre-printed fabric intended for making a fabric book. Repurposing the fabric panels made this a wonderful quilt. Pearls were hand-stitched to the frames. Quilt by Linda Pool.
This panel was intended to be stitched into a fabric book with photos ironed onto the fabric pages, but I made it into a whole quilt instead. Notice how the photos do not fit exactly into the white bordered space. This does not mar the look of the overall quilt block. You can also group smaller photos inside one frame.
Now, let’s talk about transferring photos.
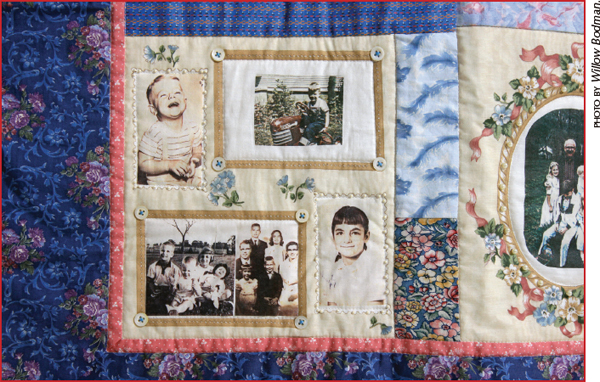
Family heritage quilt close-up. This block combines my husband Don’s picture as a two- to three-year-old and my picture as a five-year-old. You can group smaller photos inside one frame to take advantage of the space and incorporate as many images as you can to tell the story. Quilt by Linda Pool.
Floral-bordered photo. I ironed this image of a charming little girl onto an empty floral frame, one of the many different floral frames printed on this fabric panel.
Preparing Images for Transfer
The first thing I need to say here is that you are NOT going to ruin any of your old or new photos or documents by doing any of the processes that I am about to discuss. You will only be using the photos and documents to make copies. They will either be scanned into the computer or laid onto the surface of a flat-bed printer for copying. Breathe freely! You will NOT lose your originals.
You will need a program for your computer that will let you manipulate your images; this includes getting rid of red-eye, cutting out unwanted background, darkening or lightening photos, etc. Check your local computer store for such a program, maybe read some online software reviews, and even take a class if you need to. This software is not a necessity, but you can get a more professional look by cleaning up your photos for use in your quilt.
A flat-bed copier/scanner/printer is great for working with photos. If you have a photo that is not already on the computer (transferred from your camera or downloaded), you can scan the image into the computer for clean up and print out.
If an image or writing on a document is too light to make a good copy, the lighter/darker setting on the printer can be changed to several settings darker for a better print.
The images that transfer best are clear ones with high contrast and bright colors. This is not to say that black-and-white photos do not transfer and work well; they do. If you look at an old black-and-white photo, you will find that it is not really true black and white but brown and off-white. If you want this same old photo look, copy it onto the fabric using the color setting. You will get a truer copy of the original with its sepia (brown) tones.
Printing Words and Pictures Directly Onto Fabric
You can print the words you would like to use directly onto the fabric by using the computer and printer. If printing directly to fabric, the words will be in the same order as they are on the computer screen. The reason I mention this here is that the words will be in reverse if using the Heat Transfer method as in the following instruction.
The fabric you are printing onto will need to be treated with a solution that makes the inkjet ink permanent on the fabric. If the fabric is not treated, the inks will wash away. (This kind of printing onto fabric cannot be done with a laser printer.)
There is a product you can purchase to treat the fabric yourself called Bubble Jet Set 2000. The instructions will be included with the purchase. If you want to do this technique, you will need to iron Reynolds brand freezer paper (purchased at the grocery store) to the back of the treated fabric, cut it the size of a sheet of printer paper, trim off all loose threads, and then send it through the printer. The paper will be removed and, after the print has dried for at least thirty minutes, the image will need to be rinsed to remove any excess ink from the surface.
If you prefer to purchase fabric already treated with the solution, there are a couple I recommend for colorfast printing of words and photos: Printed Treasures by Milliken and Sew-in Colorfast Fabric Sheets for Ink Jet Printers by June Tailor, Inc.
Transferring Handwritten Words to Your Quilt
Several different methods can be used to get words onto your fabrics. Words can be hand-colored onto fabric using permanent markers, and they also can be printed directly onto fabric. If printing the words directly onto fabric, there are several important steps you need to follow.
You want the fabric to be a white or a light color and 100 percent cotton or poly–cotton blend with a tight weave. To make the fabric as taut as possible so the pen strokes will flow easily and smoothly, iron Reynold’s Freezer Paper (purchased at the grocery store) onto the fabric, placing the wax side against the back side of the fabric. It takes very little time, two to three seconds, and just a medium/hot iron temperature to adhere the freezer paper to the back of the fabric.
If you choose to handwrite words on your quilt, you can do it by tracing. Type the words on your computer and then change the font style. Choose between fancy letters or very simple straight letters that look like handwriting or printing. Change the font size to the one you want for the quilt and print the words out on regular paper. This can then be used for tracing the letters and words onto the fabric.
The best type of pen for this technique is one of the permanent ink pens made for writing on fabrics. Quilters tend to choose Pigma Micron pens by Sakura Color Corporation, which come in a variety of colors and can be purchased at your craft or fabric store. They have a permanent ink and a very small point so you can get a lot of detail with very narrow lines without the ink running and blurring the image.
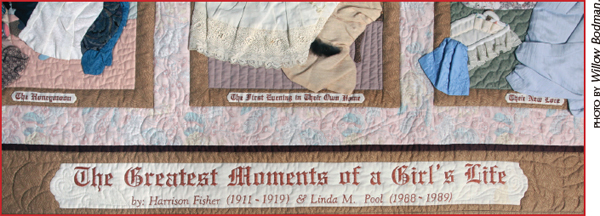
Words from “The Greatest Moments of a Girl’s Life.” Illustrations by Harrison Fisher inspired me to make this quilt. I hand-inked words using Pigma Micron pens to explain the meaning of the pictures in the quilt. You can use this hand-inked technique to put words and phrases onto your quilt. Quilt by Linda Pool.
Place the paper with your printed words under the paper-backed fabric and trace the outline of the letters onto the fabric. If you can’t see the printed words, tape these layers on a light box or window glass, where the light comes through from the back of the paper. After you trace the outline of the letters, fill in the letters with the Pigma pen. Do this on a flat surface.
The Pigma pens come in several different tip sizes. Number 01 is very small. Number 05 is a little bigger, so you may want the number 05. The tip of the pen also comes in a brush form. This may not be the best tip for making the outline of the letters but could be used for filling in the letters.
After the ink is dry, remove the freezer paper from the back of your inked fabric and press the fabric on both sides with a hot iron. This helps “set” the ink in the fabric. The fabric should be able to be washed without any of the ink washing away. If the ink fades or washes away, the ink you used was not permanent and will not last in your quilt.
Heat-Transfer Your Words or Images onto Fabric
If you would like to use the heat transfer process for your words and photos, you can pick up heat transfer paper at your local office supply store. This is one of my favorite techniques, because you can do so much with it. All you need to transfer the image is your fabric, a photo copied onto heat transfer paper, an iron, and a flat ironing surface. The brand of heat transfer paper is not an issue, as all brands seem to have consistent quality in recent years. Photos on pages 100–101, 130–136, and 144 were made using this heat transfer method.
You can even get a transfer paper that will make your image show up on dark fabric. This is a slightly different process, but the instructions are included.
If printing words, you will need to print them in reverse by using a Transfer or Mirror Image setting on your printer. When you iron the image on the fabric, it will be the reverse of what is printed on the surface of the transfer paper.
For a permanent way to save your children’s drawings, you can get them to draw directly onto the transfer paper with markers and then iron this drawing onto fabric. The drawing will be in reverse. However, this will not matter if words, letters, and numbers are not included.

Children’s drawings of family memories, 18” × 28”. Elementary school students drew these images on heat transfer paper. Because they used words and letters in their drawings, I color-copied the images onto pre-treated fabric, as the letters and words would have been backwards after ironing them onto fabric. Quilt by Linda Pool.
Family Stories on Fabric
Showcase a child’s drawing on a quilt or tote bag to highlight a family story, an idea, or an inspiration. Teachers and parents can do this project with a child or group of children. Ask the child to draw an image on heat transfer paper using magic markers. The surface of the transfer paper melts when heated by the iron, transferring the drawing onto fabric. No erasing can be done.
When the image is transferred it will be in reverse, so keep this in mind when planning the drawing. Have the child write about the drawing and put the words onto fabric. Stitch them onto the finished quilt or tote bag. This is a child’s graphic-inspired memoir.
When using the transfer paper, you can cut any part of the transferred photo away before you iron it onto fabric. You can cut the photo into the shape of a heart, or use your zigzag scrapbooking scissors and add a decorative edge. This edge will transfer as well. You can group photos and cut away any parts that overlap each other, or cut a person out of the photo and transfer that person’s image without the background.
Whether you are printing directly onto pre-treated fabric, ironing an image to fabric using heat transfers, or writing words onto fabric with permanent markers, your quilt will still be washable. However, I recommend delicate washing by hand to save the beauty and integrity of your transferred images and to ensure a long life for your heirloom memoir quilt.
Fancy cut image. When using the heat transfer technique to put photos onto fabric, manipulate the image before you iron it onto the fabric for a quilt. For example, use decorative scrapbooking scissors to make fancy edges around the image. Cut away parts of the images that you do not want on the quilt, or change their size and shape to fit odd spaces.
Have fun and many happy memories!
Signing Your Quilt
A quilt can be a life-long treasure as well as a family heirloom and will be more meaningful to its owner if he or she knows the piece’s history. If you are the maker, type a label of information about yourself and the quilt on your computer. Add a photo and then print this onto pre-treated fabric for permanency. Stitch this fabric signature block to the back of your quilt so future generations will know who made the quilt, for whom it was made, where you lived, and any other pertinent information you would like to share. A quilt with a documented history is always more valuable and will be treasured by anyone who owns it.

Signature Block from quilt back. The information you want to share about the maker of a quilt can be typed on your computer. Add a photo, print onto pre-treated fabric for permanency, then stitch the block to the back of your quilt. This signature block was made to be stitched to the back of my most recent quilt. Signature Block by Linda Pool.
Keep in Mind
• Memoir quilts are usually made to preserve family history, to memorialize a loved one, or to heal a loss and/or recover from a traumatic event.
• Memorable moments are good starting places for creating a quilt that tells a story. Memories to cherish can come from all kinds of experiences: holidays, weddings, pets, hobbies, travel, careers, and so much more. “Memorial” quilts need not be only about death and loss; they can be about relevant happenings in a memorialized one’s life: a celebration, a collection, an event, or a representation of the loved one.
• Of all the inspirations for memoir quilts, the challenge is to choose just one subject or idea, one person, or one family as the theme and focal point for your quilt.
• Memoir quilts can be made with more than purchased fabrics; they can include clothing, photos, words, documents, correspondence, and trinkets. Using such well-chosen artifacts triggers memories, helps tell your stories, and helps you make a connection to the past.
• Images can be added to memoir quilts in three ways: copying directly to the fabric, hand-lettering, or converting your image to a heat transfer, and ironing it onto fabric.
• Ensure a long life for your heirloom memoir quilt by delicate hand-washing and proper fabric care.