Comprehensive lighting instructions are beyond the scope of this book, but here is some essential information, including a simple and reliable lighting setup, to help you function when you need lighting. Supplemental to what follows below, you’ll find at this book’s website (www. directingthedocumentary.com) under project AP-3 Lighting Analysis, a brief description of lighting terms with illustrations. You can also see part of the film from which illustrations were drawn.
Today’s camera viewfinder gives a good idea of what your lighting looks like, so digital technology is very much on your side, and makes working in dicey lighting situations easier. For tripod camera situations, especially in high ambient light situations when a viewfinder can be hard to see, a quality monitor attached to the camera video output multiplies this help many times over.
The best way to learn about lighting is to analyze fiction material for its lighting. Do also study observational documentaries shot by available light, since they show all the deficiencies that lighting seeks to rectify. Let’s first consider light as a physical phenomenon.
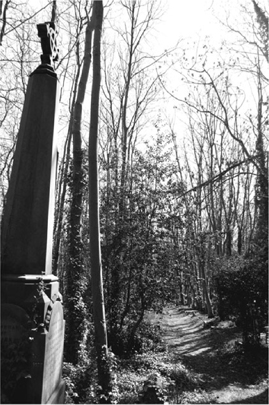
Hard or specular light comes from relatively small, bright sources such as the sun, or a spotlight, and is recognizable by the sharp-edged shadows it makes (Figure 11-1). Such shadows are the product of light traveling as organized, parallel rays. Paradoxically, a candle, in spite of its low power, creates hard light, the result of it being an effectively small light source that casts distinct, hard-edged shadows.
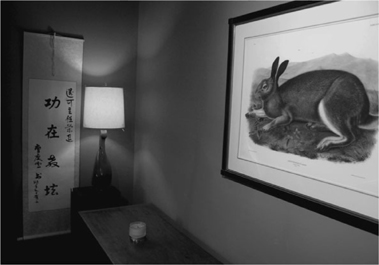
Light is diffused or soft when it creates soft-edged shadows (Figure 11-2). Diffused, disorganized light rays have the same effect as scattered light arriving from a broad source. Soft light throws shadows, but so soft that they are hardly noticeable.
FIGURE 11-2
Soft light is diffused and either creates soft-edged shadows or no shadows at all.
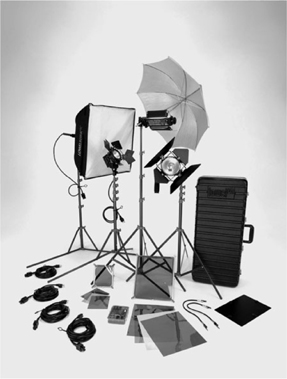
Figure 11-3 shows the kind of portable lighting kit that documentarians use. You can do acceptable interior work armed only with a 750 watt quartz soft light (Figure 11-4) . You can produce soft light from one of the stand-mounted quartz open-face lamps in Figure 11-3 by (a) bouncing its light off a white wall or ceiling, (b) off the aluminized umbrella provided, or (c) by diffusing its output through a large square of silk or fiberglass. If instead you want the kind of hard light associated with sunlight, you will need a focusing lamp or spotlight (Figure 11-5).
Open-face quartz lamps are light and compact for travel. Quartz bulbs have a long life, remain stable in color temperature, and have tungsten filament bulbs small enough to cast a moderately hard light. Their disadvantage is that light pours uncontrollably in every direction, making lighting a rather rudimentary exercise unless you have barn doors (adjustable flaps at the sides, top, and bottom as in Figure 11-3) to stop light spilling in unwanted directions. Useable, low-cost quartz work-lights can be found at hardware stores, but check the color-temperature rating on the bulb body.
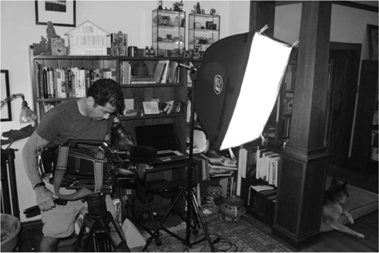
FIGURE 11-4
Tod Lending shooting an interview using only a soft light.
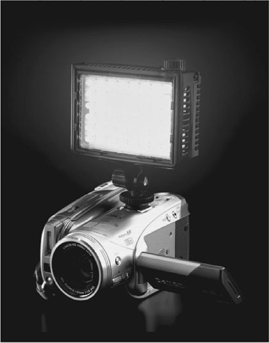
Banks of LEDs are now quite powerful (Figure 11-6) and can be bought with adjustable color temperature and light output. They are low voltage, create no heat, draw very little current, and are safe and easy to use. The Litepanels LP Micro panel clips to the top of the camera and is useful for fill light while shooting inside a car (Figure 11-7, and see www.litepanels.com). You can mount a circle of LEDs around the lens (Figure 11-8) for traveling shots that require some fill light, but this can be painfully distracting for participants, as with any camera-mounted lighting. Find out what it feels like by becoming a camera subject yourself.
An HMI is a small, high-intensity light source enclosed in a quartz envelope. They use mercury vapor and metal halides, and two tungsten electrodes generate light like a miniature arc light. Their color temperature is approximately that of sunlight, but changes as the bulb ages. They combine a high light output with economy of consumption, require an electrical ballast, and are expensive unless you rent them.
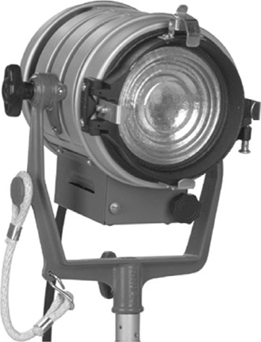
FIGURE 11-5
Molequartz® 650 watt Tweenie II Solarspot Fresnel spot lamp. (Courtesy of Mole-Richardson Co.)
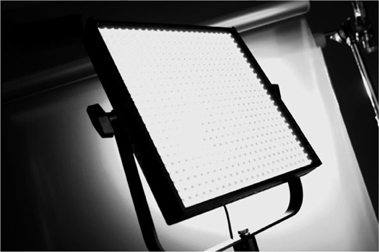
FIGURE 11-6
A 1 × 1 Litepanels™ LED bank. (Photo courtesy of Litepanels, Inc.)
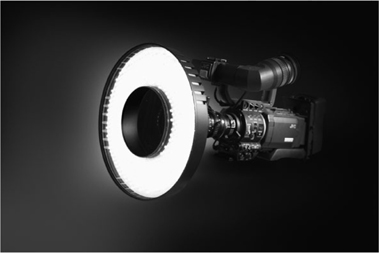
FIGURE 11-8
Litepanels™ Ringlite™ Mini, with LEDs surrounding a camera lens. (Photo courtesy of Litepanels, Inc.)
Fluorescent tubes produce soft light in a broken spectrum, but if you need to make a fluorescent-lit area consistent, you can get tubes and CFL (compact fluorescent lamps) rated by Kelvin temperature. They divide into warm white (3000 K or less), white or bright white (3500 K), cool white (4000 K), or daylight (upward of 5000 K).
There is a good article on color temperature in Wikipedia, with color illustrations. Your main preoccupation will be with two standards: studio interior lighting color temperature of 3200 K, and a nominal exterior color temperature of 5600 K. Actual K of exterior light—whether sunlight, mountain light, overcast sky daylight—will vary according to the situation, but this is a cinematographer’s special concern. In Chapter 12 there is a section on shooting under mixed color temperature circumstances.
As a rule, high consumption luminaires (lighting instruments) run extremely hot and require prudence. So,
● Let lamps cool before you disassemble them after shooting.
● Never touch quartz bulbs. Use a wadded tissue to hold them since oil in your skin bakes into the quartz envelope, causing the bulb to discolor or even explode when next turned on.
● Never switch on an open-face lamp if anyone is within range. Bulbs most often explode at this moment, sending out razor-sharp fragments.
● Never let rain get to hot bulbs. Sudden cooling by water droplets can cause them to explode.
The amount and type of lighting you will need depends on the size and reflectivity of the location space, the amount and color temperature of available light, and the kind of lighting look that you want. LED lamps are very energy-efficient, but for harder, more specular (hard-edged, shadow-producing) light you will need tungsten spotlamps or quartz movie lights which are power-hungry, run hot, and consume anywhere between 500 and 2000 watts each. A 2 kW (2 kilowatts, or 2000 watts) soft light running from a 110 volt supply consumes 9.5 amps (or 4.5 amps if the supply is 220 volts). The basic North American domestic household circuit (110 V at 15 A) is unable to power a 2 kW lamp, so you must locate a supply of 20 A or better.
Lamps are rated in watts of energy consumption. To calculate their power consumption in amps (rate of flow), divide your total desired watts (amount of energy consumption) by the volts (pressure) of the supply voltage. If you know any two, you can calculate the third.
Assuming you are using a working supply of 111 volts,
Amperes (A): W ÷ V = A (Example: 2,000W ÷ 110V = 18.18A)
Watts (W): A × V = W (Example: 25A × 110V = 2750W)
Volts (V): W ÷ A = V (Example: 4,000W ÷ 36.36A = 110V)
Survey the electrical supply, keeping high current requirements in mind. Locate the building’s power breaker-box: inside will be a number of circuit-breakers (or in old buildings, fuses), one for each of the building’s circuits. They will carry a rating of 15 A, 20 A, 50 A, etc. on the fuse or breaker. Do not replace with a fuse or breaker of higher rating as this can start a fire in the wiring.
Map your supply by powering up one circuit at a time and tracing its outlets with a plug-in handlamp. By numbering or color-coding each circuit’s outlets, you can now plan to power your lighting, if necessary, by spreading the load over multiple circuits. Make a note to bring the necessary lengths of heavy-duty extension cable, and spare fuses. Circuit breakers are reset-table because they pop open when the load exceeds their rating. Slo-blow breakers, designed for air-conditioning and refrigerator motors with a high initial current, tolerate a second or two of higher current.
An expensive mistake is to tap into a 220 V supply and blow one’s lamps. Arm yourself with a cheap little multimeter (combining voltage, resistance, and current) from an electronics store so you can check supply voltages. Use it also to measure voltages at a heavy-consumption lamp that is getting its power via an extension cord. Any reduced voltage can markedly lower color temperatures.
At each location, determine whether any intermittent appliance (refrigerator or air conditioner, say) is going to kick in during shooting and either make noise or trigger a circuit overload. When you turn anything off while shooting, leave your car keys there to remind you to turn it back on when you leave.
Lighting in fiction films pays little attention to actors’ comfort since it’s their job to adapt. Lighting in documentaries, however, can strongly affect ordinary people’s sense of normality. Old boxers, actors, or conjurors may like it, but for others normally out of the public eye, lighting can induce an overwhelming self-consciousness. Even they can get used to it, if you occupy them well.
Light is defined not only by its strength but by its shadow-casting properties. A hard light source casts organized, parallel light rays that cast hard-edged shadows. The rays of soft light are disorganized and cast soft-edged, less perceptible shadows. Do not however confuse hard and soft light with the strength of the source, since sunlight and the light of a candle, although wildly different in strength, both cast hard-edged shadows and count as hard light sources. Sunlight coming through a cloud layer, however, is diffused light that arrives via an effectively large source. A soft-light source this large can cast virtually no shadows.
Digital cameras can register good images by candlelight, so you would think lighting was unnecessary. However,
● An interior lit by daylight has bright highlight areas and impossibly dark shadow areas.
● Problem: Contrast ratio of key to fill light is too high.
● Solution: Cut highlight illumination—difficult with sunlight—or boost shadow area lighting.
● An interior lit by daylight with pools of artificial light does strange things to skin hues when people move around.
● Problem: they are passing through mixed color temperature lighting.
● Solution: See next chapter’s advice on shooting under mixed color temperatures. Essentially you filter one source to make it consistent with others.
● An exterior where you must shoot in heavy shadow has a sunlit background that burns out.
● Problem: There’s a huge contrast ratio disparity between sunlit and shadow areas.
● Solution: Use lighting or refiectors to raise light level in shadow area, or angle camera differently to incorporate a less “hot” background.
Other conditions that may call for supplementary lighting:
● Shadow area is too dark to get an exposure on detail where you need it.
● A scene or an object does not look its best under available light.
● Available light is too contrasty, creating “hot” (overbright) highlights and impenetrably murky shadow areas.
● You are working under mixed color-temperature sources, that is, light sources having a mix of color biases.
No camera can handle a contrast ratio (range of brightnesses) like the human eye, so lighting work must often squeeze that range into whatever the imaging technology can handle. In practical terms, reducing contrast often means raising light levels in the shadow areas, which you do with fill light (from a soft light or by using bounce light, that is, light diffused by reflecting it off a white card, silver reflector, or white walls and ceiling). Once you lower the lighting ratio to a range your imaging system can handle, your screen reproduces the picture you wanted—now with adequate detail in both highlight and deep shadow areas, detail otherwise lost (Figure 11-9).
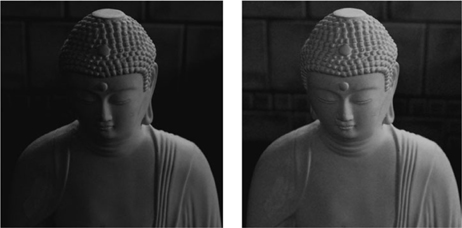
FIGURE 11-9
A subject with side key-light, and the same subject with fill-light lowering contrast.
A low overall light level may be impractical for quite another reason: it forces you to shoot at a wide lens aperture, and thus at the much-reduced depth of field (DOF) that wide aperture produces. Focusing also becomes impractically critical if the camera must follow any spontaneous action. However, by adding more overall light, you can reduce the lens aperture, and now, using less area of the lens, you have a greater DOF and less critical focusing is necessary.
In light-toned spaces, light thrown into the lens by the walls can overpower that reflected by your subjects. At its worst this gives dark humanoid outlines against a blinding white background. The solution is to cheat (imperceptibly separate) furniture and subjects away from walls, and raise lighting levels on the foreground subject while lowering it on background walls. You do this best by sending light downward from instruments raised high. This helps keep light from spilling on to the background and also casts shadows low and out of the camera’s line of vision.
When you light a set or an object, you are usually trying to make your subject look interesting and credible while counteracting various problems endemic to photography. To this end, you deal with hard light and soft light, each fulfilling a different purpose, as you try to erase all artificiality from the scene. You are using the art that hides art.
The key light is a relatively hard source that creates the highlight and shadow areas from whose direction we sense the time of day, season, lighting environment, and so on. Resist the folklore about taking photos with your back to the sun. Interesting lighting begins when the key light’s angle of throw is to the side of the subject or even relatively behind it. This ensures some shadow area in the subject, which provides modeling, that is, evidence of the subject’s third dimension—depth.
When shooting by available light you can often produce interesting lighting simply by reorienting the proposed action in relation to the ambient lighting, or by altering the camera placement
Fill light is often a soft light source close to the camera-to-subject axis. It provides enough light to see fill shadow areas so we can see detail there. Being close to the camera, the soft-edged light casts its shadows directly behind the subject, and they go largely unseen.
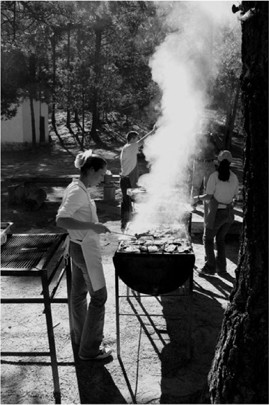
Backlight creates a rim of light separating subject from background, gives highlights to hair, and texture to smoke or vapor (Figure 11-10). Achieving subject/background separation is important in black-and-white photography but less so in color, where varying hues help define and separate the different planes of a composition.
A light source that appears in picture is called a practical but it seldom functions to provide any of the lighting (Figure 11-11). Cut its light output if needed by putting layers of paper or neutral-density (ND) filter around the inside of its shade.
Providing you stay within the bounds of the credible, you can cheat (creatively adjust) the angle of the key for convenience, artistic effect, or to minimize ugly background shadows. You can also cheat furniture and participants away from walls, and, by using a key light on a tall stand, project people’s shadows low and out of sight instead of visibly behind them on to walls. To help with framing you can also cheat participants closer to each other than usual—always providing you don’t compromise their sense of normality.
In documentary when you often have to work fast, there is a simple and reliable solution to lighting interiors called adding to a base. First you provide enough ambient soft light for an adequate exposure, then you add modeling by using a harder light source as a shadow-producing key. Here’s what to do:
If there is insufficient baselight, provide your own by bouncing hard light off a reflective wall or ceiling. This provides a good overall illumination, but used alone will give a rather dull and flat (that is, comparatively shadowless) look (Figure 11-12). This may be just right for some dull, flat situations (hospital, classroom, office, etc.).
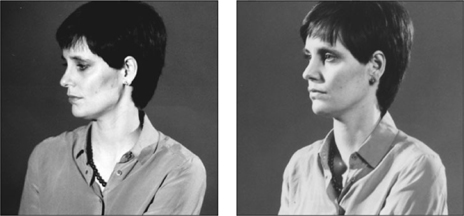
FIGURE 11-12
A flat-lit subject and the same subject side-lit.
The light that provides highlights and casts telltale shadows is called the key light. From its pattern of light and shadow the audience unconsciously infers time of day, mood, and even time of year.
Key light should be “motivated,” that is, it must appear to come from a logical source. In a bedroom scene, for instance, you would position the key low and out of frame to produce the characteristic shadow pattern cast by a bedside lamp. For a warehouse scene lit by a bare overhead bulb hanging into the frame, the additional key light would come from above. In a pathology lab where the source is a light table, the key would have to strike the subject from a low angle.
Using multiple key lights is a skilled business and without a lot of practice can lead to the dread trademark of amateur lighting—ugly, multiple shadows. When in doubt, keep it simple.
This is the standard setup for lit interviews and you can find good tutorials on YouTube. It uses fill light for an overall exposure in the shadow area, with modeling provided by adding a key light and backlight, sometimes called a hair light or rim light.
To assess lighting, shoot tests and critically assess the results. If lighting is at all elaborate, a lighting rehearsal ahead of time, with a series of representative digital stills, can obviate embarrassingly protracted location lighting sessions—or worse, costly electrical failures.
Shoot when possible against dark or book-covered walls, since they absorb reflected light that would otherwise overpower that reflected by your subjects. When this is impossible, keep light off the background walls by (a) angling light from high down, and (b) using flags or barn-doors to keep illumination from falling on backgrounds, and (c) cheating participants away from walls so you can better control background illumination problems as well as your subjects’ propensity for casting shadows. Distancing participants from sound-reflective surfaces has the double advantage of reducing sound reverberation problems.
Take a feature film you like and study some sequences for their lighting using AP-3 Lighting Analysis. Be sure not to miss the several pages of text and illustrations that accompany this project. Try planning for a shoot using AP-2 Making a Floor Plan. This sketch method is good for working out the fewest necessary camera angles in relation to the expected action, for planning lighting in addition to any natural light available, and also for mapping out power supplies.